

TL;DR
Updated on: MAY 30 2025
This post serves as a streamlined guide and personal reference for setting up my Arch Linux machine, tailored specifically for PWN challenges. It's designed for quick reference when repairing my OS or setting up a new instance if necessary.
I continuously refine my configuration as I use it, updating these notes and syncing them periodically.
Setting up Arch Linux is also an excellent opportunity to deepen our understanding of the Linux system, its system-level commands, and architectures. After downloading the Arch Linux ISO, we can proceed with the installation of Arch Linux alongside Plasma Desktop on VMware. I’ll skip over the basics of loading the ISO image onto VMware or a physical machine.
Arch Linux
Installation Guide & Download: link.
Setup
Keyboard
The default console keymap is US. Available layouts can be listed with:
localectl list-keymapsTo set the keyboard layout, pass its name to loadkeys(1). For example, to set a German keyboard layout:
loadkeys de-latin1Font
Console fonts are located in /usr/share/kbd/consolefonts/ and can likewise be set with setfont(8) omitting the path and file extension. For example, to use one of the largest fonts suitable for HiDPI screens, run:
setfont ter-132bInternet
Ensure network interface is listed and enabled, for example with ip-link(8):
ip linkClock
Use timedatectl(1) to ensure the system clock is synchronized:
timedatectlBoot Mode
BIOS and UEFI are types of firmware that are embedded on a chip on our computer's motherboard. They provide the essential code that helps initialize our computer's hardware when we turn it on and hand control over to our operating system.
For computer machines, the boot mode is hardwared. For a VM machine, we can change it here:
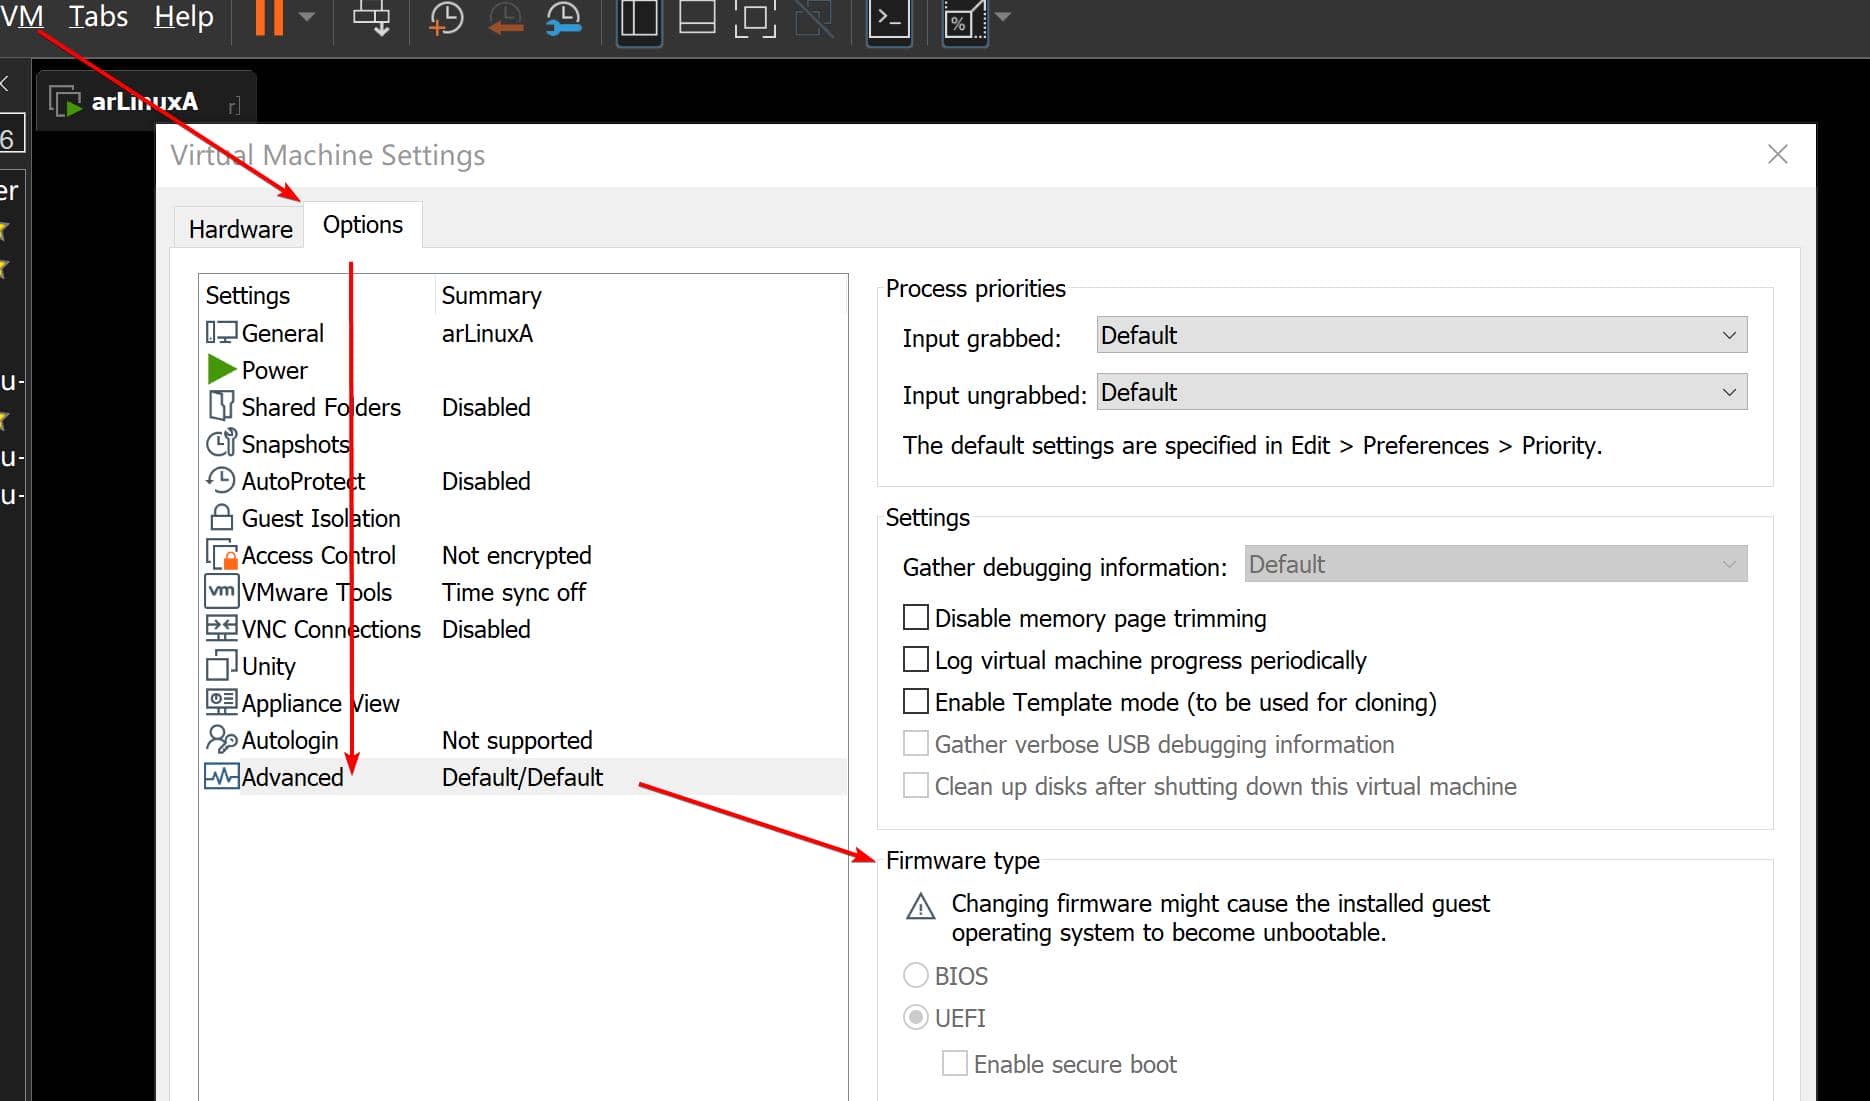
Verify
Verifying the boot mode ensures that we are using the expected boot environment, which is essential for compatibility with certain boot loaders and partitioning schemes.
Verify the boot mode, check the UEFI bitness:
cat /sys/firmware/efi/fw_platform_sizeThe fw_platform_size file helps determine if the system booted in UEFI mode or in legacy BIOS (CSM) mode.
Mode | BIOS
BIOS (Basic Input/Output System):
- Legacy Firmware Interface: BIOS is the older firmware standard that initializes hardware during the boot process and hands off control to the operating system.
- Introduced in the 1980s: It has been used for decades as the standard way to start a computer.
- User Interface: Typically features a simple, text-based interface.
- MBR (Master Boot Record) Support: BIOS uses MBR for the disk partitioning scheme, which limits drives to a maximum of 2 TB and supports only up to four primary partitions.
- Boot Mode: Referred to as "legacy mode" or "CSM (Compatibility Support Module)."
- Slower Boot Time: Compared to UEFI, booting with BIOS can be slower.
- Limited Features: Lacks advanced features like Secure Boot, larger disk support, and modern user interfaces.
Mode | UEFI
UEFI (Unified Extensible Firmware Interface):
- Modern Firmware Interface: UEFI is the successor to BIOS and offers a more flexible and powerful firmware environment.
- Introduced in the 2000s: Developed to replace BIOS and overcome its limitations.
- User Interface: Supports a graphical user interface (GUI) with mouse navigation, making it more user-friendly than BIOS.
- GPT (GUID Partition Table) Support: UEFI uses GPT, which allows for larger drives (over 2 TB) and up to 128 primary partitions.
- Boot Mode: Provides faster boot times and additional features such as Secure Boot, which helps prevent unauthorized bootloaders from running during startup.
- Advanced Features: Includes support for network booting, larger address spaces (32-bit and 64-bit versions), and pre-boot applications that can be run directly from UEFI.
- Secure Boot: Ensures that only trusted software is loaded by checking the digital signatures of boot files.
Partition the Disk
Partitioning the disk properly is crucial to ensure that the system boots correctly and that disk space is efficiently utilized. Nowadays I will suggest the modern UEFI mode to set up partitioning schemes, of course.
Schemes
UEFI with GPT (GUID Partition Table)
- EFI System Partition (ESP): Required for UEFI booting. Contains boot loaders and related files.
- Root (/) Partition: The main partition where the Linux OS is installed.
- Swap Partition: Used as swap space for managing memory. It's optional if we use a swap file or zram instead.
BIOS with MBR (Master Boot Record)
- Root (/) Partition: The main partition for the OS.
- Swap Partition: Similar to UEFI, it's optional but useful for memory management.
Tables
UEFI with GPT
| Mount Point | Partition | Partition Type | Suggested Size |
|---|---|---|---|
| /boot | /dev/efi_system_partition | EFI System Partition | 1 GiB |
| [SWAP] | /dev/swap_partition | Linux Swap | At least 4 GiB |
| / | /dev/root_partition | Linux x86-64 root (/) | Remainder of the disk (at least 23–32 GiB) |
BIOS with MBR
| Mount Point | Partition | Partition Type | Suggested Size |
|---|---|---|---|
| [SWAP] | /dev/swap_partition | Linux Swap | At least 4 GiB |
| / | /dev/root_partition | Linux | Remainder of the disk (at least 23–32 GiB) |
Partition | Fdisk
Scheme
To partition a disk for a UEFI scheme using fdisk, we need to create partitions in a specific way to support UEFI booting with the GPT partition table. This is my personal scheme table:
| Device | Mount Point | Size | Type |
|---|---|---|---|
| /dev/sda1 | /boot | 1 GiB | EFI System |
| /dev/sda2 | [SWAP] | 4 GiB | Linux Swap |
| /dev/sda3 | / | 50 GiB | Linux filesystem |
| /dev/sda4 | /home | 365 GiB | Linux filesystem |
Separating root and home directories allows easier OS reinstallation without affecting personal files.
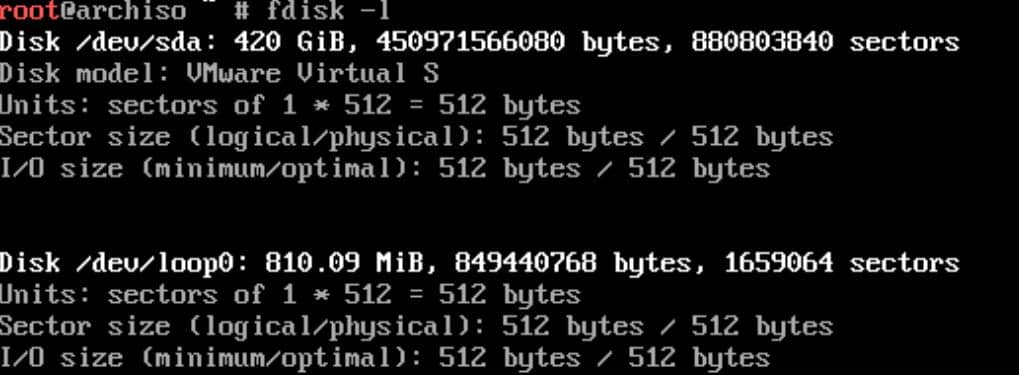
Step 1 | Lookup
Disks are assigned to a block device such as /dev/sda, /dev/nvme0n1 or /dev/mmcblk0. Identify these devices using fdisk command:
fdisk -lResults ending in rom, loop or airootfs may be ignored. mmcblk* devices ending in rpbm, boot0 and boot1 can be ignored.
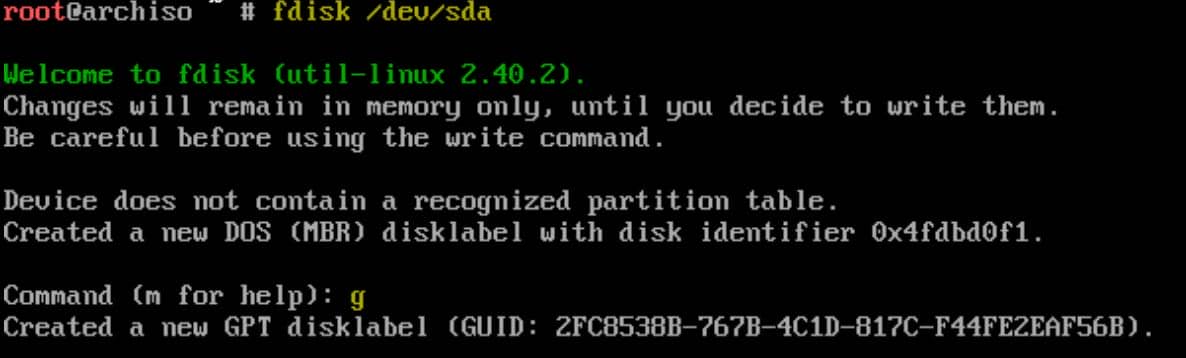
Step 2 | Partition
Use fdisk or parted to partition the disk:
fdisk /dev/sdaStep 3 | Create Table
Then we will follow our GPT Partition Table designed previously. press g to create a new GPT partition table. This ensures the disk is formatted for UEFI.
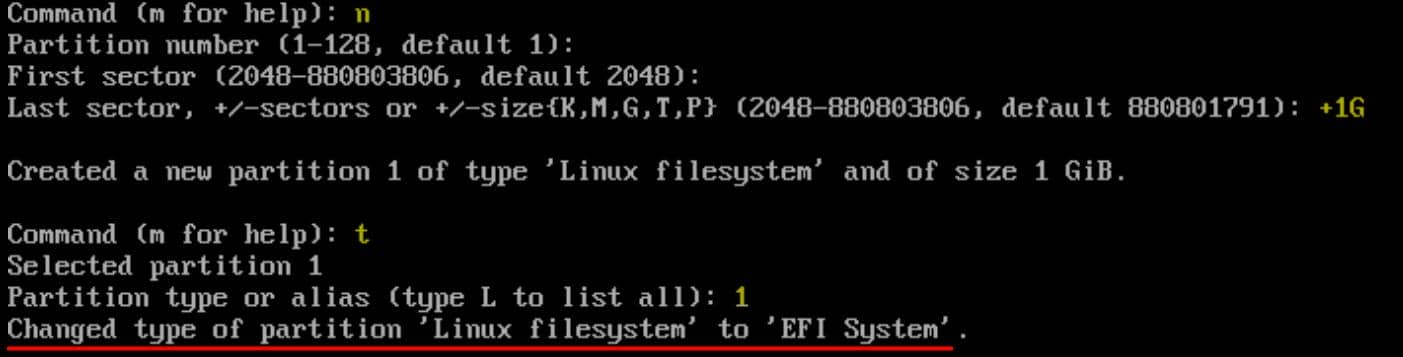
Step 4 | Create ESP
Create an EFI System Partition:
- Press
nto create a new partition. - Choose a partition number (or press Enter to select the default).
- For the first sector, press Enter to accept the default.
- Specify the size (e.g.,
+1Gfor 1 GiB) for the EFI system partition and press Enter. - Press
tto change the partition type. - Enter
1for the EFI System partition type.
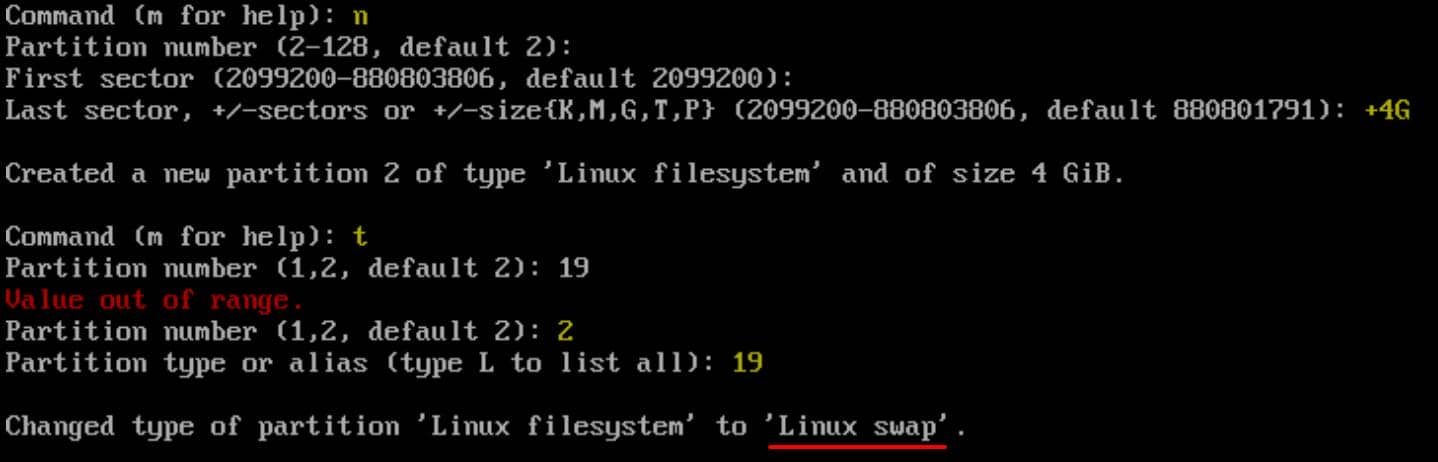
Step 5 | Create Swap
It's optional, but recommended.
- Press
nto create another new partition. - Accept the default partition number and first sector by pressing Enter.
- Specify the size (e.g.,
+4Gfor 4 GiB) for the swap partition and press Enter. - Press
tto change the partition type for this partition. - Enter the partition number for the swap partition and type
19for the Linux swap type.
Step 5 | Create Root
- Press
nto create a new partition for the root (/) directory. - Accept the default settings by pressing Enter.
- Specify the size (e.g.,
+50Gfor 50 GiB) for the root partition and press Enter. - No need to change the partition type for the root partition as it defaults to Linux filesystem.

Step 6 | Create Home
- Press
nto create a new partition for the home (/home) directory. - Accept the default settings by pressing Enter.
- Use the remaining space on the disk by pressing Enter to set the default size.
- No need to change the partition type for the root partition as it defaults to Linux filesystem.

Step 7 | Write Changes
Press w to write the changes and exit fdisk. This will apply the partition table to the disk.
Verify our scheme:
- EFI System Partition: 1 GiB (
/dev/sda1) - Swap Partition: 4 GiB (
/dev/sda2) - Root (
/) Partition: 50 GiB (/dev/sda3) /homePartition: 365 GiB (/dev/sda4)
Step 8 | Format
Format the EFI system partition as FAT32:
mkfs.fat -F32 /dev/sda1Format the root partition as ext4:
mkfs.ext4 /dev/sda3Format the /home partition as ext4:
mkfs.ext4 /dev/sda4Activate the swap partition:
mkswap /dev/sda2
swapon /dev/sda2
Successfully formatted:

Step 9 | Mount
The mount operation is crucial for preparing the system's file structure so that the Linux installation process can properly access and set up the partitions.
- Mounting associates a storage device (like a partition) with a specific directory in the file system tree. When we mount a partition, we make its data accessible to the system at a specific mount point.
- In Linux, all storage devices are mounted to the directory tree. For example, mounting
/dev/sda3to/mntmakes the contents of that partition accessible at the/mntdirectory.
We need to mount before installation. Because the installation process needs to know where to write system files, namely the correct locations for /root, /boot, /home, etc.
Mount the root partition, telling the system where to install the base system and additional software—the installation scripts can place the system files there:
mount /dev/sda3 /mntCreate a mount point for the ESP (EFI system partition) to /boot, so that the boot loader can place its necessary files in the correct location—ensures that our computer will know where to find and start the operating system during boot:
mount --mkdir /dev/sda1 /mnt/bootCreate a mount point for the /home partition to ensure that user files are kept separate from system files. This can make system upgrades or reinstallation easier, as we can format and reinstall the root partition without affecting user data:
mount --mkdir /dev/sda4 /mnt/homeVerify
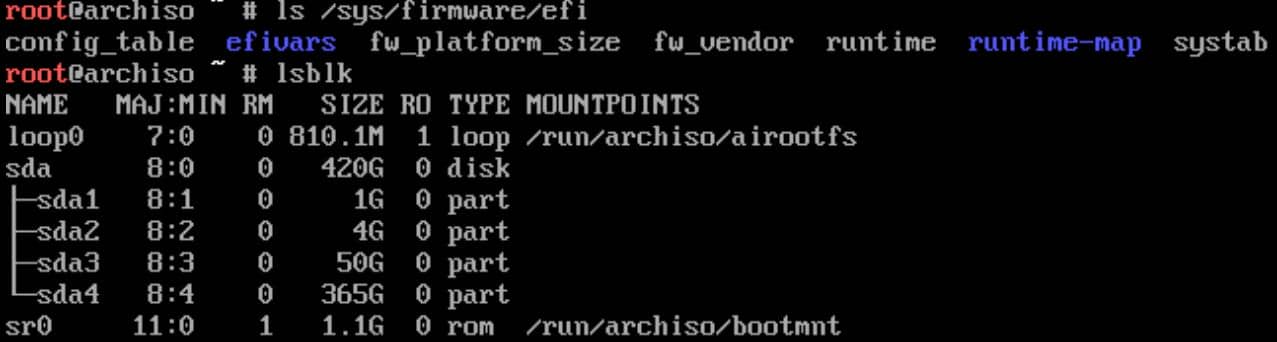
Ensure that our system is in UEFI mode by running:
ls /sys/firmware/efiIf the directory exists, you are booted in UEFI mode.
Additionally, verify that the device identifiers (/dev/sda1, /dev/sda2, /dev/sda3, /dev/sda4) match the actual partitions created by checking with lsblk or fdisk -l.
Installation
Packages to be installed must be downloaded from mirror servers, which are defined in /etc/pacman.d/mirrorlist.
Before Installing
We may need to fix network issues in the Arch Linux installation environment. To check network connectivity:
ping -c 3 archlinux.orgIf this fails, it means our network connection is not working properly.
For Wired Connections (Ethernet): Ensure the Ethernet cable is connected, and run:
dhcpcdFor Wireless Connections: Use iwctl (from the iwd package) to connect:
iwctlInside iwctl, run:
station wlan0 scan
station wlan0 get-networks
station wlan0 connect <SSID>
Replace <SSID> with the name of our Wi-Fi network and follow any prompts for the password.
Base System
Install the basic system and essential tools:
pacstrap /mnt base linux linux-firmware vimAfter installing, we have a classic Linux filesystem structure:

Fstab
Generate the filesystem table (fstab file):
genfstab -U /mnt >> /mnt/etc/fstabgenfstab is a tool that generates the /etc/fstab file, which is a critical configuration file in Linux systems. This file contains information about disk partitions and how they should be mounted at boot time.
The /etc/fstab file is essential because it tells the system which partitions to mount at boot and where to mount them (e.g., mounting /dev/sda3 as /, /dev/sda1 as /boot, etc.):

Using UUIDs in /etc/fstab provides a stable way to identify partitions, avoiding issues that can occur if device names change (e.g., /dev/sda becomes /dev/sdb).
Chroot
Change root into the new system:
arch-chroot /mntarch-chroot is a script provided by Arch Linux that does more than the basic chroot command. It mounts /proc, /sys, /dev, and /run automatically so that the environment inside the chroot behaves more like a fully booted system, changing the root directory to the specified path, allowing us to run commands as if we are in the installed system instead of the live installation environment.
Localization
Timezone
Set the time zone to specific city:
ln -sf /usr/share/zoneinfo/<Region>/<City> /etc/localtime
hwclock --systohc
Locale
The locale-gen command is used to generate locale information on Linux systems. In Arch Linux, this is an important step in setting up our system's language, region, and formatting preferences (e.g., date/time formats, currency).
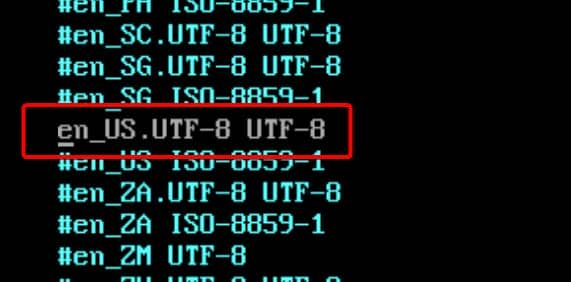
First, set the locale (uncomment the appropriate locale in /etc/locale.gen and generate it):
echo "en_US.UTF-8 UTF-8" >> /etc/locale.genOr just vim /etc/locale.gen to uncomment manually:
Then generate the locales by running:
locale-genThen set the locale by rewriting the /etc/locale.conf file:
echo "LANG=en_US.UTF-8" > /etc/locale.confNetwork
Set the hostname:
echo "arLinuxA" > /etc/hostnameConfigure hosts file:
echo "127.0.0.1   localhost mylocalhost" > /etc/hosts
echo "::1         localhost" >> /etc/hosts
echo "127.0.1.1   arLinuxA.localdomain arLinuxA" >> /etc/hosts
Set 127.0.0.1 mylocalhost to make sure we can use BurpSuite to intercept localhost traffic, via http://mylocalhost, in Chrome.
Install Essential Packages
Install the bootloader (GRUB):
pacman -Sy
pacman -S grub efibootmgr dosfstools os-prober mtools
We're using UEFI mode, therefore:
grub-install --target=x86_64-efi --efi-directory=/boot --bootloader-id=GRUBCreate a configuration file for GRUB:
Set Root Password
Simply:
passwdInstall Network Tools
pacman -S networkmanager
systemctl enable NetworkManager
Reboot
Exit the chroot environment first:
exitDuring the installation, the root partition (/mnt) and other partitions (e.g., /mnt/boot, /mnt/home) are mounted. Unmounting releases these partitions from the live environment, ensuring they are not still being accessed or locked when the system reboots:
umount -R /mnt
reboot
We ensure that our file systems are properly closed and data integrity is maintained, preventing any issues that could arise from mounted file systems during a reboot.
Finally, after rebooting, the system should load into our new Arch Linux installation!

Post-Install Configuration
Notes for the list of configuration after setting up.
sudo pacman -SyuCreate User
Add the User:
useradd -m -G wheel -s /bin/bash Axura-m: Creates a home directory for the user.-G wheel: Adds the user to thewheelgroup, which typically hassudoprivileges.-s /bin/bash: Sets the user's shell to/bin/bash.
Set the User's Password:
passwd AxuraGive the wheel Group Sudo Privileges:
# pacman -S sudo
# export EDITOR=vim
visudo
Uncomment the following line:
# wheel ALL=(ALL:ALL) ALLThis line allows any user in the wheel group to execute commands as root using sudo.
Network
Modern Linux distributions, including Arch, implement features that can prevent loopback traffic from being intercepted by user-space applications for security reasons—But we need to cancel this for testing with BurpSuite proxy.
Check sysctl settings:
sysctl -a | grep net.ipv4.confLook for unusual restrictions, such as:
net.ipv4.conf.all.route_localnet = 0net.ipv4.conf.lo.rp_filter = 1
To allow traffic:
sudo sysctl -w net.ipv4.conf.all.route_localnet=1
sudo sysctl -w net.ipv4.conf.lo.rp_filter=0
And better create a new config file /etc/sysctl.d/99-ipv4.conf (and /etc/sysctl.conf) for the new rules to make them permanent:
net.ipv4.conf.lo.rp_filter=0
net.ipv4.conf.all.route_localnet=1
Then:
sudo sysctl --systemDesktop
KDE Plasma
A desktop environment is essential to unlock certain key functionalities. While Gnome is more lightweight, I opted for KDE Plasma due to its flexibility for further customized layout design.
Install KDE Plasma and KDE Applications:
sudo pacman -S plasma-meta kde-applicationsEnable and Start the Display Manager:
sudo systemctl enable sddm
sudo systemctl start sdd
sddm is the recommended display manager for KDE Plasma.
Configure SDDM Settings (Optional):
create the SDDM configuration file to customize the behavior and integration, using the default template:
sudo cp /usr/lib/sddm/sddm.conf.d/default.conf /etc/sddm.confSDDM Configuration Options (Optional):
Add or edit the following sections in /etc/sddm.conf to improve usability:
[General]
# Enable or disable automatic login
HaltCommand=/usr/bin/systemctl poweroff
RebootCommand=/usr/bin/systemctl reboot

[Theme]
# Change the theme if needed
Current=breeze

[X11]
# Make sure input is handled correctly
InputMethod=/usr/bin/ibus

[Users]
# Set the default user if you want auto-login
DefaultPath=/usr/local/sbin:/usr/local/bin:/usr/bin

[Autologin]
User=Axura
Session=plasma.desktop # Replace with the session you're usingVerify:
sudo systemctl restart sddm
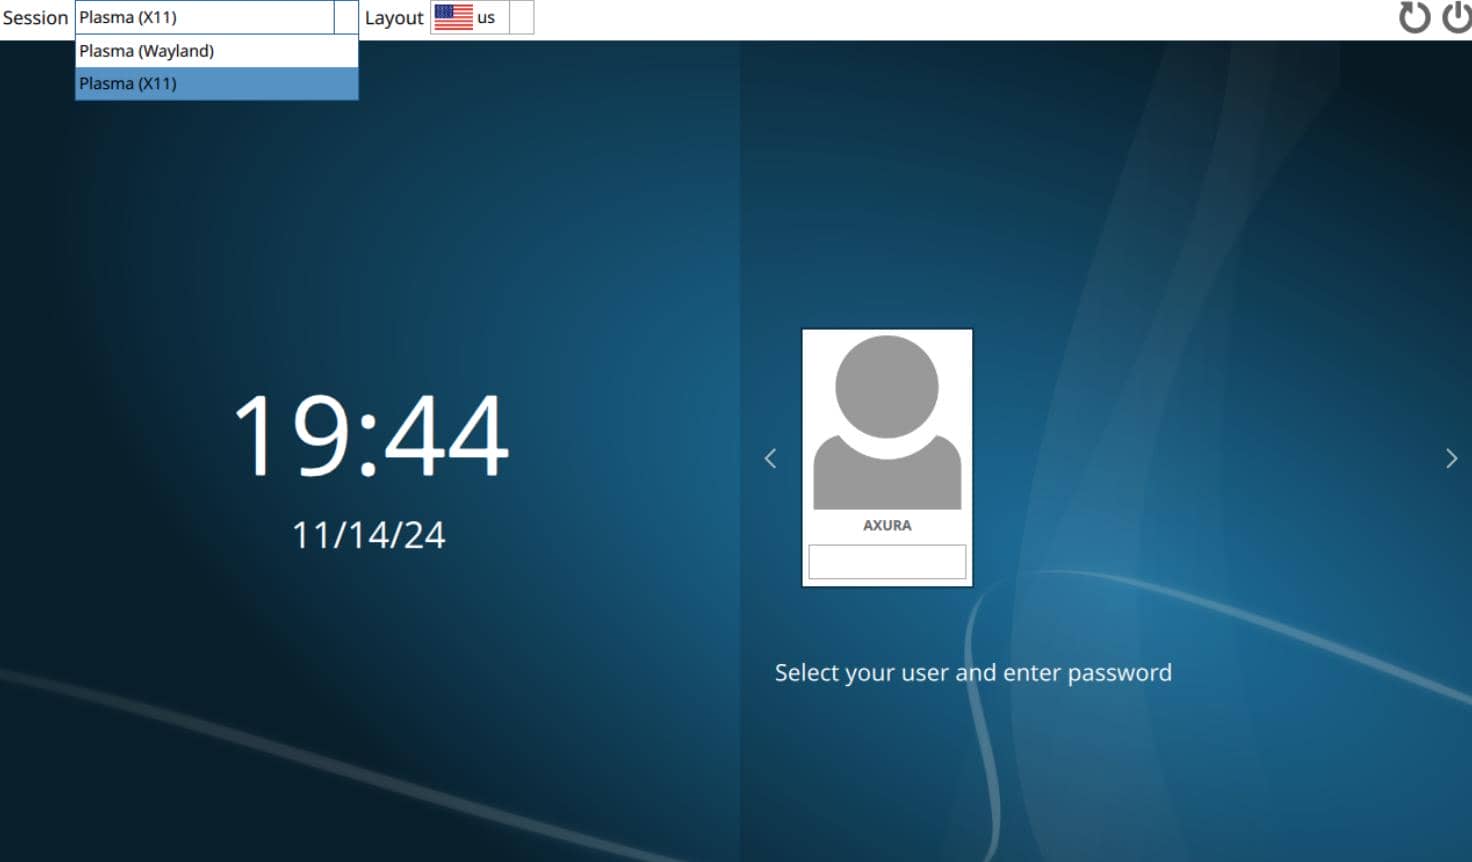
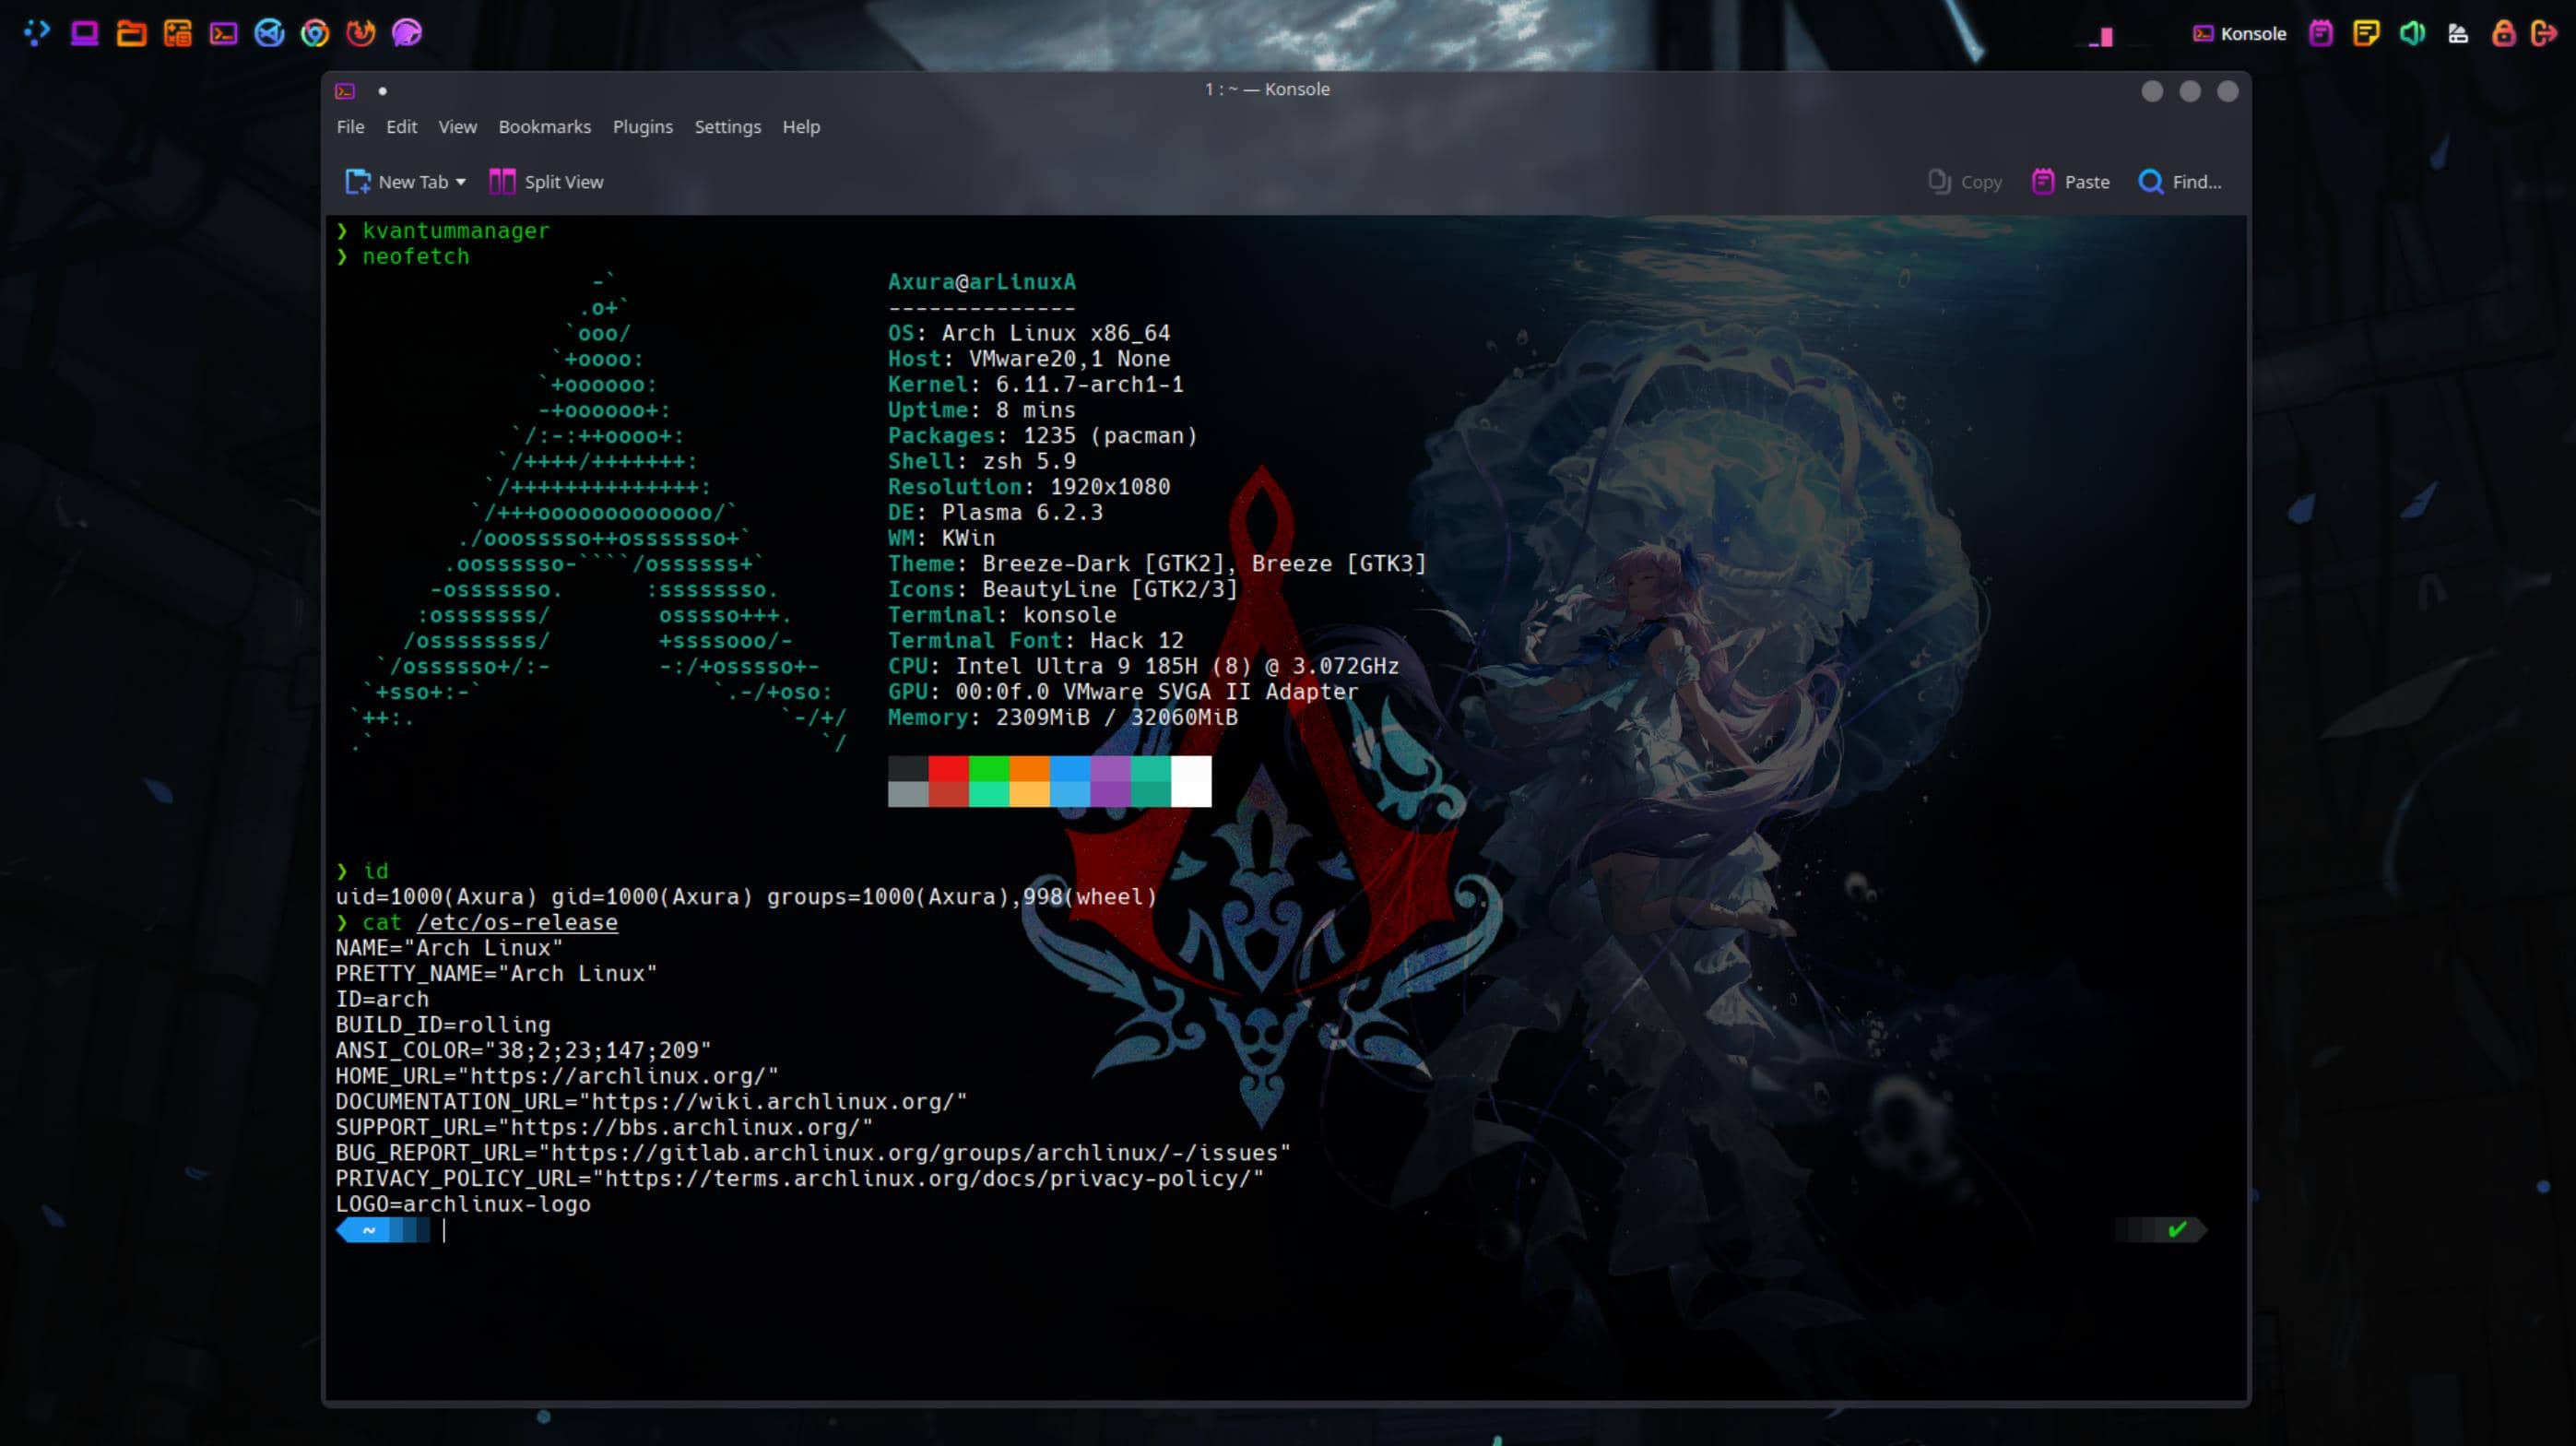
journalctl -u sddm # logsOnce we complete the setup, we’ll have a basic KDE desktop on our Linux system. For running this in a virtual machine, I recommend using X11 over Wayland. As of November 15, 2024, Wayland support, while improving, still faces compatibility issues, especially with tools like VMware:
Vm-tools
If we run Arch Linux as a Vm machine:
sudo pacman -S open-vm-tools gtkmm3To enable and start the vmtoolsd service:
To enable and start the `vmtoolsd` service:This will enable key functions like copy-paste between computer and VM, only after we have the desktop installed previously.
Essential Tools
Basic tools we need in a Linux system, especially for Pwners:
#!/bin/bash

# List of packages to install
packages=(
  net-tools
  curl
  wget
  wget
  git
  gzip
  unzip
  p7zip
  zip
  tree
  less
  jqa
  tmux
  ufw
  nmap
  openvpn
  whois
  traceroute
  socat
  gnu-netcat
  cmake
  extra-cmake-modules
  base-devel
  nodejs
  php
  php-apache
  php-fpm
  php-intl
  php-mbstring
  npm
  jdk8-openjdk
  jdk17-openjdk
  go
  htop
  neofetch
  docker
  openldap
  bind	# nslookup
)

# Install all packages with --noconfirm flag
echo "Installing packages..."
for pkg in "${packages[@]}"; do
  sudo pacman -S "$pkg" --noconfirm
done

# Install Docker Compose
echo "Installing Docker Compose..."
sudo curl -L "https://github.com/docker/compose/releases/download/v2.20.2/docker-compose-$(uname -s)-$(uname -m)" -o /usr/local/bin/docker-compose
sudo chmod +x /usr/local/bin/docker-compose

# Install Wireshark
sudo pacman -S wireshark-qt
sudo usermod -aG wireshark $(whoami)
newgrp wireshark

echo "Installation complete."
Zshell (Zsh)
Install
Install Zsh:
sudo pacman -S zshOh My Zsh:
sh -c "$(curl -fsSL https://raw.githubusercontent.com/ohmyzsh/ohmyzsh/master/tools/install.sh)"Make Zsh default shell:
chsh -s $(which zsh).Zshrc
The main configuration file for Oh My Zsh is ~/.zshrc. We can edit it to customize our Zsh experience.
Change the Theme:
ZSH_THEME="agnoster"Enable Plugins:
Find the plugins line and add the plugins we want. Common plugins include git, zsh-autosuggestions, zsh-syntax-highlighting, and history:
plugins=(git zsh-autosuggestions zsh-syntax-highlighting)Plugins
zsh-autosuggestions:
git clone https://github.com/zsh-users/zsh-autosuggestions ~/.oh-my-zsh/custom/plugins/zsh-autosuggestionszsh-syntax-highlighting:
git clone https://github.com/zsh-users/zsh-syntax-highlighting.git ~/.oh-my-zsh/custom/plugins/zsh-syntax-highlightingThemes
Themes from official repository.
Themes from external repository.
Install and Configure powerlevel10k Theme from Github repository, which is a popular theme for Zsh with a lot of customization options:
git clone --depth=1 https://github.com/romkatv/powerlevel10k.git ~/.oh-my-zsh/custom/themes/powerlevel10kChange the theme in ~/.zshrc:
ZSH_THEME="powerlevel10k/powerlevel10k"Run source ~/.zshrc and then run:
p10k configureThis will guide us through the configuration options for powerlevel10k.
Set colors through Powerlevel10k configuration parameters:
To see how different numbered colors look in terminal, run the following command:
for i in {0..255}; do print -Pn "%K{$i} %k%F{$i}${(l:3::0:)i}%f " ${${(M)$((i%6)):#3}:+$'\n'}; doneOpen ~/.p10k.zsh, search for "color", "foreground" and "background" and change values of appropriate parameters, such as:
POWERLEVEL9K_DIR_BACKGROUND
POWERLEVEL9K_DIR_FOREGROUND
POWERLEVEL9K_DIR_SHORTENED_FOREGROUND
POWERLEVEL9K_DIR_ANCHOR_FOREGROUND
POWERLEVEL9K_DIR_ANCHOR_BOLD
For example, here's how to set the foreground of time prompt segment to bright red:
typeset -g POWERLEVEL9K_TIME_FOREGROUND=160Font
Install for Jetbrains Mono for all users, after downloading the font:
sudo cp fonts/ttf/*.ttf /usr/share/fontsUpdate the font cache:
fc-cache -fvVerify installation:
fc-list | grep "JetBrainsMono"Set up:
- Go to Settings > Edit Current Profile > Appearance > Edit > Font (After creating a new profile).
- Select
JetBrains Monofrom the font list and adjust the size as desired. - Click OK and Apply.
Yay
A must-install for managing AUR packages:
# sudo pacman -S git
git clone https://aur.archlinux.org/yay.git
cd yay
makepkg -si
Graphics Drivers
sudo pacman -S nvidia  # For NVIDIA cards
sudo pacman -S mesa  # For integrated/AMD cards
OpenSSH
Install the client and server:
sudo pacman -S opensshStart and enable the SSH server:
sudo systemctl start sshd
sudo systemctl enable sshd
Python
Python3.12
Arch Linux has the latest version (3.12 on NOV 15 2024)
sudo pacman -S python
sudo pacman -S python-pip
sudo pacman -S python-pipx
However, this Python version is not compatible for most Penetration tools.
Python3.11 | Python3.10
Using pyenv to Install Python 3.11
Install pyenv:
curl https://pyenv.run | bashAdd pyenv to shell configuration: ~/.bashrc or ~/.zshrc file:
export PATH="$HOME/.pyenv/bin:$PATH"
eval "$(pyenv init --path)"
eval "$(pyenv virtualenv-init -)"
Source the shell configuration file:
source ~/.zshrc # For Zsh<br># or<br>source ~/.bashrc # For BashInstall Python 3.11 with pyenv:
sudo pacman -S tk # tkinder<br>pyenv install 3.11.9Set Python 3.11 as the global version:
pyenv global 3.11.9
# I think 3.10.15 is better (11/18/2024)
Verify the Python version:
python --versionOther Python versions:
Download Link: Python 3.10.15 Release (Better for ropper and other tools)
pipx
pipx is a tool for installing and running Python applications in isolated environments — ideal for managing CLI tools written in Python.
sudo pacman -S pipx python-virtualenvAfter installation, ensure its binary path is in your shell:
pipx ensurepathThen restart shell or source config:
source ~/.zshrcInstall hacking tools, such as:
pipx install bloodyad
pipx install impacket
pipx install ropgadget
pipx install poetry
pipx install powerview
pipx install sqlmap
pipx install bbot
pipx install certifpy --python /usr/bin/python3.13
Or install the newest releast via Github repo:
pipx install git+https://github.com/ly4k/Certipy.gitUpgrade tools:
# pipx list
pipx upgrade-all
CAP_NET_BIND_SERVICE
This capability allows a program to bind to privileged ports without requiring root permissions.
Run the following command to grant this capability to python3:
pyenv which python3
# /home/Axura/.pyenv/versions/3.10.15/bin/python3

ls -l /home/Axura/.pyenv/versions/3.10.15/bin/python3
# lrwxrwxrwx 1 Axura Axura 10 Nov 15 00:34 /home/Axura/.pyenv/versions/3.10.15/bin/python3 -> python3.10

sudo setcap 'cap_net_bind_service=+ep' /home/Axura/.pyenv/versions/3.10.15/bin/python3.10
Java
To install OpenJDK 17 (current LTS):
sudo pacman -S jdk17-openjdkTo install OpenJDK 11 (previous LTS):
sudo pacman -S jdk11-openjdkTo install OpenJDK 8 (older LTS, still used by some legacy applications):
sudo pacman -S jdk8-openjdkSet the Default Java Environment: If we have multiple versions of Java installed, we can set the default one using:
sudo archlinux-java set java-8-openjdk
# archlinux-java status
Replace java-8-openjdk with the version we want to set as default.
Environment Variables: Java might need environment variables like JAVA_HOME set up for certain applications. Add this to .bashrc or .zshrc if needed:
# Add tom ~/.zshrc
export JAVA_HOME=/usr/lib/jvm/java-8-openjdk
export PATH=$JAVA_HOME/bin:$PATH
Ruby
rbenv
We can install Ruby 3.3.0 (just a choice) using rbenv, a lightweight Ruby version management tool.
Could be better use system ruby (install with
sudo gem install ...) on vmare machines, while I preferrbenvon my Mac.
Arch provides rbenv and its plugin ruby-build via the official repositories:
sudo pacman -S rbenv ruby-buildThen we add rbenv to our shell environment to .zshrc (or .bashrc):
echo 'export PATH="$HOME/.rbenv/bin:$PATH"' >> ~/.zshrc
echo 'eval "$(rbenv init - zsh)"' >> ~/.zshrc
source ~/.zshrc
Verify installation:
rbenv -vBefore installation, ensure required build dependencies are available:
sudo pacman -S libyaml gdbmThen install Ruby:
rbenv install 3.3.0
rbenv global 3.3.0
This sets Ruby 3.3.0 as the global version.
ruby -v
# Expected output: ruby 3.3.0
Install gem-based tools, for example:
gem install evil-winrm --user-install
gem install one_gadget --user-install
gem install seccomptools --user-install
gem install zsteg --user-install
System-wide
Install Ruby and Bundler (system-wide):
sudo pacman -Syu ruby ruby-bundlerThis ensures:
- System-only installs
- Binaries go to
/usr/local/bin
Configure gem for system-only installs:
sudo tee /etc/gemrc > /dev/null <<EOF
gem: --no-user-install --bindir /usr/local/bin
EOF
This ensures:
- No user-local gem clutter (e.g.,
~/.gem,/root/.local/share/gem) - All binaries go to
/usr/local/bin
(Optional) Suppress Ruby 3.4+ warnings for outdated gems:
echo 'export RUBYOPT="-W:no-deprecated -W:no-experimental"' >> ~/.zshrc
source ~/.zshrc
Install gem-based tools, for example:
# dependencies
sudo gem install csv
sudo gem install racc
# tools
sudo gem install evil-winrm
sudo gem install one_gadget
sudo gem install seccomp-tools
sudo gem install zsteg
Browsers
Chrome
yay -S google-chromeFirefox
sudo pacman -S firefoxSet Default Browser
xdg-settings set default-web-browser firefox.desktop  # For Firefox
xdg-settings set default-web-browser google-chrome.desktop  # For Chrome
VS Code
Code is a cross-platform text editor developed by Microsoft, built on the Electron framework. Visual Studio Code is a binary distribution of the MIT-licensed Code - OSS repository, with Microsoft specific customizations and released under a proprietary license.
sudo pacman -S codeInput
To install Fcitx5, a popular input method framework for Linux, follow these steps on your Arch Linux system.
Step 1: Install Fcitx5
Install Fcitx5 Core:
sudo pacman -S fcitx5 fcitx5-configtoolInstall Supporting Packages, for better integration with GTK and Qt applications:
sudo pacman -S fcitx5-gtk fcitx5-qtStep 2: Add Input Method
Open the Fcitx5 Configuration Tool:
fcitx5-configtoolIn the configuration window, go to Input Method and click on the "+" button to add input methods.
Search for and add the input methods we want to use.
Step 3: Set Default Input Method
Add the following environment variables to our ~/.zshrc file:
export GTK_IM_MODULE=fcitx5
export QT_IM_MODULE=fcitx5
export XMODIFIERS=@im=fcitx5
export DEFAULT_INPUT_METHOD=fcitx5
Reload profile:
source ~/.zshrcStep 4: Launch Fcitx5
- Run
fcitx5manually or restart session to start it automatically. - Switch between input methods using the shortcut key (default is
Ctrl+SpaceorSuper+Space).
Step 5: Autostart
Ensure that fcitx5 is set to start on login by adding it to Autostart in desktop environment's settings or by creating an entry in ~/.config/autostart/fcitx5.desktop:
mkdir -p ~/.config/autostart
echo -e "[Desktop Entry]\nType=Application\nExec=fcitx5\nHidden=false\nNoDisplay=false\nX-GNOME-Autostart-enabled=true\nName=Fcitx5" > ~/.config/autostart/fcitx5.desktop
chmod +x ~/.config/autostart/fcitx5.desktop
Step 6: Theme
Recommend Fluent-fcitx5. Put the Fluent* folder under /usr/share/fcitx5/themes/ or $HOME/.local/share/fcitx5/themes/, then run fcitx5-configtool and choose the theme.
Hack Tools
List special hacking tools that are installed differently on Arch Linux compared to Ubuntu/Debian.
BloodHound
Install BloodHound.py
pip install bloodhound
# run bloodhound-python
Install Locally | Binary
Install Neo4j:
git clone https://aur.archlinux.org/neo4j-desktop.git
cd neo4j-desktop
sudo archlinux-java set java-17-openjdk
makepkg -si- Lauch Neo4j. Then open browser and go to http://localhost:7474 to access the Neo4j web interface.
- The default login credentials are:
- Username:
neo4j - Password:
neo4j
- Username:
- Change the password when prompted.
Download the BloodHound binary from the GitHub release, configure the database credentials, and run it with sudo ./BloodHound --no-sandbox.
Install Locally | Docker
I recommend using Docker to run BloodHound on Arch Linux:
mkdir bloodhound
cd bloodhound
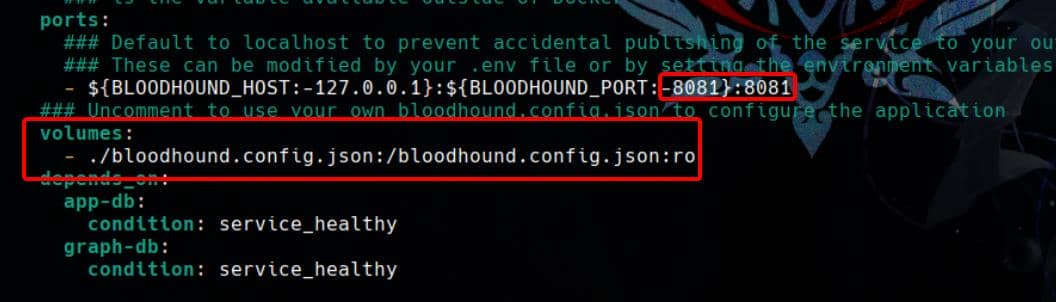
curl -L https://ghst.ly/getbhce -f -o docker-compose.yml # docker-compose.ymlPlace the bloodhound.config.json file in the same directory. We can download it from here. This avoids conflicts, like port 8080 overlapping with Burp Suite. My configuration:
{
  "version": 1,
  "bind_addr": "0.0.0.0:8081",
  "metrics_port": ":2112",
  "root_url": "http://127.0.0.1:8081/",
  "work_dir": "/opt/bloodhound/work",
  "log_level": "INFO",
  "log_path": "bloodhound.log",
  "tls": {
    "cert_file": "",
    "key_file": ""
  },
  "collectors_base_path": "/etc/bloodhound/collectors",
  "default_admin": {
    "principal_name": "Axura",
    "first_name": "Axura",
    "last_name": "Labyrinth",
    "email_address": "[email protected]"
  }
}
Back in docker-compose.yml, we should uncomment the volume section for the configuratio file, and adjust the port numbers:
Within the same folder run this command:
docker-compose upPS: If we run docker-compose up and don't see the initial password in the output, we need to clean env or run docker-compose down -v to wipe the volume, then run docker-compose up again. The password only shows when it is the first time it initializes a postgres db.
Now we can startup BloodHound via URL http://127.0.0.1:8081 in the browser as Login username Axura.
Netexec
yay -S netexecMSF
yay -S metasploitEvil-winrm
Refer this part to the previous section which introduces how we manage Ruby and gem via rbenv:
# sudo pacman -S ruby
sudo gem install evil-winrm

# $ gem env
# RubyGems Environment:
#      - /usr/lib/ruby/gems/3.3.0
#      - /home/Axura/.local/share/gem/ruby/3.3.0

echo 'export PATH="$PATH:export PATH="$PATH:$HOME/.local/share/gem/ruby/3.3.0/bin/""' > ~/.zshrc

source ~/.zshrc
Impacket
I prefer the development version, which can be downloaed from Github repository:
git clone https://github.com/fortra/impacket.git
cd impacket
python3 -m pipx install .
John & Hashcat
sudo pacman -S john --noconfirm
sudo pacman -S hashcat --noconfirm
Sqlmap
sudo pacman -S sqlmap --noconfirmOthers
yay -S wfuzz --noconfirm
yay -S ffuf --noconfirm
yay -S kerbrute
yay -S responder --noconfirm
yay -S volatility --noconfirm
yay -S rustscan --noconfirm
sudo pacman -S aircrack-ng --noconfirm
sudo pacman -S hydra --noconfirm
sudo pacman -S binwalk --noconfirm
sudo pacman -S foremost --noconfirm
sudo pacman -S perl-image-exiftool --noconfirm
sudo pacman -S proxychains-ng --noconfirm
gem install zsteg

# kerbrute
wget https://github.com/ropnop/kerbrute/releases/download/v1.0.3/kerbrute_linux_amd64 -O kerbrute
chmod +x kerbrute
sudo mv kerbrute /usr/local/bin/
PWN
Set up pwn environments for pwners.
GDB | Pwndbg
For pwners, we will need to install GDB:
sudo pacman -S gdbClone and install the pwndbg:
# pip install pwntools
git clone https://github.com/pwndbg/pwndbg
cd pwndbg
./setup.sh
Arch Linux does not have a direct libc-dbg package like Debian-based distributions. However, we can install debug symbols for glibc using the debuginfod service.
Install glibc debug symbols:
sudo pacman -S glibcInstall debuginfod (to automatically fetch debug symbols):
sudo pacman -S debuginfodEnable debuginfod support in GDB: Add the following line to ~/.gdbinit file GDB:
set debuginfod enabled onDocker Pwn Env
To debug different versions of GLIBC, I recommend a program on Github: docker_pwn_env.
Tips for running docker:
echo "alias docker='sudo docker'" >> ~/.zshrc
echo "alias docker-compose='sudo docker-compose'" >> ~/.zshrc
# or `.bashrc`
Docker Pull
Pull the prepared images from Docker Hub. For example, to set up environment of GLIBC 2.35 and ubuntu version 22.04-2.35-0ubuntu3.8:
sudo docker pull roderickchan/debug_pwn_env:22.04-2.35-0ubuntu3.8-20240601Two users in the image:
rootuser and password:root/rootctfuser and password:ctf/ctf
Run Container
--cap-add=SYS_PTRACE: Adds SYS_PTRACE capabilities to enable debugging or tracing in the container.
Mode 1: Auto-Update with update.sh Script:
Run a Docker container with SYS_PTRACE capabilities enabled and automatically runs an update.sh script on startup:
docker run -it -d -v host_path:container_path -p host_port:container_port --cap-add=SYS_PTRACE IMAGE_IDMode 2: Without Auto-Update (No update.sh Execution):
This command starts the container with SYS_PTRACE but opens an interactive shell instead of automatically running update.sh:
docker run -it -d -v host_path:container_path -p host_port:container_port --cap-add=SYS_PTRACE IMAGE_ID /bin/shMode 3: Without Auto-Update (No update.sh Execution):
This command runs the container in privileged mode with auto-updating enabled via update.sh:
docker run -it -d -v host_path:container_path -p host_port:container_port --privileged IMAGE_IDMode 4: Privileged Mode Without Auto-Update (With Interactive Shell):
This command runs the container in privileged mode and opens an interactive shell without automatically running update.sh:
docker run -it -d -v host_path:container_path -p host_port:container_port --privileged IMAGE_ID /bin/shWith the
-dflag set indocker run, the process starts in background. And we need to rundocker attach <container_id>listed bydocker psto recover the shell.Usually I will just remove this flag to run docker.
Attach Container
Enter a container:
docker exec -it CONTAINER_ID /bin/sh<br>docker exec -it -u root CONTAINER_ID /bin/shCheck Container
After entering the prepared container, we can run the test-this-container.sh script for testing:
/bin/test-this-container.shExample Use
To use the mode 3—privileged enabled and auto update, adding --rm flag to auto remove container after quiting (so we will always start a new test environment for the binary):
docker run --rm -it -v $PWD:/home/ctf/hacker -p 10001:10001 --privileged fb3419793ccd /bin/zsh Key parameters:
-v $PWD:/home/ctf/hacker:-v: Mounts a volume from the host machine to the container.$PWD: Represents the current working directory on the host machine./home/ctf/hacker: The path inside the container where the current directory from the host will be mounted.
-p 10001:10001: Maps port10001on the host to port10001in the container.- First
10001: Port on the host. - Second
10001: Port inside the container. - Purpose: This enables access to a service running inside the container on port
10001from the host machine or any network connected to the host.
- First
--privileged: Grants the container extended privileges, effectively giving it almost the same access to the host as a root user. This is useful for running low-level system tools.
Other Pwn Tools
I suggest using Python3.10.15 environment to install the following Pwn tools:
# sudo pacman -S ruby
sudo gem install one_gadget
pip install ropper
pipx install ROPgadget
pip install pwncli
# sudo pacman -S yay
# gem install racc
yay -S seccomp-tools
sudo pacman -S patchelf
KDE Plasma 6
Earlier, we covered how to install the KDE Plasma desktop during the Arch Linux setup. At this stage, we have a basic, minimal desktop layout:
sudo pacman -S plasma-meta kde-applications
sudo systemctl enable sddm
sudo systemctl start sddm
And I recommend to choose X11 environment as we aforementioned:
However, the KDE/Plasma environment or Dolphin (the file manager) might sometimes be incomplete. To resolve this, consider reinstalling Dolphin and related KDE packages:
sudo pacman -S dolphin dolphin-plugins plasma-desktopIn this section, I’ll focus on Designing the Layout to match my preferences.
Dolphin
Dolphin is the default file manager for the KDE Plasma desktop environment, designed to provide an intuitive and powerful way to manage files and directories.
Config | Dolphinrc
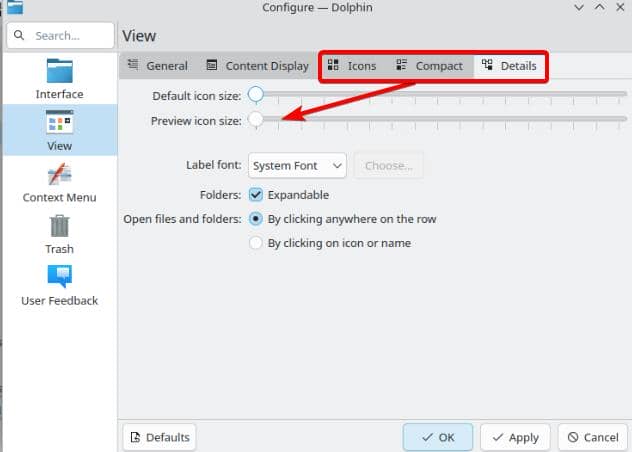
To mprove Dolphin performance (when lagging), we can edit ~/.config/dolphinrc. My configuration:
[Version]
update_info=dolphin_detailsmodesettings.upd:rename-leading-padding,dolphin_detailsmodesettings.upd:move-content-display,dolphin_directorysizemode.upd:convert-directorysizecount-to-directorysizemode

[General]
Version=202
ViewPropsTimestamp=2024,11,14,21,45,55.739

[KFileDialog Settings]
Places Icons Auto-resize=false
Places Icons Static Size=22

[MainWindow]
MenuBar=Disabled
ToolBarsMovable=Disabled

[PreviewSettings]
PluginsEnabled=false

[ViewProperties]
ViewMode=Details  # Change to Icons, Compact, or Details
And check off all options in Previews:
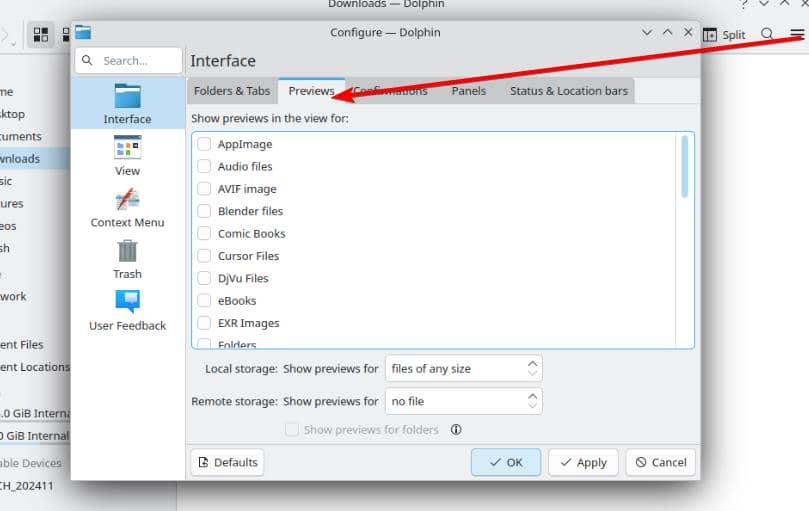
Close any preview-related options (Except "Icons" though):

Themes
KDE Plasma has a built-in theme store where we can find a variety of themes for global appearance, icon packs, widgets, color schemes, and more.
Theme store: Pling.
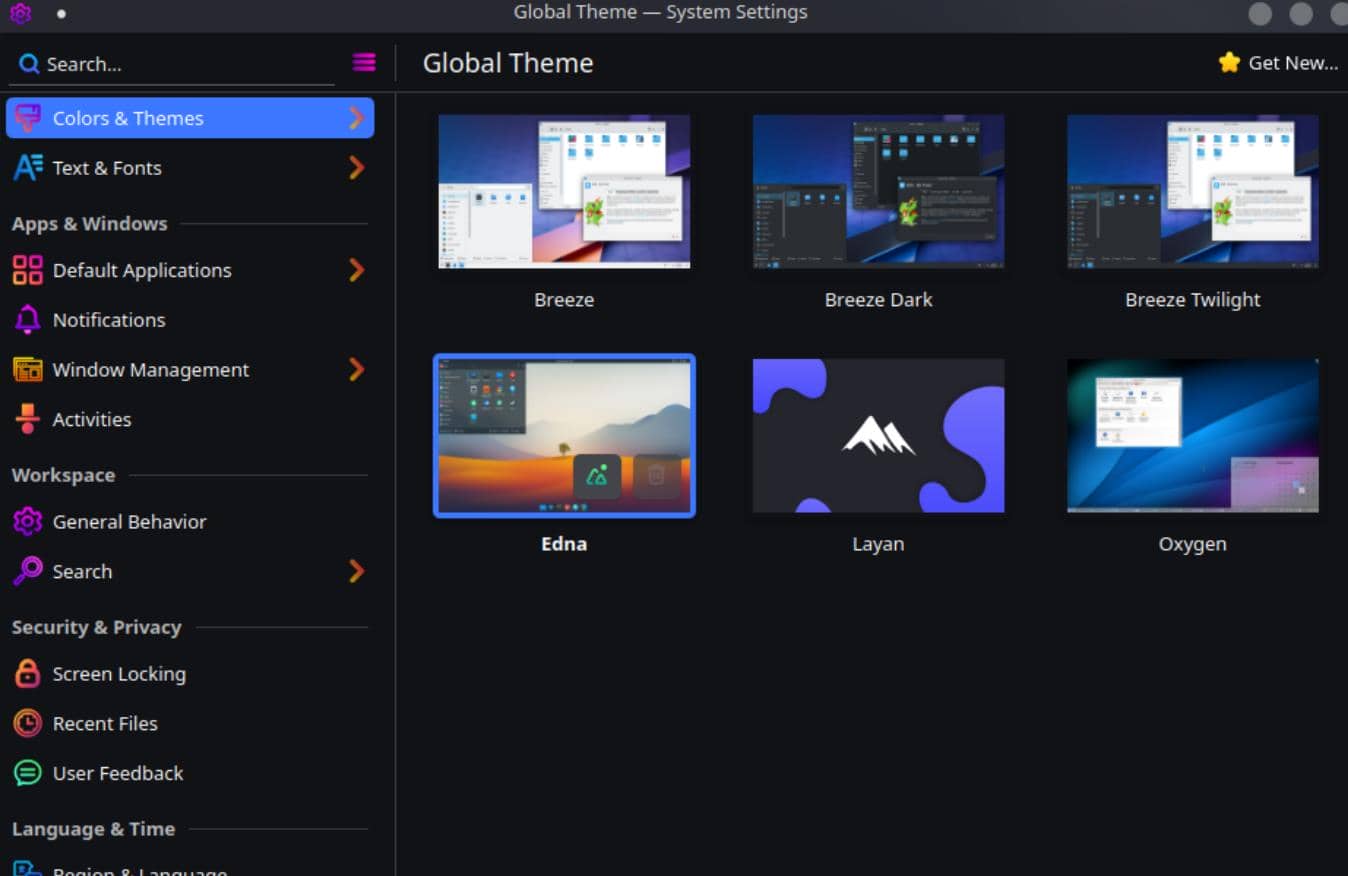
Global Theme
This changes the overall appearance, including Plasma visual style, window decorations, and color schemes.
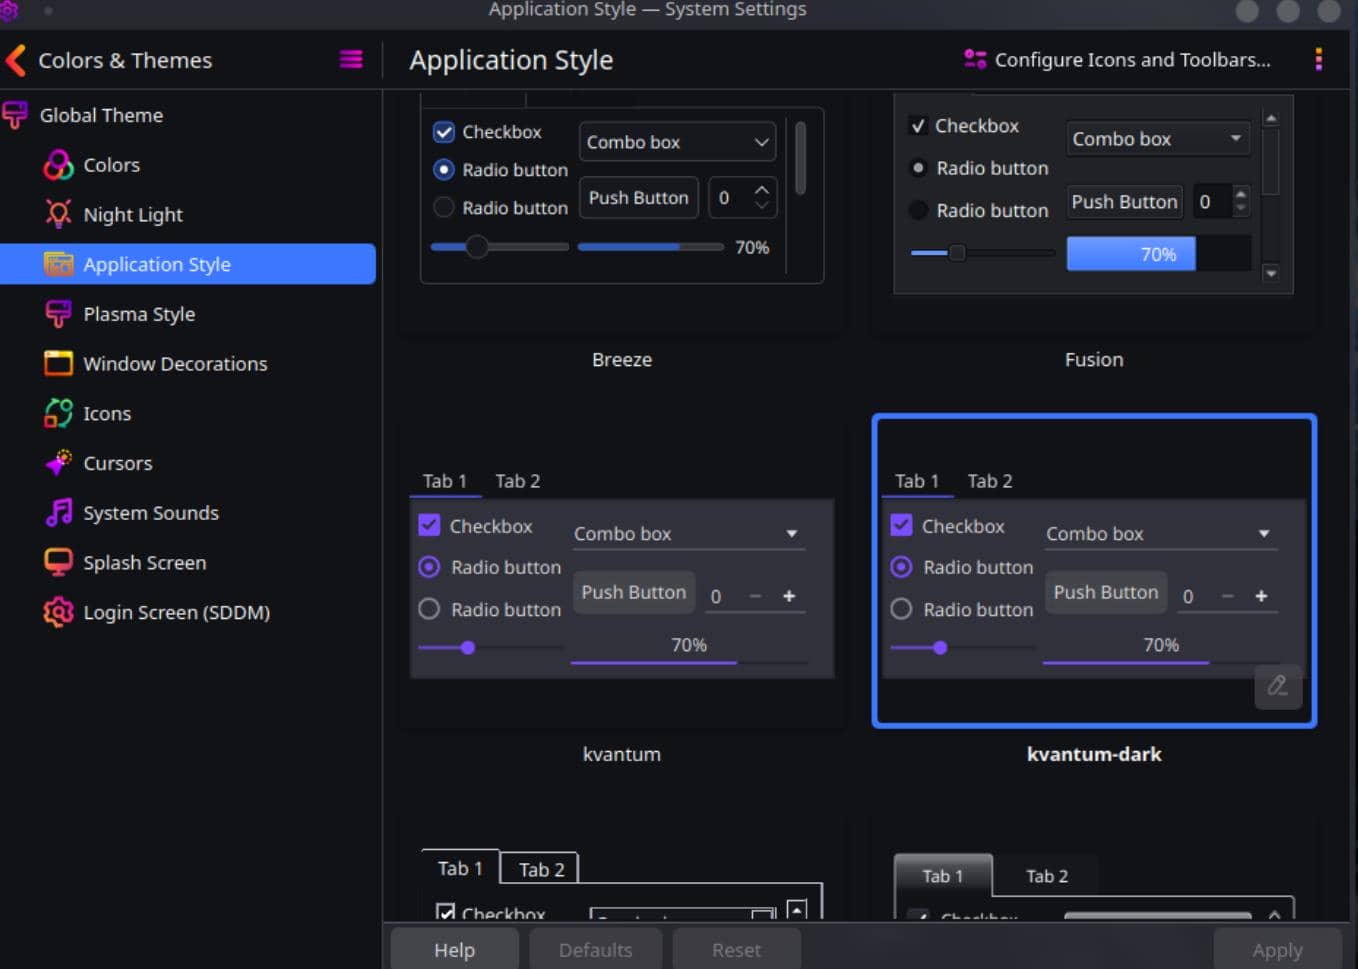
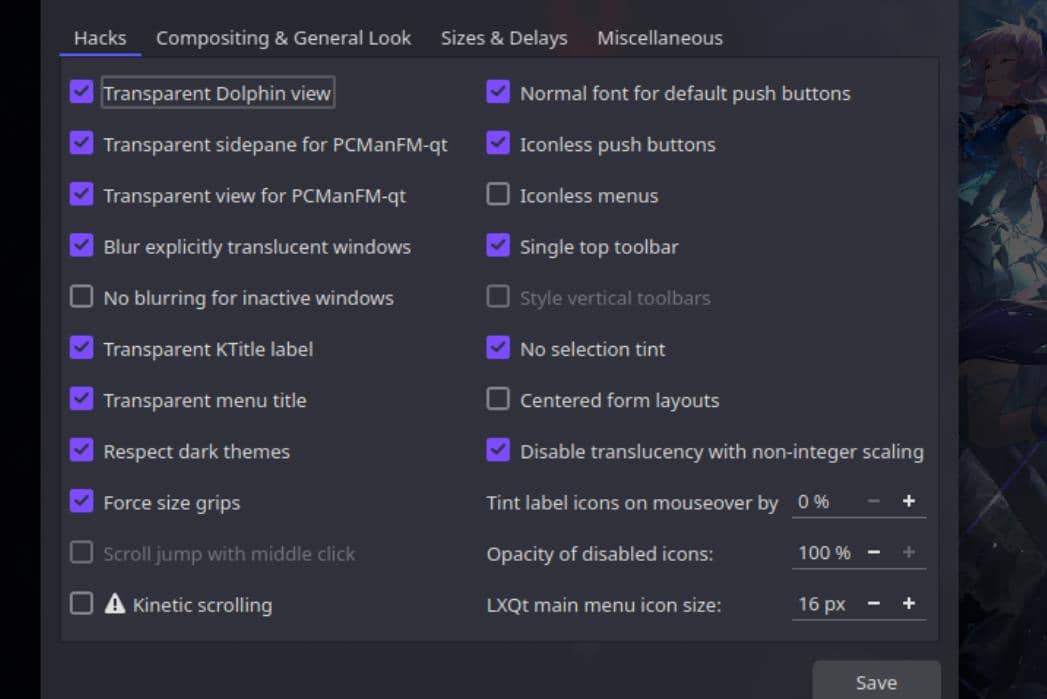
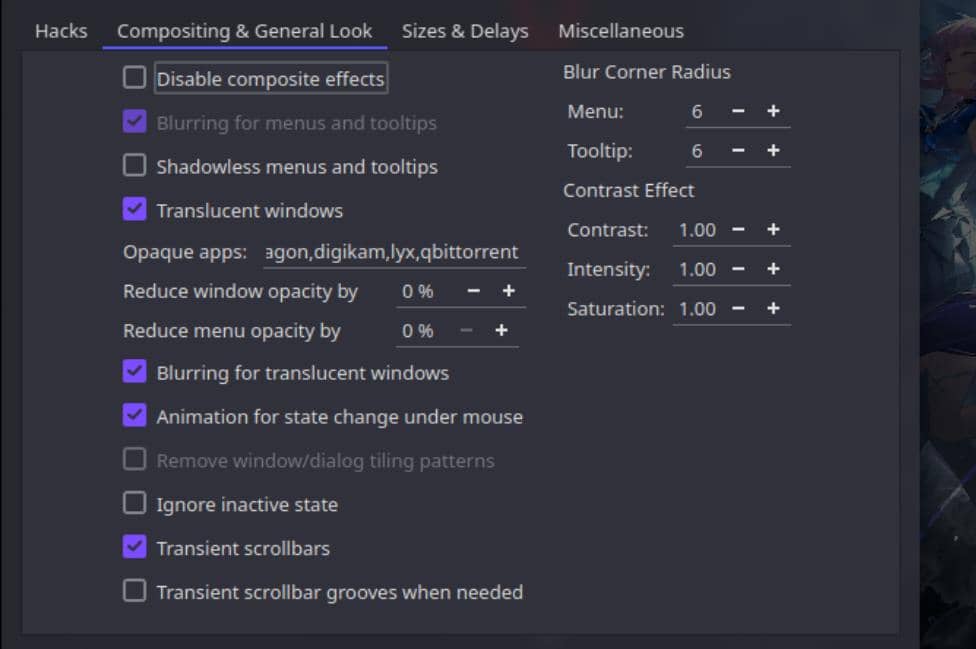
Kvantum Theme
Kvantum is a Qt-based theme engine that enables effects like blurred, translucent backgrounds. It’s essential for themes that support such effects.
Installing Kvantum:
yay -S kvantumWe can run kvantummanger in the console and install themes downloaded:
Open Kvantum Manager to apply and customize Kvantum themes.
Configuration will be saved at /home/Axura/.config/Kvantum/Default#/Default#.kvconfig.
Tip: If our system uses display scaling, uncheck "Disable pseudo-transparency for non-integer scaling" in the Kvantum configuration to ensure the blur effect works correctly.
GTK theme
A GTK theme is a design style applied to applications that use the GTK (GIMP Toolkit), which is a popular toolkit for creating graphical user interfaces. GTK is used by many Linux applications, including those that are part of the GNOME desktop environment. KDE Plasma, by default, uses Qt as its toolkit, but many applications are built with GTK, and having a matching GTK theme ensures a consistent look and feel across all applications, whether they are Qt or GTK-based.
Icon Theme
Fluent Icon Theme is a popular choice that complements the blurred aesthetic. We can download it from vinceliuice/Fluent-icon-theme: Fluent icon theme for linux desktops.
After downloading, run for a system-wide installation:
sudo cp -r Fluent Fluent-dark Fluent-light /usr/share/icons/Update the Icon Cache:
sudo gtk-update-icon-cache /usr/share/icons/Fluent
sudo gtk-update-icon-cache /usr/share/icons/Fluent-dark
sudo gtk-update-icon-cache /usr/share/icons/Fluent-light
Apply the Icon Theme:
- Open KDE Plasma System Settings.
- Go to Appearance > Icons.
- Select Fluent, Fluent-dark, or Fluent-light from the list.
- Click Apply to set the new icon theme.
SDDM | Login Screen
Recommend the Chili SDDM theme which can be downloaded from KDE store.
Splash Screens
Search one we like from KDE store.
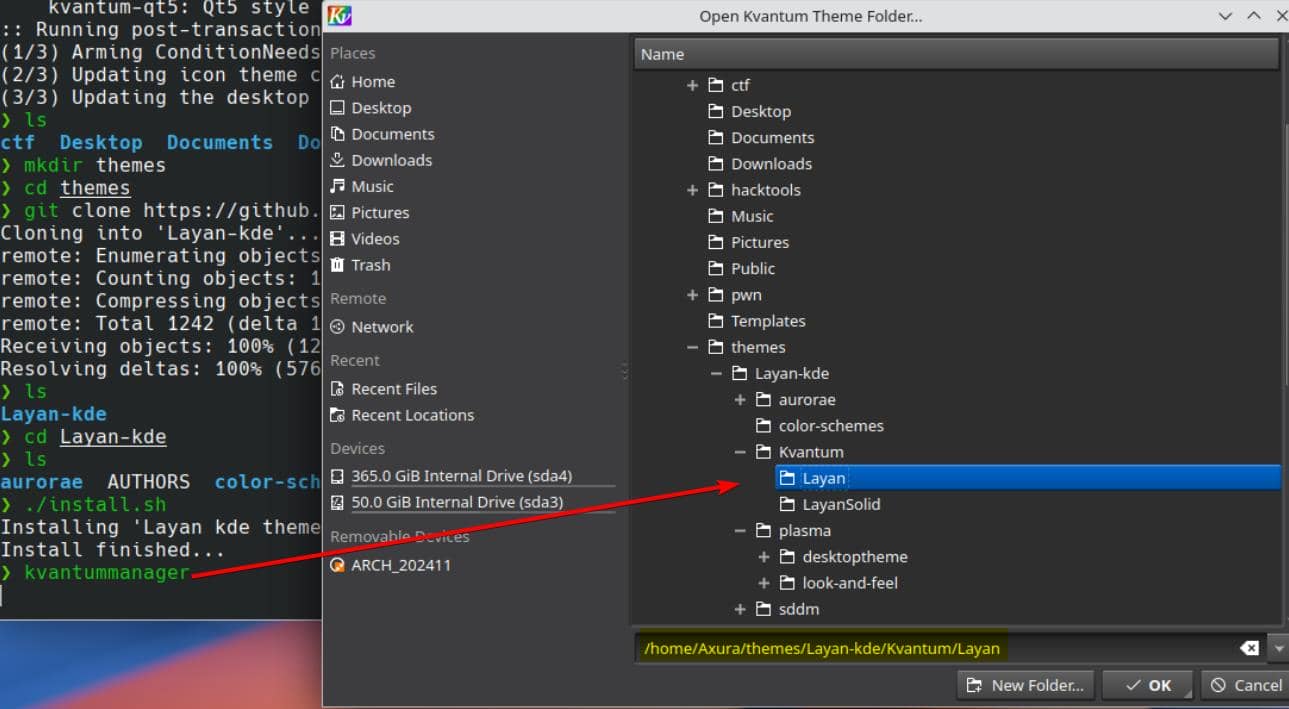
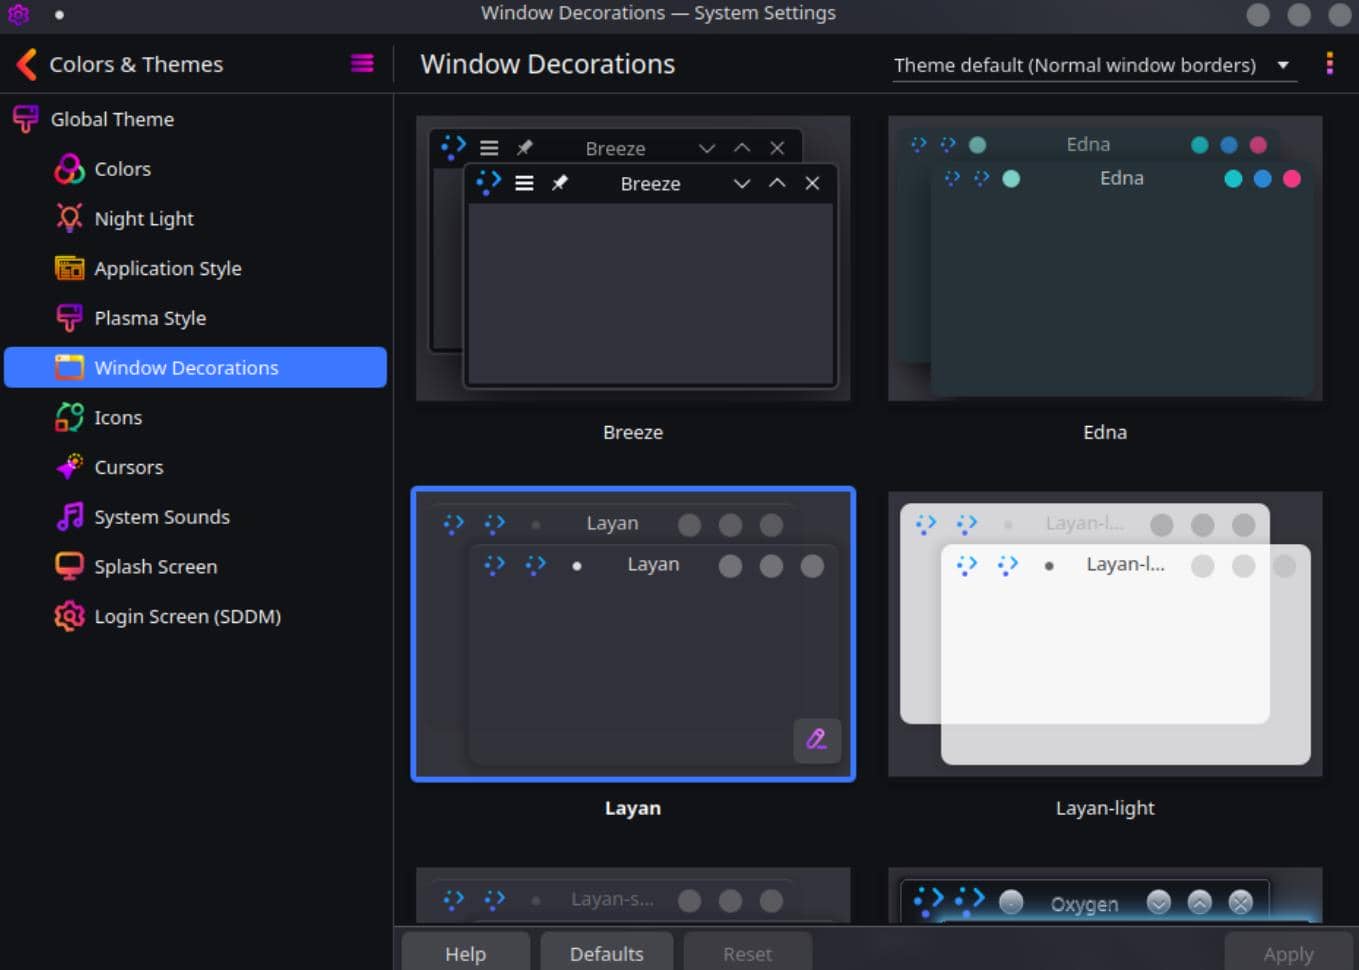
Theme | Layan
Recommend to install the theme directly from Github repository.
Apply the theme in System Settings > Appearance > Global Theme.
Theme | Edna
Personal current favorite. Install from KDE store.
Recommend Apply Blur in Window Management settings after installed.
Dock
For Plasma 6, Latte Dock is no longer an option, as it’s a discontinued project at the time of writing.
A developing alternative is crystal-dock, which offers full features but only supports Wayland sessions.
From my experience, I recommend installing the Panel Colorizer widget, which I’ll cover in the next section.
Panel Colorizer
We can use the Panel Colorizer widget to beautify and customize the desktop layout. To run or install a Plasmoids file (a widget for KDE Plasma), we need to follow these steps:
- Download the Plasmoid: Make sure we have the Plasmoid package (usually in
.plasmoidor a compressed format). - Install the Plasmoid via KDE GUI:
- Right-click on desktop or panel.
- Select "Add Widgets".
- Click on the three-line menu (hamburger icon) and select "Install Widget From Local File".
- Navigate to the
.plasmoidfile and select it. - Install the widget, and it will become available in the widget list.
Window
Window Management > Window Behavior > Window Activation Policy to: Focus follows mouse.
Blur & Transparent
Different ways to achieve goals.
Script
#!/usr/bin/env sh

### Usage ###
# ./plasma-blur.sh 'command' 'class' [transparency level]
# E.g.:
# $ ./plasma-blur.sh 'dolphin' 'dolphin' 2

### Dependencies ###
# sudo pacman -S xdotool xorg-xprop qt5-tools

# Run the specified command in the background
eval "$1 &"

# Blur effect
i=0
while [ "$i" -lt 18 ]; do
    if [ "$i" -lt 6 ]; then
        sleep 0.1s
    else
        sleep 0.2s
    fi

    # Check if the window ID is found, if so, apply the blur property
    window_id=$(xdotool search --classname "$2")
    if [ -n "$window_id" ]; then
        for id in $window_id; do
            xprop -id "$id" -f _KDE_NET_WM_BLUR_BEHIND_REGION 32c -set _KDE_NET_WM_BLUR_BEHIND_REGION 0
        done
        break
    fi

    i=$((i + 1))
done

# Adjust transparency level
if [ -n "$3" ]; then
    for ((j=0; j<"$3"; j++)); do
        qdbus org.kde.kglobalaccel /component/kwin org.kde.kglobalaccel.Component.invokeShortcut "Decrease Opacity"
    done
fi
KWin
Create a new folder for the script:
mkdir -p ~/.local/share/kwin/scripts/custom-blur-trans
cd ~/.local/share/kwin/scripts/custom-blur-trans
Create the main script file:
Create a metadata.desktop file with the following content:
[Desktop Entry]
Type=Service
X-KDE-ServiceTypes=KWin/Script
Name=Custom Blur & Transparent Effect
Comment=Applies a custom blur & transparent effect to specific windows
Create a main.js file with the script logic:
evar blurEffect = {
    onWindowAdded: function (client) {
        // Replace 'your-app-class-name' with the actual window class name
        if (client.resourceClass == "your-app-class-name") {
            // Set window to apply a blur effect
            client.setUserNoBorder(true);
            workspace.enableEffect("blur");
            client.keepBelow = false; // Optional: Keeps the window from staying below others;
            client.opacity = 0.8;
        }
    }
};

workspace.clientAdded.connect(blurEffect.onWindowAdded);

var transparentEffect = {
    onWindowAdded: function (client) {
        if (client.resourceClass == "your-app-class-name") {
            client.opacity = 0.8; // Set to 80% opacity
        }
    }
};

workspace.clientAdded.connect(transparentEffect.onWindowAdded);
Install and Enable the KWin Script:
Reload KWin scripts: Run the following command to reload KWin scripts:
qdbus org.kde.KWin /KWin reconfigureEnable the script in System Settings:
- Go to “System Settings” > “Window Management” > “KWin Scripts”.
- You should see your “Custom Blur Effect” script listed. Enable it by clicking the checkbox.
- Click “Apply” to activate the script.
KDE Window Rules
- Open System Settings:
- Go to “System Settings” > “Window Management” > “Window Rules”.
- Create a New Window Rule:
- Click on “Add New...” to create a new rule.
- In “Window Class (Application)”, set it to match the class of our application (e.g.,
dolphin). - Use
xprop | grep "WM_CLASS"in the terminal and click the window to get the correct class name.
- Configure the Blur Effect:
- In the Appearance & Fixes tab, select “Apply Effect” and choose “Blur”.
- Enable the “Force” option if available.
- Set Transparency:
- If we also want to set transparency, go to “Size & Position” and modify “Opacity” settings to our preference.
- Apply the Rule:
- Save and apply the rule. Our settings should now apply automatically every time we open the specified application.
Kwinrc
Edit kwinrc Manually:
We can try manually editing the kwinrc configuration file located in ~/.config/kwinrc and add the relevant rules to apply opacity or other effects:
[Rules]
Blur=true
OpacityActive=80   # Opacity percentage when the window is active
OpacityInactive=70 # Opacity percentage when the window is inactive
After editing, run:
qdbus org.kde.KWin /KWin reconfigureEnsure we have plasma-workspace and other dependencies that allow us to customize window rules.
Cleanup
List Installed KDE Applications: Run the following command to list all installed KDE packages:
pacman -Qs kdeRemove Specific Applications: Use sudo pacman -R to remove individual KDE applications. For example, to remove KMail:
sudo pacman -R kmailRemove Applications with Dependencies: If we want to remove an application and its unused dependencies, use:
sudo pacman -Rns kmailMy Cleanup Scripts:
#!/bin/bash
# Packages to be removed
packages=(
kmail
kmail-account-wizard
Mastodon
telly-skout
step
signon-kwallet-extension
plasmatube
picmi
parley
palapeli
neochat
minuet
mbox-importer
merkuro
mailcommon
lskat
kwordquiz
kwrited
kweather
kwalletmanager
kubrick
kturtle
ktuberling
ktrip
ktouch
ksudoku
ksquares
ksnakeduel
ksirk
kshisen
kreversi
krecorder
kpat
kontact
knavalbattle
kmplot
kmahjongg
klines
klickety
klettres
kjumpingcube
kiriki
kirigami-gallery
kimagemapeditor
killbots
kimagemapeditor
kig
khangman
kgoldrunner
kgeography
kfourinline
kdiamond
ommunication betwe
kcontacts
kbruch
kbreakout
kbounce
kblocks
katomic
kapman
kanagram
kamoso
kalm
kajongg
kaddressbook
juk
granatier
ffmpegthumbs
elisa
bovo
bomber
blinken
audiotube
artikulate
angelfish
kate
code
)
# Removal
for pkg in "${packages[@]}"; do
if pacman -Qi "$pkg" &>/dev/null; then
echo "Removing $pkg..."
sudo pacman -Rns "$pkg" --noconfirm
else
echo "$pkg is not installed, skipping..."
fi
done
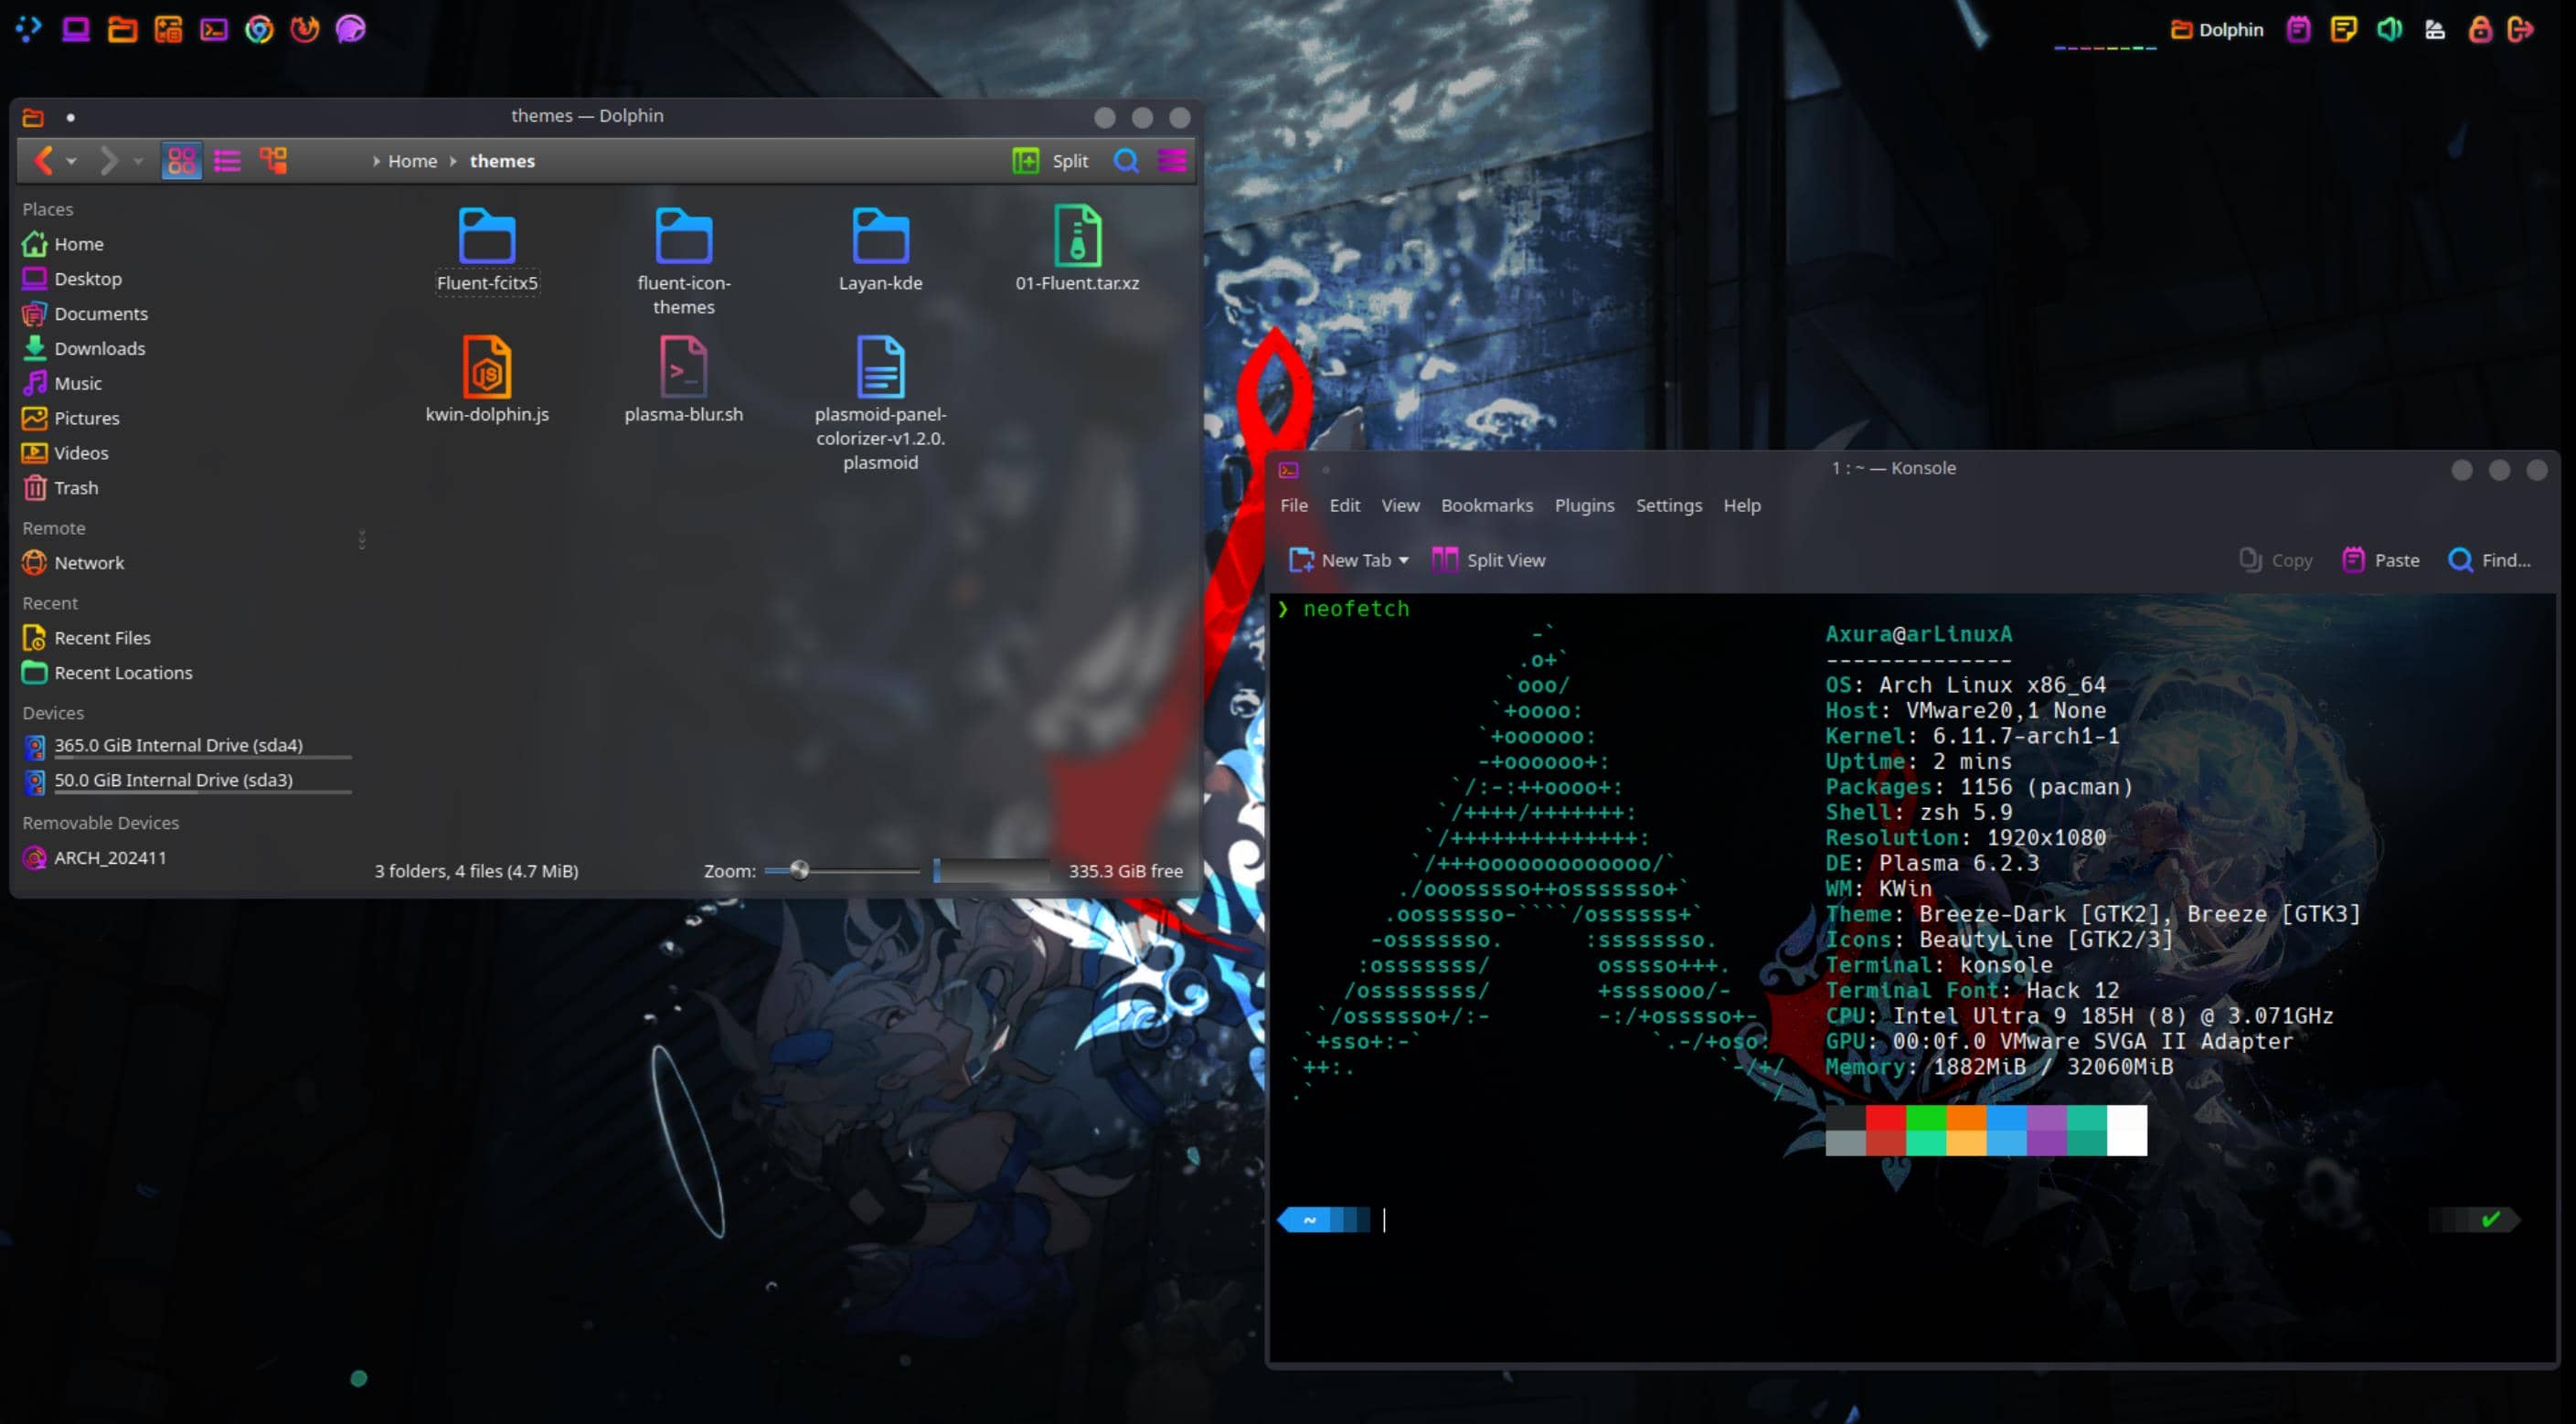
echo "Cleanup completed."Screenshots
Screenshots for my personal preference.
Theme:
Application Style:
Window:
Icons:
Kvantummanager:
Overview:
Comments | NOTHING